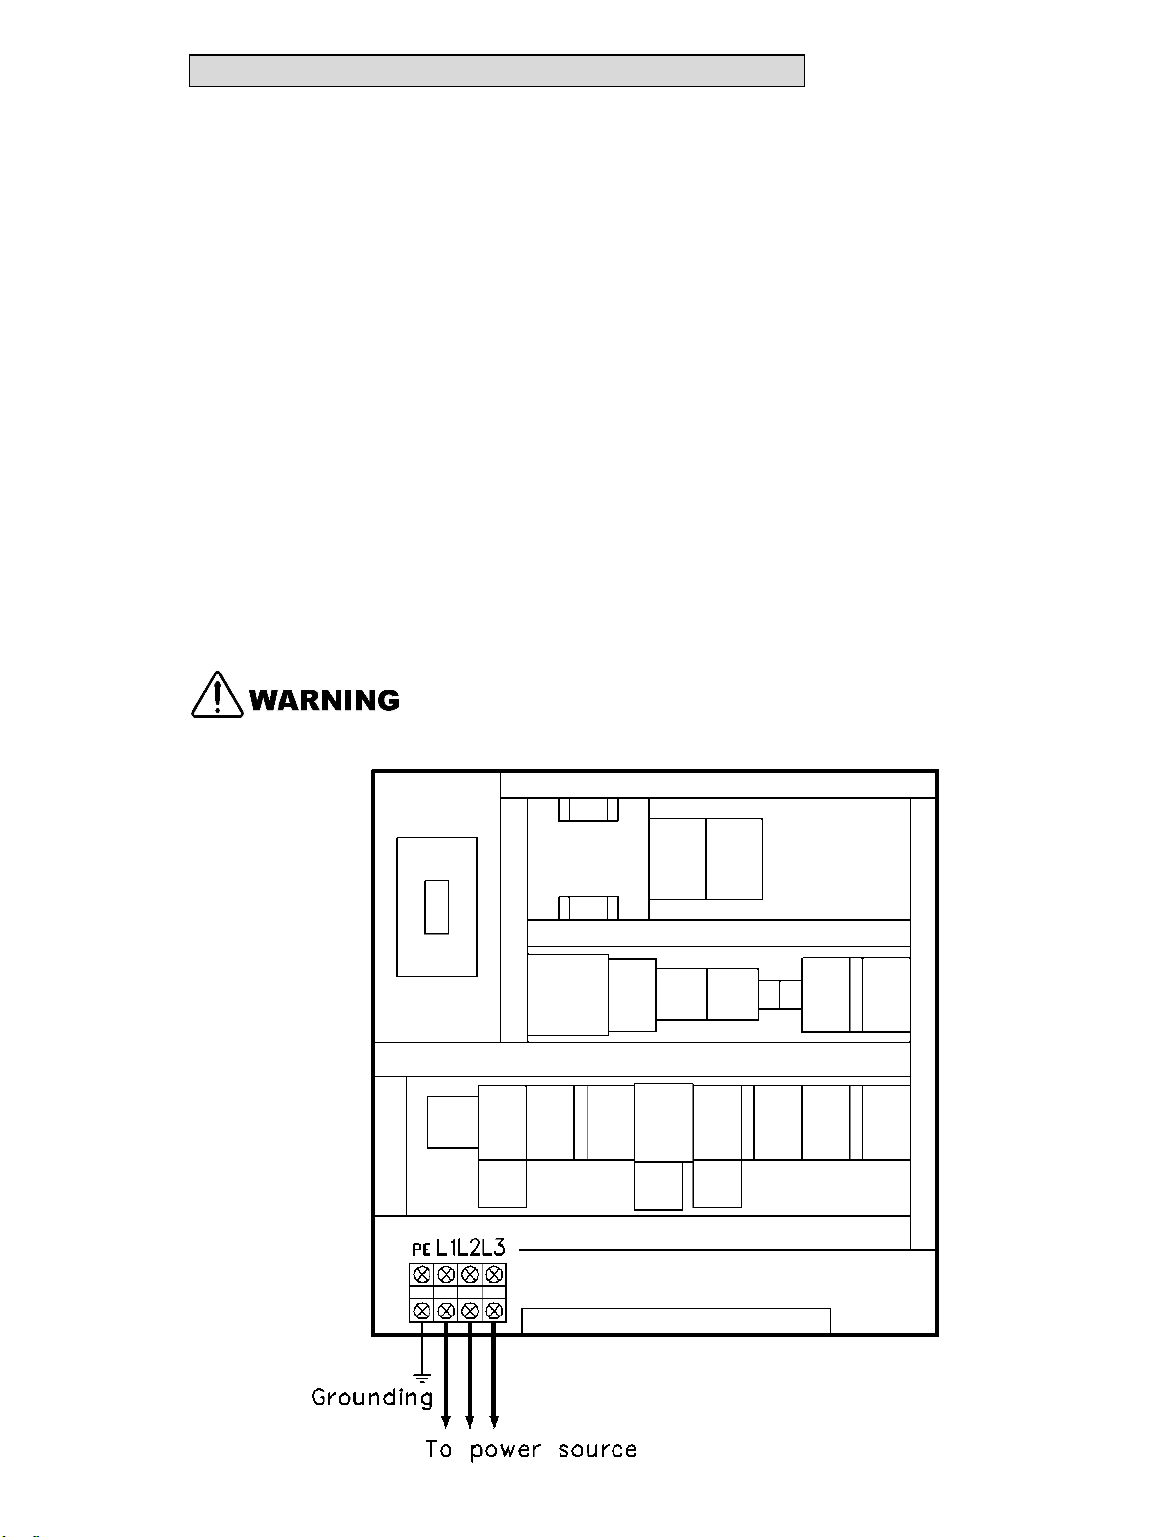
H. Winter DUOMAX GT-400BRD-CE User manual

OPERATION MANUAL
DOUBLE-SIDED PLANER
WINTER DUOMAX
WARNING!
The operator must thoroughly read this manual before operation.
Keep this manual for future reference.
Henrik Winter Holztechnik GmbH
Druckereistr. 8
04159 Leipzig
Tel: +49 (0)341/ 4619021 Fax: +49 (0)341/4618358 Funk: +49 (0)171/2820443
Em@il: info@winter-holztechnik.de Internet: www.winter-holztechnik.de

3. INSTALLATION 3-1
3. INSTALLATION
3.1. SAFETY RULES FOR MACHINE LIFTING
1. Pay special attention to the balance of the machine while lifting.
2. Use a forklift with sufficient loading capacity to lift the machine.
3. Have another person help guide the way when lifting the machine.
4. The forks of forklift must protrude from under the machine underside.
5. The forklift must only be driven by an experienced forklift driver.
3.2. SELECTION OF LOCATION
Requirement of operating environment the operating temperature for this machine
should be between +5℃and +40℃,while the relative humidity should not exceed 50%
at a maximum temperature of +40℃.
3.3. LIFTING THE MACHINE
1. The machine can be lifted by a forklift.
2. Their forks should insert through the slots at the machine bottom.
3. Attention should be paid to the balance of the machine while lifting.
4. The weight of the machine is listed below.
Model
Machine weight
Forklift capacity (tons)
GT-400BRD-CE
1,900Kgs
3 tons
GT-610BRD-CE
2,500Kgs
3 tons

3. INSTALLATION
3-
3.5. INSTALLATION AND LEVELLING
Install this machine on a solid and level concrete floor. Leave proper space around the
machine for handling the materials to be machined. Four steel pads are furnished with
the machine, which are to be placed under the levelling screws at the four corners.
After the machine has been located at a proper work site, proper leveling needs to be
made. The following steps should be taken:
1. Place the steel pads (A) under the levelling screws (B).
2. Place a precision level gauge (C) on the table at infeed end, outfeed end and
middle position.
3. Adjust the leveling screws until proper leveling is obtained.

3. INSTALLATION
3-
3.6. POWER SUPPLY REQUIREMENT
Insufficient voltage from factory power source may affect the power output of the motor
and the function of the controller.
It is important to connect this machine to the correct voltage in the factory power
source. Use only an independent power source.
Table for power supplies requirement:
Model
Kw
Voltage
Current
Breaker capacity
Wire size
GT-400BRD-CE
15Kw
220V, 50/60Hz
68 A
100 A
22 mm²
GT-400BRD-CE
15Kw
400V, 50Hz
36 A
75 A
14 mm²
OPTION
20.5Kw
220V, 50/60Hz
93 A
125 A
22 mm²
OPTION
20.5Kw
400V, 50Hz
50 A
100 A
14 mm²
GT-610BRD-CE
20.5Kw
400V, 50Hz
50 A
100 A
14 mm²
OPTION
28Kw
400V, 50Hz
68 A
125 A
14 mm²

3. INSTALLATION
3-
3.7. CONNECT POWER SOURCE WIRES
1. Before connecting the power wires make sure the voltage between the machine
and your factory power source is the same.
2. Connect the power wires to the L1, L2, L3 connection points inside the electrical
control box.
3. The machine must be properly grounded to prevent possible injury from electrical
shock.
4. For wiring to different voltage, be sure to rewire upper cutterhead motor, lower
cutterhead motor, infeed table elevation motor, spike conveyor motor and
transformer to the correct voltage. Also, be sure to replace fuses to protect the
electrical components. See the current consumption as instructed on model
variation chart or contact our distributor.
5. All electrical connections should be performed by qualified electrical personnel.
Grounding should be based on the local regulations.

3. INSTALLATION
3-
3.8. CHECK POWER WIRES CONNECTION
1. After the power wires have been connected it is necessary to check if the power
wires are connected to the correct connection points.
2. Press the power switch on the control panel.
3. Press the upper planing table raise switch (A) then the upper planing table (B)
should move upward. If not, any two of the three power wires"L1, L2, L3" inside the
control box need to be changed.
3.9. CONNECT DUST COLLECTION SYSTEM
1. There are two dust hoods provided on the machine for sucking dust from upper and
lower cutterhead.
2. Fit the flexible hose to the two dust hoods and connect them to the dust collector.
3. The outlet diameter for each dust hood is 125mm.
Do not perform cutting operations until the dust collection system is started.

CA
U p p e r p l a n n i n g t a b l e u n i t
2000/12/10
NO.
Description
Q’ty
NO.
Description
Q’ty
1
Upper planning table
1
31
Spring
1
2
Motor
1
32
Shaft
1
3
Screw
4
33
Hexagon nut
1
4
Washer
4
34
Shaft
1
5
Hexagon nut
4
35
Roller
1
6
Hexagon nut
2
36
Bearing
2
7
Screw
2
37
Retaining ring
2
8
Bush
1
38
Adjustment piece
2
9
V-belt pulley
1
39
Hexagon nut
2
10
Washer
1
40
Spring
2
11
Spring washer
1
41
Fixing piece
2
12
Screw
1
42
Setscrew
2
13
Washer
4
43
Hexagon nut
2
14
Variable speed unit
1
44
Screw
4
15
Washer
4
45
Spring washer
1
16
Screw
4
46
V-belt guard shaft
1
17
Key
1
47
Hexagon nut
1
18
Chain wheel
1
48
Washer
6
19
Setscrew
2
49
V-belt guard shaft
1
20
Roller chain
1
50
V-belt guard
1
21
Chain joint
1
51
Hexagon nut
2
22
Hexagon nut
1
52
Dust suction hood
1
23
Shaft
1
53
Screw
2
24
Washer
2
54
Plate
2
25
Link
1
55
Spring washer
8
26
Hexagon nut
1
56
Screw
8
27
Chain wheel
1
57
Chain guard
1
28
Bearing
1
58
Washer
4
29
Hexagon nut
1
59
Spring washer
4
30
Screw
1
60
Screw
4

CA
U p p e r p l a n n i n g t a b l e u n i t
2000/12/10
NO.
Description
Q’ty
NO.
Description
Q’ty
61
Washer
1
91
62
Screw
1
92
63
Slide guard (L)
1
93
64
Slide guard (R)
1
94
65
Screw
12
95
66
Infeed safety device
1
96
67
Screw
4
97
68
Spring washer
2
98
69
Screw
2
99
70
Outfeed safety cover
1
100
71
Screw
3
101
72
Outfeed guard
1
102
73
Plate
1
103
74
Washer
4
104
75
Screw
4
105
76
Guard
1
106
77
Spring washer
4
107
78
Screw
4
108
79
109
80
110
81
111
82
112
83
113
84
114
85
115
86
116
87
117
88
118
89
119
90
120


CB
Va r i a b l e s p e e d u n i t
2000/12/10
NO.
Description
Q’ty
NO.
Description
Q’ty
1
Worm gear reducer
1
31
2
Rear cover
1
32
3
Spring washer
8
33
4
Screw
8
34
5
Motor
1
35
6
Driven pulley
1
36
7
Drive pulley
1
37
8
Belt
1
38
9
Front cover
1
39
10
Washer
4
40
11
Screw
4
41
12
42
13
43
14
44
15
45
16
46
17
47
18
48
19
49
20
50
21
51
22
52
23
53
24
54
25
55
26
56
27
57
28
58
29
59
30
60


CC
U p p e r c u t t e r h e a d u n i t
2000/12/10
NO.
Description
Q’ty
NO.
Description
Q’ty
1
Upper cutterhead
1
31
Screw
15
2
Spring
8
32
Washer
2
3
Set screw
40
33
Hexagon nut
2
4
Knife
4
34
Screw
2
5
Gib
4
35
Plate guard
1
6
Pressure plate bracket
2
36
Spring washer
5
7
Outfeed pressure plate bracket
2
37
Screw
5
8
Grease nipple
2
38
Screw
4
9
Bearing housing
2
39
Outfeed plate
1
10
Bearing
2
40
Spring washer
4
11
Bearing cap
1
41
Screw
4
12
Screw
6
42
Spring washer
1
13
Grease nipple
2
43
Hexagon nut
1
14
Bearing cap
1
44
Ring
2
15
Key
1
45
Spring
1
16
Bush
1
46
Screw
1
17
Pulley
1
47
Spring washer
2
18
Belt
1
48
Hexagon nut
2
19
Fixing piece
1
49
Screw
2
20
Spring washer
1
50
Spring
1
21
Screw
1
51
Spring
1
22
Spring washer
4
52
23
Screw
4
53
24
Front pressure plate bracket
1
54
25
Shaft
1
55
26
Front bracket trunnion
15
56
27
Spring
15
57
28
Oil cap
15
58
29
Spring washer
15
59
30
Hexagon nut
15
60


CD
P r e s s u r e r o l l e r u n i t
2000/12/10
NO.
Description
Q’ty
NO.
Description
Q’ty
1
Outfeed roller
1
31
Washer
2
2
Key
2
32
Link
1
3
Bearing housing
2
33
Screw
1
4
Bearing
4
34
Chain wheel
1
5
Retaining ring
2
35
Bearing
1
6
Bearing cover
2
36
Hexagon nut
1
7
Screw
16
37
Screw
1
8
Bush
1
38
Spring
1
9
Bearing cover
2
39
Screw
1
10
Chain wheel
1
40
Hexagon nut
1
11
Washer
2
41
Washer
1
12
Spring washer
2
42
Roller chain
1
13
Screw
2
43
Chain joint
1
14
Corrugated shaft
1
44
Bracket
1
15
Corrugated wheel
24
45
Washer
2
16
Rubber rod
96
46
Screw
2
17
Wheel holder (right)
1
47
Washer
2
18
Wheel holder (left)
1
48
Hexagon nut
2
19
Bearing housing
2
49
Support shaft
1
20
Bush
1
50
Chain wheel
1
21
Chain wheel
1
51
Bearing
1
22
Fix nut
4
52
Roller chain
1
23
Adjustment screw
4
53
Chain joint
1
24
Adjustment spring
4
54
25
Adjustment nut
4
55
26
Pressure adjustment screw
4
56
27
Hexagon nut
4
57
28
Domed cap nut
4
58
29
Hexagon nut
1
59
30
Hexagon nut
1
60


CE
S p i k e c o n v e yo r u n i t
2002/08/03
NO.
Description
Q’ty
NO.
Description
Q’ty
1
Flange bearing
2
31
Bracket
4
2
Spring washer
8
32
Shaft
1
3
Screw
8
33
Shaft
1
4
Spike chain wheel
4
34
Chain wheel
2
5
Drive shaft
1
35
Setscrew
4
6
Kay
5
36
Tension adjustment nut
1
7
Hexagon nut
4
37
Tension adjustment screw
1
8
Screw
4
38
Hexagon nut
1
9
Hexagon nut
4
39
Tension adjustment nut
1
10
Setscrew
4
40
Chain joint
1
11
Retaining ring
1
41
Roller chain
1
12
Torque limiter
1
42
Screw
8
13
Fixing piece
1
43
Plate
4
14
Spring washer
1
44
Screw
8
15
Screw
1
45
Screw
80
16
Adjustment base
1
46
Pin fix plate
40
17
Spring washer
1
47
Bush
80
18
Hexagon nut
1
48
Feed pin
880
19
Adjustment lever
1
49
Spring
880
20
Hexagon nut
1
50
Screw
80
21
Hand knob
1
51
Bush
80
22
Washer
1
52
Pin fix plate
40
23
Adjustable hand lever
1
53
Hexagon nut
80
24
Spacer
1
54
Hexagon nut
80
25
Setscrew
1
55
Driven shaft
1
26
Spike conveyor upper bracket
2
56
Spike conveyor chain
2
27
Spring washer
6
57
Flange bearing
2
28
Screw
6
58
Slideway
4
29
Spike conveyor guide chute
2
59
Screw
12
30
Fix screw
4
60
Fixing block
2

CE
S p i k e c o n v e yo r u n i t
2002/08/03
NO.
Description
Q’ty
NO.
Description
Q’ty
61
Spring pin
2
91
62
Screw
2
92
63
Bracket
2
93
64
Screw
4
94
65
Ring
4
95
66
Spring
2
96
67
Hexagon nut
2
97
68
98
69
99
70
100
71
101
72
102
73
103
74
104
75
105
76
106
77
107
78
108
79
109
80
110
81
111
82
112
83
113
84
114
85
115
86
116
87
117
88
118
89
119
90
120


CF
To r q u e l i m i t e r u n i t
2000/12/10
NO.
Description
Q’ty
NO.
Description
Q’ty
1
Torque limiter
1
31
2
Chain wheel
1
32
3
Chain wheel
1
33
4
Body
1
34
5
Lining
2
35
6
Bush
1
36
7
Friction piece
1
37
8
Disk spring
1
38
9
Pressure adjustment piece
1
39
10
Adjustment nut
1
40
11
Setscrew
6
41
12
Screw
4
42
13
O-ring
1
43
14
44
15
45
16
46
17
47
18
48
19
49
20
50
21
51
22
52
23
53
24
54
25
55
26
56
27
57
28
58
29
59
30
60

This manual suits for next models
1
Other H. Winter Planer manuals