H2OMY TOP AC Manual

(1
,7
'(
)5
(6
COD: 5561399
REV:5 07-2016
Instalación, uso y mantenimiento
Installation, usage et entretien
Installation, Gebrauch und Wartung
Installation, use and maintenance handbook
Installazione, uso e manutenzione

2
DICHIARAZIONE
DI CONFORMITÀ
CONFORMANCE
STATEMENT
ÜBEREINSTIMMUNGSER-
KLÄRUNG
DÉCLARATION DE
CONFORMITÉ
DECLARACIÓN DE
CONFORMIDAD
Questo apparecchio è
realizzato con materiali
idonei per il contatto con
acqua potabile.
Questo prodotto è stato con-
cepito, costruito ed immesso
sul mercato rispettando le
seguenti conformità CE:
Obbiettivi di sicurezza
della Direttiva “Bassa
Tensione” 2014/35/UE
(Ex 2006/95/CEE).
R
equisiti di protezione
della Direttiva 2014/30/UE
(Ex
2004/108/CEE)
.
C
HUWL¿FDWRGD
TÜV HESSEN
This appliance has been man-
ufactured with suitable materi-
als for use with drinking water
.
This product has been de-
signed, manufactured and
placed on the market com-
plying with the following EC
conformities:
Safety objectives of the
“Low Voltage” of Directive
2014/35/UE (Ex 2006/95/
EEC).
Protection requirements
of Directive, 2014/30/UE
(Ex 2004/108/EEC)
.
C
HUWL¿HGE\
TÜV HESSEN
Dieses Gerät wurde aus
Materialien gefertigt, die
für den Kontakt mit Trink-
wasser geeignet sind.
D
ieses Produkt wurde in
Übereinstimmung folgender
Bestimmungen entworfen,
gebaut und vermarktet CE:
S
äkerhetsobjektiv enligt
Direktivet om “Lågspän-
ning” 2014/35/UE (Ex
2006/95
/EEC).
Skyddskrav enligt Di-
rektivet 2014/30/UE (Ex
2004/108/EEC).
ZHUWL¿NDWDXV
TÜV HESSEN
Cet appareil a été réalisé
avec des matériaux appro-
priés pour le contact avec
l’eau potable.
Ce produit a été conçu,
fabriqué et introduit sur le
marché en respectant les
conformités CE suivantes:
Es objectifs de sécurité
de la Directive “Basse
Tension” 2014/35/UE
(Ex 2006/95/EEC).
L
e pré-requis de protection
de la Directive 2014/30/UE
(Ex 2004/108/EEC).
C
HUWL¿FDWGH
TÜV HESSEN
E
ste aparato ha sido fabri-
cado con materiales idó-
neos para el contacto con
agua potable.
Este producto ha sido
ideado, fabricado y comer-
cializado respetando los
siguientes estándares CE:
O
bjetivos de seguridad
de la Directiva “Baja Ten-
sión” 2014/35/UE
(Ex
2006/95
/EEC)
.
Requisitos de protección
de la Directiva 2014/30/
UE (Ex 2004/108/EEC).
CHUWL¿FDGRSRU
TÜV HESSEN
1 PRIMA DI USARE L’APPARECCHIO
1.1 AVVERTENZE
Per utilizzare al meglio il vostro apparecchio, raccomandiamo
di leggere attentamente le istruzioni per l’uso.
Conservate questo libretto per future consultazioni.
D
opo aver disimballato l’apparecchio, accertatevi che non sia danneg-
giato.
E
ventuali danni devono essere comunicati al vettore entro 24 ore
.
Se l’apparecchio è stato coricato o capovolto dovrete at-
tendere almeno 8 ore prima di metterlo in funzione.
Accertatevi che l’installazione ed il collegamento elettrico siano ef-
IHWWXDWLGDXQWHFQLFRTXDOL¿FDWRVHFRQGROHLVWUX]LRQLGHOIDEEULFDQWH
e le norme locali in vigore. L’impianto elettrico deve essere munito di
XQHI¿FDFHSUHVDGLWHUUDDQRUPDGLOHJJH.
1.2 PRECAUZIONE E SUGGERIMENTI GENERALI
Prima di qualsiasi operazione di manutenzione o pulizia,
disinserite la spina dalla presa di corrente.
Non tirate il cavo di alimentazione per staccare la spina dalla presa
di corrente.
Dopo l’installazione, accertatevi che l’apparecchio non poggi sul
cavo di alimentazione.
Idati e le caratteristiche indicati nel presente manuale
non impegnano la ditta costruttrice che si riserva il diritto
GLDSSRUWDUHWXWWHOHPRGL¿FKHULWHQXWHRSSRUWXQHVHQ]D
obbligo di preavviso o di sostituzione.
IT
1Modello
2Tensione di alimentazione
3Q
uantità di gas refrigerante
4Classe
5Assorbimento totale
6Frequenza
7Numero di matricola
8Anno-mese di costruzione
MARCATURA
DELL’APPARECCHIO
1Modell
2Speisespannung
3Kühlgasmenge
4Klasse
5Gesamtaufnahme
6Frequenz
7Matrikelnummer
8Konstruktionsjahr- Monat
GERÄTEKENNZEICHNUNG
1Modèle
2Tension d’alimentation
3Quantité de gaz réfrigérant
4Classe
5Absorption totale
6Fréquence
7Numéro de matricule
8A
nnée-mois de construction
PLAQUETTE SIGNALÉTIQUE
1Modelo
2Tensión de alimentación
3C
antidad de gas refrigerante
4Clase
5Consumo total
6Frecuencia
7Número de matrícula
8Año-mes de construcción
MARCADO DEL APARATO
1Model
2Supply voltage
3Quantity of cooling gas
4Class
5Total absorption
6Frequency
7Serial number
8Construction year-month
APPLIANCE DATA PLATE
MANUFACTURER
Mod. ..................
..........V ..........Hz ..........A
Freon R134a kg............. Classe T
MADE IN ITALY
WATER COOLERS
000100 0102
..........W 5
4
2
1
3
6
7 8

3
1 VOR DER INBETRIEBNAHME DES GERÄTS
1.1 HINWEISE
Um den optimalen Einsatz des Geräts garantieren zu können,
HPS¿HKOWGHU+HUVWHOOHUGLH%HGLHQXQJVDQOHLWXQJDXIPHUNVDP
]XOHVHQGLHDXFKQW]OLFKH+LQZHLVH.
Bewahren Sie das Handbuch auf, sodass Sie es jederzeit zu Rate ziehen
können
.
N
achdem Sie die Verpackung entfernt haben, vergewissern Sie sich, das an
dem Gerät kein Schaden entstanden ist.
E
ventuelle Schäden müssen dem
Transportunternehmer innerhalb von 24 Stunden mitgeteilt werden
.
Wenn der Apparat auf die Seite, oder auf den Kopf
gestellt wurde, müssen Sie vor dem Einschalten
mindestens 8 Stunden warten.
S
orgen Sie dafür, dass die Aufstellung und der Anschluss des Geräts an
GDV 6WURPQHW] YRQ TXDOL¿]LHUWHP 3HUVRQDO YRUJHQRPPHQ ZLUG HQWVSUH-
chend der Anweisungen des Herstellers und in Übereinstimmung mit den
örtlichen Sicherheitsvorschriften
.
1.2 VORSICHTSMASSNAHMEN UND ALLGEMEINE
HINWEISE
Vor jeder Wartungsarbeit und bei jeder Reinigung muss
der Stecker vom Stromnetz gelöst werden.
Z
iehen Sie aber nicht am Stromkabel, um den Stecker aus der Steckdose
zu entfernen
.
N
ach der Aufstellung des Geräts vergewissern Sie sich, dass das Gerät nicht
DXIGHP6WURPNDEHODXÀLHJW
.
Die angegebenen Daten und Eigenschaften sind
XQYHUELQGOLFKGLH+HUVWHOOHU¿UPDEHKlOWVLFKGDV5HFKW
vor, eventuell für nötig erachtete Änderungen ohne
Vorankündigung oder Austausch vorzunehmen.
DE
1 AVANT D’UTILISER L’APPAREIL
1.1 AVIS
Pour utiliser au mieux votre appareil, nous vous recomman-
dons de lire avec attention les instructions pour l’emploi qui
YRXVIRXUQLURQWGHVFRQVHLOVXWLOHV.
Conservez ce livret pour des prochaines consultations.
ASUqV DYRLU GpEDOOp O¶DSSDUHLO YpUL¿H] TX¶LO QH VRLW SDV HQGRPPDJp
Tout endommagement doit être communiqué au transporteur dans un
délai de 24 heures.
S
i l’appareil a été couché ou renversé, vous devrez
attendre au moins 8 heures avant de le remettre en marche
.
VpUL¿H]TXH O¶LQVWDOODWLRQ HWOH EUDQFKHPHQWpOHFWULTXH VRLHQWUpDOLVpV
SDUXQWHFKQLFLHQTXDOL¿pFRQIRUPpPHQWDX[LQVWUXFWLRQVGXIDEULFDQWHW
des normes locales en vigueur. L’installation électrique doit être munie
G¶XQHHI¿FDFHSULVHGHWHUUHFRQIRUPpPHQWDX[WHUPHVGHODORL.
1.2 PRÉCAUTIONS ET CONSEILS GÉNÉRAUX
Avant chaque opération d’entretien ou de nettoyage,
débranchez l’appareil de la prise.
Ne tirez pas sur le cordon d’alimentation pour débrancher la prise.
ASUqVO¶LQVWDOODWLRQYpUL¿H]TXHO¶DSSDUHLOQ¶pFUDVHSDVOHFRUGRQG¶DOL-
mentation.
Les données et les caractéristiques reportées dans ce
manuel n’engagent aucunement le fabricant qui se
UpVHUYHOHGURLWG¶DSSRUWHUWRXWHVOHVPRGL¿FDWLRQVTX¶LO
estimera nécessaires sans préavis ni remplacement.
FR
1 ANTES DE USAR EL APARATO
1.1 ADVERTENCIAS
Para utilizar lo mejor posible su aparato, les recomendamos
que lean atentamente las instrucciones sobre el uso, en las
que encontrarán consejos útiles.
Conserven este libro de instrucciones para consultas futuras.
Después de haber desembalado el aparato, asegúrense de que
no esté estropeado. Eventuales daños tienen que comunicarse al
transportador antes de que pasen 24 horas.
Si el aparato ha sido acostado o volteado, tendreis que
esperar por lo menos 8 horas antes de ponerlo en función.
Asegúrense de que la instalación y la conexión eléctrica las realice
XQWpFQLFRFXDOL¿FDGR VLJXLHQGR ODV LQVWUXFFLRQHV GHOIDEULFDQWH \
las normas locales en vigor. La instalación eléctrica tiene que dispo-
QHUGHXQDWRPDGHWLHUUDH¿FD]VHJ~QODVQRUPDVOHJDOHV.
1.2 PRECAUCIONES Y SUGERENCIAS GENERALES
Antes de realizar cualquier operación de mantenimiento
o de limpieza, desconecten el enchufe de la corriente.
Para desconectar el enchufe, no tiren del cable que está enchufado,
sino del enchufe mismo.
Después de la instalación, asegúrense de que el aparato no esté
colocado sobre el cable.
Los datos y las características indicados en el presente
manual no constituyen obligaciones para la empresa
fabricante que se reserva el derecho de introducir todas
ODVPRGL¿FDFLRQHVTXHHVWLPHFRQYHQLHQWHVyGHHIHFWXDU
sustitución sin aviso previo.
ES
1 BEFORE USING THE APPLIANCE
1.1 WARNINGS
IQRUGHUWRXVH \RXU DSSOLDQFH WR LWV EHVW ZH DGYLVH UHDGLQJ
WKHVHLQVWUXFWLRQVFDUHIXOO\DVWKH\FRQWDLQXVHIXOLQIRUPDWLRQ.
Keep this book for later use.
When you have removed the packaging, make sure that the appli-
ance is not damaged. Any damage must be reported to your carrier
within 24 hours
.
If the machine has been put down or turned upside down,
wait for at least 8 hours before putting it into operation.
Make sure that installation and electrical wiring are carried out by a
TXDOL¿HGWHFKQLFLDQDFFRUGLQJWRWKHPDQXIDFWXUHU¶VLQVWUXFWLRQVDQG
to the local norms in force. The electrical system must be equipped
with an effective earth according to the law (46/90).
1.2 GENERAL PRECAUTIONS AND SUGGESTIONS
Before carrying out any maintenance or cleaning
operation, remove the plug from the mains socket.
Do not pull on the supply cable in order to remove the plug from the
socket.
When the appliance has been installed, make sure it is not resting
on the mains supply cable.
The data and characteristics indicated in this manual do
not bind the manufacturer, who reserves the right to
PDNH DOO WKH PRGL¿FDWLRQV GHHPHG QHFHVVDU\ ZLWKRXW
having to give prior notice or replacement.
EN

4
1 PRIMA DI USARE L’APPARECCHIO
L’inosservanza di una qualsiasi norma di sicurezza potrebbe
causare incendi, scosse elettriche o danneggiare la macchina.
LUOGO DI INSTALLAZIONE
Q
uesto apparecchio è destinato ad usi domestici ed analoghi come:
-A
UHHGLFXFLQDGHOSHUVRQDOHLQQHJR]LXI¿FLHGDOWULDPELWLODYRUDWLYL
-AOORJJLUXUDOLHFOLHQWHODDOEHUJKLHUDGLPRWHOHDOWULDPELWLGLWLSRUHVLGHQ]LDOH
-A
PELWLGHOWLSREHGEUHDNIDVWHSHQVLRQL
-S
ervizi di ristorazione ed uso presso rivenditori simili.
N
RQ FROORFDUH OD PDFFKLQD QHOOH YLFLQDQ]H GL VROYHQWL LQ¿DPPDELOL FRPH
alcool o diluenti.
Non installare la macchina in luoghi eccessivamente umidi e polverosi, esposti
alla luce diretta del sole, all’esterno o nelle vicinanze di fonti di calore. L’installazio-
ne della macchina in questi luoghi potrebbe causare incendi o scosse elettriche
.
L’
apparecchio non è idoneo per uso in luoghi aperti.
I
n fase di collegamento della macchina alla rete idrica, tutti i tubi, guarnizioni
e giunzioni preesistenti posti tra la macchina e la presa dell’acqua di rete
devono essere sostituiti con materiali nuovi per evitare contaminazioni.
ALIMENTAZIONE ELETTRICA
N
on collocare o scollegare la macchina dalla presa di corrente con le mani bagnate.
I
nserire saldamente la spina nella presa a muro.
N
RQGDQQHJJLDUH PRGL¿FDUH DOOXQJDUHSLHJDUH RDWWRUFLJOLDUH LOFDYR GL
alimentazione.
N
on appoggiare oggetti pesanti sul cavo di alimentazione.
N
on collegare la macchina ad una presa di corrente cui sono collegate altre
apparecchiature (prolunghe, adattatori a 2 o 3 attacchi, ecc.)
N
on utilizzare la macchina se il cavo di alimentazione è legato o presenta dei nodi.
S
e si notano fumo, odori insoliti o rumori strani provenire dalla macchina,
scollegare immediatamente la macchina dalla presa di corrente e contattare
il locale rivenditore o il servizio di assistenza tecnica.
L’
utilizzo della macchina in queste condizioni potrebbe causare incendi o
scosse elettriche
.
P
eriodicamente, scollegare la macchina dalla presa di corrente e, con un
panno asciutto, pulire la spina e la presa di corrente.
S
e la macchina è collegata in un luogo esposto a polvere, fumo o alta umi-
dità, la polvere accumulatasi sulla presa assorbe umidità e potrebbe altera-
re l’isolamento e innescare un incendio.
N
on dirigere spruzzi d’acqua sull’apparecchio, questi potrebbero causare
scosse elettriche o incendi.
L
a macchina non deve essere installata in zone in cui si può generare un
getto d’acqua.
U
tilizzare un panno inumidito per pulire la macchina. Non utilizzare solventi
LQ¿DPPDELOLTXDOLDOFROEHQ]HQHRGLOXHQWL
S
HGHOOHVRVWDQ]HLQ¿DPPDELOL
dovessero entrare in contatto con i componenti elettrici all’interno della mac-
china, potrebbero causare incendi o scosse elettriche.
P
rima di pulire la macchina, spegnerla e scollegarla dalla presa di corrente.
Il mancato spegnimento o l’accidentale accensione durante la pulizia po-
trebbe causare lesioni alle persone o danni alla macchina.
L’
apparecchio può essere utilizzato da bambini di età inferiore a 8 anni e da
SHUVRQHFRQULGRWWHFDSDFLWj¿VLFKHVHQVRULDOLRPHQWDOLRSULYHGLHVSHULHQ]D
o della necessaria conoscenza, purché sotto sorveglianza oppure dopo che
le stesse abbiano ricevuto istruzioni relative all’uso sicuro dell’apparecchio e
alla comprensione dei pericoli ad esso inerenti.
I
bambini non devono giocare
con l’apparecchio.
L
a pulizia e la manutenzione destinata ad essere effettua-
ta dall’utilizzatore non deve essere effettuata da bambini senza sorveglianza
IT
1 BEFORE USING THE APPLIANCE
Failure to comply with any of these safety regulations could
FDXVH¿UHVHOHFWULFVKRFNVRUGDPDJHWKHPDFKLQH
PLACE OF INSTALLATION
This appliance is designed for household and similar uses such as
:
-K
LWFKHQDUHDVRISHUVRQQHOLQVKRSVRI¿FHVDQGRWKHUZRUNLQJHQYLURQPHQWV
-R
XUDOKRXVHVDQGKRWHOFXVWRPHUVPRWHOVDQGRWKHUUHVLGHQWLDOW\SHHQYLURQPHQWV
-AUHDVOLNHEHGEUHDNIDVWDQGJXHVWKRXVHV
-Food services and use at similar retailers.
D
RQRWSODFHWKHPDFKLQHQHDULQÀDPPDEOHVROYHQWVVXFKDVDOFRKRORUGLOXHQWV
.
D
o not install the machine in excessively damp and dusty places, exposed
to direct sunlight, outdoors or near to heat sources.
M
achine installation in
WKHVHSODFHVFRXOGFDXVH¿UHVRUHOHFWULFVKRFNV
T
he appliance is not suitable for use in open places.
D
uring connection of the appliance to the mains water supply, all pre-existing
tubes, gaskets and joints placed between the appliance and the water mains
connection must be replaced with new material to avoid contamination
.
ELECTRIC POWER SUPPLY
D
o not connect or disconnect the machine from the socket with wet hands.
I
QVHUWWKHSOXJLQWRWKHZDOOVRFNHW¿UPO\
D
o not damage, modify, stretch, bend or twist the power cable.
D
o not place heavy objects on the power cable.
D
o not connect the machine to a socket to which other equipment is con-
nected (extensions, 2 or 3 plug adaptors, etc.).
D
o not use the machine if the power cable is tied or knotted.
I
f smoke, unusual smells or strange noises are found coming from the machine, dis-
connect it immediately from the socket and contact the local retailer or technical service
assistance.
U
VHRIWKHPDFKLQHLQWKHVHFRQGLWLRQVFRXOGFDXVH¿UHVRUHOHFWULFVKRFNV
P
eriodically disconnect the machine from the socket and clean the plug and
socket with a dry cloth.
I
f the machine is connected in a place exposed to
dust, smoke or high humidity, the dust accumulated on the plug will absorb
KXPLGLW\DQGWKLVFRXOGDOWHUWKHLQVXODWLRQDQGWULJJHUD¿UH
D
RQRWVSUD\ZDWHURQWKHGHYLFHWKLVFRXOGFDXVHHOHFWULFVKRFNVRU¿UHV
T
he appliance must not be installed where water jets can be generated.
U
se a damp cloth to clean the machine.
D
RQRWXVHLQÀDPPDEOHVROYHQWVVXFKDV
alcohol, benzene or diluents.
I
ILQÀDPPDEOHVXEVWDQFHVFRPHLQFRQWDFWZLWKWKH
HOHFWULFDOFRPSRQHQWVLQVLGHWKHPDFKLQHWKH\FDQFDXVH¿UHVRUHOHFWULFVKRFNV
.
B
efore cleaning the machine, switch it off and disconnect it from the socket.
N
ot being switched off or accidental switching on during cleaning could
cause injuries to persons or damages to the machine
.
The device can be used by children under the age of 8 and by people with re-
duced physical, sensory or mental capabilities, or lack of experience or knowl-
edge, provided under supervision or after the same have been instructed on the
use ensure safe and understanding of the dangers inherent in it. Children should
not play with the appliance. Cleaning and maintenance meant to be performed
by the user must not be performed by unsupervised children.
EN
1 VOR DER INBETRIEBNAHME DES GERÄTS
B
ei Missachtung einer Sicherheitsbestimmung könnten Brand,
6WURPVFKODJRGHU0DVFKLQHQVFKlGHQYHUXUVDFKWZHUGHQ
.
AUFSTELLUNGSORT
D
ieses Gerät ist für den Haushalt entwickelt und für ähnliche Anwen-
dungen wie zum Beispiel:
-K
FKHQ%HUHLFKHQ3HUVRQDOLQ*HVFKlIWHQ%URVXQGDQGHUHQ$UEHLWVXPJHEXQJHQ
-L
andhäuser und Hotelkunden , Motels und anderen Wohntyp-Umgebungen
-BHUHLFKHZLH%HG%UHDNIDVWXQG3HQVLRQHQ
-Gastronomie und Verwendung bei ähnlichen Einzelhändler.
D
ie Maschine nicht in der Nähe von entzündlichen Flüssigkeiten, wie
Alkohol oder Lösungsmitteln aufstellen.
Die Maschine nicht in besonders feuchter, staubiger oder direkt dem Sonnenlicht
ausgesetzter Umgebung, im Außenbereich oder nahe von Wärmequellen instal-
lieren, andernfalls könnten dadurch Brand oder Stromschlag verursacht werden.
D
as Gerät darf nicht im Freien benutzt werden.
B
eim Anschluss des Gerätes an das Wasserversorgungsnetz müssen alle
bestehenden Leitungen, Dichtungen und Verbindungen zwischen dem Ge-
rät und der Wasserentnahme aus dem Wasserversorgungsnetz mit neuen
Materialien ausgewechselt werden, um eine Verunreinigung zu vermeiden.
STROMVERSORGUNG
N
iemals den Stromstecker der Maschine mit feuchten Händen in die
Steckdose einführen oder daraus entfernen
.
D
en Stecker fest in die Steckdose drücken.
D
as Stromkabel nicht beschädigen, verändern, verlängern, knicken oder
verwickeln. Keine schweren Gegenstände auf das Stromkabel legen
.
D
ie Maschine nicht an einen Steckkontakt anschließen, mit dem an-
dere Vorrichtungen verbunden sind (Verlängerungen, 2 oder 3 An-
schlussadapter, etc.)
.
D
ie Maschine nicht benutzen, wenn das Stromkabel gebunden oder
verknotet ist.
S
ollten Rauch, ungewöhnliche Gerüche oder eigenartige Geräusche
an der Maschine bemerkt werden, sofort den Netzstromanschluss der
Maschine unterbrechen und den örtlichen Einzelhändler oder techni-
schen Kundendienst verständigen.
D
er Maschineneinsatz unter den
genannten Bedingungen könnte Brand oder Stromschlag verursachen.
R
egelmäßig den Netzstromanschluss der Maschine unterbrechen und
mit einem trockenen Tuch den Stecker und die Steckdose reinigen.
DE

5
1 AVANT D’UTILISER L’APPAREIL
Le non respect de toute norme de sécurité pourrait
provoquer incendies, secousses électriques ou
endommager la machine.
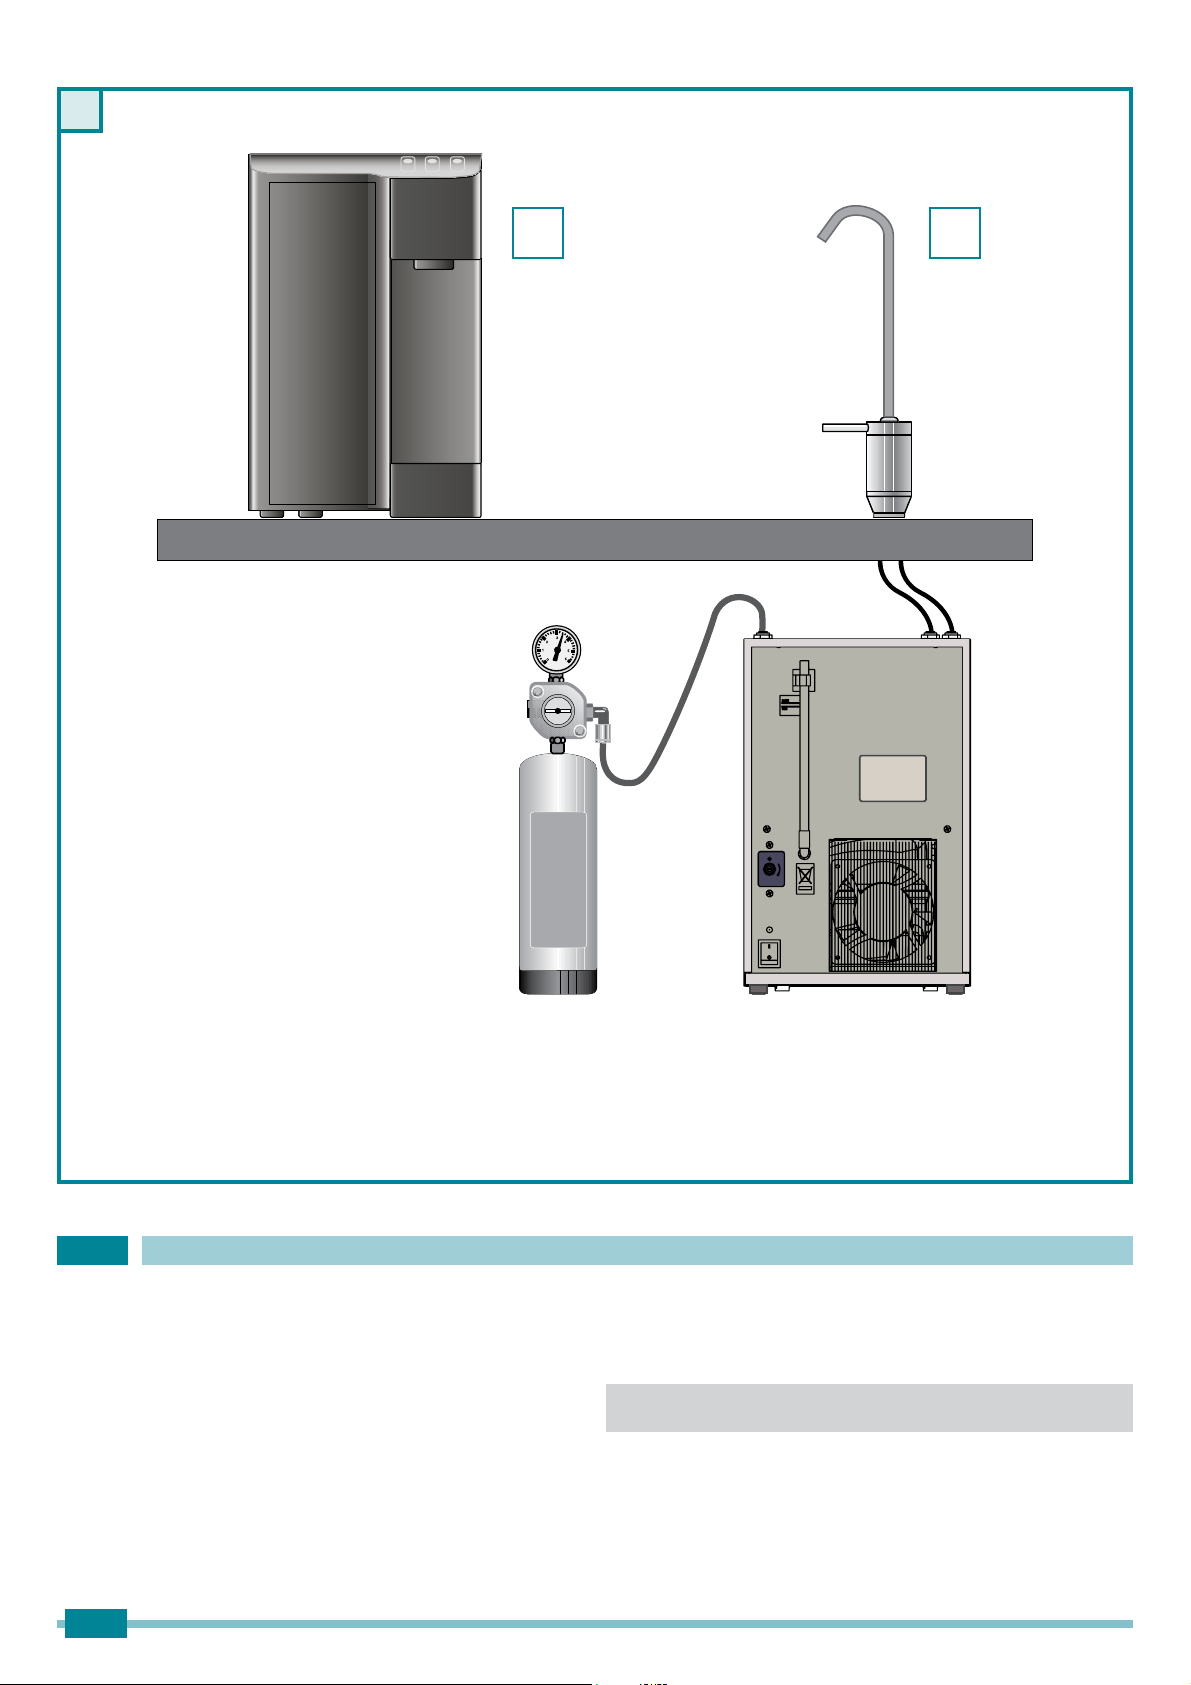
LIEU D ’INSTALLATION
Cet appareil est conçu pour usages domestiques et analogues, tels que:
-Les cuisines du personnel dans les magasins, les bureaux et
autres environnements de travail
-G
îtes ruraux et les clients de l’hôtel, motels et autres environnements
de type résidentiel
-Des domaines tels que chambres d’hôtes et maisons d’hôtes
-Services de restauration et l’utilisation chez les détaillants similaires.
NHSDVLQVWDOOHUODPDFKLQHjSUR[LPLWpGHGLVVROYDQWVLQÀDPPDEOHV
comme alcool ou diluants.
N
e pas installer la machine dans des lieux excessivement humides
ou poussiéreux, exposés à la lumière directe du soleil, à l’extérieur
ou près de sources de chaleur.
L’
installation de la machine dans ces
lieux pourrait provoquer des incendies ou des secousses électriques
.
L’appareil n’est pas adapté à une utilisation dans des lieux ouverts.
Au cours du raccordement de la machine au réseau hydrique, tous
les tuyaux, les joints et raccords préexistants situés entre la machine
et la prise de l’eau de réseau doivent être remplacés par de nou-
veaux matériaux pour éviter les contaminations.
ALIMENTATION ÉLECTRIQUE
N
e pas brancher ou débrancher la machine de la prise de courant
avec les mains mouillées.
I
QWURGXLUHIHUPHPHQWOD¿FKHGHODPDFKLQHGDQVODSULVHGHVHFWHXU.
N
HSDVHQGRPPDJHUPRGL¿HUDOORQJHUSOLHURXWRUVDGHUOHFkEOHG¶DOLPHQWDWLRQ
.
N
HSDVSRVHUG¶REMHWVORXUGVVXUOHFkEOHG¶DOLPHQWDWLRQ.
N
e pas brancher la machine à une prise de courant à laquelle sont
FRQQHFWpVG¶DXWUHVpOpPHQWVUDOORQJHDGDSWDWHXUVGHRX¿FKHVHWF
.
N
HSDVXWLOLVHUODPDFKLQHVLOHFkEOHG¶DOLPHQWDWLRQHVWOLpRXSUpVHQWHGHVQRHXGV
.
E
n cas de fumée, odeurs insolites ou bruits étranges provenant de
la machine, la débrancher immédiatement de la prise de courant et
contacter le distributeur local ou le service d’assistance technique.
L’
utilisation de la machine dans ces conditions pourrait provoquer des
incendies et secousses électriques.
P
ériodiquement, déconnecter la machine de la prise de courant et à
O¶DLGH G¶XQ FKLIIRQ VHF QHWWR\HU OD ¿FKH HW OD SULVH GH FRXUDQW 6L OD
machine est branchée dans un lieu exposé aux poussières, fumée ou
humidité élevée, la poussière accumulée sur la prise absorbe l’humi-
dité et pourrait altérer l’isolement et déclencher un incendie.
N
e pas envoyer d’éclaboussures d’eau vers l’appareil, celles-ci pour-
raient provoquer des secousses électriques ou des incendies.
L
a machine ne doit pas être installée dans des zones où un jet d’eau peut être provoqué
.
U
WLOLVHU XQ FKLIIRQ KXPLGL¿p SRXU QHWWR\HU OD PDFKLQH 1H SDV XWLOL-
VHUGHGLVVROYDQWVLQÀDPPDEOHVWHOVTXHDOFRROHVVHQFHVRXGLOXDQWV
6LGHV VXEVWDQFHVLQÀDPPDEOHVGHYDLHQWHQWUHU HQFRQWDFWDYHF OHV
composants électriques situés à l’intérieur de la machine, cela pourrait
provoquer des incendies ou secousses électriques.
A
vant de nettoyer la machine, l’éteindre et la débrancher de la prise
de courant.
L
e fait de ne pas éteindre la machine ou de l’allumer ac-
cidentellement pendant le nettoyage pourrait causer des lésions aux
personnes et des dommages à la machine.
L
e dispositif peut être utilisé par les enfants de moins de 8 ans et
par des personnes ayant un handicap physique réduite, les capacités
sensorielles ou mentales, ou le manque d’expérience ou de connais-
sances, à condition que sous surveillance ou après le même ont reçu
des instructions sur l’utilisation assurer la sécurité et la compréhension
des dangers qui lui sont inhérents.
L
es enfants ne devraient pas jouer
avec l’appareil.
N
ettoyage et entretien destinés à être effectuée par
l’utilisateur ne doit pas être effectué par des enfants sans surveillance.
FR
1 ANTES DE USAR EL APARATO
La falta de cumplimiento de cualquiera de las normas de
seguridad podría provocar incendios, sacudidas
eléctricas o estropear la máquina.
LUGAR DE INSTALACIÓN
Este aparato está diseñado para uso doméstico y usos similares, tales como:
-Á
UHDVGHFRFLQDGHSHUVRQDOHQWLHQGDVR¿FLQDV\RWURVHQWRUQRVGHWUDEDMR
-Casas rurales y clientes de hoteles, moteles y otros entornos de
WLSRUHVLGHQFLDO
-ÁUHDVFRPRODFDPD\GHVD\XQR\FDVDVGHKXpVSHGHV
-Servicios de alimentos y el uso de las minoristas similares.
NRFRORFDUODPiTXLQDHQODVSUR[LPLGDGHVGHVROYHQWHVLQÀDPD-
bles, como alcohol o diluyentes.
No instalar la máquina en un lugar excesivamente húmedo o polvo-
riento, expuesto a la luz solar, a la intemperie o cerca de fuentes de
calor. La instalación de la máquina en un lugar de estas característi-
cas podría provocar incendios o sacudidas eléctricas.
El aparato no es apto para el uso en lugares abiertos.
En fase de conexión de la máquina a la red hídrica, todos los tubos, empal-
mes y juntas existentes ubicados entre la máquina y la toma del agua de red
deben ser sustituidos con materiales nuevos para evitar contaminaciones.
ALIMENTACIÓN ELÉCTRICA
NRHQFKXIDURGHVHQFKXIDUODPiTXLQDFRQODVPDQRVPRMDGDV
Introducir con seguridad la clavija en el enchufe de pared.
NRQGDxDUPRGL¿FDUDODUJDUGREODURUHWRUFHUHOFDEOHGHDOLPHQ-
tación.No apoyar objetos pesados sobre el cable de alimentación.
No conectar la máquina a una toma de corriente a la que estén co-
nectados otros aparatos (alargos, enchufes múltiples, etc.).
N
o utilizar la máquina si el cable de alimentación está enredado o con-
tiene nudos.
Si se advierte presencia de humo, olores anormales o ruidos extraños
provenientes de la máquina, desenchufar inmediatamente la máquina
y contactar el distribuidor local o el servicio de asistencia técnica.
Utilizar la máquina en estas condiciones podría provocar incendios
o sacudidas eléctricas.
Periódicamente, desenchufar la máquina y, con un paño seco, lim-
piar la clavija y la toma de corriente. Si la máquina está enchufada
en un lugar expuesto a polvo, humo o humedad elevada, el polvo
acumulado en la toma absorbe humedad y podría alterar el aisla-
miento, provocando un incendio.
No dirigir chorros de agua sobre el aparato, pues podrían provocar
sacudidas eléctricas o incendios.
La máquina no debe ser instalada en zonas en las que se pueda
generar un chorro de agua.
Utilizar un paño húmedo para limpiar la máquina. No utilizar disolventes
LQÀDPDEOHVFRPRDOFRKROJDVROLQDRGLOX\HQWHSi cualquier sustancia in-
ÀDPDEOHOOHJDDHQWUDUHQFRQWDFWRFRQORVFRPSRQHQWHVHOpFWULFRVLQWHUQRV
de la máquina, esto podría provocar incendios o sacudidas eléctricas.
Antes de limpiar la máquina, apagarla y desenchufarla. No apa-
garla o encenderla accidentalmente mientras se está limpiando la
misma, podría producir lesiones personales o daños en la máquina.
El dispositivo puede ser utilizado por niños menores de 8 y por perso-
nas con discapacidad física reducida, sensoriales o mentales, o la falta
de experiencia o conocimiento, siempre bajo la supervisión o después
de la misma han sido instruidos en el uso garantizar la seguridad y
la comprensión de los peligros inherentes a ella. Los niños no deben
jugar con el aparato. Limpieza y mantenimiento destinados a ser reali-
zada por el usuario no debe ser realizado por los niños sin supervisión.
ES
S
ollte die Maschine an einem staubreichen, rauchigen oder sehr feuchten Ort
betrieben werden, könnte der sich auf dem Stecker abgesetzte Staub Feuchtig-
keit aufnehmen, die Isolierung beeinträchtigt und ein Brand verursacht werden.
K
eine Wasserstrahlen auf das Gerät richten, denn diese könnten
Stromschlag oder Brand verursachen.
D
as Gerät darf nicht installiert werden, wo Wasserspritzer entstehen können.
E
in feuchtes Tuch zur Reinigung der Maschine verwenden. Keine entzündli-
chen Flüssigkeiten, wie Alkohol, Benzol oder Lösungsmittel benützen.
S
ollten entzündliche Substanzen in Kontakt mit den elektrischen Teilen in
der Maschine treten, könnten diese Brand oder Stromschlag verursachen
.
Vor Reinigung der Maschine diese ausschalten und den Stromanschluss un-
terbrechen. Sollte die Maschine während der Reinigung nicht ausgeschaltet
oder versehentlich eingeschaltet werden, könnte dies Personen- oder Ma-
schinenschäden verursachen.
D
as Gerät kann von Kindern im Alter von 8 und von Menschen mit einge-
schränkten physischen, sensorischen oder geistigen Fähigkeiten oder Mangel
an Erfahrung oder Wissen, sofern unter Aufsicht oder nach dem gleichen über
die Verwendung angewiesen wurden verwendet werden sorgen für eine si-
chere und Verständnis der inhärenten Gefahren darin.
K
inder sollten nicht mit
dem Gerät spielen.
R
einigung und Wartung soll durch den Benutzer durchge-
führt werden, dürfen nicht durch Kinder unbeaufsichtigt durchgeführt werden.

6
2 REMOVAL OF PACKAGING
Product
This appliance is marked according to the European directive 2012/19/
EC on Waste Electrical and Electronic Equipment (WEEE).By ensuring
this product is disposed of correctly, you will help prevent potential nega-
tive consequences for the environment and human health, which could
otherwise be caused by inappropriate waste handling of this product.
T
he symbol on the product, or on the documents accompanying the
product, indicates that this appliance may not be treated as house-
hold waste.
I
nstead it shall be handed over to the applicable collec-
tion point for the recycling of electrical and electronic equipment
.
Disposal must be carried out in accordance with local environmental
regulations for waste disposal. For more detailed information about
treatment, recovery and recycling of this product, please contact your
ORFDO FLW\ RI¿FH \RXU KRXVHKROG ZDVWH GLVSRVDO VHUYLFH RU WKH VKRS
where you purchased the product.
EN
Place the appliance in its installation site (chap. 5 - INSTALLATION).
Cut straps Rand remove carton C, polystyrene Fand external plastic bag S
.
Do away with plastic bags
S
and polystyrene
F
immediately as they
are a danger for children.
Once the appliance is free from its packaging, remove the base
B
.
2.1
ADVICE ON HOW TO PROTECT THE ENVIRONMENT
Packaging
Packaging material is 100% recyclable.
For its disposal follow your local regulations.
The packaging material (plastic bags, polystyrene parts etc..) must be
kept out of children’s reach as it could be dangerous.
Information
This appliance does not contain CFCs (the cooling circuit contains a
gas that is not harmful to the ozone layer).
For further details, please refer to the serial data plate on the appliance.
2 DISIMBALLO Prodotto
Questo apparecchio è contrassegnato in conformità alla Direttiva Euro-
pea 2012/19/UE, Waste Electrical and Electronic Equipment (WEEE).
Assicurandosi che questo prodotto sia smaltito in modo corretto, l’u-
tente contribuisce a prevenire le potenziali conseguenze negative per
l’ambiente e la salute.
Il simbolo presente sull’apparecchio o sulla documentazione indi-
FDFKHLOSURGRWWRQRQGHYHHVVHUHWUDWWDWRFRPHUL¿XWRGRPHVWLFR
ma deve essere consegnato presso un idoneo centro di raccolta
per il riciclaggio di apparecchiature elettriche ed elettroniche.
Lo smaltimento deve avvenire seguendo le normative locali per lo
VPDOWLPHQWRGHLUL¿XWLPer ulteriori informazioni sul trattamento, recu-
SHURHULFLFODJJLRGLTXHVWRSURGRWWRFRQWDWWDWHO¶LGRQHRXI¿FLRORFDOH
LOVHUYL]LRGLUDFFROWDGHLUL¿XWLGRPHVWLFLRLOQHJR]LRSUHVVRLOTXDOHLO
prodotto è stato acquistato.
IT
P
onete l’apparecchio nel punto d’installazione (cap. 5- INSTALLAZIONE)
.
T
agliare le reggette
R
HV¿ODWHLOFDUWRQH
C
, il polistirolo
F
e il sacco
in plastica esterno
S
.
E
liminate subito i sacchi in plastica
S
e i polistiroli
F
i quali possono
rappresentare pericolo per i bambini.
U
na volta liberato l’apparecchio dal suo imballo eliminate il basamento
B
.
2.1
CONSIGLI PER LA SALVAGUARDIA DELL’AMBIENTE
Imballo
Il materiale di imballo è riciclabile al 100%. Per lo smaltimento seguite
le normative locali. Il materiale di imballaggio (sacchetti di plastica, parti
in polistirolo, ecc..) deve essere tenuto fuori dalla portata dei bambini in
quanto potenziale fonte di pericolo.
Informazione
Questo apparecchio è senza CFC (il circuito refrigerante contiene un
gas non dannoso per l’ozono).
Per maggiori dettagli, riferitevi alla targhetta matricola posta sull’apparecchio
.
1
R
F
S
B
R

7
2 ENTFERNUNG DER VERPACKUNG
Produkt
In Übereinstimmung mit den Anforderungen der Europäischen Richtlinie
2012/19/EG über Elektro - und Elektronik-Altgeräte (WEEE) ist vorlie-
gendes Gerät mit einer Markierung versehen. Sie leisten einen positiven
Beitrag für den Schutz der Umwelt und die Gesundheit des Menschen,
wenn Sie dieses Gerät einer gesonderten Abfallsammlung zuführen. Im
unsortierten Siedlungsmüll könnte ein solches Gerät durch unsachge-
mäße Entsorgung negative Konsequenzen nach sich ziehen.
Auf dem Produkt oder der beiliegenden Produktdokumentation ist
folgendes Symbol einer durchgestrichenen Abfalltonne abgebildet.
Es weist darauf hin, dass eine Entsorgung im normalen Haushalts-
abfall nicht zulässig ist Entsorgen Sie dieses Produkt im Recycling-
hof mit einer getrennten Sammlung für Elektro- und Elektronikgeräte.
Die Entsorgung muss gemäß den örtlichen Bestimmungen zur Abfall-
beseitigung erfolgen. Bitte wenden Sie sich an die zuständigen Behör-
den Ihrer Gemeindeverwaltung, an den lokalen Recyclinghof für Haus-
haltsmüll oder an den Händler, bei dem Sie dieses Gerät erworben
haben, um weitere Informationen über Behandlung, Verwertung und
Wiederverwendung dieses Produkts zu erhalten.
DE
Transportieren Sie das Gerät an die Stelle, wo es aufgestellt werden
soll. (s. Kap. 5, Aufstellung ).
Die Bänder Rdurchschneiden und den Karton C, das Polystyrol F
und den äußeren Plastiksack Sentfernen.
Die Plastiksäcke Sund das Polystyrol Fsofort entfernen, da diese
eine potentielle Gefahr für Kinder darstellen.
Entfernen Sie daraufhin das Verpackungs-Untergestell Bund sämt-
liche anderen Verpackungsrückstände.
2.1 UMWELTSCHUTZEMPFEHLUNGEN
Verpackung
Das Verpackungsmaterial ist 100% recyclefähig. Das Verpackungsma-
terial (Plastikhüllen, Steroporteile usw..) müssen für Kinder unerreichbar
aufbewahrt werden, da diese eine potenzielle Gefahrenquelle darstellen.
Information
Dieses Gerät verwendet kein FCKW (der Kühlkreis enthält ein Gas,
das die Ozonschicht nicht beschädigt).
Nähere Angaben entnehmen Sie bitte dem Typenschild des Gerätes.
2 DÉBALLAGE
Produit
Cet appareil porte le symbole du recyclage conformément à la Directive
Européenne 2012/19/CE concernant les Déchets d’Équipements Élec-
triques et Électroniques (DEEE ou WEEE). En procédant correctement
à la mise au rebut de cet appareil, vous contribuerez à empêcher toute
conséquence nuisible pour l’environnement et la santé de l’homme.
Le symbole présent sur l’appareil ou sur la documentation qui
l’accompagne indique que ce produit ne peut en aucun cas être
traité comme déchet ménager. Il doit par conséquent être remis
à un centre de collecte des déchets chargé du recyclage des
équipements électriques et électroniques.
Pour la mise au rebut, respectez les normes relatives à l’élimination
des déchets en vigueur dans le pays d’installation. Pour obtenir de
plus amples détails au sujet du traitement, de la récupération et du
recyclage de cet appareil, veuillez vous adresser au bureau compétent
de votre commune, à la société de collecte des déchets ou directement
à votre revendeur.
FR
P
ortez l’appareil à l’endroit prévu pour l’installation (chap. 5 INSTALLATION)
.
Couper les feuillards Ret enlever le carton C, les polystyrènes Fet
le sac externe en plastique S.
Éliminer immédiatement les sacs en plastique Set les polystyrènes
Fqui peuvent être dangereux pour les enfants.
Une fois ôté l’emballage, enlevez encore le socle B.
2.1 CONSEILS POUR LA PROTECTION DE L’ENVI-
RONNEMENT
Emballage
Le matériel d’emballage est recyclable à 100%. Pour le traitement des
déchets, reportez-vous aux normatives locales. Le matériel d’embal-
lage (sacs en plastique, parties en polystyrène, etc..) doit être tenu hors
de portée des enfants car il représente une réelle source de danger.
Information
Cet appareil ne contient pas de CFC (le circuit réfrigérant contient un
gaz qui n’est pas dangereux pour l’ozone).
Pour davantage de détails, reportez-vous à la plaquette signalétique
de l’appareil.
2 DESEMBALADO
Producto
Este aparato lleva el marcado CE en conformidad con la Directiva
2012/19/EC del Parlamento Europeo y del Consejo sobre residuos de
aparatos eléctricos y electrónicos (RAEE). La correcta eliminación de
este producto evita consecuencias negativas para el medio ambiente
y la salud.
El símbolo en el producto o en los documentos que se incluyen
con el producto, indica que no se puede tratar como residuo
doméstico. Es necesario entregarlo en un punto de recogida
para reciclar aparatos eléctricos y electrónicos.
Deséchelo con arreglo a las normas medioambientales para elimi-
nación de residuos. Para obtener información más detallada sobre
el tratamiento, recuperación y reciclaje de este producto, póngase en
contacto con el ayuntamiento, con el servicio de eliminación de resi-
duos urbanos o la tienda donde adquirió el producto.
ES
Coloquen el aparato en el punto de instalación (cap. 5 INSTALACIÓN).
CRUWDUORVÀHMHVRy extraer el cartón C, el poliestireno Fy la bolsa
de plástico exterior S.
Eliminar de inmediato las bolsas de plástico Sy el poliestireno F, ya
que constituyen un peligro para los niños.
Una vez liberado el aparato de su embalaje, quiten las bases B.
2.1
CONSEJOS PARA SALVAGUARDAR EL AMBIENTE
Embalaje
El material de embalaje se puede reciclar al 100%. Para la destruc-
ción del congelador, respeten la normativa local.
El material de embalaje (bolsas de plástico, partes de polesterol,
etc..) tiene que mantenerse fuera del alcance de los niños porque es
potencialmente peligroso.
Información
Este aparato no utiliza CFC (el circuito refrigerante contiene un gas
que no daña el ozono).
Para mayores detalles véase la placa presente en el aparato.

8
LATO OPERATORE
OPERATOR SIDE
SEITE BEDIENER
CÔTÉ OPÉRATEUR
OPERADOR SIDE
3 DESCRIZIONE DELL’APPARECCHIO
Questi refrigeratori sono stati studiati per servire grandi quantità di ac-
qua gassata.
Sono di facile uso e realizzati con materiali di elevata qualità, per offri-
re la massima igiene e semplicità di manutenzione.
I
ndicato per ambienti domestici, può essere installato anche in altri ambien-
WLFRPHEDUHXI¿FL
L’
installazione è prevista sempre al coperto e in con-
dizioni ambientali come descritto nel capitolo “caratteristiche tecniche”
.
Sono dotati di un impianto frigorifero interno, in grado di fornire acqua
refrigerata a 3 ÷ 10°C.
IT
Utilizzano un sistema di raffreddamento diretto.
Sono disponibili nei modelli:
Sopra banco (1)
Sotto banco (2)
Sono predisposti per erogare acqua gassata e richiedono un
collegamento ad una bombola di CO2alimentare.
Imodelli soprabanco dispongono di serie di una elettrovalvola con
funzioni di sicurezza (antiallagamento).
21
2

9
3 GERÄTEBESCHREIBUNG
Diese Trinkwasserkühler dienen der Bereitung von großen Mengen an
gekühltem stillen oder CO2-haltigem und Warm.
Sie sind einfach zu bedienen und bestehen aus hochwertigen Mate-
rialien.
Sie bieten dem Benutzer größtmögliche Hygiene und Wartungsfreund-
lichkeit.
Das Gerät ist für den Hausgebrauch geeignet, kann aber auch in An-
deren Bereichen wie Bars und Büros installiert werden. Die gewissen
Bedingungen entsprechenden (siehe Abschnitt “Technische Merkmale”).
Sie verfügen über ein internes Kühlsystem, welches das Wasser auf
Temperaturen von 3 ÷ 10°C.
DE
Dabei wird ein direktes Kühlsystem verwendet (Eisvitrine)
Folgende Modelle sind erhältlich:
Auftisch-Gerät (1)
Untertisch-Gerät (2)
ELQLJH *HUlWH N|QQHQ ]XU +HUVWHOOXQJ YRQ 6SUXGHOZDVVHU HLQJH-
setzt werden und sind daher an eine CO2-Flasche anzuschließen.
Vitrinenaufsatzmodelle verfügen serienmäßig über ein Elektroventil
mit Sicherheitsfunktion (Überlaufschutz).
3 DESCRIPTION DE L’ APPAREIL
Ces refroidisseurs d’eau ont été spécialement conçus pour débiter de
grosses quantités d’eau froide, plate ou gazeuse et chaud.
Simples à utiliser, ils sont réalisés dans du matériel de haute qualité
pour offrir un maximum d’hygiène et un entretien facile.
Indiqué pour locaux domestiques, il peut aussi être installé dans
d’autres locaux tels que bars et bureaux. L’installation est toujours
prévue à couvert et dans les conditions ambiantes prévues dans le
chapitre “caractéristiques techniques”.
IOVVRQWpTXLSpVG¶XQHLQVWDOODWLRQIULJRUL¿TXHLQWpULHXUHSHUPHWWDQWGH
débiter de l’eau froide à 3 ÷ 10°C.
FR
Ils utilisent un système de refroidissement direct (bac à glaçons)
Ils ont disponibles en version :
Aposer (1)
Sous plan (2)
Les modèles qui sont prévus pour débit d’eau gazeuse doivent être
raccordés à une bouteille de CO2 alimentaire.
Les modèles posés au sol e plan disposent, de série, d’une électro-
vanne avec fonction de sécurité (anti-inondation).
3 DESCRIPCIÓN DEL APARATO
Estos refrigeradores han sido estudiados para servir una gran canti-
dad de agua fría, natural, con gas y caliente.
Son de fácil uso y están fabricados con materiales de gran calidad
para ofrecer la máxima higiene y sencillez de mantenimiento.
Indicado para ambientes domésticos, también puede ser instalado en
RWURV DPELHQWHV FRPR EDUHV \ R¿FLQDV La instalación está prevista
para zonas cubiertas y en condiciones ambientales como las descritas
en el capítulo “características técnicas”.
EVWiQGRWDGRVGHXQDLQVWDODFLyQIULJRUt¿FDLQWHUQDFDSD]GHVXPLQLV-
trar agua refrigerada a 3 ÷ 10°C.
ES
Utilizan un sistema de refrigeración directo (acumulador de hielo)
Están disponibles en los modelos:
Sobre banco (1)
Bajo banco (2)
A
lgunos modelos están preparados para suministrar agua con gas,
por lo que requieren una conexión con una bomba de CO2 alimentario.
Los modelos sobre el suelo cuentan de serie, con una electroválvula
con función de seguridad (anti-encharcamiento).
3 DESCRIPTION OF THE APPLIANCE
These water coolers were designed to provide large quantities of still
and carbonated cold water and hot.
They are easy to use and manufactured using top quality materials,
offering the utmost hygiene and ease of maintenance.
Indicated for household use, it can also be installed in other places
OLNHEDUVDQGRI¿FHVThey should always be installed indoors and in
the environmental conditions described under the “technical features”
heading.
They are equipped with an internal cooling system, capable of supply-
ing water cooled to 3 ÷ 10°C.
EN
They use a direct cooling system (hermetic ice bank).
Two types of water coolers are available:
Countertop (1)
Undercounter (2)
Some models can also provide carbonated water, in which case they
need to be connected to a CO2 cylinder.
The countertop models have, as standard, a solenoid valve with
VDIHW\IXQFWLRQDQWLÀooding).

10
VISTA GENERALE / GENERAL VIEW / GERÄTEANSICHT / VUE GENERALE / VISTA GENERAL
(IT) Modello sottobanco - (EN) Undercounter model - (DE) Unterbaummodelle - (FR) Modelé sous plan - (ES) Modelo debajo de mesón
TOP AC
TOP ACWG
TOP ACH
TOP CHWG
IN ACH
IN CHWG
IN CWG
IN C
OUT WATER
OUT AMB
OUT SODA
OUT HOT
FILL ICE BANK
IN WATER
IN CO2
FILL ICE BANK
IN WATER
319
19
20
20
21 25
251718
21 15
15
18
18
17
26
22
16
13
13
15
7
14
14
24
7
3
4
10
10
12
12
11
11
4
5
5
3
23
6
6
19
22
16
12
11
5
28
27 8
9
23
17
41424 113
10
7
3
2
27
6
7
12
11
5
17
4
87
9
110
13 6
14 3
8
9
2
15

11
1Lato operatore
2Lato posteriore
3Presa alimentazione elettrica
4Interruttore generale
5Termostato acqua fredda
6Ingresso acqua di rete 3/4M oppure ø 8mm
7Ingresso CO2 ø 6mm (modello WG) (IN CO2)
8Uscita acqua fredda (OUT WATER)
9Uscita acqua gassata (modello WG) (OUT SODA)
10 Ingresso acqua per carico vasca (FILL ICE BANK)
11 Tubo livello e scarico vasca
12 Indicatore di livello vasca
13 Etichetta caratteristiche tecniche e matricola
14 Punto di smaltimento del calore (da non coprire)
15
I
nvolucro - Facilmente smontabile per accedere alle parti interne
IT
16 Galleggiante rosso indicante il riempimento della vaschetta
17 Spia mancanza acqua (solo modelli WG)
18 Spia tensione di rete
19 Pulsante acqua fredda
20 Pulsante acqua Temperatura ambiente
21 Pulsante acqua gassata (modelli WG)
22 Vaschetta raccolta acqua gocciolamento
è removibile e può essere collegata ad uno scarico.
23 Termostato acqua calda
24 Interruttore acqua calda
25 Pulsanti acqua calda (modelli H - HWG) da premere
contemporaneamente per ottenere l’erogazione
26
L
ED “HEATING” si accende durante la fase di riscaldamento
27 Uscita acqua calda (OUT HOT)
28 Uscita acqua ambiente (OUT AMB)
1Bedienerseit
2Rückseite
3Stromspeisungsanschluss
4Generalschalter
5Kaltwasserthermostat
6Netzwassereintritt 3/4M oder ø 8mm
7CO2-Eintritt ø 6mm (Modelle WG)
8KDOWZDVVHUDXVÀXVV
9Ausgang Sprudelwasser (Modell WG)
10 WDVVHU]XÀXVV]XP)OOHQGHU:DQQH
11 AEÀXVVXQG1LYHOOLHUXQJVURKU
12 Wasserspiegelanzeiger
13 Etikett technische Eigenschaften und Matrikelnummer
14 WlUPHDEOHLWXQJVSXQNWQLFKWDEGHFNHQ
15
G
HKlXVHOHLFKWDEQHKPEDUXPSUREOHPORV]XGHQ,QQHQWHLOHQ]XJHODQJHQ
DE
16 Roter Schwimmer, der den Füllzustand der Wanne angibt.
17 Kontrolllampe Wasser fehlt (Modellen WG)
18 Kontrolllampe Netzspannung
19 Kaltwasserschalter
20 SFKDOWHUDXI5DXPWHPSHUDWXUJHZlUPWHV:DVVHU
21 SFKDOWHUNRKOHQVlXUHKlOWLJHV:DVVHU0RGHOOHQ:*
22 Auffangwanne für Abtropfwasser abnehmbar,
NDQQDXFKDQHLQHQ$EÀXVVDQJHVFKORVVHQZHUGHQ
23 Warmwasserthermostat
24 Warmwasserschalter
25 Warmwasserschalter (Modelle H - HWG) müssen gleichzeitig
IU$XVODVVEHWlWLJWZHUGHQ
26 L('³+($7,1*´OHXFKWHWZlKUHQGGHU$XIKHL]SKDVH
27 Warmwasseranschluss (OUT HOT)
28 Ausgangswasserumgebung (OUT AMB)
1Operator side
2Rear side
3Electrical power supply socket
4Main switch
5Cold water thermostat
6Mains water inlet 3/4M or ø 8mm
7 CO2 inlet ø 6mm (WG model)
8Cold water outlet
9Carbonated water outlet (WG model)
10 Water entrance for basin loading
11 Level and basin unloading tube
12 Basin water level indicator
13 Label bearing the technical data and serial number
14 Heat outlet vent (do not cover)
15 Casing - easily removable to reach interior parts
EN
16 RHGÀRDWHULQGLFDWLQJWUD\¿OOLQJ
17 WDUQLQJOLJKWIRULQVXI¿FLHQWZDWHU:*PRGHOV
18 Network voltage warning light
19 Cold water button
20 Button for water at room temperature
21 Sparkling water button (WG models)
22 Small tank to collect dripping water.
It is removable and can be connected to a drain.
23 Hot water thermostat
24 Hot water switch
25 Hot water buttons (H - HWG models) must be pressed at the
same time for distribution
26 LED “HEATING” indicator lights up during the heating phase
27 Hot water outlet (OUT HOT)
28 Output water environment (OUT AMB)
1Face utilisateur
2Face postérieure
3Prise d’alimentation électrique
4Interrupteur général
5Thermostat eau froide
6Entrée eau de réseau 3/4M ou ø 8mm
7Entrée CO2 ø 6mm (modèles WG)
8Sortie eau froide
9Sortie de l’eau gazeuse (modèle WG
10 Entrée eau pour le remplissage de la cuve
11 Tuyau de niveau/évacuation d’eau de la cuve
12 Indicateur du niveau de remplissage de la cuve
13 Etiquettes de caractéristiques techniques et d’immatricula-
tion
14 Point d’évacuation de la chaleur (ne pas couvrir)
15
E
nveloppe - facilement démontable pour accéder aux parties internes
FR
16 Flotteur rouge indiquant le remplissage de la cuvette
17 Voyant manque d’eau (modèles WG)
18 Voyant tension de réseau
19 Bouton eau froide
20 Bouton eau à température ambiante
21 Bouton eau gazeuse (modèles WG)
22 Cuvette de réception d’eau d’égouttement
elle est amovible et peut-être reliée à un écoulement
23 Thermostat eau chaude
24 Interrupteur eau chaude
25 Boutons eau chaude (modèles H - HWG) à presser
simultanément pour obntenir le débit
26 Voyant “HEATING” s’allume pendant la phase de chauffage
27 Sortie d’eau chaude (OUT HOT)
28 Environnement de l’eau de sortie (OUT AMB)
1Lado operador
2Lado posterior
3Toma de alimentación eléctrica
4Interruptor general
5Termóstato agua fría
6Entrada agua de la red 3/4M o ø 8mm
7Entrada CO2 ø 6mm (modelos WG)
8Salida agua fría
9Salida agua con gas (modelo WG)
10 Entrada agua para cargo tina
1 1 Tubo de nivel y descargo tina
12 Indicador de nivel tina
13 Etiqueta características técnicas y matrícula
14 Punto de eliminación del calor (no cubrir
15
C
ubierta - fácilmente desmontable para acceder a las partes internas
ES
16 Flotador rojo que indica el llenado de la cubeta
17 Indicador luminoso falta de agua (modelos WG)
18 Indicador luminoso tensión de red
19 Botón agua fría
20 Botón agua a temperatura ambiente
21 Botón agua en forma gaseosa (modelos WG)
22 Cubeta de recolección del agua de goteo
removible y puede ser conectada a un desaguadero
23 Termóstato agua caliente
24 Interruptor agua caliente
25
B
otones agua caliente (modelos H - HWG) que deben ser
pulsados contemporaneamente para obtener al suministro de la misma
26
I
ndicador “HEATING” LED se enciende durante la fase de calentamiento
27 Salida de agua caliente (OUT HOT)
28 Ambiente de agua de salida (OUT AMB)

12

13
4 TECHNISCHE EIGENSCHAFTENDE
4 TECHNICAL CHARACTERISTICSEN
4 CARATTERISTICHE TECNICHEIT
4 CARACTÉRISTIQUES TECHNIQUESFR
4 CARACTERÍSTICAS TÉCNICASES
Dimensions
Dimensioner
Mått
Dimensjoner
Ɋɚɡɦɟɪɵ
(mm)
(GB) WG model
(DK) modeller WG
(S) modell WG
(N) modell WG
586 ɦɨɞɟɥɢ:*
(GB) F model
(DK) model F
(S) modell F
(N) modell F
586 ɦɨɞɟɥɢ)
Undercounter models
Modeller under skranken
Modeller som står under disken
Gulvmodeller
ɉɨɞɫɬɨɥɶɧɵɣɬɢɩɭɫɬɚɧɨɜɤɢ
A
B
H
260
300
407
A
B
H
260
235
407
4
(IT) Modello sottobanco - (EN) Undercounter model - (DE) Unterbaummodelle - (FR) Modelé sous plan - (ES) Modelo debajo de mesón
(IT) Modello TOP
(EN) TOP model
(DE) Modell TOP
(FR) Modéle TOP
(ES) Modelo TOP
AC - ACWG - ACH
CHWG
ACH - CWG - CHWG
C
(IT) Modello IN
(EN) IN model
(DE) Modell IN
(FR) Modéle IN
(ES) Modelo IN
(IT) Modello TOP
(EN) TOP model
(DE) Modell TOP
(FR) Modéle TOP
(ES) Modelo TOP
(IT) Modello IN
(EN) IN model
(DE) Modell IN
(FR) Modéle IN
(ES) Modelo IN

14
TEMPERATURA AMBIENTE:
ROOM TEMPERATURE:
RAUMTEMPERATUR:
TEMPÉRATURE AMBIANTE:
TEMPERATURA AMBIENTE:
Min 10°C
Max 43°C
TOP
AC
TOP
ACWG
TOP
ACH
TOP
CHWG
IN
C
IN
CWG
IN
ACH
IN
CHWG
Produzione acqua
Water production
Trinkwasserproduktion
Production d’eau
Producción de agua
Lt/h
usg/h
15
3,96
15
3,96
15 (13)
3,9 (3,4)
15 (13)
3,96 (3,4)
15
3,96
15
3,96
15 (13)
3,9 (3,4)
15 (13)
3,96 (3,4)
Temp. uscita acqua
Water outlet temperature
Temperatur des gespendeten Wassers
Temperature sortie de l’eau
Temp. de salida del agua
°C
°F
3 ÷ 10
37.4 ÷ 50
3 ÷ 10
37.4 ÷ 50
3 ÷ 10 (95)
38 ÷ 50 (203)
3 ÷ 10 (95)
38 ÷ 50 (203)
3 ÷ 10
37.4 ÷ 50
3 ÷ 10
37.4 ÷ 50
3 ÷ 10
(95)
38 ÷ 50
(203)
3 ÷ 10
(95)
38 ÷ 50
(203)
Produzione acqua fredda in continuo
Continuous cold water production
Laufende Kaltwasserversorgung
Production eau froide en continuation
Producción agua fría continua
L
usg
3
0.8
3
0.8
3
0.8
3
0.8
3
0.8
3
0.8
3
0.8
3
0.8
Sistema di raffreddamento
Cooling system
Kühlsystem
Système de refroidissement
Sistema de enfriamiento
Banco di ghiaccio / Ice bank / Eisbank / Banc de glace / Banco de hielo
Compressore
Compressor
Verdichter
Compresseur
Compresor
HP 1/12
Assorbimento totale
Total rated input
Gesamtaufnahme
Absorption totale
Total absorción
Watt 190 260 1390 1460 155 210 1355 1410
Alimentazione
Supply
Stromzufuhr
Aliment.
Alimentación
Volt/
Hz 220 - 240 / 1 / 50 Hz
Peso netto
Net weight
Nettogewicht
Poids brut
Peso neto
kg
Ibs
14
31
18
40
15
33
22
48,5
14
31
18
40
15
33
21
46
ƔƔ Ɣ Ɣ
ƔƔ Ɣ Ɣ ƔƔ Ɣ Ɣ
ƔƔƔƔ
ƔƔ ƔƔ
Carica
Charge
Füllmenge
Charge
Carga
g
FREON R134A
100 100 100 100 100 100 100 100
Livello di pressione sonora ponderato A
A-weighted sound pressure level
A-Schalldruckpegel
Niveau de pression sonore pondéré A
Nivel de presión sonora ponderado A
dB < 70 < 70 < 70 < 70 < 70 < 70 < 70 < 70
4.1 CONDIZIONI AMBIENTALI
4.1 CONDITIONS OF THE SURROUNDINGS
4.1 RÄUMLICHE BEDINGUNGEN
4.1 CONDITIONS AMBIANTES
4.1 CONDICIONES AMBIENTALES

15
MANUALE PARTE II
5LVHUYDWRDGRSHUDWRULTXDOL¿FDWL
HANDBOOK SECTION II
5HVHUYHGWRTXDOL¿HGRSHUDWRUV
HANDBUCH – 2. TEIL
)UTXDOL¿]LHUWH%HWULHEHQ
MANUEL PARTIE II
5HVpUYpDX[SHUVRQQHOTXDOL¿p
MANUAL - PARTE II
5HVHUYDGRDWpFQLFRVFDOL¿FDGRV

16
5 INSTALLAZIONE
6HODSUHVVLRQHGLUHWHpLQIHULRUHDEDURLOÀXVVRpLQIHULRUHDOPLQ
occorre predisporre un dispositivo in grado di aumentare la pressione di
rete (es: pompa di rilancio o sistema equivalente).
N.B: la pressione é importante sopratutto per macchine con
dispositivo di gasatura.
Se la pressione di rete é superiore a 5 bar, predisponete un riduttore di
pressione in grado di abbassare il valore di quest’ultima nel campo 2÷5 bar.
Questo distributore puo’ essere dotato di un dispositivo antiallagamento
WATER BLOCK (optional) per prevenire eventuali perdite d’acqua acci-
GHQWDOL¿J6HLO:$7(5%/2&.LQWHUYLHQHSHUULDUPDUORqQHFHVVD-
rio smontare il raccordo Ke premere il pulsante P.
Se la macchina, invece di essere collegata direttamente all’acquedotto è
collegata ad una pompa autoclave, allora è necessario installare, a mon-
te del circuito idrico, un dispositivo ANTISHOCK per prevenire i “colpi di
DULHWH´¿J
IT
5.1 POSA DELL’APPARECCHIO
Ponete l’apparecchio nel punto di installazione, lontano da fonti di calore e
protetto dai raggi diretti del sole.
È sconsigliata inoltre l’installazione all’aperto e in ambienti molto umidi:
Nel posizionare la macchina sotto al lavello, occorre fare attenzione a la-
sciare completamente libera la griglia di areazione CQRQSRQHWHSHUWDQWR
DOFXQRJJHWWRFKHSRVVDRVWUXLUHROLPLWDUHODFLUFROD]LRQHGHOO¶DULD¿J
L’apparecchio deve essere posizionato in modo da lasciare uno spazio
OLEHURGLFLUFD·FPSHUO¶DUHD]LRQH¿J1HLPRGHOOLVRWWREDQFR
occorre predisporre delle apposite griglie/feritoie di areazione nel vano di
alloggiamento dell’apparecchio, in modo da favorire lo smaltimento del
FDORUHSURGRWWRGDOFLUFXLWRIULJRULIHUR¿J
Assicuratevi che poggi su tutti e quattro i piedini.
5.2 COLLEGAMENTO IDRICO ALLA RE TE
3ULPDGHOFROOHJDPHQWRLGULFRYHUL¿FDWHFKHODSUHVVLRQHGLUHWHVLDFRP-
presa fra 1 e 3 bar.
5LVHUYDWRDGRSHUDWRULTXDOL¿FDWL5HVHUYHGWRTXDOL¿HGRSHUDWRUV)UTXDOL¿]LHUWH%HWULHEHQ5HVpUYpDX[SHUVRQQHOTXDOL¿p5HVHUYDGRDWpFQLFRVFDOL¿FDGRV
In fase di collegamento della macchina alla rete idrica,
tutti i tubi, guarnizioni e giunzioni preesistenti, posti fra la
macchina e la presa dell'acqua di rete, deviono essere
sostituitida nuovomateriale perprevenire contaminazioni.
During connection of the appliance to the mains water
supply, all pre-exixting tubes, gaskets and joints
placed between the appliance and the water mains
connection must be replaced with new material to
avoid contamination.
%HLP$QVFKOXVV GHV *HUlWHVDQGDV :DVVHUYHUVRUJXQJVQHW]
müssen alle bestehenden Leitungen, Dichtungen und
9HUELQGXQJHQ]ZLVFKHQ GHP*HUlWXQG GHU :DVVHUHQWQDKPH
aus dem wasserversorgungsnetz mit neuen Meterialien
ausgewechselt werden, um eine Verunreinigung zu vermeiden.
Au cours du raccordement de la machine au réseau
hydrique, tous les tuyaux, joints et raccords préexistants,
situés entre la machine et la prise de l'eau de réseau,
doivent être remplacés par du matériel neuf pour prévenir
les contaminations.
En fase de conexión del ma máquina a la red hidrica, todos
los tubos, empalmes y juntas existentes ubicados entre la
máquina y la toma del agua de red deben ser sustituidos
con materiales nuevos para evitar contaminaciones.
6-7cm
6-7cm
5 5.1 6
8
7
P
K

17
5 INSTALLATION
,IWKHPDLQVSUHVVXUHLVEHORZEDURUWKHÀRZUDWHLVOHVVWKDQOPLQ
¿WDGHYLFHFDSDEOHRILQFUHDVLQJWKHPDLQVSUHVVXUHH[ERRVWHUSXPS
or equivalent system).
N.B.: the pressure is especially important for those water
FRROHUV¿WWHGZLWKDFDUERQDWLRQGHYLFH
If the mains water pressure exceeds 3 bars, predispose a pressure re-
ducer capable of reducing the latter to the 1÷3 range.
7KLVZDWHUGLVSHQVHUFDQEHHTXLSSHGZLWKD:$7(5%/2&.DQWLÀRRG-
LQJGHYLFHRSWLRQDOWRSUHYHQWDQ\DFFLGHQWDOZDWHUOHDNV¿J2QFH
WKH:$7(5%/2&.GHYLFHKDVLQWHUYHQHG¿WWLQJKshould be disassem-
bled and button Ppressed to reset the device.
If instead of being connected directly to the aqueduct the machine is
connected to an autoclave pump, then it is necessary to install above the
ZDWHUVXSSO\DQ$17,6+2&.GHYLFHWRSUHYHQW³ZDWHUKDPPHUV´¿J
EN
5.1 POSITIONING THE APPLIANCE
Position the appliance in the point of installation, away from sources of
eat and direct sunlight. We also advise against installing the appliance
outdoors and in very damp rooms.
Install the machine under the sink, keeping the vent Ccompletely clear.
Do not put anything in the way that could prevent or restrict the circula-
WLRQRIDLU¿J
The appliance should be positioned in such a way as to leave approximate-
ly 6 ÷ 7 cm of space free for air to circulate freely. Special ventilation grills/
slits must be prepared in the undercounter model’s housing compartment
WRIDYRXUGLVSRVDORIWKHKHDWSURGXFHGE\WKHUHIULJHUDWLQJFLUFXLW¿J
Make sure the water cooler is resting fully on all four supporting feet.
5.2 WATER CONNECTION TO THE MAINS
Before making the water connection, make sure the mains water pressure
is between 1 and 3 bars.
5 INSTALLATION
den Vorrichtung (z.B.: Wiederanlaufpumpe oder äquivalentes System)
zu erhöhen.
NB: Der korrekte Druck ist insbesondere für die mit einer
.RKOHQVlXUH$QUHLFKHUXQJVYRUULFKWXQJYHUVHKHQHQ*HUlWH
von erheblicher Bedeutung.
Bei einem Wasserdruck von mehr als 5 bar ist ein Druckreduzierer ein-
zusetzen, der in der Lage ist, den Druck auf einen Wert von 2-5 bar
herabzusetzen.
Dieser Wasserspender kann mit einer WATER BLOCK® - Überlauf-
schutz-Vorrichtung (optional) ausgestattet werden, sodass eventuelle
Wasserverluste vermieden werden (Abb.6). Nach einem eventuellen Ein-
satz bzw. Ansprechen dieser WATER BLOCK® -Vorrichtung muss diese
wieder neu eingestellt werden. Nehmen Sie hierzu denAnschluss Kab
und drücken Sie die Taste P.
Wenn das Gerät jedoch, statt direkt an die Wasserleitung angeschlossen
zu werden, an eine Druckkesselpumpe angeschlossen wird dann muss
oben an der Wasserleitung eine ANTISHOCK-Vorrichtung installiert wer-
den, um “Widderstösse” (Abb.7) zu vermeiden.
DE
5.1 INSTALLATIONSORT
Stellen Sie Ihr Gerät am gewünschten Installationsort auf. Achten Sie da-
UDXI GDVV VLFK NHLQH :lUPHTXHOOHQ LQ XQPLWWHOEDUHU 1lKH EH¿QGHQ XQG
dass das Gerät keiner direkten Einwirkung von Sonnenstrahlen ausgesetzt
wird. Stellen Sie Ihr Gerät nicht im Freien und auch nicht in besonders
feuchten Räumlichkeiten auf.
Beim Anbringen der Maschine unter dem Spülbecken ist darauf zu achten,
dass das Lüftungsgitter CY|OOLJIUHLOLHJWGDUXPGUIHQNHLQH*HJHQVWlQ-
de abgelegt werden, welche den Luftumlauf behindern könnten (Abb.5.1).
Rund um das Gerät sollte zur Belüftung ein Freiraum von ca. 6-7 cm
eingehalten werden (Abb 5-5.1). Bei Untervitrinenmodellen muss der
Gerätesitz mit entsprechenden Entlüftungsgittern/-schlitzen versehen
werden, um die Abgabe der vom Kühlkreislauf produzierten Wärme zu
erleichtern (Abb.8).
Achten Sie darauf, dass das Gewicht des Geräts auf alle vier Füße verteilt ist.
5.2 ANSCHLUSS AN DIE WASSERLEITUNG
Vergewissern Sie sich vor dem Anschluss an die Wasserleitung, dass der
Leitungsdruck zwischen 1 und 3 bar liegt.
Sollte der Leitungsdruck unterhalb von 2 bar liegen oder die Flussmenge
unterhalb von 2 l/min, so ist der Leitungsdruck mittels einer entsprechen-
5 INSTALLATION
6LODSUHVVLRQGHUpVHDXHVWLQIpULHXUHjEDURXTXHOHÀX[HVWLQIpULHXU
à 2 l/mn, il faut prévoir un dispositif pour augmenter la pression de réseau
(ex: pompe de relance ou système équivalent).
N.B.: le problème pression est très important surtout pour
OHVDSSDUHLOVDYHFGLVSRVLWLIGHJD]pL¿FDWLRQ
Si la pression de réseau est supérieure à 5 bar, installez un réducteur de
pression à même d’abaisser la valeur de cette dernière à l’intérieur d’une
plage comprise entre 2 et 5 bar.
Sur demande, ce distributeur peut être équipé d’un dispositif contre les
risques d’inondation WATER BLOCK (en option) pour prévenir toute fuite
G¶HDXDFFLGHQWHOOH¿J3RXUUpDPRUFHUOHGLVSRVLWLI:$7(5%/2&.DSUqV
toute intervention, il faut démonter le raccord Ket appuyer sur le bouton P.
Si, au lieu d’être raccordée directement à la distribution d’eau, la machine
est raccordée à une pompe autoclave, il faut, alors, installer en amont
du circuit hydrique un dispositif ANTICHOC pour prévenir les “coups de
EpOLHU´¿J
FR
5.1 POSE DE L’APPAREIL
Posez l’appareil à l’endroit désiré, loin de toute source de chaleur et à
l’abri des rayons directs du soleil. L’installation de l’appareil à l’extérieur et
dans des endroits très humides est déconseillée.
En positionnant l’appareil sous l’évier, il convient de faire attention à lais-
ser complètement libre la grille d’aération C1HSODFH]GRQFDXFXQREMHW
VXVFHSWLEOHG¶REVWUXHURXGHOLPLWHUODFLUFXODWLRQGHO¶DLU¿J
L’appareil doit être installé de manière à dégager un espace d’environ
·FPSRXUO¶DpUDWLRQ¿J3RXUOHVPRGqOHVVRXVLOIDXWSUpGLV-
poser des grilles/fentes d’aération adaptées dans la pièce où se trouve
O¶DSSDUHLOD¿QGHIDYRULVHUO¶pYDFXDWLRQGHODFKDOHXUSURGXLWHSDUOHFLU-
FXLWIULJRUL¿TXH¿J
Contrôlez qu’il repose bien sur ses quatre pieds.
5.2 BRANCHEMENT A LA CANALISATION D’EAU
$YDQWGHSURFpGHUDXEUDQFKHPHQWjODFDQDOLVDWLRQG¶HDXYpUL¿H]TXHOD
pression de réseau est bien comprise entre 1 et 3 bar.
5LVHUYDWRDGRSHUDWRULTXDOL¿FDWL5HVHUYHGWRTXDOL¿HGRSHUDWRUV)UTXDOL¿]LHUWH%HWULHEHQ5HVpUYpDX[SHUVRQQHOTXDOL¿p5HVHUYDGRDWpFQLFRVFDOL¿FDGRV
5 INSTALACIÓN
6LODSUHVLyQGHODUHGHVLQIHULRUDEDURHOÀXMRHVLQIHULRUDOPLQ
será necesario predisponer un dispositivo capaz de aumentar la presión
de la red (Ej.: bomba de lanzamiento o sistema equivalente).
NOTA: la presión es importante sobre todo para máquinas
FRQGLVSRVLWLYRGHJDVL¿FDFLyQ
Si la presión de la red es superior a 5 bar, coloque un reductor de presión
capaz de bajar el valor de esta última en la zona a 2 - 5 bar.
Este distribuidor se puede dotar de un dispositivo anti-encharcamiento
WATER BLOCK (extra) para prevenir posibles pérdidas accidentales de
DJXD¿J6LHO:$7(5%/2&.LQWHUYLHQHSDUDUHDFWLYDUORHVQHFHVD-
rio desmontar la unión Ky pulsar el botón P.
Si la máquina, en vez de ser conectada directamente al acueducto es
conectada a una bomba autoclave, entonces es necesario instalar, des-
pués del circuito hídrico, un dispositivo ANTISHOCK para prevenir los
³JROSHVGHDULHWH´¿J
ES
5.1 UBICACIÓN DEL APARATO
Sitúe el aparato en el punto de instalación, lejos de fuentes de calor y pro-
tegido de los rayos directos del sol. También se desaconseja la instalación
al aire libre y en ambientes muy húmedos.
Al posicionar la máquina bajo el lavaplatos, es necesario prestar aten-
ción a dejar completamente descubierta la rejilla de aireado C SRU OR
tanto no colocar ningún objeto que pueda obstruir o limitar la circulación
GHODLUH¿J
El aparato se debe ubicar de forma que quede un espacio libre de unos
FPSDUDODYHQWLODFLyQ¿J(QORVPRGHORVEDMREDQFRHV
necesario predisponer rejillas/ranuras de aireación en el vano de engar-
golado del aparato, para facilitar el drenaje del calor producido por el
FLUFXLWRUHIULJHUDGRU¿J
Asegúrese de que queda apoyado sobre los cuatro pies.
5.2 CONEXIÓN HÍDRICA A LA RED
$QWHVGHUHDOL]DUODFRQH[LyQKtGULFDYHUL¿TXHTXHODSUHVLyQGHODUHG
esté comprendida entre 1 y 3 bar.

18
Il collegamento alla rete idrica viene effettuato con l’ausilio del tubo
T
in
dotazione (diametro 8 mm) servendosi del raccordo
A
in dotazione.
In fase di collegamento della macchina alla rete idrica, tutti i tubi, guarnizioni
e giunzioni preesistenti, posti fra la macchina e la presa dell’acqua di rete,
devono essere sostituiti da nuovo materiale per prevenire contaminazioni.
5.3 RIEMPIMENTO DEL BANCO DI GHIACCIO
Durante questa operazione la macchina deve essere spenta con l’in-
terruttore S in posizione 0.
Spingete il tubo Tnell’attacco IN WATER esercitando la dovuta pressione.
Aprite il rubinetto Re fate entrare lentamente acqua nel banco di ghiaccio
¿QRDTXDQGRLOOLYHOORGHOO¶DFTXDQHOWXERYHUWLFDOHWUDVSDUHQWH)LJUDJ-
giunge la posizione indicata dalla targhetta “Fill”.
Chiudete il rubinetto R.
Staccare il tubo Tpremendo con una chiave da 8 sull’anello di bloccaggio
e contemporaneamente tirando il tubo (Fig. 10) Inserite immediatamente il
tappo rosso Jsull’attacco FILL ICE BANK esercitando la dovuta pressione.
IT
5.3.1 Collegamento idraulico
Modelli soprabanco: Assemblate gli elementi A, T, E, F, G (Fig.11).
Modelli sottobanco: Spingete il tubo Tnell’attacco 11 esercitando la do-
vuta pressione (Fig. 9.1).
5.3.2 Svuotamento del banco di ghiaccio
(per manutenzione)
Scollegate il cavo di alimentazione dalla presa di corrente.
3HUVYXRWDUHLOEDQFRGLJKLDFFLRGRSRFKHORVWHVVRVLqVFLROWRqVXI¿-
ciente estrarre dalla sede il tubo verticale di livello e scarico vasca Pe far
GHÀXLUHO¶DFTXD)LJ'RSRDYHUVYXRWDWR LOEDQFRGLJKLDFFLRFLUFD
litri) riposizionare il tubo nella sua sede verticale.
(IT) Modelli sottobanco
(EN) Undercounter models
(DE) Unterbaummodelle
(FR) Modeles sous plan
(ES) Modelos debajo de mesón
5LVHUYDWRDGRSHUDWRULTXDOL¿FDWL5HVHUYHGWRTXDOL¿HGRSHUDWRUV)UTXDOL¿]LHUWH%HWULHEHQ5HVpUYpDX[SHUVRQQHOTXDOL¿p5HVHUYDGRDWpFQLFRVFDOL¿FDGRV
MAX
MIN
FILL ICE BANK
FILL
IN WATER
MAX
MIN
FILL ICE BANK
FILL
IN WATER
9
10
IN WATER
11
FILL ICE BANK
IN WATER
9.1
12
A
A
R
T
T
R
E
R
J
J
T
S
A
R
T
P
F

19
5LVHUYDWRDGRSHUDWRULTXDOL¿FDWL5HVHUYHGWRTXDOL¿HGRSHUDWRUV)UTXDOL¿]LHUWH%HWULHEHQ5HVpUYpDX[SHUVRQQHOTXDOL¿p5HVHUYDGRDWpFQLFRVFDOL¿FDGRV
Connection to the water mains is done using the Ttube provided (8 mm
diameter) and the A ¿WWLQJ SURYLGHG 'XULQJ FRQQHFWLRQ RI WKH DSSOLDQFH
to the mains water supply, all pre-existing tubes, gaskets and joints placed
between the appliance and the water mains connection must be replaced
with new material to avoid contamination.
5.3 ICE CONTAINER FILLING
Turn off the S switch (to ‘0’) on the machine beforehand.
Push tube Tin the connection IN WATER with the necessary pressure.
Open tap Rand allow water to enter ice bank slowly until the water level in
the vertical transparent (Fig. 9) pipe (P) reaches the position shown by plate
“Fill”. Close tap R. Take off the tube Tpushing with a 8key on the locking
ring and simultaneously pulling the tube (Fig. 10). Insert immediately the
red cap Jon the connection FILL ICE BANK with the right pressure.
EN
5.3.1 Water connection
Countertop models: Join elements A, T, E, F, G (Fig.11).
Undercounter models: Push pipe Tonto coupling 11 exerting the correct
amount of pressure (Fig. 9.1).
5.3.2 Ice container emptying (for maintenance)
Disconnect the power supply cable from the outlet. To empty the ice tank af-
ter the ice melted, you just have to take the vertical level and tank discharge
tube PRIILWVVLWHDQGOHWWKHZDWHUÀRZ¿J$IWHUWKHLFHFRQWDLQHUKDV
been emptied (almost 3 litres), replace the tube in its place.
Die Verbindung zum Wassernetz erfolgt mit Hilfe des mitgelieferten Rohres
T(Durchmesser 8 mm), wobei man sich des mitgelieferten Anschlusses A
bedient.Beim Anschluss des Gerätes an das Wasserversorgungsnetz müs-
sen alle bestehenden Leitungen, Dichtungen und Verbindungen zwischen
dem Gerät und der Wasserentnahme aus dem Wasserversorgungsnetz mit
neuen Materialien ausgewechselt werden, um eine Verunreinigung zu ver-
meiden.
5.3 AUFFÜLLUNG DER EISTHEKE
:lKUHQGGLHVHV(LQJULIIVPXVVGLH0DVFKLQHDEJHVFKDOWHWVHLQXQG
GHU6FKDOWHU6VLFKLQGHU3RVLWLRQEH¿QGHQ
Das Rohr Tmit dem nötigen Druck in das Verbindungsstück IN WATER
schieben. Den Hahn R|IIQHQXQGODQJVDP:DVVHULQGLH(LVYLWULQHHLQÀLH-
ßen lassen, bis das Wasser im senkrechten, durchsichtigen Rohr (Abb. 9)
den vom Schild “Fill” angezeigten Punkt erreicht hat.
Den Wasserhahn Rschließen.
Das Rohr Tentfernen indem man mit einem 8er Schlüssel auf den Blockie-
DE
rungsring drückt und gleichzeitig das Rohr zieht (Abb.10).
Sofort den roten Stöpsel Jin das Verbindungsstück FILL ICE BANK mit
dem nötigen Druck einfügen.
5.3.1 Hydraulischer Anschluss
Vitrinenaufsatzmodelle: die Bauelemente A, T, E, F, G zusammensetzen
(Abb.11)
Unterbaummodelle: Führen Sie das Roh Tin den Anschluss 11 ein (fest
eindrücken) (Abb. 9.1).
5.3.2 Entleerung der Eistheke (für Wartung)
Unterbrechen Sie die Stromverbindung durch Entnahme des Steckers aus
der Steckdose. Nach Abtauen des Eises ist es ausreichend, den senkrecht
verlaufenden Schlauch zur Wasserstandangabe aus der Halterung und den
Wannenablaufstöpsel Pzu entfernen und das Wasser ablaufen zu lassen
(Abb.12). Nach der Entleerung der Eistheke (ca. 3 Liter) das Rohr wieder in
seine senkrechte Position bringen.
La connexion au réseau hydrique est effectuée à l’aide du tuyau Tfourni
(diamètre de 8 mm) à l’aide du raccord Afourni.
Au cours du raccordement de la machine au réseau hydrique, tous les
tuyaux, joints et raccords préexistants, situés entre la machine et la prise
de l’eau de réseau, doivent être remplacés par du matériel neuf pour pré-
venir les contaminations.
5.3 REMPLISSAGE DU BAC À GLA ÇONS
Pendant cette opération l’appareil doit être éteint avec l’interrupteur
S en position 0.
Poussez le tuyau Tdans l’embout IN WATER en exerçant la pression vou-
lue. Ouvrir le robinet Ret laisser couler lentement de l’eau dans le banc de
glace jusqu’au moment où le niveau de l’eau dans le tuyau vertical trans-
parent (Fig. 9) atteint la position indiquée sur la plaquette “Fill”. Fermez le
robinet R.
Débranchez le tuyau Ten appuyant, avec une clef de 8, sur l’anneau de
blocage et en tirant le tuyau (Fig. 10) au même temps.
FR
Insérez tout de suite le bouchon rouge Jdans l’embout FILL ICE BANK en
exerçant la pression voulue.
5.3.1 Branchement à la canalisation d ’eau
Modèles a poser: Assembler les éléments A, T, E, F, G (Fig.11).
Modeles sous plan: Poussez le tuyau Tdans l’embout 11 en exerçant la
pression voulue (Fig. 9.1).
5.3.2 Vidange du bac à gla çons (pour maintenance)
'pEUDQFKH]OHFkEOHGHO¶DOLPHQWDWLRQGHODSULVHGHFRXUDQW3RXUYLGHUOH
EDFGH JODFHXQHIRLV TX¶LO HVWIRQGXLO VXI¿WG¶H[WUDLUHGH VRQORJHPHQW
le tuyau verticale de niveau et déchargement du bac Pet de faire écouler
l’eau (Fig.12). Après avoir vidé le bac à glaçons (3 litres environ) reposition-
nez le tuyau dans son logement vertical.
La conexión a la red hídrica se lleva a cabo con la ayuda del tubo Tsumi-
nistrado (diámetro 8 mm) utilizando el empalme Asuministrado.
En fase de conexión de la máquina a la red hídrica, todos los tubos, em-
palmes y juntas existentes ubicados entre la máquina y la toma del agua
de red deben ser sustituidos con materiales nuevos para evitar contami-
naciones.
5.3 RELLENAMIENTO DEL BANCO DE HIELO
Durante esta operación la máquina debe estar apagada con el inte-
rruptor S en posición 0.
Empujar el tubo Ten el ataque IN WATER haciendo la justa presión.
Abrir el grifo Ry dejar entrar lentamente el agua al banco de hielo hasta
que el nivel del agua en el tubo vertical transparente (Fig. 9) alcance la
posición indicada en la placa “Fill”.
Cerrar el grifo R.
Destacar el tubo T haciendo presión con una llave de 8 sobre el anillo de
bloqueo y contemporaneamente tirando el tubo (Fig.10).
ES
Insertar en seguida el tapón rojo Jen el ataque FILL ICE BANK haciendo
la justa presión.
5.3.1 Conexión hídrica
Modelos bajo banco: ensamblar las piezas A, T, E, F, G (Fig.11).
Modelos debajo de mesón: Empuje el tubo T en la junta 11 ejerciendo la
presión adecuada (Fig. 9.1).
5.3.2 Vaciado del banco de hielo (para mantenimiento)
Desconectar el cable de alimentación de la toma de corriente. Para vaciar
el mostrador de hielo, después que se ha disuelto, hay que extraer de su
sitio el tubo vertical de nivel y de descargo cubeta P\KDFHUÀXLUHODJXD
(Fig. 12). Después de haber vaciado el banco de hielo (casi 3 litros) reposi-
cionar el tubo en su sitio vertical.

20
5LVHUYDWRDGRSHUDWRULTXDOL¿FDWL5HVHUYHGWRTXDOL¿HGRSHUDWRUV)UTXDOL¿]LHUWH%HWULHEHQ5HVpUYpDX[SHUVRQQHOTXDOL¿p5HVHUYDGRDWpFQLFRVFDOL¿FDGRV
6 AVVIAMENTO
Attenzione! Se l’apparecchio é stato coricato o capovolto,
attendete almeno 8 ore prima di avviarlo.
6.1 COLLEGAMENTO ELETTRICO
Il collegamento alla rete elettrica avviene collegando la spina ad una presa
GLUHWH /D SUHVDGLFRUUHQWHSUHGLVSRVWD GHYH HVVHUHPXQLWDGLHI¿FHQWH
presa di terra e deve essere dimensionata al carico dell’apparecchio (vedi
FDUDWWHULVWLFKHWHFQLFKH9HUL¿FDWHFKHODWHQVLRQHGLUHWHFRUULVSRQGDFRQ
TXDQWRVSHFL¿FDWRQHOODWDUJDGDWL$VVLFXUDWHYLFKHDPRQWHGHOODSUHVDYL
sia un interruttore omnipolare con distanza minima dei contatti di 3 mm pro-
tetto da fusibili di amperaggio adeguato all’assorbimento dell’apparecchio
stesso (vedi caratteristiche tecniche e dati di targa).
$SULWHLOUXELQHWWRGHOO¶DFTXDHYHUL¿FDWHFKHQRQYLVLDQRSHUGLWH
Accendete l’interruttore generale 4.
Agite sul rubinetto posizione ¿QRDGHOLPLQDUHLUHVLGXLGLDULDGDO
circuito dell’acqua gassata (Modelli WG).
Ripetete la stessa operazione agendo sul rubinetto in Posizione .
IT
Regolate il termostato acqua fredda 5in relazione all’utilizzo e alla sta-
gione (posizioni consigliate da 4 a 7).
Collegate la macchina ad una rete di alimentazione elettrica protetta da
un interruttore differenziale con una sensibilità non superiore a 30 mA.
6.2 COLLEGAMENTO BOMBOLA GAS CO2
In questo modello di refrigeratore, la bombola CO2può essere collegata solo
all’esterno della macchina permettendo di usare anche bombole ricaricabili,
ATTENZIONE: non fate passare il tubo di collegamento della bombola
GDYDQWLDOSXQWRGLVPDOWLPHQWRGHOFDORUH¿J
Prelevate dal kit di installazione il tubo da ø6 mm e collegatelo al riduttore
di pressione RGHOODERPEROD¿J
Collegate l’altra estremità del tubo alla presa IN CO2posta sulla parte su-
SHULRUHGHOO¶DSSDUHFFKLRSUHVWDWHFXUDQHOO¶LQVHULUHFRUUHWWDPHQWHLOWXER
La bombola è dotata di una valvola di tenuta che si aprirà in fase di montag-
gio del riduttore e si richiuderà automaticamente in fase di scollegamento.
La vite di regolazione Rdel riduttore è già tarata nella posizione ottimale
di gasatura (circa 3,5 bar). E’ possibile comunque aumentare la quantità di
gas ruotando la vite in senso orario e viceversa. L’autonomia della bombola
monouso di gas CO2da 600 g. è per circa 120 litri di acqua.
Attenzione! Prima di utilizzare la macchina
SURFHGHUH DOOD VDQL¿FD]LRQH YHGL SDUDJUDIR
relativo).
Warning! Before using the machine proceed
with the sanitation (see relative paragraph).
Achtung! Vor der Verwendung der Maschine
ist eine Steilisierung auszuführen (siehe
entsprechenden Abschnitt).
Attention! Avant d'utiliser la machine
procéder à la désinfection de cette dernière
(voir le paragraphe relatif).
¡Atención! Antes de utilizar la máquina,
proceda a la sanitización (ver párrafo
correspondiente).
6 STARTINGEN
Warning! If the appliance has been laid down or turned upside
down, you should wait at least 8 hours before starting it.
6.1 ELECTRICITY CONNECTION
Connection to the mains electricity supply is carried out by connecting the
plug to a mains socket. The supply socket must be equipped with an ef-
¿FLHQWHDUWKSODWHDQGLWPXVWEHVL]HGIRUWKHORDG RIWKH DSSOLDQFHVHH
technical characteristics).
0DNH VXUH WKDW WKH PDLQV YROWDJH FRUUHVSRQGV ZLWK ZKDW LV VSHFL¿HG RQ WKH
data plate. Make sure that there is an omnipolar switch above the socket with a
minimum contact break of 3 mm protected by fuses of suitable amperage for the
absorption of the appliance itself (see technical characteristics and data plate).
Turn on the water tap and make sure there are no leaks.
Turn on the main ON/OFF switch 4.
Turn the tap to the position marked to eliminate all remaining air in
the soda water circuit (WG models).
13 14
IN CO2
1615
R
5
4
This manual suits for next models
7
Table of contents
Popular Water Dispenser manuals by other brands

Halsey Taylor
Halsey Taylor HydroBoost HTHB-HAC Installation and use manual

North Star
North Star PA101 manual

Erie water treatment
Erie water treatment IQsoft Technical manual

Hague Quality Water
Hague Quality Water Maximizer 400 Installation and service manual

Honeywell
Honeywell KaltecSoft KS30E Series installation instructions

Yarna
Yarna CWD48 user manual

Elkay
Elkay EZO4-1C, EZO8-1C, EZO8-2CJO, EZO8-3CJO Installation, care & use manual

Canature
Canature CAN165HIM-100 Operation manual

Philips
Philips ADD4963 user manual

Halsey Taylor
Halsey Taylor SW8 Series owner's manual

YZAKI
YZAKI 5.7M3/H AVEC TIMER owner's manual

Everpure
Everpure QC71 Installation and operation guide