HACENOR POC-03 B User manual

Facial and Body Oxygen System
Operation Manual

Warning/caution notices in this manual apply to hazards or unsafe practices which could
result in personal injury or property damage.
Notice: change the information contained in this document us subject without notice.
Special notes:
Do not operate this equipment without first reading and understanding this manual. If
you are unable to understand this warnings. Cautions, and instructions, contact
HACENOR technical service before attempting to use this equipment-otherwise serious
injury or property damage may result.
WARNING
Users must not smoke while using this device.Keep all matches,lighted cigarettes and
other souces of ignition out of the room in which this product is located.
DANGER
NO SMOKING signs should be prominently displayed.
Textiles and other materials that normally would not burn are easily ignited and burn with
greater intensity in oxygen enrich air. Failure to observe this warning can result in severe
fire, property damage and cause physical injure or death.
PLEASE KEEP THIS INSTRUCTIONS

HACENOR OXYGEN BEAUTY SYSTEM................................................... 1
How It generates oxygen......................................................................... 1
Convenience.......................................................................................... 2
Low Maintenance.................................................................................... 2
Safety features....................................................................................... 2
Know Your Item....................................................................................... 2
How to Operate Your POC-03B Oxygen Facial Machine.............................. 3
Point to remember:.................................................................................. 4
ATTACHMENTS...................................................................................... 5
HACENOR oxygen beauty system serum applicator....................................6
Holding Your Applicator............................................................................ 7
Using The Serum Applicator..................................................................... 8
Cleaning your applicator...........................................................................9
Point to remember...................................................................................10
Using for other treatment.........................................................................10
System maintenance...............................................................................12
Inlet filter maintenance............................................................................12
Air Intake Attachment..............................................................................12
Touble shooting ....................................................................... ............13
System Not Turning On............................................................................13
Loss Of Oxygen Pressure........................................................................13
page
Item

Risk of electric shock. DO NOT disassemble. Refer servicing to qualified service
personnel.
The HACENOR oxygen beauty system provides a rich concentration of oxygen for direct
application to the skin as an essential component in non-medical skin care treatment.
The HACENOR oxygen beauty system takes oxygen from the surrounding air (which
comprised up to 21% oxygen) using a specialized molecular-sieve filtration system.
The system provides a continuous stream of oxygen that is readily available, constantly
renewable, and always reliable.
CAUTION
1.Delivers a continuous stream of oxyen
2.Cost effective to run
3.Efficient way to deliver oxygen
4.World wide support
5.24 months warranty
6.Low maintenance
HACENOR OXYGEN BEAUTY SYSTEM
How It generates oxygen
1

Convenience
The HACENOR oxygen beauty system eliminates the need for pressurized combustible
oxygen tanks,regulator, as well as the inconcenience and costs of refilling.On a more
serious note oxygen tanks also pose as a fire& safety hazard with strict storage and
handling requirements.
These highly reliable systems require little maintenance and are easy to service. More
importantly, they consistently provide high concentrations of oxygen.
The system features a transformer that reduces shutdowns caused by electrical spikes,
EMI, and RFI. Because the system conditions the powers so source. It operated reliably
in locations with adverse electrical conditions. As well, the sieve-GARD monitors sieve
bed performance and shuts down the compressor to maintain sieve integrity in the event
of a fault.
Low Maintenance
Safety features
Picture 1:
1.LED Monitor and button
2.oxygen outlet
3.Flow Meter
4.handle
5.Oxygen outlet pipe
6.Humidifier (Aroma bottle)
Know Your Item
Picture 1
1
2
3
4
5
6
2

Picture 2:
1.O2 On/Off Button
2.Power indicator
3.Working status indicator
4.Timer indicator
5.Hig temperture alarm
6.Camulative indicator
7.Time -
8.Time + picture 2
1.Familiarize yourself with this unit.
2.Place unit on a stable flat surface which is clean and free of dust.
3.Plug power cord into electrical outlet.
4.Connecting all the pipes and the humidifier at the right way (see picture 1 )
5.Adjust the flow rate at the right level as you need, please inquire your doctor.
(see picture 2)
picture1 picture2
NOTE: Before attempting to start a cold unit, let the unit reach room
temperature in a heated area.
How to Operate Your POC-03B Oxygen Facial Machine
3

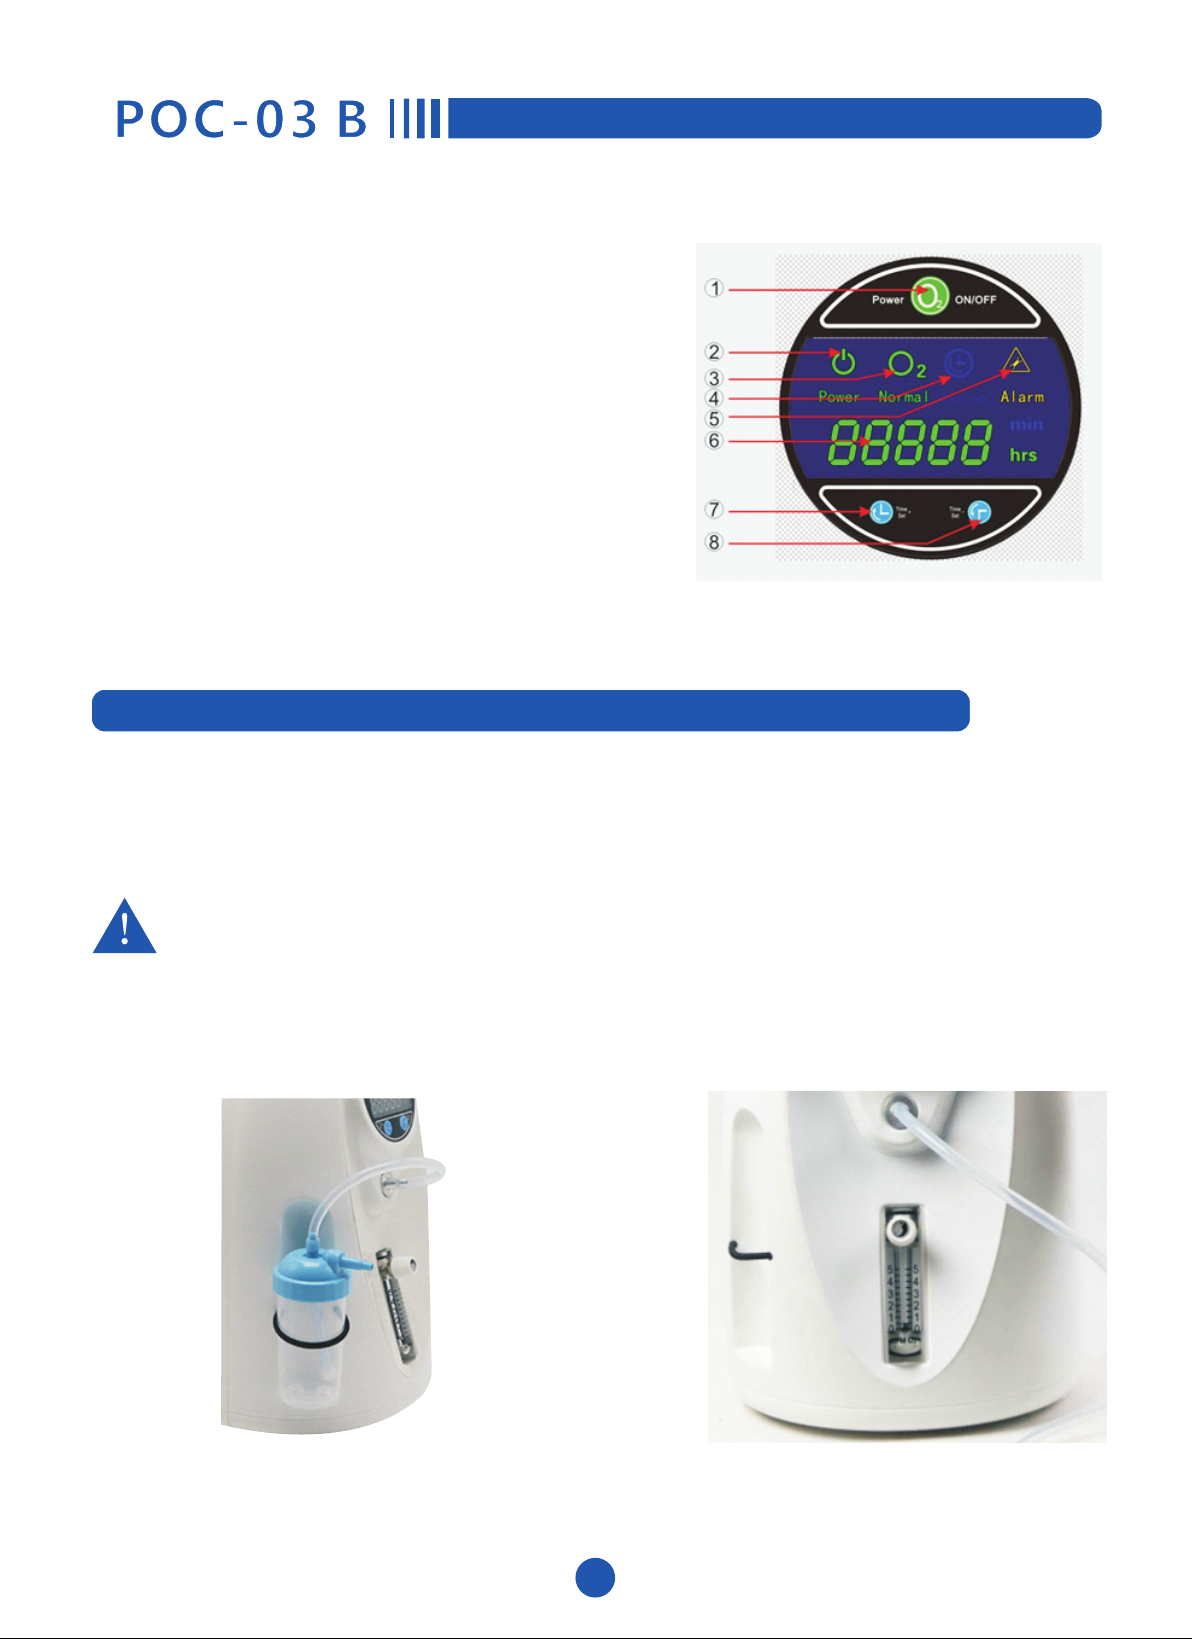
6.Press the O2 On/Off button start the unit, then the power supply indicator turn on and
you can hear an alarm sound, after 10s, the machine can work properly.
7.Set the running time by pressing the Time set +or- Button as following.
A. Press the Button Time set + first time that can increase running times .
B. Press the Button Time set - first time that can decrease running times .
You can set the timer at 30 minutes, 1,2,4,6,8 hours.
8.The machine have self temperture protection function, if the temperture over 55℃,
Unit will stop automatically.
9.The Unit will not be used in a period of time,remove the power cord from electrical
outlet.
10.Please wait at least 10 minutes after your first usage to start the machine again.
1.Warm up
The system requires appromixiately five(5) minutes to achieve the correct oxygen level.
2.Leaving room for air intake
The system draws in ambient air through the filters on the back, Ensure you leave
adequate space around the filter of the system so that air can be freely drawn in.
We recommend you do not place the sides of the systems against a wall, or any object
that will block airflow from entering.
3.Storage:
The mobility compact size of the system allow you to store it under a table, in a closet,
etc., when it is not in use.
Point to remember:
4

1.Oxygen outlet
Using your hose attach one end of the
oxygen outlet. This should be quite a
snug fit and pushed on as far as
possible.
Once the hose has been attached we
recommend leaving it on unless you
are providing a non-medical aroma
therapy session.
2.Tail piece
Attach the hose to the tail piece. This
will also be a snug fit and it is
recommended once attached to leave
it on at all times.
To remove the hose from the applicator
unscrew the tail piece.
ATTACHMENTS
5

3.Unscrew here
Features included:
1.Single finger control
2.Control of oxygen/serum mix
3.Lightweight
4.Internal stainless steel parts
5.Easy to clean
6.Durable construction
HACENOR oxygen beauty system serum applicator
6

1.Connected to the oxygen supply is the HACENOR serum applicator-when attached
provides a pressurized flow of oxygen. This allows the operator to dispense the serum
and oxygen rich concentrate over the entire face, providing maximum oxygen exposure.
2.Attach the serum infuser to the hose. This is done by screwing the bulb of the tail piece
onto the base of the applicator. Tighten it until you can no longer hear or feel any
oxygen coming out.
3.You will notice on the flow meter that the ball drops to zero and the oxygen you are now
about to use is under pressure.
To hold the serum applicator effectively
and ergonomically please uses the
following steps:
+ Firstly hold your hand flat with your
thumb facing upwards.
+Place the serum applicator with the
noozle sitting on your middle finger and
the eng of the serum applicator cradled
in the groove of your thumb.
Holding Your Applicator
Keeping your hand relaxed:
+ Fold your little, ring and middle finger
around the base of the serum applicator.
+Rest your index finger on the side or
base of the applicator pot.
7

+Leaving your thumb to rest on the
trigger enabling you to control
oxygen/serum flow
Using the trigger on your serum applicator
Your serum applicator has 2 ways simple actions you need to remember:
1.Using your thum press down on the trigger, this releases the oxygen flow.
2.Keeping the trigger pressed down draw the trigger back,this will release the serum
from the pot.
Using The Serum Applicator
Please note: You can regulate the amount of serum being spayed by
how far you pull the trigger.
Distance when spraying:
1.When spray large areas such as cheek or the forehead you must be 5-6cm away from
the surface of the skin.
2.When spraying smaller areas such as they eyes,nose or upper lip you must be 1cm
away from the surface of the skin.
After spraying
1.Once you have completed spraying the area keeping the trigger down, slide your
thumb forward to the oxygen flow position.
2.Genty guide the tip of the applicator to the surface of the skin where you have sprayed
ready for application.
Keeping your hand relaxed while
executing application reduces strain
on your hand and wrist.
8

It is essential you clean the serum
applicator after every session.
Please follow the instructions below to
best clean your serum applicator.
1.Using either the tap or a bowl of
warm to hot water rinse pot and lid
thoroughly.
2.Make sure you have rubbed the
inside of the pot and thoroughly
removed all traces of the serum.
3.Fill the pot with water, hold your finger over the tip of the applicator, press down and
pull back on the trigger. This will creat back flow causing the water in the port to bubble.
4.Let the liquid bubble for a few seconds then release your finger from the lip of applicator.
Keeping the trigger pressed down and pulled back spray water through.
5.Repeat this process 3-4 times.
6.Dry the pot and lid and make sure you have sprayed all water out.
7.On the final rinse use a sterilizing solution in place of water.
8.Using a square alcohol swab scrunch a corner to creat a point.
9.Insert the swab into the end of the applicator tip and wipe the inside.
Cleaning your applicator
9

1.Never insert a cotton bud or anything stiff into the tip of the applicator as this will bend
the fine needle slightly protruding and prevent the applicator from spraying effectively.
2.Use a sterilizing solution to complete the cleaning process , especially if you have
treated on open wound or infected pustule. You may remove the end tip of the
applicator and sterilize the tip in an autoclave if available.
Point to remember
1.Oxygen Infusion: Oxygen Infusion is
a technique exploits pressurised
oxygen injected at a pureness of
between 93% through atmospheric
pressure that is twice its normal
intensity. This technique has proved
effective in the treatment of various
skin problems.
The pressure produced means oxygen
molecules can be injected into the
dermoepidermal joints, without d
amaging skin.
Using for other treatment
10

Oxygen inhalation:
This function enables the operator to
administer a mixture of 93% pure
oxygen enriched-air through inhalation
if the specific case requires it.
The patient inhales the 93% pure
oxygen-enriched mixture through a
mask.
Aroma treatments:
put aroma into the bottle, enjoy
breathing and release.
11

The HACENOR system requires only limited maintenance. Once a week please
remove the black filters located of the left and right side of the system and wash the filter
with soap and warm water.
System maintenance
Please note: DO NOT RE-INSERT THE FILTERS IF THEY ARE WET.
These are preliminary filters that remove dust, dirt and other airborne particles that my
get sucked into the sytem.
The inlet filter need to be changed annually and it is recommended that this be done by
an HACENOR technician or sales representative.
The compartment where the filter is located is on the left-hand side of the system.
This compartment also stores the attachment for oxygen aroma therapy.
Inlet filter maintenance
After many years of testing it has been decide that the bacteria filter does not require a
regular changed. This update has been made to reduce the maintenance cost to the user.
This bacteria filter is now located internally.
Air Intake Attachment
12

The HACENOR system is extremely reliable and it is a rarity for the system to malfunction
or breakdown. If however you find your system will not turn on or there is no oxygen
pressure-do not worry. Listed below are some simple tips to ensure your system operates
as it should and to help rectify any of the above problems you may be experiencing.
Touble shooting
It is a common for the power cord to become loose if the system gets moved around
constantly, if your system will not turn on please check that power cord is pushed firmly
into the connection.
System Not Turning On
If when you switch the system on no oxygen is being emitted from the outlet please check
the following:
1.Pull the hosing off the oxygen outlet and unravel it to ensure there are kinks or holes.
Place your finger over the oxygen outlet to feel if the oxygen is being emitted. If oxygen
is present you then know it is either a setting problem or the hosing.
2.Check that the flow meter ball is sitting on 5.
3.If after checking these tow points the problem isn’t rectified please contact your
HACENOR representative.
Loss Of Oxygen Pressure
13

HINOR MEDICAL INDUSTRY COMPANY LIMITED
ADD:NO. 190 ZHUZHOU ROAD QINGDAO CHINA
TEL:86-532-68878035
EMAIL: sales@hinormedical.com
Whatsapp: +86-18661601055
Web: www.hinormedical.com
Table of contents
Popular Personal Care Product manuals by other brands

Pretika
Pretika SonicPulse ST257 user manual

BEAUTY LOON
BEAUTY LOON 307633 user manual

medi
medi circaid juxtafit premium Series Instructions for use

Artforma
Artforma LED Hexagon Mirror Instruction & installation manual

Beurer
Beurer 60505 Instructions for use

SPORT ELEC
SPORT ELEC FARMASTIM instruction manual