HAEGER DE-016.008A User manual

Dehumidifier
Desumidificador
Deshumidificador
Déshumidificateur
User instructions
Instruções de uso
Instrucciones de uso
Mode d’emploi
Dehumidifier 16
DE-016.008A
RoHS


GB
Instructions for use 1
Dear customer
Thank you for having chosen a HÆGER product.
The HÆGER products have been produced to think about the welfare of the
consumer privileging the most raised standards of quality, functionality and
assign. We are sure you will be happy with this appliance.
Before using the appliance for the first time please read carefully and
thoroughly through these operating instructions and the safety advice,
completely familiarising yourself with the appliance. Keep these instructions for
future reference and pass them on to whoever might acquire the appliance at
a future date.
Intended use
The appliance is designed and produced for domestic use only. Use this
appliance only as described in this instruction manual. As with all electrical
equipment, whilst the instructions aim to cover as many eventualities as possible.
Caution and common sense should be applied when operating and installing
this appliance.
For safety reasons, alterations or modifications of the device are prohibited.
General Safety Instructions
To reduce the risk of fire, electrical shock, or injury when using your appliance,
follows these basic precautions:
WARNING:
Do not touch the plug at the mains cable with wet
or moist hands when connecting or disconnecting.
Risk of death by electric shock!
In case of emergency, unplug the device immediately.
Hold the plug when disconnecting the mains cable; do not pull the cable.
Disconnect the plug before cleaning or servicing.
Regularly check the device and cable for signs of damage. Do not continue
to operate the device in case of damage.
A damaged mains cable must be replaced by the manufacturer or a
technician and without any delay. Do not use the device with a damaged
cable or plug.

English
2 Instructions for use
Do not repair the device by yourself. Please contact authorized personnel. In
order to avoid hazards a damaged mains cable must be replaced with an
equivalent cable by the manufacturer or qualified specialist.
Except for cleaning and maintenance work described in this manual, no
other alterations of this device must be executed.
Do not operate the device with an external timer or separate remote control
system.
CUATION!
In order to ensure your children’s safety, please keep all
packaging (plastic bags, boxes, polystyrene etc.) out of
their reach.
Do not allow small children to play with the foil as there is
a danger of suffocation!
This appliance can be used by children aged from 8 years and
above and persons with reduced physical, sensory or mental
capabilities or lack of experience and knowledge if they have been
given supervision or instruction concerning use of the appliance in a
safe way and understand the hazards involved.
Cleaning and user maintenance shall not be made by children unless they
are older 8 years and supervised.
Keep the appliance and its cord out of reach of children less than 8 years.
The packaging must be undamaged. Check the device for any possible
transport damage. Do not install a damaged device. In case of damage,
please contact your distributor.
Do not install the appliance in rooms containing gas, oil or sulphur. Do not
install near sources of heat.
Do not use the appliance on sloping surfaces.
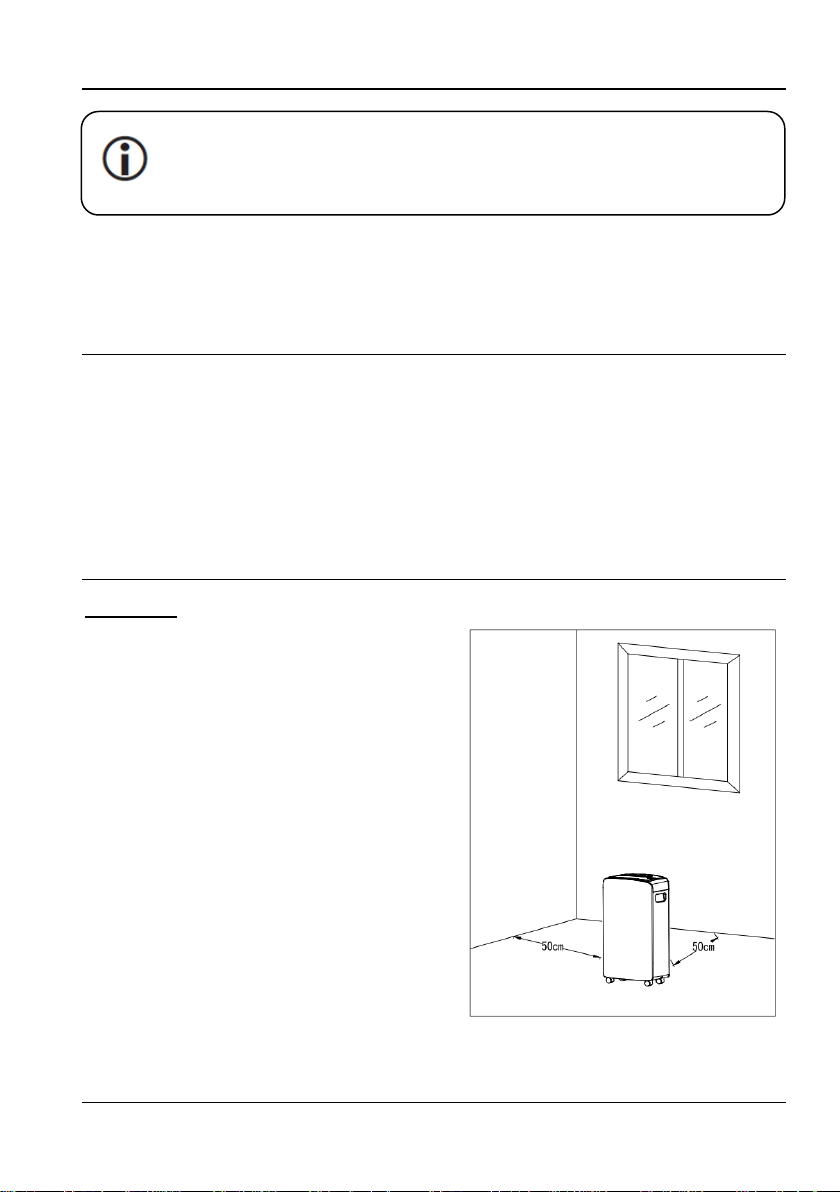
Keep the appliance at least 50 cm away from flammable substances
(alcohol etc) or pressurised containers (e.g. aerosol cans).
Do not rest heavy or hot objects on top of the appliance.
Always transport the appliance upright or resting on one side. Remember to
drain the condensate tank before moving the appliance. Wait at least 1
hour after transporting the appliance before starting it.
R134a refrigerant complies with European environmental standards. However,
you should avoid perforating the refrigerant circuit. At the end of its working
life, consign the appliance to a specialist collection centre.

English
Instructions for use 3
Environmental Information
This unit contains fluorinated greenhouse gases covered by the
Kyoto Protocol. Maintenance and disposal must be carried out by
qualified personnel only (R134a, GWP=1430).
The materials used for packaging can be recycled. You are therefore
recommended to dispose of them in special differentiated waste collection
containers.
Product description
1. Front panel
2. Louver
3. Control panel
4. Left side panel
5. Castor
6. Right side panel
7. Filter frame
8. Continuous drainage
9. Water tank
10. Power cord
11. Back panel
Installation
Location
Position the appliance in the room to
be dehumidified. A free space of at
least 50 cm must be left at the front
of the dehumidifier, so as not to block
the air outlet.
For efficient ventilation a space of
about 50 cm should be left at the
back of the appliance.

English
4 Instructions for use
Electrical connection
Warning: Improper use of the grounded plug can result in the risk of
electrical shock. If the power cord is damaged, have it replaced by
an authorized service.
After moving the appliance, wait at least an hour before turning it on again.
Before plugging the appliance into the mains socket, check that:
–The mains power supply corresponds to the working voltage indicated
on the rating plate.
–The power socket and electrical circuit are adequate for the appliance.
–The power socket matches the plug. If this is not the case, have the
plug replaced by a qualified electrician.
–The mains socket is adequately earthed.
The plug, together with the grounding conductor, must fit into the wall
socket.
The mains plug must be freely accessible.
Do not cut or remove the ground wire from the power cord supplied under
any circumstances.
Use of extension cords is not recommended.
Operating Instructions
IMPORTANT: Before connecting the appliance to the power source, let
it stand upright for approximately 1 hour. This will reduce the possibility
of a malfunction in the cooling system from handling during
transportation.
IMPORTANT: In case you disconnect the device or in case of power
failure, wait for 3 minutes before restarting the device.
Before switching on your appliance, make sure that:
-the appliance is positioned in accordance with these instructions,
-the air inlet and outlet grills are completely unobstructed,
-the appliance is placed on a flat and stable surface,

English
Instructions for use 5
Control Panel
Notes:
- Water tank must be correctly installed for the dehumidifier to operate.
- Do not remove the tank while unit is in operation.
- If you want to use drain hose to drain water away, please install the hose
according to section “continuous external draining”.
Operation Method
-Power button
Press this button to turn the dehumidifier on or off. First time to turn on, by
default, the mode is dehumidifying automatically and low wind.
- Mode button
When power or timing is on, press this button to choose auto dehumidifying or
continuous dehumidifying mode (dry cloth function). There is 2 seconds delay
for choosing any mode.
-Adjustable humidity Button
The humidity level can be set within a range of 30% RH (Relative Humidity) to
80% RH (Relative Humidity) in 5% reduce or at continuous operation.
NOTE:
- If is selected, the dehumidifier will operate continuously at its
maximum dehumidification settings if attached to a hose to drain or until
the water tank is full.
- For drier air, press the down button and set to a lower percent value
(%).For damper air, press the up button and set to a higher percent value

English
6 Instructions for use
(%).When you first use the dehumidifier, the humidity control is by default to
50%.
- Allow at least 24 hours for the dehumidifier to achieve the humidity level. If
you still have damper air than desired, set the humidity level to a lower
setting or select Continuous for maximum dehumidification.
- After a period of working, when the environment humidity is lower than the
selected humidity by 5%, the compressor will stop and fan stops working
after a presetting time later. When the environment humidity is equal to or
higher than the selected humidity by 5%, the compressor will restart once
the preset compressor protection time is over.
-Humidity Setting & Timer Indicator display
In dehumidifying, it will indicate the actual room humidity. In timing
mode, it indicates the setting time.
- Fan speed button / Internal drying function
Set the fan speed to for maximum moisture removal. When the
humidity has been reduced and quiet operation is preferred, set the fan
speed to .
Long press for 5 seconds to start the inside drying function.
-Timer button –24 hours timing / Ionizer (optional)
Press the key, to set the timing off or timing on, timing range is from 1 to
24hours, it will increase 1hour by each press. Press the key again to cancel.
Turning off
When unit is working, press Timer button to start the function, then press
UP/DOWN button to set hours from 1 to 24hours. When time is up to your
setting, unit will turn off. After setting, timer button flashes 5 times for
confirmation.
Turning on
When unit is in standby (power on), press Timer button to start the function,
then press UP/DOWN button to set hours from 1 to 24hours. When time is up
to your setting, unit will turn on. After setting, timer button flashes 5 times for
confirmation.
Ionizer –Long press for 3 seconds to start or shut off the function.

English
Instructions for use 7
Other instructions
-Water tank full indicator light
Glows when the tank is ready to be emptied, or when the tank is removed or
not replaced in the proper position.
Auto shut off
The Water Level Control Switch shuts off the dehumidifier when the water tank
is full, or when it is removed or not replaced in the proper position.
Auto Defrost
When frost builds up on the evaporator coils, the compressor will cycle off and
the fan will continue to run about 5-8 minutes to defrost.
Power Outage
In the case of a power outage or interruption, the unit will automatically
restart, in the settings last used, after the power is restored.
Draining Instructions
Draining water can be storage in the water tank, or be continuous drained by
PVC tube. (The PVC tube is not included in the product.)
A) In the water tank
When the drainage tank is full, the tank full indicator light shown as
red colour and the operation will stop automatically. The water needs to be
emptied from the drainage tank.
Emptying the drainage tank
1. Take out water tank and pour away water.
2. Once it is empty,
replace the tank in the
appliance. When
replacing the drainage
tank, press the tank
firmly into place with
both hands. If the tank is
not positioned properly,
the Water-full sensor will
be activated, and the
dehumidifier will not
operate.

English
8 Instructions for use
B) Continuous external draining
If the appliance is to be operated for long periods but you are unable to empty
the tank regularly, you are recommended to use the continuous drain facility.
1. Pull out appliance plug.
2. Cut the plastic sealing on back cover, which is circled in below picture.
3. Plug a plastic pipe (with an inner diameter of 9mm) to draining hole.
4. Draining tube should place lower than the draining hole to let water flow
out.
Note: Water pipe cannot be too long (usually 0.6m or 1m), the height cannot
surpass the height of drainage mouth, or there will be water leakage.
Fig. 1
Fig. 2

English
Instructions for use 9
Cleaning and Maintenance
Always unplug the appliance from the power socket before performing any
cleaning or maintenance operations.
For safety reasons, never wash the dehumidifier using a jet of water.
Cleaning the cabinet
-Clean the appliance using a damp cloth then dry with a dry
cloth.
-Do not use petrol, alcohol or solvents to clean the appliance.
-Do not spray liquid insecticide or similar products as they may
deform the plastic.
Cleaning the air filter
If the filter is dirty, air circulation is compromised and the efficiency of the
dehumidifying and air purifying functions decreases. It is therefore good
practice to clean the filter at regular intervals. The frequency depends on the
duration and conditions of operation. For a daily use, you are recommended to
clean the filter once a week.
1. Take down filter frame from the two positions where there are two arrows
shown in below picture. (Fig.1)
2. Hold the snap upside filer and take off filter. Put the filter in water to clean
or rinse. After cleaning, replace it in dehumidifier. (Fig.2)
Fig. 1
Fig. 2

English
10 Instructions for use
Storing the dehumidifier
Properly store the unit when it is not being used for an extended period of time
1. Discard any water left in the drainage tank.
2. Clean the air filter
3. Store the unit upright in its original packaging to keep it free of dust. Store
in a cool and dry place.
Specifications
Model
Specification
DE-016.008A
Power Supply
220-240V~50Hz
Power Input
255W
Rated current
1.2A
Refrigerant / Charge
R134a/100g
GWP / CO2equivalent
1430 / 0.143t
Dehumidify capacity (30℃RH80%)
16 Litres/day
Noise
42dB (A)
Net Weight
10.2Kg
Degree of Protection
IPX1
High / Low Pressure
3.5 / 1.0 MPa
Applicable temperature
5℃-35℃
Water Tank Capacity
2.0L
Body size (W x D x H) mm
292 x 190 x 501

English
Instructions for use 11
Troubleshooting
You can solve many common problems easily, saving you the cost of a possible
service call. Try the suggestion below to see if you can solve the problem before
calling service centre.
Problem
Possible Cause
Solution
The unit doesn't
operate
Has the power cord been
disconnected?
Plug the power cord into
the outlet.
Is the tank full indicator
light? (The tank is
full or in a wrong position.)
Discard the water in the
drainage tank and then
reposition the tank.
Is the temperature of the
room above 35℃or below
5℃?
The protection device is
activated and the unit
cannot be started.
The
dehumidifying
function
doesn't work
Is the air filter clogged?
Clean the air filter as
instructed under
"Cleaning and
Maintenance".
Is the intake duct or
discharge duct obstructed?
Remove the obstruction
from the discharge duct
or intake duct.
No air is
discharged
Is the air filter clogged?
Clean the air filter as
instructed under
"Cleaning and
Maintenance".
Operation is
noisy
Is the unit tilted or
unsteady?
Move the unit to a stable,
sturdy location.
Is the air filter clogged?
Clean the air filter as
instructed under
"Cleaning and
Maintenance".

English
12 Instructions for use
Disposal –Environment policy
Disposal
The appliance is manufactured using recyclable material.
This appliance is marked according to the European directive 2012/19/EU on
Waste Electrical and Electronic Equipment (WEEE).
By ensuring this product is disposed of correctly, you will help prevent potential
negative consequences for the environment and human health, which could
otherwise be caused by inappropriate waste handling of this product.
This symbol on the product, or on the documents accompanying the
product, indicates that this appliance may not be treated as
household waste. Instead it shall be handed over to the applicable
collection point for the recycling of electrical and electronic
equipment.
Before disposal, make the appliance unusable by cutting off the power cable.
Disposal must be carried out in accordance with local environmental
regulations for waste disposal. Deliver the appliance immediately to an
authorized dump; do not leave it unattended even for a few days, since it is
potentially dangerous for children.
For more detailed information about treatment, recovery and recycling of this
product, please contact your local city office, your household waste disposal
service or the shop where you purchased the product.
Packing
The packaging material is entirely recyclable, and marked
with the recycling symbol. Follow local regulations for
scrapping. Keep the packaging materials (plastic bags,
polystyrene parts, etc.) out of reach of children, as they are
potentially dangerous.

English
Instructions for use 13
Conformity
This product has been designed, manufactured and marked in compliance
with:
-the safety of Low Voltage Directive 2014/35/EU,
-the protection requirements of EMC Directive 2014/30/EU,
-RoHS directive 2011/65/EU.
The electrical safety of the appliance is guaranteed only if it is connected to an
efficient and approved earthing system.
Regulation (EU) no. 517/2014
Refrigerant gas R-134a - Do not vent the gas into the atmosphere: R-134a is a
fluorinated greenhouse gas, as per the Kyoto Protocol, with global warming
potential (GWP) = 1430, CO2 equivalent = 0.143t.
Guarantee
This unit is covered by a 24 months (*) warranty, from the purchase date, and
covers the repair free of charges of the damaged due to the manufacturer
fault or defected components. The distributor reserves the right to change the
unit for an equivalent model.
The warranty does not cover any damaged caused by incorrect use, lightning,
incorrect installation, external factors or any intentional damaged. The warranty
does not cover damage thus attributable to falls, blows, spill, exposure to
extreme environmental conditions or deterioration caused by normal use of
plastic parts or keyboards, as well as by the use of batteries other than those
specified in this manual.
For the repairing, during the warranty period, the unit shall be sent to the
distributor or reseller, or to the address indicated by them, and must be jointed
the warranty certificated and the respective original invoice or selling ticket,
where the buying date is expressed indicated.
The consumer is protected by the guarantee provided by Directive 1999/44/CE
of European Parliament and Council of 25 May.
(*) Only for European Union countries

PT
14 Manual de Instruções
Estimado Cliente
Obrigado por ter escolhido um produto HÆGER.
Os produtos HÆGER foram concebidos a pensar no bem-estar do consumidor,
privilegiando os mais elevados padrões de qualidade, funcionalidade e
designe. Estamos certos da sua satisfação pela aquisição deste produto.
Antes da primeira utilização, leia cuidadosa e totalmente estas instruções de
utilização e de segurança e familiarize-se com as funções do aparelho.
Guarde estas instruções para futura referência e entregue-as a quem adquirir o
produto no futuro.
Uso previsto
Este aparelho destina-se apenas para uso doméstico. Utilize o aparelho apenas
conforme descrito neste manual de instruções. Tal como acontece com todos
os equipamentos elétricos, estas instruções não pretendem abranger todas as
condições e situações possíveis.
Cuidados e bom senso devem ser seguidos quando operar e instalar este
aparelho.
Por razões de segurança, alterações e modificações são proibidas.
Características
Para reduzir o risco de incêndio, choque elétrico ou ferimentos ao usar o
aparelho, siga estas precauções básicas:
AVISO:
Não toque na ficha do cabo de alimentação com as
mãos molhadas ou húmidas quando ligar ou desligar.
Risco de morte por choque elétrico!
Em caso de emergência, desligue o aparelho imediatamente.
Segure a ficha ao desligar o cabo de alimentação; não puxe pelo cabo.
Desligue a ficha antes de limpar ou fazer a manutenção.
Verifique regularmente o dispositivo e cabo para sinais de danos. Não
continue a utilizar o aparelho em caso de danos.
Um cabo de alimentação danificado deve ser substituído imediatamente
pelo fabricante ou um técnico. Não utilize o dispositivo com o cabo ou a
ficha danificados.

Português
Manual de Instruções 15
Não tente reparar o aparelho por si mesmo. Entre em contacto com o
pessoal autorizado. A fim de evitar perigo para o utilizador o cabo de
alimentação danificado deve ser substituído por um cabo equivalente pelo
fabricante ou por um especialista qualificado.
Exceto para os trabalhos de limpeza e manutenção descritos neste manual,
não se deve realizar nenhuma outra modificação no aparelho.
Não opere o dispositivo com um temporizador externo ou sistema de
controlo remoto separado.
Cuidado!
Para a segurança dos seus filhos, não deixe partes da
embalagem (sacos plásticos, papelão, esferovite, etc.) ao
alcance dos mesmos.
Não deixe crianças pequenas brincarem com a bolsa de
plástico. Existe o perigo de asfixia!
Este aparelho pode ser utilizado por crianças com idade a partir de 8 anos
e por pessoas com capacidades físicas, sensoriais ou mentais ou falta de
experiência e conhecimento, se tiverem recebido supervisão ou instruções
relativas à utilização do aparelho de forma segura e entender os riscos
envolvidos. As crianças não devem brincar com o aparelho.
Qualquer limpeza e ou manutenção não deve ser feito por crianças a não
ser que tenham idade superior a 8 anos e sejam supervisionados.
Mantenha o aparelho e o cabo de alimentação fora do alcance de
crianças com menos de 8 anos.
A embalagem deve estar em bom estado. Verifique o dispositivo para
qualquer possível dano de transporte. Não instale um dispositivo danificado.
Em caso de danos, contacte o seu distribuidor.
Não instale o aparelho em ambientes cujo ar possa conter gás, óleo,
enxofre, ou junto a fontes de calor.
Não utilize o aparelho em superfícies inclinadas.
Mantenha o aparelho a uma distância de pelo menos 50 cm de
substâncias inflamáveis, (álcool, etc.) ou de recipientes sob pressão (ex.:
latas de spray).
Não pouse objetos pesados ou quentes em cima do aparelho.
Em caso de transporte, o aparelho deve permanecer na posição vertical
ou, então, ser cuidadosamente colocado de lado. Relembre-se de eliminar
a água de condensação do depósito antes do transporte. Após um
transporte, aguarde pelo menos, 1 hora antes de ligar o aparelho.
O gás R-134a é um refrigerante que respeita as normas de ecologia
europeias. Recomendamos, no entanto, que o circuito de refrigeração do

Português
16 Manual de Instruções
aparelho não seja perfurado. No fim da sua vida útil, deposite o
desumidificador em centros de recolha especializados.
Informação ambiental
Esta unidade contém gases fluorados com efeito de estufa,
abrangidos pelo Protocolo de Quioto. As operações de
manutenção e eliminação devem ser realizadas apenas por
pessoal qualificado (R134a, GWP=1430).
Os materiais utilizados na embalagem são recicláveis. Recomendamos, por
isso, que sejam depositados nos respetivos contentores de recolha seletiva.
Descrição do Produto
1. Painel frontal
2. Aberturas de ventilação
3. Painel de controlo
4. Placa lateral esquerda
5. Roda
6. Placa lateral direita
7. Grelha do filtro
8. Orifício de drenagem contínua
9. Depósito de água
10. Cabo de alimentação
11. Painel traseiro
12.
Instalação
Localização
Coloque o aparelho na divisão a
desumidificar. É essencial deixar, na
parte frontal do desumidificador, um
espaço de pelo menos 50 cm para
não obstruir a saída do ar.
Para permitir a circulação do ar, é
aconselhável deixar, na parte traseira
do aparelho, um espaço de cerca de
50 cm.

Português
Manual de Instruções 17
Ligação Elétrica
Atenção: O uso inadequado da ficha com terra pode resultar em
risco de choque elétrico. Se o cabo de alimentação estiver
danificado, deverá ser substituído por um serviço autorizado.
Depois de transportar o aparelho, aguarde pelo menos uma hora antes de
o ligar.
Antes de inserir a ficha na tomada de alimentação, certifique-se de que:
–A tensão da rede corresponde à tensão de exercício indicada na
chapa de características.
–A tomada e a linha de alimentação elétrica têm capacidade para
suportar a carga requerida.
–A tomada é compatível com a ficha. Caso contrário, solicite que um
técnico qualificado proceda à sua substituição.
–A tomada está devidamente ligada à terra.
A ficha, juntamente com o fio terra, deve caber na tomada.
A ficha deve ser de livre acesso.
Não corte ou remova o fio terra do cabo de alimentação fornecido sob
quaisquer circunstâncias.
Não é recomendado uso de cabos de extensão.
Operação
IMPORTANTE: Antes de ligar o aparelho à fonte de alimentação, deixe-
o ficar em posição vertical durante aproximadamente 1 horas. Isso irá
reduzir a possibilidade de uma falha no sistema de refrigeração devido
ao manuseamento durante o transporte.
IMPORTANTE: No caso de desligar o aparelho ou em caso de falha de
energia, aguarde pelo menos 5 minutos antes de reiniciar o dispositivo.
Antes de ligar o seu aparelho, certifique-se de que:
–o posicionamento do aparelho descrito no presente modo de utilização é
respeitado,
–as grelhas de entrada e de saída do ar estão totalmente soltas,
–o aparelho está situado sobre uma superfície plana e estável,

Português
18 Manual de Instruções
Painel de Controlo
Observações:
- O depósito de água deve estar corretamente instalado para que o
desumidificador funcione.
- Não retire o depósito enquanto a unidade estiver a funcionar.
- Se quiser usar a mangueira de drenagem para escoar a água, instale a
mangueira de acordo com as instruções na seção "Drenagem contínua
para o exterior".
-Tecla de energia
Pressione esta tecla para ligar ou desligar o desumidificador. A primeira vez
que liga, o modo padrão é desumidificação auto e velocidade da ventoinha
baixa.
- Tecla de seleção do modo
Quando ligar ou ativar o temporizador, pressione a tecla para escolher entre
o modo de desumidificação auto ou contínuo (função de secagem). Existe
um atraso de 2 segundos para escolher qualquer modo.
-Teclas de ajuste da humidade
O nível de humidade pode ser definido dentro de um intervalo entre 30% HR
(Humidade Relativa) e 80% HR (Humidade Relativa) em reduções de 5% ou
em para funcionamento contínuo.
NOTA:
- Se selecionar funcionamento contínuo, o desumidificador irá operar
continuamente na configuração máxima de desumidificação se estiver
Table of contents
Languages:
Other HAEGER Dehumidifier manuals