manuals.online logo
Brands
  1. Home
  2. •
  3. Brands
  4. •
  5. Haier
  6. •
  7. LCD TV
  8. •
  9. Haier L26M9 User manual

Haier L26M9 User manual

R
L26M9/L32M9/L42M9/L46M9/
L55M9/LB26R3/LB32R3
LB37R3/LB42R3/LB46R3/
LP55R3/L26K3/L32K3/L42K3
USB
SOURCE
H.LOCK
STILL
ARC
MUTE
S.MODE
TV.MENU
EXIT
REV
ZOOM
VOD
TV/FM
FAV
Fn DDS GAME BUSINESS
SHOCK SLEEP
INTERACTION
INFO CH.LIST
AUDIO GUIDE PAGE+
PAGE-
D.CALL TV.CALLTIMESHIFT
REC
PLAY/PAUSE
BACK
D.MENU
P.MODE
OK
.,@ abc def
ghi jkl mno
pqrs tuv wxyz
Q.VIEW
*#
P
Warning------------------------------------------------------------------------------------
Important Safety Instructions----------------------------------------------------------
Panel Control andRear Terminals Control-------------------------------------------
Remote Control---------------------------------------------------------------------------
Remote control function-----------------------------------------------------------------
External Equipment Connections-----------------------------------------------------
Antenna Connection------------------------------------------------------------------
VCR Connection-----------------------------------------------------------------------
DVD Setup------------------------------------------------------------------------------
HDMI or DVISetup---------------------------------------------------------------------
PC Setup---------------------------------------------------------------------------------
Monitor Out Setup----------------------------------------------------------------------
Connecting Headphones--------------------------------------------------------------
Basic Receiving and Playing Operations
Switching ON/OFF the TV set--------------------------------------------------------
Choose the MenuLanguage----------------------------------------------------------
Choose the InputSource--------------------------------------------------------------
Searching Channel--------------------------------------------------------------------
Watching TVProgram-----------------------------------------------------------------
Picture Control Functions-------------------------------------------------------------
Sound Control Functions--------------------------------------------------------------
Timer Functions------------------------------------------------------------------------
Function Menu--------------------------------------------------------------------------
Adjust Menu-----------------------------------------------------------------------------
Lock Setup------------------------------------------------------------------------------
Streaming Media PlayingSystem---------------------------------------------------
Maintenance------------------------------------------------------------------------------
Troubleshooting--------------------------------------------------------------------------
Specifications-----------------------------------------------------------------------------
Format--------------------------------------------------------------------------------------
1
2
4
5
6
7
7
8
9
9
10
10
11
12
12
12
13
15
16
17
18
20
22
23
25
30
31
32
33
Panel Control and Rear Terminals Control
COMPONENT IN COMPONENT IN
37 /
37 /
USB
SOURCE
H.LOCK
STILL
ARC
MUTE
S.MODE
TV.MENU
EXIT
REV
ZOOM
VOD
TV/FM
FAV
Fn DDS GAME BUSINESS
STOCK SLEEP
INTERACTION
INFO CH.LIST
AUDIO GUIDE PAGE+
PAGE-
D.CALL TV.CALLTIME SHIFT
REC
PLAY/PAUSE
BACK
D.MENU
P.MODE
Q.VIEW
* #
OK
.,@ abc def
ghi jkl mno
pqrs tuv wxyz
1
2
3
4
8
11
10
13
15
17
19
21
22
23 25
24 26
27 29
31
32
28 30
33
34
35
38
36
37
P
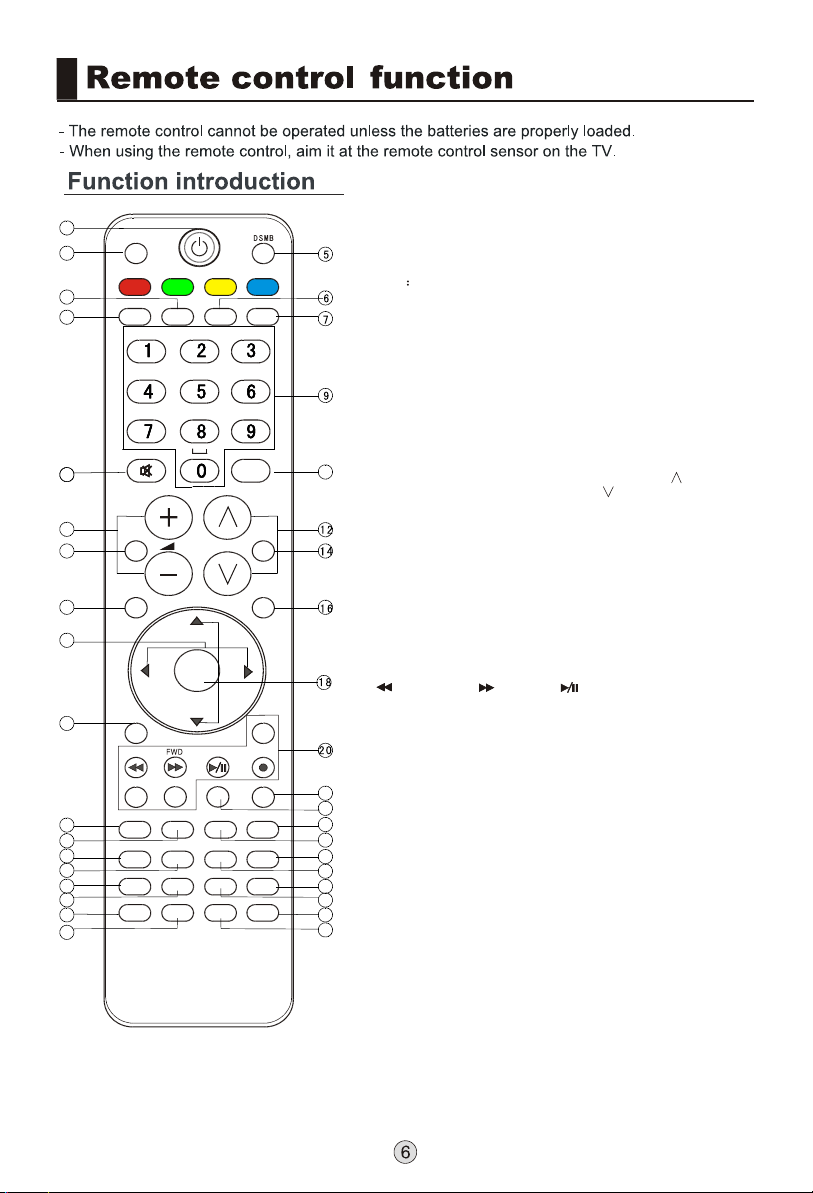
1.POWER: Press thiskey to startTV from standby
mode, press itagain to returnto standby mode.
2.USB: Press thiskey for quickswitching of streamingmedia.
3.H. LOCK: Referto the FunctionalDescription on Page23.
4.Press this keyto open/close signalsource options menu.
5.DSMB Press this keyfor quick switchingof MO-Card.
6.STILL: Press thiskey to freezethe image. Pressit again
to return tonormal screen. (Note:Do not displaya still
picture for along time toprevent the screenfrom burns.)
7.ARC: Press thiskey to selectthe screen displayproportion.
8.MUTE: Press thiskey to mutethe sound, pressit again to
activate the sound.The sound maybe activated byturning
the TV onagain or increasingthe volume.
9.0-9: These keysare used toselect a channel.
10.Q. VIEW: Pressthis key toreturn to theprevious TV
program(only work inthe TV mode).
11.VOL+ /-:Used to adjustthe volume whenthe screen
menu is closed.
12.CH+/-: Used toselect a TVchannel when thescreen
options menu isclosed, specifically,press P to
decrease the channeland press P to increase the
channel.
13.Sound Mode: Pressthis key continuouslyto select the
sound mode.
14.Picture Mode: Pressthis key continuouslyto select the
picture mode .
15.TV.MENU: Press this key to display or exit the main menu.
16.D.MENU: Press thiskey to displaythe Special Function
Menu (it functionswhen special modulesare inserted).
17.THUMBSTICK (Up/Down/Left/Right)
18.OK: Press thiskey to confirmthe selection.
19.Clears all on-screendisplays and returnsto TV viewing
from any menu.
20.USB Control theUSB System.
Backward Forward Play/Pause BACK: Back
REC: no available ZOOM: Press tomagnify/minify an image
D.CALL: Press todisplay program information.
21.TV.CALL: Display on/off
22.no available
23.no available
24.no available
25.no available
26.no available
27.no available
28.no available
29.no available
30.no available
31.Press this keyto display thefavorite program listmenu.
32.no available
33.Displaying the sleeptime.
34.no available
35.no available
36.no available
37.no available
38.no available
Note: From 22 to 38(except 31 and 33), are belonged to DSMB function button.
It will act when the module installed only. Pls refer to DSMB user's manual.
ANT.
AUDIO
VGA IN
VIDEO
ANT.
HDMI3
VGA IN
VGA/DVI AUDIO
SOURCE
COMPONENT IN
COMPONENT IN
1
AUDIO
VGA IN
VIDEO
HDMI3
VGA IN
VGA/DVI AUDIO
COMPONENT IN
HDMI2 HDMI1 S-VIDEO USBAV IN
VIDEO L-AUDIO-R
CARD
TV
AV1
AV2
S-Video
YPbPr/YCbCr1
YPbPr/YCbCr2
HDMI 1
HDMI 2
HDMI 3
PC
USB
Source
Language English
Blue Screen On
Menu Timeout 15s
AAA Picture Optimize
DSM Demo Off
MEMC
OPC
Eye Guard Mode
Tetris
If the TV is not in TV mode, press SOURCE on the
remote control unit, and signal source menu will be
displayed on theTV screen (as shown inthe right figure).
Press to select the TV option, and press or OK to
confirm the switchingto TV input terminal.After
switching, the signal source menu disappears, and at
the upper right corner of screen displays the information
of current signal source.
Pressing this key repeatedly can exit from the signal
source menu.
In case of no other operation, the signal source menu
will automatically disappearupon reaching the OSD
disappearance time preset in the main menu.
/
1. Press MENU and / to select Function menu.
2. Press to select the Language.
3. Select a particular language by pressing repeatedly.
4. When you satisfied with your choice, press MENU to
return to normal viewing.
/
When you satisfied with your set for the first time, you must select the language which
will be used for displaying menus and indications.
1. First, connect power cord correctly and the power indicator will light.
2. Press POWER on the remote control again.
3. If you want to exchange to standing by status, please press down POWER on the
remote control.
4. Disconnect the power supply or unplug the television if it is intended to completely
cease the television performance.
menu
On
Channel Edit
Manual Search 874.25MHz
Fine Tune 20
Color System Auto
Sound System DK
Skip ON
1. Press MENU on the remote control unit or MENU on
the TV's front panel to display main menu, and then
press / to select Channel menu.
2. Press to select the Channel Edit option, and
then press to enter submenu.
/
Channel Edit
Auto Search
Exchange
Search: Press / to select the Manual Search
option, and finally press / to start manual search.
Upon finding a program, the search will automatically
stop, and the program will be stored onto the current
channel. You may stop the search by pressing OK or
MENU.
Fine Tuning: Press / to select the Fine Tune
option, and then press / to start UP or DOWN fine
tuning until obtaining a relatively good picture effect.
The fine tuning function is for the purpose of improving
picture effect through fine tuning when that of a certain
program is not good enough. Normally, the optimal
picture effect can be obtained without fine tuning when
watching TV programs, and fine tuning is to meet the
need of adjusting a certain program.
Color system: Press / to select the Color
Systems option, and then press / to select correct
color system.
The TV is designed with three systems for your choice,
i.e. Auto, PAL , SECAM and NTSC. Generally, the
system is set as Auto and it is not necessary to make
an adjustment. The system is normally set as Auto
during auto search.
Sound system: The TV is designed with four systems
for your choice, i.e. DK, M, BG and I. Generally, it is not
necessary to adjust the system. The system is normally
set as DK during auto search.
Skip: When the skip is set ON, the channel will be
skipped when pressing P or P and only can be
selected by pressing 0-9 numerical keys.
If you want to recover the skipped channel
1. Use Direct-digit Choosing button to select the
number of the channel to be recovered.
2. Do the above steps again.
3. Press to set Skip as Off.
Channel Edit
menu
menu
1. Press MENU on the remote control to display main
menu, and then press / to select Channel menu.
(Note: Only when Tuning Lock in the H. Lock menu is
Off can the Channel menu be selected.)
2.Press to select the Auto Search option, and
then press /OK to enter submenu.
3.Press to select the Storage from option, and
then press / to set the found from which to be
stored, press to select the Auto Search option,
press /OK to enter the auto search menu, afterwards
press to select the Confirm option, and finally press
OK to confirm the starting of auto search.
4. During auto search, the scale value on the progress
bar is continually increasing, indicating the auto search
is in progress. After finishing the auto search, the TV
will play the channel starting the auto search. To stop
the search in halfway, just press MENU/OK, and the
TV will play the first searched channel.
/
/
/
Channel Edit
Auto Search
Exchange
1. Press MENU on the remote control unit or MENU on
the TV's front panel to display main menu, and then
press / to select Channel menu.
2. Press / to select the Exchange option, and then
press to enter its submenu.
3. Press / to select the To Channel option, and then
press / to set the found to be exchanged to.
4. After adjusting the current channel and the found to
be exchanged to, press / to move the cursor to the
Exchange option, and then press / to start exchange
and exchange the program on current channel to the
channel you set for exchange.
Exchange
Auto Search
Storage from
Auto Search
menu
menu
menu
menu
menu
1. Suppose that you previously watched a TV program on
Channel 8, but now you are watching a TV program on Channel
18 (as shown in the right figure).
2. If you want to return to Channel 8, just press “Q. VIEW
(Flashback)” once.
3. If you want to return to Channel 18 again, just press “Q. VIEW
(Flashback)” once again.
Note: This function is only available in TV mode.
Quick program view
How to selectthe desired program
Using P /P buttons
Press P to select a channel number in number increasing direction.
Press P to select a channel number in number decreasing direction.
Using Program number buttons
Directly enter the channel number with the numeric keypad on the remote control.
If to select channel numbers of double-digital or three-figure, press continuously the
numeric buttons in three second.
How to selectthe desired sound
Press VOL-/+ buttons on the remote or the front of the
TV set to adjust the volume level. The range is 0~100.
When the volume buttons are pressed the volume level
is displayed automatically on the TV screen.
Mute Setting
1. Press MUTE button on the remote control and a icon
will display on the screen. At this time, the sound of the
TV set is turned off.
2. If you want to recover the sound, press MUTE button
again or directly press VOL+ button.
1. Press MENU to display main menu on the screen, and
then press / to select the Picture menu, afterwards
press to enter the option to be adjusted.
2. Press to move the cursor to the option to be
adjusted, and then press / to adjust it to your desired
effect.
Chroma
/
/
Brightness: This will adjust the light output of the
complete picture, which will mainly affect the darker
areas of the picture.
Contrast: This will adjust the intensity of bright parts in
the picture but keep the dark parts unchanged.
Sharpness: This will adjust the sharpness of fine details
in the picture.
Hue(select able in NTSC mode only): Allows you to
select the color mix (Tine) of the picture.
: This will adjust the saturation level of the colors
to suit your personal preference.
Picture Mode: Select the mode of picture(Standard/Bright/Soft/User/Eye Guard)
Palette: Press / to select the Palette option, and then press to enter its
submenu, and finally press / to select a toner pattern from six patterns (User,
Standard, 6500K, 7300K, 8500K and 9300K) to your color preference. Normally, the
Standard mode is selected.
If the User mode is selected, press / to enter the palette menu, (as shown in the
right figure), and then press / to select a benchmark in the range of 2500K15000K
from warm color to cold color, afterwards press / to adjust; if a different
benchmark is selected for adjustment, the original adjustment data will be
automatically cleared.
Reset: Return to factory default settings.
How to customize your own picture status
menu
menu
This means the adjustment of specific contents in the picture, if already in normal
condition, it is not necessary to make any adjustment.
Due to different TV signal inputs, some items may need to be adjusted. The following
makes a description by only taking TV signal as an example.
How to select the picture mode
1. Press MENU to display main menu on the screen, and then press / to select the
Picture menu, afterwards press / to enter the option to be adjusted.
2. Press / to move the cursor to the option to be adjusted, and then press / to
select Standard/Bright/Soft/User/Eye Guard mode.
You can also press P.MODE on the remote control to select Standard/Bright/Soft/
User/Eye Guard mode.
Standard: The picture brightness and hue are moderate.
Bright: The picture is vivid, bright and dynamic.
Soft: The picture is soft and in light color.
User: The picture effect is set by yourself to your preference.
Eye Guard(The option does not exist when using a USB device.): In line with the
change of using environment, the TV set will adjust automatically the image display
mode to protect viewers' eyes from any negative impact.
1. Press MENU to display main menu on the screen, and then press to select the
Audio menu, /
2. /
select User/Standard/Music/Theater mode.
User: A spare setting that can be adjusted to personal tastes.
Standard: Normal sound with moderate bass and treble setting.
Music: Designed the sound to best suit music programs.
Theater: Enables extra bass and treble to enhance the movie experience.
You can also press S.MODE button on the remote control to select User, Standard,
Music and Theater mode.
/
afterwards press to enter the option to be adjusted.
Press to move the cursor to the option to be adjusted, and then press / to
How to choose modeaudio
1. Press MENU to display main menu on the screen, and
then press / to select the Audio icon, afterwards
press to enter the option to be adjusted.
2. Press / to adjust.
/
How to customize your own audio status
Volume
Press to adjust the volume of a TV program.
Balance
This will adjust the output of the right and left speakers
to obtain the best stereo reproduction for your listening
position.
The intermediate value is 0. When indication value of
Balance increases toward 50, sound of the right and
left speakers becomes stronger and weaker, respectively.
When indication value of Balance decreases toward -50,
sound of the right and left speakers becomes weaker
and stronger.
Sound Mode
This select the modes for sound reproduction dependent on the broadcast signals or
signals from external inputs received.
Select the mode of sound (User/Standard/Music/Theater).
If the User mode is selected, press to enter the sound mode menu,(as shown in
the right figure), and then press to select a benchmark in the range of 50-15K
from bass to treble, afterwards press / to adjust, if a different benchmark is
selected for adjustment, the original adjustment data will be automatically cleared.
SRS TS XT
The surround sound feature expands the audio listening field wider and deeper to
create exceptional sound quality from the Tv’s speakers.
AVL (Automatic Volume Limit)
This will reduces the differences in volume level among broadcasters.
MAXX Bass
To adjust the superbass. Press to select superbass on or off.
Reset: Return to factory default settings.
/
/
/
User
Standard
Music
Theater
Sound Mode
menu
menu
SRS TS XT
MAXX Bass
The current time is calculated from the moment upon
turning the TV on. At first, check whether the time
indicated on the TV's clock is consistent with the
standard time of your time zone; if not, adjust the clock
as follows:
1. Press MENU on the remote control unit or MENU on
the TV's front panel to display the main menu, and then
press / to select the Time menu, afterwards press
to select the Current Time option.
2. Press to set hour and minute.
3. Press to adjust the time.
4. Afterfinishing time setting,press OK orMENU to
confirm.
/
/
Setting of CurrentTime
1. Press MENU on the remote control unit or MENU on
the TV's front panel to display the main menu, and then
press / to select the Time menu, afterwards press
to select the Sleep option.
2. Press / to set your desired time.
Pressing / allows you to select the time from the
following options in turn: off, 5min, 10min, 15min, 30min,
45min, 60min, 90min, 120min, 180min and 240min.
Notes:
1. You may also set the sleep function by operating the
Sleep key on the remote control unit.
2. If the Sleep function is set OFF, the function is not
available. If a time period is selected, the TV will
automatically enter standby mode upon reaching the
preset time, and will resume work when POWER is
pressed.
3. If the Sleep function has been set, press SLEEP
once, the remaining time to sleep will display on the
screen, if you press SLEEP once again before the
display disappears, the sleep time set last time will be
cleared and new time can be set.
4. During 1min before the TV enters sleep mode, there
will be count-down prompt such as Sleep 59s on the
screen until the TV is off. During the 60s, the user may
change the time or cancel the Sleep function by
operating the SLEEP key.
/
Sleep Setting
menu
menu

This manual suits for next models

13

Other Haier LCD TV manuals

Haier 40D3505T User manual

Haier

Haier 40D3505T User manual

Haier L26C300 User manual

Haier

Haier L26C300 User manual

Haier 15HL25S - 15" LCD TV User manual

Haier

Haier 15HL25S - 15" LCD TV User manual

Haier TFT-LCD User manual

Haier

Haier TFT-LCD User manual

Haier LE42U6500A User manual

Haier

Haier LE42U6500A User manual

Haier L26V6-A8 User manual

Haier

Haier L26V6-A8 User manual

Haier HL32D2 User manual

Haier

Haier HL32D2 User manual

Haier HL32P2 User manual

Haier

Haier HL32P2 User manual

Haier L32A18-AK User manual

Haier

Haier L32A18-AK User manual

Haier LE22B600 User manual

Haier

Haier LE22B600 User manual

Haier HL24XK2 User manual

Haier

Haier HL24XK2 User manual

Haier HDMI LE19K300 User manual

Haier

Haier HDMI LE19K300 User manual

Haier 48LTV3002 User manual

Haier

Haier 48LTV3002 User manual

Haier L42A9 User manual

Haier

Haier L42A9 User manual

Haier HLH15BB User manual

Haier

Haier HLH15BB User manual

Haier LTF47K1a User manual

Haier

Haier LTF47K1a User manual

Haier L32A8A-A1 User manual

Haier

Haier L32A8A-A1 User manual

Haier L37A9A-A User manual

Haier

Haier L37A9A-A User manual

Haier LTF47K1 User manual

Haier

Haier LTF47K1 User manual

Haier LE32B7500 User manual

Haier

Haier LE32B7500 User manual

Haier L37A8A-A1 User manual

Haier

Haier L37A8A-A1 User manual

Haier LEB42A300 User manual

Haier

Haier LEB42A300 User manual

Haier LE24C700 User manual

Haier

Haier LE24C700 User manual

Haier LT42A1 User manual

Haier

Haier LT42A1 User manual

Popular LCD TV manuals by other brands

LG 84LM9600 owner's manual

LG

LG 84LM9600 owner's manual

TCL Roku S4610R user guide

TCL

TCL Roku S4610R user guide

ViewSonic VS12119-1M user guide

ViewSonic

ViewSonic VS12119-1M user guide

Kalley K-LED40FHDST2 Service manual

Kalley

Kalley K-LED40FHDST2 Service manual

LG 43NANO75UPA owner's manual

LG

LG 43NANO75UPA owner's manual

LG DM2352D owner's manual

LG

LG DM2352D owner's manual

Philips 32PFL3205/12 Service manual

Philips

Philips 32PFL3205/12 Service manual

Magnavox 15MF227B - Hook Up Guide user manual

Magnavox

Magnavox 15MF227B - Hook Up Guide user manual

Sharp AQUOS BOARD 4W-B65FT5U Operation manual

Sharp

Sharp AQUOS BOARD 4W-B65FT5U Operation manual

Insignia NS-L55X-10A user guide

Insignia

Insignia NS-L55X-10A user guide

LG 42LK550 owner's manual

LG

LG 42LK550 owner's manual

Philips 32PFL7532D Specifications

Philips

Philips 32PFL7532D Specifications

Philips 32PF5321D/37 user manual

Philips

Philips 32PF5321D/37 user manual

Panasonic Viera TX-20LA70P operating instructions

Panasonic

Panasonic Viera TX-20LA70P operating instructions

Philips 20HF5335D brochure

Philips

Philips 20HF5335D brochure

Philips 47PFL7603D - annexe 1 Specification sheet

Philips

Philips 47PFL7603D - annexe 1 Specification sheet

AOC LE32K0D7D(U) Service manual

AOC

AOC LE32K0D7D(U) Service manual

Logik L19DVDP10 quick start guide

Logik

Logik L19DVDP10 quick start guide

manuals.online logo
manuals.online logoBrands
  • About & Mission
  • Contact us
  • Privacy Policy
  • Terms and Conditions

Copyright 2025 Manuals.Online. All Rights Reserved.