Haier HRF-521DS6 User manual

Order No.Ref1609S025V0
©2013(HAIER ELECTRICAL APPLIANCES COR. LTD)
Allrightreserved. Unauthorized copying and distribution is a violation of law.
Refrigerator
SERVICE MANUAL
MODEL: HRF-521DS6
This service information is designed for experienced repair technicians only and is not designed for use by the general public. It
dose not contain warnings and cautions to advice non-technical individuals of potential dangers in attempting to service a product.
Product powered by electricity should by serviced or repaired only by experienced professional technicians. Any attempt to service
or repair the product or products dealt with in this service information by anyone else could result in serious injury or death.
Haier Grou
p
Version: V1 Date: 20160907
WARNING

SERVICE MANUAL
Model: HRF-521DS6
2
Issue 2016-09-07
REF. Ref 1609S025V0.
Contents
Chapter 1 General Information...............................................................................................................................3
1-1. General Guidelines..........................................................................................................................................3
1-2. Insurance test...................................................................................................................................................3
1-3. How to read this Service Manual ....................................................................................................................4
Chapter 2 Product Feature ......................................................................................................................................5
2-1. Specifications ..................................................................................................................................................5
2-2. Main Functions................................................................................................................................................5
2-3. External views.................................................................................................................................................6
Chapter3 Disassembly and Installation...................................................................................................................7
3-1. Display panel Disassembly..............................................................................................................................7
3-2. Main Control Board and Power Cable Disassembly.......................................................................................7
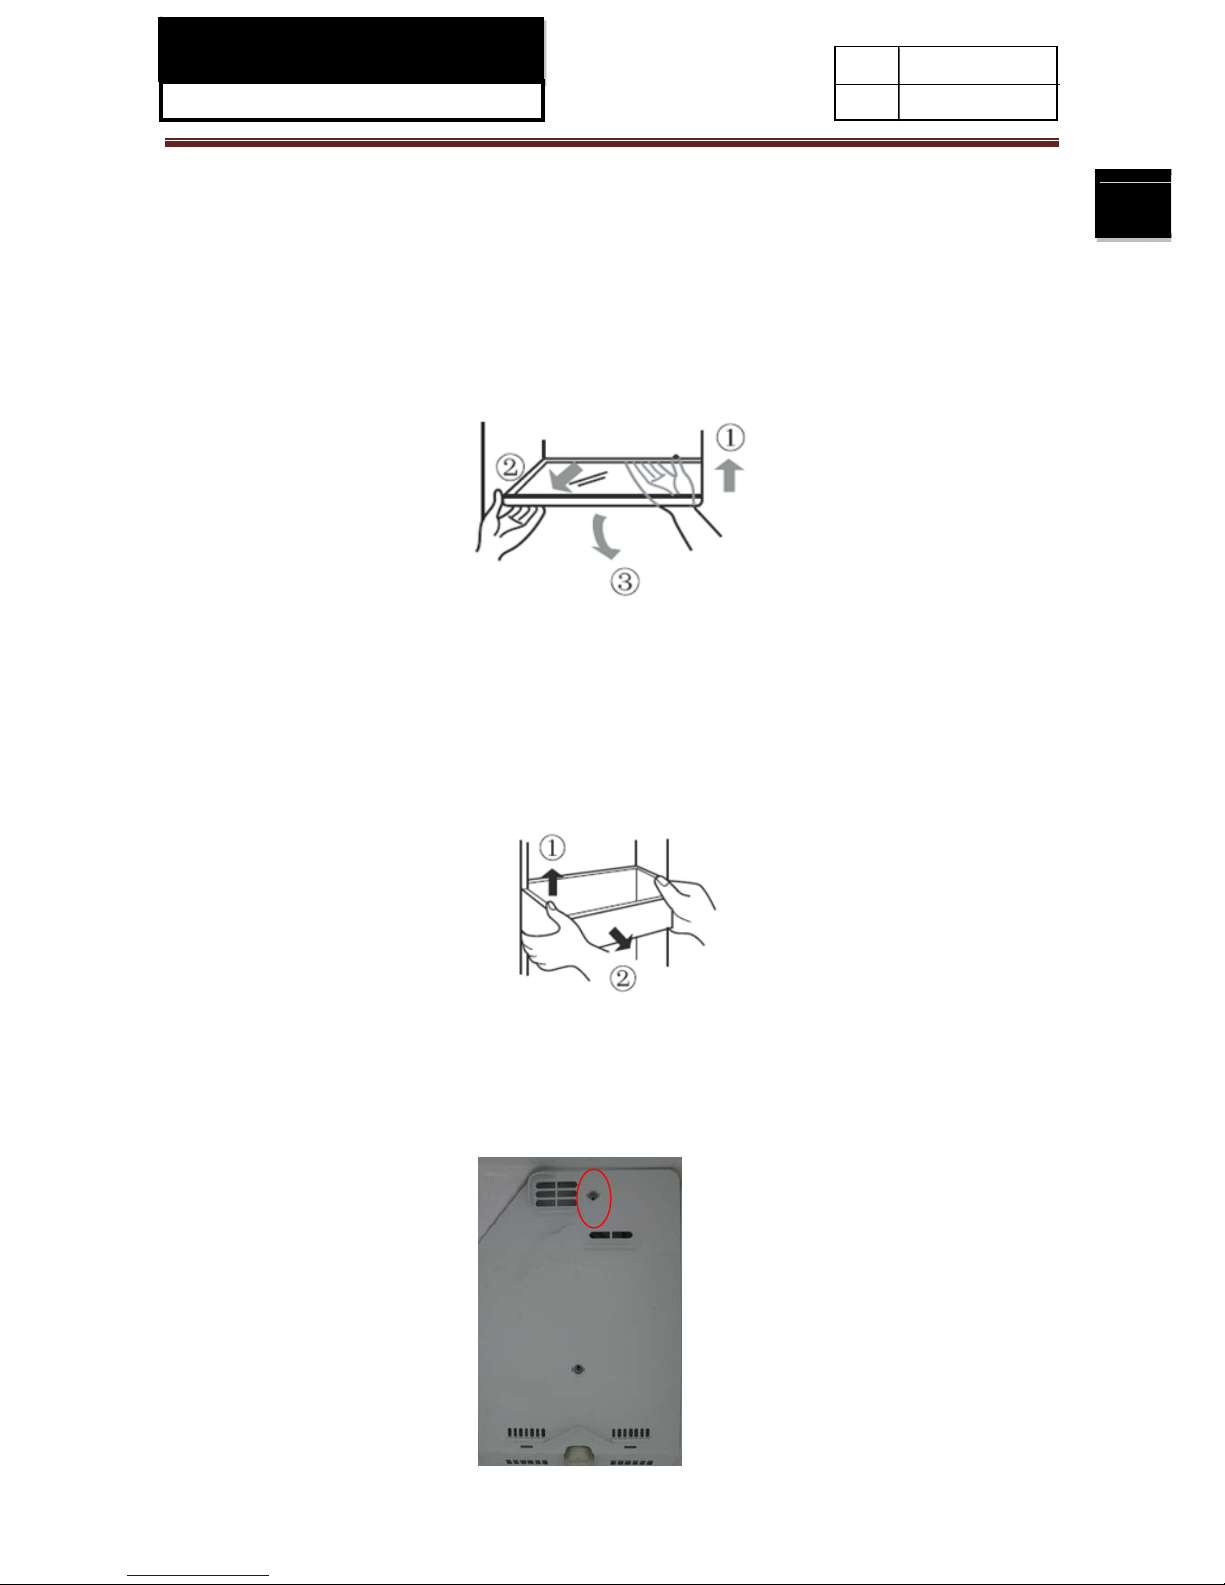
3-3 .Removing Shelf to Clean.................................................................................................................................8
3-4.Adjust Bottle and clean ....................................................................................................................................8
3-5. Freezer air duct cover assembly and disassembly...........................................................................................8
3-5. Refrigerator air duct cover assembly and disassembly....................................................................................9
Chapter 4 Control and display system..................................................................................................................10
4-1.Control panel..................................................................................................................................................10
4-2.Lock/Unlock setting .......................................................................................................................................10
4-3.Intelligence/Holiday function settings............................................................................................................10
4-4.Quick-cooling function setting.......................................................................................................................11
4-5.Quick-freezing function setting......................................................................................................................11
4-6.Temperature setting and adjustment...............................................................................................................11
4-7.Door alarm......................................................................................................................................................12
4-8.Power-off memory..........................................................................................................................................12
Chapter 5 Control principal and related test functions .........................................................................................13
5-1.Refrigerator`s temperature control introduction.............................................................................................13
5-2. Defrost control...............................................................................................................................................13
5-3. Sensor`s position and control principle .........................................................................................................14
5-4. Operating description of combination key ....................................................................................................15
Chapter 6 System flow principle...........................................................................................................................17
6-1.System flow scenograph.................................................................................................................................17
6-2.System flow chart...........................................................................................................................................17
Chapter 7 Circuit diagram.....................................................................................................................................18
7-1. Main control PCB diagram............................................................................................................................18
7-2. Brief principle diagram..................................................................................................................................19
Chapter 8 Trouble shooting and fault detecting....................................................................................................20
8-1. Frequent problem...........................................................................................................................................20
8-2. Fault diagnosis and display method...............................................................................................................22

SERVICE MANUAL
Model: HRF-521DS6
3
Issue 2016-09-07
REF. Ref 1609S025V0.
Chapter 1 General Information
1-1. General Guidelines
When servicing, observe the original lead dress. If a short circuit is found, replace all parts which have been
overheated or damaged by the short circuit. After servicing, see to it that all the protective devices such as
insulation barriers, insulation papers shields are properly installed. After servicing, make the following
leakage current checks to prevent the customer from being exposed to shock hazards.
1) Leakage Current Cold Check
2) Leakage Current Hot Check
3) Prevention of Electro Static Discharge (ESD) to Electrostatic Sensitive
1-2. Insurance test
1. Check if there is any leak of current.
2. Cut out the power supply before the repair to avoid an electrical shock hazard.
3. In the case of a live-line test, insulating gloves should be worn to avoid potential electrical shock.
4. Confirm the rated current, voltage and capacity before testing with any kinds of instruments.
5. Watch if the upper door is open when you check something at a lower position.
6. Take out every part in the cabinet before moving the machine, especially things like panels (e.g. glass
shelf).
7. Please wear intact cotton gloves when repair any parts of the evaporator, so that scratches by the sharp
fins can be avoided.
8. If there is a breakdown with the refrigeration system, please surrender the machine to the service center,
else the leaked refrigerant may pollute the atmosphere.
9. The refrigerator use AC of 220V with a frequency of 50Hz.
10. A big fluctuation of voltage (exceed the range 187~242V) may cause a start failure of the refrigerator, a
burn-out of the control panel and compressor, or an abnormal sound from the compressor in operation. In
this condition an automatic voltage regulator over 60W should be added.
11. Take care not to damage the supply line. Don’t yank at the line; pull the plug out gently from the
receptacle. Don’t press the line under the cabinet or step on it. Take care not to roll on or damage the
supply line when moves the machine from the wall.
12. In the case of leakage of inflammable gases like carbon monoxide, open the door and windows. Don’t
pull out or insert the plugs of the appliance.
13. Don’t touch the refrigeration surface of the freezing compartment when the refrigerator is in operation,
especially when your hand is wet, else you may be glued to the surface.
14. Pull out the plug of power supply during clearance or power outage. Wait at least five minutes to resume
the power supply in order to prevent damage to the compressor caused by continuous restart.

SERVICE MANUAL
Model: HRF-521DS6
4
Issue 2016-09-07
REF. Ref 1609S025V0.
Photo used in this manual
The illustration and photos used in this Manual may not base on the final design of products, which may differ
from your products in some way.
1-3. How to read this Service Manual
The meaning of each icon is described in the table below:
Note:
A “note” provides information that is not indispensable.
Caution:
A “caution” is used when there is danger, through incorrect manipulation, may damage equipment, loose
data, get an unexpected result or has to restart (part of) a procedure.
Warning:
A “warning” is used when there is danger of personal injury.
Reference:
A “reference” guides to find additional information on a specific topic.

SERVICE MANUAL
Model: HRF-521DS6
5
Issue 2016-09-07
REF. Ref 1609S025V0.
Chapter 2 Product Feature
2-1. Specifications
Model HRF-521DS6
1. Product identification
Description of appliance Side By Side
Type of appliance(FS = free standing, BI = built-in) FS
Supplier own brand Haier
2. Basic features
Climate class
(SN=10~32°C, N=16~32°C, ST=18~38°C, T=18~43°C) SN.N.ST.T
Gross capacity l 565
capacity refrigerator compartment l 341
et capacity freezer compartment (total) l 177
Freezing capacity kg/24 h 12
Max storage time by power failure(Freezer)h 5
Refrigerant R600a/80g
3. Control panel
External control display LED
Temperature range (from>to) °C (Fridge)1~9°C/
(freezer)-23~-15°C
Super Cooling (Fridge) YES
Super Freezing (Freezer) YES
Stand-by function (Holidays) YES
4. Basics dates
Voltage / frequency 220/50
Input power / mains fuse (intensity) W /A 187/1.8
Length of cable/incl. plug cm 349
5. Packing dimensions
Unit dimensions without handle ( H / W / D) mm 1790*908*655
Net weight kg 98
Packing dimensions (H / W / D) mm 1890*980*730
Gross weight kg 112
2-2. Main Functions
1. Single cooling system with air-cooled computer control, there is a freezer evaporator in freezing room,
fridge room temperature is controlled by ON/OFF of electronic air damper.

SERVICE MANUAL
Model: HRF-521DS6
6
Issue 2016-09-07
REF. Ref 1609S025V0.
2. Super bright LED& energy-saving, brighter& better reliability.
3. Fault code automatically hiding function.
2-3. External views

SERVICE MANUAL
Model: HRF-521DS6
7
Issue 2016-09-07
REF. Ref 1609S025V0.
Chapter3 Disassembly and Installation
Note: Unplug the power cord from the outlet when demount the refrigerator.
3-1. Display panel Disassembly
You can aspirate the display panel by using vacuum suction nozzle.
Note: you need to use vacuum suction nozzle in the red zone.
3-2. Main Control Board and Power Cable Disassembly
Non professionals do not remove the main control board (including open the control box)
1 Check the power supply cable and ensure power off to disassemble.
2 open the main control box by using a plum screwdriver, then you can see all the refrigerator control
board.
3 pull cable plug off on the refrigerator main control board.
4 replace the damaged main control board.
1. Remove the control board and power cable like picture

SERVICE MANUAL
Model: HRF-521DS6
8
Issue 2016-09-07
REF. Ref 1609S025V0.
5 cover the main control box, then fixed well with screw.
(Note: when you pull off the cable plug on the main control panel, you should press on the plug buckle)
3-3 .Removing Shelf to Clean
Lift the front of shelf according to the direction of ①, then pull out the shelf according to the direction of ②,
and at the same time rotate the shelf to get it out completely according to the direction of ③.
3-4.Adjust Bottle and clean
1 Lift up the bottle according to the direction of ①, then seize bottle`s both sides to pull out according to the
direction of ②
2 You can install bottle according to the reserve operation after cleaning, or you can adjust the bottle`s
height according to the position of food.
3-5. Freezer air duct cover assembly and disassembly
1. First remove the screw cap on the freezer air duct cover (in the red zone), then take
out screw by using cross screwdriver.

SERVICE MANUAL
Model: HRF-521DS6
9
Issue 2016-09-07
REF. Ref 1609S025V0.
2. Seize the freezer air duct cover plate with your hands (in the red zone), then take out
the top air duct cover.
3. Take out the freezer bottom air duct cover on the interface of top and bottom air duct
cover (in the red zone).
3-5. Refrigerator air duct cover assembly and disassembly
Take out the screw (in the red zone)by using cross screwdriver, then seize the air duct
cover plate to pull out.

SERVICE MANUAL
Model: HRF-521DS6
10
Issue 2016-09-07
REF. Ref 1609S025V0.
Chapter 4 Control and display system
4-1.Control panel
A. Refrigerating temperature display area
B. Freezing temperature display area
C. Holiday icon
D. Intelligent icon
E. Quick-cooling icon
F. Quick-freezing icon
G. Lock icon
H. Refrigerating temperature adjustment button
I. Freezing temperature adjustment button
J.Intelligent function adjustment button
K.Quick-cooling adjustment button
L.Quick-freezing adjustment button
M. Unlock/lock button
4-2.Lock/Unlock setting
In unlocked state, a buzz will be heard and "Lock icon" G will be illuminated after “Unlock/lock button”
M is pressed down for 3 consecutive seconds. Lock function will be enabled. In locked state, "Lock
icon" will turn off after "Unlock/Lock button" M is pressed down for 3 consecutive seconds, then lock is
removed.
In locked state, it's not allowed to regulate the refrigerating temperature, freezing temperature,
quick-cooling function, quick-freezing function and intelligent function, etc.
Caution
The following 3-6 functions should be all operated under unlocked state, and it's advised to
quit locked state if it's locked state if you intend to make such operations.
4-3.Intelligence/Holiday function settings
In unlocked state, "Intelligent icon" D will be illuminated upon a press on "Intelligent function
adjustment button" J, and the refrigerator will enter intelligent state; in intelligent state, "Intelligent icon"
D will turn off upon a press on "Intelligent function adjustment button" J, and the refrigerator will quit
intelligent state; in intelligent state, the refrigerator regulates the temperature in the chamber
automatically in accordance with the changes in ambient temperature and internal temperature; in
intelligent state, the default temperature in the refrigerating chamber is 4℃, and it’s -18℃in the
freezing chamber.
In unlocked state, “Holiday icon” C will be illuminated after "Intelligent function adjustment button" J is
pressed down for 3 consecutive seconds, and the refrigerator will enter Holiday state; in Holiday state,
“Holiday icon” will turn off after a press on "Intelligent function adjustment button" J, and the
refrigerator will quit Holiday state.

SERVICE MANUAL
Model: HRF-521DS6
11
Issue 2016-09-07
REF. Ref 1609S025V0.
In Holiday state, the freezing chamber works normally and the temperature in the refrigerating
chamber is set as 17℃automatically. Such function helps avoid possible odors in the refrigerating
chamber and save energy.
4-4.Quick-cooling function setting
In unlocked state, “Quick-cooling icon” E will be illuminated upon a press on “Quick-cooling adjustment
button” K, and the refrigerator will enter quick-cooling state; after reaching the set temperature, the
refrigerator will shut down quick cooling function automatically; if you intend to quit quick-cooling
function manually, please press “Quick-cooling adjustment button” K in quick-cooling state,
“Quick-cooling icon” E will go off and the refrigerator will quit quick-cooling function.
When a lot of food is placed in the refrigerating chamber, quick-cooling function may help food reach
the set temperature rapidly, and it’s favorable for long-time preservation of food. It’s advised to use this
function if you intend to put much food in the refrigerator at one time.
Caution
In intelligent state, intelligent or holiday state will quit automatically when quick-cooling
function is enabled.
4-5.Quick-freezing function setting
In unlocked sate, “Quick-freezing icon” F will be illuminated upon a press on “Quick-freezing
adjustment button” L and the refrigerator will enter quick-freezing state; when reaching the set
temperature, the refrigerator will shut down quick-freezing function automatically; if you intend to quit
quick-freezing function manually, please press
“Quick-freezing adjustment button” L in quick-freezing state, the “Quick-freezing icon” F will go off
and the refrigerator will quit quick-freezing function.
Quick-freezing function is designed to keep the nutrition of food in the freezing chamber. It can freeze
the food in the shortest possible time. If you intend to freeze a lot of food at a time, it’s advised to set
the freezing function 12h in advance, and don’t put the food in until the temperature turns lower
in the freezing chamber. At this moment, the freezing speed is accelerated in the freezing
chamber and the food can be frozen rapidly to secure the nutrition and facilitate preservation.
Caution
In intelligent state, the intelligent or holiday state will quit automatically when quick-freezing
function is enabled.
4-6.Temperature setting and adjustment
①Refrigerating temperature adjustment
In unlocked state, the value in “Refrigerating temperature display area” A will blink and decrease 1℃
upon each press on “Refrigerating temperature adjustment button” H. When the blink stops, the actual
refrigerating temperature will show in “Refrigerating temperature display area” A. When the setting
temperature reaches 9℃, it will return to the minimum setting temperature1℃in the refrigerating
chamber if “Refrigerating temperature adjustment button” H is pressed again. Namely, the setting
temperature of the refrigerating chamber will be displayed in an order “04→03→02→01→09→08
→07→06→05→04”.

SERVICE MANUAL
Model: HRF-521DS6
12
Issue 2016-09-07
REF. Ref 1609S025V0.
Caution
In quick-freezing, intelligent or locked state, it’s not allowed to adjust the setting temperature in
the refrigerating chamber. If you make the said adjustment in such state, the quick-cooling
function, intelligent or lock icon will blink, and a warning tone will be given to indicate that the
setting temperature in the refrigerating chamber cannot be adjusted.
②Freezing temperature adjustment
In unlocked sate, the setting value in “Freezing temperature display area” B reduces 1℃and blinks
upon each press on “Freezing temperature adjustment button” I, and the actual temperature in the
chamber will show in “Freezing temperature display area” B after the blink stops. When the setting
temperature reaches -24℃, it will turn to the maximum setting temperature -14℃when “Freezing
temperature adjustment button” I is pressed again. Namely, the setting temperature is displayed in an
order “-18→-19→-20→-21→-22→-23→-24→-14→-15→-16→-17→-18”.
Caution
In quick-freezing, intelligent or locked state, it’s not allowed to adjust the setting temperature in
the freezing chamber. If you intend to make adjustment in such state, the quick-freezing,
intelligent or lock icon will blink, and a warning tone will be given to indicate that the setting
temperature in the freezing temperature cannot be adjusted in the current state.
4-7.Door alarm
When the door is open or not closed properly for a long while, the refrigerator will give an alarm at
intervals to remind you to close the door tightly.
4-8.Power-off memory
Upon power-off, the working state will be memorized instantaneous, and the refrigerator will work in
the set state before power-off when it’s powered on again.
Caution
Locking function will not be memorized, and the refrigerator will be in unlocked sate when it’s
powered on again.

SERVICE MANUAL
Model: HRF-521DS6
13
Issue 2016-09-07
REF. Ref 1609S025V0.
Chapter 5 Control principal and related test functions
5-1.Refrigerator`s temperature control introduction
Switch point of fridge setting temperature is based on fridge sensor SNR temperature;
When the fridge SNR temperature is greater than the starting point, fridge`s large wind door will open;
When the fridge SNR temperature is less than shutdown point, fridge`s large wind door will close;
When the refrigerator SNRF temperature is greater than switch point, freezer fan motor will start, or fan
motor will stop.
Variable temperature position regulate by setting variable room`s key-press panel, the initial setting state
is in the fresh food section, once press set key, temperature position shift from right to left by recycling.
When the variable room SNRD SNR temperature is greater than the starting point,fridge`s small wind
door will open, or will close.
5-2. Defrost control
First power on to defrost & under fault state,compressor accumulatively work 5Hr, enter the state of
defrosting, fridge and freezer defrosting frozen at a time;
And do statistic and judgment according to the running time of compressor and refrigeration,frozen
door switch`s opening time, then defrosting fridge and freezer separately or simultaneously.
Under normal working condition:
Defrosting cycle can change by defrosting control, change defrosting cycle and the door opening
and closing times and time, inner temperature is related to environmental temperature.
Freezer defrosting:
When freezer door open more frequently, according to the different frequency, compressor defrost
one time every working 7~12 hours;
When freezer door open less times, according to the different frequency, compressor defrost one
time every working 12~24 hours;
The longest time for defrosting is refrigerator running 72 hours;
Fridge defrosting:
When fridge door open more frequently, according to the different frequency, compressor defrost
one time every working 3~6 hours;
When fridge door open less times, according to the different frequency, compressor defrost one time
every working 6~12 hours;
The longest time for defrosting is refrigerator running 72 hours;

SERVICE MANUAL
Model: HRF-521DS6
14
Issue 2016-09-07
REF. Ref 1609S025V0.
5-3. Sensor`s position and control principle
Name Mark Position
Freezer sensor F SNR Center of freezer air duct assembly
Refrigerator sensor R SNR Center of refrigerator air duct assembly
Freezer defrosting sensor RD SNR On the freezer evaporator
Environment temperature
sensor RT SNR Under the refrigerator hinge box
Notes: The parameters of refrigerator sensor and environment temperature sensor are the same,
and can be general.
The parameters of freezer sensor, refrigerator defrosting sensor and freezer defrosting sensor

SERVICE MANUAL
Model: HRF-521DS6
15
Issue 2016-09-07
REF. Ref 1609S025V0.
are the same and general.
5-4. Operating description of combination key
No. function state Enter operation Exit operation Time Remarks
1 Exhibition
function Lock
Press “Refrigerator” For a
long time & continue to clic
k
“Smart” for five times
The same with
enter operation
within
3s
Not memory
after power
off
2 Fault code Lock
Press “Refrigerator” For a
long time & continue to clic
k
“Freezer” for five times
The same with
enter operation;
No fault, exit
after 3 seconds;
Fault , exit
automatically
after 1 minutes
within
3s
Not memory
after power
off
3 Clear
EEPROM Lock
Press “Refrigerator”
For a long time
& continue to click
“Lock” for five times
Exit
automatically
within
3s
Not memory
after power
off
4 T mode Lock
Press “Freezer”
For a long time
& continue to click
“Smart” for five times
In T4 mode, click
“unlock” once,
exit after 3 seconds.
within
3s
Not memory
after power
off
5 Fine tuning Lock
Press “Freezer” For a
long time & continue to
click “Refrigerator” for
five times
The same with
enter operation
within
3s
Not memory
after power
off
6 Quick-cooling Unlock
Press “Refrigerator”
For a long time
The same with
enter operation
Long
by 3s
Memory
after power
off
7 Quick-freezin
g
Unlock Press “Freezer”
For a long time
The same with
enter operation
Long
by 3s
Memory
after power
off
8 Smart Unlock Press once The same with
enter operation
Long
by 3s
Memory
after power
off
9 Lock Unlock
Press “Lock/lock”
For a long time
The same with
enter operation
Long
by 3s
Not memory
after power
off
10 Smart, quick-cooling and quick-freezing have no priority.
Quick-cooling and quick-freezing can work at the same time.
Smart state can`t work together with quick-cooling and quick-freezing state.
11 Under smart state, invalid operation by pressing “Refrigerator” or “Freezer” once.

SERVICE MANUAL
Model: HRF-521DS6
16
Issue 2016-09-07
REF. Ref 1609S025V0.
Under quick-cooling state, invalid operation by pressing “Refrigerator” once.
Under quick-freezing state, invalid operation by pressing “Freezer” once.
12 Under lock state, Any single operation is invalid.
13 Main control panel :0061800283A
Mechanical key SW1 is “TEST” key, which can directly enter T mode.
Click once to enter T1; click twice to enter T2; enter T1 to T4 by recycle.
Mechanical key SW2 is “shorten time” key. Click and buzzer ring once, shorten 1 minutes;
Press once for 3s and buzzer ring once, shorten 30 minutes.

SERVICE MANUAL
Model: HRF-521DS6
17
Issue 2016-09-07
REF. Ref 1609S025V0.
Chapter 6 System flow principle
6-1.System flow scenograph
6-2.System flow chart

SERVICE MANUAL
Model: HRF-521DS6
18
Issue 2016-09-07
REF. Ref 1609S025V0.
Chapter 7 Circuit diagram
7-1. Main control PCB diagram

SERVICE MANUAL
Model: HRF-521DS6
19
Issue 2016-09-07
REF. Ref 1609S025V0.
7-2. Brief principle diagram

SERVICE MANUAL
Model: HRF-521DS6
20
Issue 2016-09-07
REF. Ref 1609S025V0.
Chapter 8 Trouble shooting and fault detecting
8-1. Frequent problem
Nu
m
fault
phenomenon Detection method Maintenance
measures Use tools
1 Do not powe
r
on
1、Detect whether main control panel, display panel
and frequency conversion panel is matching ;
2、detect whether frequency conversion panel and
main control panel is connected properly;
3、Detect whether Connecting line between
frequency conversion panel and compressor is
normal;
4、Detect whether main control panel outpu
t
frequency signal
5、Enter the mandatory start to detect whethe
r
compressor is working;
Replace
correct
Component
Screwdriver
、multimete
r
2
Door body is
uneven
Side by side series:
1、Minor unevenness can adjust bottom foot;
2、Large height difference can increase the gasket
in the lower hinge parts;
3、
A
djustable hinge door body can adjust hinge to be
even;
Adjust & Repair
Screwdriver、
multimeter 、
poke rod
3
Fridge is in
deep freeze
cooling
1、Closing the fridge air outlet, detect air outlet
position and assembly whether cold air blowing
around, if that is not tightly sealed;
2、Take fridge electric air outlet apart, repeatedly
switching freezer, detect whether air door can freely
switch on/off, and close closely;
3、If the Department does not move, you can test
damper wiring terminal position and the main control
panel ,and check every line`s conducting state
according to the color;
4、If line is normal but throttle can`t act, that means
main control panel or throttle fault; use the normal
throttle or main control panel for testing to confirm
final faulted piece;
5、The above detection without problems, test
whether parameters of fridge sensor 1 are normal.
1、If throttle is not
tightly sealed,
seal lax part with
Sponge article;
2、If padlock is
not tightly closed,
generally throttle
is bad;
3、maintain line
section;
4、Replace the
defective part;
5、Replace
sensor.
Screwdriver、
multimeter
4
Sometimes
panel shows
fault code, or
displays
1、Check connector between freezer sensor and the
box body, and the internal terminal backing out,
ensure contact well;
2、Test parameter of freezer sensor;
If terminal take
off, adjust and
repair internal
terminal
Screwdriver
Table of contents
Other Haier Refrigerator manuals

Haier
Haier AFE635C J Series User manual

Haier
Haier HRC3211AC User manual

Haier
Haier HC17SF10R User manual

Haier
Haier HRN 186 User manual

Haier
Haier HRF-420FDX User manual

Haier
Haier HB18FGSAAA User manual

Haier
Haier HRT18R1APW User manual

Haier
Haier HRF-628I 6 Series User manual

Haier
Haier RT-146A User manual

Haier
Haier SBFS21EDAW User manual

Haier
Haier HB21FWRSS User manual

Haier
Haier HSF04WNB User manual

Haier
Haier HSP02WNB User manual

Haier
Haier HRF15N3BGF User manual

Haier
Haier HSP04WND - 03-06 User manual

Haier
Haier HRF-656FF/A User manual

Haier
Haier HR-386KAAME User manual

Haier
Haier BC-110E User manual

Haier
Haier HRF-300M User manual

Haier
Haier HCR27L User manual