Haier HRQ04GNB - 06-01 User manual

Compact
Refrigerator
User Manual-
Guide de l’Utilisateur-
Manual del Usuario-
(Features may vary per model) Model #
Modèle
Para Modelo de
Refrigerador
Compacto
Réfrigérateur
Compact
HRQ04WNA
HRQ04GNB
(Les caractéristiques peuvent
varier en fonction du modéle)
(Las funciones pueden
variar según el modelo)
HRQ04WNA/HRQ04GNB 10/22/01 12:23 PM Page 1

SAFETY PRECAUTIONS
Read all of the instructions before using this appliance.
When using this appliance, always exercise basic safety
precautions, including the following:
1) Use this appliance only for its intended purpose as described in this use
and care guide.
2) This refrigerator must be properly installed in accordance with the
installation instructions before it is used. See grounding instructions in the
installation section.
3) Never unplug your refrigerator by pulling on the power cord. Always
grasp the plug firmly and pull straight out from the outlet.
4) Repair or replace immediately, all electric service cords that have become
frayed or otherwise damaged. Do not use a cord that shows cracks or
abrasion damage along its length, the plug or the connector end.
5) Unplug your refrigerator before cleaning or before making any repairs.
Note: If for any reason this product requires service, we strongly
recommend that a certified technician performs the service.
6) If your old refrigerator is not being used, we recommend that you remove
the doors and leave the shelves in place. This will reduce the possibility
of danger to children.
7) This refrigerator should not be recessed or built-in an enclosed cabinet. It
is designed for freestanding installation only.
8) Do not operate your refrigerator in the presence of explosive fumes.
SAVE THESE INSTRUCTIONS
For Future Reference
1
English
HRQ04WNA/HRQ04GNB 10/22/01 12:23 PM Page 2

2
Staple your receipt to your manual. You will need it to obtain
warranty service.
DANGER
Risk of child entrapment. Before you throw away your old
refrigerator or freezer, take off the doors. Leave the shelves
in place so that children may not easily climb inside.
As per UL 250 Standards
English
Thank you for using our Haier
product. This easy-to-use manual will
guide you in getting the best use of
your refrigerator.
Remember to record the model and
serial number. They are on a label in
back of the refrigerator.
Model number
Serial number
Date of purchase
HRQ04WNA/HRQ04GNB 10/22/01 12:23 PM Page 3

Table Of Contents
PAGE
Safety Precautions ..........................................................................1
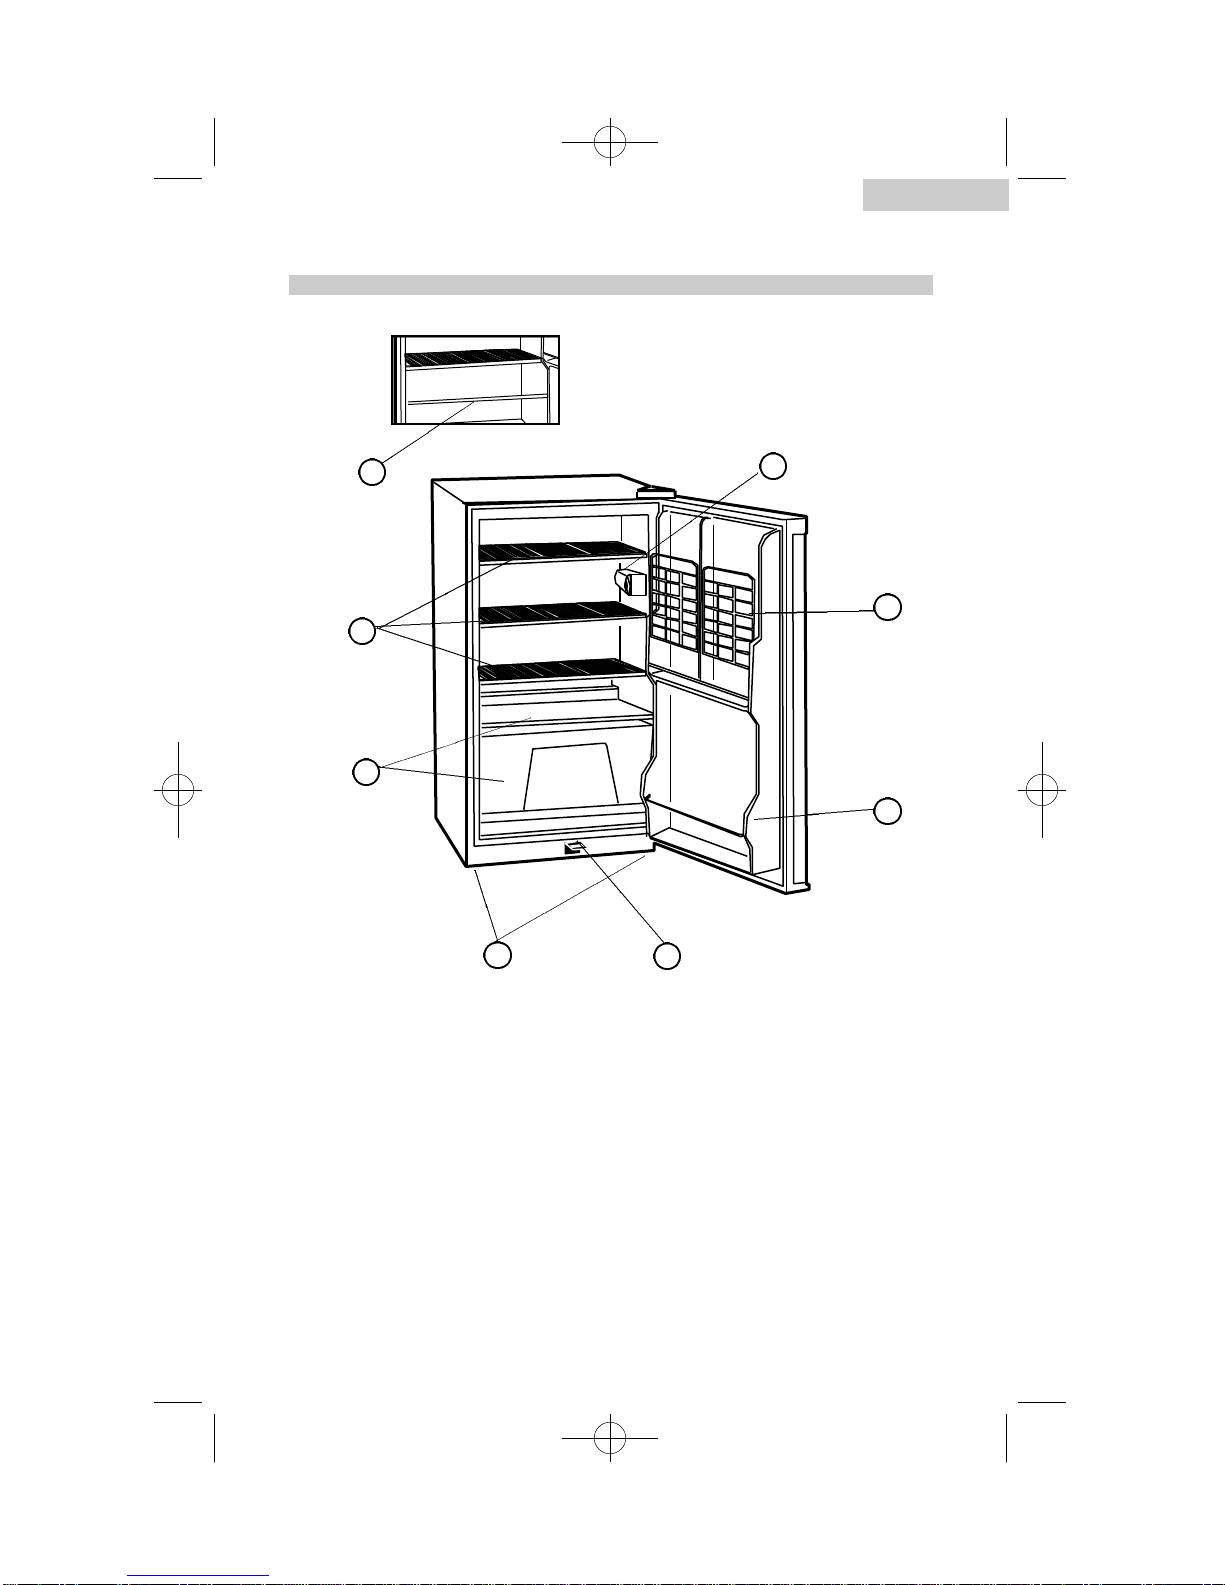
Parts And Features ..........................................................................4
Installing Your Refrigerator............................................................5
Unpacking Your Refrigerator ..................................................................5
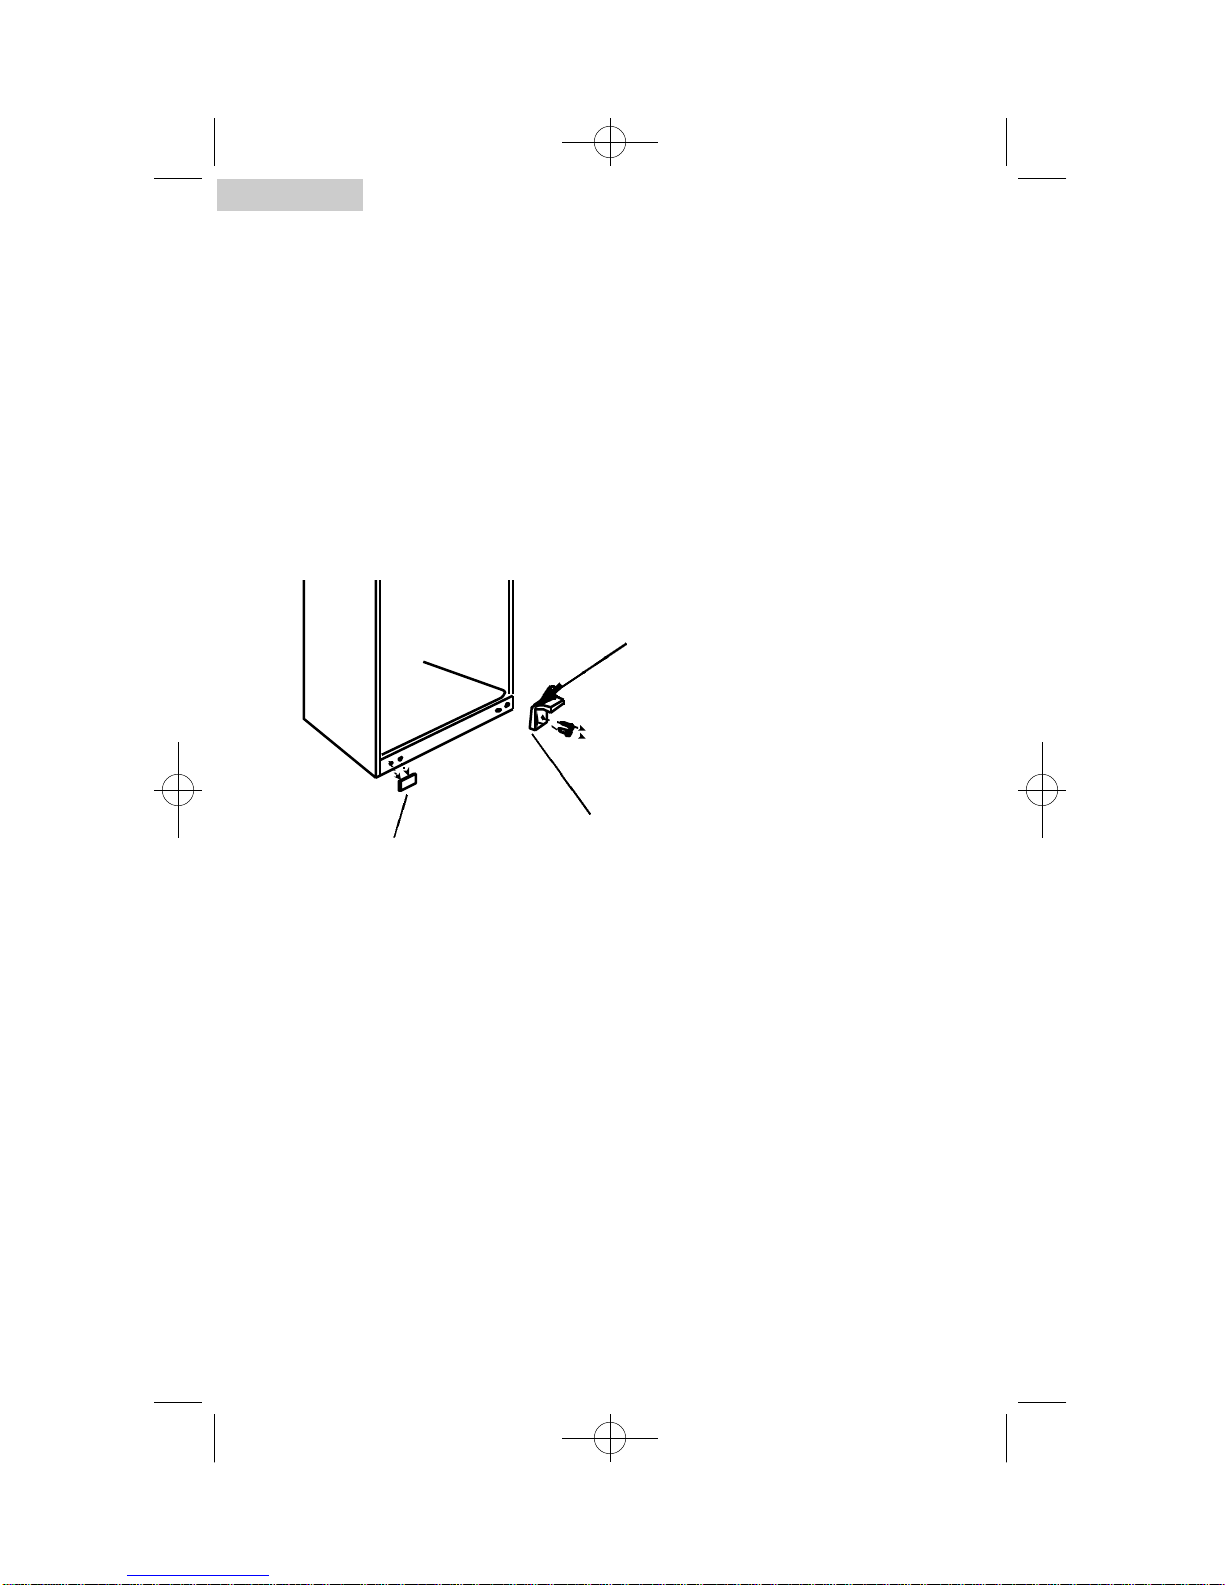
Leveling Your Refrigerator ......................................................................5
Proper Air Circulation ............................................................................5
Electrical Requirements............................................................................6
Door Alignment......................................................................................7
Door Reversal ........................................................................................8
Refrigerator Features And Use..........................................................10
General Features..................................................................................10
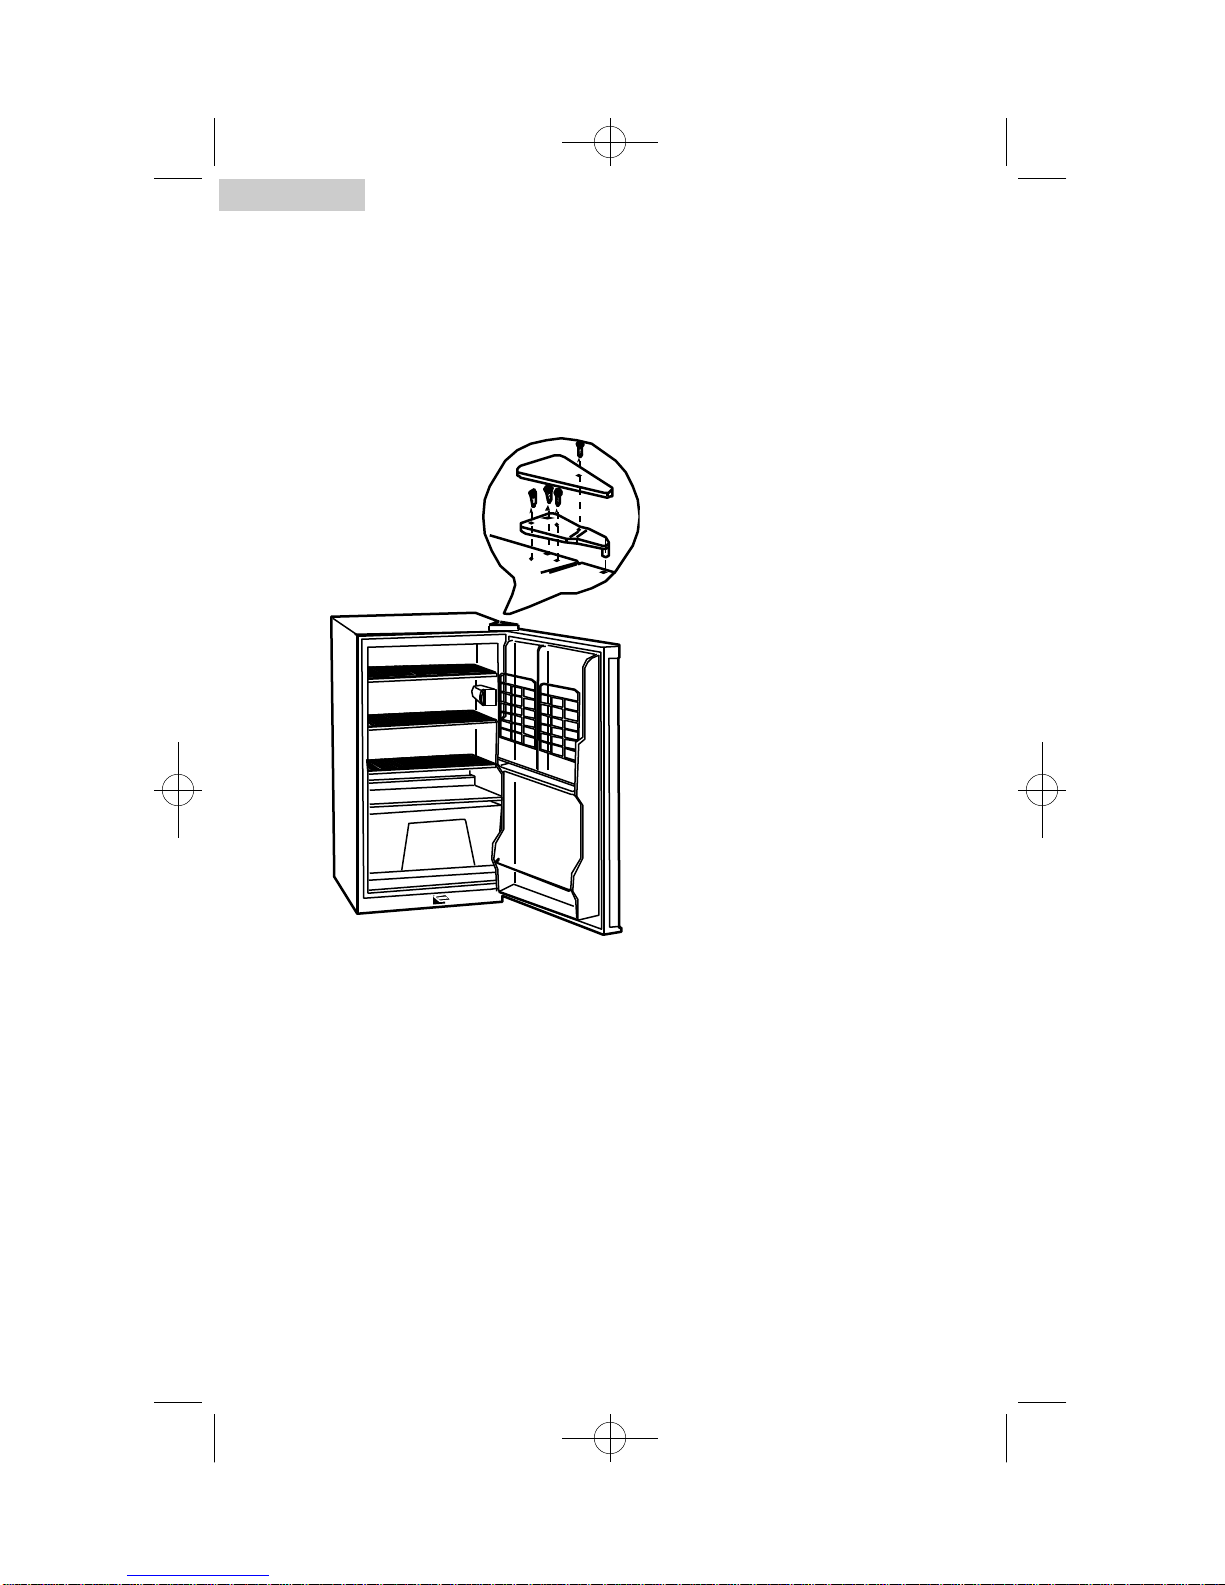
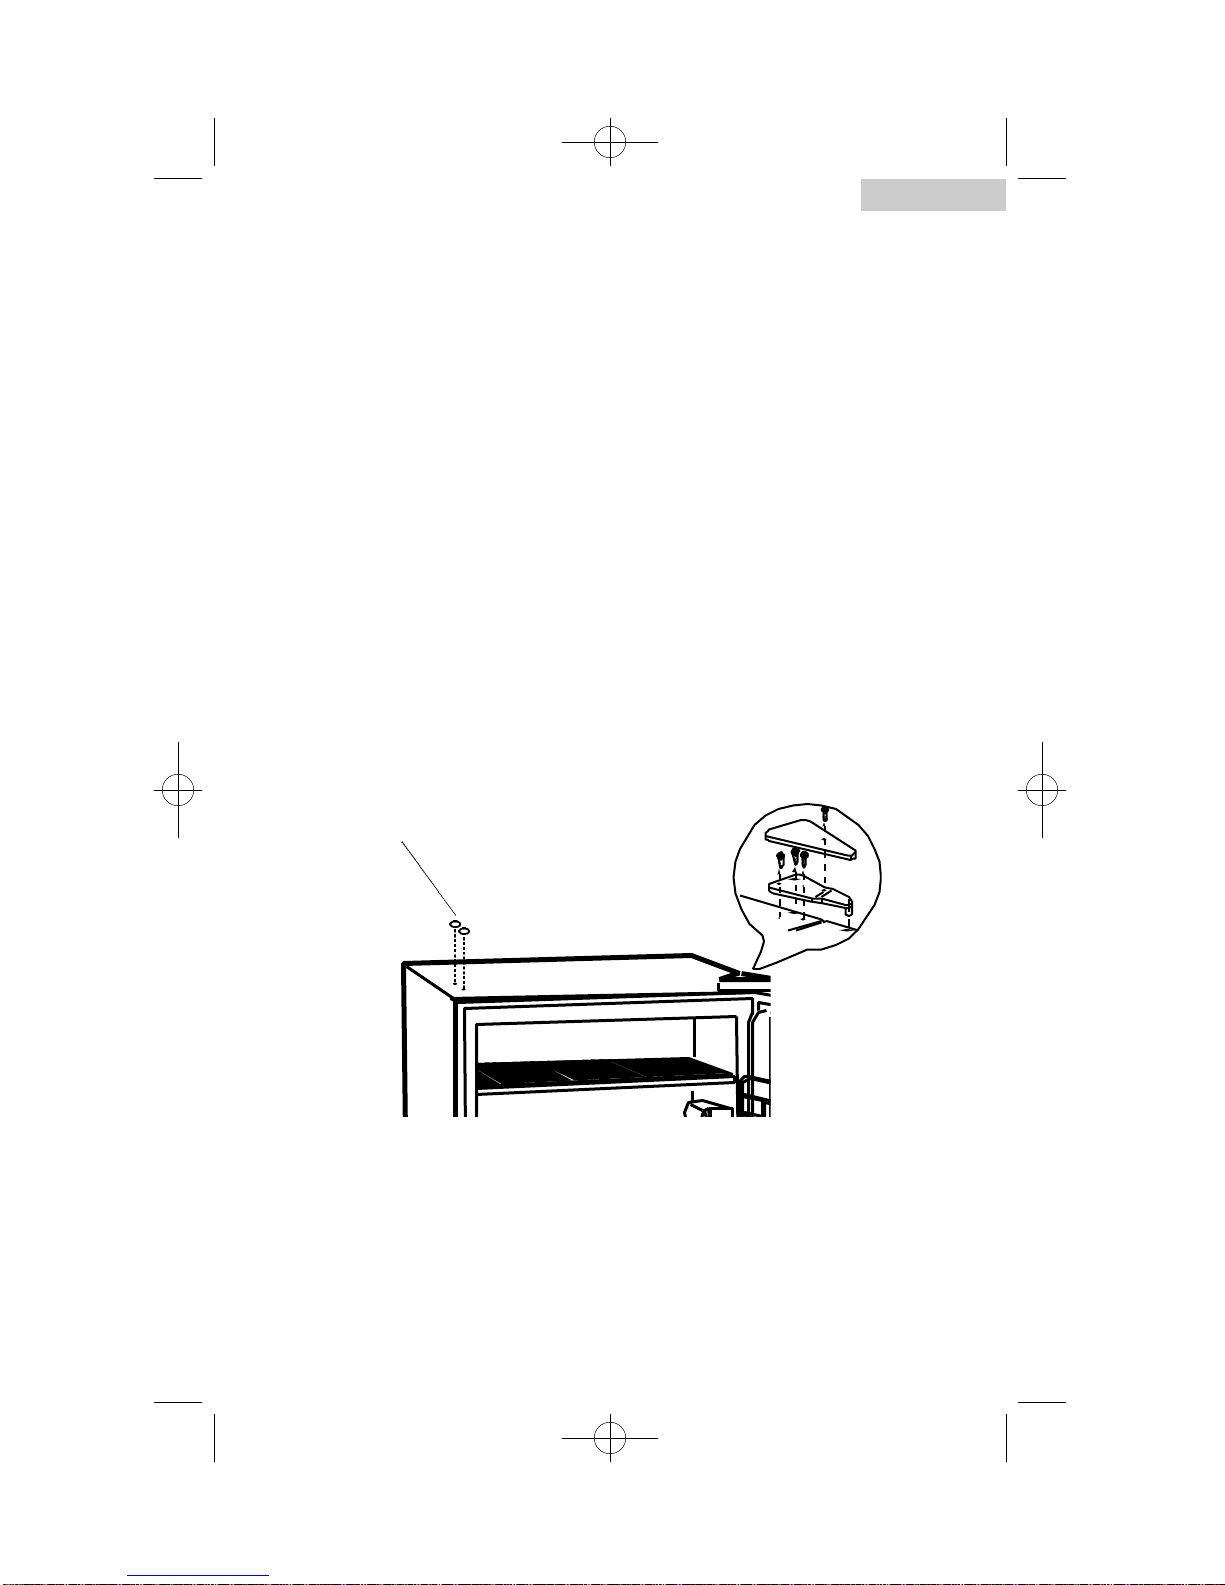
Refrigerator Interior Shelves ..................................................................10
Dispense-A-Can™................................................................................11
Light....................................................................................................11
Crisper................................................................................................12
Retainer Bar ........................................................................................12
Lock and Key ......................................................................................12
Food Storage Information ....................................................................13
Normal Operating Sounds....................................................................13
Proper Refrigerator Care and Cleaning ....................................14
Cleaning and Maintenance ..................................................................14
Power Interruptions ..............................................................................15
Vacation and Moving Care ..................................................................15
Troubleshooting..............................................................................16
Warranty Information ..................................................................18
English
3
HRQ04WNA/HRQ04GNB 10/22/01 12:23 PM Page 4

Parts And Features
1. Adjustable Temperature
Control and Light
2. “Dispense-A-Can™” can storage
3. Fixed Door Shelf to
Accomodate 2 Liter Bottles
4. Lock
5. Adjustable Front Leveling Leg
(not shown)
6. Crisper and Crisper Cover
7. 1 Slide-Out Shelf and
2 Slide-Out Flip Shelves or
2 Slide-Out Glass Shelves
8. Bottom Shelf Retainer Bar
(included as accessory)
English
4
3
4
5
6
7
81
2
HRQ04WNA/HRQ04GNB 10/22/01 12:23 PM Page 5

5
1. Remove all packaging material. This includes the foam base and all
adhesive tape holding the refrigerator accessories inside and
outside. Slide out and remove plastic or foam guard used to
secure the compressor from shipping damage due to vibration
and shock.
2. Inspect and remove any remains of packing, tape or printed
materials before powering on the refrigerator.
• Your refrigerator has two leveling legs which are located in the
front corners of your refrigerator. After properly placing your
refrigerator in its final position, you can level your refrigerator.
•Leveling legs can be adjusted by turning them clockwise to raise your
refrigerator or by turning them counterclockwise to lower
your refrigerator. The refrigerator door will close easier when the
leveling legs are extended.
• To assure your refrigerator works at the maximum efficiency it
was designed for, you should install it in a location where there
is proper air circulation, plumbing and electrical connections.
•The following are recommended clearances around the refrigerator:
Sides……………3/4 "(19mm)
Top....................2" (50mm)
Back..................2" (50mm)
Installing Your Refrigerator
Unpacking Your Refrigerator
Proper Air Circulation
Leveling Your Refrigerator
English
HRQ04WNA/HRQ04GNB 10/22/01 12:23 PM Page 6

English
Electrical Requirement
•Make sure there is a suitable power Outlet (115 volts, 15 amps outlet)
with proper grounding to power the refrigerator.
• Avoid the use of three plug adapters or cutting off the third grounding in
order to accommodate a two plug outlet. This is a dangerous practice
since it provides no effective grounding for the refrigerator and may
result in shock hazard.
•Do not install your refrigerator in any location not properly insulated or
heated e.g. garage etc. Your refrigerator was not designed to operate in
temperature settings below 55˚ Fahrenheit.
•Select a suitable location for the refrigerator on a hard even
surface away from direct sunlight or heat source e.g. radiators,
baseboard heaters, cooking appliances etc. Any floor unevenness
should be corrected with the leveling legs located on the front bottom
corners of the refrigerator.
Install Limitations
6
HRQ04WNA/HRQ04GNB 10/22/01 12:23 PM Page 7

7
1. Remove hinge cover screw.
2. Remove the top hinge cover.
3. Loosen the top hinge screws using a phillips head screwdriver.
4. Adjust the door or put a spacer in between and then tighten the screws.
5. Replace the top hinge cover.
Door Alignment (see fig. # 1)
fig. # 1
English
HRQ04WNA/HRQ04GNB 10/22/01 12:23 PM Page 8

English
Reversing the Door Hinge
1. Remove the top hinge cover screw and then remove
the top hinge cover. (see fig. # 1)
2. Using a Phillips Head Screwdriver, loosen and remove the
screws holding the top hinge in place. (see fig. # 1)
3. Remove the top hinge and carefully lift off the door.
4. Remove the screw hole plug from the opposite side and
insert the plug in the screw hole openings of the just
removed screws. (see fig. # 2)
5. Remove the door pin from the bracket of the lower
hinge by turning counter clockwise. Move the pin to the
opposite hole and tighten. (see fig. # 3)
6. Loosen the screws holding the lower hinge bracket
and remove the hinge.(see fig. # 3)
7. Align the holes in the lower hinge bracket to the
corresponding holes in the opposite side of the cabinet.
Insert and tighten the screws.(see fig. # 3)
8. Align the bottom hole on the left side of the door with the
pin of the lower hinge and slide into place.
fig. # 2
screw hole plugs
8
HRQ04WNA/HRQ04GNB 10/22/01 12:23 PM Page 9

English
9
9. Align the pin of the top hinge with top hole on the left
side of the door and push into place. Replace the screws in the
upper hinge bracket but do not tighten all the way.
10. Make sure the door closes easily but forms a tight seal.
Adjust the door as needed. Once you are satisfied with the door
alignment, completely tighten the upper door hinge screws.
11. Replace the hinge cover, insert the screw and
tighten completely. (see fig. # 2)
12. If the door does not close properly, refer to the
section titled “Door Alignment”.
fig. # 3
door pin
lower hinge bracket
screw hole plug
HRQ04WNA/HRQ04GNB 10/22/01 12:23 PM Page 10

Refrigerator Features And Use
To remove or replace a full-width slide-out shelf:
(see fig. # 4)
1. Gently tilt the shelf up and slide forward until the shelf has been
completely removed.
2. To replace the shelf, gently slide the shelf back.
General Features
Adjustable temperature dial:
Your refrigerator will automatically
maintain the temperature level you
select. The temperature control dial has
7 settings plus off. 1 is the warmest. 7 is
the coldest. Turning the dial to OFF stops
cooling in the refrigerator. At first, set
the dial to 4 and allow 24 hours to pass
before adjusting the temperature to your
needs.
(Note: If the refrigerator has
been placed in a horizontal or
tilted position for any period
of time wait 24 hours before
plugging the unit in.)
Refrigerator Interior Shelves
(Shelves will vary per model purchased)
fig. # 4
English
10
To use the interior flip shelf: (see fig. # 4)
1. Simply flip the shelf as shown in the diagram. This is designed to
give you extra storage for tall bottles.
HRQ04WNA/HRQ04GNB 10/22/01 12:23 PM Page 11

English
11
Using the Dispense-A-Can™
• Your refrigerator is equipped with the convenient “Dispense-A-Can™”
compartment. Each compartment will hold up to four cans. Simply load
the cans from the top. To dispense a can, simply draw one out from the
bottom. It is that easy.
fig. # 5
Light
• To replace burnt-out bulbs, remove the temperature control knob by
pulling it out (see fig. # 6a). Carefully pull the plastic light cover to the
left and remove. Unscrew the bulb and replace it with a new one (use
bulbs of 15 watts or less). To replace cover, insert the back slots into the
casing (see fig. # 6b). Align the front and push the control knob back in.
5fig. # 6a
fig. # 6b
HRQ04WNA/HRQ04GNB 10/22/01 12:23 PM Page 12

English
• Your refrigerator has a crisper. To remove the crisper, grab it firmly and
pull out. Slide back in to replace it (see fig. # 7).
Crisper
fig. # 7
12
Bottom Shelf Retainer Bar
• To use, remove crisper and crisper cover and insert the retainer bar in
existing slots (see fig. # 8).
fig. # 8
retainer bar
Lock and Key
• To use, insert key and turn (see fig. # 9).
fig. # 9
HRQ04WNA/HRQ04GNB 10/22/01 12:23 PM Page 13

13
English
Fresh Food
•When storing fresh food, which is not prepackaged, be sure to wrap or
store food in airtight and moisture proof material unless otherwise
noted. This will ensure proper shelf life and prevent the transfer of
odors and tastes.
• Wipe containers before storing to avoid needless spills.
•Eggs should be stored in an upright position in their original carton to
maximize shelf life.
•Fruit should be washed and dried then stored in sealed plastic bags
before storing in the refrigerator.
• Vegetables with skins should be stored in plastic bags or containers.
•Leafy vegetables should be washed and drained and then stored in
plastic bags or containers.
•Hot food should be allowed to cool before storing in the refrigeration.
This will prevent unnecessary energy use.
• Fresh seafood should be used the same day as purchased.
•When storing meats in the fresh food section, keep in the original
packaging or rewrap as necessary. Follow the suggestions below for
safe storage:
• Chicken 1-2 Days
• Ground Beef 1-2 Days
• Cold Cuts 3-5 Days
• Steaks/Roasts 3-5 Days
• Smoked/Cured Meats 7-10 Days
• All others 1-2 Days
Food Storage Information
•Boiling water, gurgling sounds or slight vibrations that are the result of
the refrigerant circulating through the cooling coils.
•The thermostat control will click when it cycles on and off.
Normal Operating Sounds You May Hear
HRQ04WNA/HRQ04GNB 10/22/01 12:23 PM Page 14

14
English
Warning: To avoid electric shock always unplug your
refrigerator before cleaning. Ignoring this warning
may result in death or injury.
Caution: Before using cleaning products, always read and
follow manufacturer’s instructions and warnings to
avoid personal injury or product damage.
General:
•Prepare a cleaning solution of 3-4 tablespoons of
baking soda mixed with warm water. Use sponge or
soft cloth, dampened with the cleaning solution, to
wipe down your refrigerator.
• Rinse with clean warm water and dry with a soft cloth.
•Do not use harsh chemicals, abrasives, ammonia,
chlorine bleach,concentrated detergents, solvents or
metal scouring pads. SOME of these chemicals may
dissolve, damage and/or discolor your refrigerator.
•Clean door gaskets every three months according to
general instructions. Gaskets must be kept clean and
pliable to assure a proper seal.
•Petroleum jelly applied lightly on the hinge side of gas-
kets will keep the gasket pliable and assure a good
seal.
Proper Refrigerator Care and Cleaning
Cleaning and Maintenance
Door Gaskets:
hat are the result of
and off.
HRQ04WNA/HRQ04GNB 10/22/01 12:23 PM Page 15

English
•Occasionally there may be power interruptions due to thunderstorms or
other causes. Remove the power cord from AC outlet when a power
outage occurs. When power has been restored, replug power cord to
AC outlet. If outage is for a prolonged period, inspect and discard
spoiled food in refrigerator. Clean refrigerator before reusing.
•
For long vacations or absences, empty food from refrigerator and
freezer, move the temperature DIAL to the OFF position and clean the
refrigerator and door gaskets according to "General cleaning" section.
Prop doors open, so air can circulate inside.When moving always move
the refrigerator vertically. Do not move with the unit lying down. Possible
damage to the sealed system could occur.
Power Interruptions
Vacation and Moving Care
15
HRQ04WNA/HRQ04GNB 10/22/01 12:23 PM Page 16

English
16
Refrigerator Does Not Operate
• Check if thermostat control is not in the “OFF” position.
• Check if refrigerator is plugged in.
•Check if there is power at the ac outlet, by checking the circuit breaker.
Food temperature appears too warm
• Frequent door openings.
•Allow time for recently added warm food to reach fresh
food temperature.
• Check gaskets for proper seal.
• Adjust temperature control to colder setting.
Food temperature is too cold
•If temperature control setting is too cold, adjust to a warmer
setting and allow several hours for temperature to adjust.
Refrigerator runs too frequently
•This may be normal to maintain constant temperature during
high temperature and humid days.
•Doors may have been opened frequently or for an extended
period of time.
• Check gasket for proper seal.
• Check to see if doors are completely closed.
TroubleShooting
HRQ04WNA/HRQ04GNB 10/22/01 12:23 PM Page 17

English
Moisture build up on interior or exterior
of the refrigerator:
• This is normal during high humidity periods.
• Prolonged or frequent door openings.
• Check door gaskets for proper seal.
Refrigerator has an odor:
• Interior needs cleaning.
• Foods improperly wrapped or sealed are giving off odors.
Refrigerator door does not shut properly:
• Level the refrigerator.
• Re-align refrigerator door.
•Check for blockages e.g. food containers, crisper cover,
shelves, bins etc.
17
HRQ04WNA/HRQ04GNB 10/22/01 12:23 PM Page 18

Limited Warranty
What is covered and for how
long?
This warranty covers all defects in work-
manship or materials for a period of:
12 months labor
12 months parts
5 years sealed system
The warranty commences on the date
the item was purchased and the original
purchase receipt must be presented to
the authorized service center before
warranty repairs are rendered.
EXCEPTIONS: Commercial or
Rental Use warranty
90 days labor (carry-in only)
90 days parts
No other warranty applies
What is covered.
1. The mechanical and electrical parts,
which serve as a functional, purpose
of this appliance for a period of 12
months. This includes all parts except
finish, and trim.
2. The components of the sealed system
e.g. hermetic compressor, condenser
and evaporator from manufacturing
defects for a period of 5 years from
the date of purchase. Any damages
to such components caused by
mechanical abuse or improper
handling or shipping will not be
covered.
What will be done?
1. We will repair or replace, at our dis-
cretion any mechanical or electrical
part which proves to be defective in
normal usage during the warranty
period so specified.
2. There will be no charge to the
purchaser for parts and labor on any
covered items during the initial 12
month period. Beyond this period
only parts are covered in the remain-
ing warranty. Labor is not provided
and must be paid by the customer.
3. Contact your nearest authorized
service center. For the name of the
nearest service center please call
1-877-337-3639
THIS WARRANTY COVERS
APPLIANCES WITHIN THE
CONTINENTAL UNITED STATES,
PUERTO RICO AND CANADA.
IT DOES NOT COVER
THE FOLLOWING:
Damages from improper installation.
Damages in shipping.
Defects other than manufacturing.
Damage from misuse, abuse, accident,
alteration, lack of proper care and
maintenance or incorrect current or
voltage.
Damage from other than household use.
Damage from service by other than an
authorized dealer or service center.
Decorative trims or replaceable
light bulbs.
Transportation and shipping.
Labor (after the initial 12 months).
THIS LIMITED WARRANTY IS GIVEN IN
LIEU OF ALL OTHER WARRANTIES,
EXPRESSED OR, INCLUDING THE
WARRANTIES OF MERCHANTABILITY
AND FITNESS FOR A PARTICULAR
PURPOSE
The remedy provided in this warranty is
exclusive and is granted in lieu of all
other remedies.
This warranty does not cover incidental
or consequential damages, so the above
limitations may not apply to you. Some
States do not allow limitations on how
long an implied warranty lasts, so the
above limitations may not apply to you.
This warranty gives you specific legal
rights, and you may have other rights,
which vary, from state to state.
Haier America Trading L.L.C.
New York, NY, 10018. 18
English
HRQ04WNA/HRQ04GNB 10/22/01 12:23 PM Page 19

HRQ04WNA/GNB-June 01
IMPORTANT
Do Not Return This Product To The Store
If you have a problem with this product, please contact the "Haier Customer
Satisfaction Center" at 1-877-337-3639.
DATED PROOF OF PURCHASE REQUIRED FOR WARRANTY SERVICE
IMPORTANT
Ne pas Réexpédier ce Produit au Magasin
Pour tout problème concernant ce produit, veuillez contacter le service des
consommateurs ‘Haier Customer Satisfaction Center’ au 1-877-337-3639.
UNE PREUVE D’ACHAT DATEE EST REQUISE POUR BENEFICIER DE LA GARANTIE.
IMPORTANTE
No regrese este producto a la tienda
Si tiene algún problema con este producto, por favor contacte el "Centro de Servicio al
Consumidor de Haier" al 1-877-337-3639 (Válido solo en E.U.A).
NECESITA UNA PRUEBA DE COMPRA FECHADA PARA EL SERVICIO DE LA GARANTIA
115V, 60 Hz
Made in China
Fabriqué en Chine
Hecho en China
Haier America Trading, L.L.C.
New York, NY 10018
Printed in China Part # RF-9999-A5
HRQ04WNA/HRQ04GNB 10/22/01 12:23 PM Page 58
This manual suits for next models
3
Table of contents
Other Haier Refrigerator manuals

Haier
Haier HC45SG42SW User manual

Haier
Haier HRZ-113 User manual

Haier
Haier HB21F User manual

Haier
Haier HS-26LDB User manual

Haier
Haier HRZ-60 User manual

Haier
Haier CH013 User manual

Haier
Haier HR-915C User manual

Haier
Haier HBCN02EBB User manual

Haier
Haier BCD-259DVC User manual

Haier
Haier HXC-936 User manual

Haier
Haier HFW7819EWMP User manual

Haier
Haier HR-138A User manual

Haier
Haier HB21FC45N Series User manual

Haier
Haier HRF-636I 6 Series User manual

Haier
Haier SC-230 User manual

Haier
Haier HRF- 329AA User manual

Haier
Haier HRD-073 User manual

Haier
Haier HRF328W2 User manual

Haier
Haier HRF-628I 6 Series User manual

Haier
Haier HSSR-13F1 User manual