Haier HW90-B14939S8 User manual

HW80-B14939S8
HW90-B14939S8
HW100-B14939S8
HW80-B14939
HW90-B14939
HW100-B14939

Thank You EN
2
Legend
Warning – Important Safety information
General information and tips
Environmental information
Disposal
Help protect the environment and human health. Put
the packaging in applicable containers to recycle it.
Help to recycle waste of electrical and electronic ap-
pliances. Do not dispose appliances marked with this
symbol with the household waste. Return the product
to your local recycling facility or contact your municipal
Thank you for purchasing a Haier Product.
Please read these instructions carefully before using this appliance. The instructions con-
tain important information which will help you get the best out of the appliance and ensure
safe and proper installation, use and maintenance.
Keep this manual in a convenient place so you can always refer to it for the safe and proper
use of the appliance.
If you sell the appliance, give it away, or leave it behind when you move house, make sure
you also pass this manual so that the new owner can become familiar with the appliance
and safety warnings.
WARNING!
of it. Remove the door catch to prevent children and pets to get closed in the appliance.

EN Content
3
1-Safety information........................................................................................................................... 4
2-Product description......................................................................................................................... 7
3-Control panel .................................................................................................................................... 8
4-Programmes...................................................................................................................................11
5-Consumption..................................................................................................................................12
6-Daily use...........................................................................................................................................13
7-Eco-friendly washing ....................................................................................................................18
8-Care and cleaning ..........................................................................................................................19
9-Troubleshooting .............................................................................................................................22
10-Installation.....................................................................................................................................25
11-Technical data...............................................................................................................................29
12-Customer service........................................................................................................................30

1-Safety information EN
4
Before switching on the appliance for the rst time read the follow-
ing safety hints!
WARNING!
Before rst use
▶Make sure there is no transport damage.
▶Make sure all transport bolts are removed.
▶Remove all packaging and keep out of children´s reach.
▶Handle the appliance always with at least two persons because it
is heavy.
Daily use
▶This appliance can be used by children aged from 8 years and
above and persons with reduced physical, sensory or mental ca-
pabilities or lack of experience and knowledge if they have been
given supervision or instruction concerning use of the appliance
in a safe way and understand the hazards involved.
▶Keep away children under 3 years of age from the appliance un-
less they are constantly supervised.
▶Children shall not play with the appliance.
▶Do not let children or pets come close to the appliance when the
door is open.
▶Store washing agents out of reach of children.
▶Pull up zips, x loose threads and take care for small items to pre-
vent laundry from being entangled. If necessary, use an appropri-
ate bag or net.
▶Do not touch or use the appliance when barefoot or with wet or
damp hands or feet.
▶Do not cover or encase the appliance during operation or after-
wards to allow any moisture or dampness to evaporate.
▶Do not place heavy objects or sources of heat or damp on top of
the appliance.
▶Do not use or store flammable detergent or dry cleaning agent in
close vicinity to the appliance.
▶Do not use any flammable sprays in close vicinity to the appliance.
▶Do not wash any garments treated with solvents in the appliance
without having dried them previously in the air.

EN 1-Safety information
5
WARNING!
Daily use
▶Do not remove or insert the plug in the presence of flammable
gas.
▶Do not hot wash foam rubber or sponge-like materials.
▶Do not wash any laundry which is polluted with flour.
▶Do not open detergent drawer during any wash cycle.
▶Do not touch the door during the washing process, it gets hot.
▶Do not open the door if the water level is visibly over the porthole.
▶Do not force the door to open. The door is tted with a self-lock
device and will open shortly after the washingprocedure is ended.
▶
undertaking any routine maintenance and disconnect the appli-
ance from the electrical supply to save electricity and for safety.
▶Hold the plug, not the cable, when unplugging the appliance.
Maintenance / cleaning
▶Make sure children are supervised if they carry out cleaning and
maintenance.
▶Disconnect the appliance from the electrical supply before un-
dertaking any routine maintenance.
▶Keep the lower part of the porthole clean and open door and de-
tergent drawer if appliance is not in use to prevent odours.
▶Do not use water spray or steam to clean the appliance.
▶Replace a damaged supply cord only by the manufacturer, its ser-
▶Do not try to repair the appliance by yourself. In case of repair
please contact our customer service.
Installation
▶The appliance should be placed in a well-ventilated place. Ensure
a location which allows opening the door fully.
▶Never install the appliance outdoors in a damp place, or in an area
which may be prone to water leaks such as under or near a sink
unit. In the event of a water leak cut power supply and allow the
machine to dry naturally.

1-Safety information EN
6
Intended use
This appliance is intended for washing machine-washable laun-
dry only. Anytime follow the instructions given on the label of each
garment label. It is designed exclusively for domestic use inside the
house. It is not intended for commercial or industrial use.
Changes or modications to the device are not allowed. Unintended
use may cause hazards and loss of of all warranty and liability claims.
WARNING!
Installation
▶Install or use the appliance only where the temperature is above
5 °C.
▶Do not place the appliance directly on a carpet, or close to a wall
or furniture.
▶Do not install the appliance in direct sunlight or in the near of heat
sources(e.g. stoves, heaters).
▶Make sure that the electrical information on the rating plate
agrees with the power supply. If it does not, contact an electri-
cian.
▶Do not use multi-plug adapters and extension cables.
▶Make sure only the delivered electric cable and hose set are used.
▶Make sure not to damage the electric cable and the plug. If dam-
aged have it replaced by an electrician.
▶Use a separate earthed socket for the power supply which is easy
accessible after installation. The appliance must be earthed.
Only for UK: The appliance’s power cable is tted with 3-cord
(grounding) plug that ts a standard 3-cord (grounded) socket.
Never cut o or dismount the third pin (grounding). After the ap-
pliance is installed, the plug should be accessible.
▶Make sure the hose joints and connections are rm and there is
no leakage.

EN 2-Product description
7
2.1 Picture of appliance
Front (Fig. 2-1): Rear side (Fig. 2-2):
2.2 Accessories
Check the accessories and literature in accordance with this list (Fig. 2-3):
Note:
-
2-3
1 Detergent /
Softener drawer
2 Work top
3 Programme selector
4 Panel
5 Washer door
6 Service flap
7 Adjustable feet
2-1 2-2
Inlet hose-
assembly 5 Blanking
plugs
Drain hose
bracket User manual
Warranty
card
Noise reduc-
tion pads
2x
2x
7
5
6
3
14
2
Eco40-60
Refresh
Cotton20°C
Duvet
Quick15’
BabyCare
Anti-crease
Shirt
Fast
T1 T2
T3 S1
S2 S6
S4
T4
134
265
1 Transportation bolts (T1-T4)
2 Back cover
3 Back cover screws (S1-S6)
4 Power cord
5 Water inlet valve
6 Drain hose
S3 S5

3-1
3-2
3-3
3-4
Eco 40-60
Refresh
Cotton 20°C
Duvet
Quick 15’
Baby Care
Anti-crease
Shirt
Fast
Eco 40-60
Refresh
Cotton 20°C
Duvet
Quick 15’
Baby Care
Shirt
Fast
Anti-crease
By turning the knob(Fig. 3-3), one of 15 programmes
(the OFF is not included) that can be selected, its def-
ault settings will be displayed.
Turn the knob to any position (except OFF) to start the
machine. Turn knob the OFF position to shut down the
machine(Fig. 3-2).
Steam washing
Locking the door
Child lock
▶
▶
▶
3.1 OFF

9
3.5 Function buttons
polanoitiddaelbane)6-3.giF(snottubnoitcnufehT -
tions in the selected programme before the program-
me starts. The related indicators are displayed.
By switching off the appliance or setting up a new pro-
gramme, all options are disabled.
If a button has multiple options, the desired option can
be selected by pressing the button sequentially.
By pressing the buttons, when it is in bright light, the
function is selected.
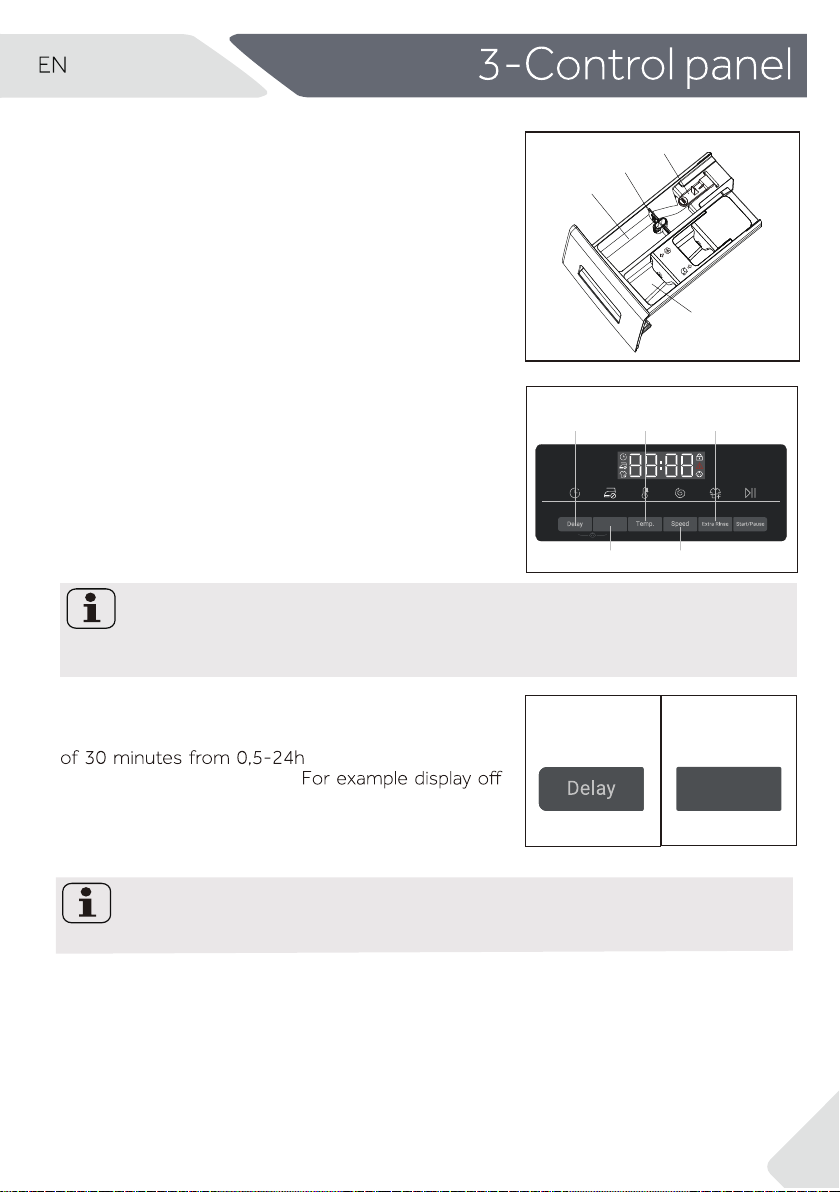
3.5.1-Function button “Delay“
3.5.2 Function button “Anti-crease”
Note: Factory settings
To get the best results in each programme, Haier has well defined specific default
settings. If there is no special requirement, default settings are recommended.
3.4 Detergent drawer
Open dispenser drawer, the following components can
be seen (Fig. 3-5):
1: compartment for powder or liquid detergent.
2: detergent flap slector, lift it up for powder detergent,
keep it down for liquid detergent.
3: compartment for softner.
4: lock tab, press it down to pull out dispenser drawer.
The recommendation on the type of the detergents
is suitable for the various washing temperatures.
Please refer to the manual of detergent(see P11).
Press amme
rgorpehttratsot)7-3.giF(nottubsiht
with a delay. End time delay could be increased in steps
6:30 means end of programme
(
End time will longer th-
programme time).
cycle will be in 6 hours
and 30
min
utes.
Press “Start/Pause” button to activate
delay. It is not applicable to programme Spin,the time
Refresh.
3.5.1
Note: Liquid detergent
If using liquid detergent, it is not recommended to activate the end time delay.
1
2
4
3
an original
3-5
3-6
3-7 3-8
Anti-crease
3.5.3 3.5.5
3.5.2 3.5.4
Anti-crease
For those programmes that can select "Anti-crease" function (Fig. 3-8) , press "Anti-crease"
button to select this function and the corresponding icon will light up. Press again or select
another programme, this feature will be cancelled.
Under "Anti-crease" function, the max spin speed will be set to 800 rpm.
After spin, the washing machine keeps intermittent operation to shake off the clothes to
prevent mildew and odor, reduce wrinkles and make them smoother after hanging up.
During operation, the LED display will show “ - ” “ -- ” “ --- ” “ ---- ”, and this phase lasts for
12 hours at most, users can press "Start/Pause" to terminate the programme at any time.

3-Control panel EN
10
3.5.4 Function button“Speed“
Press this button (Fig. 3-10) to change or deselect the
spin of the programme. If no value is illuminated the dis-
play"0"the laundry will not spin.
3.6 “Start/Pause“ button
Press this button (Fig. 3-12) gently to start or inter-
rupt the currently displayed programme. During pro-
gramme setting and during programme run the LED
above the button is shining, or if interrupted blinking.
3.5.5 “Extra Rinse”button
Press this button (Fig. 3-11) to rinse the laundry more
intense with fresh water. This is recommended for people
with sensitive skin.
-ddaeerhtotorezsemitlarevesnottubeht
Pressing
yB
itional cycles can be selected. They appear in the display
with P--0/P--1/P--2/P--3.
3.7 Child lock
Choosing a programme and then start, touch button“ Del-
ay”and ”Anti-crease”( Fig .3-13) for 3 seconds simulta-
neously to block all panel elements against activation,
panel display . For unlocking please touch again the
two buttons.The child lock indicator lights up when the
child lock works. Feature is optional when the machine
is running.
The display shows CLOI-(Fig. 3-14) if a button will be
pressed, when the child lock is activated. The change
is not running.
Different programme opti-
ones are diffrent.
3-10
3-11
3-12
3-13
3-14
Anti-crease
3.5.3 Function button “Temp.“
Press this button (Fig. 3-9) to change the washing tem-
perature of the programme. If no value is illuminated
(the display“--°C”) the water will not be heated.
3-9
Note: The procedure to check the number of cycles that the
machine has run.
Procedure: under standby mode, select "cotton" programme first, then press “temp.”
and "speed" at the same time, it will display the number of running cycles for 2 seconds,
and then back to standby interface. The cumulativer running cycles will add 1 after the
programme ends. The running cycles will be displayed in hexadecimal if it is over 9999.

3
2
1)
Water is not heated up.
*
Choose 90°C wash tempera ture only for special hygienic requirements.
2)
Reduce detergent amount because programme duration is short.
The design and specifications are subject to change without notice for quality
improvement purposes.
Max. load Temperature Preset
spin
speed
in rpm
Function
in kg in °C 1)
Preset
Extra Rinse
Delay
Programme selectable
range 1 2
Fabrics
type
Detergent compartment for:
1
2
Detergent
Softener or care product
1
2
Anti-crease
HW80/HW90
/HW100
3
•Yes, º
Optional, / No
EN 4-Programmes
11
Cotton 8/9/10 * to 90 40 Cotton 1400
•ºº º º
Synthetic or mixed
fabric 1200Synthetics * to 60 40 •º
8/9/10 º º º
1000Mix * to 60 30 •
4/4.5/5 º
Duvet
º º º
800* to 40 •º
30
Machine-washable
fabric made of wool
or with wool content
4/4.5/5Duvet º º º
* to 90 60 •º
Delicate laundry and
silk
10008/9/10Allergy Care º º º
60 •º
Cotton
10004/4.5/5 * to 90Baby Care º º º
Cotton / Synthetic
* to 40 1000402.5/3/3.5Shirt •ºº º º
/ //
Cotton / Synthetic
1Refresh / / / / /
8/9/10 40 •
Cotton / Synthetic
1000Fast * to 40 ºº º º
Cotton / Synthetic
* to 40 •º800Wool 2/2.5/3 * / º º
Delicate 2/2.5/3
all fabrics
600* to 30 30 •ºº º º
•1000
º
Cotton
Cotton 20°C 8/9/10 º º º
/ / 14008/9/10 •º
/
Eco 40-60 / / º
Spin 8/9/10 / / / / 1000 / /
Non-fragile fabric
4/5/6 * to 40 * •º
Lightly soiled mixed-
laundry of cotton and
synthetic
Quick 15’ 1000 º º
2)
º
/ /
º

12
5-Consumption EN
Note: Auto Weight
The appliance is equipped with a loading recognition. At low loading, energy, water and
washing time will be reduced automatically in some progr
ammes.
The display shows AUtO.
Scan QR code on energy label for energy consumption information.
The actual energy consumption may differ from the declared one according to local
conditions.

6.3 Preparing laundry
▶Sort out clothes according to fabric (cotton, syn-
thetics, wool or silk etc.) and how to dirty they are
--wfognillebaleracehtotnoitnettayaP.)3-6.giF(
ashing labels.
▶Separate white clothes from coloured ones.
they fade or run.
▶Empty pockets (keys, coins, etc.) and remove
harder decorative objects (e.g. brooches).
▶
into a wash bag to care for this delicate laundry
(hand or dry cleaning would be better).
▶Close zippers, velco fastener and hooks, make
sure the buttons are sewn on tightly.
▶
hem, delicate underwear (Dessous) and small
items such as socks, belts, bras, etc. in a wash
bag.
▶Unfold large pieces of fabric such as bed sheets,
bedspreads etc.
▶Turn jeans and printed, decorated or color-inten-
sive textiles inside out; possibly wash separately.
6.1 Power supply
Connect the washing machine to a power supply
(220V to 240V~/50Hz; Fig. 6-1). Please refer also to
section INSTALLTION (see P28).
6.2 Water connection
▶Before connecting check the cleanliness and clar-
ity of the water inlet.
▶Turn on the tap (Fig.6-2).
Note: Tightness
Before use check for leakage in the joints between the tap and the inlet hose by turning on
the tap.
CAUTION!
Non-textile, as well as small, loose or sharp-edged items may cause malfunctions and
damage of clothes and appliance.
6-3
6-1 6-2
6-Daily use
EN
13

Care chart
Washing
Washable up to 95°C
normal process Washable up to 60°C
mild process
Washable up to 40°C
normal process Washable up to 40°C
mild process Washable up to 40°C
very mild process
Washable up to 30°C
normal process Washable up to 30°C
mild process Washable up to 30°C
very mild process
Wash by hand
max. 40°C Do notwash
Bleaching
Any bleaching allowed Only oxygen/
non-chlorine Do not bleach
Drying
Tumbledryingpossible
normal temperature Tumbledryingpossible
lower temperature Do not tumble dry
Line drying Flat drying
Ironing
Iron at a maximum
temperature
up to 200 °C
Iron at a medial tem-
perature
up to 150°C
Iron at a low temper-
ature up to 110 °C;
withoutsteam(steam
ironing may cause irre-
versible damage)
Do not iron
Professional Textile Care
Dry cleaning in tetra-
chloroethene Dry cleaning in hy-
drocarbons Do not dry clean
Professional wet clean Do not professional
wet clean
6.4 Loading the appliance
▶Put in the laundry piece by piece.
▶
thumb for maximum load: Keep six inches between load and drum top.
▶Close the door carefully. Make sure that no pieces of laundry are pinched.
6-Daily use EN
14

6.5 Selecting detergent
▶
▶Use only machine wash approved detergent.
▶
▶See tips for countertop detergent stickers.
.
▶Do not use dry cleaning agents such as trichloroethylene and similar products.
Choose the best detergent
Programme
Kind of detergent
Universal Colour Delicate Special Softener
Cotton L/P L/P - - o
Synthetics --
L/P -
Duvet
-
Wool
- -
L L/P
L L/P -
Allergy Care L/P L/P - o
o
Baby Care - - L/P
Refresh
L/P L/P - - o
- -
- - -
Mix
L L - - o
Quick 15’
L - - o
Fast
- L/P L/P o
Spin
- - L/P L/P o
Cotton 20℃L/P L/P - - o
Eco 40-60 L/P L/P - - o
L = gel-/liquid detergent P = powder detergent O = optional _= no
If using liquid detergent, it is not recommended to activate the time delay.
We recomment by using:
▶Laundry powder: 20°C to 90°C* (best use: 40-60°C)
▶Color detergent: 20°C to 60°C (best use: 30-60°C)
▶Wool/delicate detergent: 20°C to 30°C (best use: 20-30°C)
* Choose 90 °C wash temperature only for special hygienic requirements.
If you choose the water temperature 60°C or above, we would like to advise you to use
less detergent. Please kindly use the special disinfectant, which is suitable for cotton or
synthetic cloth.
*
* It is better to use less or free suds detergent powder.
15
EN 6-Daily use
-
L/P
L/P
o
-
o
-
Delicate
shirt
- - - - -

6.7 Switch on the appliance
6.6 Adding detergent
1. Slide out the detergent drawer.
2. Put the required chemicals into corresponding
compartments (Fig. 6-4),
3. Push back the drawer gently.
Note:
▶Remove detergent residues before next wash cycle from the detergent drawer.
▶Do not overuse detergent or softener.
▶Please follow the instruction on the detergent package.
▶
▶Concentrated liquid detergent should be diluted before adding.
▶Do not use liquid detergent if function “Delay“ is selected.
▶Carefully choose the programme settings according to the care symbols on all laun-
dry labels and according to the programme table.
6.8 Select a programme
To get the best washing results, select a programme
type.
Turn the programme knob (Fig. 6-6) to select the right
programme. The default settings are displayed.
6.9 Add individual selections
Select required options and settings (Fig. 6-7); refer to
Control Panel.
6-5
6-6
6-4
Note: Odour removal
amount of detergent in washing agent compartment (2) or special
“COTTON+90 °C+600rpm”
cleaner
to remove possib
machine ly corruptive residues.
6-7
1
3
2
Turn the knob to any position (except OFF and Spin) to
start the machine. Turn the knob to the OFF position to
shut down the machine(Fig. 6-5).
16
6-Daily use EN
Eco 40-60
Refresh
Cotton 20°C
Duvet
Quick 15’
Baby Care
Shirt
Fast
Anti-crease

1. At programme cycle end END is displayed.
2.
3. Remove laundry as soon as possible to go easy on it and to prevent more wrinkling.
4.
5. Unplug the power cord.
6. Open the door to prevent formation of moisture and odours. Let it open while not used.
6.13 Activate or deactivate the buzzer
The acoustic signal can be deselected if necessary:
1. Switch on the appliance.
2. Select the programme.
Press the “Anti-crease” button and ”Temp.” button and “Extra Rinse” button at the
same time for about 3 seconds. “BEEP OFF” will be displayed and the buzzer will be
deactivated.
.3
To interrupt a running programme press gently “Start/Pause“. The LED above the button
is flashing. Press it again to resume operation.
To cancel a running programme and all its individual settings:
1. Press ”Start/Pause” button to interrupt the running programme.
2.
3.
After closing the programm to restart the appliance,select a new programme and
6.12 After washing
Note: Door lock
For safety reasons the door is locked partially during the washing cycle. It is only pos-
sible to open the door at the end of the programme or after the programme was can-
celled correctly (see description above).
In case of high water level, high water temperature and during spinning it is not pos-
sible to open the door; Locl- is displayed.
Note: Standby-mode / energy-saving mode
The switched on appliance will go into standby-mode if it will not be activated within 2
This saves energy.
6.10 Start wash programme
Press “Start/Pause” button (Fig. 6-8) to start. The LED stops flashing
and lights up continuously.
Appliance operates according to present settings.
Changesareonly possiblebycancellingtheprogramme.
6.11 Interrupt / cancel wash programme
6-8
EN 6-Daily use
17
Turn the knob to select the programme "Spin" and Press "Speed" (slecet speed "0")
XIM
start it.
meme
▶
▶
For activating the buzzer touch these three buttons at the same time again. “bEEP ON”
will be displayed.
to drain the water.

Environmentally responsible use
▶
To achieve best use of energy, water, detergent and time you should use the recom-
mended maximum load size.
▶Do not overload (hand width clearance above laundry).
▶For slightly soiled laundry select the Express 15’ programme.
▶Apply exact dosages of each washing agent.
▶
ciently cleaning below 60°C.
▶Raise default settings only due to heavy staining.
▶Select max. spinning speed if a domestic dryer is used.
7-Eco-friendly washing EN
18
-iffe era stnegreted nredom-erutarepmet gnihsaw etau qeda tsewol ehtesoohC

8.1 Cleaning the detergent drawer
Take always care there are no detergent residues.
Clean the drawer regularly (Fig. 8-1):
1. Pull out the drawer until it stops.
2. Press the release button and remove the drawer.
3. Flush the drawer with water until it is clean and
insert the drawer back in the appliance.
8.2 Cleaning the machine
▶Unplug the machine during cleaning and mainte-
nance.
▶Use a soft cloth with soap liquid to clean the ma-
chine case (Fig. 8-2) and rubber components.
▶Do not use organic chemicals or corrosive sol-
vents.
To prevent blockage of water supply by solid substan-
▶
supply.
▶Unscrew the water inlet hose at the back (Fig.
8-3) of the appliance as well as on the tap.
▶
▶
8.4 Cleaning the drum
▶
Remove accidentally washed items,especially met-
al parts such as pins, coins, etc. from the drum (Fig.
8-5) because they cause rust stains and damage.
▶Use a non-chloride cleaner for removing rust
stains. Observe the warning hints of the cleaning
agent manufacturer.
▶Do not use any hard objects or steel wool for clean-
ing.
8-5
8-2
8-Care and cleaning
EN
19
2
1
8-1
Eco40-60
Refresh
Cotton20°C
Duvet
Quick15’
BabyCare
Anti-crease
Shirt
Fast
8-4
8-3

8.5 Long periods of disuse
If the appliance is left idle for a longer period:
1. Pull out the electrical plug (Fig. 8-6).
2.
3. Open the door to prevent formation of moisture
and odours. Let door open while not used.
Before next usage check carefully power cord, water
inlet and drain hose. Make sure everything is properly
installed and without leackage.
8-6 8-7
8-Care and cleaning EN
20
1.
2. Push and open service flap (Fig. 8-9).
3. Provide a flat container to catch leach water
(Fig. 8-10). There could be bigger amounts!
4. Pull the drainhose out and hold its end above the
container (Fig. 8-10).
5. Take the sealing plug out of the drainhose (Fig.
8-10).
6. After complete drainage close drainhose (Fig.
8-11). and push it back into the machine.
7. Unscrew and remove counter clockwise the pump
8. Remove contaminants and dirt (Fig. 8-13).
WARNING!
hot! Before any action please ensure water has
cooled down.
for instance if the appliance:
▶Doesn´t drain the water.
▶Doesn´t spin.
▶Cause unusual noise while running.
8
8
8
8-10 8-11
8-12 8-13
8-8 8-9
This manual suits for next models
5
Table of contents
Other Haier Washer manuals

Haier
Haier LMA0120WPAB0 User manual

Haier
Haier HWM120-01A6 User manual

Haier
Haier XPB60-CS User manual

Haier
Haier XQB60-68 User manual

Haier
Haier HW-B1270 User manual

Haier
Haier HW-B1060TVE User manual

Haier
Haier HW70-B1239 User manual

Haier
Haier HWM130-0523S User manual

Haier
Haier XQB70-10 User manual

Haier
Haier HW120-B14686 Series User manual

Haier
Haier HWF90BW1 User manual

Haier
Haier HW90 User manual

Haier
Haier HW70-1402D User manual

Haier
Haier HW100-B14636N User manual

Haier
Haier XPB90-99VGS User manual

Haier
Haier HVS1000 User manual

Haier
Haier HWM150-0623S User manual

Haier
Haier HW100-BDV14979S8U1 User manual

Haier
Haier 50FREE-3 User manual

Haier
Haier HWM65-0523K User manual