Haier XQS60-78H User manual

Fuzzy Computerized Automatic
Washing Machine
User's manual
This manual is for
Please read this manual
carefully before using.
Retain it for future reference.
XQS60-78H
User's manual
W0030804888A

1. Heating function can be selected for "STANDARD", "QUICK", "JEAN"
and " POSTHASTE" programs, but it's unavailable for "RINSE "process.
2. If heating function is selected, for water levels "1"or "2", it begins to heat after
water reaches the set level, and begins to wash when the set temperature is
reached; for water levels "3"-"6", it begins to heat upon water reaching level "2", it
continues water supply and gently agitates while heating to the set temperature,
then it begins STANDARD washing; for water levels above "6", the cycle is: after
water reaching level "2", it begins to heat, meanwhile water supply continues
until level "6", water supply stops and it continues heating to the set temperature,
then it begins to wash while water supply is resuming, (the hot water
temperature then is good for detergent active enzyme function and for the
clothes to be in an optimum detergent concentration with a good washing effect.
The subsequent washing while water supply can facilitate dirt flushing and
removing), water supply stops when reaching the set level, then it continues to
wash STANDARDly. For high water levels, only the water amount below level
"6"can be heated to the set temperature, then it washes and supplements water
to the set level
3. This washing machine provides 3 temperature selections of 20 , 30 and
40 .
Description of heating function
CONTENTS
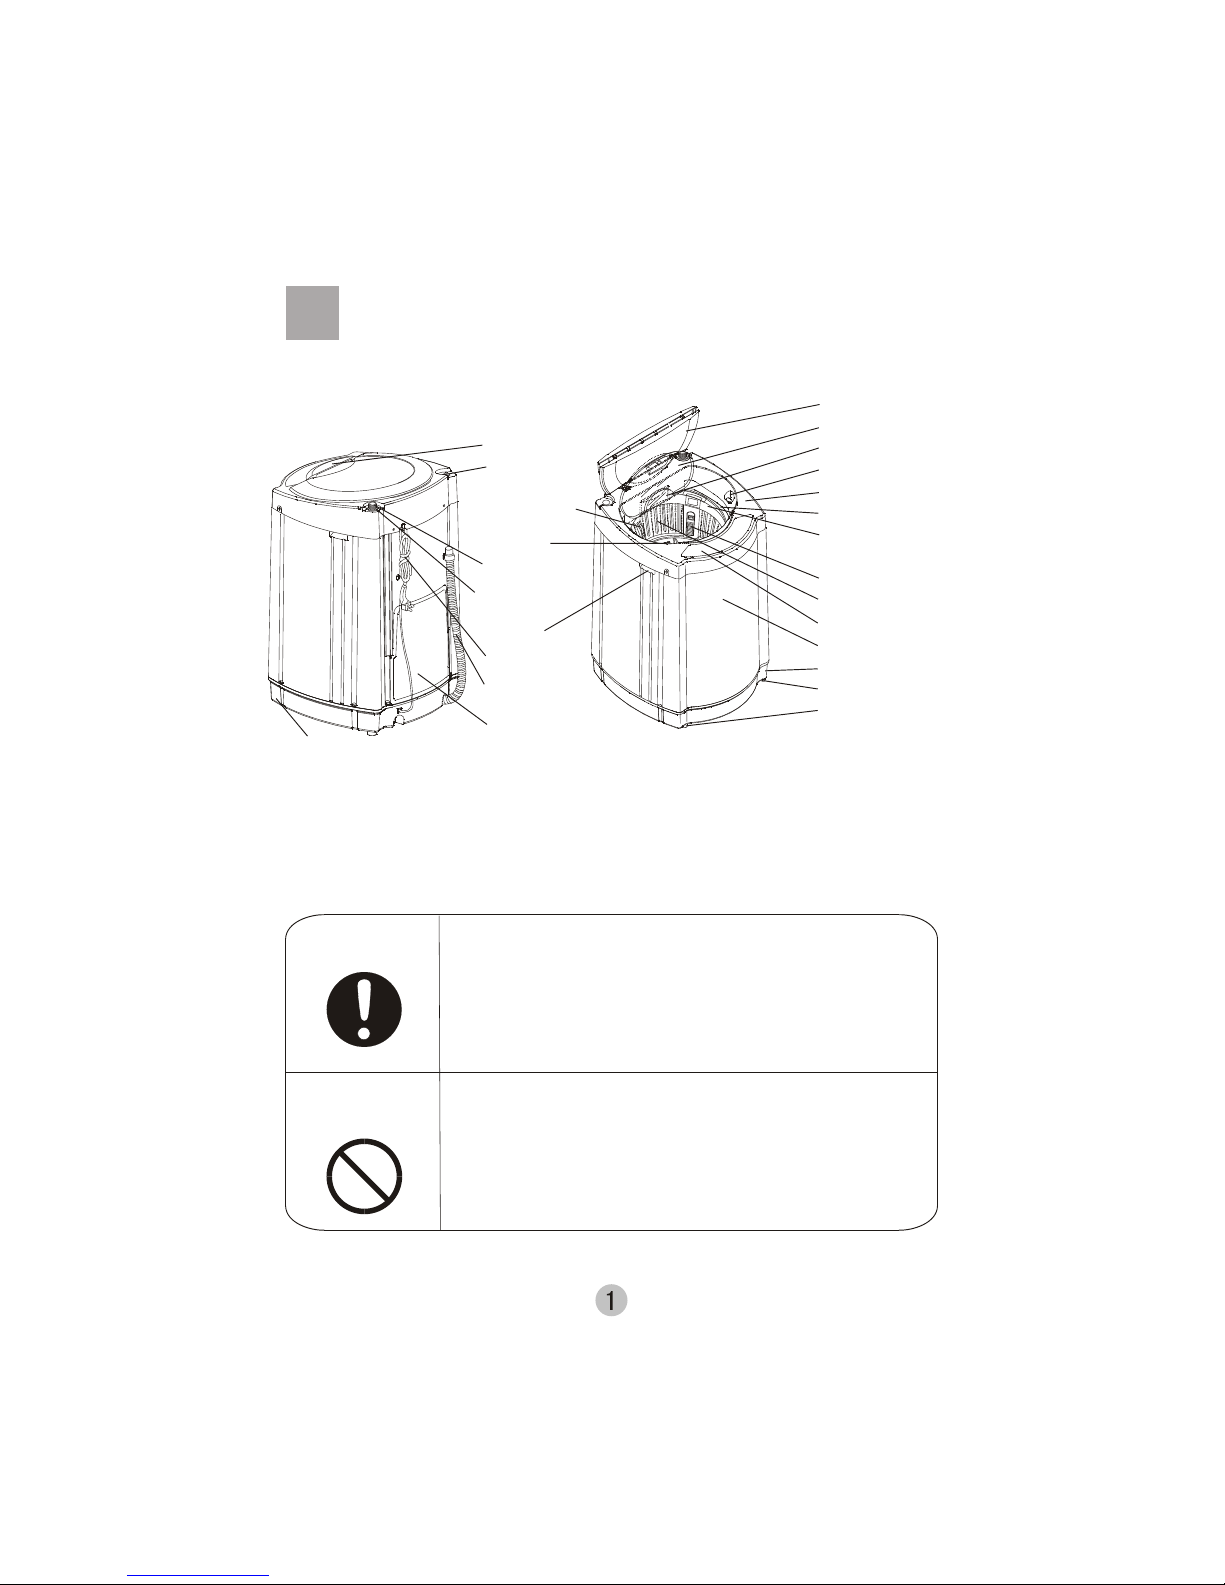
Names of the parts.................................................................1
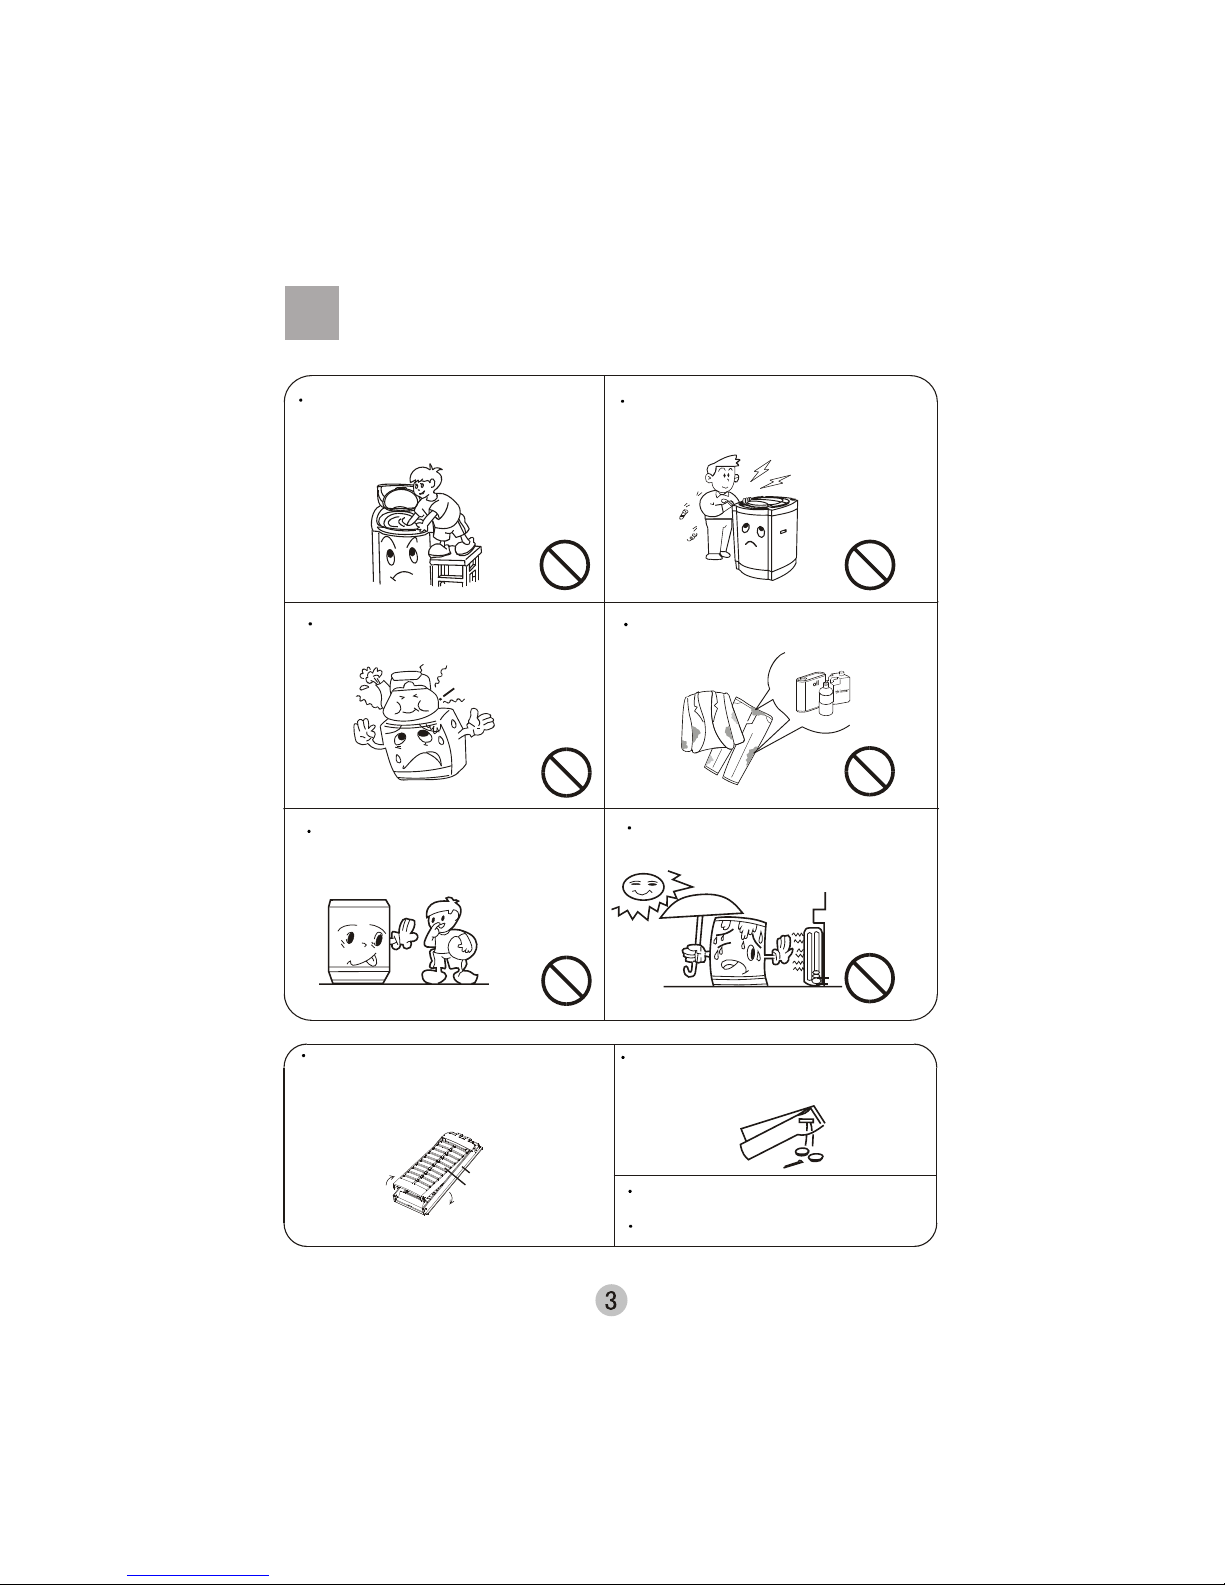
Safety precautions .................................................................2
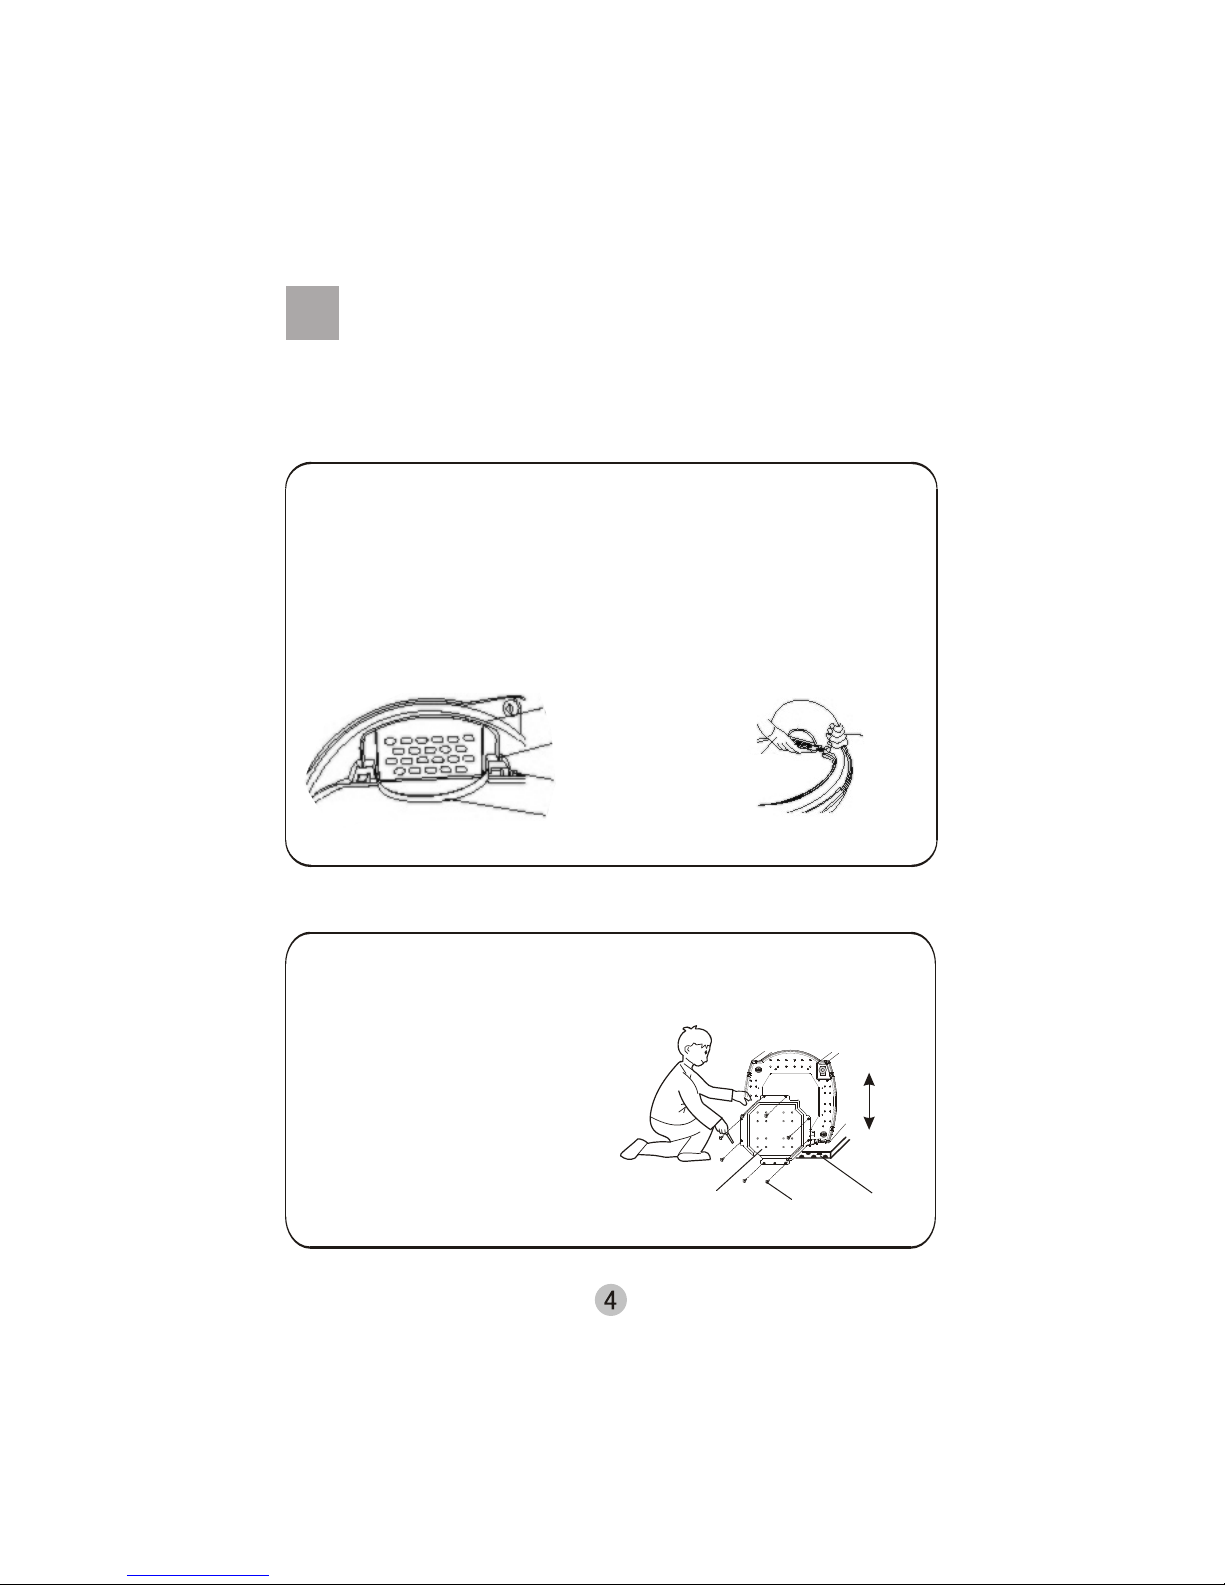
Installation and adjustment ....................................................4
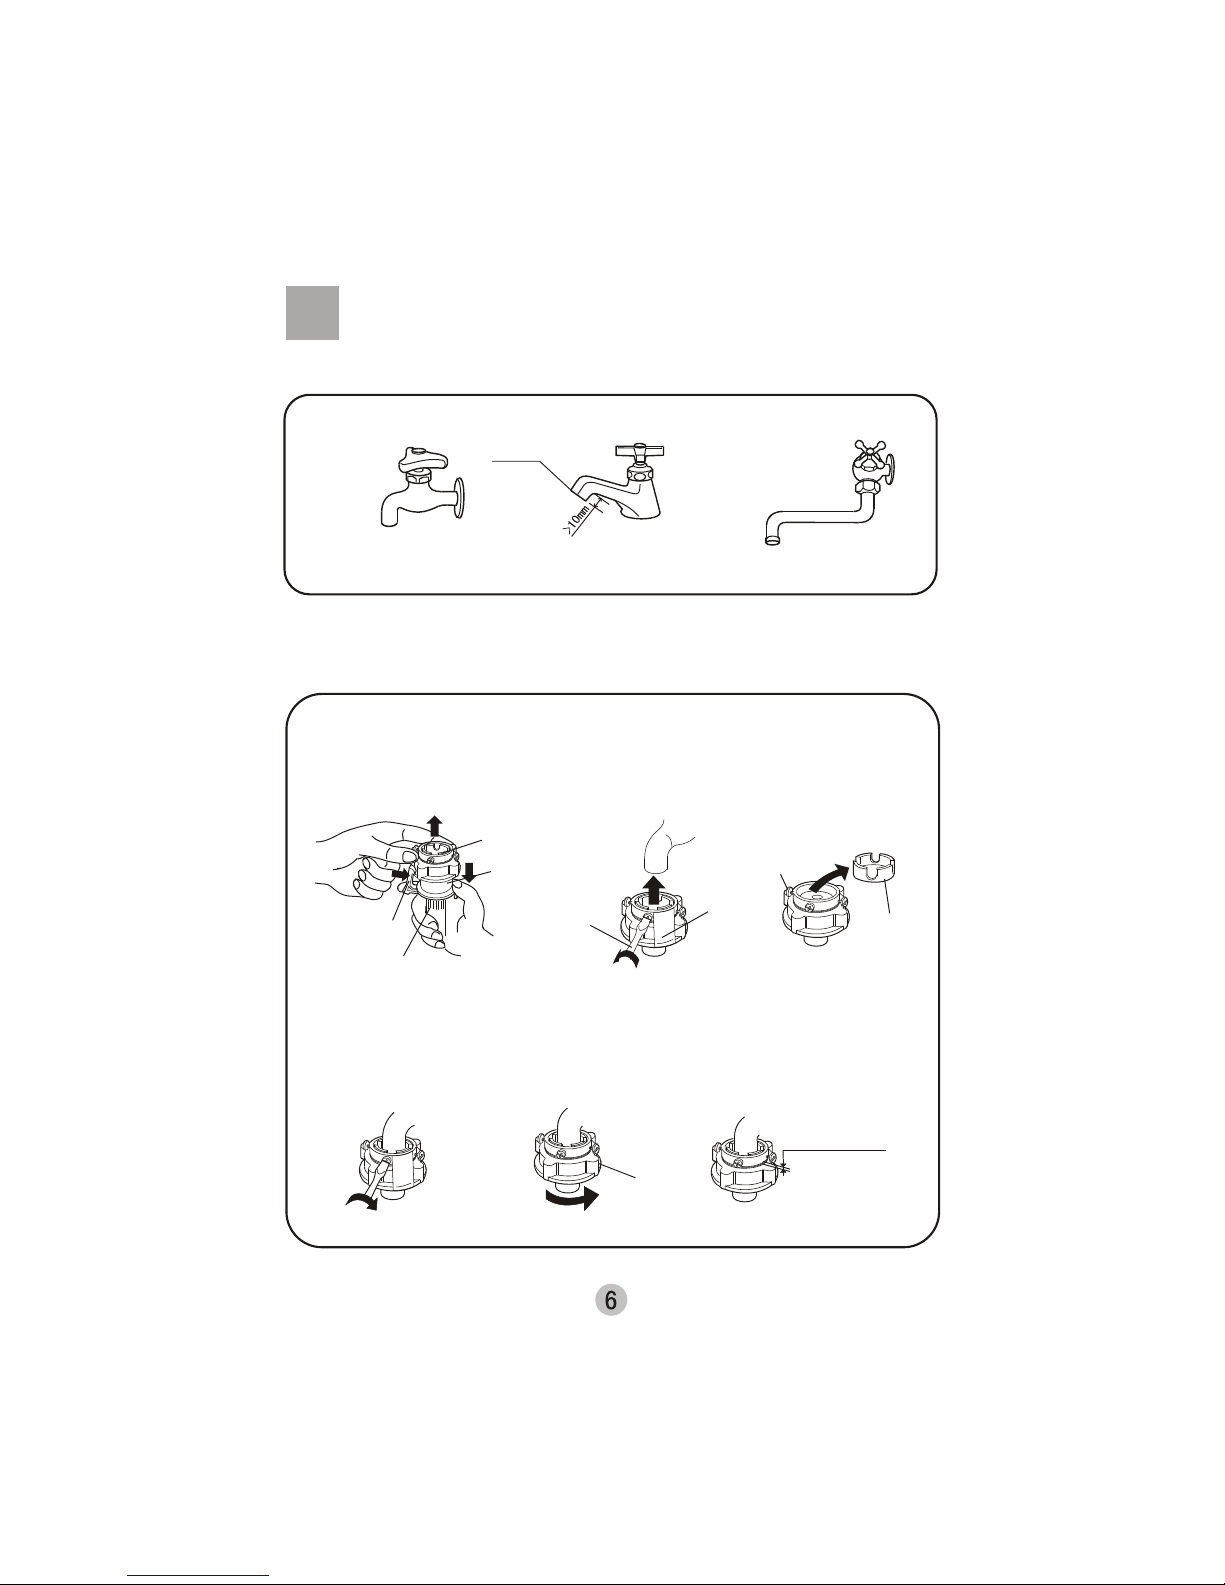
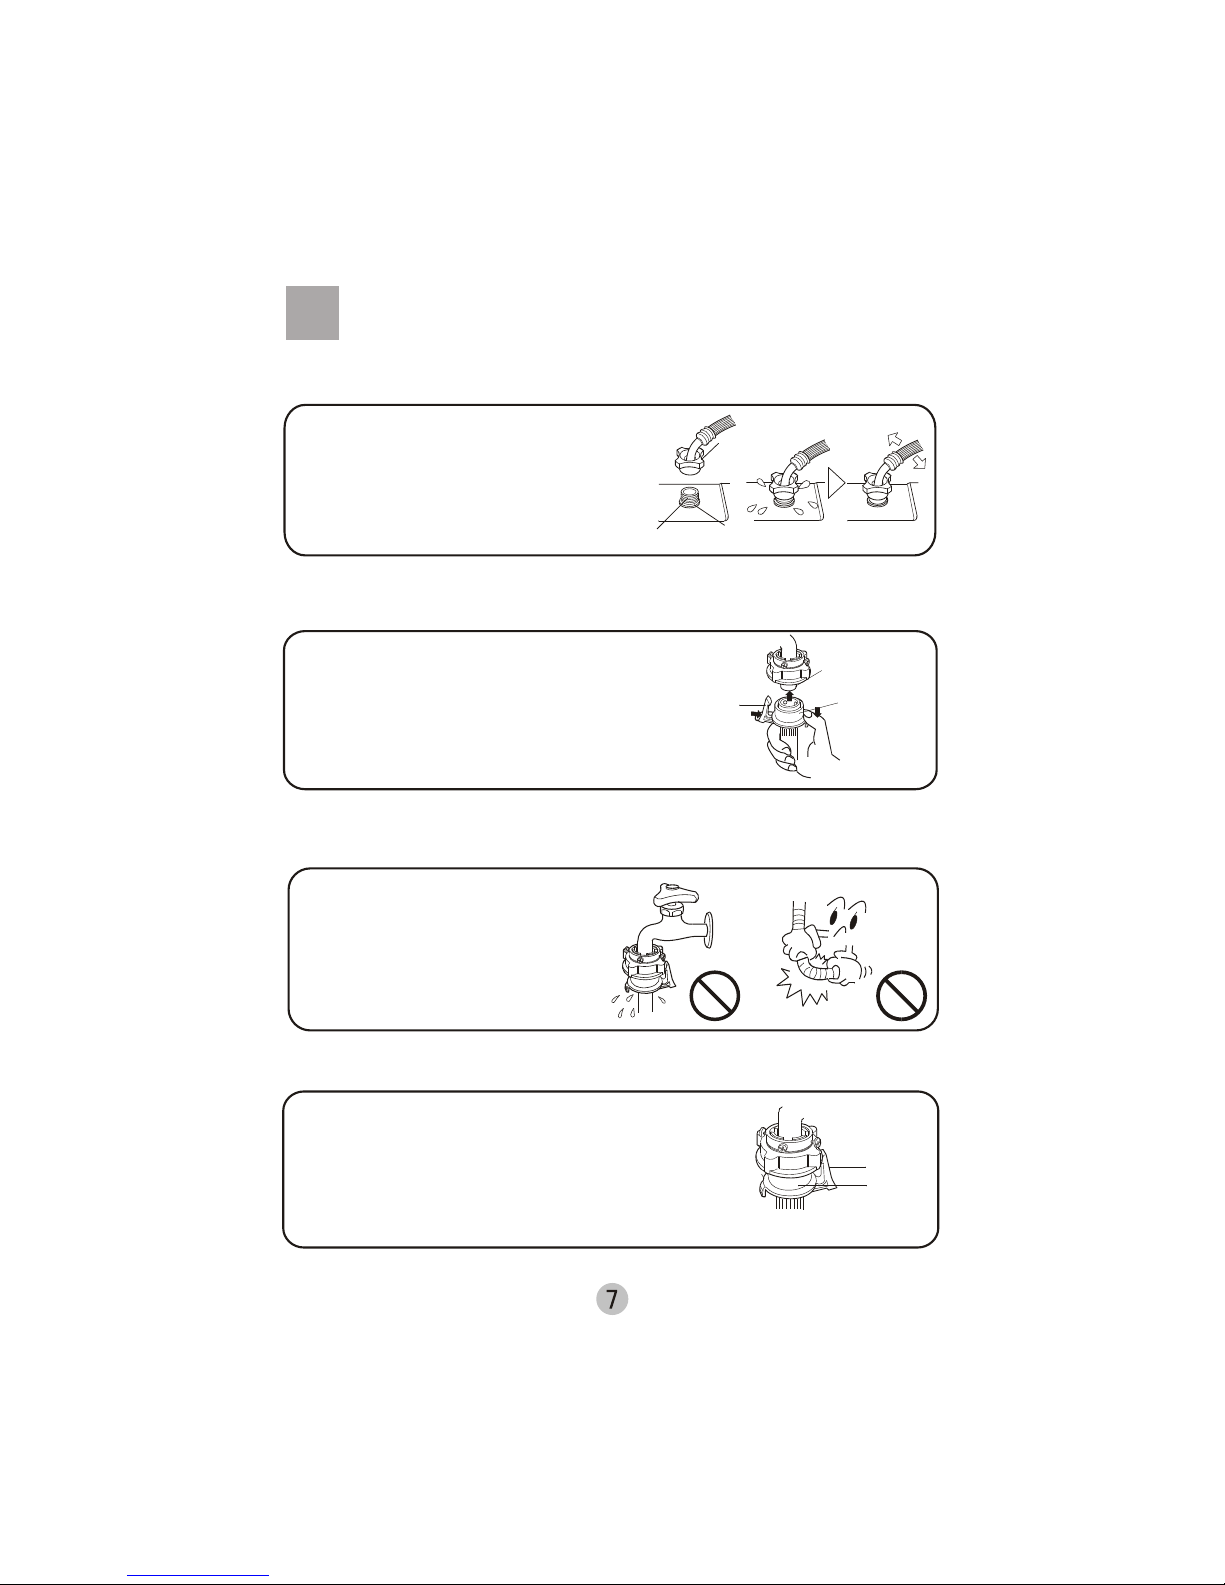
Install the water inlet hose.......................................................6
Preparation before washing ...................................................8
Put in the laundries .................................................................9
Put in the detergent ................................................................9
Use the operation buttons .......................................................10
Close the top lid .......................................................................14
Finish washing .........................................................................14
Disposal after washing .............................................................15
Trouble shooting Answer to question......................................16
Packing list Specification........................................................17

Water inlet valve
Water absorption
cushion
Handle
Power cord
Drain hose
Round cover
Top lid component
Inner cover component
Detergent box
liquid whitener inlet
Control panel
Outer tub cover
Balance ring
Lint Filter
Inner tub
Front control board
Cabinet
Base frame
Adjustable leg
Fixed leg (3 pieces)
Back cover
Adjustable leg film
Attachment block
(2 pieces)
Top lid handle
Pulsator
Names of the parts
Meaning and description of the symbols
Warning sign
Forbidden sign
Contents marked with that symbol are related to the safety
of the product and the personal safety of the users. Please
operate in strict conformity to the contents, otherwise it may
cause damage of the machine or injure the personal safety
of the user.
Contents marked with that symbol are actions forbidden to
perform. Performing of those actions may result in damage
of the machine or injure the personal safety of the user.

The ventilation
holes at the bottom
Safety precautions
In case the washing machine is installed on ground
with carpet, be careful not to block the ventilation hole
with carpet.
Do not put the machine at damp place like the
bathroom. Never wash it with water. Do not
put wet laundries on the front control panel board..
Do not let the machine share one receptacle with other
electric appliances. If the power plug is damaged, or
the plugging into the receptacle is loose, do not use
the plug any more.
Do not wash water-proof laundry like the raincoat,
bike-covers, down textiles etc. To avoid abnormal
vibrations in spinning and damages to the laundries-
Do not bend,stretch, twist, bind the power cord by force, or reform it.
Do not pressor clamp it with heavy items. If the power cord and power
plug are bad,or the receptacle is loose, be sure to have it replaced by
the technicians ofour special shopor our agent,or the after-salesservice
department to avoidany risk. Keep the prong of the power plugclean. If
dust is foundon the powerplug, please wipeit off withdry cloth.
In normal usage of the washing machine, the power
plug shall be ready to be pulled or plugged with hang.
Be sure to pull the plug off and close the water faucet
when occurring power failure, delivering the maching,
setting the machine idle or cleaning the machine, do
not plug or pull the power plug with wet hand.
Do not use water with temperature higher than 50
Please plug the plug on special 220V AC receptacle.
Be sure to use single-phase three pins receptacle.
Ensure the earthing prong of the power receptacle is
earthed reliably. Use leakage protector if possible.
Soft items

Do not put hand into the rotating tub. It is dangerous
even if the rotation speed is slow. Take special care of
the children. Keep children away from the washing
machine to avoid them climbing on.
Do not decompose, repair or alter the machine by
yourself.
Do not put any hot or heavy items (such as the
kettle with hot water) on the washing machine.
Do not wash laundry with volatile materials
(such as thinner, petrol etc.).
Keep the machine away from direct sunlight and
heat source like the heater.
The handicapped or children without care shall not
use the machine.
Please keep the lint filter in good condition, and
install it to proper position during washing. If the
lint filter is lost or damaged, please contact the local
after-sales service department of our company.
Benzene
Safety precautions
To protect your laundries and washing machine,
please take out all of the coins, buttons, sand, hairpin
and other foreign materials before washing.
Please check if the water faucet is open, and if the
connection of the water inlet pipe is proper.
It is suggested to use foamless washing powder.
The back cover of lint filter
The front cover of lint filter
install
dismantle

Install the bottom plate
Please install and adjust the machine according to the requirement of the manual.
It is very important to your security and correct operating the machine.
Installation and adjustment
After opening the package, please lean the washing machine gently down on soft items (like
towel cloth, blanket, etc.). Install the bottom plate to the bottom of the machine with eight screws
by a cross screw driver, then lift the machine up gently. See to the figure:
1.Open the top lid of the washing machine.
2.Put the inner cover component on the outer tub cover, aiming the inner cover
shaft to the installation hole of the corresponding outer tub cover shaft groove.
3.Firstly insert the inner cover shaft of one side into the corresponding outer tub
cover shaft groove, then push the another inner cover shaft into the corresponding outer
tub cover shaft groove. Please install to designated position to guarantee there are no
dropping or abnormal sound in opening and closing of the inner cover, and the operation
shall be smooth. Do not dismount the inner cover component after washing.
Install the inner cover component
Screw
Back
Front
Bottom plate Soft items
Outer tub cover
Outer tub cover shaft groove
Inner cover shaft
Inner cover component
Figure 1
Right hand
Left hand
Figure 2

The drainage shall be smooth with the drain hose.
The height of the drain hose shall be less than
10cm, or the drainage will not be smooth, and cost
such long time that the machine may stop at mid
way.
Do not step on or press the drain hose.
If extra drain hose is needed, please make separate
purchase. The inner diameter of the extra hose shall
not less than 30mm, and the length shall not exceed
1.5m.
If the extra hose is too long, cut
it either at A or at B point.
AB
<10cm
A
> 30mm
<1.5m
If the drain hose is too long, cut it at mid point. To make
smooth drainage, cut the front end of the hose slantingly.
Usage the drain hose
The largest allowable slope of the shank base of the machine is 1 . The slanting or rough ground will result in
unstable running or stoppage of the machine. Please adjust it with following methods:
Confirm it's horizontal:
Hang the lead line to check if it is
horizontal.
Adjust the adjustable leg:
Adjust the Installation position
FastenLoosen
High Low
The adjustable nut
The adjustable feet
1 .To twist the adjustable leg, please first lift up the
side of the leg slightly, loosen the adjustable nut,
and twist the leg.
2 . Afteradjustment, fasten thenut.

The exit end face of the faucet
Confirm the water faucet
Connection between the water inlet hose jointer
and the water faucet
water faucet, suitable water faucet, not suitable
It is required that the front end shall be longer than 10mm.
The exit end face of the faucet shall be flat and smooth. If not please file it to avoid leakage.
2 Loosen the screw till the water faucet can be accessed. Put the jointer of the water inlet hose on the faucet.
See to Figure 2. (If the faucet is too large and the jointer can not be set on the water faucet, please loosen
the four screws and take out the bushing in the jointer. The front end of the faucet must be smooth,
otherwise it may leak water. See to Figure 3.)
1.Press the lower end of the lock lever and push down the slider. Take off the water inlet hose jointer from the
water inlet hose component. See to Figure 1.
3.Fasten the four screws evenly. See to Figure 4.
About 4mm before twisting
remark: Before installation, the threading is 4mmabove the upper surface of the nut.
After installation, the threading is 2mm above the upper surface of the nut..(see to figure 6)
About less than 2mm after twisting
water inlet hose jointer
Screw knife
Screw
Bushing
Sign plate
Screw nut
water inlet hose
Figure 1
Figure 4
Figure 2
Figure 5
Figure 3
Figure 6
Slider
Lock level
Install the water inlet hose
4 Take off the nameplate. Twist the fastening nut as per the indication of the figure
to seal up the exit end face of the faucet. See to Figure 5.

Connection between the water inlet hose and the washer
Dismantle the water inlet hose
Connection between the jointer of the water inlet hose
and the water inlet hose
Check the connection between the jointer of the water inlet
hose and the water faucet
1.Do not take off the water absorption cushion. Please check if the
cushion is dropped or damaged before each usage. If it happens
please contact our after-sale department immediately.
1.Swing the hose gently to confirm if it is fastened stable.
2.After installation, open the faucet to check if it leaks.
3.Do not bend the hose with overstrain.
1.Push down the slider. Insert the water inlet hose into the jointer.
2 Hang the lock lever to the jointer. Release the slider till a click
sound is heard.
Locking level
Slider
water absorption
cushion.
nut of the water
inlet hose
the jointer of the
water inlet hose
Slider
Locking level
jointer of the
water inlet valve
1. Close the water faucet.
2. Press the locking lever. Push down the slider. Then pull of the water inlet
hose.
If the machine is used frequently, the jointer of the water inlet hose can be
kept
on the faucet to prevent damaging the fixing screw.
2 Put the nut of the water inlet hose on the valve jointer.
3 Fasten the nut. Swing it gently to confirm if it's suitable.
4.Before each usage please check if the connection
between the jointer of the water inlet hose and the
water faucet, and the installation of the water inlet
hose are firm, so as to prevent dropping from
improper installation position.

1 Preparation before washing
Confirm if there's
special requirement
for the laundries.
Clear the pocket.
Take out the coins ,
sand,hairpins etc.
Fasten the buttons
and zippers.
When the pulsator is
running ,the buttons of
the laundries may cause
noise. For the sake of
discretion ,please put
the laundries with
buttons into other
laundries.
Preparation before washing
The quantity of the
laundries shall not
exceed the rated
value. The big
laundries like the
jeans shall be put
in loosely.
Pay attention to followings before washing the laundries
1.Connect the water inlet hose.
2.Confirm that the washing machine is earthed
reliably . Then insert the power plug into the
receptacle. Do not connect the earth terminal
to the gas pipe and tap water pipe.
3.Put down the drain hose.
a. Check if the laundries are applicable for washing with machine.
b. Divide the laundries with infest color from other laundries.
c. Put those laundries difficult to absorb water into water with hand.
d. For those laundries with heavy soil, please first remove the dirt like mud or dust. For the parts with heavy soil,
please apply detergent in advance, which can make it easier to remove the soil.
e. For those laundries that may get lint ball and those with long fur, turn it over before putting in.
f. Do not put those laundries polluted by chemicals directly into the washing machine.

The capacity of washing of the machine refer to
the largest weight of the standard laundries under
dry condition that can be washed in one time.
Laundries quantity in one washing cycle shall
be lower than the rated capacity. The largest
capacity of this machine is 6.0 kg.
The thickness ,size , type of the cloth will influence
the actual washing capacity. It is suitable to put in
reasonable amount of laundries and the laundries
can be turned round in washing for one time
washing.
Do not select the higher than "4" water level for
laundries less than 1.0kg ,so as to avoid splashing
of water.
2 Put in the laundries
3 Put in the detergent
Access for detergent and washing powder
Access for softener
Detergent box
Put the washing powder and softener into the detergent box
directly as Indicated in the left figure.
After that, please close the detergent box. Refer to the following
list for the usage of the detergent :the standard dosage of the
detergent and the water quantity.
How to use the whitener
Fill water to decided level .Dilute the whitener with
container. Pour it slowly into the washing tub.
Avoid using whitener on laundries with colour or
pattern as they are prone to lose colour.
The whitener shall not touch the laundries directly.
Refer to the user's manual for the usage and
quantity of the whitener.
For powder whitener, please dissolve it before use.
How to use softener
See to the manual of softener for the usage
and dosage. When adding softener into the
softener inlet of washing powder box, note
that it shall not exceed the lower side of the cap.
Do not leave the softener for long period after
adding it into the box. Otherwise it may be
solidified and block the inlet.
As the softener is easy to solidify,please clean
the box frequently. (You shall clean it each time
you use reserve function).
Before use softener, you must select to sterilize
function.
How to use the washing powder
Directly dissolved in the machine (not applicable for fuzzy program and reserve wash)
1.Fill small quantity of water.
2.Add the powder Run for 30 seconds to dissolve it completely.
3.Put in the laundry. Select suitable water level.
The instant dissolving of the washing powder:
1.Prepare warm water of 30 and a container.
2.Add the powder while stirring to fully dissolve it In selecting
The super quick program, it is suggested to adopt liquid detergent instead of washing powder to guarantee the washing effect.
The powder is more prone to pollute the laundry than the detergent. Therefore please use it with suitable quantity.
It is suggested not to use high sudsing detergent.
Washing powder with poor quality or long time storage maybe caked. Please pay attention to cleaning the detergent box in time.

4 Use the operation buttons
Description of the function of buttons
Mode and meaning of the indicators
Flashing: indicate the running program
On: indicate the program about to run, or indicate the
selected mode
Digital tube
During sensing, it displays
During operation of programs, it displays the remained time
(minute) or remained times of the corresponding procedure
Push the SOAK button to set
the soak procedure.
During STANDARD and
JEAN programs, push the
SOAK button to set different
soak time (10,20,30,40 minutes)
During FIBER and
COTTON programs, push
the soak button to select soak
procedure, but the soak time
cannot change.
During QUICK
, POSTHASTE , WOOLLEN ,
and SILK programs, push the
SOAK button, the machine
have no reaction.
SOAK button WASH button
Push the WASH button to set
the wash procedure.
During STANDARD and
JEAN programs, push the
wash button to set different
wash time (from 0 to 25 minutes)
During FIBER , COTTON
WOOLLEN , and SILK
programs, push the WASH
button to select wash
procedure, but the wash time
cannot change.
During QUICK
, POSTHASTE , programs,
push the wash button the
machine have no reaction.
RINSE button
Push the RINSE button to set the rinse
and disinfect procedure.
During STANDARD and JEAN
programs, push the RINSE button to set
different rinse times ( 0, 1, 2, 3, 4times).
During FIBER , COTTON ,
WOOLLEN and SILK programs, push
the RINSE button to select rinse
procedure, but the rinse times cannot
change.
During QUICK , POSTHASTE
programs, push the RINSE button, the
machine have no reaction.
During STANDARD program, the machine
is set to save water program. If you push
the rinse button before starting operation, it
will change to water storage rinse program.
Push the SPIN button to set
the spin procedure.
During STANDARD and
JEAN programs, push the
SPIN button to set different
spin time (from 0 to 9 minutes)
During FIBER , COTTON ,
WOOLLEN and SILK
programs, push the SPIN
button to select spin procedure,
but the spin time cannot change.
During QUICK ,
POSTHASTE , programs,
push the SPIN button, the
machine have no reaction.
SPIN button
SOAK
WASH
RINSE SPIN
Minutes
Minutes
Times
Minutes

POWER ON/OFF button
Push the ON/OFF button to switch
on the power.
When the power is on, push it
again to switch off the power.
Push the ON/OFF button to switch
on the power.
If the START/PAUSE button is not
pushed, the washing machine will
automatically switch off the power
after 5 minutes.
RESERVE/CALEFACTION
WATER LEVEL
Time remained
(minutes)
Reserve
(hours later)
10
8
6
4
2
9
7
5
3
1
CHILD LOCK FUNCTION
Push and hold the WATER LEVEL button and SPIN button, then push down the POWER ON/OFF
button. The digitron displays CL . You can continue setting desired washing procedures.
After setting, push down the START/PAUSE button. The child lock function is activated. All of
the buttons are locked and cannot make selection.
Release the child lock function: push down the WATER LEVEL and SPIN button at the same
time for more than 1 second. After a beep sound, the child lock function is released.
During sensing, it displays --
During reserve procedure, it displays the remained reserve time (in
hours)
During operation of programs, it displays the remained time (minutes).
If the remained time exceeds 99 minutes, it adopts A at tens place to
represent 100 minutes, b to represent 110 minutes. For instance, A3
represents 103 minutes.
In case of abnormal phenomenon, it displays
the abnormal symbol (see to Page 16)
Page16
RESERVE/REMAIN time indicator digitron
WATER LEVEL button
The washing machine can detect the laundries automatically.
After detection, it will set the water level to suitable value among 4, 6,
8, and 10 automatically.
You can also set water level by yourself. After the machine is started,
it will not set water level automatically. You shall push the
start/pause button to make new setting.
If there's water inside the tub, the machine cannot detect the
laundries and will display water level 6 .
If wet laundries are put in, it may display water level 10 . You must
set suitable water level by yourself.
If POSTHASTE programs selected, it will display water level 3 .
When water level 2 is reached in water filling, it will perform
washing while filling water. When water level 3 is reached, it will
change to normal washing.
During operation of wash and rinse program, you can push down
the water level button to add water. When you release the button, or
it reaches the overflow water level, the machine will stop adding
water.
S
TART/PAUSE button
After the power is switched on, push it to Start the machine
During working, push it to pause working.
During pause, push it to resume working.
PROGRAM
STANDARD
QUICK
POSTHASTE
JEAN
FIBER
COTTON
WOOLLEN
SILK
PROGRAM selection button
Following automatic programs are available for selection
Applicable situation
Common washing
Washing the relatively big and thick laundries
Washing the chemical fiber laundries
Washing the cotton textiles
Washing the woolen textiles
Washing the textile
Quick and high-efficiency wash for
common
POWER
ON/OFF
START
PAUSE
PROGRAM
FIBER
COTTON
WOOLLEN
SILK
STANDARD
QUICK
POSTHASTE
JEAN
Super quick wash of the laundry under 1 kg
with light soil
"RESERVATION/CALEFACTION" button
Heating function can beselected if keep pressing
"RESERVATION/CALEFACTION"Button for morethan 2 s.
If the decimal pointof digitron is lighted,it means heating
function is selected.The initial temperature isabout 30 ,
and you can selectyour desired value ina switching
sequence 30 40 off 20 . If keep pressingthe
"RESERVATION/CALEFACTION" button formore than 2 s
again, the temperature indicatorturns off, andthe
Reservation can be selected, you can selectreserved time.
After the machine startsrunning, if selection orcancellation
of heating function isdesired, you should switchoff the power
and reselect.
During machine running, thedigitron indicates the cycle
remaining time in minutes). Press "
"button, the digitron willIndicate the
remaining reserved time tocycle end (in hours).Thedigitron
will indicate the runningstate of the machine.
RESERVATION
/CALEFACTION
Press " "button to set
reservation or heating Function.
RESERVATION/CALEFACTION

b
Steps of using the operation buttons and description of the steps
10
8
6
4
2
9
7
5
3
1
FIBER
COTTON
WOOLLEN
SILK
Minutes Minutes
Times
Minutes
Time remained
(Minute)
Reserve
(Hour)
POWER
ON/OFF
START
PAUSE
PROGRAM
WATER LEVEL
SPIN
RINSE
WASH
SOAK
1 Push the "POWER ON/OFF " button to switch on the power.
POWER
ON/OFF
PROGRAM
2 Push the "PROGRAM" button to select suitable automatic program.
After switching on the power, the machine will set "STANDARD " program automatically. To select
other automatic program, push the "PROGRAM" button till the relative indicator is on. Refer to the
"PROGRAM" button on Page 11 for the selection.
For instance: select "POSTHASTE" program for laundries with small
quantity and light soil.
Page 11
In selecting the ••••••••program, the machine
will execute fuzzy program to select water and wash
time according to the cloth and weight of the
laundries. The full procedure is controlled
automatically.
3 Push the "SOAK", "WASH", "RINSE" OR "SPIN" button to select suitable procedure.
Minutes
Minutes
Times
Minutes
SOAK
WASH
RINSE SPIN
FIBER
COTTON
WOOLLEN
SILK
STANDARD
QUICK
POSTHASTE
JEAN
RESERVE/
SATANDARD
QUICK
POSTHASTE
JEAN

After switching on the power, the washing machine will set to common
program including"wash, rinse,spin "automatically. To select other
procedures, push the "SOAK", " WASH", " RINSE" or "SPIN" button
to select the time of soak, wash and spin, and the times of rinse. After
switching on the power, if you push one of the button among "WASH",
"RINSE"and"SPIN", the digitron of the former procedures will turn off
automatically. The former procedures will not run. For instance: after
switching on the power. If you push the "SPIN"button first, it will execute
spin singly after starting.
Attention
Even there's no water in the tub, a certain period is
required before spin starting.
Do not use the soak program for the woolen textiles.
Separate the laundries that are not colorfast from
other laundries in washing.
The pulsator will not rotate unless the water is
filled to"3" water level.
The soak procedure can work in cooperation with automatic programs like standard, jeans,
fiber and cotton. There is intermittent pulsator stirring during soak.
After the machine starts operation, you can only set the program and procedure during
washing, and can not make setting in other cases.
WATER
LEVEL
Press " WATER LEVEL "button,
select suitable water level
After switching on the power, the washing machine will execute fuzzy program automatically to
detect the cloth. After defection, it can set the water level automatically. To select other water
level, first push the "START/PAUSE"button, then push the "WATER LEVEL" button to set the
water level. Refer to "water level button"in Page 11 for selection.
Page 11

After switching on,the washing machine reserved wash program will be automatically set
inactive. If youdesire a wash cycle to end at a reserved time, you can press the
"RESERVATION/CALEFACTION"button to seta reserved wash program.
Refer to The button of "RESERVATION/CALEFACTION"on page 11.
When "RESERVATION" becomesactive, the nixie tube displays the time
to the endof the reserved wash cycle, and the indicator turns on.
Tochange the running program or cancel the reservation,
you should cutoff the supplyand reselect.
the washing willfinish
about 18 hourslater
Confirm the reserveprogram
Page 11
Keep pressing the"RESERVATION/CALEFACTION"button for morethan 2 s,
the heating indicatorturns on (red).
Keep pressing the"RESERVATION/CALEFACTION"button for morethan 2 s again, the
heating indicator turnsoff and heating function is cancelled.
After the machinestarts running, if selection or cancellation of heating function
is desired, youshould switch off the power and reselect.
Confirm the heating function
6.Push the "START/PAUSE " button
5 Close the lop lid 6 Finish washing
START
PAUSE
Push the "RESERVE/CALEFACTION "button to select suitable
reserve wash program
As the top lid opened, the Washer will automatically give an alarm
and stop running, exclusively during supplying water and rinsing.
After finishing wash , it will alarm
automatically.
RESERVE/CALEFACTION

The filter screen of the water inlet valve is likely to be
blocked by foreign materials and influence the water
inlet.
Please clean it with brush every two months.
7.Disposal after washing
After using, please clean the lint and foreign materials of the lint filter etc. in time. Otherwise it may
influence your using the machine.
The lint filter must be used during washing.
It must be cleaned in time after each using
Lint filter:
1.Rotate the inner tub with hand till the lint filter reaches
the position convenient for you to take it off. Pull it up to
dismount.
2.Push it down to install.
3.Clean the filter screen after washing.
Clean the detergent box and set it on
the control panel seat.
1.The method of dismantle : Push it up aslant and gently.
2.The method of install : install it upwards and aslant
and push it in .
Dismantle Install
If the cabinet is dirty, wipe it with wet cloth
Do not flush it directly with water.
Wipe it with neutral detergent.
Do not wipe it with thinner, petrol, alcohol etc.
1.After washing, close the water faucet. ( If needed, you can dismantle the water inlet hose).
Please first pull off the power plug from the receptacle before cleaning.
5.Wipe off the water drops on the surface of the machine and inside the tub. Open the top lid for some time (
about 1 hour), then close the top lid.
4.Hang up the power cord and drain hose.
3.Be sure to pull off the power plug before maintenance.
2.Do not store water in the washing machine for a long period. Drain the water completely after each using.
Dismantle
Install
Install
Dismantle

The digitron displays E0.
The safety switch acts, and the
spinning cannot work. The
digitron displays E3.
The water filling does not work, or is
slow. After about 40 minutes later,
the digital displays E4.
The drainage cannot work, or is too slow.
The digitron displays E1.
It stops running in midway. The digitron
displays E2.
The top lid is not closed.
The top lid is opened during reserve
procedure.
Close the top lid.
Close the top lid.
Is the drain hose put down?
Is the drain hose blocked?
Put down the drain hose. Open and close the
top lid once.
Clean the foreign material. Open and close
the top Lid Once.
Are the laundries put slantingly?
Is the machine slanting?
Reorder the laundries. Close the top lid.
The machine will start running after 10
seconds of being placed horizontally.
Is the water tap opened, or is there water
supply failure?
Is the water inlet valve blocked?
Is the water pressure too low?
Open the water tap. Push the Start/Pause
button once.
Clean the water inlet valve then push
the Start/Pause button once.
Push the Start/Pause button once.
The water level sensor is bad.
Please contact the after-sales service department.
Is the machine slanting?
Are the laundries put slantingly in spinning?
Are there any foreign materials?
Is the screw of the jointer of water
inlet hose loose or awry?
Adjust the machine to be even
Reorder the laundries and close the top lid.
Remove the foreign materials.
Fasten the screw of the jointer properly.
The water tap leaks
The digitron displays E6.
There's abnormal sound
inside the machine
Phenomenan The reason How to settle
Trouble-shooting Answer to question
(If there's breakdown, please pull off the power plug before checking) The following phenomena are not breakdowns
sometimes. Please confirm again before sending it to repair. If there are real breakdowns, please come to the special
maintenance department or after-sale service department of our company. Do not repair it by yourself.
The machine does
not act
Not wash
Not spin
Is there power failure?
Is the power plug inserted tightly?
Is the water level reached preset position?
Please use it when there's power supply.
Insert the power plug tightly.
Fill water to the preset position.
Is the power plug inserted tightly?
Is the top lid closed reliably?
Are the laundries set flat?
Insert the power plug tightly.
Close the top lid.
Set the laundries flat.
The temperature sensor is fallen.
The water level drops to the replacement
point after it has supplied water for 2 times
during the whole process.
Open and close the top lid once.
The digitron displays E5.
The digitron displays F5.
Please contact the after-sales service department.
* The actual heating temperature may have
discrepancy with the setting level.
* This is the normal phenomenon .The actual heating
temperature is also influenced by the atmosphere
temperature the water temperature for wash and the
water hardness.
When the power plug is inserted,computer
board indicator is switched on,and the machine
starts working.
**
Explanation
* The spinning is intermittent when it starts.
* The wash procedure pauses.
* Select "SPIN"program, but it does not work.
* The pusaltor pauses during washing , rinsing or
adding water.
* There may be some water flowing out of the
drain hose in the first use of the machine.
* Balance the laundries to avoid slanting.
* The cloth sensor is detecting the cloth. It will start
adding water after about 48 seconds.
* The program is setting the drain time. A certain
period is needed before it starts spinning.
* It is to avoid splashing during water filling.
* It is the water remained in the performance
inspection by the factory.
It is the special resume function.
.
In the case of power
failure or the power plug is loose during washing, the
machine can save the running program, and resume
the program after the power supply is recobered. You
do not need to set the program again
Common phenomena
Phenomena

Packing list
Name
User's manual
Quantity
One
One
Storage position
Inside the document bag
Inside the accessory bag
Between the upper cushion of the
washing machine package and the
upper seal of the package carton
Inner cover component
Components of the water inlet hose
Inside the accessory bag
Eight
Tapping screws
Bottom plate One
One
One
Inside the accessory bag
Specification
Rated washing / spinning capacity 6.0kg/6.0kg
Water level/Water quantity (about)
Injection pressure 0.03MPa~0.78MPa
1/12L 2/16L 3/20L 4/25L 5/29L
6/33L 7/38L 8/42L 9/47L 10/50L
Water inlet hose (1 piece)
Water inlet hose joint (1 piece)
inlet hose jointer
The end connecting to thewashing machine
Jointer connecting the water
inlet hose and the waterfaucet
The end connecting to thewater
Fuzzy Computerized
Automatic Washing
Machine
Warranty manual
One Inside the document bag
Table of contents
Other Haier Washer manuals

Haier
Haier HWM80-187S User manual

Haier
Haier HWM80-0566 User manual

Haier
Haier HBF601T User manual

Haier
Haier HE600TX User manual

Haier
Haier XPB50-23BS User manual

Haier
Haier HWF85AW1 User manual

Haier
Haier HD800TX User manual

Haier
Haier LMD3123PBEB0 User manual

Haier
Haier HWM85-9288 User manual

Haier
Haier HWM65-0566 User manual

Haier
Haier HW1210A User manual

Haier
Haier HWM65-0523S User manual

Haier
Haier HWD1406 User manual

Haier
Haier AWT-80LI User manual

Haier
Haier HWM95-187S User manual

Haier
Haier XQG65-8SU User manual

Haier
Haier HWM60-20B User manual

Haier
Haier HWM65TLF User manual

Haier
Haier HNS1260TVE Operation and maintenance manual

Haier
Haier HWM68-0523K User manual