Haiyang HGP-660F User manual

- 1 -
TABLE OF CONTENTS
HGP-660F
Introduction ……………………...………………………… 3
Fishfinder Specification ……………………………………… 4
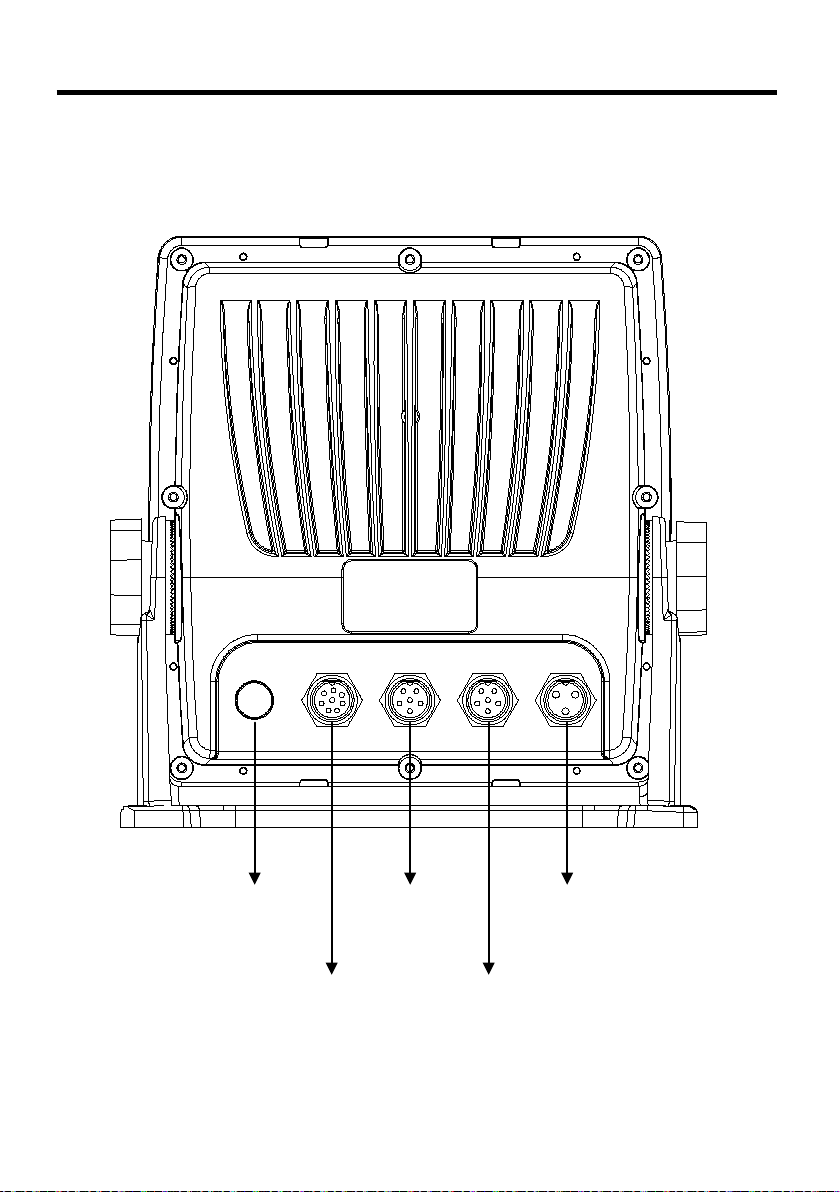
Interconnecting diagram ……………………………………… 5
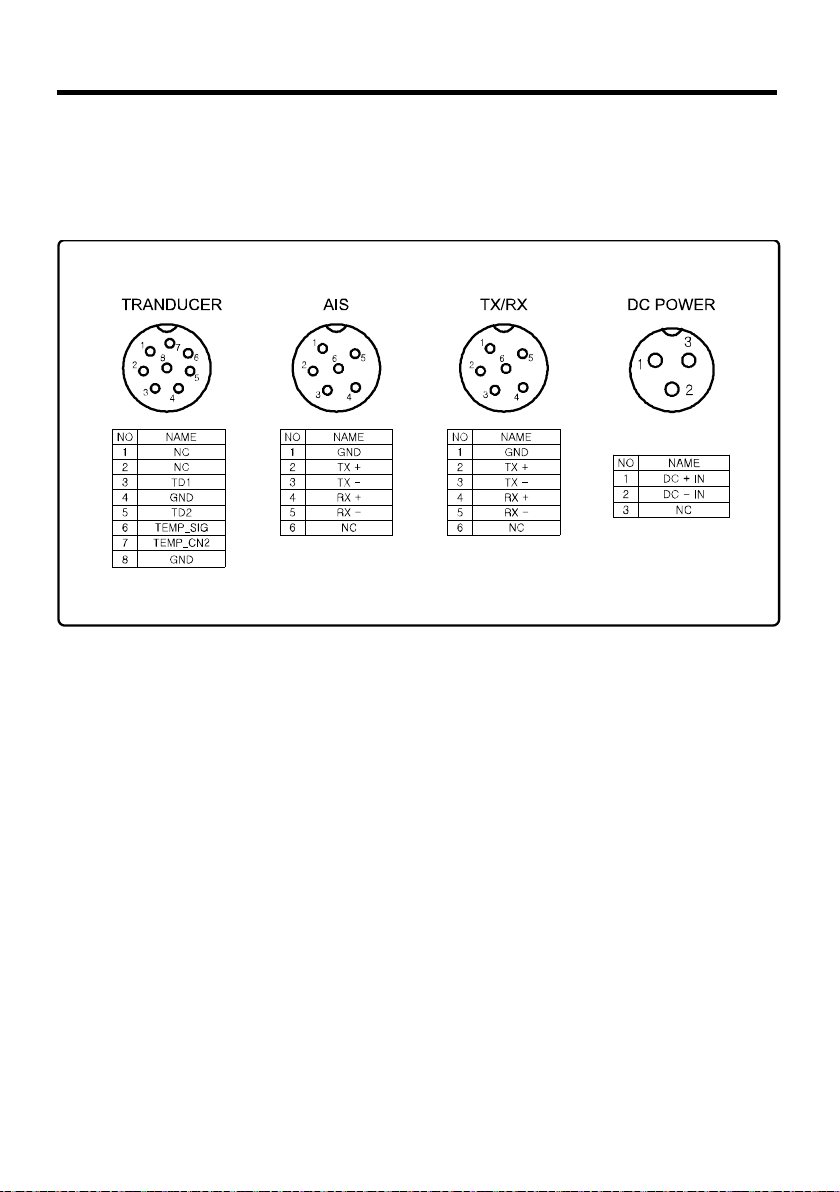
SPEC of the connectors ……………………………………… 6
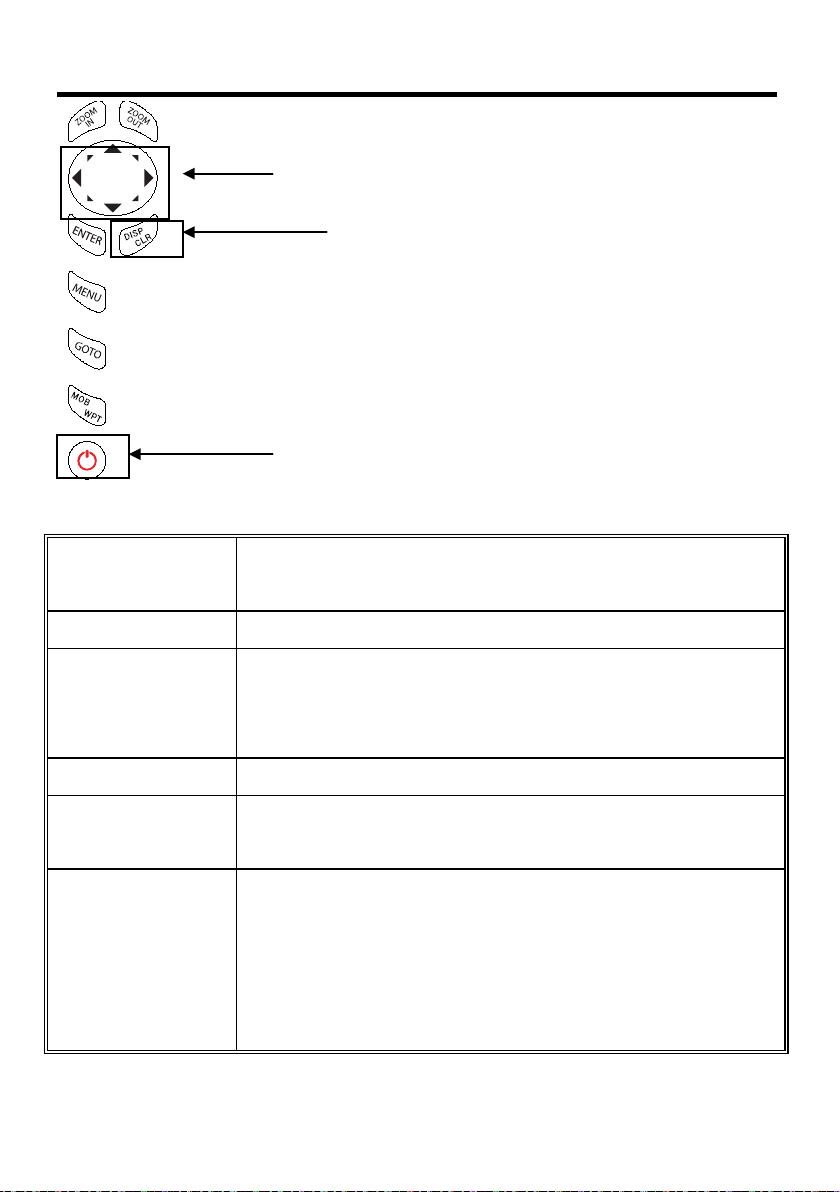
The Keyboard ………………………………………………… 7
Page Select
Page Select ………………………………………………… 8
1. Chartplotter/Fishfinder mode ……………………………… 9
2. Full Fishfinder mode ……………………………………… 11
Operations
Fishfinder 1/2 ………………………………………………… 12
Fishfinder 2/2 ………………………………………………… 14
Fishfinder Modes ………………………………………………… 16
Installation
1. Display unit Location…………………………………………… 18
2. Display unit Installation………………………………………… 18
3. Power connection. ……………………………………… 19
4. Sensor connection ……………………………………… 19
5. Transducer Installation………………………………………… 20
6. Transom Mounting …………………………………………… 22
7. Transom Transducer Maintenance…………………………… 22

- 2 -
7. Through-hull Transducers ……………………………………… 23
8. Dead-rise………………………………………………………… 23
9. Through-hull Transducer Maintenance……………………… 26

- 3 -
HGP-660F
Introduction
Equipment Supplied
AQUA Display unit GPS ANT.
(stand is option) Fixable Band(option)
Protector Mounting Bracket Knobs
Power cable Manual TD(*selectable)
*The type of TDs is optional, Thru-Hull, In-Hull and Transom. And the output is
optional, 600W, 1KW and 1.2KW.

- 4 -
HGP-660F
FISHFINDER SPECIFICATION
◆Display Mode
Normal (single/dual-frequency), Bottom-lock,
Bottom-zoom, A-scope
◆Frequency
50 and 200 KHz (single or dual)
◆Output Power
600W (HFF-600) / 1.2KW (HFF-1200)
◆Range speed
600W : 2.5m ~ 600m(HFF-600)
1.2KW : 2.5m ~ 1,200m (HFF-1200)
◆Image speed
Fixed 8 speeds (4/1, 2/1, 1/1, 1/2, 1/4, 1/8, 1/16, 1/32)
and stop
◆Interference rejection: 3 levels
◆Noise rejection: 4 levels
◆Function
Gain (auto/manual),
Range (auto/manual),
Depth with shift (auto/manual), water temperature
Pulse length selection, white/black line
◆Power Output: 10.8 – 35V DC
◆Operating Temperature: –10°C to +50°CThe

- 5 -
HGP-660F
Interconnecting diagram(Metal connector)
Power
(10.8V~39.6V)
TX/RX
(NMEA 0183)
AIS
PC LINK
Transducer
GPSANTENA

- 6 -
HGP-660F
SPEC of the connectors (Metal connector)

- 7 -
Keyboard
[ZOOM-IN/OUT] CHANGES THE RANGE OF
THE DEPTH IN
FISHFINDER.
[MENU] Menu opens menu to select options
[DISP]
Selects function to display on HY Display, Plotter Display, LAT/LOT
Display, Highway Display, Steering Display, Nav data Display.
(* When the menu or the cursor appears, it’s used fro ESC.
[ENTER] Completes pending selection or operation
[Power/Brightness] BRT: Brightness adjust the brightness in day mode or night.
PWR: Turns On/Off
[CURSOR PAD]
Use to move the cursor, select menu items, scroll list, select options,
change settings in plotter and Fishfinder.
[▲][▼]: Depth setting
[◀][▶ ]: S T C /G a i n s e t t i n g
(*To make the cursor deleted, press [MAIN SCREEN].)
Cursor pad
Select display mode & cancel
Power & Brightness

- 8 -
Page Select
Pressing the key, [DISP], you will see the following pages. Move the red box with the arrow key and
press the key, "ENTER". The chosen page will be active. Please, kindly note that the FF page will be
available when the display is connected with a black box FF.

- 9 -
Page Select
1. Chartplotter/Fishfinder mode
This is dual images, chartplotter and Fishfinder.
i) This image is for chartplotter. (The keypad is operating for chartplotter functions)
※Please, refer the chartplotter manual about chartplotter functions .
VESSEL LAT/LOT
Speed of Ground
Course of Ground
GPS Receiver
status
Chartplotter
Display
Frequency
Depth
Temperature
Depth Bar
Fishfinder Display
※Please, refer the
chartplotter manual about
chartplotter functions .

- 10 -
Page Select
1. Chartplotter/Fishfinder mode
This is dual images, chartplotter and Fishfinder.
ii) This is for Fishfinder(The keypad is operating for Fishfinder functions)
※If you want to convert the keypad for Fishfinder, press the [DISP] for 2 sec. If you return
to chartplotter, press the [DISP] again.
Frequency
Depth
Temperature
Depth Bar
Fishfinder Display
Fishfinder Guide
Frequency
STC/GAIN

- 11 -
Page Select
2. Full Fishfinder mode
This is the full image of Fishfinder. Please, kindly note the chartplotter information is unavailable on
this image.
Frequency
Depth
Temperature
Depth Bar
Fishfinder Guide

- 12 -
Operation
Fishfinder
It is available to control and confirm information in fishfinder.
▶[MENU]->[0.Fishfinder]
Fishfinder 1/2
1. Manual/Auto Range
Auto range selects the best condition for measuring the depth automatically in the environment of the
sea. On manual, the user can set the range manually.
2. A-Scope
A-Scope shows the research under the water by a scope to see the environment under the water.
3. Image Speed
Select the speed of fishfinder image from 4X until 1/32X.
4. Shift
A user selects this function to see more detailed bottom of the sea. When you turn up the shift, the
range of fishfinder shall go up from the shift range.
5. White Line
It is necessary to research a detailed fish on the bottom or a seaweed under the sea. The color of the
bottom changes into white or black to see the bottom easier than red.
6. Auto Gain
AQUA selects the best condition of gain for measuring automatically in the environment of the sea.
7. Auto Gain Adjustment (200KHz)
When the auto gain sets, you adjust the auto gain up and down.
8. Auto Gain Adjustment (50KHz)
When the auto gain sets, you adjust the auto gain up and down.

- 13 -
Operation
Fishfinder
It is available to control and confirm information in Fishfinder.
▶[MENU]->[0.Fishfinder]
Fishfinder 1/2
9. Interference Rejection
When there are other boats around you on sailing, your fishfinder could be disturbed to work. The step
of the function is from off to level 2. The bigger number, the more rejection.
0. Noise Rejection
Your Fishfinder could be disturbed by the engine noise. This function can reject the noise from the
engine or other machinery instruments.

- 14 -
Operation
Fishfinder
It is available to control and confirm information in fishfinder.
▶[MENU]->[0.Fishfinder]->[MENU]
Fishfinder 2/2
1. Color Level
This function adjusts the colors. Make it upper level, the color becomes darker.
2. Color Rejection
There are 16 color levels for fishfinder. The color bar is on the left of the Fishfinder. If the level is higher,
the color of the bar is deleted one by one.
3. Screen Color
Select he back ground color of the Fishfinder for your convenience.
4. Pulse
Select the pulse of the output from the transducer. Levels are from 0.5X until 1.5X, which depends
upon the depth. 0.5X is proper to research precise a fish school but it is not suitable to measure a
deep depth. 1.5X is opposite from 0.5X.
5. Output Power
Select the output from the installed transducer. Levels are from off to 3. It should be careful about the
depth. If you set high level in a sallow depth, the Fishfinder screen turns to red. You see nothing
expect red on the screen.
6. Bottom Zoom Range
Select the range of the bottom zoom or lock. (refer Fishfinder main modes) It is necessary to modify
the bottom.
7. Fishfinder Modes
Fishfinder modes are selectable for single frequency or dual and some functions, for example bottom
zoom or lock.(Please, refer the Fishfinder modes)

- 15 -
Operation
Fishfinder
It is available to control and confirm information in Fishfinder.
▶[MENU]->[0.Fishfinder]->[MENU]
Fishfinder 2/2
8. Depth Display
The menu selects Depth displayed ON/OFF.
9. Temp Display
The menu selects Temperature displayed ON/OFF.

- 16 -
Operation
Fishfinder Modes
Fishfinder modes are selectable for single frequency or dual and some functions, for example bottom
zoom or lock.
1.Normal (200KHz or 50KHz)
Bottom Zoom magnifies the Fishfinder display from the sea bottom toward the surface for a short
distance. The sea bottom contour is displayed and additional contour lines are added at intervals
above the sea bottom to aid in determining distances of echoes near the bottom. Use the Fishfinder
Menu to set the magnified Bottom Range from 2.5 to 20m (10 to 60ft.). Default setting is 10m (40ft.). If
the depth Range is set manually, the setting must place the sea bottom echo in the lower portion of the
screen for Bottom Zoom to be effective.
2. Bottom Zoom (200KHz or 50KHz)
Bottom Zoom magnifies the Fishfinder display from the sea bottom toward the surface for a short
distance. The sea bottom contour is displayed and additional contour lines are added at intervals
above the sea bottom to aid in determining distances of echoes near the bottom. Use the Fishfinder
Menu to set the magnified Bottom Range from 2.5 to 20m (10 to 60ft.). Default setting is 10m (40ft.). If
the depth Range is set manually, the setting must place the sea bottom echo in the lower portion of the
screen for Bottom Zoom to be effective.

- 17 -
Operation
Fishfinder Modes
Fishfinder modes are selectable for single frequency or dual and some functions, for example bottom
zoom or lock.
3. Bottom Lock (200KHz or 50KHz)
Bottom Lock divides the Fishfinder main screen image for the selected Fishfinder into two sections.
The left hand section displays a Normal Mode image. The right hand section of the screen displays the
Fishfinder image relative to the sea bottom. The sea bottom appears as a straight line with the
Fishfinder image magnified for a short distance toward the surface. A scale appears on the right for
estimating distances of echoes near the bottom. Use the Fishfinder Manu to set the magnified Bottom
range from 2.5 to 20m (10 to 60ft.). Default setting is 10m (40ft.). If the depth Range is set manually,
the setting must place the sea bottom echo in the lower portion of the screen for Bottom Lock to be
effective.
Fishfinder modes are selectable for single frequency or dual and some functions, for example bottom
zoom or lock.
4. Normal (200KHz/50KHz)
The high frequency (200KHz) displays on the left and the low frequency (50KHz) Normal displays on
the right, which increase the accuracy of a fish school and your decision to catch fishes.
5. Bottom Zoom (200KHz/50KHz)
The high frequency (200KHz) displays on the left and the low frequency (50KHz) Bottom Zoom
displays on the right, which increase the accuracy of a fish school and your decision to catch fishes.

- 18 -
Installation
Display unit brings expandable display technology to your bridge or navigation station. A careful
installation will assure maximum benefit from Display unit integrated features.
Display Unit Location
Select a location for your Display unit that provides easy viewing from all likely operator’s positions.
The display unit is designed to be mounted on either a console or from an overhead surface. The
Display unit is also designed for flush mounting using six threaded holes on the rear panel. Locate the
display in an area with protection from the elements and avoid direct sunlight on the viewing window.
Also, consider access to the rear panel of the unit for connecting power and cables to the various
remote sensors. The mounting surface must be flat and solid to support the unit and prevent vibration.
There should be access to the inside of the surface to permit through bolt fastening for the mounting
bracket.
Display Unit Installation
Temporarily install the mounting bracket on the Genesis display unit and place the unit at the selected
location.
CAUTION
The Display unit is unstable when the mounting bracket is not secured. Hold the unit in place
at all times.
Check the suitability of the location and make any adjustments. When all is satisfactory, use the holes
in the mounting bracket as a guide and mark the holes locations on the mounting surface.

- 19 -
Installation
Drill a 1/4 in. diameter hole at each marked location. Mount the Display unit bracket using bolts
through the mounting surface. Place large flat washers on the opposite side of the mounting surface
from the bracket and then install lock washers and nuts. Tighten securely.
Install the display unit into the mounting bracket. Check alignment and operation of the pivots and
security of the mounting. Make any adjustments necessary to prevent binding and assure even
meshing of the pivot locking washers. It is advised to remove the display unit and store it in a safe
place to prevent damage during the rest of the installation process.
Power Connection
Power is supplied to the Fishfinder Unit through a connector on the rear panel of the display unit.
Route the power cable from the Fishfinder Unit location to the ship’s power distribution panel.
Connect the black wire to a battery negative (-) terminal of the power panel.
Connect the white wire to a fused battery positive (+) terminal of the power panel ( 12 to 24 Vdc
nominal). If a fused terminal is not available, install an in-line fuse holder.
Sensor Connection
There are many sensors and transducers available which may be used to expand the capabilities of
the Fishfinder Unit. Connectors for these accessories are provided on the rear panel of the Fishfinder
Unit. For most sensors, only data and control connections are routed to the Fishfinder Unit.

- 20 -
Installation
An input designation means, in put to Fishfinder unit and an output designation means, output from
AQUA. Sensors will have similar designations, but from the sensors point of view. Therefore, a sensor
output will connect to an AQUA input and a sensor input will connect to an Fishfinder unit output.
Transducer Installation
If you have chosen a Sonar option for your Genesis a transducer must be installed on your vessel
unless an exiting compatible transducer is installed. The installation of sonar transducers require some
planning and skill to achieve the best result. It is strongly advised hat you read the installation
instructions completely before starting. The two basic types of transducers are transom mount and
through-hull mount. There are variations within each type to provide for options such as temperature
sensors, speed sensors and for different beam angels and sonar frequencies. Several different
transducers may be used with the AQUA. Refer to the optional Equipment list for the variations
available.
CAUTION
Mounting a sonar transducer for your AQUA Sonar requires drilling holes into the hull of your boat
which could affect its water integrity. Therefore, installation should be attempted only by qualified
individuals. If you have any doubt about your ability to complete the process successfully, we
recommend you obtain the services of a HAIYANG dealer or marine service center with knowledge
and experience in transducer installation .
Since your AQUA Sonar performance depends upon how well the transducer is installed, please
carefully observe the following mounting procedures.
For proper performance, the transducer’s mounting location must be chosen carefully. The transducer
must be mounted in a location that is free from turbulence and air bubbles created by movement of the
boat through water. Air bubbles greatly reduce the efficiency of the transducer. It is also strongly
recommended, for transom mounted transducers, the transducer be mounted in an area with the least
Table of contents
Other Haiyang Fish Finder manuals