Hall Technologies HT-ODYSSEY User manual

Hall Technologies November 8, 2022 Page 1 of 30
Hall Technologies • 1234 Lakeshore Dr Suite #150 Coppell, TX 75019 • halltechav.com
HT-ODYSSEY
BYOD Conference Speakerphone with presentation switch and wireless casting
User Manual
Version: 1.0

Hall Technologies November 8, 2022 Page 2 of 30
Important Safety Instructions
!
1. Do not expose this apparatus to rain, moisture, dripping or
splashing and that no objects filled with liquids, such as
vases, shall be placed on the apparatus.
2. Do not install or place this unit in a bookcase, built-in
cabinet or in another confined space. Ensure the unit is well
ventilated.
3. To prevent risk of electric shock or fire hazard due to
overheating, do not obstruct the unit’s ventilation openings
with newspapers, tablecloths, curtains, and similar items.
4. Do not install near any heat sources such as radiators, heat
registers, stoves, or other apparatus (including amplifiers)
that produce heat.
5. Do not place sources of open flames, such as lighted
candles, on the unit.
6. Clean this apparatus only with dry cloth.
7. Unplug this apparatus during lightning storms or when
unused for long periods of time.
8. Protect the power cord from being walked on or pinched
particularly at plugs.
9. Only use attachments / accessories specified by the
manufacturer.
10. Refer all servicing to qualified service personnel.

Hall Technologies November 8, 2022 Page 3 of 30
Table of Contents
Introduction ........................................................................................................................................ 4
Overview .................................................................................................................................. 4
Features ................................................................................................................................... 4
Package Contents ................................................................................................................... 5
Panel Description .................................................................................................................... 6
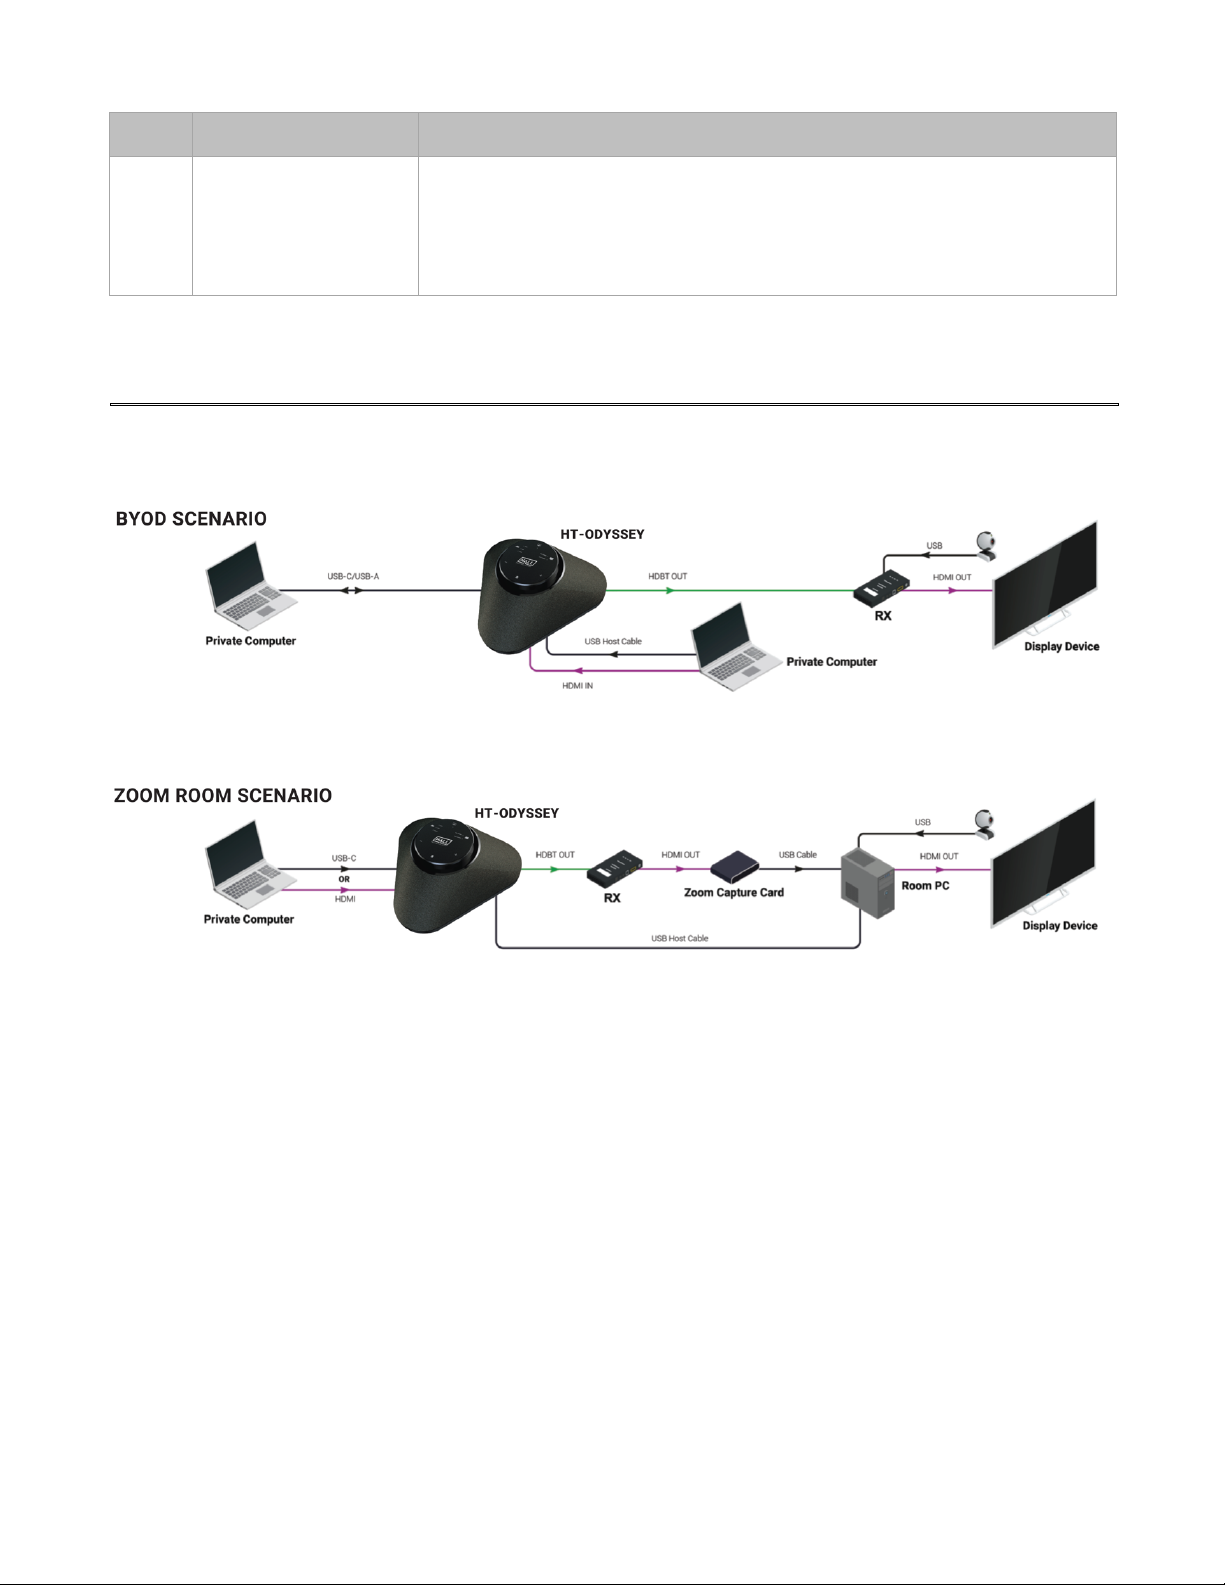
Applications ........................................................................................................................................ 8
Key Functions .......................................................................................................................... 9
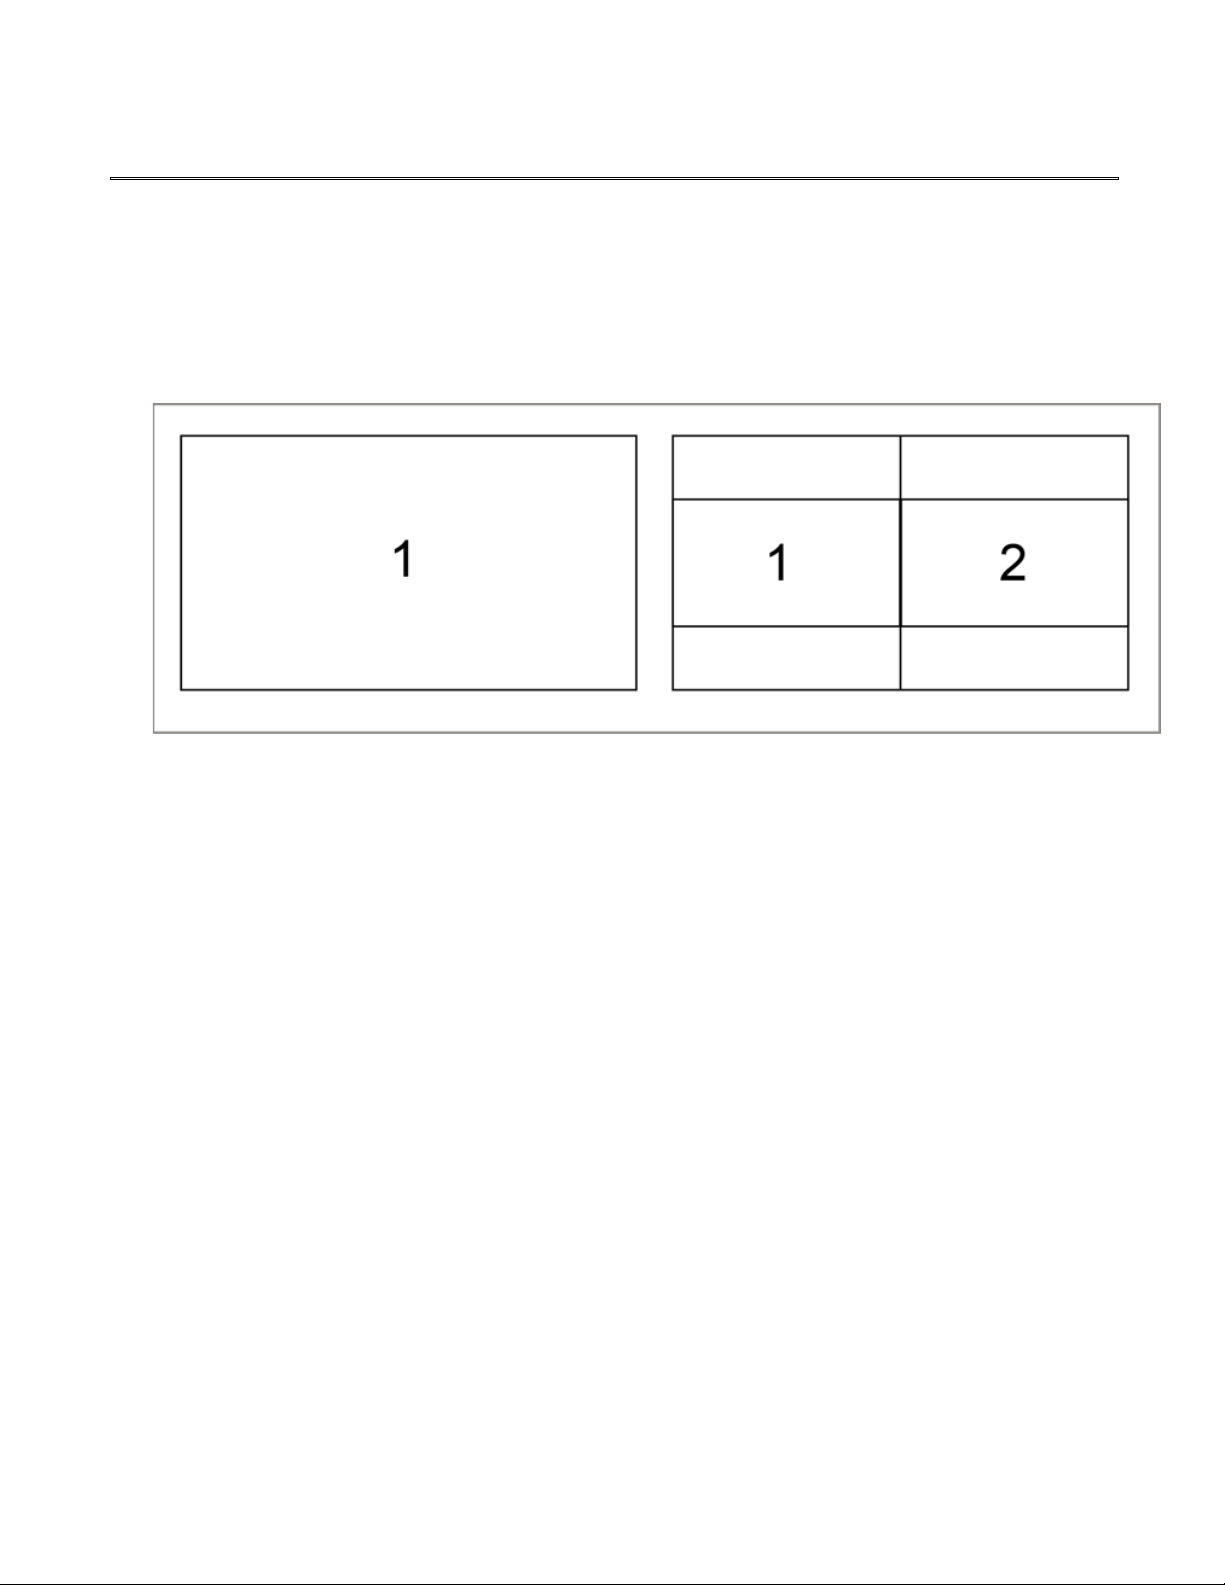
Video Switching ...................................................................................................................... 9
Screen Mirroring ................................................................................................................... 10
(1)Screen Mirroring over AirPlay ............................................................................. 10
(2)Screen Mirroring over Smart View ...................................................................... 12
(3)Screen Mirroring over Miracast .......................................................................... 12
(4)Screen Mirroring over HT-Voyager ..................................................................... 14
Guide Screen ........................................................................................................................ 14
OSD ....................................................................................................................................... 15
Web UI .............................................................................................................................................. 17
General Page ........................................................................................................................ 18
Device Name ........................................................................................................................ 18
Network ................................................................................................................................ 18
Wi-Fi Settings ....................................................................................................................... 19
Soft AP .................................................................................................................................. 19
BYOD ..................................................................................................................................... 20
RS323 Command for Display Control ................................................................................. 21
CEC ....................................................................................................................................... 21
Standby ................................................................................................................................. 22
Video ..................................................................................................................................... 23
HDMI Out Resolution ........................................................................................................... 23
Output HDCP ........................................................................................................................ 23
Video Mute ........................................................................................................................... 24
Manage Alias ........................................................................................................................ 24
Advanced Setting ................................................................................................................. 25
Application Mode ................................................................................................................. 25
Login Password ................................................................................................................... 25
Lock Button .......................................................................................................................... 26
Welcome Menu – Custom Web UI Logo ............................................................................ 26
Guide Screen ........................................................................................................................ 26
Firmware Upgrade ............................................................................................................... 26
System .................................................................................................................................. 27
Firmware Version ................................................................................................................. 27
Troubleshooting .............................................................................................................................. 28
Specifications .................................................................................................................................. 29

Hall Technologies November 8, 2022 Page 4 of 30
Introduction
OVERVIEW
This product is an all-in-one BYOD Speakerphone with a presentation switch, wireless casting
and an HDBT out port. It allows everyone to hear the sound in the meeting room during
conference calls and to show a presentation from a laptop, smartphone, or tablet with USB Type-
C port or HDMI in. The USB-C port also provides 60W of charging power. When connected
through the Type-C port/HDMI In port, HDMI out/ HDBT out can support resolutions up to
4K@30Hz, while through USB 3.0 Display-Link technology, it can support resolutions up to
1080P@60Hz.
With a 360-degree 4x Mic array that picks up sound from any angle, including echo cancellation,
active background noise reduction and speech enhancement, HT-ODYSSEY offers excellent
meeting performance.
FEATURES
! All-in-one meeting collaboration with mic, speaker, and built-in presentation switch.
! Powerful and stable BYOD feature for sharing content via Miracast, AirPlay and HT-Voyager.
! Built-in HDBT module allows for 4K video signal extension up to 40m.
! 10W enhanced speaker with crystal sound can be heard anywhere clearly in the meeting
room.
! Powerful Mic array with omni-directional pickup, unique automatic echo cancellation and
noise reduction.
! Compatible with old and new laptops with multi-connector cable (USB Type-C and USB 3.0
Type-A Adapter) provided.
! Touch buttons, smart LED indicator for showing dynamic talking direction.
! Auto detects source status to send power on/off command to sync display.
! Plug and Play compatibility for Window, Mac OS, and Android, also UC platforms like Zoom,
WebEx, Teams, etc.

Hall Technologies November 8, 2022 Page 5 of 30
Package Contents
! 1 x Speakerphone
! 1 x DC 24V Power Adapter
! 1 x AC Power Cord with US Pins
! 1 x AC Power Cord with UK Pins
! 1 x AC Power Cord with EU Pins
! 1 x AC Power Cord with AU Pins
! 1 x USB Type-C to Type-C Cable with Type-C to USB 3.0 Type-A Adapter
! 1 x Cable Fixing Bar (with Screws)

Hall Technologies November 8, 2022 Page 6 of 30
Panel Description
5
6
34
8
10
7
1
2
9
15 20
19
18
1716
14
13
11
12

Hall Technologies November 8, 2022 Page 7 of 30
ID
Name
Description
1
Speaker
Outputs audio of input source.
2
Source Switch Button
Press to select the source:
! AUTO: When there is no wire source or only showing Wireless source
(default).
! HDMI: Select HDMI source with USB host
! TYPE-C: Select Type-C source with USB host
3
LED
! AUTO LED lighting is blue: When there is no wired source or only showing
wireless source
! HDMI LED lighting is blue: HDMI source is selected
! TYPE-C LED lighting blue: Type-C source is selected
4
Power Button (Video
Mute)
Press Power button to mute/unmute video.
Note:
! Video mute is working whether the source is active or inactive;
! After pressing the power button again, video returns to the default status
(unmute).
5
Status LED
! LED Lighting is blue: Video input signal is detected.
! LED Lighting is white: No video input signal is detected.
! LED Lighting is red: Video is muted.
! LED Lighting is “Breathing” and is white: Standby status. (Standby occurs
when no source is connected and wireless times out)
6&7
BYOD ON/OFF Button
& LEDs
Press to set BYOD (AirPlay and Miracast) function to On/Off.
On/Off LED will light blue depending on selection.
8
Volume Up Button
Press to increase volume.
9
Mute Mic Button
Press to mute/unmute the mics.
10
Volume Down Button
Press to decrease volume.
11
Mic
4 x Omnidirectional mics array for picking up sound.
12
Pairing
Connect to HT-Voyager for pairing. (Plug in HT-Voyager and leave in until
HT-Voyager’s LED becomes solid white – after about 20 seconds)
13
DC 24V
Connect to the power adapter provided.
14
LAN
Connect to a network device (e.g. network switch, router, computer, etc.) for
AirPlay Mirroring signal input and LAN control (Web GUI & Telnet API).
15
HDBT Out
Connect to an HDBT receiver.
16
HDMI Out
Connect to an HDMI display.
17&18
HDMI IN &USB-B
! HDMI IN: Connect to an HDMI source.
! USB-B: Connect to the USB host device using a mini USB to USB Type A
cable.
Note: USB-B is bound with HDMI IN.
19
USB 3.0
Connect to a USB Device.
20
USB-C
USB 3.1 Gen1: 5Gbps
USB PD: 60W Max

Hall Technologies November 8, 2022 Page 8 of 30
ID
Name
Description
Connect to a USB-C video source (e.g. laptop) for video input using the USB
Type-C cable provided.
You can also use either of the following suggested cables:
• USB Type-C to USB 3.0 Type-A cable;
• USB Type-C to Type-C cable (USB 3.1 Gen 1 or above).
Applications
APPLICATION 1: BYOD OR ZOOM ROOM
APPLICATION 2: ZOOM ROOM ONLY WITH BYOD CONTENT SHARING
1. In the “Zoom Room Only” Application the Zoom Room PC gets the Odyssey mics through
the USB Micro to USB-A connection
2. In the “Zoom Room Only” Application the USB-C or HDMI inputs will only route video and
audio out to the Zoom capture card for content sharing. The USB-C will get the Odyssey mics
or camera. Switching to HDMI will not switch the USB from the Zoom PC.
3. When switching the scenario, a device reboot is needed to apply the settings. (Using Web UI
or API commands to switch the scenario, refer to “Web UI” section or the separate document
“API Command Set HT-ODYSSEY”.)
Note: After the speakerphone is connected to a laptop using the included USB-A to USB-B Mini
cable, the speakerphone can be detected by the system.
• Speaker: HT-ODYSSEY
• Mic: HT-ODYSSEY
• Wi-Fi: HT-ODYSSEY

Hall Technologies November 8, 2022 Page 9 of 30
Key Functions
The device offers multiple functions such as video switching, automatic signal switching,
Guide Screen and OSD, allowing for easy system use.
VIDEO SWITCHING
The device supports full screen and split screen, as shown in the following figure.
1. When BYOD is set to OFF, the HT-ODYSSEY only works as full screen, and can switch sources
between HDMI IN /USB Type-B / USB Type-C and HT-Voyager and will follow the rule: “Last-
in-first-out”:
• When a video source is connected, the device automatically switches to this source and
outputs it.
• When the current video source is disconnected, the device switches to the active video
source most recently connected or selected. If there’s no active source connected, the
device outputs the Guide Screen picture.
Note:
• You can switch HDMI IN/Type-C source by plugging or unplugging the cable, or by
pressing the Source Switch button on the top panel.
• When switching sources, the USB device is always bound with the selected source.
2. When BYOD is set to ON, the device supports switching among all sources.
• When one source is connected to the device, the device is in full screen mode.
• When two or more sources are connected to the device, the device is in split screen and
the latest inserted source will replace the earliest connected source to display in the
corresponding split screen.
• When the currently selected video source is disconnected:
o First, the device checks the last selected wired source. If the source is active, the

Hall Technologies November 8, 2022 Page 10 of 30
device will switch to the source and display it on the screen.
o If the last selected wired source is not active, the device will check the other wired
source. If that source is active, the device will switch to the source and display it
on the screen.
o If there’s no active source, the device will display the Guide Screen on the display,
and after 1 minute, the device will send the CEC power off command to turn off
the sync display.
Note: If a new source replaces the current wireless source (HT-Voyager / AirPlay / Miracast,
Smart View), the current wireless source is disconnected from the device and the new source is
displayed.
SCREEN MIRRORING
With screen mirroring support, the device allows users to wirelessly share multimedia from their
devices on any HDMI displays. Screen mirroring can be performed over AirPlay, Miracast, Smart
View and HT-Voyager.
1. Screen mirroring over AirPlay
Using an iPhone 8 (iOS 15.2) for example:
1. Connect your iPhone to the soft AP of the device.
ð Soft AP SSID: this should be the same as the device name which can be obtained
from the OSD at the upper right corner of the display screen. By default, it is set as
HT-ODYSSEY.
ð Password: this password can be set through Web UI or Telnet API and can be obtained
from the OSD at the bottom right corner of the display screen. By default, it is set as
12345678.
2. Slide up from the bottom of the iPhone’s screen to show the control center. Click Screen
Mirroring and choose the device name in the pop-up list.

Hall Technologies November 8, 2022 Page 11 of 30
3. HT-ODYSSEY now displays your iPhone’s screen.
4. To disconnect iPhone from the device: click
Stop Mirroring, the display stops displaying
your iPhone’s screen.
HT-ODYSSEY
HT-ODYSSEY

Hall Technologies November 8, 2022 Page 12 of 30
2. Screen mirroring Smart View
For Android mobile (take Samsung Galaxy S9 for example):
1. Enable the Wi-Fi or WLAN feature of the mobile device.
2. Slide down from the top of the screen and click the Smart View icon in the pop-up
interface.
3. The Smart View window appears and starts to search for Miracast receiver. Click the HT-
ODYSSEY device name in the search result and the device will output the mobile screen.
3. Screen mirroring Miracast
For Windows 10 PC:
1. Enable the WLAN feature of your PC.
2. Click the icon on bottom right of the screen to open Action Center.

Hall Technologies November 8, 2022 Page 13 of 30
3. Click Connect.

Hall Technologies November 8, 2022 Page 14 of 30
4. Click the HT-ODYSSEY device name in the search results.
5. The HT-ODYSSEY device displays the PC’s content once your PC is connected to the device
successfully.
6. To disconnect the PC from the device, click Disconnect.
Note:
! The icon and interface of the Miracast function may vary on different computers.
! Some Windows 10 computers may fail to perform screen mirroring with Miracast due to
compatibility issues.
! A shortcut for displaying from a Windows computer can be found by pressing Windows + K.
Tip: Both the AirPlay mirroring and Miracast support access code. If you see the PIN entry
window appears on your devices, input the access code which can be obtained through OSD.
(See “OSD” section for more information.)
4. Screen mirroring over HT-Voyager
HT-Voyager allows you to share your laptop’s content on the display screen without installing
any additional software. Simply plug in the HT-Voyager into USB-C and click the button. For more
information, see the user guide of HT-Voyager. (Note: HT-Voyager is sold separately.)
GUIDE SCREEN
The device uses a Guide Screen to convey the basic connection instructions for user access.
The Guide Screen can be personalized to allow custom connection instructions on the device’s
Web UI page. When all video sources are disconnected from the device, the following default
Guide Screen is displayed on the screen automatically:
Note:
• This Guide Screen picture can be changed through the Web UI setting. Please refer to Guide
No Access Code
UAV-G709-000
WiFi Pwd:12345678
IP: 192.168.9.46
Guide
HT-ODYSSEY

Hall Technologies November 8, 2022 Page 15 of 30
Screen section for more information.
• By default, if the Guide Screen is being displayed for 60 seconds with no wireless casting
connectivity, a countdown timer with the time period of 60 seconds will appear. When the
timer ticks to zero, if the connected display is CEC-supported, the display will enter standby
mode.
OSD
The device supports OSD (On Screen Display) to convey basic information, including the video
source’s information, access code, device name, IP address, and Wi-Fi password. The following
are two different OSD examples.
Example 1: Full Screen Mode:
HT-ODYSSEY
IP. 192.168.9.46
WiFi Pwd:12345678

Hall Technologies November 8, 2022 Page 16 of 30
Example 2: Split Screen Mode:
Note:
• When the device outputs the Guide Screen, the OSD will be displayed continuously until the
countdown timer reaches zero.
• When the device outputs video input sources, the OSD will be displayed for 10 seconds and
then will disappear.
• By default the access code is set as blank, and therefore the OSD doesn’t display the access
code. If you want to set an access code, see BYOD section for more information.
HT-ODYSSEY
IP. 192.168.9.46
WiFi Pwd:12345678

Hall Technologies November 8, 2022 Page 17 of 30
Web UI
The Web UI for this device allows for basic controls and device settings. This Web UI can be
accessed through a modern browser, e.g. Chrome, Safari, Firefox, IE10+, etc.
To get access to the Web UI:
1. Connect the LAN port of the device to a local area network. Ensure there’s a DHCP server in
the network so that the device can obtain a valid IP address. (If there is no DHCP server the
device will revert to a 169.254.x.x address which you can find on the OSD. Use this to change
the device IP to a static IP address and set your own.)
2. Connect the PC to the same network as the device.
3. Input the device’s IP address in the browser and press Enter, the following window pops up.
4. Input password (default password: admin) and click Login to enter the main page of Web UI.
The Web UI main page consists of four tabs: General, Video, Audio and Advanced Setting.

Hall Technologies November 8, 2022 Page 18 of 30
General Page
DEVICE NAME
UI Element
Description
Device Name
Change the device name if desired
.
Note: The name must be 1~20 characters in length, including letters,
numbers, “_” or “-”.
Apply
Click to apply setting changes.
NETWORK
UI Element
Description
Network
Used to modify network settings.
IP Mode
Select the desired IP mode between DHCP and Static. (Default is DHCP)
IP Address
Set the IP address manually if Static mode is selected.
Subnet Mask
Set Subnet Mask manually if Static mode is selected.
Default Gateway
Set the Default Gateway manually if Static mode is selected.
DNS Server 1
Set gateway address manually for the device to communicate with another
network that uses different communication protocols when Static mode is
selected.
DNS Server 2
Set DNS server manually for the switcher to ensure normal network
communication.
Apply
Click to apply setting changes.

Hall Technologies November 8, 2022 Page 19 of 30
WI-FI SETTINGS
UI Element
Description
Mode
• 5G: Configure the device’s frequency band as 5GHz.
• 2.4G: Configure the device’s frequency band as 2.4GHz.
By default, the device works at 5GHz. If your wireless devices don’t support 5GHz,
configures the frequency band as 2.4G before connecting them to the device via
Miracast.
Channel
By default the Channel is set to Auto. If a different wireless channel is desired,
uncheck Auto and select the desired channel.
Apply
Click to apply setting changes.
SOFT AP
UI Element
Description
Setting
• On: Enable the device’s soft AP (Access Point) function.
• Off: Disable the device’s soft AP function.
Soft AP Router
• On: Enable the device’s soft AP router function so that wireless devices
connected to soft AP are able to access the internet (in the condition that the
LAN port of the device is connected to the internet).
• Off: Disable the device’s soft AP function to prevent wireless devices
connected to soft AP from accessing the internet.
Note: Before you use this feature, ensure the soft AP function is enabled.
Soft AP Password
Configure soft AP password.
Note: The soft AP password must be 8~20 characters in length, including letters,
numbers, “_” or “-”.

Hall Technologies November 8, 2022 Page 20 of 30
UI Element
Description
Apply
Click to apply setting changes.
BYOD
Error! Bookmark not defined.
UI Element
Description
BYOD Feature
• On: Enable the device’s BYOD feature.
• Off: Disable the device’s BYOD feature.
Access Code
Enter a four-digit access code to help prevent users from accidentally connecting
to an unintended device and protect from unauthorized access.
! When an access code is configured, it appears on the upper right corner of the
display.
! If you don’t want to set access code, you can leave this blank.
By default, it is set as blank.
Auto
When “Auto” is checked, the device randomly generates a four-digit access code in
the following cases:
! The device switches to Guide Screen.
! The device reboots.
Apply
Click to apply setting changes.
Table of contents
Other Hall Technologies Telephone manuals