Halo 1600 User manual

POWER STATION 1600
FOR ALL QUESTIONS ABOUT THE WARRANTY
OR EXCHANGE REQUESTS, CONTACT US.
1-800-255-6061
Operating Instructions
PLEASE READ BEFORE OPERATING THIS EQUIPMENT

— 01 —
WARNING
Please read the following instructions for safety before use. Improper use may result
in re, property damage or personal injury or death. DO NOT use the product with
incompatible components or alter the product in any way.
WARNING WARNING
Improper use may result in re, property
damage, or personal injury. Make sure
to use the product according to the
following safety rules and guidelines.
Do not expose the product to any liquid
or submerge in water. If the battery comes
into contact with water, it may cause
chemical decomposition of the battery.
This may cause the battery to catch re or
explode.
SAFETY INSTRUCTIONS
Read the following instructions to ensure safe usage:
Carefully read the instructions for the electric devices that you intend to connect to your
power.
Battery Maintenance:
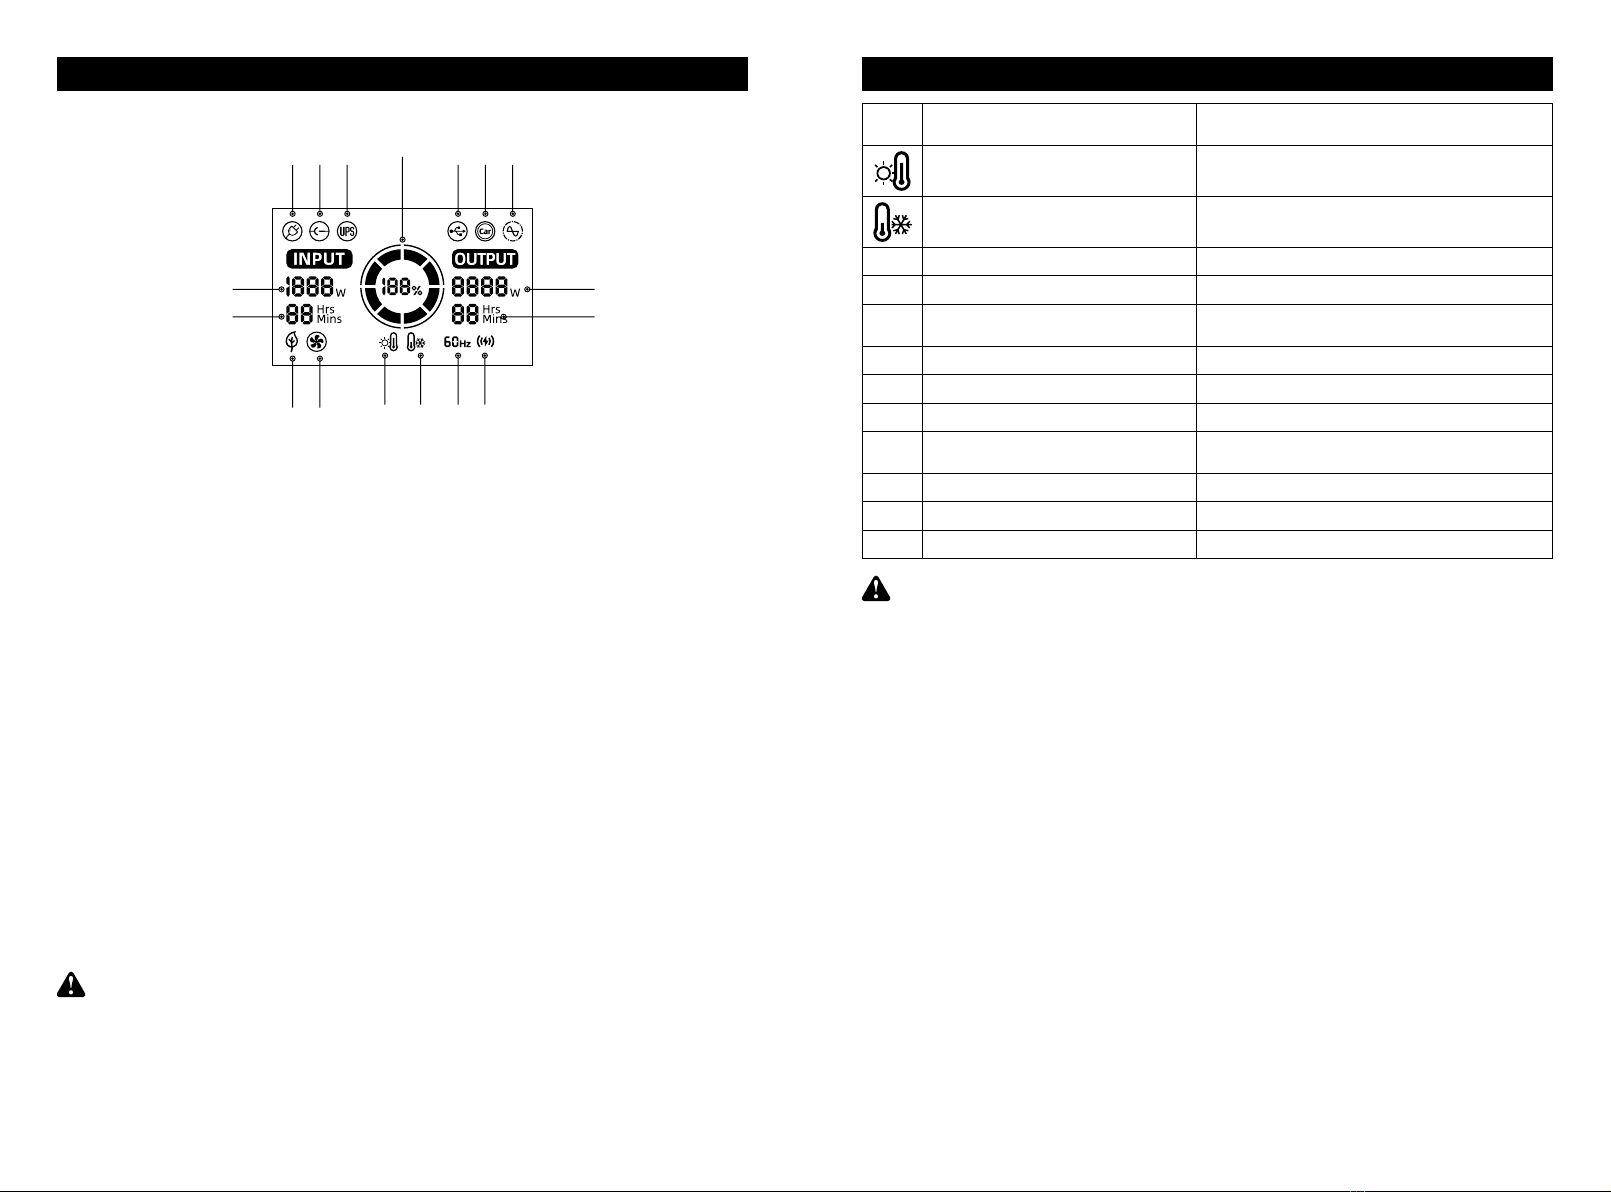
When not used, the Halo 1600 power station should be stored in a cool, dry place. However, we
recommend every 3 months to recharge for 2 hours. During this maintenance, the fans may turn on
and the unit may get warm. This behavior is normal. If this occurs, leave the unit plugged in until
fan activity stops. This charge cycle will help prolong battery life and maintain peak performance.
DANGER
Noncompliance may very likely
lead to serious injury*or death.
• DO NOT disassemble, repair or
modify the unit or the battery.
• DO NOT place the unit close to or in
a re or expose it to heat. Keep out
of direct sunlight.
• DO NOT charge, use or store the unit
in a bathroom or in an area exposed
to rain or moisture. Only use the
output socket to power external
devices.
• Never connect the output to mains
power under any circumstances.
• DO NOT touch the unit or the plug in
points if your hands are wet.
• DO NOT connect any metallic objects
to the AC input or output.
• DO NOT rub your eyes if uid from
inside the unit should get in your eyes.
• DO NOT dispose the unit together
with household waste.
• DO NOT use any inappropriate
power cords.
• DO NOT operate the unit above the
specied input voltage.
• DO NOT use the unit if it is not
functioning correct.
• DO NOT move the unit if it is
recharging or in use.
WARNING
Noncompliance may lead to
serious injury** or death.
• Use and store the unit only in a
clean and dry environment. Do
not use and store in dusty and wet
environment.
• Check the unit prior to every use.
Do not use the unit if it is damaged,
broken.
• DO not use the unit if the power cord
is damaged or broken. Keep the unit
away from children.
• DO NOT let children use the power
supply unit. Keep this product away
from pets.
• DO NOT use or store the unit in
an area or environment with high
temperature.
• Should uid from inside of the unit
come in contact with your skin or
clothing, wash the aected areas
with tap water. In a storm, unplug
the power cord from the socket.
• DO NOT charge the device through a
power system other than the rated
voltage.
• DO NOT place the unit on its side or
upside down while in use or storage.
• DO NOT use accessories for other
usage.
CAUTION
Noncompliance may lead
to injuries and/or property
damage**
• If rust peculiar odors. overheating
or other abnormal circumstances
are observed, stop using the unit
immediately and contact the dealer
or our customer service center.
• The unit complies with all legal
requirements for transport of
dangerous goods.
• Make sure that the unit is properly
secured when transporting it in a
motor vehicle.
• Only charge, use and store the unit
within an ambient temperature of 0
to 40℃ (32 ~104 ℉ ).
• Switch the unit o immediately if it
has accidentally fallen, was dropped
or was exposed to vibrations.
• Once the unit is fully charged,
unplug the AC charging cable. We
is not liable for any damage caused
by using dierent brand charging
cables.
• Use of dierent cables will void the
products warranty and may cause
damage or serious bodily injury.
THANK YOU
We appreciate your business and would like to thank you for choosing HALO!
Your safety is important to us.
Please read the instructions carefully and utilize the proper precautions before
operating this equipment.
IMPORTANT
Before using your power station for the rst time, fully charge it to ensure the best performance.

— 02 — — 03 —
CONTENTS
SAFETY INSTRUCTIONS ·················· 01
PRODUCT INTRODUCTION ················ 02
DEVICE COMPATIBILITY ·················· 02
PACKING LIST ······················ 02
PRODUCT FUNCTION DESCRIPTION ············ 04
BUTTON INDICATOR ··················· 05
LCD DISPLAY ······················· 06
LIST OF FAULT CODES ··················· 07
CHARGING FUNCTION DESCRIPTION ············ 08
OPERATING INSTRUCTIONS ················ 10
TRANSPORT INSTRUCTIONS FOR DANGEROUS GOODS ··· 12
TROUBLESHOOTING ··················· 12
PRODUCT MAINTENANCE ················· 12
FCC NOTE ························ 13
TECHNICAL SPECIFICATIONS ··············· 14
WARRANTY ························ 15
Laptops (41.4Wh)
Around
25 Recharges
Mini Fridge (40W)
Around
26 hours
32" TV (60W)
Around
17 hours
Drone (89.2Wh)
Around
11 Recharges
CPAP without heated
humidier (15W)
69 hours
Smartphone (10Wh)
Around
104 Recharges
Camera (5.9Wh)
Around
177 Recharges
Game Console (16Wh)
Around
65 Recharges
Floodlight (5W)
Around
208 hours
+MORE
Halo Power
Station 1600
User Manual AC Charging Cable DC 12V
to Anderson Cable
DC5525
to Anderson Cable
The power requirements, run times and recharge gures below are estimates and are provided for
reference purposes only. Actual results may may vary by device.
PRODUCT INTRODUCTION
DEVICE COMPATIBILITY
PACKING LIST
Whether you're a modern nomad taking your RV to new horizons, or a homeowner seeking
reassurance during unexpected outages, the HALO Power Station 1600 is your answer
to staying charged and connected. A fusion of power, portability, and versatility, this power
station promises to empower your experiences and keep you charged at home, in the
backyard and even the backcountry.

— 04 — — 05 —
Button Power ON/OFF
Press and hold to turn the unit on. Press and hold to turn the unit o.
Button MODE
Turn on the unit rst. Press the button to switch between AC fast charging and slow charging (25%).
Use slow charging if your AC outlet is being shared by other equipment. The default mode
is fast charging.
Button LED Light
Turn on the unit rst. Press the button to turn on the LED light. Press again to cycle the LED light
mode in this order; Low, High, Strobe, S.O.S., O.
Button DC Output
Turn on the unit rst. Press the button to turn the DC 12V output on. Press again to turn o.
Button USB Output
Turn on the unit rst. Press the button to turn the USB-A and USB-C output on. Press again
to turn o.
Button AC Output
Turn on the unit rst. Press the button to turn the AC output on. Press again to turn o.
PRODUCT FUNCTION DESCRIPTION
8
12345 6 7
910 11 12 13
1. DC Output Port (5521)
2. 12V Output Port
3. USB-A Output Ports
4. USB-C Output Ports
5. LCD Display
6. AC Output Ports
7. DC/Solar Input Port
8. Wireless Output
9. Air Intake Vent with Cooling Fan
10. Overload Protection (OLP) Reset
11. AC Input Port
12. Grounding Port
13. LED Light
15
15
16
17
18
19
20
16
17
18 19 20
BUTTON INDICATOR

— 06 — — 07 —
LIST OF FAULT CODES
Error
Code Potential Cause Solutions
High Temperature Warning Please stop using the product and let it cool down
to room temperature until the icon disappears.
Low Temperature Warning Please stop using the product until the icon disappears.
E01 Battery overvoltage Please disconnect the charging cable and stop charging
E02 Battery undervoltage Please disconnect the output and charge the device
E03 Inverter overheating Please disconnect the output and wait 1-2 hours before
operation
E04 Abnormal input voltage Please disconnect the charging cable
E05 Abnormal grid frequency Please disconnect the charging cable
E06 Abnormal output voltage Please contact customer service center
E07 AC and USB outputs are overloaded or
short-circuited
Please disconnect the output and check the electrical
equipment
E08 DC output is overloaded or short-circuited Please disconnect output
E09 Inverter failure Please contact customer service center
E16 Charge overload Please disconnect the output load
NOTE: When the DC load is abnormal, the system will automatically turn o the output
and will not show the fault code. Please disconnect the output and check the electrical
equipment then try again. When the USB load is abnormal, the corresponding output
power will be zero and the system will not show the fault code. Please disconnect the
outputs and check the electrical equipment, then try again.
① AC Input: During AC charging, this icon displays on the LCD.
② DC Input: When solar panel or DC source is connected to the DC/Solar input, the icon will turn on.
③Uninterruptible Power Supply (UPS): An uninterruptible power supply (UPS) is backup feature
that provides near instantaneous power in the event of an unexpected power failure or outage
which protect sensitive equipment from damage.
Devices with sensitive electronics like CPAP machines, some medical equipment, or computers
can benet from the UPS feature. Instead of powering down during an outage, they maintain
performance despite the power outage.
④ Input Power: When the power station 1600 is being charged by AC, DC, or AC and DC, the total
charging power will be displayed under "INPUT". DC/Solar input takes priority over AC input,
when both are being used.
⑤ Input Time: Estimated time remaining to fully charged the internal battery.
⑥ AC Charge Mode: When displayed, AC slow charging is enabled, fast charge by default.
⑦ Cooling Fan Status: Cooling fan is on when the fan icon is displayed.
⑧ High Temperature Warning: When this icon illuminates, the internal temperature has reached
its high temperature limit, the unit will shut o automatically.
⑨ Low Temperature Warning: When this icon illuminates, the internal temperature has reached
its low temperature limit, the power station will not be able to provide output or being charged.
⑩ AC Output Frequency: Indicates the AC output frequency.
⑪ Wireless Icon: wireless output is on when this icon is displayed.
⑫ Discharge Time: Estimated time to fully discharge the internal battery.
⑬ Output Power: Shows the total output power.
Note: This value displays the real-time power consumption, it changes accordingly when
change in power consumption of the devices connected.
⑭ AC Output: This icon is on indicates the AC output is enabled.
⑮ DC Output: This icon indicates DC 12V and cigarette lighter socket is enabled.
⑯ USB Output: Indicates USB port is enabled.
⑰ Battery Level Indicator: Shows the battery charged level.
LCD DISPLAY
①
⑥
④ ⑬
⑤ ⑫
⑯
⑩ ⑪
②
⑦
⑮③
⑧ ⑨
⑰⑭
Table of contents
Other Halo Power Supply manuals
Popular Power Supply manuals by other brands

Videx
Videx 520MR Installation instruction

Poppstar
Poppstar 1008821 Instructions for use

TDK-Lambda
TDK-Lambda LZS-A1000-3 Installation, operation and maintenance manual

TDK-Lambda
TDK-Lambda 500A instruction manual

Calira
Calira EVS 17/07-DS/IU operating instructions

Monacor
Monacor PS-12CCD instruction manual