Hama Delta Multi User manual

Power
Charge
E
F
D
GB
I
NL
P
CZ
FIN
PL
S
RUS
Operating Instructions
Bedienungsanleitung
Mode d‘emploi
Instrucciones de uso
Руководство по эксплуатации
Istruzioni per l‘uso
Gebruiksaanwijzing
Instrukcja obsługi
Návod k použití
Manual de instruções
Bruksanvisning
Käyttöohje
“Delta Multi”
Universal Charger
Universal-Ladegerät
00
081360


Power
Charge
Power
Charge
Front Back
Power
Charge
Power
Charge
Power
Charge
Ni-MHB attery AA
Ni-MHB attery AA
Power
Charge
Li-ion Battery
3.6 V
Li-ion Battery
7.2 V
Pic. 1
Pic. 3 Pic. 4
Pic. 2

2
GOperating instruction
Thank you for choosing a Hama product.
Take your time and read the following instructions
and information completely. Please keep these
instructions in a safe place for future reference. If
you sell the device, please pass these operating
instructions on to the new owner.
Features
•Suitable for nearly all Li-ion batteries (3.6 V/
3.7 V/7.2 V/7.4 V) and NiMH batteries (AA/AAA)
•LED function indicator displays charging status
•100 V-240 V mains connection, suitable for use
worldwide in conjunction with country-specic
adapter
•USB connection for charging additional devices
(5 V/500 mA)
•Voltage and polarity of Li-ion batteries are
automatically recognised
•Contacts are adjusted on the bottom of the
charger, so it is not necessary to touch the
contacts
•Contacts can be easily set to a wide range of
congurations
•Charging process automatically switches off to
protect the battery
•With 12 V charging cable for use in cars
1. Explanation of Warning Symbols and Notes
Warning
This symbol is used to indicate safety
instructions or to draw your attention to specific
hazards and risks.
Note
This symbol is used to indicate additional
information or important notes.
2. Package Contents
•“DELTA MULTI” universal charger
•100 V-240 V adapter
•DC 12 V car charging cable
•These operating instructions
3. Safety Notes
•This product is intended for private, non-
commercial use only.
•Only use the product for the intended purpose.
•Protect the product from dirt, moisture and
overheating, and only use it in dry locations.
•Do not use the product in the immediate vicinity
of heaters or other heat sources or in direct
sunlight.
•Only connect the product to an electrical socket
that has been approved for the device. The
electrical socket must always be easily accessible.
•Disconnect the product from the power supply
using the on/off switch – if this does not exist,
disconnect the power cable from the electrical
socket.
•Lay all cables so that they do not pose a tripping
hazard.
•Do not bend or crush the cable.
•Do not drop the product and do not expose it to
any major shocks.
•Keep children away from the packaging material
as there is a risk of suffocation.
•Supervise children to ensure that they do not play
with the device.
•Immediately dispose of the packaging material in
accordance with local disposal regulations.
•Do not modify the device in any way. Doing so
voids the warranty.
•Do not use power supply units that are not
recommended by the manufacturer.
Electrical shock hazard
•Do not use the product if the power supply
unit or power cable are damaged.
•Do not attempt to service or repair the device
yourself. Leave any service work to qualied
professionals.
•Do not open the device or continue to
operate it if it becomes damaged.

3
Warning – Batteries
•Do not attempt to charge any Li-ion batteries
with voltages above or below the voltage
range specied for this charger. This can
damage the charger.
•Do not charge NiMH and Li-ion batteries at
the same time.
•Do not attempt to charge any non-
rechargeable batteries (e.g. alkaline) or any
batteries which are damaged, leaking or
corroded.
Note
•The product is not designed to charge
InfoLithium batteries.
•The charging process only begins if the
distance between the two adjustable Li-ion
charging contacts is greater than 3 mm.
4. Getting Started and Operation
•Connect the charger to one of the two possible
power supplies (Pic. 1). When the redpower LED
remains lit, the charger is in standby mode.
Note
•The charger automatically recognises faulty
batteries and does not charge these for safety
reasons.
•When the green charge LED is ashing, this
indicates proper charging.
•The green charge LED remains lit when the
batteries are fully charged.
4.1 Charging Li-ion batteries
•Open the slide cover of the charger completely
until it locks into place.
•Adjust the contacts on the bottom of the charger
to t the particular Li-ion battery to be charged
(Pic. 2).
•Insert the battery into the charger (Pic. 3). The
charger automatically recognises the polarity of
the Li-ion battery.
•Unlock the slide cover by pressing the silver
release button and then close the slide cover so
that the particular battery is held securely and is
touching the contacts.
•Ensure that the green charge LED indicates
proper charging. If this is not the case, check
the contacts.
4.2 Charging NiMH batteries (AA/AAA cells)
•Open the slide cover of the charger completely
until it locks into place.
•When charging NiMH batteries, observe the
correct polarity indicated on the battery symbols.
Insert the NiMH battery with the correct polarity
(Pic. 4).
•Unlock the slide cover by pressing the silver
release button and then close the slide cover so
that the particular battery is held securely and is
touching the contacts.
•Ensure that the green charge LED indicates
proper charging. If this is not the case, check
the contacts.
•1or 2 NiMH rechargeable batteries can be
charged. If 2 NiMH rechargeable batteries
are charged at the same time, they must be
of the same type (AA or AAA) and have the
same capacity and charge state (remaining
capacity). We recommend that you only charge 2
rechargeable batteries at the same time, which
were used together in the same device.
4.3 USB charging option
•Connect the USB device to be charged with the
USB connection on the charger. In contrast to
charging options 4.1 and 4.2, the green charge
LED does not indicate charging.
•The USB charging option supplies a
maximum of 5 V/500 mA.

4
5. Care and Maintenance
Only clean this product with a dry, lint-free cloth
and do not use aggressive cleaning agents.
6. Warranty Disclaimer
Hama GmbH & Co. KG assumes no liability and
provides no warranty for damage resulting from
improper installation/mounting, improper use of
the product or from failure to observe the operating
instructions and/or safety notes.
7. Service and Support
Please contact Hama Product Consulting if you
have any questions about this product.
Hotline: +49 9091 502-115 (German/English)
Further support information can be found here:
www.hama.com
8. Technical Data
Voltage source 12 V DC
Input current max. 800 mA
Input voltage for car
charging cable 12 V
Input voltage for power
supply unit 100–240 V / 50/60 Hz
Li-ion charging voltage 4.2 V / 8.4 V
Output charging current
650 mA max. (3.6V–3.7V
Li-Ionen batteries)
650 mA max. (7.2V–7.4V
Li-Ionen batteries)
650 mA max.
(1 x NiMH Akku
(Typ AA/AAA))
250mA max.
(2 x NiMH Akku
(Typ AA/AAA))
USB output 5 V 500 mA
Operating temperature0–40° Celsius

5
DBedienungsanleitung
Vielen Dank, dass Sie sich für ein Hama Produkt
entschieden haben!
Nehmen Sie sich Zeit und lesen Sie die folgenden
Anweisungen und Hinweise zunächst ganz durch.
Bewahren Sie diese Bedienungsanleitung anschlie-
ßend an einem sicheren Ort auf, um bei Bedarf
darin nachschlagen zu können.
Features
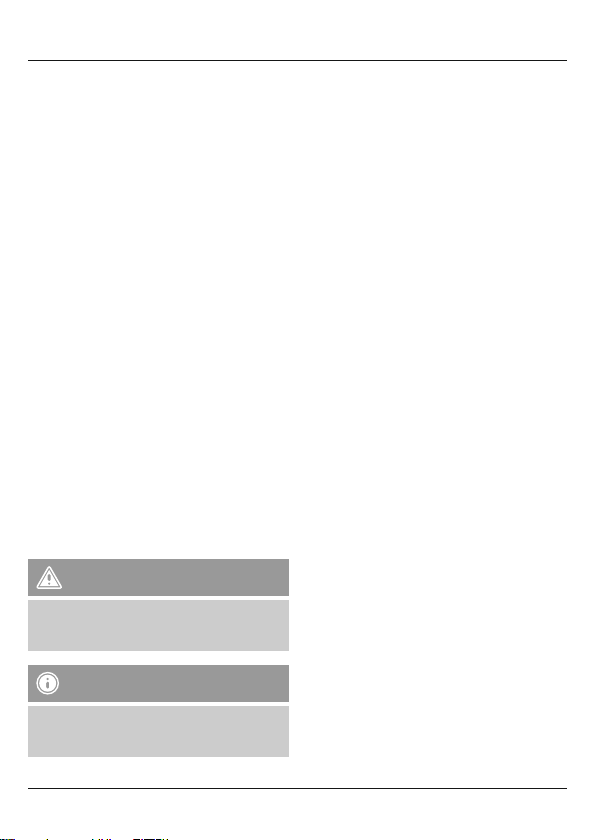
•Geeignet für nahezu alle Li-Ionen-Akkus (3,6 V/
3,7 V/7,2 V/7,4 V) und NiMH-Akkus (AA/AAA)
•LED-Funktionsanzeige gibt Auskunft über den
Ladestatus
•Netzanschluss von 100–240 V geeignet für
weltweiten Einsatz in Verbindung mit länderspe-
zischem Adapter
•USB-Anschluss zum Auaden weiterer Geräte
(5 V/500 mA)
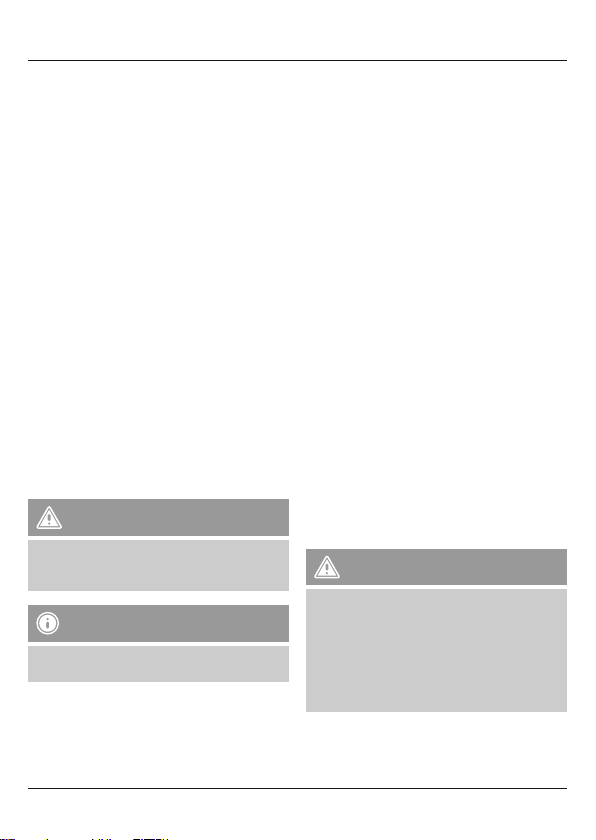
•Automatische Erkennung der Spannung und
Polarität von Li-Ionen-Akkus
•Kontakte werden an der Laderunterseite justiert,
daher kein Berühren der Kontakte nötig
•Vielfältige und einfache Einstellung der Kontakte
•Automatische Ladeabschaltung zum Schutz der
Akkus
•Mit 12V-Ladekabel für Kfz-Betrieb
1. Erklärung von Warnsymbolen und Hin-
weisen
Warnung
Wird verwendet, um Sicherheitshinweise zu
kennzeichnen oder um die Aufmerksamkeit auf
besondere Gefahren und Risiken zu lenken.
Hinweis
Wird verwendet, um zusätzlich Informationen
oder wichtige Hinweise zu kennzeichnen.
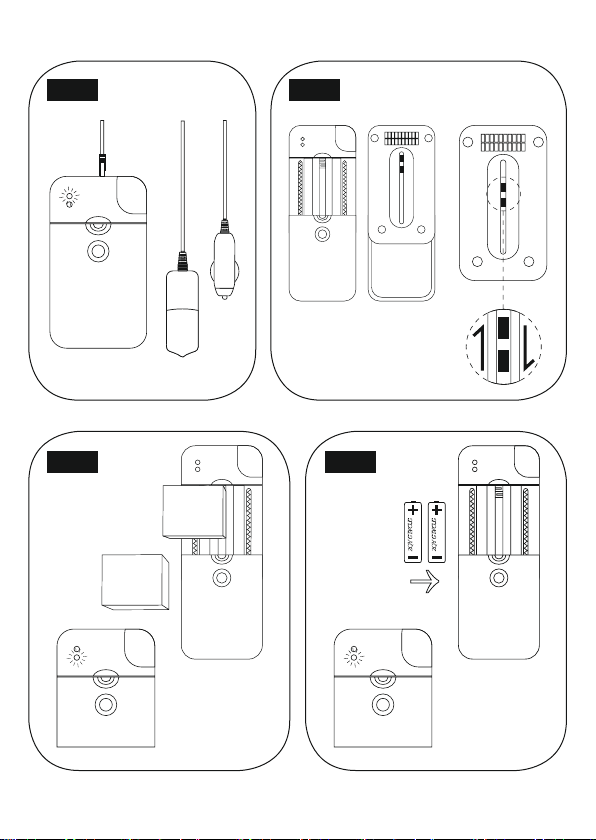
2. Packungsinhalt
•Universal Ladegerät „DELTA MULTI“
•Steckernetzteil 100-240V
•12V DC Kfz-Ladekabel
•diese Bedienungsanleitung
3. Sicherheitshinweise
•Das Produkt ist für den privaten, nicht-gewerbli-
chen Haushaltsgebrauch vorgesehen.
•Verwenden Sie das Produkt ausschließlich für den
dazu vorgesehenen Zweck.
•Schützen Sie das Produkt vor Schmutz, Feuchtig-
keit und Überhitzung und verwenden Sie es nur
in trockenen Räumen.
•Betreiben Sie das Produkt nicht in unmittelbarer
Nähe der Heizung, anderer Hitzequellen oder in
direkter Sonneneinstrahlung
•Betreiben Sie das Produkt nur an einer dafür
zugelassenen Steckdose. Die Netzsteckdose muss
jederzeit leicht erreichbar sein.
•Trennen Sie das Produkt mittels des Ein-/Ausschal-
ters vom Netz – wenn dieser nicht vorhanden ist,
ziehen Sie die Netzleitung aus der Steckdose.
•Verlegen Sie alle Kabel so, dass sie keine Stolper-
gefahr darstellen.
•Knicken und quetschen Sie das Kabel nicht.
•Lassen Sie das Produkt nicht fallen und setzen Sie
es keinen heftigen Erschütterungen aus.
•Halten Sie Kinder unbedingt von dem Verpa-
ckungsmaterial fern, es besteht Erstickungsgefahr.
•Kinder sollten beaufsichtigt werden, um sicherzu-
stellen, dass sie nicht mit dem Produkt spielen.
•Entsorgen Sie das Verpackungsmaterial sofort ge-
mäß den örtlich gültigen Entsorgungsvorschriften.
•Nehmen Sie keine Veränderungen am Gerät vor.
Dadurch verlieren Sie jegliche Gewährleistungs-
ansprüche.
•Kein Netzteil verwenden, welches nicht vom
Hersteller empfohlen wird

6
Gefahr eines elektrischen Schlages
•Verwenden Sie das Produkt nicht, wenn das
Netzteil oder die Netzleitung beschädigt sind.
•Versuchen Sie nicht, das Gerät selbst zu
warten oder zu reparieren. Überlassen Sie
jegliche Wartungsarbeit dem zuständigen
Fachpersonal.
•Öffnen Sie das Produkt nicht und betreiben
Sie es bei Beschädigungen nicht weiter.
Warnung - Akkus
•Laden Sie keine Li-Ion Akkus, deren Span-
nung über oder unter der für diesen Lader
angegeben liegt. Der Lader kann dadurch
beschädigt werden.
•Laden Sie NiMH- und Li-Ion Akkus nicht
gleichzeitig.
•Laden Sie keine Batterien (z.B. Alkaline)
und keine beschädigten, auslaufenden oder
korrodierten Akkus.
Hinweis
•Das Produkt ist nicht geeignet, sog.
InfoLithium Akkus zu laden.
•Der Ladevorgang wird nur gestartet, wenn
der Abstand der beiden einstellbaren Li-Ion
Ladekontakt > 3mm beträgt.
4. Inbetriebnahme und Betrieb
•Verbinden Sie den Lader mit einer der zwei
möglichen Stromversorgungen (Pic.1) . Dauerlicht
der roten Power LED signalisiert den Standby
Status des Laders.
Hinweis
•Der Lader erkennt fehlerhafte Akkus automa-
tisch und lädt diese aus Sicherheitsgründen
nicht.
•Ein korrekter Ladevorgang wird durch die
blinkende grüne Charge-LED angezeigt.
•Voll geladene Akkus werden durch eine dauer-
haft leuchtende grüne Charge-LED angezeigt.
4.1 Li-Ion Akkus laden
•Öffnen Sie die Schiebeabdeckung des Laders
vollständig bis zum Einrasten.
•Justieren Sie die Kontakte an der Laderunterseite
passend für den jeweiligen zu ladenden Li-Ion
Akku (Pic.2).
•Legen Sie den Akku in den Lader ein (Pic. 3).
Der Lader erkennt bei Li-Ion Akkus die Polarität
automatisch.
•Entriegeln Sie die Schiebeabdeckung durch
Druck auf die silberne Entriegelungstaste und
schließen Sie die Schiebeabdeckung, so dass der
jeweilig eingelegte Akkutyp sauber gehalten und
kontaktiert wird.
•Achten Sie darauf, ob die grüne Charge-LED
einen korrekten Ladevorgang anzeigt. Ist dies
nicht der Fall, überprüfen Sie die Kontaktierung.

7
4.2 NiMH Akkus laden (AA/AAA-Zellen)
•Öffnen Sie die Schiebeabdeckung des Laders
vollständig bis zum Einrasten.
•Bei NiMH-Akkus beachten Sie die Batteriesym-
bole und die darauf angegebene Polarität. Legen
Sie die NiMH-Akkus polrichtig ein (Pic.4)!
•Entriegeln Sie die Schiebeabdeckung durch
Druck auf die silberne Entriegelungstaste und
schließen Sie die Schiebeabdeckung, so dass der
jeweilig eingelegte Akkutyp sauber gehalten und
kontaktiert wird.
•Achten Sie darauf, ob die grüne Charge-LED
einen korrekten Ladevorgang anzeigt. Wenn
nicht, überprüfen Sie die Kontaktierung.
•Es können 1 oder 2 NiMH-Akkus geladen wer-
den. Werden 2 NiMH-Akkus gleichzeitig geladen,
müssen diese vom selben Typ (AA oder AAA) sein
und die gleiche Kapazität und gleichen Ladezu-
stand (Restkapazität) haben. Es ist zu empfehlen,
nur Akkus gleichzeitig zu laden, die zusammen in
einem Gerät verwendet werden.
4.3 USB Ladeoption
•Verbinden Sie das zu ladende USB Gerät mit dem
USB Anschluss des Laders. Im Gegensatz zu den
beiden Ladeoptionen 4.1 und 4.2 erfolgt hier
keine Anzeige durch die grüne Charge-LED!
•Die USB Ladeoption liefert max. 5 V/500 mA.
5. Wartung und Pege
Reinigen Sie dieses Produkt nur mit einem
fusselfreien, trockenen Tuch und verwenden Sie
keine aggressiven Reiniger.
6. Gewährleistungsausschluss
Die Hama GmbH & Co. KG übernimmt keinerlei
Haftung oder Gewährleistung für Schäden, die aus
unsachgemäßer Installation, Montage und un-
sachgemäßem Gebrauch des Produktes oder einer
Nichtbeachtung der Bedienungsanleitung und/oder
der Sicherheitshinweise resultieren.
7. Service und Support
Bitte wenden Sie sich bei Fragen zum Produkt
gerne an die Hama-Produktberatung.
Hotline: +49 9091 502-115 (Deu/Eng)
Weitere Supportinformationen nden sie hier:
www.hama.com
8. Technische Daten
Spannungsquelle 12 V DC
Eingangsstrom max. 800 mA
Eingangsspannung
KFZ-Ladekabel 12 V
Eingangsspannung Netzteil 100–240 V / 50/60 Hz
Ladespannung Li-Ion 4.2 V / 8.4 V
Ausgangs-Ladestrom
650 mA max. (3.6V–3.7V
Li-Ionen Akkus)
650 mA max. (7.2V–7.4V
Li-Ionen Akkus)
650 mA max.
(1 x NiMH Akku
(Typ AA/AAA))
250mA max.
(2 x NiMH Akku
(Typ AA/AAA))
USB Ausgang 5 V 500 mA
Betriebstemperatur
0–40° Celsius

8
FMode d‘emploi
Nous vous remercions d’avoir choisi un produit Hama.
Veuillez prendre le temps de lire l‘ensemble des
remarques et consignes suivantes. Veuillez conserver
ce mode d‘emploi à portée de main an de pouvoir
le consulter en cas de besoin. Transmettez-le au
nouveau propriétaire avec l’appareil le cas échéant.
Caractéristiques
•Convient à pratiquement toutes les batteries
lithium-ion (3,6 V/3,7 V/7,2 V/7,4 V) et batteries
NiMH (LR6/AA / LR03/AAA)
•La LED de fonctionnement indique l‘état de
charge de la batterie
•Raccordement secteur 100-240 V adapté à une
utilisation dans le monde entier conjointement
avec un adaptateur spécique au pays
•Connexion USB pour la recharge d‘autres
appareils (5 V/500 mA)
•Reconnaissance automatique de la tension et de
la polarité des batteries lithium-ion
•Les contacts sont ajustés sur la face inférieure du
chargeur ; il n‘est donc pas nécessaire de toucher
les contacts
•Diverses possibilités de réglage et réglage simple
des contacts
•Coupure de charge automatique pour protéger
les batteries
•Avec câble de charge 12 V pour une utilisation
dans un véhicule
1. Explication des symboles d‘avertissement et
des remarques
Avertissement
Ce symbole est utilisé pour indiquer des consignes
de sécurité ou pour attirer votre attention sur des
dangers et risques particuliers.
Remarque
Ce symbole est utilisé pour indiquer des
informations supplémentaires ou des remarques
importantes.
2. Contenu de l‘emballage
•Chargeur universel « DELTA MULTI »
•Bloc d'alimentation 100-240 V
•Câble de charge véhicule 12 V CC
•Mode d'emploi
3. Consignes de sécurité
•Ce produit est destiné à une installation
domestique non commerciale.
•Utilisez le produit exclusivement conformément à
sa destination.
•Protégez le produit de toute saleté, humidité,
surchauffe et utilisez-le uniquement dans des
locaux secs.
•N’utilisez pas le produit à proximité immédiate
d‘un chauffage, d’autres sources de chaleur ou
exposé aux rayons directs du soleil.
•Branchez l‘appareil uniquement à une prise de
courant appropriée. La prise de courant doit être
facilement accessible à tout moment.
•Coupez le produit du secteur à l‘aide de
l‘interrupteur - débranchez la prise de courant en
cas d‘absence d‘interrupteur.
•Posez tous les câbles de telle sorte qu’ils ne
présentent aucun risque de chute.
•Faites attention à ne pas plier ni coincer le câble.
•Protégez le produit des secousses violentes et
évitez tout choc ou toute chute.
•Tenez les emballages d‘appareils hors de portée
des enfants, risque d‘étouffement.
•Surveillez les enfants an de garantir qu‘ils ne
jouent pas avec le produit.
•Recyclez les matériaux d’emballage
conformément aux prescriptions locales en
vigueur.
•N’apportez aucune modication à l’appareil. Des
modications vous feraient perdre vos droits de
garantie.
•N‘utilisez aucun bloc secteur non recommandé
par le fabricant.

9
Risque d’électrocution
•Cessez d‘utiliser le produit en cas de
détérioration du bloc secteur ou du câble
d‘alimentation.
•Ne tentez pas de réparer l’appareil vous-
même ni d’effectuer des travaux d’entretien.
Déléguez tous travaux d‘entretien à des
techniciens qualiés.
•Ne tentez pas d‘ouvrir le produit en cas de
détérioration et cessez de l’utiliser.
Avertissement - batteries
•Nerechargez pas de batteries lithium-ion
dont la tension ne correspond pas à la
tension indiquée pour ce chargeur. Risque de
détérioration du chargeur.
•Ne chargez pas simultanément des batteries
lithium-ion et des batteries NiMH.
•Ne chargez pas de piles non rechargeables
(alcalines, par exemple), ni de batteries
endommagées, ayant coulé ou corrodées.
Remarque
•Le produit n‘est pas conçu pour charger des
batteries de type InfoLITHIUM.
•La procédure de charge démarre uniquement
lorsque la distance entre les deux contacts de
charge lithium-ion réglables > 3 mm.
4. Mise en service et fonctionnement
•Branchez le chargeur en utilisant une des deux
possibilités d'alimentation (g. 1). L'allumage
constant du voyant LED rouge d'alimentation
indique l'état de veille du chargeur.
Remarque
•Le chargeur détecte automatiquement les
batteries défectueuses et, pour des raisons de
sécurité, ne les charge pas.
•Une procédure correcte de charge est
indiquée par le clignotement du voyant LED
vert Charge.
•La charge complète des batteries est indiquée
par l‘allumage en permanence du voyant LED
vert Charge.
4.1 Charge de batteries lithium-ion
•Ouvrez entièrement le couvercle coulissant
jusqu‘à la butée.
•Ajustez les contacts sur la face inférieure du
chargeur en fonction de la batterie lithium-ion
que vous désirez charger (g.2).
•Insérez la batterie dans le chargeur (g. 3). Le
chargeur détecte automatiquement la polarité
des batteries lithium-ion.
•Débloquez le couvercle coulissant en appuyant
sur la touche de verrouillage argentée et
refermez-le de telle sorte que la batterie insérée
soit parfaitement positionnée et que le contact
soit correctement établi.
•Contrôlez que la procédure de charge soit
indiquée par l‘allumage en permanence du
voyant LED vert Charge. Vériez les contacts si
ce n‘est pas le cas.

10
4.2 Charge de batteries NiMH (cellules AA/AAA)
•Ouvrez entièrement le couvercle coulissant
jusqu‘à la butée.
•En présence de batteries NiMH, respectez le
symbole de batteries et la polarité indiquée.
Insérez les batteries NiMH conformément aux
indications de polarité (g. 4).
•Débloquez le couvercle coulissant en appuyant
sur la touche de verrouillage argentée et
refermez-le de telle sorte que la batterie insérée
soit parfaitement positionnée et que le contact
soit correctement établi.
•Contrôlez que la procédure de charge soit
indiquée par l‘allumage en permanence du
voyant LED vert Charge. Vériez les contacts si
ce n’est pas le cas.
•1ou 2 batteries NiMH peuvent être rechargés
simultanément. Pour la recharge simultanée
de deux 2 batteries NiMH, ces deux batteries
doivent être de même type (LR6 ou LR03), de
même capacité et de même état de charge
(capacité résiduelle). Nous vous recommandons
de ne recharger simultanément que des batteries
destinées à être utilisées ensembles dans un
même appareil.
4.3 Option de charge USB
•Branchez l‘appareil USB que vous désirez recharger
àl‘aide de la connexion USB du chargeur.
Contrairement aux options de charge 4.1 et 4.2, le
voyant LED vert Charge ne s‘allume pas.
•L‘option de charge USB fournit un courant
maximal de 5 V/500 mA.
5. Soins et entretien
Nettoyez ce produit uniquement avec un chiffon
non pelucheux sec et n‘utilisez aucun détergent
agressif.
6. Exclusion de garantie
La société Hama GmbH & Co. KG décline toute
responsabilité en cas de dommages provoqués par
une installation, un montage ou une utilisation non
conformes du produit ou encore provoqués par un
non respect des consignes du mode d‘emploi et/ou
des consignes de sécurité.
7. Service et assistance
En cas de question concernant le produit, veuillez
vous adresser au service de conseil produits de
Hama.
Ligne téléphonique directe : +49 9091 502-115
(allemand/anglais)
Vous trouverez ici de plus amples informations
concernant l‘assistance : www.hama.com
8. Caractéristiques techniques
Source de tension 12 V CC
Courant d‘entrée 800 mA maxi
Tension d‘entrée du câble
de charge véhicule 12 V
Tension d‘entrée du bloc
secteur 100–240 V / 50/60 Hz
Tension de charge lithium-ion
4.2 V / 8.4 V
Courant de sortie/charge
650 mA maxi (batteries
lithium-ion 3,6 V - 3,7 V)
650 mA maxi (batteries
lithium-ion 7,2 V - 7,4 V)
650 mA max.
(1 x NiMH Akku
(Typ AA/AAA))
250mA max.
(2 x NiMH Akku
(Typ AA/AAA))
Sortie USB 5 V 500 mA
Température de service
0–40° C

11
EInstrucciones de uso
Le agradecemos que se haya decidido por un
producto de Hama.
Tómese tiempo y léase primero las siguientes
instrucciones e indicaciones. Después, guarde estas
instrucciones de manejo en un lugar seguro para
poder consultarlas cuando sea necesario. Si vende
el aparato, entregue estas instrucciones de manejo
al nuevo propietario.
Prestaciones
•Adecuado para casi todas las pilas recargables
de iones de litio (3,6 V/3,7 V/7,2 V/7,4 V) y pilas
recargables NiMH (AA/AAA)
•El indicador LED de funcionamiento informa
sobre el estado de carga
•Conexión eléctrica de 100-240 V adecuada
para usar en todo el mundo en combinación
adaptador especíco del país
•Puerto USB para cargar otros aparatos
(5 V/500 mA)
•Detección automática de la tensión y la polaridad
de las pilas recargables de iones de litio
•Los contactos se ajustan en el lado inferior del
cargador, por lo que no es necesario tocar los
contactos
•Ajuste variado y sencillo de los contactos
•Interrupción automática de la carga para
proteger las pilas recargables
•Con cable de carga de 12 V, para uso en automóvil
1. Explicación de los símbolos de aviso y de las
indicaciones
Aviso
Se utiliza para caracterizar las indicaciones
de seguridad o para llamar la atención sobre
peligros y riesgos especiales.
Nota
Se utiliza para caracterizar informaciones
adicionales o indicaciones importantes.
2. Contenido del paquete
•Cargador universal "DELTA MULTI"
•Fuente de alimentación 100-240V
•Cable de carga en vehículo de 12 V CC
•Estas instrucciones de manejo
3. Instrucciones de seguridad
•El producto es para el uso doméstico privado,
no comercial.
•Emplee el producto exclusivamente para la
función para la que fue diseñado.
•Proteja el producto de la suciedad, la humedad,
el calor excesivo y utilícelo sólo en recintos secos.
•No opere el producto en las inmediaciones de la
calefacción, de otras fuentes de calor o bajo la
radiación directa del sol
•Utilice el producto sólo en una toma de corriente
autorizada. La toma de corriente debe estar
fácilmente accesible en todo momento.
•Desconecte el producto de la red eléctrica
mediante el interruptor on/off – de no existir
éste, desenchufe el cable eléctrico de la toma
de corriente.
•Tienda todos los cables de modo que no
constituyan un peligro de tropezar.
•No doble ni aplaste el cable.
•No deje caer el producto ni lo someta a
sacudidas fuertes.
•Mantenga el material de embalaje fuera del
alcance de los niños, existe peligro de asxia.
•Se debe vigilar a los niños para asegurarse de
que no juegan con el producto.
•Deseche el material de embalaje en conformidad
con las disposiciones locales sobre el desecho
vigentes.
•Norealice cambios en el aparato. Esto conllevaría
la pérdida de todos los derechos de la garantía.
•No utilice ninguna fuente de alimentación no
recomendada por el fabricante.

12
Peligro de sufrir una descarga eléctrica
•No utilice el producto si la fuente de
alimentación o el cable eléctrico están
dañados.
•No intente mantener o reparar el aparato por
cuenta propia. Encomiende cualquier trabajo
de mantenimiento al personal especializado
competente.
•No abra el producto y no lo siga operando de
presentar deterioros.
Aviso - pilas recargables
•No cargue pilas recargables de iones de
litio, cuya tensión es superior o inferior a
la indicada para este cargador. Eso puede
provocar el deterioro del cargador.
•No cargue simultáneamente pilas recargables
NiMH y de iones de litio.
•No cargue baterías (p. ej. alcalinas) ni pilas
recargables deterioradas, derramadas o
corroídas.
Nota
•El producto no es adecuado para cargar las
llamadas pilas recargables infolitio.
•El proceso de carga se inicia sólo si la
distancia entre los dos contactos de carga de
iones de litio ajustable > 3mm.
4. Puesta en servicio y funcionamiento
•Conecte el cargador con una de las dos tomas
de corriente posibles (Pic.1). Luz permanente del
LED Power rojo señaliza el estado standby del
cargador.
Nota
•El cargador detecta automáticamente las
pilas recargables defectuosas y no las carga
por razones de seguridad.
•Un proceso de carga correcto es indicado por
el LED Charge verde parpadeante.
•El estado totalmente cargado de las pilas
recargables es indicado por la luz verde
permanente del LED Charge.
4.1 Carga de pilas recargables de iones de litio
•Abra totalmente hasta que encaje la cubierta
deslizante del cargador.
•Ajuste los contactos en el lado inferior del
cargador de tal modo que estén adaptados a la
respectiva pila recargable de iones de litio que
desea cargar (Pic.2).
•Coloque la pila recargable en el cargador
(Pic. 3). El cargador detecta automáticamente
la polaridad de las pilas recargables de iones
de litio.
•Desbloquee la cubierta deslizante presionando
sobre la tecla de desbloqueo plateada y cierre
la cubierta deslizante de modo que el respectivo
tipo de pila recargable colocado se sujete y se
contacte correctamente.
•Asegúrese de que el LED Charge verde indica
un proceso de carga correcto. Si no es el caso,
compruebe los contactos.

13
4.2
Carga de pilas recargables NiMH (pilas AA/AAA)
•Abra totalmente hasta que encaje la cubierta
deslizante del cargador.
•En el caso de las pilas recargables NiMH tenga
en cuenta los símbolos de batería y la polaridad
indicada en los mismos. Coloque las pilas
recargables NiMH con polaridad correcta (Pic.4).
•Desbloquee la cubierta deslizante presionando
sobre la tecla de desbloqueo plateada y cierre
la cubierta deslizante de modo que el respectivo
tipo de pila recargable colocado se sujete y se
contacte correctamente.
•Asegúrese de que el LED Charge verde indica
un proceso de carga correcto. Si no es el caso,
compruebe los contactos.
•Es posible cargar 1 o 2 pilas recargables
NiMH. Si se cargan 2 pilas recargables NiMH
simultáneamente, estas deben ser del mismo
tipo (AA o AAA) y tener la misma capacidad y el
mismo estado de carga (capacidad restante). Se
recomienda cargar simultáneamente únicamente
pilas recargables que hayan sido utilizadas a la
vez en un dispositivo.
4.3 Opción de carga USB
•Conecte el aparato USB que desea cargar con
el puerto USB del cargador. Contrario a las dos
opciones de carga 4.1 y 4.2, en este caso no hay
ninguna indicación por el LED Charge verde.
•La opción de carga USB suministra máx. 5 V/500 mA.
5. Mantenimiento y cuidado
Limpie este producto sólo con un paño seco que no
deje pelusas y no utilice detergentes agresivos.
6. Exclusión de responsabilidad
Hama GmbH & Co KG no se responsabiliza ni
concede garantía por los daños que surjan por
una instalación, montaje o manejo incorrectos
del producto o por la no observación de las
instrucciones de manejo y/o de las instrucciones
de seguridad.
7. Servicio y soporte
Si tiene que hacer alguna consulta sobre el
producto, diríjase al asesoramiento de productos
Hama.
Línea directa: +49 9091 502-115 (Alemán/Inglés)
Encontrar más información de soporte aquí:
www.hama.com
8. Datos técnicos
Fuente de alimentación 12 V CC
Corriente de entrada máx. 800 mA
Tensión de entrada cable
de carga en automóvil 12 V
Tensión de entrada fuente
de alimentación 100–240 V / 50/60 Hz
Tensión de carga de iones
de litio 4.2 V / 8.4 V
Corriente de carga de
salida
650 mA máx.
(pilas recargables de iones
de litio de 3.6V–3.7V)
650 mA máx.
(pilas recargables de iones
de litio de 7.2V–7.4V)
650 mA max.
(1 x NiMH Akku
(Typ AA/AAA))
250mA max.
(2 x NiMH Akku
(Typ AA/AAA))
Salida USB 5 V 500 mA
Temperatura de
funcionamiento 0–40° C

14
RРуководство по эксплуатации
Благодарим за покупку изделия фирмы Hama.
внимательно ознакомьтесь с настоящей
инструкцией. Храните инструкцию в надежном
месте для справок в будущем. В случае
передачи изделия другому лицу приложите и эту
инструкцию.
Функциональные возможности
•Для всех литий-ионных (3,6В/3,7В/7,2В/7,4В)
и никель-металлогидридных аккумуляторов
(AA/AAA).
•Светодиодная индикация режима заряда.
•Сетевой разъем 100–240 В для эксплуатации в
разных странах мира.
•USB-разъем для заряда других устройств (5
В/500 мА).
•Автоматическое обнаружение напряжения и
полярности аккумуляторов.
•Контакты для различных типов аккумуляторов
регулируются снизу, прикасаться к контактам
сверху не требуется.
•Регулировка контактов.
•Функция автоматического отключения для
защиты аккумуляторов.
•Кабель питания 12 В для автомобильного
прикуривателя.
1. Предупредительные пиктограммы и
инструкции
Внимание
Данным значком отмечены инструкции,
несоблюдение которых может привести к
опасной ситуации.
Примечание
Дополнительная или важная информация.
2. Комплект поставки
•Универсальное зарядное устройство «DELTA MULTI»
•Блок питания 100-240 В
•Автомобильный кабель питания 12 В
•Настоящая инструкция
3. Техника безопасности
•Изделие предназначено только для
домашнего применения.
•Запрещается использовать изделие не по
назначению.
•Беречь от грязи, влаги и источников тепла.
Эксплуатировать только в сухих помещениях.
•Не эксплуатировать в непосредственной
близости с нагревательными приборами,
беречь от прямых солнечных лучей.
•Прибор разрешается подключать только к
соответствующей розетке электросети. Розетка
электросети должна быть легко доступна.
•Отключать с помощью выключателя
электросети, а при его отсутствии вытащить
провод из розетки.
•Кабели не должны создавать помехи
перемещению людей.
•Кабель не сгибать и не зажимать.
•Не ронять. Беречь от сильных ударов.
•Упаковку не давать детям: опасность асфиксии.
•Не оставлять детей без присмотра во
избежание их доступа к устройству.
•Упаковку утилизировать в соответствии с
местными нормами.
•Запрещается вносить изменения в
конструкцию. В противном случае
гарантийные обязательства аннулируются.
•Запрещается применять блоки питания,
которые не были санкционированы
производителем.

15
Берегись высокого напряжения!
•Запрещается эксплуатация при
неисправном блоке питания или
поврежденном кабеле питания.
•Запрещается самостоятельно
ремонтировать устройство. Ремонт
разрешается производить только
квалифицированному персоналу.
•Изделие не открывать. Запрещается
эксплуатировать неисправное изделие.
Аккумуляторы. Техника безопасности
•Не заряжайте литий-ионные
аккумуляторы, напряжение которых не
соответствуетхарактеристикам зарядного
устройства. Это может стать причиной
выхода зарядного устройства из строя.
•Запрещается заряжатьодновременно
никель-металлогидридные и литий-
ионные аккумуляторы.
•Запрещается заряжать обычные батареи,
атакже аккумуляторы с повреждениями,
утечкой электролита и коррозией.
Примечание
•Запрещается заряжать аккумуляторы
„InfoLithium”.
•Процесс заряда начнется только, если
расстояние между контактами для литий-
ионных аккумуляторов превышает 3 мм.
4. Ввод в эксплуатацию и эксплуатация
•Подключите зарядное устройство к одному из
двух источников питания (рис. 1). Непрерывно
горящая красная лампа показывает, что
устройство находится в ждущем режиме.
Примечание
•Если устройство обнаружит недопустимый
аккумулятор, процесс заряда на
начинается.
•Во время заряда мигает зеленая лампа.
•По окончании заряда зеленая лампа горит
непрерывно.
4.1 Порядок заряда литий-ионных
аккумуляторов
•Откройте крышку до упора.
•Отрегулируйте контакты по размеру
аккумуляторов (рис. 2.).
•Вставьте аккумуляторы в устройство
(рис. 3). Полярность аккумуляторов
определяется устройством автоматически.
•Нажмите на серебряный фиксатор крышки
и закройте ее так, чтобы все аккумуляторы
сохраняли надежное присоединение к
контактам.
•Зеленая лампа показывает начало процесса
заряда. Если зеленая лампа не горит,
проверьте контакты.
4.2 Порядок заряда никель-
металлогидридных аккумуляторов (АА/ААА)
•Откройте крышку до упора.
•Загружая никель-металлогидридные
аккумуляторы, соблюдайте полярность (рис. 4).
•Нажмите на серебряный фиксатор крышки
и закройте ее так, чтобы все аккумуляторы
сохраняли надежное присоединение к
контактам.
•Зеленая лампа показывает начало процесса
заряда. Если зеленая лампа не горит,
проверьте контакты.
•Для заряда 1 или 2 никель-металлогидридных
аккумуляторов. При одновременном заряде 2
никель-металлогидридных аккумуляторов они
должны быть одинакового типа (АА или ААА),
одинаковой емкости, а также одинаковой
остаточной емкости. Одновременно
рекомендуется заряжать аккумуляторы,
которые вместе применяются в одном
устройстве.

16
4.3 Заряд через USB
•Подключите USB-прибор к USB-разъему
зарядного устройства. В отличие от функций,
описанных в пунктах 4.1 и 4.2, заряд через
USB не сопровождается индикацией зеленой
лампой.
•Максимальные параметры заряда через USB:
5 В/500 мА.
5. Уход и техническое обслуживание
Чистку производить только безворсовой слегка
влажной салфеткой. Запрещается применять
агрессивные чистящие средства.
6. Отказ от гарантийных обязательств
Компания Hama GmbH & Co. KG не несет
ответственность за ущерб, возникший
вследствие неправильного монтажа,
подключения и использования изделия не по
назначению, а также вследствие несоблюдения
инструкции по эксплуатации и техники
безопасности.
7. Отдел техобслуживания
По вопросам ремонта или замены неисправных
изделий обращайтесь к продавцу или в
сервисную службу компании Hama.
Горячая линия отдела техобслуживания:
+49 9091 502-115 (немецкий, английский)
Подробнее смотрите здесь: www.hama.com
8. Технические характеристики
Питание 12 В=
Входной токмакс. 800 мА
Входное напряжение
автомоб. кабеля питания 12 В
Входное напряжение
блока питания 100–240 В / 50-60 Гц
Напряжение заряда для
литий-ионных батарей 4,2 В / 8,4 В
Выходной зарядный ток
650 мA макс. (3,6-3,7 В
для литий-ионных)
650 мA макс. (7,2-7,4 В
для литий-ионных)
650 мA макс. (1 никель-
металлогидр. аккум.
(Typ AA/AAA))
250 мA макс. (2 никель-
металлогидр. аккум.
Typ AA/AAA)
Выход USB 5 В 500 мА
Рабочая температура 0–40° C

17
IIstruzioni per l‘uso
Grazie per avere acquistato un prodotto Hama!
Prima della messa in esercizio, leggete
attentamente le seguenti istruzioni e avvertenze,
quindi conservatele in un luogo sicuro per una
eventuale consultazione. In caso di cessione
dell‘apparecchio, consegnate anche le presenti
istruzioni al nuovo proprietario.
Caratteristiche
•Adatto per quasi tutte le batterie Li-Ion
(3,6V/3,7V/7,2V/7,4V) e NiMH (AA/AAA)
•L‘indicazione di funzionamento a LED informa
sullo stato di carica
•Allacciamento alla rete di 100-240V adatto
per l’impiego universale in abbinamento
all‘adattatore specico del paese
•Attacco USB per caricare altri apparecchi (5
V/500 mA)
•Riconoscimento automatico di tensione e polarità
di batterie Li-Ion
•Icontatti vengono regolati sul lato inferiore del
caricabatterie, per cui non è necessario toccare
i contatti
•Impostazione varia e semplice dei contatti
•Disinserimento di carica automatico per la
protezione delle batterie
•Con cavo di carica da 12V per l‘automobile
1. Spiegazione dei simboli di avvertimento e
delle indicazioni
Attenzione
Viene utilizzato per contrassegnare le indicazioni
di sicurezza oppure per rivolgere l‘attenzione
verso particolari rischi e pericoli.
Avvertenza
Viene utilizzato per contrassegnare informazioni
supplementari o indicazioni importanti.
2. Contenuto della confezione
•Caricabatterie universale „DELTA MULTI”
•Alimentatore a spina 100-240V
•Cavo di carica per autoveicolo 12V DC
•Queste istruzioni per l’uso
3. Indicazioni di sicurezza:
•Il prodotto è concepito per l’uso domestico
privato, non commerciale.
•Utilizzare il prodotto esclusivamente per lo scopo
previsto.
•Proteggere il prodotto da sporcizia, umidità
e surriscaldamento e utilizzarlo solo in locali
asciutti.
•Evitare di mettere in esercizio il prodotto in
prossimità di riscaldamento, altre fonti di calore o
la luce diretta del sole.
•Collegare il prodotto solo a una presa di rete
appositamente omologata. La presa di rete deve
poter essere raggiungibile in qualsiasi momento.
•Scollegare il prodotto dalla rete mediante
l‘interruttore on/off; se questo non è presente,
estrarre il cavo di rete dalla presa.
•Disporre tutti i cavi in modo da non inciamparsi.
•Non piegare, né schiacciare il cavo.
•Non fare cadere il prodotto e non sottoporlo a
forti scossoni!
•Tenere l’imballo fuori dalla portata dei bambini,
pericolo di soffocamento!
•Sorvegliare i bambini per accertarsi che non
giochino con il prodotto.
•Smaltire immediatamente il materiale
d‘imballaggio attenendosi alle prescrizioni locali
vigenti.
•Non apportare modiche all’apparecchio per
non perdere i diritti di garanzia.
•Non utilizzare alimentatori che non sono
consigliati dal produttore!

18
Pericolo dovuto a scossa elettrica
•Non utilizzare il prodotto se l‘alimentatore o il
cavo di rete sono danneggiati.
•Non tentare di aggiustare o riparare
l’apparecchio da soli. Fare eseguire
qualsiasi lavoro di riparazione al personale
specializzato competente.
•Non aprire il prodotto e non utilizzarlo più se
danneggiato.
Attenzione - batterie
•Non caricare le batterie Li-Ion la cui tensione
si trova al di sopra o al di sotto di quella
indicata per questo caricatore., per evitare di
danneggiare il caricatore.
•Non caricare contemporaneamente le batterie
NiMH e Li-Ion.
•Non caricare batterie alcaline, né batterie
danneggiate, scadute o corrose.
Avvertenza
•Il prodotto non è adatto a caricare le
cosiddette batterie InfoLITHIUM™.
•Il processo di carica viene avviato se la
distanza dei due contatti di carica impostabili
Li-Ion > 3mm.
4. Messa in esercizio e funzionamento
•Collegare il caricatore a una o due alimentazioni
elettriche possibili (g. 1). La luce continua del
LED rosso Power segnala lo stato di standby del
caricatore.
Avvertenza – Batterietyp
•Il caricatore riconosce automaticamente le
batterie difettose e, per ragioni di sicurezza
non le carica.
•Un processo di carica corretto viene indicato
dal LED verde Charge lampeggiante.
•Se le batterie sono completamente cariche, il
LED verde Charge è a luce verde ssa.
4.1 Carica di batterie Li-Ion
•Aprire completamente il coperchio del caricatore
no all‘arresto.
•Regolare i contatti sul lato inferiore del caricatore
in modo che corrispondano alla batteria Li-Ion
(g. 2) da caricare.
•Inserire la batteria nel caricatore (g. 3). Il
caricatore riconosce automaticamente la polarità
nelle batterie Li-Ion.
•Sbloccare il coperchio scorrevole premendo sul
tasto di sblocco argentato e chiudere il coperchio
scorrevole anché le batterie restino pulite e
facciano contatto.
•Prestare attenzione se il LED verde Charge indica
un processo di carica corretto. In caso contrario,
vericare i contatti.
4.2 Carica di batterie NiMH (tipo AA/AAA)
•Aprire completamente il coperchio del caricatore
no all‘arresto.
•Per le batterie NiMH, prestare attenzione ai
simboli delle batterie e alla polarità indicata.
Inserire le batterie NiMH con la polarità corretta
(g. 4)!.
•Sbloccare il coperchio scorrevole premendo sul
tasto di sblocco argentato e chiudere il coperchio
scorrevole anché le batterie restino pulite e
facciano contatto.
•Prestare attenzione se il LED verde Charge indica
un processo di carica corretto. In caso contrario,
vericare i contatti.
•Èpossibile caricare 1 o 2 batterie NiMH. Se si
caricano contemporaneamente 2 batterie NiMH,
devono essere dello stesso tipo (AA o AAA)
This manual suits for next models
1
Table of contents
Languages:
Other Hama Batteries Charger manuals
Popular Batteries Charger manuals by other brands

KREAFUNK
KREAFUNK wiCHARGE Operation manual

Specialty Concepts
Specialty Concepts ASC Series Installation and operation manual

Huawei
Huawei FusionCharge AP07N-EU instructions

Deca
Deca SM C36T instruction manual

Volt Polska
Volt Polska 5A owner's manual

TecMate
TecMate Optimate 5 start/stop Instructions for use