Helvi Discovery 120PLUS User manual

1
MANUALE DI ISTRUZIONI
INSTRUCTIONS MANUAL
MANUEL D’INSTRUCTIONS
BEDIENUNGSANLEITUNG
ИНСТРУКЦИЯ ПО ИСПОЛЬЗОВАНИЮ
DISCOVERY
120PLUS

2

3
ITALIANO
AVVENTENZE SICUREZZA 4
CARATTERISTICHE 5
DESCRIZIONE DELLE FUNZIONI 8
FUNZIONAMENTO DEL CARICA BATTERIE 9
MANUTENZIONE E CURA DEL CARICA BATTTERIE 11
ENGLISH
IMPORTANT SAFETY INSTRUCTIONS 12
FEATURES 13
OPERATION 16
START CHARGING YOUR BATTERY 17
MAINTENANCE AND CARE 19
FRANÇAIS
INSTRUCTIONS IMPORTANTES DE SECURITE 20
CARACTERISTIQUES 21
FONCTIONNEMENT 24
DÉMARRAGE DU CHARGEMENT DE VOTRE BATTERIE 25
MAINTENANCE ET ENTRETIEN 27
DEUTSCH
WICHTIGE SICHERHEITSMASNAHMEN 28
TECHNISCHE EIGENSCHAFTEN 29
BETRIEB 32
STARTEN DES LADEVORGANGS IHRER BATTERIE 33
WARTUNG UND PFLEGE 35
ВАЖНЫЕ ИНСТРУКЦИИ ПО БЕЗОПАСНОСТИ 36
ХАРАКТЕРИСТИКИ 37
РАБОТА 40
НАЧАЛО ЗАРЯДКИ БАТАРЕИ 41
ТЕХНИЧЕСКОЕ ОБСЛУЖИВАНИЕ 43
GB
IT
FR
D
INDEX
RU

4
Adatto per batterie al Piombo normali o stagne, Batterie al GEL e Lipo4 di poten-
za compresa tra 10 e 150 Ah per batterie 12V e tra 10 e 120 Ah per batterie 24V.
AVVENTENZE SICUREZZA
Gas
Quando si inizia a caricare la batteria si potrebbe notare il ribollire del liquido a causa
del rilascio di gas. Dato che il gas è inammabile non si devono avere amme libere
nelle vicinanze della batteria e l’area deve essere ben ventilata.
A causa del rischio dovuto ai gas esplosivi, connettere e sconnettere i cavi del carica
batterie solo se il relativo cavo di alimentazione è sconnesso.
Tipi di batterie
Questo carica batterie è adatto solo per batterie al Piombo normali o stagne, Batterie al
GEL e Lipo4 e non deve essere usato per ricaricare batterie NICAD o altri tipi di batterie
Avvertenze
Quando non in uso, il carica batterie deve essere posizionato in una zona secca per
evitare che l’umidità possa danneggiare le parti interne.
Riparazione
- Il carica batterie non deve essere aperto. Ogni tentativo di modica o riparazione
da parte dell’utente porta alla decadenza della garanzia.
- Il cavo di alimentazione di questo apparecchio non può essere sostituito. Se si
danneggia l’intero carica batterie deve essere sostituito.
Pericolo
- evitare di entrare in contatto con l’elettrolita della batteria con pelle o vestiti. E’ un
acido e può causare ustioni. In caso di contatto dovete lavare immediatamente con
acqua la zona in cui è avvenuto il contatto.
- in caso di contatto con gli occhi, lavarli abbonda mentente con acqua e contattate
un medico immediatamente.
- mai caricare una batterie congelata. Se il liquido della batteria (elettrolita) si conge-
la, portate la batteria in una zona calda per permettere alla batteria di scongelarsi pri-
ma di iniziare la carica. Non mettere mai la batteria sopra il carica batterie e viceversa
- non far toccare le pinze del carica batterie quando lo stesso è in carica.
- non usare mai il carica batterie se ha subito una gran botta, è caduto o se è dan-
neggiato. Portatelo da un esperto qualicato per un’ispezione e riparazione.
- Posizionate il cavo di alimentazione in modo che non possa essere calpestato,
strappato o danneggiato.
- Non scollegare mai il cavo di alimentazione tirandolo per il cavo. Tirare il cavo di
alimentazione può danneggiare il carica batterie.
Precauzioni da usare quando si lavora con le batterie
- se l’acido della batterie entra in contatto con la pelle o i vestiti, lavare immediata-
mente con sapone ed acqua. Se l’acido entra in contatto con gli occhi, lavateli imme-
diatamente con acqua corrente per 20 minuti e contattate un medico immediatamente.
- Non fumare o permettere amme o scintille in prossimità della batteria o del motore.
- Non far cadere utensili di metallo sulla batteria. La scintilla risultante o il corti
circuito sulla batteria o su altre parti elettriche può comportare un’esplosione.

5
- Rimuovere oggetti di metallo ad uso personale, quali anelli, braccialetti, collane e
orologi quando si lavora con batteria al piombo.
- Una batteria al piombo può produrre una corrente di corto circuito sufciente a
saldare un anello o similari al metallo, causando ustioni gravi.
CARATTERISTICHE
Carica batterie automatico con 9 stadi di carica.
Il DISCOVERY 120 è controllato da microprocessore e ha 9 stadi di carica, adatti
alla carica di batterie per automobili, moto, motoslitte, trattori, barche,….
Il microprocessore verica le condizioni della batteria e genere la corrente e tensio-
ne di carica corrette per la batteria (caratteristiche di carica). Questo darà la carica
migliore e la vita più lunga alla batteria.
Caratteristiche di carica:
FIG.1
24V Lento
24V GEL
Rapido
24V AGM
Rapido
24V
LIPO4
4~28.0V ok
≥30VEr2
4~28.0V ok
≥30VEr2
4~28.0V ok
≥30VEr2
4~28.0V ok
≥30VEr2
Test
2A nchèlatensione
scendesottoi4V
2A nchèlatensione
scendesottoi4V
2A nchèlatensione
scendesottoi4V
2A nchèlatensione
scendesottoi4V
Max4h
1A noa
20V
1A noa
20V
1A noa
20V
1A noa
20V
5~16V 2’
16~20V9h
Tensione in aumen-
tonoa
28
V 2A
Tensione in aumen-
tonoa
28
V3.6A
Tensione in aumen-
tonoa
28
V3.6A
Tensione in aumen-
tonoa
28
V3.6A
Riduzionedella
corrente28.8V
Riduzionedella
corrente28.8V
Riduzionedella
corrente28.8V
Riduzionedella
corrente28.8V
/
/
/
/
Max36h Max2h
Vericaselatensione
scendesottoi4V
Vericaselatensione
scendesottoi4V
Vericaselatensione
scendesottoi4V
Vericaselatensione
scendesottoi4V
1.5’’
26.20-28.44h
26.20-28.44h
26.20-28.44h
26.20-28.44h
26.0 - 28.8
26.0 - 28.8
26.0 - 28.8
26.0 - 28.8
Ilciclodicarrica
di4hrepartesela
tensionescende
Ilciclodicarica
ripartesela
tensionescende
12V Lento
12V GEL
Rapido
12V AGM
Rapido
12V
LIPO4
4~14.0V ok
≥30VEr2
4~14.0V ok
≥30VEr2
4~14.0V ok
≥30VEr2
4~14.0V ok
≥30VEr2
Test
2A nchèlatensione
scendesottoi2V
2A nchèlatensione
scendesottoi2V
2A nchèlatensione
scendesottoi2V
2A nchèlatensione
scendesottoi2V
Max4h
1A noa
10V
1A noa
10V
1A noa
10V
1A noa
10V
5~8V 2’
8~10V9h
Tensione in aumen-
tonoa14V2A
Tensione in aumen-
tonoa14V7.2A
Tensione in aumen-
tonoa14V7.2A
Tensione in aumen-
tonoa14V7.2A
Riduzionedella
corrente14.4V
Riduzionedella
corrente14.4V
Riduzionedella
corrente14.7V
Riduzionedella
corrente14.7V
/
/
/
/
Max36h Max2h
Vericaselatensione
scendesottoi2V
Vericaselatensione
scendesottoi2V
Vericaselatensione
scendesottoi2V
Vericaselatensione
scendesottoi2V
1.5’’
13.10-14.24h
13.10-14.24h
13.10-14.24h
13.10-14.24h
26.0 - 28.8
26.0 - 28.8
26.0 - 28.8
26.0 - 28.8
Ilciclodicarrica
di4hrepartesela
tensionescende
Ilciclodicarica
ripartesela
tensionescende

6
Test batteria e precarica (Stadio 1):
verica la tensione della batteria per vericare che le connessioni sia buone e che la
batteria sia in condizione stabile prima di iniziare il processo di carica
Desolfatazione (Stadio 2):
identica le batterie solfatate. Corrente e tensione pulsate rimuovono il solfato dalle
piastre in piombo della batteria, ripristinando la capacità della batteria
Soft Start (Stadio 3):
test iniziale della batteria per vericarne la condizione. Se la batteria è molto scarica,
il carica batterie inizia a caricare in modalità Soft Start. E’ uno stadio di carica a cor-
rente molto bassa nchè la tensione della batteria non raggiunge un valore adatta
ad una carica standard.
Bulk (Stadio 4):
stadio di carica principale, in cui la batteria riceve la maggior parte della carica. Alla
ne di questo stadio di carica la batteria raggiunge il 75-80% della sua capacità di
carica. Il carica batterie eroga la corrente massima nchè la tensione della batteria
non raggiunge il livello di carica completa per una normale batteria
Assorbimento (Stadio 5):
completa la carica no a raggiungere virtualmente il 100% a tensione costante. La
corrente di carica si riduce molto nel momento in cui la corrente raggiunge un valore
di carica minimo
Ricondizionamento (Stadio 6):
selezionando la modalità “RECONDITION”, la batteria viene ricaricata a tensione
più elevata per ricondizionare le piastre e allungare la vita delle batterie
Analisi (Stadio 7):
Verica se la batteria può mantenere la carica. Le batterie che non possono mante-
nere la carica devono essere sostituite
Floating (Stadio 8):
carica a tensione costante ridotta, serve per il mantenimento della batteria
Pulsato (Stadio 9):
se durante la fase di mantenimento (oating) la carica della batteria cala, il carica
batteria dà impulsi necessari a mantenere il 100% della carica
Modalità Alimentatore
Il DISCOVERY 120 ha la modalità ALIMENTATORE, la quale garantisce una ten-
sione costante di 13,8V con una corrente massima di 5A, utilizzata per mantenere
alimentati i circuiti elettronici del veicolo durante il cambio della batteria. (attenzione
a non invertire le polarità delle connessioni per non danneggiare il carica batterie)

7
Compensazione temperatura
Un sensore regola automaticamente la tensione di carica se la temperatura devia dal
range -20 ° C / + 45 ° C. Un ambiente a temperatura elevata abbassa la tensione e la
condizione di congelamento è gestita da una maggiore tensione. Una bassa tempera-
tura aumenta la tensione di uscita, e lo stato caldo viene gestito da tensione inferiore.
Compensazione della tensione
A causa di qualche calo di tensione nei cavi, la tensione effettiva ai morsetti della batte-
ria può essere inferiore alla tensione di uscita del caricabatterie. Uno speciale circuito
all’interno dell’unità controllerà la vera tensione in ingresso alla batteria e regolerà di
conseguenza la tensione di uscita dell’unità. Ciò massimizzerà l’efcienza di carica.
Protezione contro l’inversione di polarità
Questa unità offre una protezione contro l’inversione di polarità. Il LED ROSSO si
accende, il display visualizza Er1 e il processo di carica non si avvia. Se ciò dovesse
accadere, scollegare immediatamente dalla rete elettrica il carica batterie, collegare
il morsetto rosso al positivo (+) della batteria e il morsetto nero al negativo (-) della
stessa, quindi collegare il carica batterie alla rete elettrica e il processo di carica
inizierà in automatico.
Protezione da corto circuito
Nel caso le pinze del carica batterie venissero accidentalmente a contatto tra di loro,
ad apparecchiatura accesa, la stessa si bloccherà. Scollegate il cavo di alimentazio-
ne, allontanate le pinze e iniziate il processo di carica dall’inizio facendo attenzione
a non far toccare le pinze.
Memoria dello stato di carica
Se durante la carica il DISCOVERY 120 viene spento, alla sua riaccensione il pro-
cesso di carica ricomincerà dal punto in cui si era interrotto.
Attenzione: se le pinze vengono scollegate, la memoria dello stato di carica verrà
persa e la modalità di carica non verrà riselezionata in automatico
Altre funzioni
• Protezione contro le scintille
• Protezione contro la sovratemperatura della batteria e del carica batterie
• Avviso acustico in caso di errore
• Involucro in plastica protetto contro l’acqua, con classe IP65

8
TASTO MODE:
il tasto MODE viene utilizzato per selezionare 10 differenti modalità di carica di se-
guito elencate.
1. “12V/STD/SLOW” Mode
Modalità di carica lenta (Max. 2A di corrente di carica) per
batterie standard o GEL.
2. “12V/STD/FAST” Mode
Modalità di carica veloce (Max. 7.2A di corrente di carica) per
batterie standard o GEL.
3. “12V/AGM/DEEP/FAST” Mode
Modalità di carica veloce (Max. 7.2A di corrente di carica) per
batterie AGM.
DESCRIZIONE DELLE FUNZIONI
LED Display
• POWER LED:
LED verde indica che il
caricabatterie è connesso
alla linea di alimentazione.
• STATUS LED:
LED VERDE lampeggiante
indica che la batteria è in
fase di carica; LED ROS-
SO lampeggiante + Er1
indicano l’inversione di po-
larità.
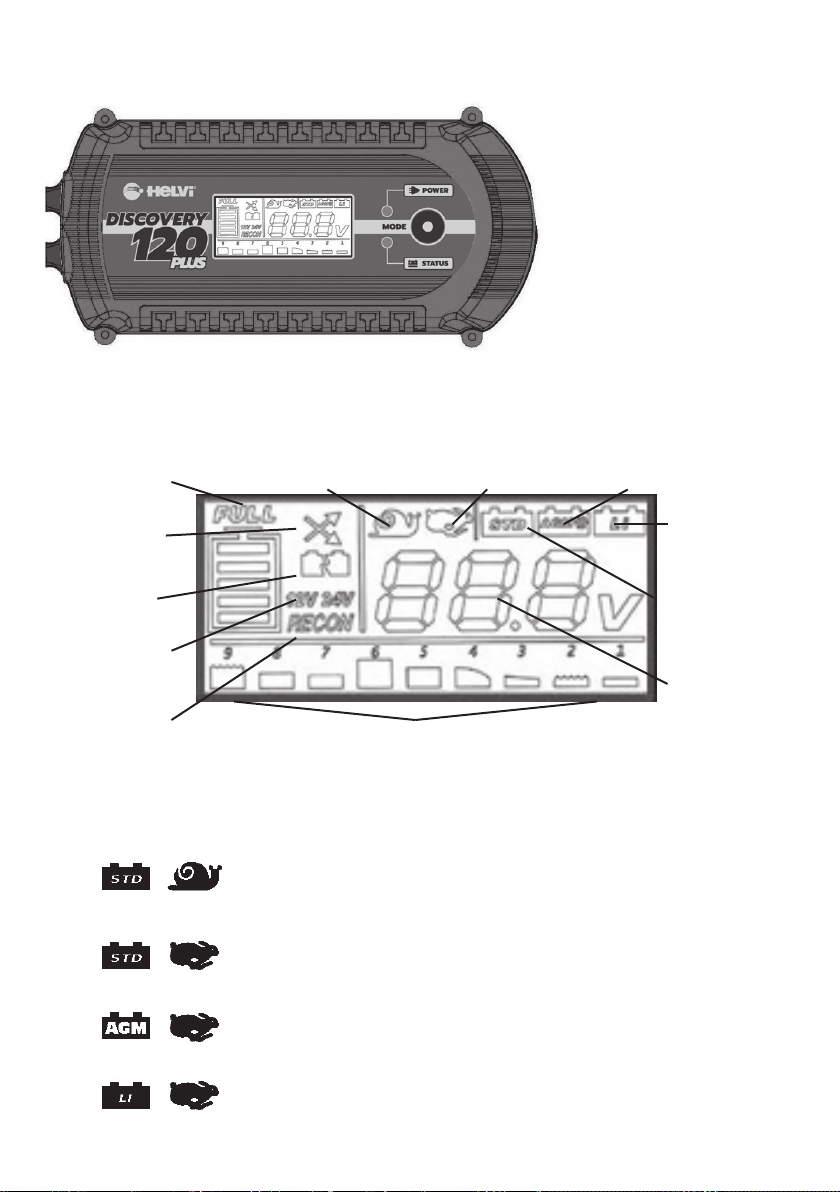
FIG.2
LCD Display
Il carica batterie è costruito con un display LCD per visualizzare lo stato di carica:
Inversione
Polarità
Carica
Fallita
12/24V
Modalità
Desolfatazione Stato di carica
Livello della
batteria
Modalità
Carica Lenta
Batteria
AGM
Batteria GEL
/ Standard
Lettura
Tensione
della
Batteria
Modalità
Carica Veloce
FIG.3
Batteria
Lipo4

9
4. “12V/LI/FAST” Mode
Modalità di carica veloce (Max. 7.2A di corrente di carica) per
batterie LIPO4.
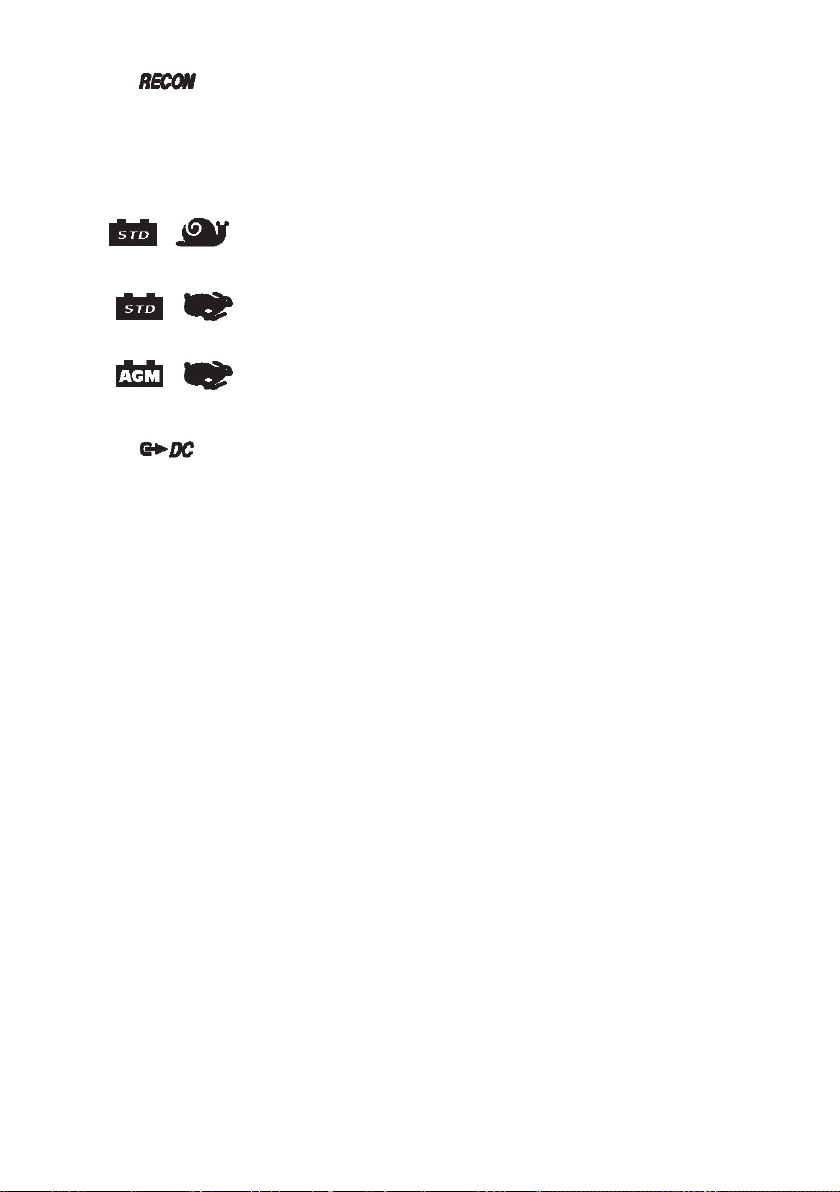
5. “RECONDITION” Mode
Ricondiziona la batteria dopo un utilizzo prolungato o un lun-
go periodo di scarica che può aver degradato le prestazioni
della stessa.
Il ricondizionamento potrebbe diminuire il tempo di vita della batteria perciò consul-
tare il proprio rivenditore di batterie se necessario.
6. “24V/STD/SLOW” Mode
Modalità di carica lenta (Max. 2A di corrente di carica) per
batterie standard o GEL.
7. “24V/STD/FAST” Mode
Modalità di carica veloce (Max. 3.6A di corrente di carica) per
batterie standard o GEL.
8. “24V/AGM/DEEP/FAST” Mode
Modalità di carica veloce (Max.3.6A di corrente di carica) per
batterie AGM.
9. “POWER SUPPLY” Mode
Converte il caricabatterie in un alimentatore stabilizzato a
13,8V capace di erogare un max. di 5A.
FUNZIONAMENTO DEL CARICA BATTERIE
Leggere attentamente prima di passare all’utilizzo.
Il caricabatterie è predisposto per batterie 12V e 24V – Piombo, GEL, AGM,
LIPO4 - con corrente compresa tra 10-120Ah per le batterie a 24V, 10-150Ah
per le batterie a 12V.
1. PREPARAZIONE DELLA BATTERIA
• Controllare la batteria da ricaricare vericando che l’involucro sia in buone con-
dizioni, senza perdite e che i morsetti non siano ossidati.
• SOLO PER BATTERIE AL PIOMBO: Togliere i tappi dalla batteria per permettere
l’eventuale fuoriuscita di gas durante la carica e controllare il livello di liquido in ogni
cella. Se necessario aggiungere acqua distillata no a coprire gli elementi interni
della batteria.
2. COLLEGAMENTO
• Collegare la pinza di carica di colore rosso al morsetto positivo (+) della batteria
e la pinza di colore nero al morsetto negativo (-) della batteria.
Attenzione: scollegare sempre il caricabatterie dalla linea di alimentazione
principale durante le fasi di connessione e sconnessione con la batteria.

10
3. INIZIO CARICA
• Collegare il caricabatterie all’alimentazione principale. Entrerà in funzione auto-
maticamente lo stato di carica SLOW per batterie 12V (impostato di default) indicato
dall’icona illuminata. Questa è la modalità di carica standard.
• Entro i primi 5’’ dal collegamento del carica batterie sarà possibile selezionare
un’altra modalità di carica :
1. Tenere premuto il tasto MODE per passare a 24V e viceversa.
2. Premere il tasto MODE e selezionare una delle 9 modalità di carica pre-
viste.
• Dopo 5’’ la carica parte in base all’impostazione.
4. FINE CARICA
• Accensione completa della barra di stato con simbolo batteria e FULL ,
la batteria è completamente carica.
• Il caricabatterie si porta in modalità FLOAT con l’icona 9 ON , provvedendo al
mantenimento dello stato di carica della batteria senza necessarie attenzioni dell’utente.
• Scollegare il caricabatterie dalla linea di alimentazione principale e le pinze (+) e
(-) dai morsetti della batteria.
SOLO PER BATTERIE AL PIOMBO: Ispezionare il livello del liquido e reinserire
i tappi della batteria.
5. DESCRIZIONE ANOMALIE
L’accensione delle icone e il LED STATUS rosso acceso o lampeg-
giante potrebbero essere causate da:
Er1 - Led Status rosso acceso
Errore di connessione e inversione di polarità.
Er2 - Batteria non corretta
Tensione batteria: modalità 12V ≥15V, modalità 24V ≥30V
Er3 - La tensione della batteria non raggiunge un valore adatto alla carica standard
12V (4V- 8V 2Min ) , (8V-10V 9Hr)
24V (4V-16V 2Min ) , (16V-20V 9Hr)
Er4 - La batteria non può mantenere la carica
Er5 - La carica si interrompe durante la Desolfatazione o Assorbimento. Premete il
pulsante MODE e la carica riprende il suo ciclo. Se ancora si ha lo stesso problema,
allora potrebbe essere che:
• Batteria è troppo solfatata
• Batteria non può essere caricata
• Batteria non può mantenere la carica
Al presentarsi di una di queste condizioni la modalità di carica si interromperà im-
mediatamente.
Il Led rosso lampeggiante e un suono indicano l’errata selezione della tensione della
batteria.

11
MANUTENZIONE E CURA DEL CARICA BATTTERIE
E ‘essenziale mantenere la batteria carica regolarmente durante tutto l’anno, so-
prattutto durante i mesi invernali. In inverno l’efcacia della vostra batteria dell’auto
è ridotta dal freddo. Il carburante è più denso, i motori sono difcili da avviare. Ter-
gicristalli e le luci sono tutte causa del calo di carica della batteria. È in queste con-
dizioni che le batterie devono essere al massimo della loro resa. Se la batteria non
è regolarmente mantenuta e completamente carica, può causare problemi e essere
soggetta a possibili rotture.
Sono elencati alcuni suggerimenti utili su come mantenere la batteria in buona salu-
te in relazione con il carica batterie.
Celle difettose
Le batterie sono solitamente realizzate con sei celle. Una di queste celle può dete-
riorarsi o danneggiarsi. Se, dopo diverse ore di carica la batteria è ancora scarica, si
dovrebbe vericare la batteria.
SOLO per batterie non sigillate: Prendere letture con il densimetro da ogni cella della
batteria. Se una lettura è inferiore rispetto alle altre, questo potrebbe indicare una
cella difettosa. Se necessario, chiedete ad uno specialista di vericare la batteria.
Una cella difettosa è sufciente per rovinare la batteria.
E’ inutile continuare ad usarla e sarebbe meglio prenderne una nuova.
Manutenzione della batteria
A volte la batteria potrebbe apparire scarica, ma questo potrebbe essere sempli-
cemente dovuto a connessioni sporche o incoerenti sui terminali della batteria. È
importante controllare i cavi regolarmente. A tale scopo, rimuovendo i cavi dalla
batteria, pulire l’interno di ogni connettore e i terminali sulla batteria, pulire le mor-
settiere e i connettori con vaselina, rimontarli nelle posizioni corrette e stringere le
connessioni saldamente.
E’ necessario mantenere l’elettrolita sopra il livello delle piastre.
Si noti, tuttavia, che non si deve averne una quantità eccessiva, in quanto l’elettrolita
è fortemente acido. Per il rabbocco non usare l’acqua del rubinetto. Utilizzare solo
acqua distillata o deionizzata. È importante mantenere il livello di acidità. Se neces-
sario farlo controllare da uno specialista.
Controllare la condizione della batteria (SOLO per batterie non sigillate)
Utilizzando un densimetro, che può essere acquistato nella maggior parte dei negozi
di accessori auto, è possibile controllare il peso specico dell’elettrolita in ogni cella.
Il densimetro è utilizzato per aspirare una quantità di uido dalla cella. Il galleggiante
all’interno del densimetro registrerà la condizione di quella cella. Rimettere il liquido
nella cella dopo il test, facendo attenzione a non schizzare il liquido.

12
Suitable for Normal Lead Acid, Sealed, Gel or Lipo4 Batteries between 5-150Ah
for 12V batteries and 5-120Ah for 24V batteries.
IMPORTANT SAFETY INSTRUCTIONS
Gases
When the battery is being charged you may notice bubbling in the uid caused by
the release of gas. As the gas is ammable no naked lights should be used around
the battery, and the area should be kept well ventilated.
Because of this risk of explosive gas only connect and disconnect the battery leads
when the mains supply is disconnected.
Type of batteries
This charger is only suitable for normal lead acid, sealed, gel or Lipo4 batteries and
should not be used to recharge NICAD or any other type of battery.
Points of note
• When not in use, store the charger in a dry area to avoid moisture damaging the
internal parts.
Repair
• The Battery Charger should not be opened. Any attempt at modication or repair
by the user will entail the loss of your guarantee.
• The mains supply cord of this appliance can not be replaced; if the cord is dama-
ged, the appliance should be discarded.
Danger!
• Avoid getting electrolyte on your skin or clothes. It is acidic and can cause burns.
If this occurs you should rinse the affected area with water immediately.
• If it gets into your eyes - wash thoroughly and seek medical attention immediately.
• Never charge a frozen battery. If battery uid (electrolyte) becomes frozen, bring
battery into a warm area to allow battery to thaw before you begin charging. Never
let a battery on top of charger or vice versa.
• Do not touch the battery clamps together when the charger is on.
• Never operate charger if it has received a hard blow, been dropped, or otherwise
damaged. Take it to a qualied professional for inspection and repair.
• Be sure to position the charger power cord to prevent it from being stepped on,
tripped over, or damaged.
• Never pull out the plug by the cord when unplugging the charger. Pulling on the
cord may cause damage to the cord or the plug.
Precautions When Working with Batteries
• If battery acid contacts skin or clothing, wash immediately with soap and water. If
acid enters eye, immediately ood eye with running cold water for at least 20 minu-
tes and get medical attention immediately.
• Never smoke or allow a spark or ame in vicinity of battery or Engine.

13
• Do not drop a metal tool on the battery. The resulting spark or short-circuit on the
battery of other electrical part may cause an explosion.
• Remove personal metal items such as rings, bracelets, necklaces, and watches
when working with a lead-acid battery.
• A lead-acid battery can produces a short-circuit current high enough to weld a
ring or the like to metal, causing severe burns.
FEATURES
Automatic and Intelligent 9-Stage Charging Curve
The DISCOVERY 120 is controlled by a microprocessor with 9-stage charging cha-
racteristic for charging batteries automobiles, motorcycles, snow mobiles, tractors,
personal watercraft, boats etc.
A microprocessor senses the condition of the battery to provide the right current and
voltage to the battery (charging characteristic). This will give the best effect on char-
ging and give the longest life to battery.
Charging characteristic:
FIG.1
24VSlow
24V GEL
Fast
24V AGM
Fast
4~28.0V ok
≥30VEr2
4~28.0V ok
≥30VEr2
4~28.0V ok
≥30VEr2
Test
2A untilvoltage
dropslessthen4V
2A untilvoltage
dropslessthen4V
2A untilvoltage
dropslessthen4V
Max4h
1A until
20V
1A until
20V
1A until
20V
5~16V 2’
16~20V9h
Increasingvoltage
until
28
V 2A
Increasingvoltage
until
28
V3.6A
Increasingvoltage
until
28
V3.6A
Currentreduction
28.8V
Currentreduction
28.8V
Currentreduction
28.8V
/
/
/
Max36h Max2h
Checkifvoltage
dropslessthen4V
Checkifvoltage
dropslessthen4V
Checkifvoltage
dropslessthen4V
1.5’’
26.20-28.44h
26.20-28.44h
26.20-28.44h
26.0 - 28.8
26.0 - 28.8
26.0 - 28.8
4hchargecycle
restartsifvoltage
drops
Chargecycle
restartsifvoltage
drops
12VSlow
12V GEL
Fast
12V AGM
Fast
12V
LIPO4
4~14.0V ok
≥30VEr2
4~14.0V ok
≥30VEr2
4~14.0V ok
≥30VEr2
4~14.0V ok
≥30VEr2
Test
2A untilvoltage
dropslessthen2V
2A untilvoltage
dropslessthen2V
2A untilvoltage
dropslessthen2V
2A untilvoltage
dropslessthen2V
Max4h
1A until
10V
1A until
10V
1A until
10V
1A until
10V
5~8V 2’
8~10V9h
Increasingvoltage
until14V2A
Increasingvoltage
until14V7.2A
Increasingvoltage
until14V7.2A
Increasingvoltage
until14V7.2A
Currentreduction
14.4V
Currentreduction
14.4V
Currentreduction
14.7V
Currentreduction
14.7V
/
/
/
/
Max36h Max2h
Checkifvoltage
dropslessthen2V
Checkifvoltage
dropslessthen2V
Checkifvoltage
dropslessthen2V
Checkifvoltage
dropslessthen2V
1.5’’
13.10-14.24h
13.10-14.24h
13.10-14.24h
13.10-14.24h
26.0 - 28.8
26.0 - 28.8
26.0 - 28.8
26.0 - 28.8
4hchargecycle
restartsifvoltage
drops
Chargecycle
restartsifvoltage
drops

14
Battery Test and Precharge (Stage 1):
Check the battery voltage to make sure battery connections are good and the battery
is in a stable condition before beginning the charge process
Desulphation (Stage2):
Detects sulfated batteries. Pulsing current and voltage, removes sulfate from the
lead plates of the battery restoring the battery capacity
Soft Start (Stage 3):
Initial battery test to determine battery condition. If the battery is severely dischar-
ged, charger will begin the Soft Start stage. Charging starts with reduced current
until battery voltage reaches a normal condition for charge.
Bulk (Stage 4):
Major charging stage where the battery receives the majority of its charge.
During this stage the battery brought to 75 - 80% of its charge. The charger delivers
maximum current until the terminal voltage has risen to the full charge level for Nor-
mal battery.
Absorption (Stage 5):
Completes the charge up to virtually 100% at a constant voltage. The current tapers
off after the current reached the minimum level.
Recondition (Stage 6):
Select “Recondition” mode, charged by higher voltage to recondition the sulfate of
the battery to save battery life.
Analysis (Stage 7):
Tests if the battery can hold charge. Batteries that can not hold charge may need to
be replaced.
Float (Stage 8):
Low constant voltage, minimal charge current, battery is fully charged
Pulse (Stage 9):
Maintaining the battery at 95-100% capacity. The charger monitors the battery volta-
ge and gives a pulse when necessary to keep the battery fully charged
Power Supply:
DISCOVERY 120 has a power supply mode setting which has a constant voltage of
13.8V and current up to 5A, keep to provide power to computer system of modern
car when replacing battery (Please don’t reverse battery connection to avoid the
damage on the charger).
Temperature Compensation
A sensor will automatically adjust the charging voltage if the temperature deviates

15
from –20°C to +45°C. A high temperature environment will lower the voltage and fre-
ezing condition is handled by higher voltage. A low temperature heightens the output
voltage, and hot condition is handled by lower voltage.
Voltage compensation
Because of some voltage drop in the cables, the actual voltage at the clamps of the
battery can be lower than the charger output voltage. A special circuitry inside the
unit will monitor the true input voltage to the battery and adjust the output voltage of
the unit accordingly. This will maximize the charging efciency.
Reverse-polarity protection
This unit offers reverse-polarity protection under charging modes, the RED LED will
illuminate and the charging process will not start. If this happens, unplug immediately
from mains, connect the red clamp to positive (+) battery post, and black clamp to
negative (-) post, then plug into the mains power and the charging process will start.
Short-circuit protection
Should you accidentally touch the clamps together whilst the mains power is on, the
unit will not perform charging. Unplug from mains, disconnect and start the process
again being careful not to touch the clamps together.
Charge Memory
If power off on charging, DISCOVERY 120 can automatically restart charging base
on previous power down status for battery and charging current.
ATTENTION: Once the clamp of charger is disconnected from the battery, this me-
mory is erased and the charging mode will need to be reselected.
Other features
Anti Spark Protection
Battery and Charger Overheating Protection
It will give a warning buzz while error occurs
Waterproof Plastic Housing. Ingress Protection Rating IP65
16
OPERATION
Charger LED display
Power LED -
Green color LED to indi-
cate Power is connect to
charger
STATUS LED -
Green color LED to indica-
te that the battery is char-
ging. Red color LED to in-
dicate a charging failure,
battery problem or reverse
polarity.
FIG.2
Charger LCD display
The unit is built-in with LCD display for showing charger status:BUTTON AND MODE
FIG.3
MODE BUTTON:
The Mode button on unit is used to select the Five different battery charger mode
as below.
1. “12V/STD/SLOW” Mode
Slow charge (Max. 2A Charging Current) with Standard or
GEL lead acid battery
2. “12V/STD/FAST” Mode
Fast charge (Max. 7.2A Charging Current) with Standard or
GEL lead acid battery.
3. “12V/AGM/DEEP/FAST” Mode
Fast charge (Max. 7.2A Charging Current) with AGM type
lead acid battery.
4. “12V/LI/FAST” Mode
Fast charge (Max. 7.2A Charging Current) with Lipo4 battery.
Reverse
Connection
Fail in
Charging
12/24V
Supply Mode
Recondition
Mode Charging Stage
Battery
Level
Slow Charge
Mode
Lipo4
Battery
GEL / Stan-
dard Battery
Battery
Voltage
Read Out
Fast Charge
Mode
AGM
Battery
17
5. “RECONDITION” Mode
A special mode to recondition your battery after the battery
has not been used for long time or after long deep discharge
that degrade the battery performance.
The Recondition mode may decrease the battery life hence consult your battery
vendor for advise if necessary.
6. “24V/STD/SLOW” Mode
Slow charge (Max. 2A Charging Current) with Standard or
GEL lead acid battery
7. “24V/STD/FAST” Mode
Fast charge (Max. 3.6A Charging Current) with Standard or
GEL lead acid battery.
8. “24V/AGM/DEEP/FAST” Mode
Fast charge (Max. 3.6A Charging Current) with AGM type
lead acid battery.
9. “POWER SUPPLY” Mode
Change the battery charger into a Power supply with 13.8V x
voltage, with max. of 5A current.
START CHARGING YOUR BATTERY
PLEASE READ CAREFULLY BEFORE USING
Suitable for 12V and 24V Normal Lead Acid, Sealed, Lipo4, Leisure or Gel Bat-
teries between 5-150Ah for 12V batteries and 5-120Ah for 24V batteries.
1. PREPARING THE BATTERY
• Firstly remove the caps from each cell and check that the level of the liquid is
sufcient in each cell. If it is below the recommended level, top up with de-ionized or
distilled water.
Note: Under no circumstances should tap water be used.
• The cell caps should not be replaced until charging is complete. This allows any
gases formed during charging to escape. It is inevitable that some minor escape of
acid will occur during charging.
For permanently sealed battery, it is not necessary to carry out the above checks.
2. CONNECTION
• Connect the positive charging lead (red) to the positive terminal post of the bat-
tery (marked P or +). Connect the negative charging lead (black) to the negative
terminal post of the battery (marked N or -).
Once you connected the DISCOVERY 120 battery charger to AC power, it will
sound a tone for 0.5 seconds and all of the LEDs on the touch panel will be on
for a short time.
Warning! Always disconnect the AC plug from the AC mains socket before
connecting or disconnecting the appliance to or from the battery.

18
3. CHARGING
• Connected to power supply and the battery, the charger will automatically enter into
charging status, it is working on slow charging stage for 12V batteries by default. The
slow charge icon will illuminate, and the charger is automatically detecting the battery.
This is the standard charging mode.
• Within the rst 5’’ after connecting the charger to the power supply you can select a
different charging mode:
1. Hold the Mode key to switch to 24V and back.
2. Pressing the mode key to select one of the nine charge modes.
• After 5’’ the charge starts according to the setting.
4. WHEN CHARGING IS COMPLETE
When the Stage 8 icon and Full illuminates, the battery is completely
charged. The battery charger now switches to the Float mode and doesn’t require
your attention until the next time it is used, it will automatically maintain your battery.
If LCD stage 9 icon illuminates, it indicates that the charger has automatically
maintained your battery.
Switch off the mains supply, unplug the charger, and disconnect the leads from the
battery posts. NOT to be done for permanently sealed battery: Inspect the liquid
levels in each cell and top up. If necessary, using the correct uid. Replace the caps.
Any surplus uid around the cell tops should be wiped off (this should be done with
extreme care as it may be acidic/corrosive).
Where appropriate, if the battery has been removed for charging, replace it and
reconnect the cables.
5. BATTERY FAULT
If fail red LED indicator lights or blinks and LCD Fail icons illuminate,
the following occurs:
Er1 - Fail Red LED blinks
Improper connection of Charger and battery polarity
Er2 - Wrong battery
Battery voltage 12V mode ≥15V, 24V mode ≥30V
Er3 - Battery voltage doesn’t reach a normal condition for charge.
12V (4V- 8V 2Min ) , (8V-10V 9Hr)
24V (4V-16V 2Min ) , (16V-20V 9Hr)
Er4 - Battery that can not hold charge
Er5 - Charging stopped under “Desulphation” or “ Absorption” mode, then press “MODE”
button could resume to charging, if still have the same problem, maybe caused by:
• 1. Battery is over-sulfated
• 2. Battery can’t be charged
• 3. Battery can’t hold the charge
Under these conditions, the battery charger will stop charging.
Flashing red LED and a buzzer mean wrong battery voltage selection.

19
MAINTENANCE AND CARE
It is essential to keep your battery regularly charged throughout the year, especially
during the winter months. In the winter the effectiveness of your car battery is redu-
ced by the cold. Oil is thick. Engines are difcult to start and the heater, windscreen
wipers and lights are all draining power. It is at this time that batteries have to be at
peak power. If your battery is not regularly maintained and kept fully charged, it can
cause problems and a possible breakdown.
Listed are some helpful hints on how to keep your battery healthy in conjunction with
your Battery Charger.
Faulty Cells
Batteries are usually made with six cells. One of these cells can deteriorate or get dama-
ged. If, after several hours charging your battery is still at, you should test the battery.
ONLY for NOT sealed batteries:
Take hydrometer readings from each cell in the battery. If one reading is lower than
the others, this could indicate a faulty cell. If necessary, get an Auto-Electrician to
check your battery. One faulty cell is enough to ruin your battery.
It is pointless to continue using it and you would be better getting a new one.
Care
Sometimes the battery may appear at, but this could simply be dirty or loose con-
nections on your battery terminals. It is important to maintain the leads on a regular
basis. Do this by removing the leads from the battery, clean the inside of each con-
nector and terminal posts on the battery, smear the terminal posts and connectors
with Vaseline, ret in there correct positions and tighten rmly.
It is essential to keep the electrolyte level above the plates.
Note, however, that you should not overll it, as the electrolyte is strongly acidic.
When topping up do not use tap water. Always use distilled or de-ionized water. It
is important to keep the acid level up. If necessary have it checked by your garage.
Checking the condition of your battery (ONLY for NOT sealed batteries)
Using a hydrometer, which can be purchased, from most motor accessory stores,
you can check the specic gravity of the electrolyte in each cell. The hydrometer is
use to suck up a quantity of uid from the cell. The weighted oat inside the hydro-
meter will register the condition of that cell. Put the uid back into the cell after te-
sting, taking care not to splash the uid about.

20
Compatible pour des batteries au plomb standard, batteries scellées, au gel ou
Lipo4 entre 5-150Ah pour les batteries 12V et 5-120Ah pour les batteries 24V.
INSTRUCTIONS IMPORTANTES DE SECURITE
Gaz
Pendant le chargement de la batterie vous pourriez constater des bulles dans le
uide en raison du gaz qui s’échappe. Et comme ce gaz est inammable éviter toute
ampoule nue à proximité de la batterie et veillez à ce que l’endroit soit bien ventilé.
En raison du risque de ce gaz explosif, connectez et déconnectez les câbles de la
batterie uniquement quand le courant principal est coupé.
Type de batteries
Le chargeur est uniquement compatible pour des batteries au plomb standard,
scellées, au gel ou Lipo4 et ne doit pas être utilisé pour recharger des batteries NICAD
ou d’autres types de batteries.
Conseils
- Quand vous n’utilisez pas le chargeur, rangez-le dans un endroit sec an d’éviter tout
risque d’humidité qui pourrait endommager les composants à l’intérieur.
Réparations
- Le chargeur de batterie ne doit pas être ouvert. Toute tentative de modication ou de
réparation par l’utilisateur peut entraîner une perte de la garantie.
- Le câble principal de cet appareil ne peut pas être remplacé. Si ce dernier est
endommagé, l’appareil doit être mis au rebut.
Danger !
- Eviter le contact avec l’électrolyte avec votre peau ou vos vêtements. C’est un produit
acide qui peut provoquer des brûlures. Si ceci devait se produire, rincer la partie
concernée immédiatement avec de l’eau.
- En cas de contact de l’électrolyte avec les yeux, rincer abondamment et chercher de
l’aide médicale immédiatement
- Ne jamais charger une batterie gelée. Si le uide de la batterie (l’électrolyte) commence
à geler, transportez la batterie dans un endroit chaud lui permettant de dégeler avant
tout début de chargement. Ne jamais poser un chargeur sur une batterie et vice-versa.
- Ne jamais faire entrer en contact les câbles de batterie entre eux quand le chargeur
est allumé.
- Ne jamais utiliser le chargeur s’il a reçu un coup violent, s’il est tombé ou s’il est
endommagé pour d’autres raisons. Adressez-vous à un personnel qualié pour
vérication et réparation.
- Placer le câble d’alimentation générale du chargeur de manière à ce que personne
ne puisse marcher dessus ou trébucher, et éviter tout risque d’endommagement.
- Ne tirez débranchez jamais la prise en tirant sur un câble pour déconnecter le
chargeur.
Précautions à prendre en manipulant une batterie
- Si l’acide de la batterie entre en contact avec la peau ou les vêtement, rincer
abondamment avec de l’eau et du savon. En cas de contact avec les yeux, rincer
This manual suits for next models
1
Table of contents
Languages:
Other Helvi Batteries Charger manuals


