HandHeld Nautiz X8 User manual

NAUTIZ X8
MANUAL

2
CONTENTS
1. INTRODUCTION 4
1.1. Trademarks........................................................................................................................................4
1.2. About the NAUTIZ X8 Terminal..........................................................................................................4
1.3. Model Name: NAUTIZ X8...................................................................................................................4
1.4. Accessories........................................................................................................................................5
2. SAFETY REGULATIONS 6
2.1. Symbols in this manual......................................................................................................................6
2.2. General Safety Rules.......................................................................................................................... 6
2.3. Power Supply.....................................................................................................................................6
2.4. LED Safety.........................................................................................................................................6
2.5. FCC RF Exposure ..............................................................................................................................7
2.6. CB Scheme........................................................................................................................................ 7
2.7. FCC Part 15 Regulation .....................................................................................................................7
2.8. Canadian Compliance........................................................................................................................ 7
2.9. Radio Compliance..............................................................................................................................8
2.10. WWAN................................................................................................................................................ 8
2.11. HSPA+ ...............................................................................................................................................8
2.12. WEEE Compliance............................................................................................................................. 8
3. GETTING STARTED 9
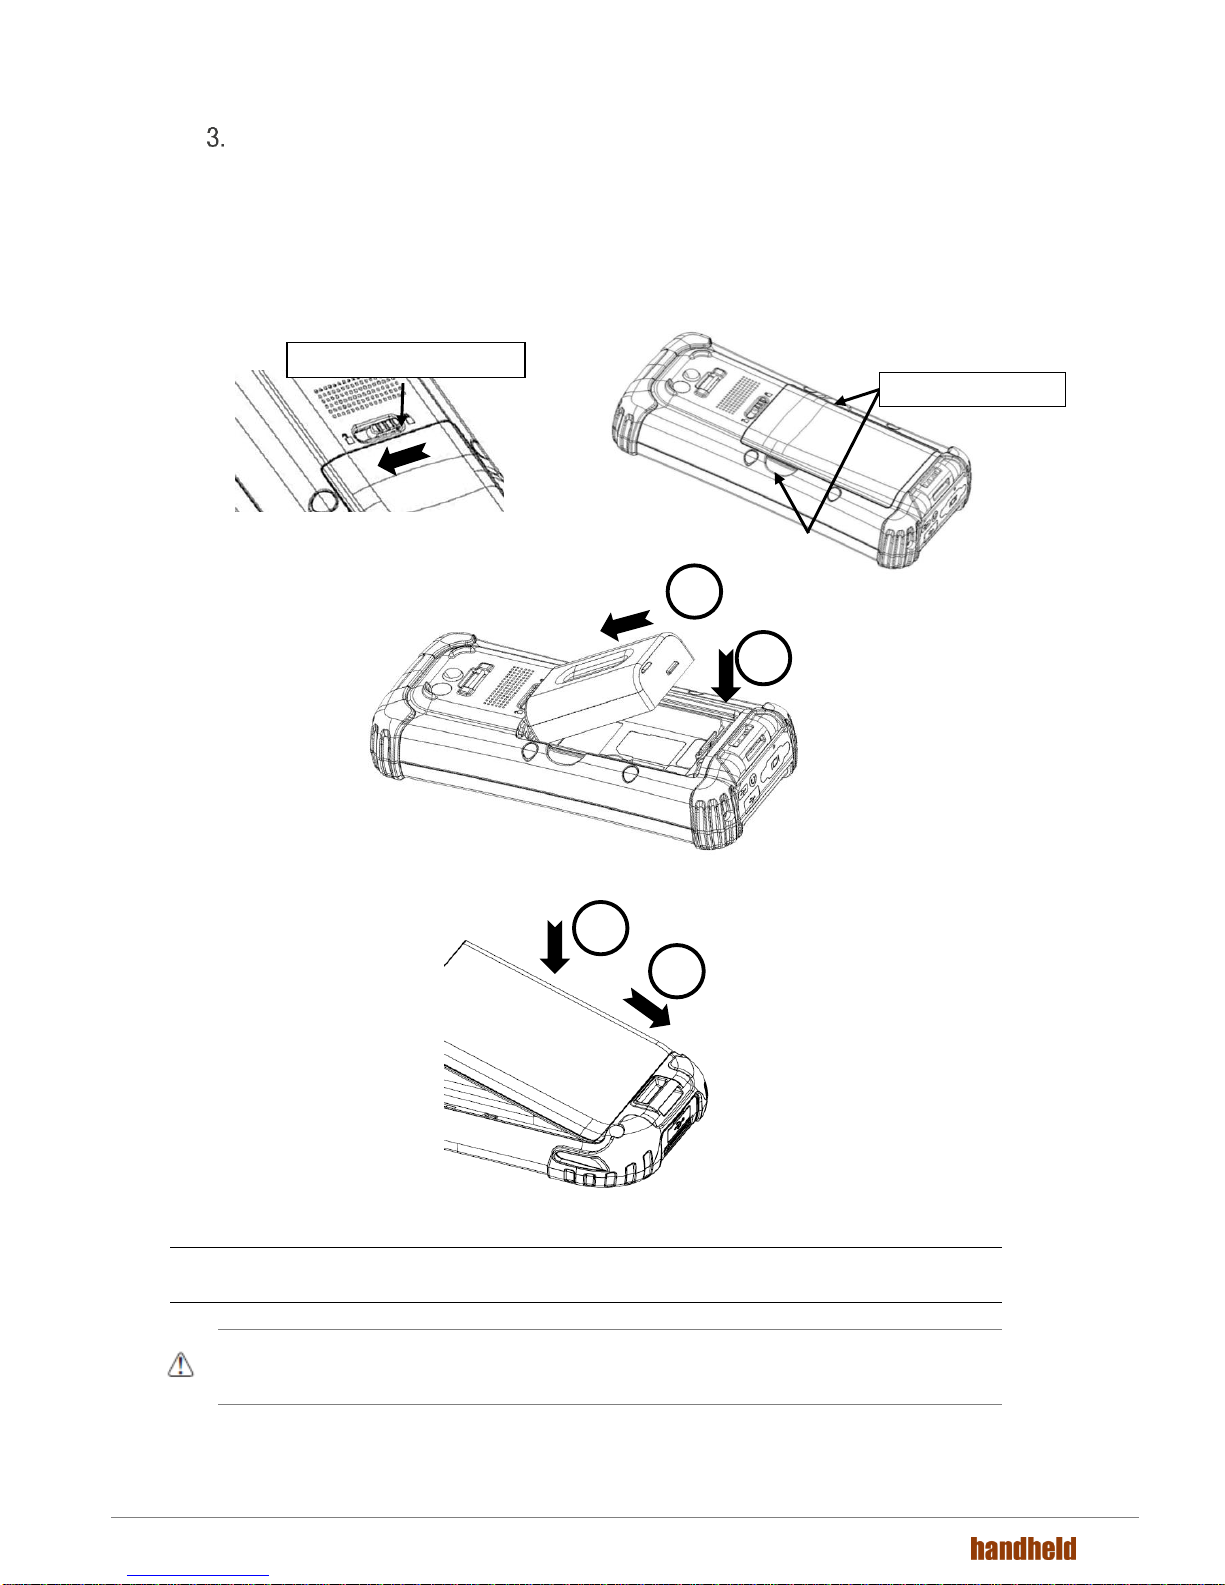
3.1. Install the Battery...............................................................................................................................9
3.2. Charge the Batteries........................................................................................................................ 10
3.3. LED Indicators.................................................................................................................................. 10
3.4. Guidelines for Battery Pack Use and Disposal ................................................................................ 11
3.5. Turn Your Device On........................................................................................................................ 12
3.6. Indicator Icons ................................................................................................................................. 12
3.7. Using the Stylus............................................................................................................................... 14
3.8. Selecting Programs.......................................................................................................................... 14
3.9. Pop-Up Menus................................................................................................................................. 14
3.10. Using File Explorer........................................................................................................................... 14
4. GET TO KNOW YOUR DEVICE 15
4.1. NAUTIZ X8 Terminal......................................................................................................................... 15
4.2. Front Panel Layout........................................................................................................................... 16
4.3. Display Backlight ............................................................................................................................. 17
4.4. Keypad Backlight............................................................................................................................. 17
4.5. Using Screen Protectors (optional accessory)................................................................................. 17
4.6. Installing Your Screen Protector ...................................................................................................... 18
4.7. Back Panel Layout........................................................................................................................... 19
4.8. Battery Cavity Layout....................................................................................................................... 20
4.9. Installing Memory Cards.................................................................................................................. 20
4.10. Left Side Panel Layout..................................................................................................................... 21
4.11. Top Panel Layout............................................................................................................................. 21
4.12. Bottom Panel Layout ....................................................................................................................... 21
4.13. Peripherals and Accessories............................................................................................................ 21
4.14. USB Cable ....................................................................................................................................... 22
4.15. Li-ion Battery Packs......................................................................................................................... 22
4.16. Battery Power .................................................................................................................................. 22
4.17. Main Battery Pack............................................................................................................................ 22
4.18. Managing Main Battery Power......................................................................................................... 24
4.19. Resetting the Terminal..................................................................................................................... 24
4.20. Suspend Mode................................................................................................................................. 25
4.21. Memory Allocation........................................................................................................................... 25
4.22. Care and Cleaning of the Products.................................................................................................. 25
4.23. NAUTIZ X8 Technical Specifications ............................................................................................... 26
5. USING THE KEYPAD 28
5.1. Numeric Keypad Layout................................................................................................................... 28
5.2. Navigation Keys............................................................................................................................... 28
5.3. Basic Keys ....................................................................................................................................... 28
5.4. Program Buttons.............................................................................................................................. 29
5.5. Capturing Images............................................................................................................................. 29

3
6. USING CONTROL PANEL 30
6.1. System Properties............................................................................................................................ 30
6.2. Power Properties ............................................................................................................................. 31
6.3. Program Buttons.............................................................................................................................. 32
6.4. Backlight Properties......................................................................................................................... 33
7. COMMUNICATION 34
7.1. Communication Options.................................................................................................................. 34
7.2. Installing Additional Software........................................................................................................... 34
7.3. Connecting the USB Cable.............................................................................................................. 34
7.4. Workstation Communication............................................................................................................ 35
7.5. Communication Type....................................................................................................................... 35
7.6. Hardware Requirements for Setup................................................................................................... 35
7.7. Software Requirements for Communication.................................................................................... 35
7.8. Setting Up the Host Workstation ..................................................................................................... 35
7.9. Communicating with the Terminal ................................................................................................... 35
7.10. Synchronizing with the Host Workstation........................................................................................ 35
7.11. Exploring the Terminal from the Workstation................................................................................... 36
7.12. Adding Programs via Windows Mobile............................................................................................ 36
7.13. Wireless Radios ............................................................................................................................... 37
7.14. Connecting the Terminal to a Wireless Network.............................................................................. 37
7.15. WLAN (802.11 b/g/n Radio) ............................................................................................................. 38
7.16. Adding Programs from the Internet.................................................................................................. 38
8. WLAN CLIENT 39
8.1. Enabling the WLAN Radio................................................................................................................ 39
8.2. Establishing a Connection ............................................................................................................... 39
9. BLUETOOTH HANDLER 40
9.1. Enabling the Bluetooth Radio .......................................................................................................... 40
9.2. Connecting to Other Devices........................................................................................................... 40
9.3. Pairing Bluetooth Devices................................................................................................................ 40
9.4. Setting Up a Bluetooth Printer......................................................................................................... 40

4
INTRODUCTION
Thank you for purchasing NAUTIZ X8 Terminal.
This manual generally provides you with the safety information and basic features and operations of the
NAUTIZ X8 device. Please read all safety precautions and this manual carefully before using your Terminal
and peripherals to ensure safe and proper use.
1.1. Trademarks
The official name of Windows Vista is Microsoft Windows Vista Operating System.
The official name of Windows 7 is Microsoft Windows 7 Operating System.
The official name of Windows 8 is Microsoft Windows 8 Operating System.
Microsoft, Windows, Windows Embedded Handheld 6.5 Pro, Windows Mobile Device Center, and the brand
names and product names of other Microsoft products are trademarks of Microsoft Corporation in the US
and other countries.
Other company and product names given in this manual or displayed in this software may be the trademarks
of their respective companies.
1.2. About the NAUTIZ X8 Terminal
The new NAUTIZ X8 is the latest generation terminal device, combining a pocket sized rugged form factor
built on Microsoft Windows Embedded Handheld 6.5.3 Pro operating system. It is designed and optimized
for GIS and field applications where maximum performance and durability is required.
The NAUTIZ X8 Terminal is available in different models depending on the options. There are also other
languages available. Please contact Handheld for information.
1.3. Model Name: NAUTIZ X8
P/N
Spec
FCC ID
Model Name
IC Number
NX8-WG-M
W/WWAN-GSM, Windows
YY3-14248G
14248-GSM
11695A - 14248G
NX8-WG-D
W/WWAN-GSM, Android
NX8-WC-M
W/WWAN-CDMA, Windows
YY3-14248C
14248-CDMA
11695A - 14248C
NX8-WC-D
W/WWAN-CDMA, Android
NX8-NW-M
No WWAN, Windows
YY3-14248
14248
11695A - 14248
NX8-NW-D
No WWAN, Android

5
1.4. Accessories
P/N
Description
NX8-1004
Standard Battery. Li-Ion, 3.7vm 5200mAh (19.2 Wh) (Warm Swappable) with smart gauge.
NX8-1010
USB Micro (PC sync and charging) cable
NX8-1005
AC Adapter, INPUT: AC100~240V 50/60Hz, OUTPUT: DC5V 1.8A with MicroUSB type
NX8-1023
Handstrap
NX8-1011
Stylus and tether
NX8-1029
Tall Cap (optional)
NAUTIZ X8 TERMINAL BOX CONTAINS THE FOLLOWING ITEMS:
Terminal
USB micro (PC sync and charging)
5V/1.8A AC Adaptor with MicroUSB type
AC Plugs
Battery Pack
Stylus Pen and tether
Handstrap
Quick Start Guide
OPTIONAL ACCESSORIES:
Tall expansion cap
3.5mm Headset
LCD Screen Protection Film
NOTE: Keep the original packaging for use when sending products to the technical assistance center. Damage caused by
improper packaging is not covered under the warranty.
NOTE: Rechargeable battery packs are not initially charged or discharged. Before you begin to use, you must charge the
battery packs first. See Paragraph 3.2.

6
SAFETY REGULATIONS
2.1 Symbols in this manual
In this manual, some important items are described with the symbols shown below. Be sure to read these
items before using this equipment.
WARNING: Indicates a potentially hazardous situation which, if not avoided, could result in death, serious injury, or
serious damage, or fire in the equipment or surrounding objects.
CAUTION: Indicates a potentially hazardous situation which, if not avoided, may result in minor or moderate injury,
partial damage to the equipment or surrounding objects, or loss of data.
NOTE: Indicates information to which you should pay attention when operating the equipment.
This section outlines the safety precautions associated with using NAUTIZ X8 Terminal.
NOTE: NAUTIZ X8 Terminals meet or exceed the requirements of all applicable standards organizations for safe operation.
However, as with any electrical equipment, the best way to ensure safe operation is to read this manual carefully
before performing any type of connection to the Terminal and operate them according to the agency guidelines
described in the manual.
2.2 General Safety Rules
CAUTION
Use only the components supplied by the manufacturer for the specific NAUTIZ X8 being used.
Do not attempt to disassemble the NAUTIZ X8 Terminal, as it does not contain parts that can be repaired by
the user. Any tampering will invalidate the warranty.
When replacing the battery pack or at the end of the operative life of the NAUTIZ X8 Terminal, disposal must
be performed in compliance with the laws in force in your country.
Before using the devices and the battery packs, read this manual carefully.
2.3 Power Supply
The power supply for this device has met applicable KCC/CCC safety requirements. Please adhere to the
following safety instructions per UL guidelines:
Failure to follow the instructions outlined may lead to serious personal injury and possible
property damage.
Important safety instructions save these instructions.
WARNING DANGER to reduce the risk of fire or electric shock, carefully follow these instructions.
Use only Handheld-approved power supply. Use of a non-Handheld-approved power supply may be
dangerous and the warranty does not cover damage to the device caused by non-Handheld-approved power
supply. The package includes international AC plugs. The AC plugs must be plugged in the power supply
before the power supply itself is plugged on the wall outlet. The power supply is intended to be correctly
oriented in a vertical or horizontal or floor mount position.
2.4 LED Safety
The LED output on this device has met IEC62471 LED safety and certified to be under the limits of a CLASS
1 LED product.

7
2.5 FCC RF Exposure
This device complies with FCC RF exposure guidelines set forth for an uncontrolled environment.
2.6 CB Scheme
This device complies with CB Scheme IEC 60950-1
2.7 FCC Part 15 Regulation
Pursuant to part 15 of the FCC Rules, you are cautioned that changes or modifications not expressly
approved by Handheld could void your authority to operate the NAUTIZ X8 Terminal.
This device complies with part 15 of the FCC Rules. Operation is subject to the following two conditions: (1)
This device may not cause harmful interference, and (2) this device must accept any interference received,
including interference that may cause undesired operation.
This device has been tested and found to comply with the limits for a Class B digital device, pursuant to Part
15 of the FCC Rules. These limits are designed to provide reasonable protection against harmful interference
in a residential installation. This equipment generates uses and can radiate radio frequency energy and, if not
installed and used in accordance with the instructions, may cause harmful interference to radio
communications. However, there is no guarantee that interference will not occur in a particular installation. If
this equipment does cause harmful interference to radio or television reception, which can be determined by
turning the equipment off and on, the user is encouraged to try to correct the interference by one or more of
the following measures:
Reorient or relocate the receiving antenna.
Increase the separation between the equipment and receiver.
Connect the equipment into an outlet on a circuit different from that to which the receiver is
connected.
Consult the dealer or an experienced radio/TV technician for help.
In accordance with FCC 15.21, changes or modifications not expressly approved by the party responsible for
The antenna(s) must not be co-located or operating in conjunction with any other antenna or transmitter. To
maintain compliance with FCC RF exposure guidelines for body-worn operation, do not use accessories that
contain metallic components.
2.8 Canadian Compliance
This radio transmitter has been approved by Industry Canada to operate with the antenna types listed below
with the maximum permissible gain and required antenna impedance for each antenna type indicated.
Antenna types not included in this list, having a gain greater than the maximum gain indicated for that type,
are strictly prohibited for use with this device.
Under Industry Canada regulations, this radio transmitter may only operate using an antenna of a type and
maximum (or lesser) gain approved for the transmitter by Industry Canada. To reduce potential radio
interference to other users, the antenna type and its gain should be so chosen that the equivalent
isotropically radiated power (e.i.r.p) is not more than that necessary for successful communication.
This device complies with Industry Canada license-exempt RSS standard(s). Operation is subject to the
following two conditions: (1) this device may not cause interference, and (2) this device must accept any
interference, including interference that may cause undesired operation of the device.
Le présent émetteur radio a été approuvé par Industrie Canada pour fonctionner avec les types d'antenne
énumérés ci-dessous et ayant un gain admissible maximal et l'impédance requise pour chaque type
d'antenne. Les types d'antenne non inclus dans cette liste, ou dont le gain est supérieur au gain maximal
indiqué, sont strictement interdits pour l'exploitation de l'émetteur.
Conformément à la réglementation d'Industrie Canada, le présent émetteur radio peut fonctionner avec une
antenne d'un type et d'un gain maximal (ou inférieur) approuvé pour l'émetteur par Industrie Canada. Dans le
but de réduire les risques de brouillage radioélectrique à l'intention des autres utilisateurs, il faut choisir le

8
type d'antenne et son gain de sorte que la puissance isotrope rayonnée équivalente (p.i.r.e.) ne dépasse pas
l'intensité nécessaire à l'établissement d'une communication satisfaisante.
Le présent appareil est conforme aux CNR d'Industrie Canada applicables aux appareils radio exempts de
licence. L'exploitation est autorisée aux deux conditions suivantes : (1) l'appareil ne doit pas produire de
brouillage, et (2) l'utilisateur de l'appareil doit accepter tout brouillage radioélectrique subi, même si le
brouillage est susceptible d'en compromettre le fonctionnement.
2.9 Radio Compliance
NAUTIZ X8 RF terminals are in conformity with all essential requirements of the R&TTE Directive (1999/5/EC).
This device is marked with in accordance with the Class II product requirements
specified in the R&TTE Directive, 1999/5/EC. The device is intended for use throughout the European
Community; PAN European Frequency Range: 2.402 ~ 2.480 GHz.
Restrictions for use in France are as follows:
Indoor use: maximum power (EIRP*) of 100 mW for the entire 2.400 ~ 2.4835 GHz
Outdoor use: Maximum power (EIRP*) of 100 mW for the 2.400 ~ 2.454 GHz band and
maximum power (EIRP*) of 10 mW for the 2.454 ~ 2.483 GHz band.
The CE mark on the device indicates that the system has been tested to and confirm with the
provisions noted within the 2004/108/EC Electromagnetic Compatibility Directive and the 2006/95/EC Low
Voltage Directive, 1999/5/EC (R&TTE), and 2011/65/EU (RoHS).
Handheld shall not be responsible for use of our product with equipment (i.e., power supplies, personal
computers, etc.) that is not CE marked and does not comply with the Low Voltage Directive.
2.10 WWAN
In radio systems configured with mobile computers and access points, the frequencies to be used must be
allowed by the spectrum authorities of the specific country in which the installation takes place. Be
absolutely sure that the system frequencies are correctly set to be compliant with the spectrum requirements
of the country. The Radio modules used in this product automatically adapt to the frequencies set by the
system and do not require any parameter settings .The TYPE field shows the correspondence between
NAUTIZ X8 types and radio modules:
2.11 HSPA+
HSPA+, or Evolved High-Speed Packet Access, is a technical standard for wireless, broadband
telecommunication. HSPA+ enhances the widely used WCDMA (UMTS) based 3G networks with higher
speeds for the end user.
2.12 WEEE Compliance
Information for the user in accordance with the European Commission Directive 2012/19/EU of the European
Parliament and of the Council of 4 July 2012 on Waste Electrical and Electronic Equipment (WEEE)
This product has required the extraction and use of natural resources for its production. It may contain
hazardous substances that could impact health and the environment, if not properly disposed. In order to
avoid the dissemination of those substances in our environment and diminish the pressure on the natural
resources, we encourage you to reuse, recycle and recover the product. If the product is disposed according
to the Directive, it will avoid potentially negative consequences to the environment and human health which
otherwise could be caused by incorrect disposal.
The product marked with crossed out wheeled bin must be disposed separately from municipal
waste. For more detailed information about disposal, reuse, and recycle system, contact your local
or regional waste administration.

9
GETTING STARTED
3.1 Install the Battery
The TERMINAL is shipped with the battery packaged separately from the unit. Follow the steps below to
install the battery.
1. Remove the battery compartment door by moving the battery door lock to the left and lifting up the
door through the slots on the sides.
2. Insert the battery well with the battery contacts facing the top.
3. Replace the battery door inserting the bottom first and then push the top of the door until the lock secures
the door.
NOTE: The battery door must be installed prior to booting the unit.
WARNING: Use only Handheld-approved Li-Ion battery packs. Unauthorized battery may result in damage not
covered by the warranty.
Battery door lock
1
2
Slots on the sides
1
2

10
3.2 Charge the Batteries
The Terminal ships with the battery only slightly charged. Charge the battery with the charging cable for a
minimum of 4 or 6 hours before initial use.
1. Attach the appropriate plug adapter to the plug of the power cable.
2. Insert the plug into the appropriate power source.
3. Plug the power cable into the USB Jack on the side end of the Terminal.
WARNING: Use only Handheld-approved peripherals, power cables, and power adapters. Unauthorized peripherals,
cables, or power adapters may cause batteries to explode or damage your device.
DO NOT attempt to charge damp/wet terminals or batteries. All components must be dry before connecting to an
external power source.
Batteries must be charged at a temperature ranging from 0~45℃(±3℃) or the life of the battery may be shortened.
CAUTION: After the battery has been charged, disconnect the DC Power Jack from the terminal. If you stay on that
plug in use, it is possible to break the power code.
NOTE: The rechargeable battery pack is not initially charged. Charge the battery before using.
NOTE: If you remove the battery pack or it completely discharges, you have 30 minutes to insert a charged battery pack
before the battery completely discharges.
3.3 LED Indicators
The red LED is ON while charging the battery and the green LED is ON when the battery is fully charged.

11
3.4 Guidelines for Battery Pack Use and Disposal
The following are general guidelines for the safe use and disposal of batteries:
Store the terminal and the spare batteries between 20 to 30 ºC (68 to 86 ºF) in order to maintain
optimal battery performance.
Standard batteries must be charged at a temperature ranging from 0 to 45℃(±3℃).
The battery level may not be displayed correctly for a few minutes after the disconnection if the
unit is disconnected from power supply before the charging cycle is completed.
The Terminal could get warm during charging. This is normal and does not mean a malfunction.
To achieve the best battery life, turn off the radios not in use.
The rechargeable battery pack is not initially charged. Charge the battery before using. See
below.
By default, the battery pack is disconnected at the factory to avoid damage due to excessive
draining. Annual replacement of rechargeable battery pack avoids possible risks or
abnormalities and ensures maximum performance.
WARNING: DO NOT attempt to charge damp/wet terminals or batteries. All components must be dry before
connecting to an external power source.
WARNING: Never throw a used battery in the trash. It contains heavy metals and should be recycled according to
local guidelines.
WARNING: Storage of batteries for a long time at fully charged status or at fully discharged status should be
avoided. Only in cases of long storage to av
recharge the battery every two-three months to keep the charge status at a medium level.
WARNING: Installing, charging and/or any other action should be done by following this manual.
The battery pack may get hot, explode, ignite, and/or cause serious injury if exposed to abusive
conditions.
If the battery pack is replaced with an unauthorized battery, there is risk of explosion or damage
to your terminal.
Do not place the battery pack in or near a fire or heat; do not place the battery pack in direct
sunlight, or use or store the battery pack inside unventilated areas in hot weather; do not place
the battery pack in microwave ovens, dryer, high pressure containers, on induction cookware or
similar device. Doing so may cause the battery pack to generate heat, explode or ignite. Using
the battery pack in this manner may also result in a loss of performance and a shortened life
expectancy.
Use only a Handheld approved power supply. The use of an alternative power supply will void
the product warranty, may cause product damage and may cause heat, explosion or unit to
ignite.
The area in which the units are charged should be clear of debris and combustible materials or
chemicals.
Do not use the battery pack in any other manner outside its intended use in the Terminal and
peripherals.
Do not short-circuit the battery pack contacts connecting the positive terminal and negative
terminal. This might happen, for example, when you carry a spare battery pack in your pocket
or purse; accidental short circuiting can occur when a metallic object such as a coin, clip, or
pen causes direct connection of the contacts of the battery pack (these look like metal strips on
the battery pack). Short circuiting the terminals may damage the battery pack or the
connecting object.
Do not apply voltages to the battery pack contacts.
Do not pierce the battery pack with nails, strike it with a hammer, step on it or otherwise subject
it to strong impacts or shocks.
Do not disassemble or modify (i.e. bend, crush or deform) the battery pack. The battery pack
contains safety and protection devices, which, if damaged, may cause the battery pack to
generate heat, explode or ignite.
In case of leakage of liquid from the battery, avoid contact with liquid the skin or eyes. If the
contact occurs, immediately wash the affected area with water and consult a doctor.
Do not solder directly onto the battery pack.
Do not expose the battery pack to liquids.
Avoid any knocks or excessive vibrations. If the device or the battery is dropped, especially on
a hard surface, you should take it to the nearest Authorized Repair Center for inspection before

12
continuing to use it.
Do not replace the battery pack when the device is turned on.
Do not use the battery pack if it is damaged in any way.
Battery pack usage by children should be supervised.
Collect and recycle waste batteries separately from the device in comply with European
Directive 2006/66/EC, 2011/65/EU, 2012/19/EU and subsequent modifications, US and China
regulatory and others laws and regulations about environment.
NOTE: In order to guarantee an adequate operating autonomy, when replacing the battery pack, the Terminal checks the
battery energy level. If the battery is not sufficiently charged, the Terminal does not turn on. In this case, either
substitute the battery pack with a charged one (sufficiently charged) or plug it into the direct power supply.
3.5 Turn Your Device On
If you apply the power to your device, it turns on by itself. Do NOT press any keys or interrupt during turning
on process. When the process is complete, the Desktop appears, and the terminal is ready for use.
3.6 Indicator Icons
Tap the touch screen at the top once to
zoom in the upper menu.
The command bar provides access to many system functions and programs.

13
Icon
Meaning
Open the start menu
Access the Wireless Manager
Indicates numeric keypad
Shows phone signal mode
Shows the volume
Indicates the Battery Control Panel (CPL)
Indicates Clock & Alarm CPL
Zoom in/ out
Access the Bluetooth radio
Left and right arrows are used to scroll through additional icons
Icon
Meaning
Indicates AC connection mode
Indicates WAN (Phone) connection mode
Indicates Sound connection mode
Indicates LAN / Bluetooth mode
Indicates Numeric Keypad

14
3.7 Using the Stylus
The terminal comes with a stylus and a Lanyard. Use this stylus (or your finger) to select or enter information
on the touch screen. The stylus functions as a mouse; generally, a tap is the same as a click.
Tap Tap the touch screen once to open menu items and select options.
Drag Hold the stylus on the screen and drag across the screen to select text and images.
Tap & hold Tap and hold the stylus on an item and a pop-up menu appears. On the pop-up menu, tap
the action of the task you want to perform.
WARNING: Use of objects, such as paper clips, pencils, or ink pens on the touch screen can damage the input
panel and may cause damage not covered by the warranty.
3.8 Selecting Programs
Tap Start. To open a program, tap the icon on the menu.
3.9 Pop-Up Menus
You can quickly choose an action for an item using the pop-up menus.
1. Tap and hold the stylus on the item name. The pop-up menu appears.
2. Lift the stylus and tap the action you want to perform. The contents of pop-up menus change according to
the program you are using.
3.10 Using File Explorer
Use File Explorer to navigate through the files on your system. Tap Start -> File explorer.
Move files by tapping and holding on the file, and then tapping Cut, Copy or Paste on the pop-up menus
that appear.

15
GET TO KNOW YOUR DEVICE
The following list outlines a few of the features included in your device.
4.1 NAUTIZ X8 Terminal
Operating Systems: Microsoft Windows Embedded Handheld 6.5.3 Pro
Texas Instruments 4470 dual-core @ 1.5GHz
RAM Memory: 1GB
FLASH Memory: 4GB iNAND
4.7" FWVGA (854x480); IPS; 600 nits, capacitive multi-touch; Asahi Dragontrail chemically
strengthened glass
Keyboards: Numeric with 3 programmable function keys
MicroSD/MicroSDHC Expansion Memory Card Interface
Power Supply: MicroUSB power adaptor
Connections: USB A Host, USB micro (PC sync and charging, DB9 RS-232 serial, 3.5mm
headset (stereo & mic)
Battery: Li-Ion, 3.7vm 5200mAh (19.2 Wh) (Warm-Swappable) with smart gauge.
IP67 certified enclosures
Audio: Built in: Receiver, loud-Speaker; Mic
Bluetooth: Class 2 (10m),v3.0 in Android OS and v2.0 in Windows Mobile OS
WLAN: 802.11 b/g/n
WWAN: Voice and Data, 3.8G GSM HSPA+/HSUPA or CDMA EVDO Rev. A
Navigation: Integrated with stand-alone u-Blox GPS
Indicators: LEDs: 1. charge state, 2. GPS, 3. Notification; Vibration motor
Camera: 8-megapixel rear-facing camera with autofocus and LED illumination
Sensors: 3-axis accelerometers, 3-axis gyroscope, Ambient light sensor, Digital compass,
Altimeter/barometer, Proximity, Ambient temperature.

16
4.2 Front Panel Layout
LED INDICATOR
Shows the information needed to operate your device as follows:
Note: The LED is user-programmable.
LED COLOR MEANING
Red:
Lights when main battery is charging.
Blinks, when the battery is very low (<10%),
Lights when the battery is low (<20%),
Blinks as Red/ Green by turns when it is no battery or not recognized
Green:
Lights when the PDA resets
Lights when main battery charging has completed.
Blinks as Red / Green by turns when it is no battery or not recognized
KEYPAD
20 numeric keypad
MICROPHONE
The integrated microphone can be used for audio recording and phone call.
Keyboard
(20-key numeric)
Touch screen
display
Light/ Proximity
sensor
Receiver
LED

17
TOUCH SCREEN DISPLAY
The display is a LCD (Liquid Crystal Display) with a capacitive multi-touch screen. The 4.7" FWVGA (Full
Wide Video Graphics Array) has Asahi Dragontrail chemical strengthened glass and the resolution is 854 x
480. See Display Backlight on paragraph 4.3.
Try to keep water off the display as the touch screen does not perform well with water on it.
Use the stylus provided with your Terminal as this touchscreen works best with this stylus. For touch screen
input, use the stylus included with the terminal or your finger. Generally you also achieve greater accuracy
with the stylus for buttons or icons that are close together.
WARNING: Use of objects, such as paper clips, pencils, or ink pens on the touch screen can damage the input panel
and may cause damage not covered by the warranty.
4.3 Display Backlight
The intensity of the backlight of the touch screen display may be changed, and the backlight may be
programmed to turn off after the terminal has been idle for a specified period of time. To adjust the intensity
of the backlight while on battery power, tap Start -> Settings -> System -> Backlight.
SCREEN BACKLIGHT - BATTERY/EXTERNAL POWER
Move the slider to adjust the screen backlight while on battery power.
You may turn the screen backlight off if the device is not used for a designated period
of time by checking the option and designating the desired time period.
You may also turn on the screen backlight when a button is pressed or the screen is
tapped by selecting the appropriate checkbox.
You may make the same changes when on external power by tapping the External tab.
NOTE: Using the backlight option while on battery power substantially reduces battery life.
4.4 Keypad Backlight
To turn on the keypad backlight, check the checkbox.
The duration of the keypad backlight is the same as the settings on the display backlight.
4.5 Using Screen Protectors (optional accessory)
Handheld recommends using a screen protector and stylus, especially with applications
that require a high to medium level of interface with the touch panel.
Handheld also mandates use of the proper stylus, which is one that has a stylus tip
radius of no less than 0.8mm. Use of the stylus included with the terminal is
recommended at all times.

18
4.6 Installing Your Screen Protector
When installing a screen protector, use a flat plastic card (e.g., credit card) to apply the screen protector
smoothly and remove any air bubbles.
1. Press the Power key to put the terminal in suspend mode.
2. Clean the touch panel thoroughly with a clean, non-abrasive, lint-free
cloth, Make sure nothing is on the touch panel.
3. Blue tag with cover film: Peel off this mask before application.
4. Align the exposed edge of the screen protector along the left edge of the
touch panel. Make sure that it lies flush with edges of the touch panel.
5. Yellow tag with cover film: Peel off this mask after application
completed.
6. Press gently but firmly. Use the card a necessary to smooth out any
air pockets or bumps after allocation
8. Verify that the screen accepts input from the stylus as usual. If not, re-apply the screen protector.
9. Press the Power key to put the terminal back in suspend mode.
10. Clean the surface of the screen protector with a clean, non-abrasive, lint-free cloth.
11. Press the Power key to wake the terminal again.
NOTE: To reposition the screen
protector, lift up gently and
reapply.
7. Press the Power key and check
the touch panel with the stylus.

19
4.7 Back Panel Layout
HANDSTRAP
The Terminal comes with Handstrap that makes the terminal comfortable to hold and helps prevent from
accidentally dropping the terminal. You can attach it to the device.
INSTALLED BATTERY
For information about installing the battery, see Install the Battery on paragraph 3.1.
For information about battery power, see Battery Power on paragraph 4.17.
SPEAKER
The integrated speaker sounds audio signals as you enter data, but emits no ambient noise on system
activity (i.e., processor, memory access, radio traffic, etc.). The speaker can also be used for playing sounds
(e.g., WAV or MP3 files).
The speaker meets the following SPL levels at 10cm:
80dB
kHz 90dB
kHz 90dB
Battery
cover
Speaker
Handstrap mount
LED window
Camera window
Handstrap
mount
Battery lock

20
STYLUS AND TETHER
The Terminal is shipped with a stylus that stores in a loop on the handstrap using it; see
Using the Stylus in paragraph 3.8.
4.8 Battery Cavity Layout
4.9 Installing Memory Cards
The TERMINAL supports Micro Secure Digital (SD) memory cards up to 32GB. Sandisk, Kingstone and ATP
micro SD are recommended
To access the Micro SD card slot and insert the card, proceed as follows:
1. Press the Power key to put the terminal in Suspend Mode; see Suspend Mode on paragraph 4.23.
2. Remove the battery door on the back of the unit.
3. Remove the battery.
4. Insert the SD card with the label facing upward.
NOTE: To remove an installed SD card, tap on the edge lightly to unlock the card; the card will pop out just enough for you
to grab its edge and pull it out.
5. Replace battery and battery door.
6. Tap the Power key to resume operation.
7. To verify that the operating system recognizes the new memory card, open Windows Explorer and
navigate to My Device\Storage Card.
WARNING: Follow proper ESD precautions to avoid damaging the SD. Proper ESD precautions include, but are not
limited to, working on an ESD mat and ensuring that the operator is properly grounded.
Do not force the card. If you feel resistance, remove the card, check the orientation, and reinsert it.
Do not use the Micro SD card slot for any other accessories.
It is highly recommended to lock the card holder even if the card is not present.
Battery Pack Retainer
Micro SD slot
IMEI number (for WWAN)
Other manuals for Nautiz X8
1
Table of contents
Other HandHeld Cell Phone manuals