Hanlong Unicorn 3112 User manual

User Manual
Unicorn 3112
Analog Telephone Adaptor
Hanlong Technology Co., Ltd
http://www.hanlongtek.com
Table of Content

Unicorn 3112 User Manual
Copyright © 2008 Hanlong Technology Co., Ltd Page 2 of 42
1. WELCOME...................................................................................................................3
2. WHAT IS IN THE PACKAGE.......................................................................................3
3. PRODUCT OVERVIEW ...............................................................................................3
3.1. Key Features..................................................................................................3
3.2. Hardware specification...................................................................................4
4. INSTALLATIONS .........................................................................................................5
4.1. Safety.............................................................................................................6
5. BASIC OPERATIONS..................................................................................................6
5.1. Get Familiar with Voice..................................................................................6
5.2. Make Phone call.............................................................................................8
5.2.1. Calling Phone or Extension Numbers ....................................................8
5.2.2. Call Hold .................................................................................................8
5.2.3. Call Waiting.............................................................................................8
5.2.4. 3-way Conferencing................................................................................9
Star Code Style 3-way Conference.......................................................................9
Bellcore Style 3-way Conference..........................................................................9
5.2.5. Direct IP-to-IP Calls................................................................................9
5.2.6. Blind Transfer........................................................................................10
5.2.7. Attended Transfer .................................................................................11
5.2.8. Send and Receive PSTN Calls.............................................................11
5.2.9. VoIP-to-PSTN Calls..............................................................................11
5.2.10. PSTN-to-VoIP Calls..............................................................................11
5.2.11. Route Calls to PSTN.............................................................................12
5.3. Call Features................................................................................................12
5.3.1. Call Features Tables.............................................................................12
5.3.2. PSTN Pass Through.............................................................................13
5.4. FAX...............................................................................................................13
5.5. Status Light Indicator ...................................................................................13
6. CONFIGURATION GUIDE.........................................................................................14
6.1. Configuring Unicorn 3112 using Web Browser (Recommended)................14
6.1.1. Accessing the Web Configuration ........................................................15
6.1.2. Programming Unicorn 3112 via the LAN Port ......................................15
6.1.3. Programming Unicorn 3112 via the WAN Port.....................................15
6.1.4. User Programming and Configuration..................................................16
6.1.5. Passwords ............................................................................................16
6.1.6. End User Settings:................................................................................17
6.1.6.1 Device Status: ...............................................................................17
6.1.6.2 Basic Options:...............................................................................18
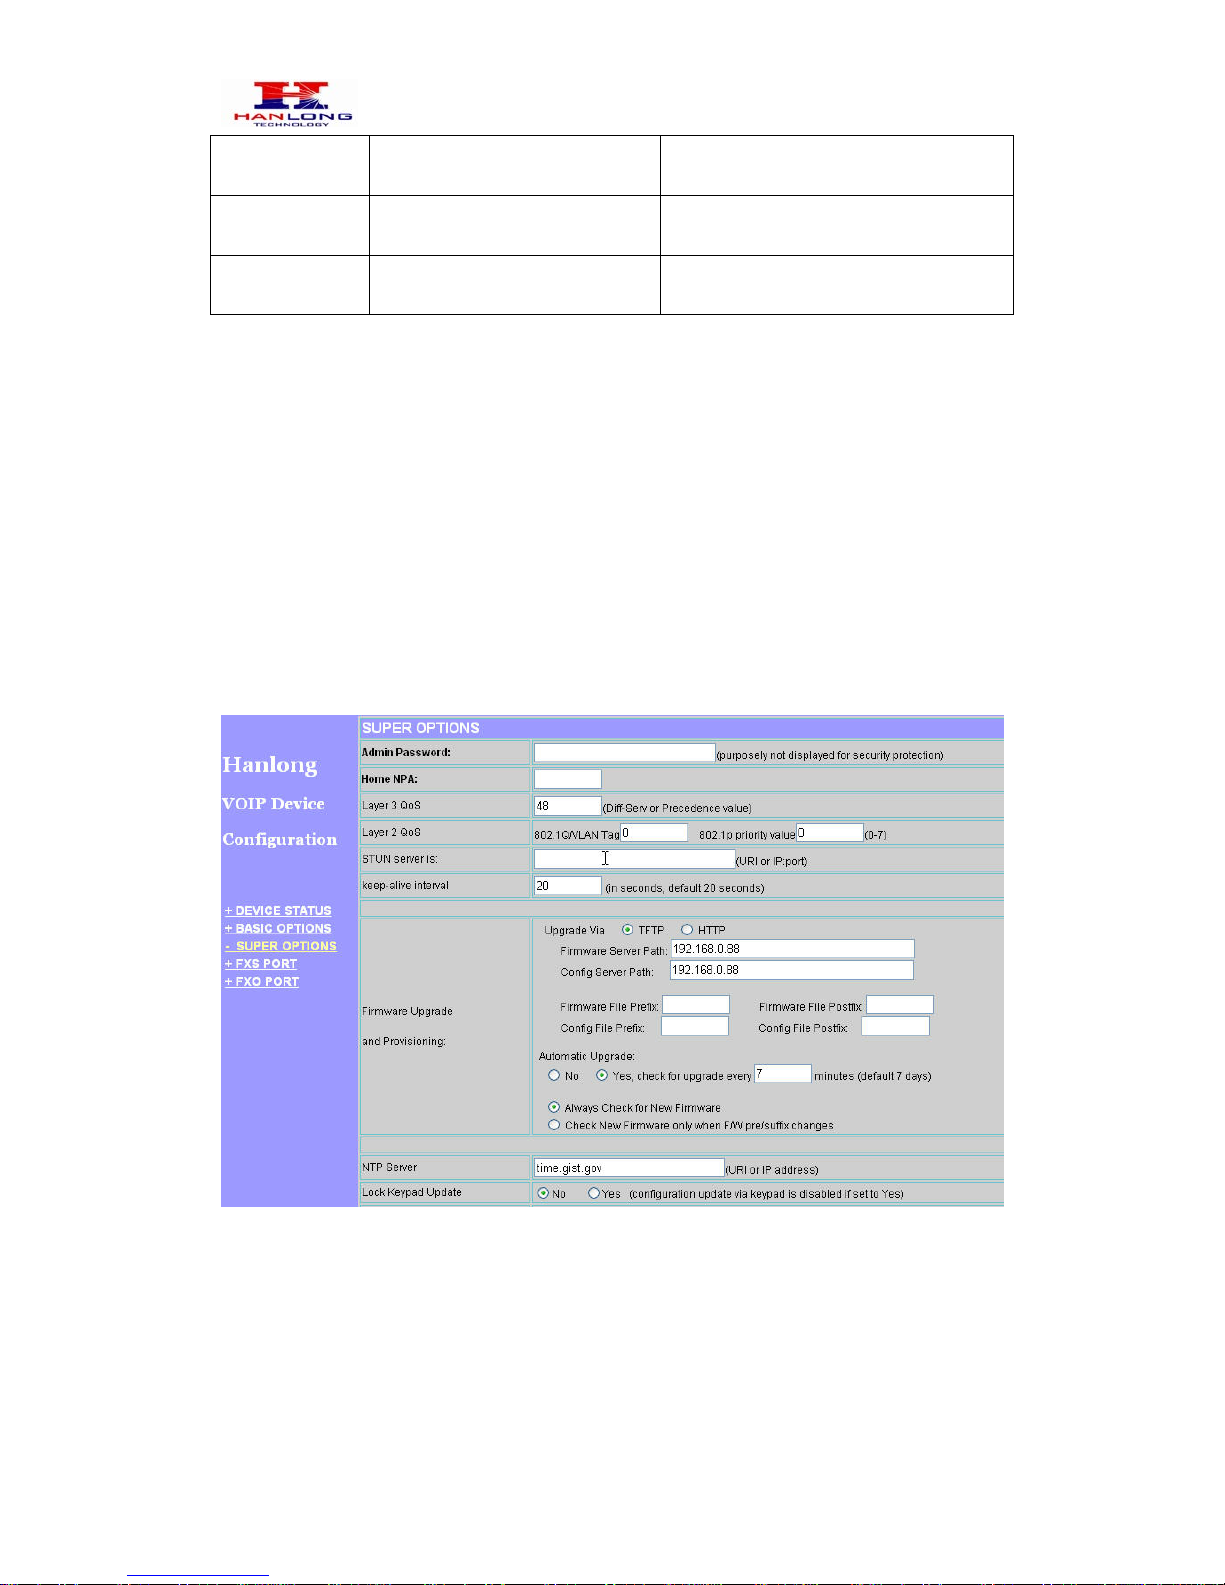
6.1.6.3 Super Option.................................................................................21
6.1.6.4 FXS Port Settings:.........................................................................24
6.1.6.5 FXO Port Settings: ........................................................................33
6.1.7. Saving the Configuration Changes.......................................................39
6.1.8. Rebooting the Unicorn 3112 .................................................................40
6.2. Configuring Unicorn 3112 via Voice Prompt................................................41

Unicorn 3112 User Manual
Copyright © 2008 Hanlong Technology Co., Ltd Page 3 of 42
6.2.1. DHCP Mode..........................................................................................41
6.2.2. Static IP Mode.......................................................................................41
6.2.3. Configuration through a Central Server................................................41
7. SOFTWARE UPGRADE............................................................................................41
8. RESTORE FACTORY DEFAULT SETTINGS............................................................42
9. TECHNICAL SUPPORT CONTACT..........................................................................42
1. WELCOME
Unicorn 3112 is an all-in-one VoIP integrated access device that features superb
audio quality, rich functionalities, high level of integration, compactness and
ultra-affordability. The Unicorn 3112 is fully compatible with SIP industry standard and can
interoperate with many other SIP compliant devices and software on the market.
Special compatibility features include:
Nortel MCS
Standard SIP
Broadsoft
Howdy
2. WHAT IS IN THE PACKAGE
The Unicorn 3112 package contains:
One Unicorn 3112 VoIP adapter
One universal power supply
One Ethernet cable
One phone cable
3. PRODUCT OVERVIEW
3.1.Key Features
Supports SIP 2.0(RFC 3261), TCP/UDP/IP, RTP/RTCP, HTTP, ICMP, ARP/RARP, DNS,
DHCP (both client and server), NTP, PPPoE, STUN, TFTP, etc.
Built-in router, NAT, Gateway and DMZ port forwarding

Unicorn 3112 User Manual
Copyright © 2008 Hanlong Technology Co., Ltd Page 4 of 42
Supports call origination and termination from/to the PSTN network(via FXO Port)
Powerful digital signal processing (DSP) to ensure superb audio quality;
advanced adaptive jitter control and packet loss concealment technology
Support various vocoders including G.711 (a-law and u-law), G.723.1 (5.3K/6.3K),
G.726 (40K/32K/24K/16K), as well as G.728, G.729A/B, and iLBC(Pending).
Support Caller ID/Name display or block, Hold, Call Waiting/Flash, Call Transfer, Call
Forward, in-band and out-of-band DTMF, Dial Plans, etc.
Support fax pass through T.30 and T.38.
Support Silence Suppression, VAD (Voice Activity Detection), CNG (Comfort Noise
Generation), Line Echo Cancellation (G.168), and AGC (Automatic Gain Control)
Support standard encryption and authentication (DIGEST using MD5 and MD5-sess)
Support for Layer 2 (802.1Q VLAN, 802.1p) and Layer 3 QoS (ToS, DiffServ, MPLS)
Support automated NAT traversal without manual manipulation of firewall/NAT
Support device configuration via built-in IVR, Web browser or central configuration file
through TFTP or HTTP
Support firmware upgrade via TFTP or HTTP with encrypted configuration files. Ultra
compact (wallet size) and lightweight design, great companion for travelers
Compact, lightweight Universal Power adapter.
3.2.Hardware specification
Model Unicorn 3112
LAN interface
1 x RJ45 100MBase-T
WAN interface
1 x RJ45 100MBase-T
FXS telephone port
1 x FXS
FXO port
1 x FXO
LED light
Green and red color
Universal switching power supply Input: 100-240VAC 50-60 Hz
Output: +5VDC, 1200mA,
UL certified
Dimension
70mm (W) ×130mm (D)×27mm (H)
Weight
0.30kg
Temperature 40 – 130 F
5 – 45 C
Humidity
10 - 90%
Unicorn 3112 User Manual
Copyright © 2008 Hanlong Technology Co., Ltd Page 5 of 42
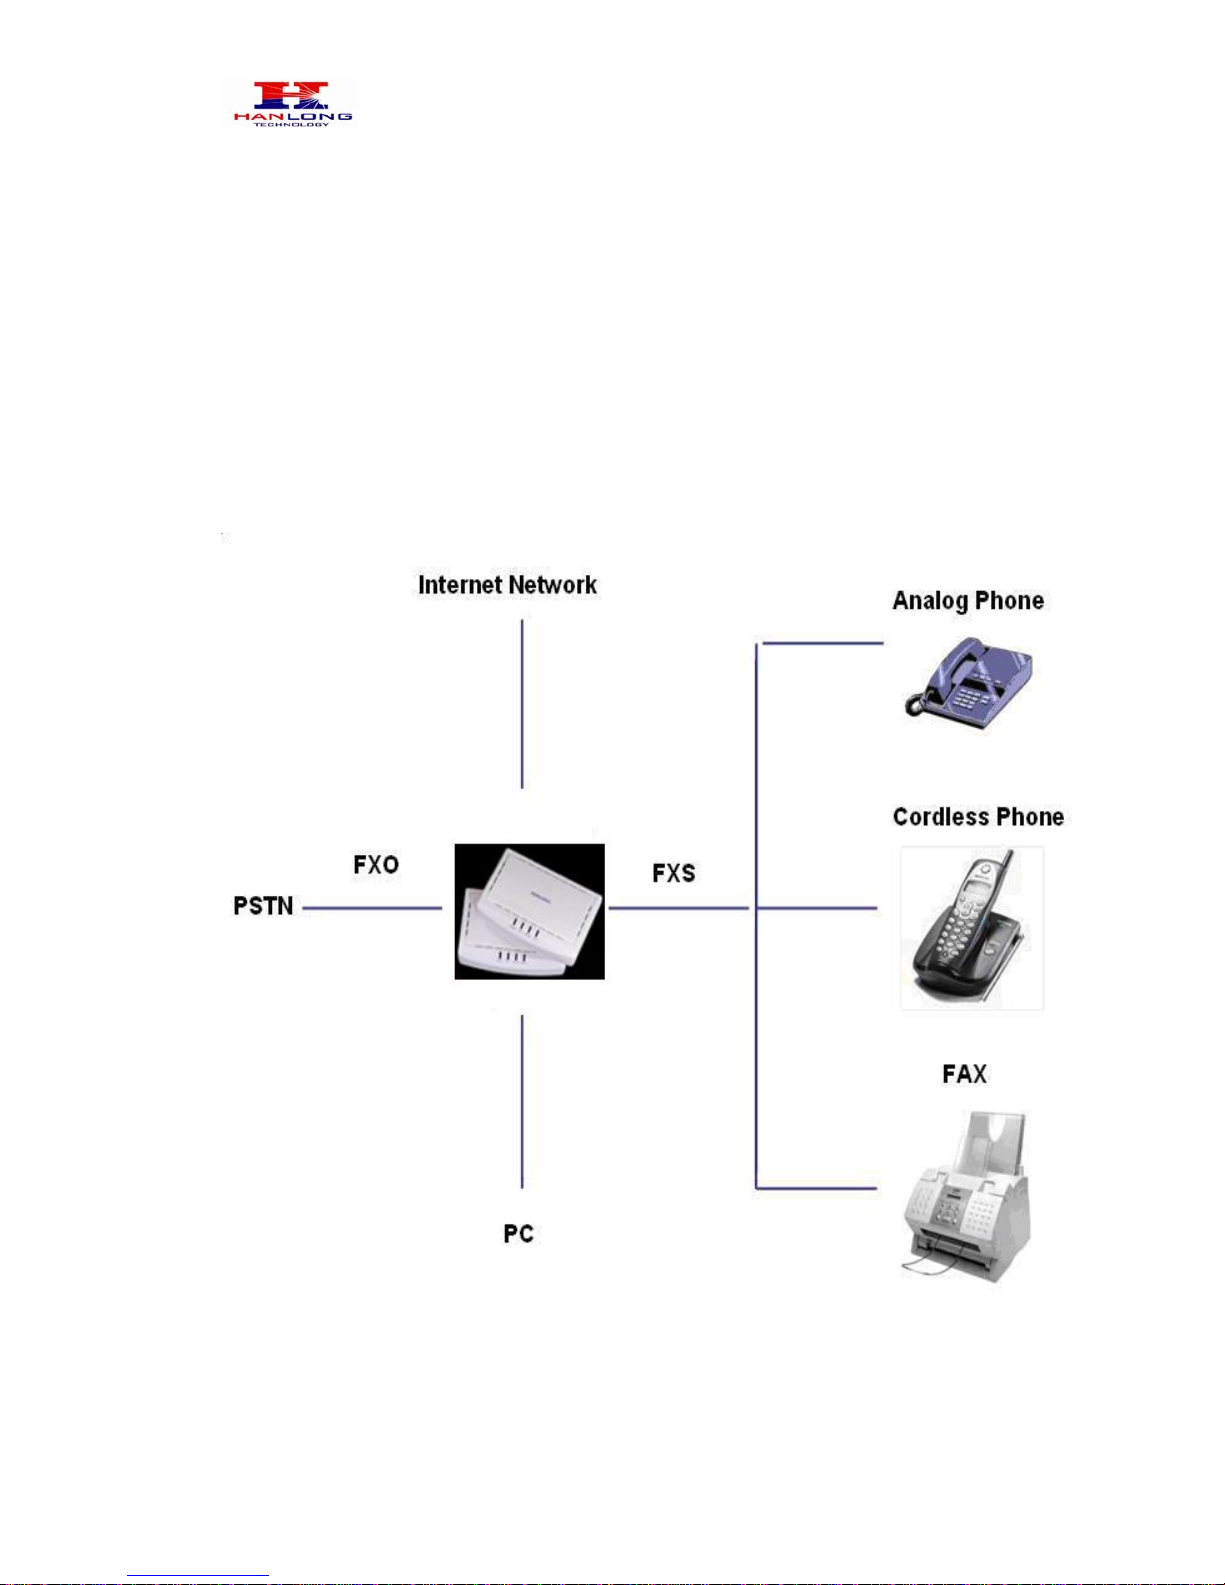
4. INSTALLATIONS
The Unicorn 3112 is an all-in-one VoIP integrated device designed to be a total solution for
networks providing VoIP services. The Unicorn 3112 VoIP features are available when
you connect any regular analog telephone to it.
Unicorn 3112 has one FXS port (labeled “Phone”) and one PSTN pass through port
(labeled “Line”). After setting up the Unicorn 3112, you can make PSTN calls by pressing
*00. Without pressing *00, all your calls will be VoIP. You can also receive PSTN calls
and VoIP calls.
The following photo illustrates the Interconnection Diagram of the of a Unicorn 3112:
Following are the steps to install a Unicorn 3112:
Connect a standard touch-tone analog telephone to the “Phone” port.

Unicorn 3112 User Manual
Copyright © 2008 Hanlong Technology Co., Ltd Page 6 of 42
Insert a standard RJ11 telephone cable (included with package) into the “Line” port and
connect the other end of the telephone cable to a wall jack.
Connect a PC to the LAN port of Unicorn 3112 (Ethernet cable is included with
package).
Insert another Ethernet cable into the WAN port of Unicorn 3112 and connect the other
end of the Ethernet cable to an uplink port (a router, switch, hub, modem, etc)
Insert the powers supply (included with package) into the Unicorn 3112 and connect it to
a power outlet.
4.1.Safety
The Unicorn 3112 is compliant with various safety standards including FCC/CE and
C-Tick. Its power adaptor is compliant with UL standard. The Unicorn 3112 should only
operate with the universal power adaptor provided in the package.
Warning: Please do not use a different power adapter. Using other power
adapter may damage the Unicorn 3112 and will void the manufacturer warranty!
Caution: Changes or modifications to this product not expressly approved by Hanlong
Technology, or operation of this product in any way other than as detailed by this User
Manual, could void your manufacturer warranty.
Information in this document is subject to change without notice. No part of this document
may be reproduced or transmitted in any form or by any means, electronic or mechanical,
for any purpose without the express written permission of Hanlong Technology.
5. BASIC OPERATIONS
5.1.Get Familiar with Voice
Unicorn 3112 has stored a voice prompt menu for quick access to settings and simple
configuration. You can enter this voice prompt menu as follows:
Pick up the receiver (or press the Handsfree button) of the analog telephone and press
“***”
A voice will say, “Enter the new option.” At this point, you can select from the following
menu voice prompt options to begin using the Unicorn 3112:
Menu
Voice Will Say the Following:
Main
Menu “Enter a Menu Option” Enter “*” for the next menu option
Enter “#” to return to the main menu

Unicorn 3112 User Manual
Copyright © 2008 Hanlong Technology Co., Ltd Page 7 of 42
Enter 01 – 07,12 - 17, 47, 86 or 99 Menu
option
01 “DHCP Mode”, “Static IP Mode” Enter ‘9’ to toggle the selection
If user selects “Static IP Mode”, user need
configure all the IP address information
through menu 02 to 05.
If user selects “Dynamic IP Mode”, the
device will retrieve all IP address
information from DHCP server
automatically when user reboots the
device.
02 “IP Address “ + IP address The current WAN IP address is
announced Enter 12-digit new IP address
if in Static IP Mode.
03 “Subnet “ + IP address Same as Menu option 02
04 “Gateway “ + IP address Same as Menu option 02
05 “DNS Server “ + IP address Same as Menu option 02
06 “MAC Address” Announces the Mac address of the unit.
07 Preferred Vocoder Enter “9” to go to the next selection in the
list:
PCM U
PCM A
G-726
G-723
G-729
12 WAN Port Web Access Enter “9” to toggle between enable and
disable
13 Firmware Server IP
Address Announces current Firmware Server IP
address. Enter 12 digit new IP address.
14 Configuration Server IP
Address Announces current Config Server Path IP
address. Enter 12 digit new IP address.
15 Upgrade Protocol Upgrade protocol for firmware and
configuration update.
Enter “9” to toggle between TFTP and
HTTP
16 Firmware Version Firmware version information.
17 Firmware Upgrade Firmware upgrade mode. Enter “9” to
rotate among the following three options:
1. always check
2. check when pre/suffix changes
3. never upgrade
47 “Direct IP Calling” Enter the target IP address to make a
direct IP call, after dial tone. (See “Make

Unicorn 3112 User Manual
Copyright © 2008 Hanlong Technology Co., Ltd Page 8 of 42
a Direct IP Call”.)
99 “RESET” Enter “9” to reboot the device; or
Enter MAC address to restore factory
default setting (See Restore Factory
Default Setting section)
“Invalid Entry” Automatically returns to Main Menu
Other Menu Prompt Features:
“*” shifts down to the next menu option
“#” returns to the main menu
“9” functions as the ENTER key in many cases to confirm an option
All entered digit sequences have known lengths - 2 digits for menu option and 12 digits
for IP address. Once all of the digits are collected, the input will be processed.
Incorrect keyed entry cannot be deleted or undone. The Unicorn 3112 will prompt you
to start over by telling you that you made an error.
5.2.Make Phone call
5.2.1. Calling Phone or Extension Numbers
Dial the number directly and wait for 4 seconds (Default is 4 seconds. To change the
default, change the settings via the web configuration page under “No Key Entry
Timeout”). Or
Dial the number directly, and press # (assuming that “Use # as Dial Key” is set to “YES”
during web configuration of your Unicorn 3112).
Other functions available during the call are call-waiting/flash, call-transfer, and
call-forward. Your SIP gatekeeper/proxy server needs to support these features in order
for them to work.
5.2.2. Call Hold
While in conversation, pressing the “FLASH” button on the attached phone will put the
remote end on hold. Pressing the “FLASH” button again will release the previously Hold
party and the bi-directional media will resume.
5.2.3. Call Waiting
If call waiting feature is enabled, while the user is in a conversation, he will hear a special

Unicorn 3112 User Manual
Copyright © 2008 Hanlong Technology Co., Ltd Page 9 of 42
stutter tone if there is another incoming call. User can press the flash button to put the
current call party on hold and switch to the other call. Pressing flash button toggles
between two active calls.
5.2.4. 3-way Conferencing
Unicorn3112 supports 3-way conference in two styles: star code style or Bellcore style.
Star Code Style 3-way Conference
Assuming that call party A and B are in conversation. A wants to bring C in a conference:
1. A presses FLASH (on the analog phone, or Hook Flash for old model phones) to get a
dial tone.
2. A dials *23 then C’s number then # (or wait for 4 seconds).
3. If C answers the call, then A press “flash” to bring B, C in the conference.
4. If C does not answer the call, A can press “flash” back to talk to B.
Bellcore Style 3-way Conference
Bellcore style 3-way conference is also supported. To do this, user needs to enable “Use
Bell-style 3-way Conference” in FXS web configuration.
Assuming that call party A and B are in conversation. A wants to bring C in a conference:
1. A presses FLASH (on the analog phone, or Hook Flash for old model phones) to get a
dial tone.
2. A dials C’s number then # (or wait for 4 seconds).
3. If C answers the call, then A press “flash” to bring B, C in the conference.
4. If C does not answer the call, A can press “flash” back to talk to B.
5.2.5. Direct IP-to-IP Calls
Direct IP calling allows two parties, that is, a FXS Port with an analog phone and another
VoIP Device, to talk to each other in an ad hoc fashion without a SIP proxy.
Elements necessary to completing a Direct IP Call:
1. Both Unicorn3112 and other VoIP Device, have public IP addresses, or
2. Both Unicorn3112 and other VoIP Device are on the same LAN using private IP
addresses, or
3. Both Unicorn3112 and other VoIP Device can be connected through a router using
public or private IP addresses (with necessary port forwarding or DMZ).
Unicorn3112 supports two ways to make Direct IP Calling:
Using IVR
1. Pick up the analog phone then access the voice menu prompt by dial “***”
2. Dial “47” to access the direct IP call menu

Unicorn 3112 User Manual
Copyright © 2008 Hanlong Technology Co., Ltd Page 10 of 42
3. Enter the IP address using format ex. 192*168*0*160 after the dial tone.
Using Star Code
1. Pick up the analog phone then dial “*47”
2. Enter the target IP address using same format as above.
Note: NO dial tone will be played between step 1 and 2.
Destination ports can be specified by using “*” (encoding for “:”) followed by the port
number.
Examples:
a) If the target IP address is 192.168.0.160, the dialing convention is
*47 or Voice Prompt with option 47, then 192*168*0*160.
followed by pressing the “#” key if it is configured as a send key or wait 4 seconds. In this
case,the default destination port 5060 is used if no port is specified.
b) If the target IP address/port is 192.168.1.20:5062, then the dialing convention would be:
*47 or Voice Prompt with option 47, then 192*168*0*160*5062 followed by pressing the
“#” key, if it is configured as a send key or wait for 4 seconds.
NOTE: When completing direct IP call, the “Use Random Port” should set to “NO”.
5.2.6. Blind Transfer
Assuming that call party A and party B are talking to each other on the phone. Party A
wants to transfer party B to party C:
Party A presses FLASH (on the analog phone, or Hook Flash for old model phones) to
get a dial tone.
Then party A dials *87 then dials party C’s number, and then # (or wait for 4 seconds)
Party A can hangs up the phone.
Note: Call features have to be activated during web configuration by selecting YES to
“Enable Call Features”. These features need to be supported by your
SIP gatekeeper/proxy server in order to work.
Party A can hold on to the phone and wait for one of the three following events:
1. A quick confirmation tone (temporarily using the call waiting indication
tone) followed by a dial tone. This indicates the transfer is successful (transferee
has received a 200 OK signal from transfer target). At this point, party A can either
hang up or make another call.
2. A quick busy tone followed by a restored call (on supported SIP
gatekeeper platforms only). This means the transferee has received a 4xx
response signal for the INVITE and will try to recover the call. The busy tone is just to
indicate to the transferor that the transfer has failed.
3. Busy tone keeps playing. This means the Unicorn 3112 has failed to receive the

Unicorn 3112 User Manual
Copyright © 2008 Hanlong Technology Co., Ltd Page 11 of 42
second NOTIFY signal from the transferee and decided to time out.
Note: this does not indicate the transfer has been successful, nor does it indicate the
transfer has failed. When transferee uses a device that does not support the second
NOTIFY signal, this will be the case. In poor or unstable network scenarios, this could also
happen, although the transfer may have been completed successfully.
5.2.7. Attended Transfer
Assuming that call party A and party B are in conversation. Party A wants to Attend
Transfer party B to party C:
Party A presses FLASH (on the analog phone, or Hook Flash for old model phones) to
get a dial tone.
Party A then dials party C’s number then # (or wait for 4 seconds). Party A and party C
now are in conversation.
Party A can hang
Note: When Attended Transfer failed and if party A hangs up, the Unicorn 3112 will ring
party A again to remind party A that party B is still on the call, by pressing FLASH or Hook
again will restore the conversation between party A and party B.
5.2.8. Send and Receive PSTN Calls
Users can send and receive calls from PSTN. To receive PSTN calls, simply take the
phone off hook when the analog phone rings. To make a PSTN call, first press *00 (or
your own PSTN Access Code) to get the PSTN line dial tone and dial the PSTN number.
5.2.9. VoIP-to-PSTN Calls
To make a VoIP-to-PSTN call, users need to dial the FXO SIP account phone number first.
A ring tone is played once followed by a dial tone. At this time, users can dial a PSTN
telephone number or a mobile telephone number then # (or wait for 4 seconds). The call
will be established afterwards. If no PSTN number is entered after the dial tone, Unicorn
3112 will hang up automatically in 10 seconds.
In the web configuration page, if the Route to PSTN field is configured, the second stage
dialing is eliminated. That is, after users dial the FXO SIP account number, the PSTN
number will be called automatically.
5.2.10. PSTN-to-VoIP Calls
To make a PSTN-to-VoIP call, PSTN callers need to originate a call to the FXO port

Unicorn 3112 User Manual
Copyright © 2008 Hanlong Technology Co., Ltd Page 12 of 42
telephone number first. If no one answers the FXS phone after 4 (default value, can be
configured) ring tones, a dial tone is played. At this time, users can dial a VoIP telephone
number then # (or wait for 4 seconds). The call will be established afterwards. If no VoIP
number is entered after the dial tone, Unicorn 3112 will hang up automatically in 10
seconds.
In the web configuration page, if the Route to VoIP field is configured, the second stage
dialing is eliminated. That is, after users dial the FXO port telephone number, the VoIP
number will be called automatically.
5.2.11. Route Calls to PSTN
If configured, certain calls will be routed to PSTN line automatically. This call feature is
especially useful for emergency calls or local telephone calls. To use this feature, users
need to specify a prefix or a telephone number in the Route to PSTN field in the web
configuration page. If the dialed digits match one of the specified prefix, outbound calls will
be routed to PSTN port.
5.3.Call Features
5.3.1. Call Features Tables
Following table shows the call features of Unicorn 3112:
KeyCall Features
*23 3-way conference
*87 Blind Transfer
*30 Block Caller ID (for all subsequent calls)
*31 Send Caller ID (for all subsequent calls)
*67 Block Caller ID (per call)
*82 Send Caller ID (per call)
*50 Disable Call Waiting (for all subsequent calls)
*51 Enable Call Waiting (for all subsequent calls)
*70 Disable Call Waiting. (Per Call)
*71 Enable Call Waiting (Per Call)
*72 Unconditional Call Forward.
To use this feature, dial “*72” and get the dial tone. Then dial the forward
number and “#” for a dial tone, then hang up.
*73 Cancel Unconditional Call Forward.
To cancel “Unconditional Call Forward”, dial “*73” and get the dial tone,
then hang up.
*90 Busy Call Forward.
To use this feature, dial “*90” and get the dial tone. Then dial the forward

Unicorn 3112 User Manual
Copyright © 2008 Hanlong Technology Co., Ltd Page 13 of 42
number and “#” for a dial tone, then hang up.
*91 Cancel Busy Call Forward.
To cancel “Busy Call Forward”, dial “*91” and get the dial tone, then hang
up.
*92 Delayed Call Forward.
To use this feature, dial “*92” and get the dial tone. Dial the forward
number and “#” for a dial tone and then hang up.
*93 Cancel Delayed Call Forward.
To cancel this feature, dial “*93”, get the dial tone, and then hang up.
Flash/Hook call waiting indication.
When in conversation without an incoming call, this action will switch to a
new channel to make a new call.
5.3.2. PSTN Pass Through
When Unicorn 3112 is out of power or loses registration or if the network connection is
down, the RJ 11 line jack on the side of Unicorn 3112 will function as a pass through
connection for PSTN calls. Users will be able to use the same analog phone for PSTN
calls.
5.4.FAX
Unicorn3112 supports FAX in two modes: T.38 (Fax over IP) and fax pass through. T.38 is
the preferred method because it is more reliable and works well in most network
conditions. If the service provider supports T.38, please use this method by selecting Fax
mode to be T.38. If the service provider does not support T.38, pass-through mode may
be used. To send or receive faxes in fax pass through mode, users will need to select all
the Preferred Codecs to be PCMU/PCMA.
5.5.Status Light Indicator
Following tables show the Unicorn 3112 button light pattern indication.
Light Indicator Signal Pattern Status Meaning
Red Light
Red light flashes every 2
seconds
(if internet connection is
configured for DHCP)
DHCP failed or WAN port
has no
Ethernet connection.
Red Light
Red light flashes every 2
Unicorn 3112 is not able to register
Unicorn 3112 User Manual
Copyright © 2008 Hanlong Technology Co., Ltd Page 14 of 42
6. CONFIGURATION GUIDE
6.1.Configuring Unicorn 3112 using Web Browser
(Recommended)
Unicorn 3112 has embedded Web server and HTML pages that allow users to configure
the Unicorn 3112 through an easy-to-use Web browser interface such as Microsoft’s
Internet Explorer or Netscape browser. Below is a screen shot of the Unicorn 3112
configuration page:
seconds
(if SIP server is configured) with SIP gatekeeper/proxy server
Green Light Button flashes every 2 seconds Message waiting
(if feature is available)
Green Light Button flashes at 1/10 second
Phone is ringing. Incoming call in
progress.

Unicorn 3112 User Manual
Copyright © 2008 Hanlong Technology Co., Ltd Page 15 of 42
6.1.1. Accessing the Web Configuration
The Unicorn 3112 configuration page can be accessed via the LAN or WAN port.
6.1.2. Programming Unicorn 3112 via the LAN Port
To program Unicorn 3112 via the LAN port, directly connect an Ethernet cable from your
PC to the LAN port of the Unicorn 3112. After connecting the cable, confirm that the
green light of the LAN port is on. If the green light is not on, this means that your PC is not
yet properly connected to the Unicorn 3112 via the LAN port.
For LAN port configuration, use the following default IP address to access the device:
http://192.168.22.1
6.1.3. Programming Unicorn 3112 via the WAN Port
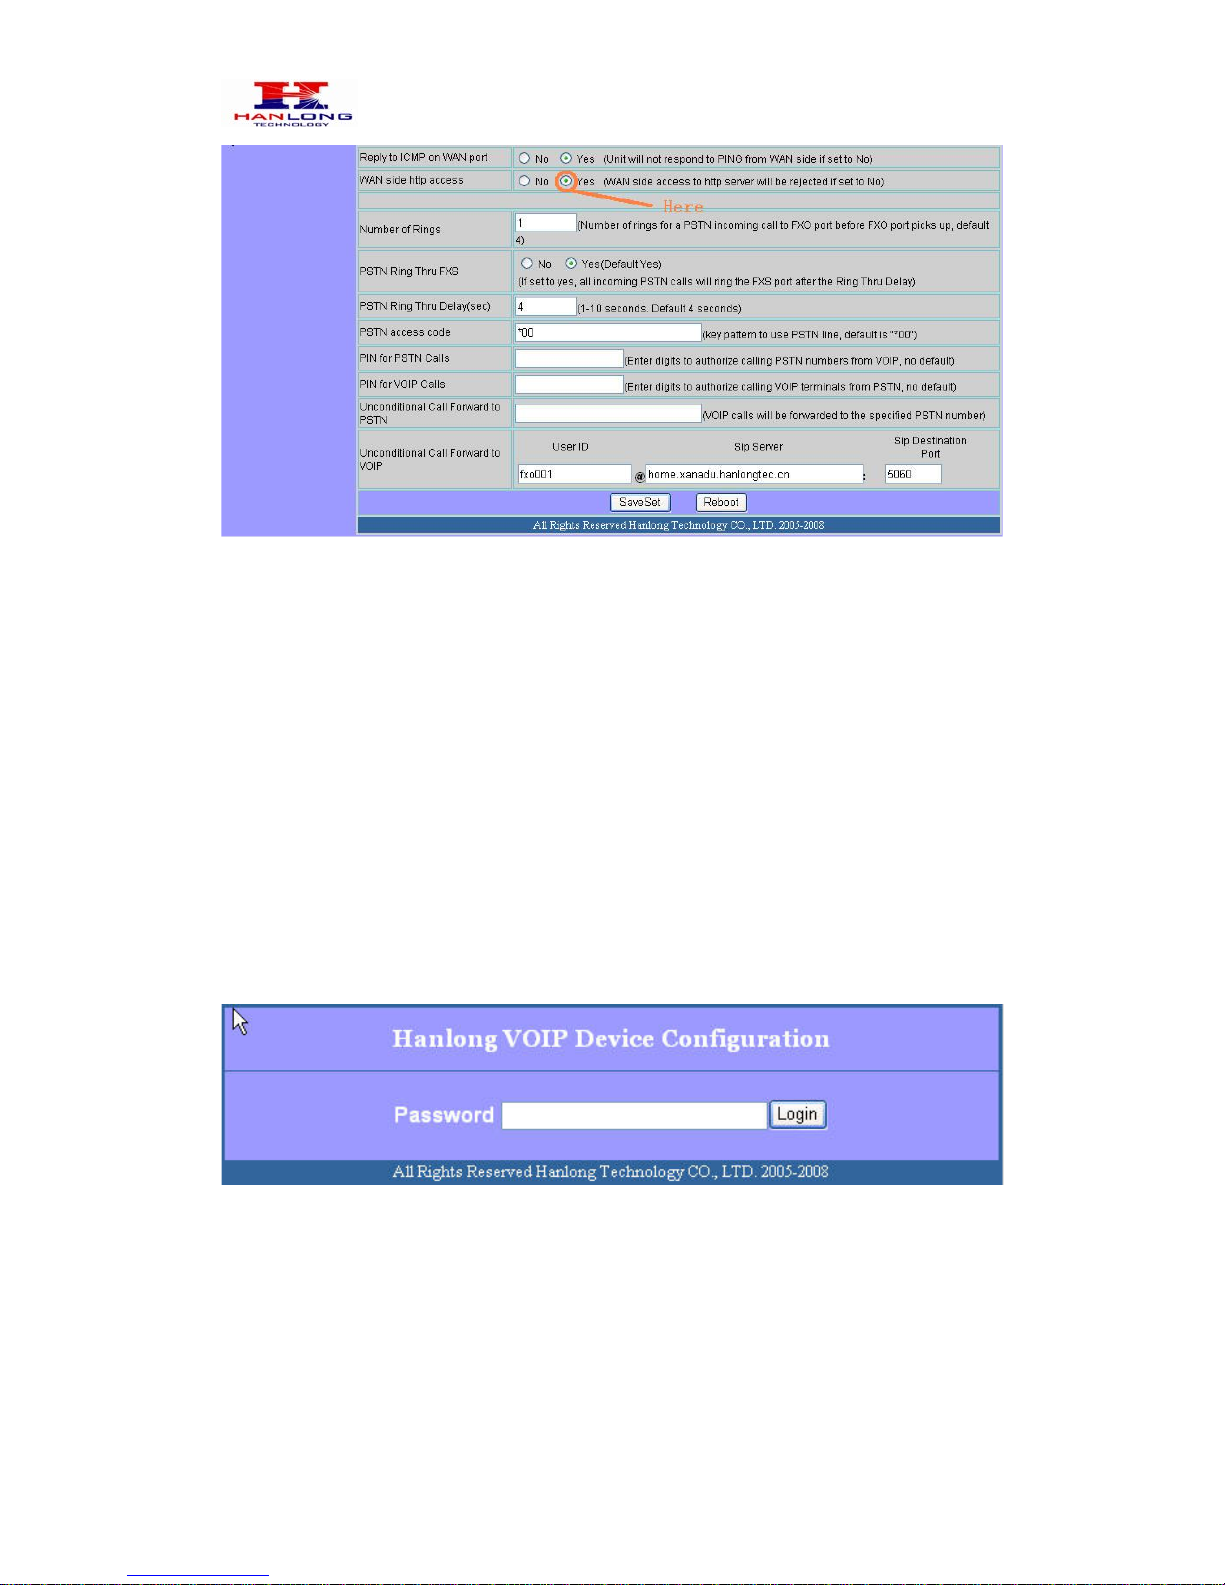
The WAN port access for web configuration is disabled by default from the factory. To
access the web configuration menu from the WAN port, you must first access the device
via the device LAN port (see instructions above “Programming Unicorn 3112 via the LAN
port”) and enable the “Enable WAN Web Access” option.
Please see the following screen shot of the Unicorn 3112 basic option page:
Unicorn 3112 User Manual
Copyright © 2008 Hanlong Technology Co., Ltd Page 16 of 42
After enabling WAN access, be sure that the WAN port of the Unicorn 3112 is connected
to an uplink (i.e. router, hub, switch, etc). Then, get the WAN IP address of the Unicorn
3112 and selecting menu option 02. Then, access the Unicorn 3112 via your web
browser by entering the WAN IP address:
http://Unicorn 3112’s IP Address
Be sure that your PC is connected to the router/hub/switch directly or via the LAN port
(which also serves as a pass-through connection for internet/network access for your PC)
of the Unicorn 3112.
6.1.4. User Programming and Configuration
From your web browser, the Unicorn 3112 will show the following login screen:
Enter the password and click on the “Login” button
6.1.5. Passwords
Passwords are case sensitive and all Unicorn devices come with factory default
passwords as indicated below:
Advanced User Password for access to Super User Options: admin
Unicorn 3112 User Manual
Copyright © 2008 Hanlong Technology Co., Ltd Page 17 of 42
End User Password for access to Basic User Options: 1234
6.1.6. End User Settings:
After a correct password is entered in the login screen, the embedded web server inside
the Unicorn 3112 will show the configuration page, which is explained in details below:
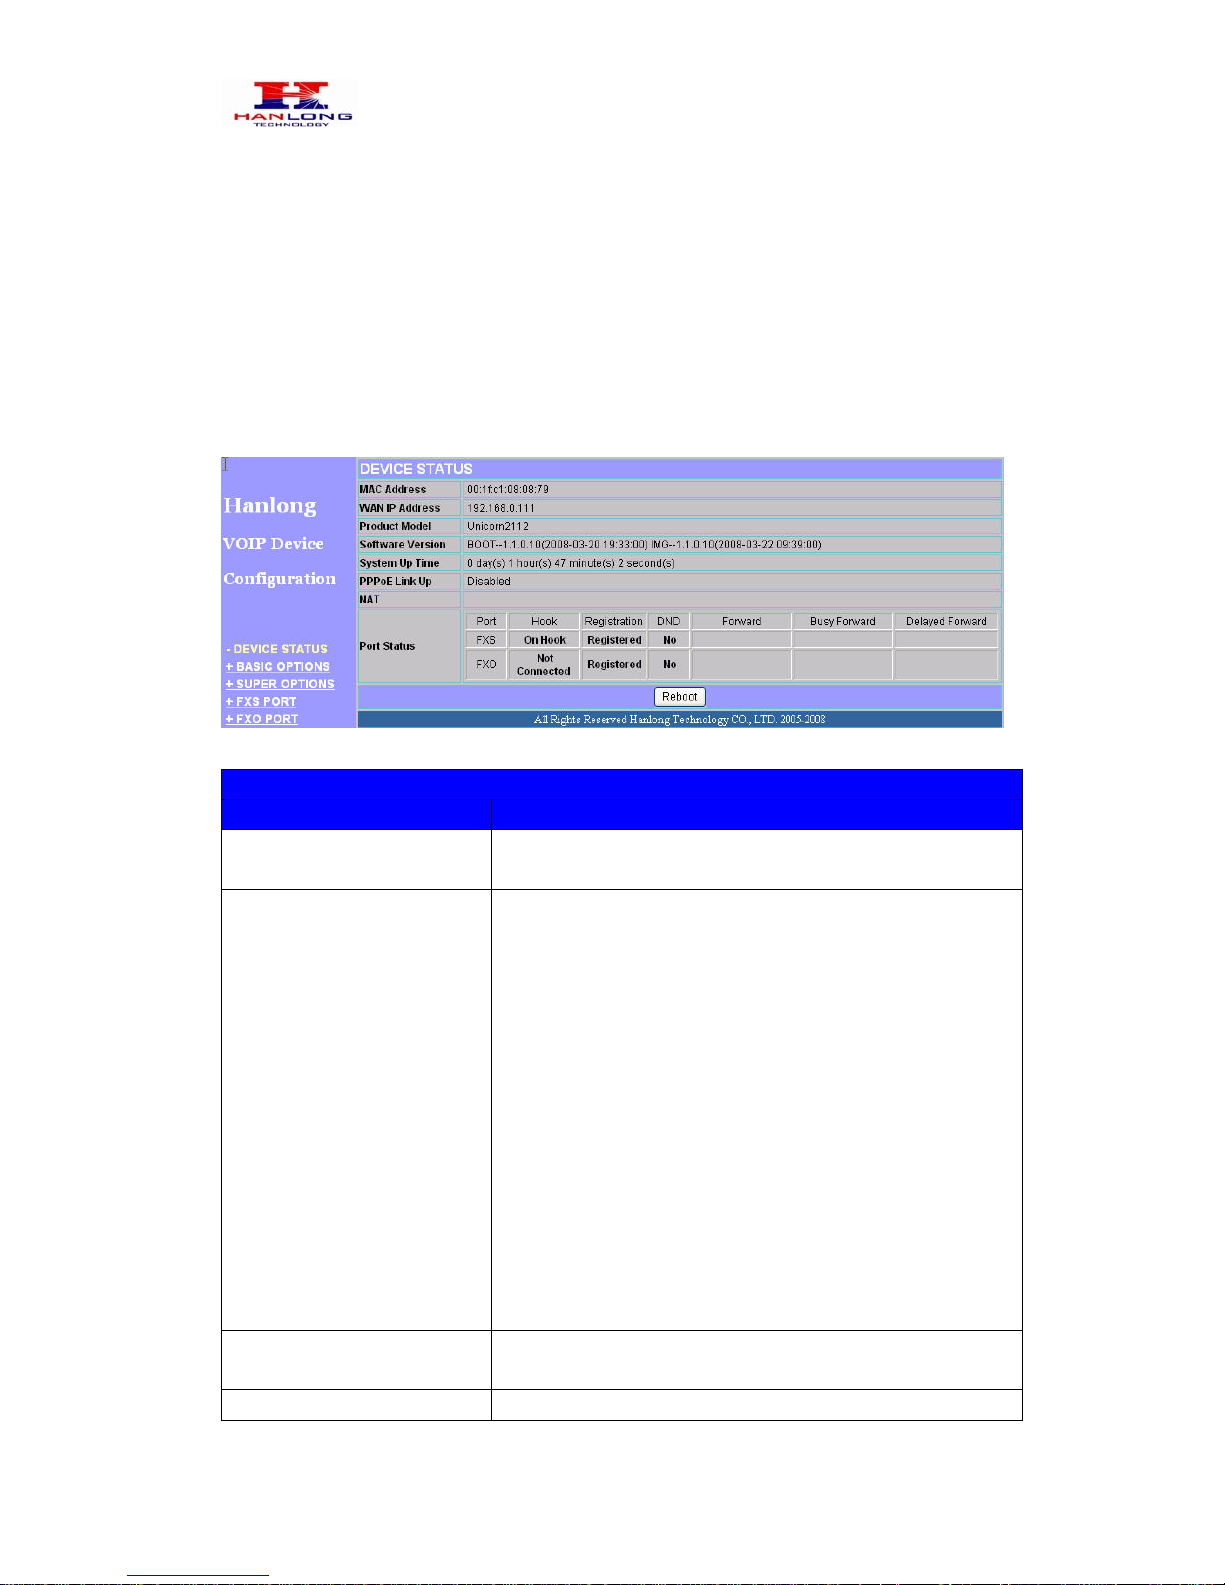
6.1.6.1 Device Status:
DEVICE STATUS SETTING
Setting Options Meaning
MAC Address The device ID, in HEX format. This is a very important ID
for ISP troubleshooting.
WAN IP Address
There are 2 modes under which the Unicorn 3112 can
operate:
- If DHCP mode is enabled, then all the field values for the
Static IP mode are not used (even though they are still
saved in the chipset's memory). The Unicorn 3112 will
acquire its IP address from the first DHCP server it
discovers from the office/home network it is connected to.
To use the PPPoE feature, the PPPoE account settings
need to be set. The Unicorn 3112 will attempt to establish
a PPPoE session if any of the PPPoE fields have been
entered with data.
- If Static IP mode is enabled, then the IP address, Subnet
Mask, Default Router IP address, DNS Server 1 (primary),
DNS Server 2 (secondary) fields will need to be configured
by the user. These fields are reset to zero by default.
Product Model This field contains the product model info, such as Unicorn
3112
Software Version
Program: This is the main software release. Boot and

Unicorn 3112 User Manual
Copyright © 2008 Hanlong Technology Co., Ltd Page 18 of 42
Loader are not changed often.
System Up Time
This shows system up time since last reboot.
PPPoE Link Up This shows whether the PPPoE is up if connected to DSL
modem.
NAT
This shows what kind NAT the Unicorn 3112 is connected
to. It is based on STUN protocol. If the detected NAT is
symmetric NAT, STUN will not work and Outbound Proxy
needed to make Unicorn 3112 functioning correctly.
Port Status Shows several information regarding the FXS and FXO
ports.
6.1.6.2 Basic Options:
BASIC OPTIONS SETTING
Setting Options Meaning
Web Port This is the device’s internal HTTP server port.
Default is 80.
IP Address
- If DHCP mode is enabled, then all the field values for
the Static IP mode are not used (even though they are
still saved in the Flash memory.) The Unicorn 3112 will
acquire its IP address from DHCP in the network. PPPoE
settings is usually for DSL/ADSL modem users. The
Unicorn will attempt to establish a PPPoE ses
sion if
PPPoE account is set.

Unicorn 3112 User Manual
Copyright © 2008 Hanlong Technology Co., Ltd Page 19 of 42
- If Static IP mode is selected, the IP address, Subnet
Mask, Default Router IP
address, DNS Server 1
(mandatory), DNS Server 2 (optional) fields need to be
configured.
Time Zone This parameter controls how the displayed date/time will
be adjusted according to the specified time zone.
BASIC OPTIONS SETTING
Setting Options Meaning
Daylight Savings Time This parameter controls whether the displayed time will
be daylight savings time or not. If set to Yes, then the
displayed time will be 1 hour ahead of normal time.
Date Display Format
Allow user to choose among the following three
formats:
Year-Month-Day
Month-Day-Year
Day-Month-Year
Device Mode
This parameter controls whether the device is working
in NAT router mode or Bridge mode.
Need save the setting and reboot the device before the
setting start to work
LAN Subnet Mask Sets the LAN subnet mask.
Default value is 255.255.255.0
LAN DHCP Base IP Base IP for the LAN port which functions as a Gateway
for the subnet. Default value is 192.168.22.1
DHCP IP Lease Time
Value is set in units of hours. Default value is 120 hrs
Unicorn 3112 User Manual
Copyright © 2008 Hanlong Technology Co., Ltd Page 20 of 42
(5 Days.)
The time IP address is assigned to the LAN clients.
DMZ IP Forward all WAN IP traffic to a specific IP address if no
matching port is used by Unicorn 3112 itself or in the
defined port forwarding
Port Map Forwards a matching (TCP/UDP) port to a specific LAN
IP address with a specific (TCP/UDP) port
End User Password
This contains the password to access the Web
Configuration Menu. This field is case sensitive.
BASIC OPTIONS SETTING
Setting Options Meaning
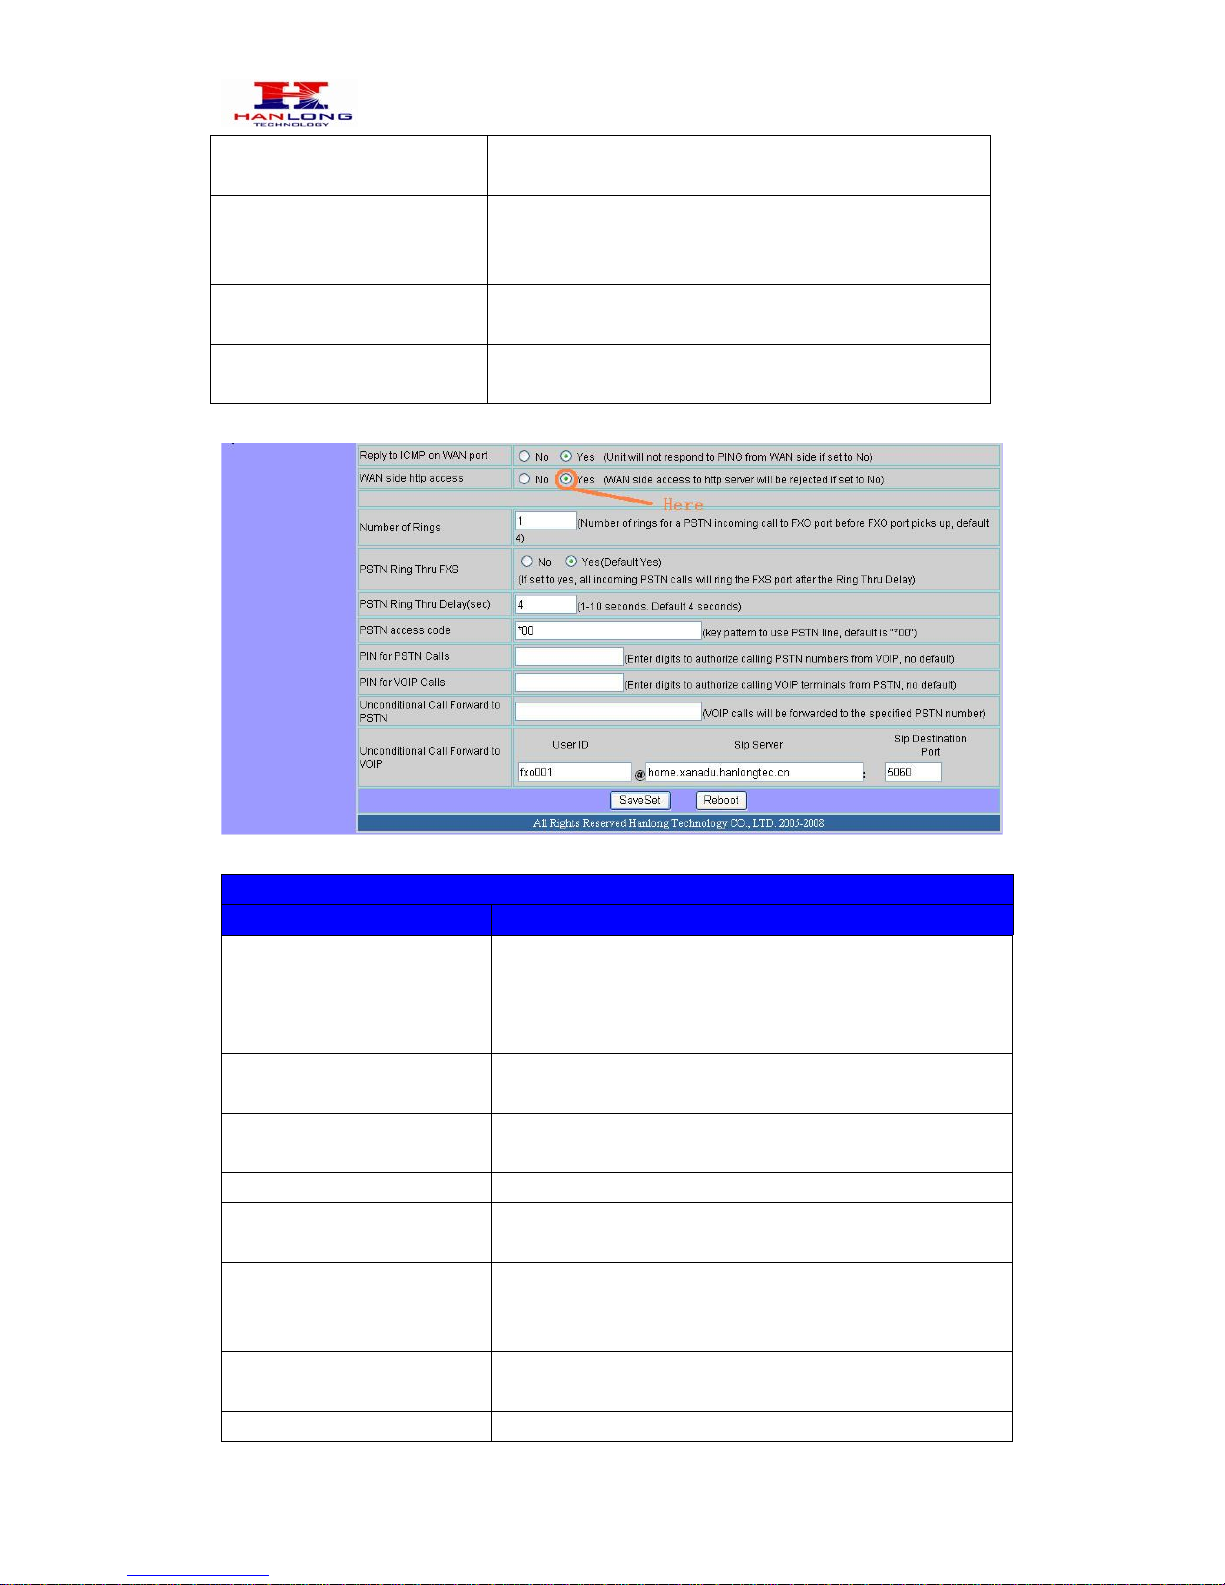
Reply to ICMP on WAN
port
If set to “Yes”, the Unicorn 3112 will respond to the PING
command from other computers, but it also is vulnerable
to the DOS attack.
Default is No.
WAN side http access If this parameter is set to “No”, the HTML configuration
update via WAN port is disabled.
Number of Rings This parameter specifies the number of FXS phone rings
for incoming PSTN calls to FXO port. Default is 4
PSTN Ring Thru FXS
Default is Yes
PSTN Ring Thru
Delay(sec)
Default is 4 sec
PSTN access code This field allows users to customize their own code to
access the PSTN line.
Default is “*00”.
PIN for PSTN Calls Enter digits to authorize calling PSTN numbers from
VOIP, no default
PIN for VOIP Calls
Enter digits to authorize calling VOIP terminals from
Table of contents
Other Hanlong Adapter manuals


