Hanover Chapel Stone Firepit Kit Round User manual

Hanover®Firepit Kit Round | Chapel Stone®
Contents :
60 Chapel Stone®Units 213/16”
36 FireBrick (yellow bricks inside pit)
8 FireBrick Wedges
1 FireBrick 4 x 4
1 FireBrick 2 x 8
1 Steel Insert
1 Stainless Steel Grate
Concrete Adhesive is sold separately;
4 - 5 10 oz. tubes are needed per kit
Dimensions :
approximately 48” outside diameter
approximately 14” high
Total Weight :
1300 lbs.
Color :
Tan Blend
Gray Blend
Canyon Blend
Safety Precautions :
•Hanover®Firepits are for outdoor
use only.
• The firepit should be located at
least 10’ away from any structure or
flammable surface, including low
hanging trees.
• Be sure to clear away brush and
leaves near the firepit.
• Always have a container of water,
garden hose or fire extinguisher nearby.
• Do not start a fire with gasoline or
lighter fluid; use kindling to build the
fire up slowly.
• Avoid burning in windy conditions.
• Always use a fire poker to move
and arrange logs.
Scan to view
installation video.
OR
See back for Assembly
Instructions.
5000 Hanover Road, Hanover, PA 17331
717.637.0500 • fax 717.637.7145
www.hanoverpavers.com
Hanover®Firepit Kit Round | Chapel Stone®
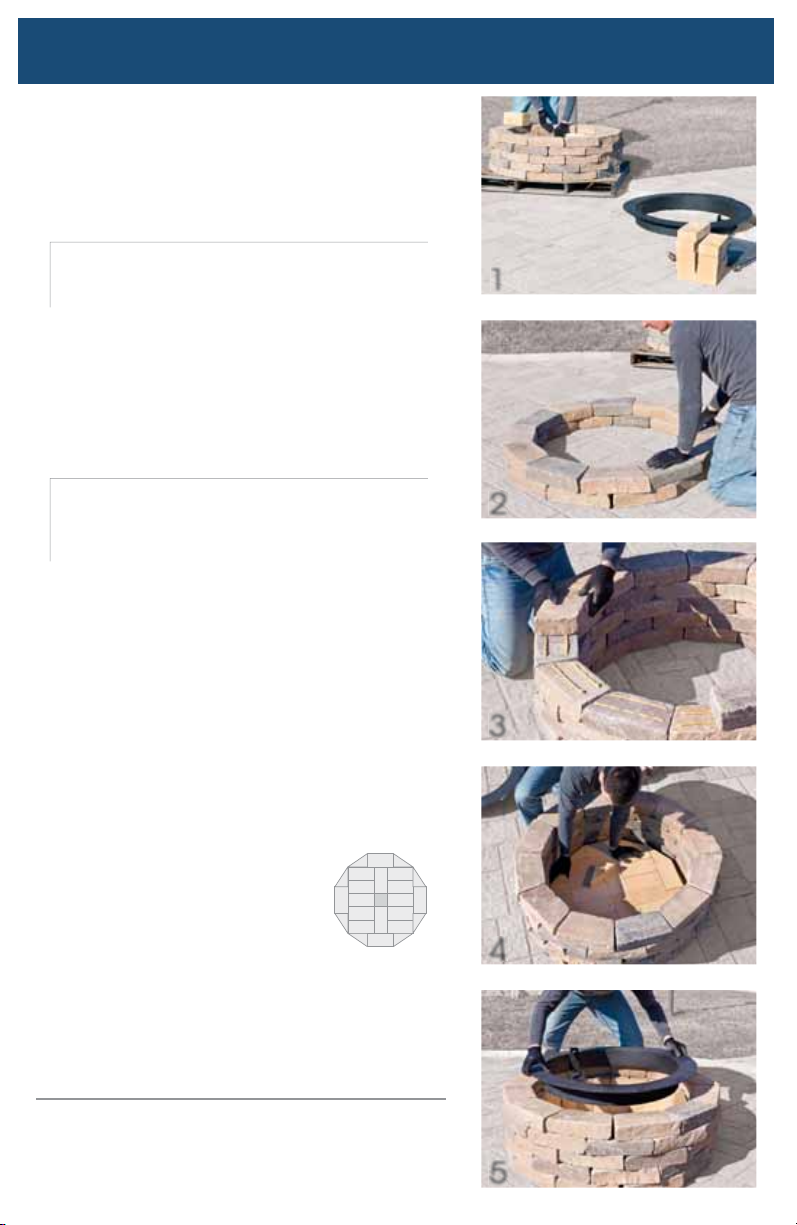
Assembly Instructions :
1 Unpacking
Remove all packaging materials including
green bands. Remove the black insert
and grate, set aside. Remove all FireBricks
and set aside.
TIP: Before removing, take a photo showing the
FireBrick placement inside the firepit.The photo
can be used for reference later in Step 4.
2 Constructing the Firepit
In the location of your choice, re-build the
firepit the same way it is packaged/assembled
on the pallet.The firepit will consist of 5 layers
of Chapel Stone®units, laid in a circle. Each
layer will consist of 12 units, totaling 60 units for
all 5 layers.
TIP: Before disassembling the firepit, take a
photo of the firepit showing placement of the
Chapel Stone®units.The photo can be used
for reference later.
3 Placing the Final Layer
Place the final layer of Chapel Stone®. It is
suggested the final layer be glued with a
concrete adhesive.**
4 Inserting the FireBricks
Insert the FireBricks in the firepit using your
photo or the illustration below for reference.*
Lay the FireBricks on the bottom first to serve
as the base. Begin in the center with the
4 1/2” x 4 1/2”. After all base FireBricks are
inserted, there will be a 1” gap between the
FireBricks and the Chapel Stone®units.
Next, line the inside of the firepit
with the remaining FireBricks
including the 2 1/4” x 9” piece.
Placing them vertically against
the Chapel Stone®units.
5Finishing
Place the steel insert into the firepit, resting
on the top layer. Place the grate into the
appropriate slots on the insert with the handle
pointing upward.
1
2
3
4
5
*FireBricks should be installed loosely; without mortar.
** Firepits can be installed with or without the use of a con-
crete adhesive. However, it is suggested that the top layer be
adhered to the layer beneath.
Other Hanover Outdoor Fireplace manuals


Popular Outdoor Fireplace manuals by other brands

PEAKTOP
PEAKTOP HF11802AA-EU Use and care guide

BOND MANUFACTURING
BOND MANUFACTURING HYFP50095-45 owner's manual

FIREPITS
FIREPITS Brightstar Installation and instruction manual

Outsunny
Outsunny 842-269 Assembly & instruction manual

Bond
Bond BH65003-9 user guide

Desa
Desa VCD36RN VCD36RNE OWNER'S OPERATION AND INSTALLATION MANUAL


