Hansa F3 CHAFF CUTTER User guide
HANSA NEW ZEALAND
+64 7 849 4749 info@hansaproducts.co.nz
www.hansaproducts.co.nz
HANSA AUSTRALIA
1800 426 722 info@hansaproducts.com.au
www.hansaproducts.com.au
Operation, maintenance and safety manual
All operators must fully read and understand
this operator’s manual before using the chipper.
Keep this manual for future reference.

Hansa F3 Chaff Cutter O&M Manual - OM-016 Revision B 14/05/2019
© Hansa Products 2019
TABLE OF CONTENTS
WHAT CAN MY HANSA CHAFF CUTTER PROCESS?........................................................................................................................1
INTENDED USES OF THE CHAFF CUTTER .......................................................................................................................................................1
RECEIVING YOUR HANSA CHAFF CUTTER .....................................................................................................................................1
CHAFF CUTTER COMPONENTS...................................................................................................................................................................1
ASSEMBLY............................................................................................................................................................................................2
Steps to assemble the chaff cutter................................................................................................................................................ 2
SAFETY .........................................................................................................................................................................................2
OPERATOR COMPETENCY.........................................................................................................................................................................2
AMBIENT CONDITIONS............................................................................................................................................................................ 3
WORK AREA SAFETY ...............................................................................................................................................................................3
ELECTRICAL SAFETY.................................................................................................................................................................................3
PERSONAL SAFETY.................................................................................................................................................................................. 3
MACHINE USE AND CARE.........................................................................................................................................................................3
SERVICE ...............................................................................................................................................................................................4
IDENTIFYING HAZARDS AND RISKS .............................................................................................................................................................. 4
OPERATION..................................................................................................................................................................................5
SAFE SETUP PROCEDURE..........................................................................................................................................................................5
SAFE OPERATING PROCEDURE...................................................................................................................................................................5
POWER SUPPLY .....................................................................................................................................................................................6
CONTROLS............................................................................................................................................................................................7
Start/Stop...................................................................................................................................................................................... 7
Forward/Reverse........................................................................................................................................................................... 7
Emergency stop............................................................................................................................................................................. 7
STORAGE......................................................................................................................................................................................7
TRANSPORTATION ....................................................................................................................................................................... 7
TROUBLESHOOTING..................................................................................................................................................................... 8
WHAT TO DO IF:.................................................................................................................................................................................... 8
MAINTENANCE............................................................................................................................................................................. 8
BELT REPLACEMENT................................................................................................................................................................................ 8
MAINTAINING THE CHAIN DRIVE................................................................................................................................................................9
GREASING THE BEARINGS.......................................................................................................................................................................10
BASE BLADE/REEL REMOVAL AND SHARPENING ..........................................................................................................................................10
CUTTING MECHANISM CHECKING/ADJUSTMENT .........................................................................................................................................11
TYRE PRESSURE ................................................................................................................................................................................... 13
BOLT TORQUE .....................................................................................................................................................................................13
SPECIFICATIONS ......................................................................................................................................................................... 13
DECALS....................................................................................................................................................................................... 14
HANSA GLOBAL INDUSTRIAL LIMITED WARRANTY..................................................................................................................... 15
COMMISSIONING CHECKLIST AND REGISTRATION ..................................................................................................................... 17

Hansa F3 Chaff Cutter O&M Manual - OM-016 Revision B 14/05/2019
© Hansa Products 2019
1
What can my Hansa chaff cutter process?
Intended uses of the chaff cutter
The Hansa F3 chaff cutter is built to process animal feed and light organic material. Do NOT use the machine for any other purpose.
Suitable feed materials include:
Hay
Lucerne
Silage
Chaff
Do NOT process:
Bones
Soil, sand, grit, stones, metal
Sticks and other lignified (woody) plant material
Paper, cardboard
Processing this kind of material can cause damage to the cutting mechanism of the machine.
If you have any questions, contact Hansa or your local authorised dealer.
Receiving your Hansa chaff cutter
You may receive your chaff cutter assembled from your dealer or it may arrive packaged in a crate. Assembly takes approximately
10 minutes.
Chaff cutter components

Hansa F3 Chaff Cutter O&M Manual - OM-016 Revision B 14/05/2019
© Hansa Products 2019
2
Assembly
Tools required for assembly (not supplied):
•6 mm Allen key –to secure the wheels to the axles
•13 mm spanner –to secure the rubber feet to the legs of the machine
•Square drive bit with drill/driver –to separate the chaff cutter from the
pallet
The chaff cutter will come with two wheels detached from the shafts, and a pack
containing a number of fasteners:
1. Two m8x16 hex bolts
2. Two m8x20 cap screws
3. Four m8 spring washers
4. Two large m8 washers
5. Two small m8 washers
6. Two rubber feet
Steps to assemble the chaff cutter
Using a 13mm spanner, fasten the rubber feet to the bottom of the
front legs of the machine. Use an m8x16 bolt (item no. 1), spring
washer (item no. 3) and small washer (item no. 5) to fasten each
foot.
Using a 6 mm Allen key, fasten the wheels to the axles on the
bottom of the back legs of the machine. Use an m8x20 cap screw
(item no. 1), spring washer (item no. 3) and large washer (item no.
4) to fasten each wheel to the axles. Ensure the air valve is facing
outward.
Safety
Preventing accidents is the responsibility of every equipment operator. Ensure every operator is familiar with the safe operation
procedures of the machinery, how to identify hazards and the steps required to avoid injury while handling and operating the
machine. Relevant information is contained in this manual.
Do NOT modify the design of the chaff cutter
Operator competency
Only people over the age of 16 are to operate the chaff cutter. Ensure that every person operating the chaff cutter understands
and follows the safe operating procedures as specified in this manual.
Do NOT allow persons to operate the machine without full and proper instruction in the use and safe operation of the
chaff cutter and maintenance as detailed in this manual.
1
2

Hansa F3 Chaff Cutter O&M Manual - OM-016 Revision B 14/05/2019
© Hansa Products 2019
3
Ambient Conditions
Only use the chaff cutter in an environment that is between -5°C and 40°C. Do not use the chaff cutter in the rain or in wet
environments. Processing wet material may result in blockages inside the machine.
Work area safety
a) Keep work area clean and well lit. Cluttered or dark areas invite accidents.
b) Do not operate machines in explosive atmospheres, such as in the presence of flammable liquids, gases or dust. Machines
create sparks which may ignite the dust or fumes.
c) Keep children and bystanders away while operating a machine. Distractions can cause you to lose control.
Electrical safety
a) Machine plugs must match the outlet. Never modify the plug in any way. Do not use any adapter plugs with earthed (grounded)
machines. Unmodified plugs and matching outlets will reduce risk of electric shock.
b) Avoid body contact with earthed or grounded surfaces, such as pipes, radiators, ranges and refrigerators. There is an increased
risk of electric shock if your body is earthed or grounded.
c) Do not expose machines to rain or wet conditions. Water entering a machine will increase the risk of electric shock.
d) Do not abuse the cord. Never use the cord for carrying, pulling or unplugging the machine. Keep cord away from heat, oil,
sharp edges or moving parts. Damaged or entangled cords increase the risk of electric shock.
e) When operating a machine outdoors, use an extension cord suitable for outdoor use. Use of a cord suitable for outdoor use
reduces the risk of electric shock.
f) If operating a machine in a damp location is unavoidable, use a residual current device (RCD) protected supply. Use of an RCD
reduces the risk of electric shock.
Personal safety
a) Stay alert, watch what you are doing and use common sense when operating a machine. Do not use a machine while you are
tired or under the influence of drugs, alcohol or medication. A moment of inattention while operating machines may result in
serious personal injury.
b) Use personal protective equipment. Always wear eye protection. Protective equipment such as a dust mask, non-skid safety
shoes, hard hat or hearing protection used for appropriate conditions will reduce personal injuries.
c) Prevent unintentional starting. Ensure the switch is in the off-position before connecting to power source and/or battery pack,
picking up or carrying the machine. Carrying machines with your finger on the switch or energising machines that have the switch
on invites accidents.
d) Remove any adjusting key or wrench before turning the machine on. A wrench or a key left attached to a rotating part of the
machine may result in personal injury.
e) Do not overreach. Keep proper footing and balance at all times. This enables better control of the machine in unexpected
situations.
f) Dress properly. Do not wear loose clothing or jewelry. Keep your hair and clothing away from moving parts. Loose clothes,
jewelry or long hair can be caught in moving parts.
g) If devices are provided for the connection of dust extraction and collection facilities, ensure these are connected and properly
used. Use of dust collection can reduce dust-related hazards.
h) Do not let familiarity gained from frequent use of machines allow you to become complacent and ignore machine safety
principles. A careless action can cause severe injury within a fraction of a second.
Machine use and care
a) Do not force the machine. Use the correct machine for your application. The correct machine will do the job better and safer at
the rate for which it was designed.
b) Do not use the machine if the switch does not turn it on and off. Any machine that cannot be controlled with the switch is
dangerous and must be repaired.

Hansa F3 Chaff Cutter O&M Manual - OM-016 Revision B 14/05/2019
© Hansa Products 2019
4
c) Disconnect the plug from the power source and/or remove the battery pack, if detachable, from the machine before making
any adjustments, changing accessories, or storing machines. Such preventive safety measures reduce the risk of starting the
machine accidentally.
d) Store idle machines out of the reach of children and do not allow persons unfamiliar with the machine or these instructions
to operate the machine. Machines are dangerous in the hands of untrained users.
e) Maintain machines and accessories. Check for misalignment or binding of moving parts, breakage of parts and any other
condition that may affect the machine’s operation. If damaged, have the machine repaired before use. Many accidents are
caused by poorly maintained machines.
f) Keep cutting machines sharp and clean. Properly maintained cutting machines with sharp cutting edges are less likely to bind
and are easier to control.
g) Use the machine, accessories and machine bits etc. in accordance with these instructions, taking into account the working
conditions and the work to be performed. Use of the machine for operations different from those intended could result in a
hazardous situation.
h) Keep handles and grasping surfaces dry, clean and free from oil and grease. Slippery handles and grasping surfaces do not allow
for safe handling and control of the machine in unexpected situations.
Service
a) Have your machine serviced by a qualified repair person using only identical replacement parts. This will ensure that the safety
of the machine is maintained.
Identifying hazards and risks
Identify hazards and risks, and take preventative steps to avoid accidents and minimise risk. Possible hazards include, but are not
limited to, moving parts, thrown objects, weight of chaff cutter and components, and the operating environment.
Below is a list of hazards and actions required to prevent injury.
Hazard
Risk
Corrective action
Dust
Injury or irritation of the
eyes
Respiratory irritation
Wear safety glasses
Process freshly cut materials and/or wear a dust mask
Belt drive
Skin pinching and/or
abrasions
Ensure that the belt guard is in place, and properly secured
by bolts with spring washers.
When performing maintenance on the machine, ensure that
it is disconnected from its power supply
Rollers and cutting reel
Pinching, crushing, cutting,
severing
Keep hands clear from the infeed rollers
Use a stick or push block to push materials into the
feed rollers
Do NOT push material in with your hands past the
edge of the safety screen
Discharge material
Eye injury, minor cuts
Always wear safety glasses when operating the machinery
Do NOT look in to, or put your face near the outlet,
even when the machine is turned off
Do NOT put the machinery in a place where
material output might be obstructed

Hansa F3 Chaff Cutter O&M Manual - OM-016 Revision B 14/05/2019
© Hansa Products 2019
5
Feeding material
Cuts and scrapes, pricks
Wear safety gloves
Wear tight fitting long sleeves to cover bare skin when
operating the machinery
Weight of the machine
Straining, crushing
Operate the machinery on level ground
Take care when moving the machine around, especially
when going up/down slopes
Ensure the inlet chute is properly secured before operating
the machine
Electric cable
Electric shock
Ensure you use a residual current device (RCD). Ensure
power supply cords are in good condition
If a wire is cut or damaged in any way, turn off the machine
immediately and disconnect the power supply
Operation
Safe setup procedure
Before you start:
Ensure the chaff cutter is positioned on level ground
Ensure that the outlet discharge is directed toward a suitable area or catcher bag
Do NOT allow the flow of material through the chaff cutter to be obstructed
Keep children and spectators clear of the work area at all times
Do NOT allow any person under the age of 16 to operate the chaff cutter
Check:
That all screws, nuts, bolts, and other fasteners are properly secured
That the belt guard and the safety screen on the inlet chute are in place and in good condition.
That the inlet chute and housing are clear of any leftover material or other obstructions that could block or
prevent start-up of the machine
That all labels are in good condition and easily legible
Replace damaged or unreadable warning and operating
View photos of labels in the ‘Decals’ section
Safe operating procedure
Wear safety equipment: Safety glasses must be worn at all times
Wear work gloves: Wearing work gloves is optional but highly recommended
Teasing hay/chaff can result in cuts/pricks to bare hands
Tie long hair up
Long hair could be pulled into the machine
Wear clothes that sit tightly
Avoid scarves and clothes with loose sleeves and any items that can get caught in the rollers of the machine
Tease densely packed hay/chaff or other material out on the inlet chute before switching on the machine
Doing so will reduce the chances of the machine stalling and increase the life of the cutting components
Separate unsuitable feed material from what is being fed into the machine.
Woody stems/roots can stall/jam the machine or result in damage or accelerated wear on the machine’s cutting
mechanism
Exercise caution when feeding material into the machine, especially when the length of material is short
Do NOT use your hands to feed material in past the safety guard
DO:

Hansa F3 Chaff Cutter O&M Manual - OM-016 Revision B 14/05/2019
© Hansa Products 2019
6
It is recommended to use either a push block, a short stick, or simply more material to feed from a
comfortable distance
Turn the machine off when material is not being processed
Running the machine for more than 3 seconds without any material being fed into it will dull the cutting
components inside the machine
Keep the outlet area free of blockage
If a blockage occurs, turn the machine off and disconnect it from its power supply. Open the bonnet and remove
material until the inside of the machine is clear of excess material
As the discharge material piles up
Move the processed material to avoid blocking, or, if using a feed bag, adjust or replace the bag
Turn off the motor whenever you leave the work area
Ensure that the outlet discharge is directed toward a suitable area or catcher bag
Do NOT allow the flow of material to be obstructed
If using a bag to catch output material, periodically check the bag to ensure it is not full and causing the machine to choke
Operate the machine wearing loose clothing and untied long hair
Put soil, sand, grit, stones, woody material or pieces of metal into the machine
This will damage the sharp edge of the cutting reel and could stall the machine.
Overload the chaff cutter
Ensure material is suitable for the chaff cutter and that it is teased out before feeding the machine
Allow processed material to build up in the discharge area as this can:
Prevent proper discharge
Result in the machine stalling
Leave the machine running while no material is being processed
This will damage the sharp edge of the cutting reel
Move the chaff cutter while the motor is running
Put hands or any other part of the body or clothing:
Inside the feed chute past the safety screen
Inside or near the outlet area
Near any moving part
Remove any guards on the machine unless its cable is unplugged from an electrical outlet
Leave the chaff cutter connected to a power supply while it is unattended
Power supply
The F3 chaff cutter requires a 220-240V AC 50Hz earthed power connection. The chaff cutter is rated at 8.4 A. It is recommended
that the chaff cutter is only connected to a power socket which is protected by a circuit-breaker that would activate with a residual
current not more than 30 mA. It is also recommended that the chaff cutter is always used with an RCD (residual current device)
having a rated residual current of 30 mA or less. Always check and test your RCD every time you use it.
If extension cords are used, they must meet these requirements:
Rated at 10 A minimum
Minimum conductor cross section is 1.0 mm2
Maximum length of all cords connected must be less than 40 m
Comply with H05VV-F or H07VV-F
Be in good condition
Used away from sharp edges and water
Ensure the power supply cable is kept away from moving hazardous parts
Ensure the power supply cable is kept away from any sources of water
If the power supply cable becomes damaged, do NOT attempt to operate the chaff cutter
If the power supply cable becomes damaged, do NOT touch the damaged cable unless it has been disconnected from its
power source
Do NOT attempt to repair any damaged cables unless you are competent to do so
DO NOT:

Hansa F3 Chaff Cutter O&M Manual - OM-016 Revision B 14/05/2019
© Hansa Products 2019
7
Controls
Before proceeding, ensure the ‘safe setup procedure’ has been followed on page 3 of this
manual.
Start/Stop
Plug the power supply cable into a suitable power socket.
To start the chaff cutter, press the green power button on the control panel.
To stop the chaff cutter, press the red power button on the control panel.
Forward/Reverse
To change from forward to reverse operation (or vise-versa), flick the rotary switch either
left or right to the desired setting. While set to reverse, the green power button must be
held down in order to run the machine. Note that there is also a time delay of 3 seconds
when switching the feed direction to allow the motor to slow down before switching
direction.
Emergency stop
The F3 Chaff cutter comes with an emergency stop, which acts as an immediate kill
switch to the machine. To engage the emergency stop, push the red button. To
disengage the emergency stop, twist the red button clockwise until it releases outwards.
Use it when foreign matter such as sand, stones, woody material or metal enter
the inlet of the machine
Use it in response to an immediate hazard/danger to an operator or onlooker
Inspect the machine before resetting the emergency stop
Storage
Store the chaff cutter out of the reach of children
Store the chaff cutter out of the rain
Water can rust the steel body of the chaff cutter
If necessary, the inlet chute of the machine can be folded down for storage. To do so, undo the wingnut (anticlockwise)
on the outside of the machine, lift the inlet chute up slightly while pushing forward on the wingnut, then drop the inlet.
To raise the inlet back up to its operating position, lift the inlet up until the wingnut clicks into place, then tighten
(clockwise) the wingnut to secure it in place.
Transportation
The F3 Chaff Cutter is designed to be moved by one person using the handles at the top of the inlet chute to lean the machine
backwards and transfer its weight onto the wheels. The chaff cutter can then be wheeled to and from the work location.
Ensure the power supply cable is properly secured when moving the chaff cutter around
Do NOT use the wheels to move the chaff cutter up and down stairs or kerbs.
Take care when wheeling the chaff cutter up slopes. The mass of the machine is approximately 150 kg.
For long distance transport by means of a vehicle, the chaff cutter has two tie-down points on both the front and back of the
machine. When using a strap to secure the machine, ensure the straps are sufficiently tight around these points, but not too tight
so as to flex the body of the chaff cutter.

Hansa F3 Chaff Cutter O&M Manual - OM-016 Revision B 14/05/2019
© Hansa Products 2019
8
Troubleshooting
What to do if:
The chaff cutter won’t start
•The power source might be switched off
Check that the power supply cable is plugged in and switched on
Check that the power supply cable is undamaged
Do NOT attempt to use the chaff cutter if the cable is damaged.
The chaff cutter slows down and stalls
•The feed material is unsuitable for the chaff cutter
•Too much material is being fed into the chaff cutter
Reduce volume of material, tease material out more, or feed the chaff cutter slower
•The cutting reel or base blade is blunt
Contact Hansa to arrange sharpening of the cutting components
Discharge slows down/stops
•The chaff cutter is clogged up
Turn the machine off, disconnect from the power source, open bonnet and clear excess material.
The output material is not being cut finely enough
•The position of the reel might need adjustment
Move the reel closer to the base blade (see ‘cutting mechanism adjustment’ under the maintenance
section of this manual.
•The reel and/or base blade might be blunt
Inspect and sharpen/replace base blade as required. If base blade is sharp then inspect/sharpen reel.
Maintenance
Maintain the chaff cutter with care and keep it clean at all times.
To service or inspect the machine, or to change an accessory, you must first disconnect the chaff cutter from its power source
Belt replacement
If the belts in your chaff cutter look similar to any of the following images or are clearly broken, then they need to be replaced. The
chaff cutter uses two Z51v-belts. To inspect the belts, remove the pulley guard (see step 1 of ‘Maintaining the chain drive’ below).
WARNING! Do NOT open the bonnet unless the chaff cutter is turned off and disconnected from its power source
Cracked underside of belt
Sidewall belt wear
Soft, swollen belt
Worn cover on back of belt
Split belt cover

Hansa F3 Chaff Cutter O&M Manual - OM-016 Revision B 14/05/2019
© Hansa Products 2019
9
Maintaining the chain drive
It is recommended to clean and lubricate the chain drive approximately every 100 operating hours. To lubricate the chains, follow
the steps below:
Approx. time: 20-30 minutes
Disconnect the chaff cutter from its power supply. Remove the pulley
guard by removing the four m8 bolts at the top, side and bottom of the
pulley guard with a 13 mm spanner.
Remove the two chains from the machine. The chain at the back can
easily be removed by pulling the tensioning arm in to gain slack on the
chain. For the outer chain, you must separate the chain by removing the
master link. Rotate the pulley until you locate the master link. Using a
flathead screwdriver, place the head against the steel in the middle of
the spring clip, and rotate the screwdriver to open up the clip. Then, using
another screwdriver (or similar tool), push the other side of the spring
clip to pop it out from the chain pins. Once the spring clip is removed,
you can easily separate the remaining two pieces of the chain link. Ensure
you do not lose the spring clip.
Clean the chains with WD40, petrol or another suitable industrial grade metal cleaner. Reapply chain oil or other
suitable lubricant to the chains. Do not lubricate the chains with grease; dust/grit can stick to the grease causing
accelerated chain wear.
Put the chains back on in the correct configuration (as per the diagrams)
When putting the front chain back on, check that the tensioner drum is
in the right position. You should not be able to take the chain off the
sprockets when the tensioner is in the correct position.
1
2
3
4

Hansa F3 Chaff Cutter O&M Manual - OM-016 Revision B 14/05/2019
© Hansa Products 2019
10
Greasing the bearings
The chaff cutter has two bearings that support the cutting reel. These bearings must be greased approximately every 100 operating
hours. There are two caps on each side of the chaff cutter that permit access to the grease nipples on the bearings. A 13 mm
spanner is required to remove these caps. The cap on the control-panel side of the chaff cutter is located behind the pulley guard,
which must be taken off to access the grease nipple.
When greasing bearings:
One or two pumps is sufficient
Be careful not to over grease
The bearings are already greased when the equipment is new
Use bearing grease or all-purpose grease
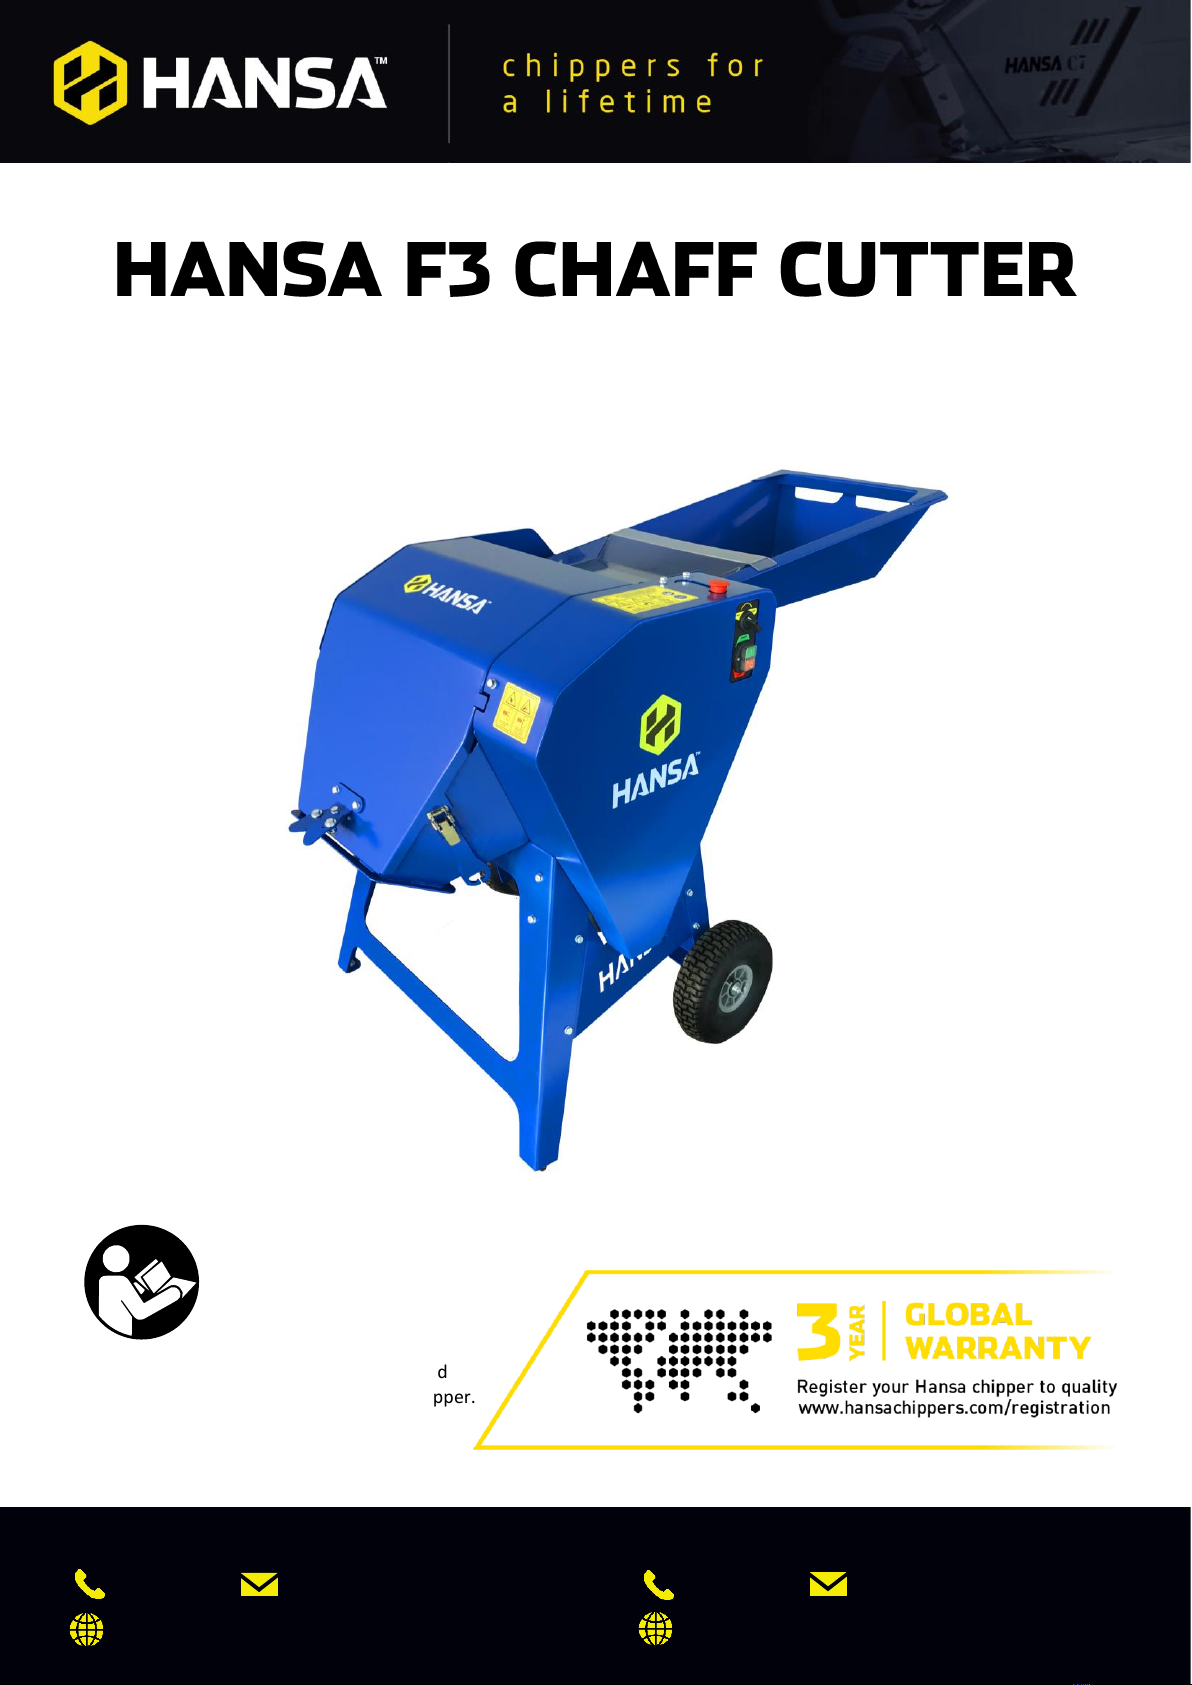
Base blade/reel removal and sharpening
After many hours of operation, the edges of the base blade will become rounded, allowing material to be processed without being
properly cut (it will be folded/crushed/smashed instead of sheared). When it becomes significantly rounded in this way, or when
you notice a decline in the quality of machine output, it is recommended to take the base blade out of the machine.
Typically the cutting reel of your Hansa chaff cutter will not require sharpening as often as the base blade. The reel blades are made
from hardened steel, so under normal circumstances the cutting reel will maintain its sharp edge for hundreds of hours of use.
Feeding unsuitable material (such as sand/dirt/grit) will cause accelerated wear.
To remove the base blade and/or cutting reel, follow the steps below:
Disconnect the chaff cutter from its power supply. Remove the pulley guard by removing the four m8 bolts at the
top and bottom of the pulley guard with a 13 mm spanner.
Open the bonnet by releasing the two clamps either side of the machine.
Remove the belts from the lower pulley (you may need to lift the lower
pulley up slightly to do so.
Remove the two chains from the machine. The chain at the back can
easily be removed by pulling the tensioning arm in to gain slack on the
chain. For the outer chain, you must separate the chain by removing
the master link. Rotate the pulley until you locate the master link. Using
a flathead screwdriver, place the head against the steel in the middle
of the spring clip, and rotate the screwdriver to open up the clip. Then,
using another screwdriver (or similar tool), push the other side of the
spring clip to pop it out from the chain pins. Once the spring clip is
removed, you can easily separate the remaining two pieces of the chain
link. Ensure you do not lose the spring clip
1
2
Hansa F3 Chaff Cutter O&M Manual - OM-016 Revision B 14/05/2019
© Hansa Products 2019
11
Remove the side plate on the right side of the machine (4x m8 bolts)
using a 13 mm ratchet spanner.
Remove the two bolts securing the spring mounting rail to the left side
of the machine housing. You can then remove the side plate and spring
mounting rail together as one unit. Remove the springs from the
notches on the swing arm.
Lift and rotate the cutting reel out of the machine, resting it carefully
on the folded edges of the housing. From this angle, you can see the
condition of the base blade more clearly. To take the base blade off the
machine, undo the bearing on the right side of the roller (using 2x
13mm spanners) then undo the four m10 countersunk bolts using a 6
mm Allen key.
To remove the reel, remove 4x m10 bolts holding it in place from both
sides of the reel (requires a 16 mm socket plus extension). Once
removed, loosen the grub screws in the bearings (requires a on both
sides of the reel shaft, then slide them off. When replacing these bolts,
ensure they are done up with spring washers and torque the bolts to
44 Nm.
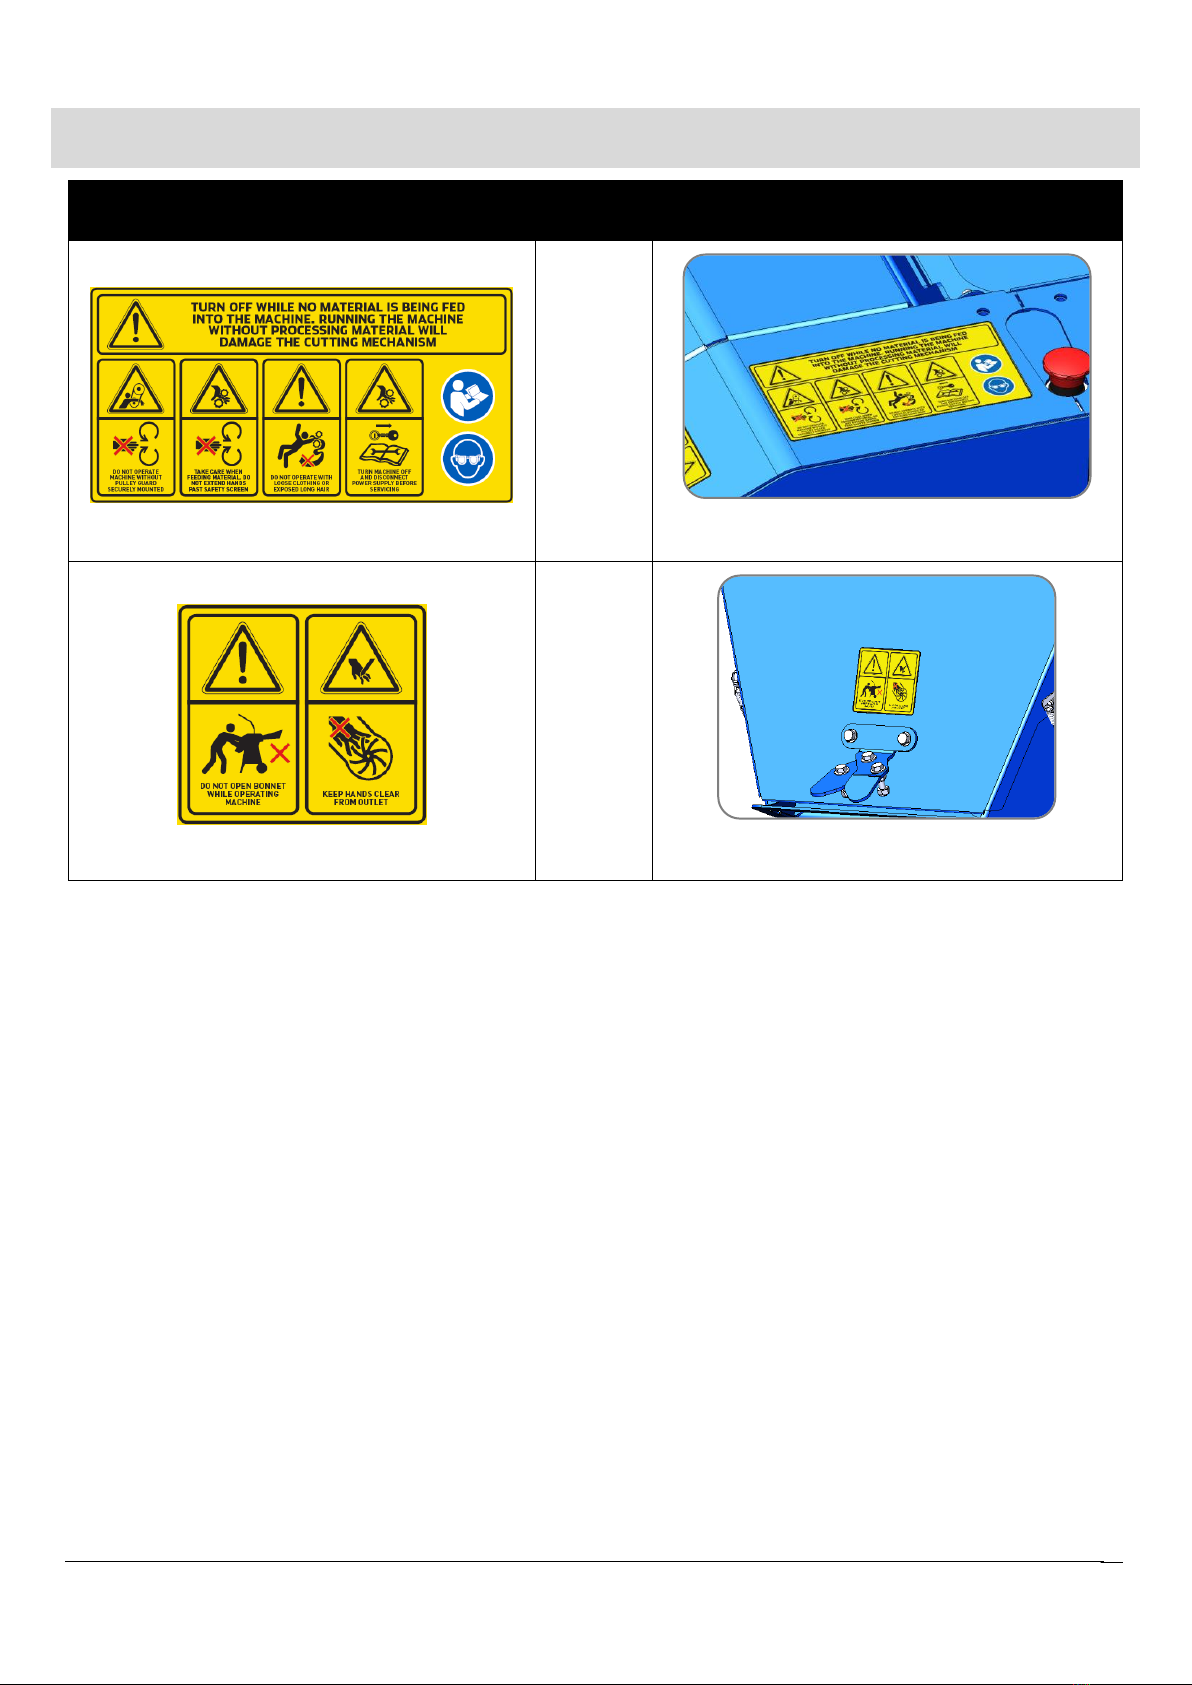
Sharpening the base blade
Sharpen the base blade on a surface grinder. A cutting angle of 2.5 ° (relative to the inside flat face of the base blade) is critical for
the performance of the cutting mechanism. Make sure plenty of coolant is used when grinding to avoid softening of the base blade.
If you don’t have a surface grinder or are unsure how to re-sharpen the base blade, contact a professional saw doctor or Hansa to
arrange re-sharpening.
Cutting mechanism checking/adjustment
Over time, or after sharpening, the base blade on the machine will wear down resulting in material being cut more coarsely or not
being cut at all. It is recommended that every 50 hours, or as required, the position of the cutting reel be adjusted. To adjust the
cutting reel position, follow the steps below:
3
4
5
2.5°
Base blade
Inside face of base blade

Hansa F3 Chaff Cutter O&M Manual - OM-016 Revision B 14/05/2019
© Hansa Products 2019
12
Approx. time: 45 minutes
Disconnect the chaff cutter from its power supply. Remove the pulley guard by removing the four m8 bolts at the
top and bottom of the pulley guard with a 13 mm spanner.
Open the bonnet by releasing the two clamps either side of the machine.
Remove both guards on the swing arm by removing the four m8 bolts securing them in place.
Check that the cutting reel is in the correct position by feeding a piece
of A4 paper between the cutting reel and the base blade. Spin the
cutting reel in the feed direction by using the large pulley as a handle.
A clean cut through the paper means the cutting reel is correctly
adjusted and sharp. Check all blades, on the both the left and right hand
sides of the reel. If the paper is passing through any blades without
being cleanly cut, the cutting reel will need adjustment (continue with
step 3).
Loosen the four adjustment plate bolts (outer two bolts on each side
of the swing arm) from the supporting structure of the reel (a 16mm
socket plus extension are recommended). Do not loosen them all the
way (make sure they are still slightly tight).
To move the cutting reel closer to the base blade, loosen the outer
locknut (left-most nut on the image) on the adjustment thread and
tighten the inner locknut (right-most nut). To move the cutting reel
farther away, loosen the inner locknut and tighten the outer one. After
setting the locknuts, test how the reel is cutting by feeding more paper
through it (as per step 2). Repeat this adjustment on both sides of the
cutting reel. Once the distance is correct, retighten both the outer
locknut and inner locknuts against the plate between them.
It is critical to the operation of the machine to have this adjustment set
correctly. If the reel is set too far out, then the machine will not cut
material properly. If set too far in, then the cutting components may
wear at an excessive rate or become permanently damaged. A correctly
set reel will contact the base blade along its entire length. It is
recommended to feed paper through to check it is being cut properly
(as per step 2).
Torque the reel adjustment plate bolts to 44 Nm. After doing so, check that the position of the reel hasn’t changed
by running more paper through the cutting mechanism.
1
2
3
4
5

Hansa F3 Chaff Cutter O&M Manual - OM-016 Revision B 14/05/2019
© Hansa Products 2019
13
Sharpening the reel
If the edges of the reel are considerably worn/rounded, contact a professional saw doctor or Hansa to arrange re-sharpening.
Tyre pressure
The maximum recommended tyre pressure is 25 Psi. Over inflation may cause tyre to rupture.
Bolt torque
Relative Strength Bolt Marking
4.6
8.8
Recommended Tightening Torque
Recommended Tightening Torque
Bolt size
Spanner size
lb ft
Nm
lb ft
Nm
M8
13 mm
6
8.5
16
22
M10
16 mm
12.5
17
32
44
M12
18 mm
22
30
57
77
M16
24 mm
54
73
140
190
M20
30 mm
105
143
274
372
Specifications
General
Length
1740 mm (1090 mm with chute folded down)
Width
850 mm
Height
1170 mm
Weight
145 kg
Discharge height
540 mm
Motor
Type
Electric 1.5 kW
Power source
Single phase 230-240V AC
Cutting System
Reel speed
386 RPM
Feed speed
76 RPM (250mm of material per second)
Reel diameter
230mm
Shaft diameter
25 mm
Blades
12
Distance between cuts
3.25 mm
Reattach all guards to the swing arm.
6
Hansa F3 Chaff Cutter O&M Manual - OM-016 Revision B 14/05/2019
© Hansa Products 2019
14
Decals
Decal
Description
Location
General
machine
safety
Top of pulley guard, next to E-stop
Bonnet
safety
Side of pulley guard, next to lockout switch tab

Hansa F3 Chaff Cutter O&M Manual - OM-016 Revision B 14/05/2019
© Hansa Products 2019
15
HANSA global industrial limited warranty
For the purposes of this warranty document, “HANSA” means HANSA Products Limited and any of its international subsidiary
companies. Refer to contact details below for further information.
HANSA warrants each new HANSA chipper (“HANSA product”) free from defects in materials and workmanship under normal use
and routine servicing, for the warranty periods and subject to the limitations and exclusions detailed below.
HANSA offers a special extended warranty period (“Extended Warranty”) to new HANSA products purchased from an authorised
HANSA dealer. The Extended Warranty period is set out below. In order to take advantage of the Extended Warranty you must:
1. Register your HANSA product through the HANSA warranty registration process and identify your HANSA product by its
machine serial number. Registration must be completed with ten (10) days from the date of purchase. Your warranty
registration confirmation email is your identification for warranty service; and
2. Have your registered HANSA product maintained in accordance with the schedule contained in the relevant owner’s manual
supplied with the product by an authorised HANSA dealer for the applicable territory. In order to ensure the safe operation
of your HANSA product, we strongly recommend that you only use an authorised HANSA dealer for servicing. The cost of
routine or required maintenance and services is the responsibility of the purchaser. You must keep a record of all service and
maintenance history as proof of servicing history. HANSA may request such servicing history when assessing any future
warranty claim.
When making a claim for warrantable repairs under the Extended Warranty, your warranty registration must accompany the
HANSA product. If the warranty registration is lost or destroyed, proof of purchase documentation clearly recognising the machine
serial number shall be accepted for warranty purposes. Where neither is available and HANSA does not have any record of the
purchaser’s details the warranty period shall be calculated from the appropriate dealer wholesale sale date. Any claim under the
applicable Warranty must be made within the relevant warranty period specified below.
The Extended Warranty may be subject to cancellation if the above requirements are not satisfied.
The Extended Warranty is available to domestic (non-commercial) and commercial customers (excluding commercial customers in
the business of plant/equipment hire).
All HANSA products that have not complied with the Extended Warranty registration and maintenance requirements are entitled
to the “Non-Registered” warranty period set out below.
Any authorised HANSA dealer is further authorised to repair or replace any part which proves defective within the limits of the
Extended Warranty or Non-Registered Warranty (the “Warranties”) at no charge to the owner, covering parts and labour.
Consumable items such as but not limited to oils, grease, blades and belts shall be the responsibility of the owner. All defective
parts replaced under the Warranties become the property of HANSA.
You (as owner) are responsible for all shipping and transportation costs (including insurance) to and from an authorised HANSA
dealer for the product subject to a warranty claim.
Exclusions
The warranties shall NOT APPLY TO:
•Any damage which results from neglect of periodic maintenance specified by HANSA.
•Any damage which results from repair or maintenance operations by methods other than specified by HANSA.
•Any damage which results from misuse or use beyond the limitations of the intended purpose specified by HANSA, such
as overloading, including foreign objects such as stones, pieces of steel, glass etc. being dropped into the running machine
or use under abnormal conditions (in HANSA’s sole judgement).
•Any damage which results from use of non-genuine parts, lubricant or fluid not approved by HANSA.
•Any damage resulting from modification or installation in other products in a way not approved by HANSA which has any
influence on the function and/or performance of the products.
•Any damage which results from operation other than specified in the Owner’s Manual either intentionally or by error.
•Fading of painted surfaces, deterioration of plated surfaces, deterioration of rubber and plastics, including rusting due to
the passage of time.
•Normal phenomena such as noise, vibration or oil seepage which are considered by HANSA as not affecting the quality,
function or performance of the product.
•Any damage due to improper storage or transport.
•Consumable replacement items: Belts, cutting blades, anvil, serviceable bearings.
•Periodical maintenance items such as cleaning, inspection and adjustments.
•Any repair and/or adjustment performed by persons other than an authorised dealer, or damage resulting therefrom.
•Any repair and/or adjustment to correct improper or poor quality work previously performed.

Hansa F3 Chaff Cutter O&M Manual - OM-016 Revision B 14/05/2019
© Hansa Products 2019
16
•Incidental expenses incurred in the warranty claim. For example: additional expenses such as those for towing,
communications, hotel and meals, incurred due to breakdown of the product at a remote location. Any expense related
to personal injury and/or property damage, (exclusive of the product itself). Compensation for loss of time, commercial
losses or rental costs of a substitute product during the period of adjustment.
•Any damage which results from unavoidable natural disasters, fire, collision, theft, etc.
•Any normal wear or deterioration, such as that of sliding or rotating parts caused under normal operating conditions. For
example: Normal wear pivot points, rod ends and bearings.
•Any damage resulting from exposure of the product to soot and smoke, medicines and chemical agents, sea water, sea
breeze, salt or other environmental phenomena.
Limitations
•HANSA reserves the right to modify, alter and improve any product without incurring any obligation to replace any product
previously sold with such modification.
•In no event shall HANSA’s liability exceed the purchase price of the product.
•Equipment and accessories not of HANSA’s manufacture (such as engine, battery and tires) are warranted only to the
extent of the original manufacturer’s warranty and subject to their allowance to HANSA only if found to be defective by
such manufacturer.
•HANSA reserves the right to supply remanufactured parts as it deems appropriate.
HANSA Product Warranty Period
HANSA CHIPPERS
DOMESTIC
COMMERCIAL
(EXCLUDING HIRE)
COMMERCIAL (HIRE)
Non-Registered
12 months
12 months
3 months
Extended Warranty
36 months (Conditional)*
36 months (Conditional)*
N/A
Each of the warranty periods stated above commence from the date on which you purchased your HANSA product.
*Conditional Warranty:
This is a HANSA extended warranty period for products that are:
•Purchased from an authorised HANSA Dealer.
•Registered at the time of sale through the Hansa Chippers website: www.hansachippers.com/registration
•Serviced by a HANSA Dealer in accordance with the Hansa service schedule using genuine HANSA parts.
•Meeting all other warranty requirements.
Warranty periods vary depending on whether the purchaser is: (i) a domestic (i.e. non-commercial) customer; (ii) commercial
customer (excluding plant/equipment hire businesses); or (iii) a commercial customer in the business of plant/equipment hire.
General
1. Your rights:
a. HANSA will recognise any implied rights and remedies that are available to you at law in the applicable territory and that
cannot be excluded by HANSA.
b. In New Zealand, Hansa Products Ltd will recognise your statutory rights under the Consumers Guarantee Act 1993 (provided
that you are a consumer for the purposes of that Act).
c. In Australia, this warranty is given by Hansa Products Pty Ltd. This warranty is provided in addition to other rights and
remedies you have under law - our HANSA products come with guarantees that cannot be excluded under the Australian
Consumer Laws.
2. If any provision of this warranty document is held by any competent authority to be invalid or unenforceable in whole or in
part, the validity of the other provisions of this warranty document and the remainder of the provisions in question will not be
affected.
3. The English language version of this warranty document prevails over any translated version/s of its terms.
4. This warranty document is governed by the laws of New Zealand. The parties submit to the exclusive jurisdiction of the New
Zealand Courts.
Contact Details
New Zealand: Rest of World:
Hansa Products Limited Please refer to www.hansaproducts.com
PO Box 10323, Te Rapa for a current list of our authorised dealers
Hamilton and contact details relevant to your territory.

Hansa F3 Chaff Cutter O&M Manual - OM-016 Revision B 14/05/2019
© Hansa Products 2019
17
Commissioning checklist and registration
Product registration must be completed online:
For registration, you will require the chipper serial number and customer details.
It is the retailers’ responsibility to check the following:
Final Assembly Check all bolts for tightness including knives
Operation Instruct the owner/operator on operating procedures and techniques
Safety Instruct owner/operator on safety procedures
Maintenance Explain the maintenance requirements and the importance of following the maintenance schedule to
the owner/operator
Manual Emphasise the importance of reading and understanding the manual in full before
initial operation of the chipper
It is the retailers’ responsibility to ensure that this chipper is correctly commissioned for use, and that the
purchase is registered with Hansa Chippers so as to provide the owner with the full benefit of the warranty
policy.
www.hansachippers.com/registration
Table of contents


