Harbor Freight Tools OneStopGardens 91240 User manual

PVC WPVC W
PVC WPVC W
PVC Wagon w/ Wagon w/ W
agon w/ Wagon w/ W
agon w/ Wooden Sidesooden Sides
ooden Sidesooden Sides
ooden Sides
ASSEMBLY AND OPERATING INSTRUCTIONS
3491 Mission Oaks Blvd., Camarillo, CA 93011
Visit ourWeb site at http://www.harborfreight.com
Copyright © 2004 by Harbor Freight Tools®. All rights reserved. No portion of this
manual or any artwork contained herein may be reproduced in any shape or form
without the express written consent of Harbor FreightTools.
For technical questions and replacement parts, please call 1-800-444-3353
91240

SKU91240 Page 2
Specifications
Thisruggedwagonisdurable,usefulandfun!ThePVCbodyandzincplatedand
paintedmetalparts are rust and weather resistant. The heavy duty pneumatictires
offerstrengthanda smooth ride. The attractive wooden sides will keep kids and
loadsinthewagon,wheretheybelong.
Contents
Upon opening, check the package to be sure that no parts are missing, and none
are damaged. In case of missing or damaged parts, please call the number on the
frontofthismanual.
Save This Manual
You will need the manual for the safety warnings and precautions, assembly
instructions,operatingandmaintenance procedures, parts list and diagram. Keep
your invoice with this manual. Write the invoice number on the inside of the front
cover. Keep the manual and invoice in a safe and dry place for future reference.
noitpircseDmetIytQnoitpircseDmetIytQ
yarTnogaW1sediSnedooW4
sleehWcitamuenP4eldnaH1
ylbmessAekoYtnorF1 ylbmessAekoYraeR1
secarBraeR2spilCrenroC4
tikerawdraH1launaMs'renwO1
noitcurtsnoCemarF
leetsyolladepmats&demroF dnatnorf,ekoyemarferawdrah llupleetsralubut,stroppuselxaraer pirgmaofhtiweldnah
noitcurtsnoCydoB debcitsalpenelyhteylopdedlom sliardnahdna
snoisnemiDllarevOH"8/7-73xW"2/1-22xL"2/1-54snoisnemiDkceDnogaW "2/1-3xW"4/1-02xL"8/7-63 peed
snoisnemiDeriT W"8/3-3x.aiD"01 )4-05.3/01.4( erusserPriAeriT dlocisp03 ebutrennievlavdradnats
yticapaCnogaW.sbl003thgieWteN.sbl04

SKU91240 Page 3
SafetyWarnings and Precautions
WARNING:When using this product,basic safety precautions should always
be followed to reduce the risk of personal injury and damage to equipment.
Read all instructions before using this tool!
1. Keep work area clean. Clutteredareasinviteinjuries.
2. Observe work area conditions. Keepwork area welllighted.
3. Keep children away. Children must never be allowed in the work area. Do
not let them handle machines or tools. Do not let unsupervised children play
with this product. Serious injury could result.
4. Store idle equipment. When not in use, equipment must be stored in a dry
location to inhibit rust. Always lock up equipment and keep out of reach of
children.
5. Use the right tool for the job.Do not attempt to force a small item to do the
work of a larger industrial item. Do not modify this item and do not use this
item for a purpose for which it was not intended. Do not exceed the 300 lbs.
maximum weight capacity. Note:The wooden sides provide limited support
to keep objects in the wagon; wooden sides are not designed to provide
significant weight support.
6. Do not overreach. Keep proper footing and balance at all times.Do not
stand on this wagon.When unattended, be sure it will not accidently roll
away. Use the wagon sensibly;be careful not to overload or tip the wagon
over.
7. Maintain tools with care. Followinstructionsforlubricating and changing
accessories.The handles must be kept clean, dry, and free from oil and
grease at all times.
8. Stay alert. Watch what you are doing, use common sense.Do not operate
any item when you are tired.
9. Do not wear loose clothing. Do not allow loose clothing, hair or hands to
get caught in the moving parts of this wagon.
10. Check for damaged parts. Before using any item, any part that appears
damaged should be carefully checked to determine that it will operate
properlyandperformitsintendedfunction.Checkforalignmentandbinding
of moving parts; any broken parts or mounting fixtures;and any other
condition that may affect proper operation.Any part that is damaged should
beproperlyrepaired or replaced by a qualified technician.
11. Replacement parts and accessories. Whenservicing,use only identical
replacementparts.

SKU91240 Page 4
13. Do not operate item if under the influence of alcohol or drugs. Read
warninglabelsonprescriptionstodetermineifyourjudgmentorreflexesare
impaired while taking drugs. If there is any doubt, do not operate the item.
14. Maintenance. For your safety, service and maintenance should be performed
regularlyby a qualified technician.
15. Maintain 30 PSI tire air pressure for optimal rolling of wagon.
Warning:The warnings,cautions,and instructions discussed in this instruction
manual cannot cover all possible conditions and situations that may occur.It
must be understood by the operator that common sense and caution are fac-
tors which cannot be built into this product, but must be supplied by the opera-
tor. Assembly
You will need 2 small wrenches and a pliers to complete assembly of this item.
(Tools are not included.)These tools maybeobtained from Harbor FreightTools.
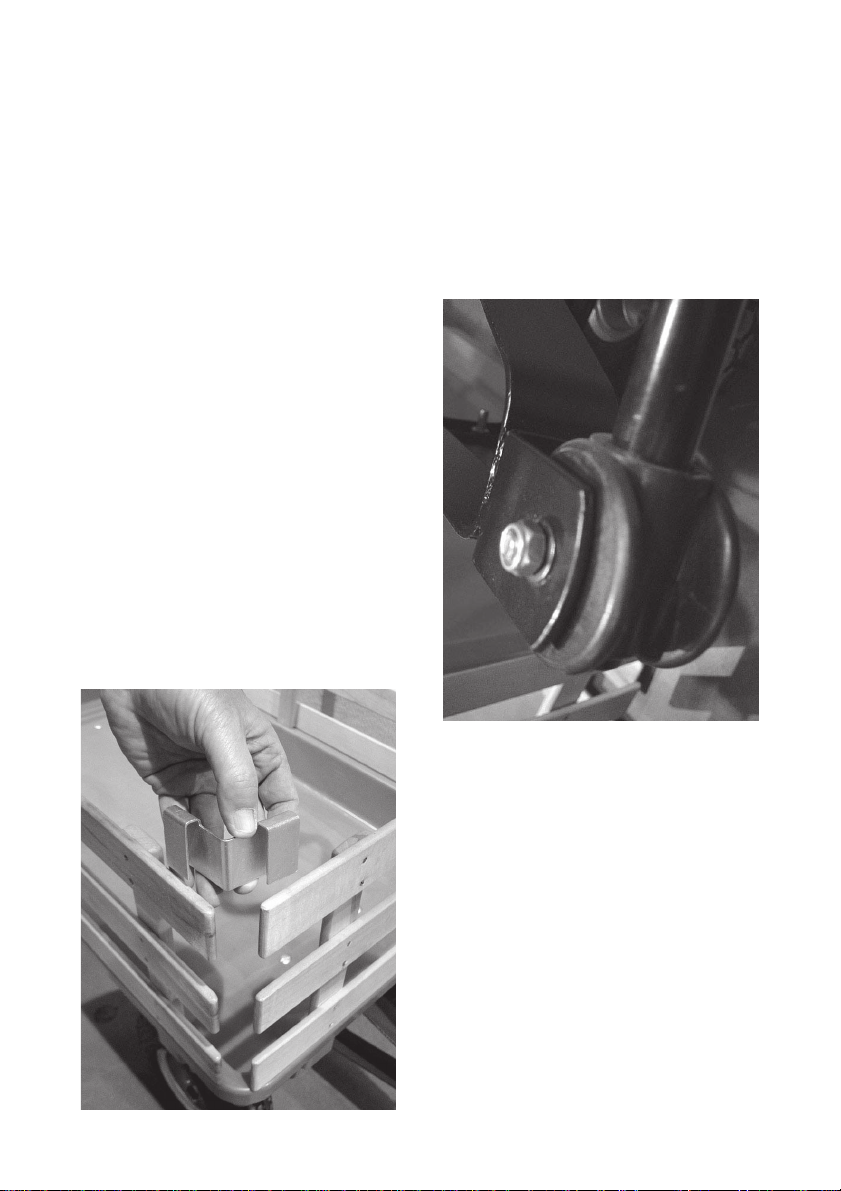
WARNING:Be careful not to pinch your fingers as you proceed with assembly.
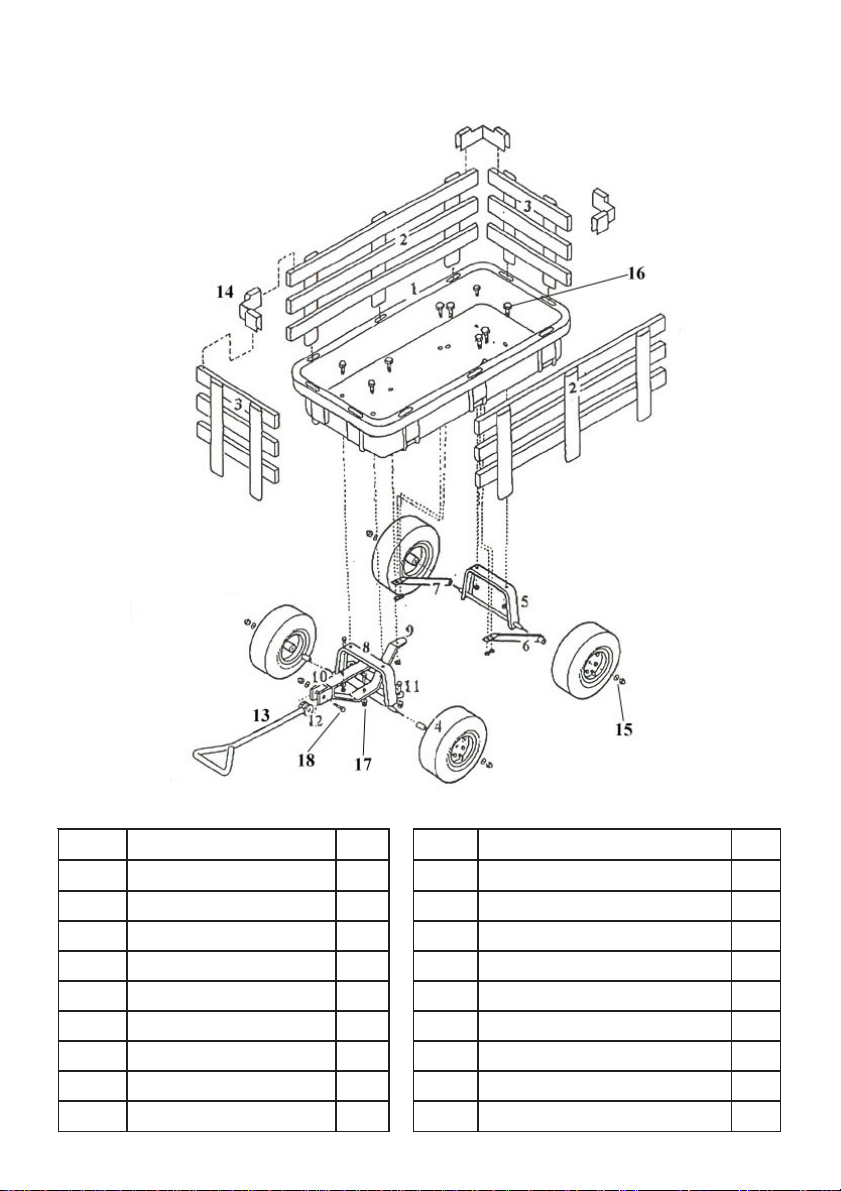
Please refer to the Assembly Diagram on page 7 for part numbers.
First assemble the front and rear axle supports onto the wagon tray.
1. Determinethefront and rear orientation of the Tray (1). Thefrontwillhavea
“triangle” bolt hole pattern of 3 holes to fit the Front Axle Support (8), and
CenterFrontAxleBrace(9).Therear will have a “square” bolt hole pattern of 6
holes to fit the Rear Axle Support (5) and Rear Axle Braces (6) and (7).
2. Find the Rear Axle Support (5), and place it in position on the rear underside
ofthe Tray (1). Insert a Hex Head Bolt(16) through one of the rearmost holes
in the Tray (1), and through the aligning hole in the Rear Axle Support (5).
Place a Lock Washer and Nut (16) on the bolt, and finger-tighten. Install the
second Bolt, LockWasher and Nut (16) the same way.
3. IdentifytheLeft and Right Rear
Axle Braces (6 and 7), by
comparing them to the photo.
Position these on the rear axle
with the flanges pointed in, to
align with the holes in the Tray
(1). Install Bolts, Lock Washers
and Nuts (16) as before.You may
now tighten all six bolts and nuts
fortheRearAxle Support (5). DO
NOTOVERTIGHTEN:Checkto
be sure that the bolt heads do not
damage the plastic Tray (1) as
youtighten.

SKU91240 Page 5
4. Identify the Front Axle Support (8). Align it with the three predrilled holes on
the underside of the Tray (1). Install Bolts, Lock Washers and Nuts (16) as
before.You may now tighten all bolts and nuts for the Front Axle Support (8).
DONOTOVERTIGHTEN: Check to be sure that the bolt heads donot
damage the plastic Tray (1) as you tighten.
5. Attach each of the four Wheels (4) onto the axles. Slide each Wheel onto an
axleend, with the inflation valve of the wheel onthe outside. Slide one of the
Washers (15) onto the end of the axle, and install an Acorn Nut (15). Tighten
the nut on each wheel in turn.
6. InstalltheHandle(13)bypositioning
the Plastic Coupling (12) into the
end of theYoke (10) as shown in
thephoto.InserttheHandle
Fastener Bolt (18) through theYoke
(10),andPlasticCoupling(12).
Place the Washer and Nylock Nut
fromthe Fastener Set (18) onto the
HandleFastenerBolt,andsecure.
NOTE:Do not overtightenthe
Nylock Nut, the handle must still be
abletomoveupanddownfreelyin
the Yoke.
7. With the wagon right side up, install
the wooden sides. First place the Side
Panels(2)andthe Front and Rear Panels
(3) into the slots on the sides of the Tray
(1) as shown in the Assembly Drawing,
with the vertical slats on the outside.
Secure the corners of the sides together
usingthe Clips (14). WARNING:Be
carefulnottopinchyourfingerswhen
installing the clips. Slide them over the
corners of the sides as shown in the
photo.

SKU91240 Page 6
8. Using a hand pump, inflate the tires to 30psi. WARNING: Do not use an air
compressor or other high-pressure source to inflate the tires, as they may
explodeif overinflated.
Maintenance
1. Checkthetire pressure periodically with agood quality air pressure gauge.
Maintain the tire air pressure at 30 psi. Inflate the tires using a hand pump to
avoidover inflation. Hand pumpandpressure gauge areavailableat Harbor
FreightTools.
2. Protectthe wagonfromexcessiveexposure to direct sunlight, rain, freezing
and other weather.Store the wagon in a dry, protected place when not in use.
3. Periodically check the bolts and other fasteners to be sure they are tight.
4. If theWheels orYoke squeak when in use, apply a heavy-duty lubricant.Do
not get oil-based lubricants on the plastic parts.
PLEASE READ THE FOLLOWING CAREFULLY
THE MANUFACTURER AND/OR DISTRIBUTOR HAS PROVIDED THE PARTS DIAGRAM
INTHIS MANUAL AS A REFERENCETOOL ONLY. NEITHER THE MANUFACTURER NOR
DISTRIBUTOR MAKES ANY REPRESENTATION OR WARRANTY OF ANY KIND TO THE
BUYERTHAT HE OR SHE IS QUALIFIEDTO MAKE ANY REPAIRS TOTHE PRODUCT OR
THAT HE OR SHE IS QUALIFIED TO REPLACE ANY PARTS OFTHE PRODUCT. IN FACT,
THE MANUFACTURER AND/OR DISTRIBUTOR EXPRESSLY STATES THat ALL REPAIRS
AND PARTS REPLACEMENTS SHOULD BE UNDERTAKEN BY CERTIFIED AND LI-
CENSED TECHNICIANS AND NOT BY THE BUYER. THE BUYER ASSUMES ALL RISK
AND LIABILITY ARISING OUT OF HIS OR HER REPAIRS TO THE ORIGINAL PRODUCT
OR REPLACEMENT PARTS THERETO, OR ARISING OUT OF HIS OR HER INSTALLA-
TION OF REPLACEMENT PARTS THERETO.
NOTE: Some parts are listed and shown for illustration purposes only and are not
available individually as replacement parts.

SKU91240 Page 7
Assembly Diagram
#traPnoitpircseDytQ#traPnoitpircseDytQ
1yarT101ekoY1
2lenaPediS211kniLgnireetS1
3lenaPraeR&tnorF221gnilpuoCcitsalP1
4sleehW431eldnaH1
5troppuSelxAraeR141pilC4
6ecarBelxAraeRtfeL151erawdraHleehW4
7ecarBelxAraeRthgiR161)tes(erawdraHgnitnuoMyarT7
8troppuSelxAtnorF171renetsaFekoY1
9ecarBelxAtnorFretneC181)tes(renetsaFeldnaH1
Table of contents
Other Harbor Freight Tools Utility Vehicle manuals
Popular Utility Vehicle manuals by other brands

Can-Am
Can-Am Roadster RT-622 2010 Service manual

Joyner
Joyner JNSZ150DS owner's manual

PRONAR
PRONAR RC2100 TRANSLATION OF THE ORIGINAL COPY OF THE MANUAL

Razor
Razor Ground Force CONTROLLER INSTALLATION GUIDE

Primo Water
Primo Water UT5 10-18HSS Series Assembly instructions

Aosom
Aosom 370-286V00 Assembly instruction