Harbour HBROB609 User manual

IM VERSION 1.8 |MODEL HBROB609 |PRODUCT CODE 706138 |ISSUE DATE 09/2021
SUPPORT 1300 11 4357 |WWW.HARBOURAPPLIANCES.COM.AU
60cm 80L
Electric Oven
INSTRUCTION MANUAL

02
Congratulations on purchasing your new Harbour Oven.
All products brought to you by Harbour are manufactured to the highest standards
of performance and safety and, as part of our philosophy of customer service and
satisfaction, are backed by our comprehensive 3 Year In Home Warranty.
We hope you will enjoy using your purchase for many years to come.
Welcome

03
Contents
02 Welcome
04 Warranty Details
05 General Safety Instructions
07 Product Overview
08 Oven Functions
09 Installation Instructions
11 Operation Instructions
14 Maintenance and Cleaning
16 Troubleshooting
17 Specifications
18 Repair and Refurbished Goods or Parts Notice
19 Warranty Returns

04
The product is guaranteed to be free from defects in workmanship and parts for a period
of 36 months from the date of purchase. Defects that occur within this warranty period,
under normal use and care, will be repaired, replaced or refunded at our discretion. The
benets conferred by this warranty are in addition to all rights and remedies in respect of
the product that the consumer has under the Competition and Consumer Act 2010 and
similar state and territory laws.
Our goods come with guarantees that cannot be excluded under the Australian Consumer
Law. You are entitled to a replacement or refund for a major failure and for compensation
for any other reasonably foreseeable loss or damage. You are also entitled to have the
goods repaired or replaced if the goods fail to be of acceptable quality and the failure does
not amount to a major failure.
60cm 80L Electric Oven
Congratulations!
REGISTER YOUR PURCHASE AT www.aldi.com.au/en/about-aldi/product-registration/ TO KEEP UP-TO-DATE WITH IMPORTANT PRODUCT INFORMATION
You have made an excellent choice of this quality product. Our commitment to quality also includes our service. Should you, contrary to
expectations, experience defects due to manufacturing faults, ALDI will provide you with a warranty against defects as follows:
Warranty
The product is guaranteed to be free from defects in workmanship and parts for a period of 36 months from the date of purchase. Defects that occur within this
warranty period, under normal use and care, will be repaired, replaced or refunded at our discretion. The benefits conferred by this warranty are in addition to
all rights and remedies in respect of the product that the consumer has under the Competition and Consumer Act 2010 and similar state and territory laws.
Our goods come with guarantees that cannot be excluded under the Australian Consumer Law. You are entitled to a replacement or refund for a major failure
and for compensation for any other reasonably foreseeable loss or damage. You are also entitled to have the goods repaired or replaced if the goods fail to be of
acceptable quality and the failure does not amount to a major failure.
Proof of Purchase
This warranty is valid for the original purchase and is not transferable. Please keep your purchase docket, tax invoice or receipt as the best proof of purchase, and
as proof of date on which the purchase was made.
Extent of Warranty
This warranty is limited to defects in workmanship or parts. All defective products or parts will be repaired or replaced.
Normal Wear and Tear
This warranty does not cover normal wear and tear to the products or parts.
118 Campbell Street, Collingwood, VIC 3066
Exclusions
This warranty does not cover:
• Any defects caused by an accident, misuse, abuse, improper installation or operation, lack of reasonable care, unauthorised modification, loss of parts,
tampering or attempted repair by a person not authorised by the distributor.
• Any product that has not been installed, operated or maintained in accordance with the manufacturer’s operating instructions provided with the product.
• Any product that has been used for purposes other than domestic use.
• Any damage caused by improper power input or improper cable connection.
To Make a Claim
This warranty against defects is provided by ALDI Stores, Locked Bag 56, St Marys Delivery Centre, NSW 2760, Phone (02) 9675 9000. If a defect in the goods
appears within 36 months, you are entitled to claim a warranty, please contact or send all warranty claims to:
When making a return, please ensure the product is properly packaged so as to ensure that no damage occurs to the product during transit.
Please provide the original or a copy of the proof of purchase. Also please make sure you have included an explanation of the problem.
Please note that the costs of making a warranty claim, including any return postage, will be covered by the supplier identified above.
Please note upon receiving your warranty claim, the supplier will send, via the post or email, a repair and refurbished goods
or parts notice.
Please provide your email address and advise the supplier, if you wish to obtain a repair and refurbished goods or
parts notice via email.
AFTER SALES SUPPORT:
1300 11 4357
AUS
3
Hotline number: 1300 11 4357
Residentia Group Pty Ltd
MODEL: SUC54EEW PRODUCT CODE: 62878 11/2018
IN HOME

05
General Safety Instructions
IMPORTANT SAFETY INSTRUCTIONS
READ CAREFULLY AND KEEP FOR FUTURE REFERENCE
Read this manual thoroughly before first use, even if you are familiar with this type of product. The safety
precautions enclosed herein reduce the risk of fire, electric shock and injury when correctly adhered to.
Make sure you understand all instructions and warnings.
Keep the manual in a safe place for future reference, along with the completed warranty card and
purchase receipt. If you sell or transfer ownership of this product, pass on these instructions to the
new owner.
Always follow basic safety precautions and accident prevention measures when using an electrical
appliance, including the following:
IMPORTANT: Pay particular attention to messages that contain the words DANGER, WARNING or
CAUTION. These words are used to alert you to a potential hazard that can seriously injure you and others.
The instructions will tell you how to reduce the chance of injury and let you know what can happen if the
instructions are not followed.
USAGE CONDITIONS AND RESTRICTIONS
• Domestic use only: This appliance is intended for indoor household use only. It is not intended
for commercial, industrial or outdoor use. It is not intended for use in a recreational vehicle.
• Purpose: Do not use this appliance for anything other than its intended purpose.
Other uses are not recommended and may cause fire, electric shock or personal injury.
• Attachments: The use of attachments is not recommended by the appliance manufacturer
and distributor as they may be hazardous.
• Improper use: Damage due to improper use or repairs made by unqualified personnel will void your
warranty. The producer will assume no liability for any eventual damages caused by misuse of the
product or noncompliance with these instructions.
• IMPORTANT: The appliance must be installed by an authorised technician. The producer is not
responsible for any damage that might be caused by defective placement, and installation by
unauthorised personnel.
WARNING:
• When the oven is first switched on, it may give off an unpleasant smell. This is due to the bonding agent
used for the insulating panels within the oven.
• After the appliance has been properly installed, and before first use, you should burn off any dust,
oil or other remnants that may have been left inside the cavity from the manufacturing process or
transportation. Please run the new empty oven with the conventional cooking function at 250º C
for at least 90 minutes.
• During the first use, it is completely normal that there will be a slight smoke and odors. If it does occur,
you merely have wait for the smell to clear before putting food into the oven.
• The appliance and its accessible parts become hot during use. Care should be taken to avoid touching
heating elements. Children less than 8 years of age shall be kept away unless continuously supervised.
• If the surface is cracked, switch off the appliance to avoid the possibility of electric shock.
• This appliance can be used by children aged from 8 years and above and persons with reduced physical,
sensory or mental capabilities or lack of experience and knowledge if they have been given supervision
or instruction concerning use of the appliance in a safe way and understand the hazards involved.
• Children shall not play with the appliance. Cleaning and user maintenance shall not be made by children
without supervision.
• During use, the appliance becomes very hot. Care should be taken to avoid touching heating elements
inside the oven.

06
GENERAL SAFETY INSTRUCTIONS CONT.
WARNING:
• Do not allow children to go near the oven when it is operating, especially when the grill is on.
• Ensure that the appliance is switched off before replacing the oven lamp to avoid the possibility
of electric shock.
• The means for disconnection must be incorporated in the fixed wiring in accordance with the wiring
specifications.
• Children should be supervised to ensure that they do not play with the appliance.
• This appliance is not intended for use by persons including children with reduced physical, sensory
or mental capabilities, or lack of experience and knowledge, unless they have been given supervision
or instruction concerning use of the appliance by person responsible for their safety.
• An all-pole disconnection means must be incorporated in the fixed wiring in accordance with the
wiring rules.
• If the supply cord is damaged, it must be replaced by the manufacturer, its service agent or similarly
qualified persons in order to avoid a hazard.
• Do not use harsh abrasive cleaners or sharp metal scrapers to clean the oven door glass since they can
scratch the surface, which may result in shattering of the glass.
• Only use the temperature probe recommended for this oven.
• Excess spillage must be removed before cleaning.
• A steam cleaner is not to be used.
• The appliances are not intended to be operated by means of an external timer or separate remote
control system.
• To ensure the oven shelves operate safely, correct placement of the shelves between the side rail is
imperative. Please refer to page 9 for more information.
SAFETY HINTS
• Do not use the oven unless you are wearing something on your feet. Do not touch the oven with wet
or damp hands or feet.
• The oven door should not be opened often during the cooking period.
• When the door or drawer of oven is open do not leave anything on it, you may unbalance your appliance
or break the door.
• Some parts of appliance may keep its heat for a long time; it is required to wait for it to cool down before
touching onto the points that are exposed to the heat directly.
• If you will not use the appliance for a long time, it is advised to turn it off at the power source.
DECLARATION OF COMPLIANCE
When you have unpacked the oven, make sure that it has not been damaged in any way. If you have any
doubts at all, do not use it: contact a professionally qualified person. Keep packing materials such as plastic
bags, polystyrene, or nails out of the reach of children because these are dangerous to children.

07
COOKING FUNCTIONS
Product Overview
CONTROL PANEL
Note: The images in this user manual are for reference only. Your appliance may appear differently.
TEMPERATURE KNOB
DISPLAY SCREEN
DECREASE BUTTON
TIME FUNCTION BUTTON
YOUR OVEN
OVEN DOOR
CONTROL PANEL
SLIDER BRACKETS
LIGHT
GRILL
ALUMINIUM HANDLE
FAN
BAKING TRAY
2 × WIRE SHELVES
INCREASE BUTTON

08
OVEN FUNCTIONS
SYMBOL FUNCTION DESCRIPTION
Oven Lamp: Enables the user to observe the progress of cooking without opening the door.
The oven lamp will light for all cooking functions.
Defrost: The circulation of air at room temperature enables quicker thawing of frozen food
without the use of any heating elements. It is a gentle but quick way to speed up the
defrosting time and thawing of ready-made dishes, cream-filled produce, etc.
Lower element: Heat is applied only by the oven’s lower heating element. Use this option
for browning the base of the food. This function is suitable for slow cooking recipes or for
warming up meals.
Conventional cooking: The top and bottom heating elements evenly heat the exposed food.
Baking and roasting are possible only at a single level.
Convention with fan: The top and bottom heating elements, along with the fan, cooks the
food evenly and quickly.
Grill: This cooking method is for everyday grilling, utilising only the inner grill element only,
which directs heat downwards onto the food.
Max grill: Both the inner and outer grill heating elements direct the heat downwards
onto the food. This function is suitable for grilling more significant quantities of food.
Max grill with fan: The inner and outer grill heating elements, along with the fan,
are suitable for grilling a large amount of meat.
Convection: Heat from the rear heating element circulated around the cavity by the fan. It is
faster and economical than the conventional mode. This function also helps food cook faster
whilst also reducing hot and cool spots and helping dishes on every shelf cook more evenly.
Oven Functions

09
Installation Instructions
ACCESSORIES
WARNING: The appliance must be installed by an authorised technician and put into use.
Damage due to improper use, or installation or repairs made by unqualified personnel will void your
warranty. We assume no liability for any eventual damages caused by misuse of the product or
noncompliance with these instructions.
Wire shelf : For grill, dishes, cake pan with items for
roasting and grilling.
Universal pan: For cooking large quantities of food such
as moist cakes, pastries, frozen food etc, or for collecting
fat/spillage and meat juices.
ACCESSORIES
10
Slider bracket : For cooking larger size food, these
shelf support rails on the right and left sides of the
oven can be removed, dishes and tray can be put
on the oven floor, using functions as Radiant grilling,
Double grilling, Double grill with fan.
NOTE: When placing dishes on the oven floor,
please DO NOT use functions with bottom heater to
prevent heat gathering at bottom.
(only for specific models)
Telescopic
runner: Some models might with telescopic
runners to facilitate the use of oven. These telescopic
runners and slider brackets could be disassembled by
unscrewing the screws used to fix it. After disassembled,
dishes and tray can be put on the oven floor, using
funcstions as Radiant grilling, Double grilling, Double grill
with fan.
NOTE: When placing dishes on the oven floor, please
DO NOT use functions with bottom heater to prevent
heat gathering at bottom.
(only for specific models)
2 x Wire Shelves
For grill, dishes, cake pan with items for
roasting and grilling
Slider brackets
These shelf support rails on the right and left
sides of the oven can be removed. Dishes
and tray can be put on the oven floor, using
functions as Radiant grilling, Double grilling
or Double grill with fan.
NOTE: When placing dishes on the oven
floor, please DO NOT use functions with
bottom heater to prevent heat gathering
at bottom.
Baking tray
For cooking large quantities of food such
as cakes, pastries, frozen food etc, or for
collecting fat/spillage and meat juices.
SHELF PLACEMENT
To ensure the oven shelves operate safely, correct placement of the shelves between the side rail is
imperative. Shelves and the pan only can be used between the first and fifth layers. The shelves should use
with the right direction, it will ensure that during careful removal of the shelf or tray, hot food items should
not slide out
12
Installation Instructions
ACCESSORIES
Wire shelf : For grill, dishes, cake pan with items for
roasting and grilling.
Universal pan: For cooking large quantities of food such
as moist cakes, pastries, frozen food etc, or for collecting
fat/spillage and meat juices.
ACCESSORIES
10
Slider bracket : For cooking larger size food, these
shelf support rails on the right and left sides of the
oven can be removed, dishes and tray can be put
on the oven floor, using functions as Radiant grilling,
Double grilling, Double grill with fan.
NOTE: When placing dishes on the oven floor,
please DO NOT use functions with bottom heater to
prevent heat gathering at bottom.
(only for specific models)
Telescopic
runner: Some models might with telescopic
runners to facilitate the use of oven. These telescopic
runners and slider brackets could be disassembled by
unscrewing the screws used to fix it. After disassembled,
dishes and tray can be put on the oven floor, using
funcstions as Radiant grilling, Double grilling, Double grill
with fan.
NOTE: When placing dishes on the oven floor, please
DO NOT use functions with bottom heater to prevent
heat gathering at bottom.
(only for specific models)
2 x Wire Shelves
For grill, dishes, cake pan with items for
roasting and grilling
Slider brackets
These shelf support rails on the right and left
sides of the oven can be removed. Dishes
and tray can be put on the oven floor, using
functions as Radiant grilling, Double grilling
or Double grill with fan.
NOTE: When placing dishes on the oven
floor, please DO NOT use functions with
bottom heater to prevent heat gathering at
bottom.
Universal pan
For cooking large quantities of food such
as cakes, pastries, frozen food etc, or for
collecting fat/spillage and meat juices.
SHELF PLACEMENT
To ensure the oven shelves operate safely, correct placement of the shelves between the side rail is
imperative. Shelves and the pan only can be used between the first and fifth layers. The shelves should use
with the right direction, it will ensure that during careful removal of the shelf or tray, hot food items should
not slide out
BULB REPLACEMENT
For replacement, follow the below process:
1> Disconnect power from the mains outlet or switch off the circuit breaker of the unit’s mains outlet.
2> Unscrew the glass lamp cover by turning it counter-clockwise (note, it may be stiff) and replace the bulb
with a new one of the same type.
3> Screw the glass lamp cover back in place.
NOTE: Only use 25-40W/220V-240V , T300°C halogen lamps.

10
INSTALLATION
FITTING THE OVEN INTO THE KITCHEN UNIT
Fit the oven into the space provided in the kitchen unit; it may be fitted underneath a work
top or into an upright cupboard. Fix the oven in position by screwing into place, using the two
fixing holes in the frame. To locate the fixing holes, open the oven door and look inside. To allow
adequate ventilation, the measurements and distances adhered to when fixing the oven.
IMPORTANT
If the oven is to work properly, the kitchen housing must be suitable. The panels of the kitchen
unit that are next to the oven must be made of a heat resistant material. Ensure that the glues of
units that are made of veneered wood can withstand temperatures of at least 120º C. Plastics or
glues that cannot withstand such temperatures will melt and deform the unit, once the oven has
been lodged inside the units, electrical parts must be completely insulated. This is a legal safety
requirement. All guards must be firmly fixed into place so that it is impossible to remove them
without using special tools. Remove the back of the kitchen unit to ensure an adequate current
of air circulates around the oven. The hob must have a rear gap of at least 45mm.
Note: The cavity is not to include the power switch or socket.
SECURING THE OVEN TO THE CABINET
1. Fit oven into the cabinet recess.
2. Open the oven door.
3. Secure the oven to the kitchen cabinet with the two distance holders “A”
which fit the holes in the oven frame and fit the two screws “B”.
VENTILATION
When cooking is finished, in pause state or in waiting state and if the oven’s center
temperature is over 75 degrees the cooling fan will continue working for 15 minutes.
Or when the oven’s center temperature becomes lower than 75 degree, the cooling
fan will stop in advance.
11
BULB REPLACEMENT
For replacement, process as follows:
1> Disconnect power from the mains outlet or switch off the circuit breaker of the unit's mains outlet.
2> Unscrew the glass lamp cover by turning it counter-clockwise (note, it may be stiff) and replace
the bulb with a new one of the same type.
3> Screw the glass lamp cover back in place.
NOTE: Only use 25-40W/220V-240V, T300°C halogen lamps.
SHELF PLACEMENT WARNING:
To ensure the oven shelves operate safely, correct placement of the shelves between the side rail is
imperative. Shelves and the pan only can be used between the first and fifth layers.
The shelves should be used with the right direction, it will ensure that during careful removal of the
shelf or tray, hot food items should not slide out.
SECURING THE OVEN TO THE CABINET
1. Fit oven into the cabinet recess.
2. Open the oven door.
3. Secure the oven to the kitchen cabinet with two
distance holders " A " which fit the holes in the oven
frame and fit the two screws " B ".
OR
INSTALLATION INSTRUCTIONS CONT.
12
NOTE: The number of accessories included depends on the particular appliance purchased.
INSTALLATION
Remark:
1.Only plus deviations are admissible for all dimension.
2.The cabinet is not include the power switch or socket.
CONNECTION OF THE OVEN
L
N
VENTILATING OPENINGS
When cooking is finished or in pause state or in waiting state, if the oven's center temperature is
over 75 degree, the cooling fan will continue working for 15 minutes. Or when the oven's center
temperature becomes lower than 75 degree, the cooling fan will stop in advance.
Ventilating openings
555
20
595
595
560
570
min.560
606
600
80
250
100

11
Operation Instructions
BEFORE FIRST USE
• Read: Before using the oven for the first time, read this manual thoroughly, even if you are familiar with
this type of appliance. Pay particular attention to the safety instructions on pages 5–6. Refer to pages
7–10 for a product overview, oven functions and installation instructions.
• Initial use: After the appliance has been properly installed, and before first use, you should burn off any
dust, oil or other remnants that may have been left inside the cavity from the manufacturing process or
transportation. Please run the new empty oven with the conventional cooking function at 250º C for at
least 90 minutes.
• When first connected, the display screen will show “ 12.30 ”. A beep will sound and the “ 12 ” and “ . ” will
flash, prompting you to set the correct time of day before using the oven. Please note: This is a 24 hour
clock, for example 2pm shown as 14.00. Ensure the correct time of the day is set before using the oven.
SETTING THE CLOCK
1. Press the “ + ” and “ - ” button to adjust the hour.
2. Press the “ ←→ ” button to confirm the hour.
3. Press the “ + ” and “ - ” buttons to adjust the minute.
4. Press the “ ←→ ” button to confirm the minute.
5. The oven will now be in standby mode.
Note: If the display does not flash, press the “ + ” and “ - ” buttons at the same time for more than
3 seconds, and repeat the above steps.
SELECTING THE OVEN OPERATION MODE
When the oven is in standby mode (not in use), press the “ ←→ ” button for 5 seconds.
The oven will enter Manual mode and the symbol “ ” will display on the screen continuously .
1. Turn the Cooking Function and Temperature knobs to desired settings.
2. From Manual mode, press the “ ←→ ” button to cycle through the other oven operation modes.
The sequence of the operation modes is Manual mode, Minute minder, Duration (Dur) and End.
Note:
• The oven will turn on after you select the Manual, Minute minder, Duration (Dur) or End modes.
• You can turn the oven off automatically by using the Dur or End modes.
• After you have finished cooking in Manual mode or Minute minder, to return to standby mode, turn
the cooking function and oven temperature knob to the “ 0 ” position and then press the “ ←→ ” button
and “ + ” buttons for 5 seconds.
• After selecting an oven operation mode, you may change the cooking function or adjust the cooking
temperature if required.
MANUAL MODE
In manual mode, the cooking duration is controlled by the user. Only the time of day and the symbol
“ ” are displayed on the screen.
Note: When the oven is in manual mode, after 5 hours of inactive use, the timer will flash once per second
to warn you that the oven will be entering standby mode. After 10 hours of inactive use, the oven will enter
standby mode to ensure the oven is not left on accidentally.
If the timer is flashing in manual mode, you can press any button to reset the timer if you intend
to continue using the oven. Alternatively, press “ ←→ ” and “ + ” buttons together for more than 3 seconds
to enter standby mode if the oven will no longer be used.

12
MINUTE MINDER MODE
You can set a period of time using the minute minder function, and an alarm will sound when that time
has elapsed.
1. Turn the Cooking Function and Temperature knobs to desired settings.
2. Press “ ←→ ” button to select the Minute minder function. The relevant “ ” “ . ” symbol will flash.
3. Use the “ + ” and “ - ” buttons to adjust minute minder. (Refer to the instructions for setting the correct
time of day.) Press “ ←→ ” button to confirm, the “ ” symbol will begin to light continuously.
When the “ ” symbol begins to light continuously, the alarm warning time adjustment is done.
4. When the time is up, the timer will sound an alarm and the “ ” symbol begins to flash on the screen.
Press any button for 3 seconds to silence the alarm and the “ ” symbol disappears on the screen.
Alarm time adjustment is for warning purposes only.
5. If you no longer require the oven, press “ ←→ ” button and “ + ” together for 5 seconds to enter
standby mode.
COOKING DURATION MODE SEMIAUTOMATIC PROGRAMMING
This function can be used for cooking for a set time duration. The maximum cooking period is 10 hours.
The oven will no longer continue to heat once the countdown period has elapsed.
1. Turn the Cooking Function and Temperature knobs to desired settings.
2. Press “ ←→ ” button until you see “ Dur ” shown on the display screen to select the Duration mode.
3. Use “ + ” and “ - ” button to adjust cooking period for the food you wish to cook (Refer to the instructions
for setting the correct time of day). Press the “ ←→ ” button to confirm. The day’s time will appear on the
screen and the symbols “A” and “ ” will display on the screen. While doing this, the oven will also
begin to operate .
4. At the completion of the set duration, the timer will stop the oven and will sound an alarm.
Also, the symbol “A” will begin to flash on the screen. Bring the cooking function and oven temperature
knob to “0” position and press any button for 3 seconds to stop the alarm.
Press the “ ←→ ” button for 5 seconds set the oven to Manual mode again to use the oven.
5. If you no longer require the oven, press “ ←→ ” button and “ + ” together for 5 seconds to enter
standby mode.
COOKING END MODE SEMIAUTOMATIC PROGRAMMING
This function is used to cook according to the desired finishing time by selecting a point of time
(the time of day) at which you want the oven to switch off.
1. Turn the Cooking Function and Temperature knobs to desired settings.
2. Press “ ←→ ” button until you see “ End ” on the display screen.
3. Use “ + ” “ - ” button to adjust finishing time. (Refer to the instructions for setting the correct time of day.)
4. Press “ ←→ ” button to confirm, the day’s time will appear on the screen and the symbols “A” “ ”will
light on the screen. While doing this, the oven will also start to operate.
5. After the set duration, the timer will stop the oven and will sound an alarm.
The symbol “A” will also begin to flash on the screen.
To stop the alarm, turn the cooking function and oven temperature knobs
to the “0” position and press any button for 3 seconds.
6. If you no longer require the oven, press “ ←→ ” button and “ + ” together
for 5 seconds to enter standby mode.
OPERATION INSTRUCTIONS CONT.

13
DELAYED COOKING FUNCTION FULLAUTOMATIC PROGRAMMING
WARNING:
• Food safety: Do not leave the food for too long in the oven as food may spoil. We recommend only using
the delayed cooking function for non-perishable items only.
• Do not leave the oven unattended when cooking. Oils and fats may catch fire due to overheating.
• When baking, we do not recommend programming the oven for delayed cooking as the cake mixture
may dry out and the raising agents may lose their effectiveness.
This function is used for cooking after a certain period with a particular duration. Place your food into the
oven and adjust both the cooking function and oven temperature depending on your cooking requirements.
1. Turn the Cooking Function and Temperature knobs to desired settings.
2. Press “ ←→ ” button until you see “ Dur ” displayed on the display screen. Use “ + ” and “ - ” buttons to adjust
cooking period for the food you wish to cook. Press “ ←→ ” button to confirm, the day’s time will appear on
the screen and the symbols “ A” will begin to continuously light on the screen.
3. Continue pressing the “ ←→ ” button until you see “ End ” displayed on the display screen.
Once you see “ End ” on the display screen, use the “ + ” and “ - ” buttons to adjust finishing time.
Press the “ ←→ ” button to confirm and the day’s time will appear on the screen and the symbol “ A ” will
begin to continuously light on the screen. The symbol “ ” disappears until the time cooking starts.
You can set a time which can be up to 23.59 hours after the time obtained by adding the cooking period
to the day’s time.
The oven will start operating at the time calculated by deducting the cooking period from the set finishing
time, and will stop at the set finishing time. The timer will sound an alarm and display a flashing symbol “A”.
After turning the cooking function and oven temperature knob to the “ 0 ” position, press any button for
3 seconds to stop the alarm.
4. If you no longer require the oven, press “ ←→ ” button and “ + ” together for 5 seconds to enter
standby mode.
Please note: Once you have set the delayed cooking function full automatic mode, the time cannot be
changed. Changing the time would cancel the delayed cooking function and enter into the corresponding
mode. If you need to reset delayed cooking function, follow the above steps again.
NOTES
• When setting the time of each function, long press on “ + ” or “ - ” for 5 seconds, the time will progressively
and rapidly increase or decrease.
• When setting either of the time functions, if there is none operation for 5 minutes then it will return
to manual mode.
• When setting either of the time functions, pressing on the “ ←→ ”” button for more than
3 seconds can cancel current setting and enter manual mode.
• During time function setting, pressing on “ + ” and “ ←→ ” for 5 seconds ,
a beep sounds it can cancel the current time function setting and enter standby mode.
OPERATION INSTRUCTIONS CONT.
14
For the sake of a good appearance and reliability, keep the unit clean. The modern design of
the unit facilitates maintenance to a minimum. The parts of the unit which come into contact
with food have to be cleaned regularly.
• Before any maintenance and cleaning, disconnect the power.
• Set all controls in the OFF position.
• Wait until the inside of the unit is not hot but only slightly warm—cleaning is easier than
when warm.
• Clean the surface of the unit with a damp cloth, soft brush or fine sponge and then
wipe dry.
• In case of heavy soiling, use hot water with non-abrasive cleaning product.
• For cleaning the oven door glass, do not use abrasive cleaners or sharp metal scrapers,
as these can scratch the surface or lead to the glass being damaged.
• Never leave acidic substances lemon juice, vinegar on stainless steel parts.
• Do not use a high pressure cleaner for cleaning the unit.
• The baking tray and wire shelving may be washed in mild detergent.
BULB REPLACEMENT
For replacement, follow the below process:
1. Disconnect power from the mains outlet or switch off the circuit breaker of the unit’s mains outlet.
2. Unscrew the glass lamp cover by turning it counter-clockwise (note, it may be stiff) and replace the bulb
with a new one of the same type.
3. Screw the glass lamp cover back in place.
NOTE: Only use 25-40W/220V-240V , T300°C halogen lamps.
REMOVING THE OVEN DOOR
The removable door allows for full access to the entire interior of the oven for easier and quicker
maintenance. Follow these instructions carefully if you wish to remove the over door.
1. To remove the door, open the door to the maximum angle.
Then pull the buckle at the door hinge backward.
2. Close the door to an angle approximately 30°.
Hold the door with one hand on each side.
Lift up and slowly pull the door out from the oven.
Maintenance and Cleaning
14
INSTALLATION INSTRUCTIONS CONT.
The removable door allows for full access to the entire
interior of the oven for easier and quicker maintenance.
Follow these instructions carefully if you wish to remove
the over door.
1.
2.
3.
4.
To remove the door, open the door to the
maximum angle. Then pull the buckle at the door
hinge backward.
Close the door to an angle approximately 30°.
Hold the door with one hand on each side.
Lift up and slowly pull the door out from the oven.
Open the door rotation bracket assembly, refer
the action in the following picture.
Lift up the door outer glass and pull it out, then
take the door middle glass out in the same way.
WARNING:
Don't forcefully pull out the door to prevent the glass
from breaking during the dismantling process.
WARNING:
The hinge springs could come loose and cause personal
injury.
WARNING:
Do not lift or carry the oven door by the door handle.
30˚

15
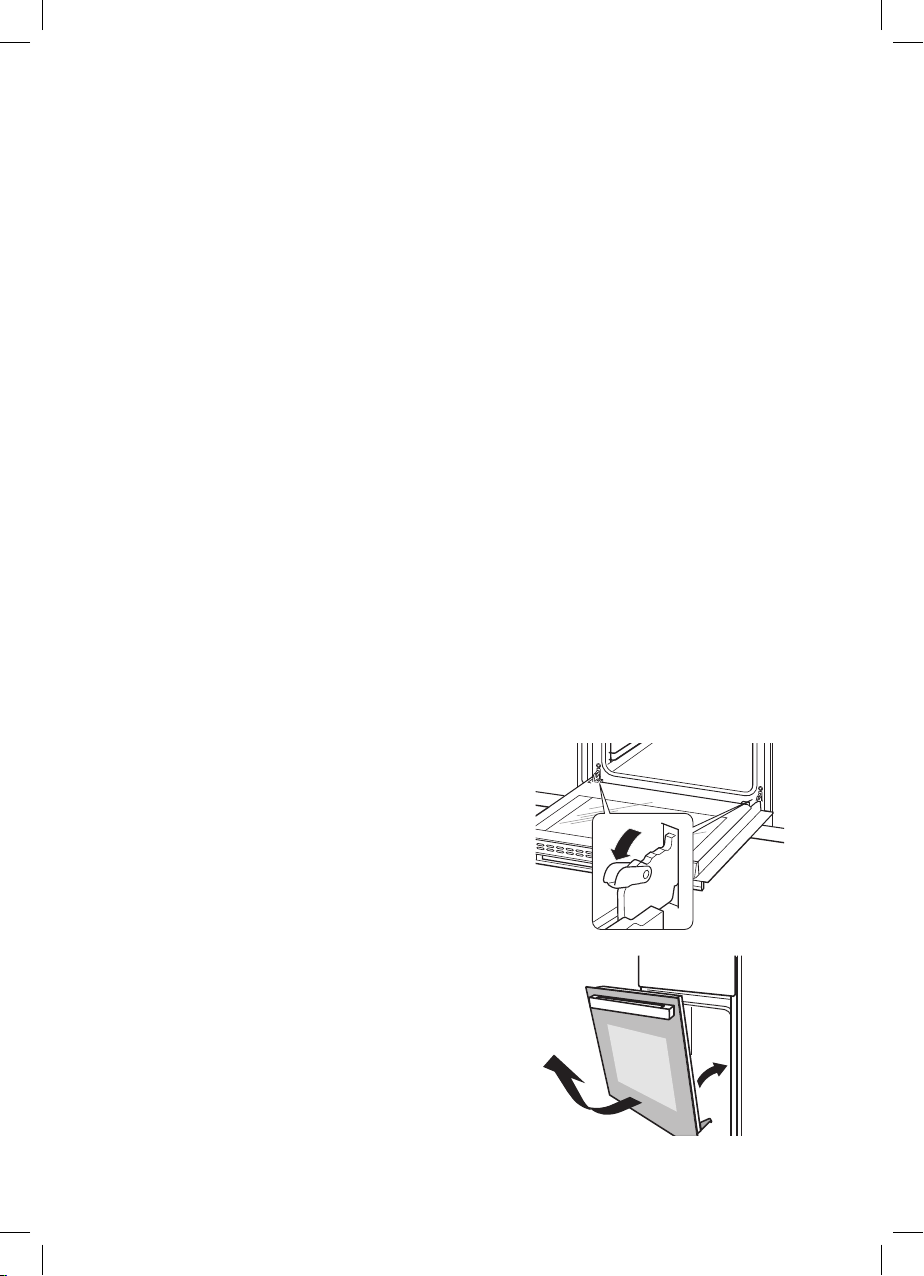
3. Open the door rotation bracket assembly, refer the action in the following picture.
4. Lift up the door outer glass and pull it out, then take the door middle glass out in the same way.
WARNING:
• Do not forcefully pull out the door to prevent the glass from breaking during the dismantling process.
• The hinge springs could come loose and cause personal injury.
• Do not lift or carry the oven door by the door handle.
DISPOSAL: Do not dispose this product as unsorted municipal waste.
Collection of such waste separately for special treatment is necessary.
This appliance is marked according to the European directive 2012/19/EU
on Waste Electrical and Electronic Equipment WEEE.
By ensuring this product is disposed correctly, you will help prevent potential
negative consequences for the environment and human health, which could
otherwise be caused by inappropriate waste handling of this product. The symbol
on the product indicates that this product may not be treated as household
waste. Instead it shall be handed over to the applicable collection point for the
recycling of electrical and electronic equipment. Disposal must be carried out
in accordance with local environmental regulations for waste disposal. For more
detailed information about treatment, recovery and recycling of this product,
please contact your local city office, your household waste disposal service or the
shop where you purchased the product.
15
For the sake of a good appearance and reliability, keep the unit clean. The modern design of
the unit facilitates maintenance to a minimum. The parts of the unit which come into contact
with food have to be cleaned regularly.
• Before any maintenance and cleaning, disconnect the power.
• Set all controls in the OFF position.
• Wait until the inside of the unit is not hot but only slightly warm-cleaning is easier than when
warm.
• Clean the surface of the unit with a damp cloth, soft brush or fine sponge and then wipe dry.
• In case of heavy soiling, use hot water with non-abrasive cleaning product.
• For cleaning the glass of the oven door, do not use abrasive cleaners or sharp metal scrapers,
these can scratch the surface or lead to the glass being damaged.
• Never leave acidic substances (lemon juice, vinegar) on stainless steel parts.
• Do not use a high pressure cleaner for cleaning the unit.
• The baking pans may be washed in mild detergent.
Maintenance and Cleaning
DISPOSAL: Do not dispose this product as unsorted municipal waste. Collection of
such waste separately for special treatment is necessary.
This appliance is marked according to the European directive 2012/19/EU on Waste
Electrical and Electronic Equipment WEEE.
By ensuring this product is disposed correctly, you will help prevent potential
negative consequences for the environment and human health, which could
otherwise be caused by inappropriate waste handling of this product. The symbol
on the product indicates that this product may not be treated as household
waste. Instead it shall be handed over to the applicable collection point for the
recycling of electrical and electronic equipment. Disposal must be carried out
in accordance with local environmental regulations for waste disposal. For more
detailed information about treatment, recovery and recycling of this product,
please contact your local city office, your household waste disposal service or the
shop where you purchased the product.
14
INSTALLATION INSTRUCTIONS CONT.
The removable door allows for full access to the entire
interior of the oven for easier and quicker maintenance.
Follow these instructions carefully if you wish to remove
the over door.
1.
2.
3.
4.
To remove the door, open the door to the
maximum angle. Then pull the buckle at the door
hinge backward.
Close the door to an angle approximately 30°.
Hold the door with one hand on each side.
Lift up and slowly pull the door out from the oven.
Open the door rotation bracket assembly, refer
the action in the following picture.
Lift up the door outer glass and pull it out, then
take the door middle glass out in the same way.
WARNING:
Don't forcefully pull out the door to prevent the glass
from breaking during the dismantling process.
WARNING:
The hinge springs could come loose and cause personal
injury.
WARNING:
Do not lift or carry the oven door by the door handle.
30˚
MAINTENANCE AND CLEANING CONT.

16
Troubleshooting
If you are having any issues with your Harbour Appliance ensure you have read and adhered to all
information in this instruction manual.
Some minor faults can be fixed by referring to the instructions given in the table below:
Issue Possible Cause Resolution
The oven is not turning on. Break in power supply. • Check the household fuse box for any
blown fuses and replace as necessary.
Also ensure that a safety switch hasn’t
tripped.
The oven light is not working. The light globe is loose
or has blown.
• When the oven has cooled and is
switched off, remove the globe cover
and ensure that the globe is tight.
• If blown, refer to the Cleaning and
Maintenance section under Bulb
Replacement.
The oven is burning the
top of my dish whilst the
underside is under-done.
Not enough heat from
the bottom of the oven.
• Try using the Conventional cooking
functions.
• Try lowering the temperature.
• Try using a lower shelf position.
The oven is burning the
underside of my dish whilst
the top is under-done.
Excessive heat from the
bottom
of the oven.
• Try using the Conventional cooking
functions.
• Try lowering the temperature.
• Try using a higher shelf position.
The oven is burning the
outside of my dish whilst
the inside is under-done.
Temperature is set too
high.
• Lower the temperature and increase
the cooking
The outside of my dish is
too dry even though it
looks cooked.
Temperature is set too low. • Increase the temperature and decrease
the cooking duration.
For further care instructions and troubleshooting tips visit our website www.harbour-appliances.com.au.
If you need to speak to someone please contact our after sales support centre on 1300 11 43 57 for
any assistance.

17
Specifications
Model: HBROB609
Gross Volume: 80L
Product Dimensions (W ×D ×H): 595 × 575 × 595mm
Weight (Net/Gross): 32.25kg/35.32kg
Rated Voltage 220-240V~
Rated Frequency 50Hz-60Hz
Rated Power 3.0kW
No. of Functions 9
Other Features: Touch Control Programmable Clock/Timer
Full Grill
Fixed Knob Controls
Black Stainless Steel Trims
Aluminium handle
2 × Chrome wire shelves
1 × Baking tray with chrome rack insert
15 Amp plug

18
1
www.xxxxxxx.com
0000 000 000
60cm/90cm Canopy Rangehood
Unfortunately, from time to time, faulty products are manufactured which need to be
returned to the Supplier for repair.
Please be aware that if your product is capable of retaining user-generated data (such as files
stored on a computer hard drive, telephone numbers stored on a mobile telephone, songs
stored on a portable media player, games saved on a games console or files stored on a USB
memory stick) during the process of repair, some or all of your stored data may be lost.
We recommend you save this data elsewhere prior to sending the product for repair.
You should also be aware that rather than repairing goods, we may replace them with
refurbished goods of the same type or use refurbished parts in the repair process.
Please be assured though, refurbished parts or replacements are only used where they
meet ALDI’s stringent quality specifications.
If at any time you feel your repair is being handled unsatisfactorily, you may escalate your
complaint. Please telephone us on 1300 11 43 57 or write to us at:
Residentia Group
1/32 Wangaratta St
Richmond VIC 3121
Australia
Repair and Refurbished
Goods or Parts Notice
60cm 80L Electric Oven
165 Barkly Avenue,
Burnley VIC 3121
Australia
Email: support@residentiagroup.com.au
Helpline hours of operation:
Mon–Fri
9:00 AM - 5:00 PM

19
For an electronic copy of this manual, go to www.harbour-appliances.com.au
and download a copy.

AN INITIATIVE BY RESIDENTIA GROUP
TEL: 1300 11 4357 |EMAIL: SUPPORT@RESIDENTIAGROUP.COM.AU
CERTIFICATE NO.: SGS-170971-EA
Other manuals for HBROB609
1
This manual suits for next models
1
Table of contents
Other Harbour Oven manuals


