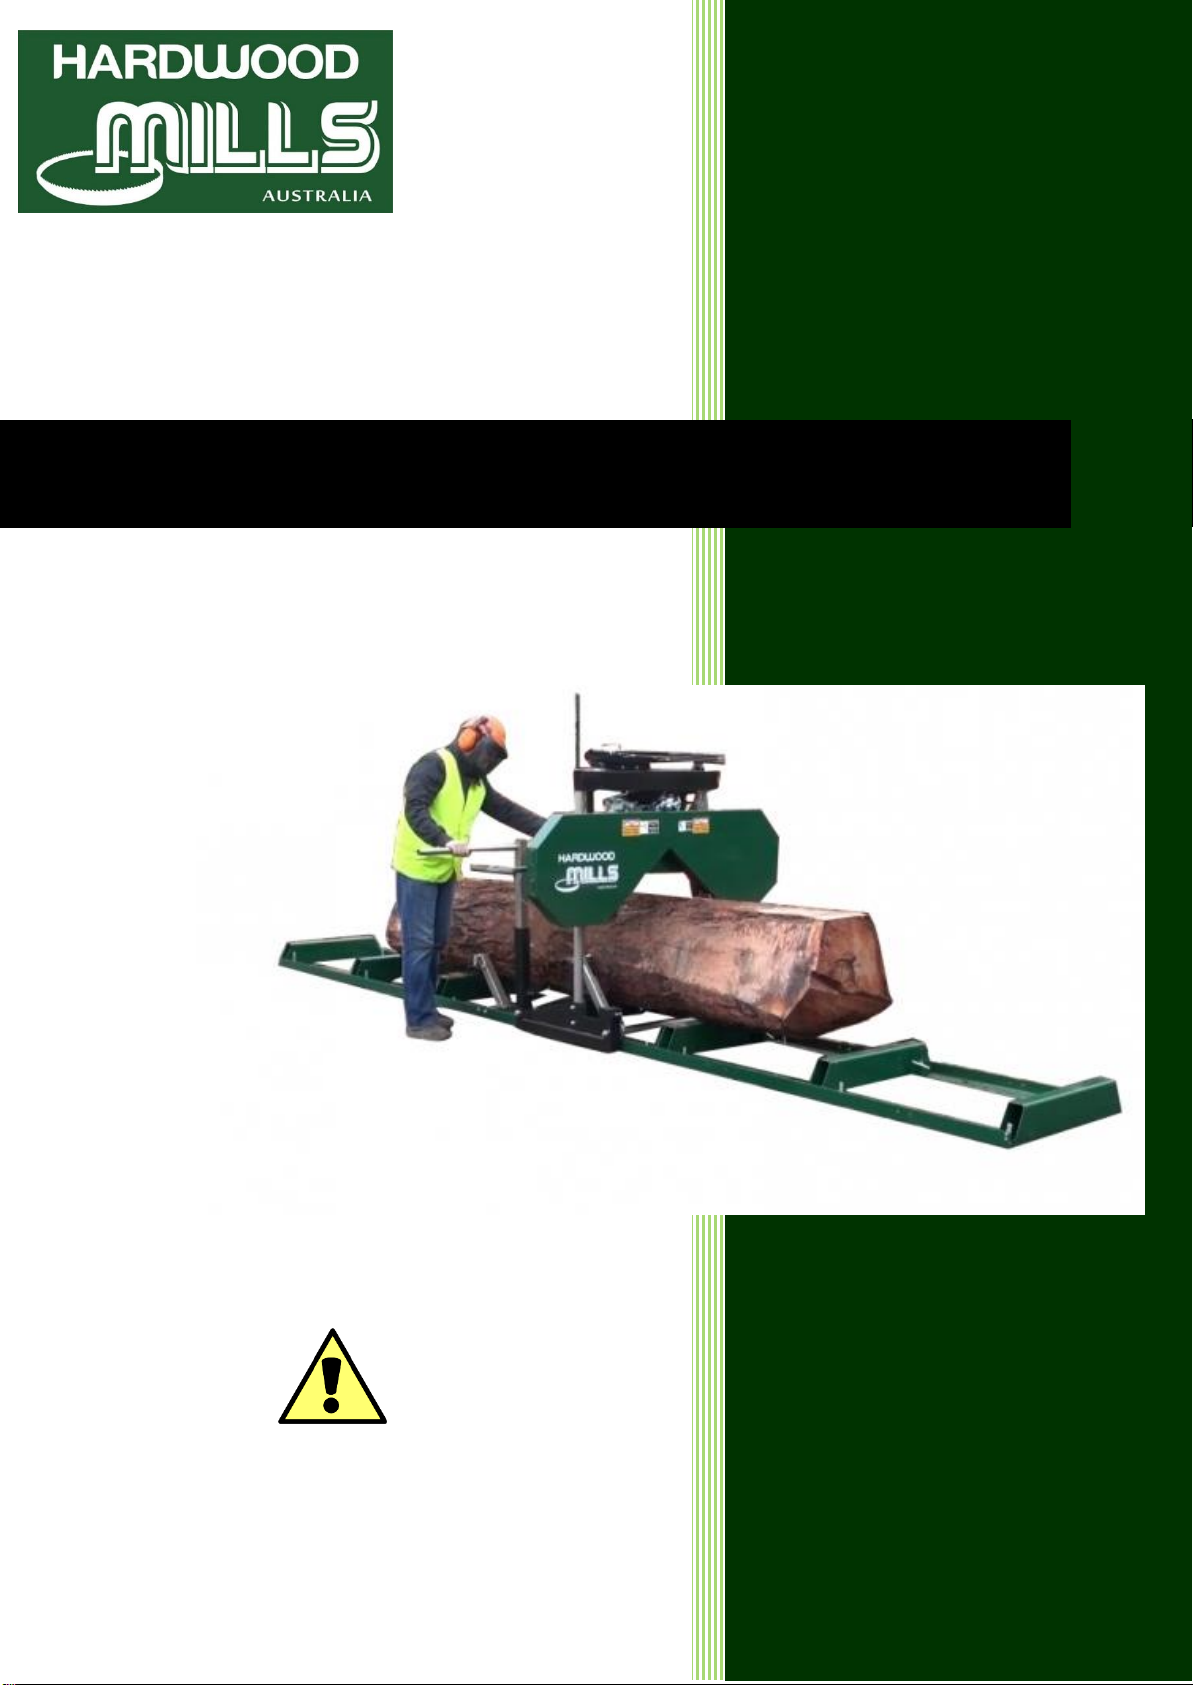
Hardwood Mills GT26 User manual

WARNING:
Read carefully and understand all INSTRUCTIONS
before operating. Failure to follow the safety rules
and other basic safety precautions may result in
serious personal injury.
2017
GT26 Sawmill Owner’s Manual

Page | 2
Contents
GENERAL SAFETY RULES………………………………………………3-9
WARRANTY INFORMATION……………………………………………. 9-10
START UP PROCEEDURE………………………………………………..10
GENERAL MAINTENANCE INFORMATION……………………………11
SAWMILL ASSEMBLY INSTRUCTIONS ……………………………….12
Inspection 12
Tracks 12
Log Dog & Supports 14
Carriage Assembly 16
Engine 24
SAWMILL SET-UP PROCEDURES …………………………………… 26
Belt Tension 26
Blade Tracking 27
Blade Guide Adjustment 31
Blade Tension 32
SAWMILL MAINTENANCE ……………………………………………….34
Changing the Blade 34
Replacing Belts 34
TROUBLESHOOTING ---------------------------------------------------------- 36
PARTS LIST ------------------------------------------------------------------------ 37
PART DIAGRAMS ---------------------------------------------------------------- 39
NOTES ------------------------------------------------------------------------------- 44

Page | 3
Thank you very much for choosing the Hardwood Mills Australia GT26 Portable Sawmill. For future
reference, please complete the owner’s purchase date:
Save the receipt for warranty and these instructions. It is important that you read the entire
manual to become familiar with this product before you begin using it.
This machine is designed for certain applications only. We strongly recommend this machine is not modified
and/or used for any application other than that for which it was designed. If you have any questions
relative to a particular application, DO NOT use the machine until you have first contacted us to determine if
it can or should be performed on the product.
For technical questions and replacement parts, please contact Hardwood Mills Australia 0432
221 952.
INTENDED USE
This sawmill is designed for sawing logs while the mill is firmly supported on the ground.
TECHNICAL SPECIFICATIONS
Item
Description
Petrol Engine
14 HP Kohler
Maximum log diameter
26" (660mm)
Maximum Board Width
21" (533mm)
Blade Size
1-1/4 x 144" (32 x 3657mm)
GENERAL SAFETY RULES
WARNING: Read and understand all instructions. Failure to follow all instructions listed below
may result in electric shock, fire and/or serious injury.
WARNING: The warnings, cautions, and instructions discussed in this instruction manual
cannot cover all possible conditions or situations that could occur. It mustbeunderstoodbytheoperator
that common sense and caution are factors which cannot be built into this product, but must be supplied by
the operator.
WARNING: Only operate the engine in a well- v e n t ila t e d area. Carbon Monoxide
produced by the engine during use can kill. Do not use indoors, near windows or in other sheltered
areas.
NOTE: All Federal and State laws and any regulation having jurisdiction covering the safety requirements
for use of the machine take precedence over the statements in this manual. Users of this machine must
adhere to such regulations.
DISCLAIMER
This sawmill, its options, accessories, engine and blades are extremely dangerous and can cause severe injury or death.
To avoid serious injury, the equipment must always be handled, operated and stored with the utmost care and good
judgment and in accordance with all warnings, cautions, instructions and procedures contained in this manual, in the
engine manual, in the instructions enclosed with optional accessories and on the decals on the equipment. Failure to
use good judgement or to follow any of these warnings, cautions, instructions and procedures can result in severe
injury or death.
Hardwood Mills Australia and Geoff’s Tools Pty Ltd. disclaim any responsibility or liability, in negligence or otherwise,
for any injuries, damages or losses of any kind arising during the course of assembling, operating or handling this
equipment, options, accessories or blades howsoever caused. Responsibility for final inspection of the Hardwood Mills
GT26 parts and components, and the assembly, maintenance and safe use of the equipment, lies solely with the
person(s) who assembles and operates the equipment and handles blades.

Page | 4
SAVE THESE INSTRUCTIONS
For your own safety and the safety of others, do not begin working with this equipment before having read
and understood this entire manual, the engine manual, the instructions enclosed with optional accessories
and the decals posted on the equipment. Save all instructions for future reference. Keep all decals in place,
clean and readable. Replace any damaged or missing decals without delay.
OPERATOR SAFETY
It must be understood by the operator that common sense and caution are
factors which cannot be built into this product, but must be supplied by the
operator.
Individuals under the age of 18 may not work with the equipment or
handle blades.
Only persons who meet all of the following requirements are qualified to
operate the equipment or handle blades.
a. Have read and fully understood all the warnings, cautions, instructions
and procedures in this manual, the engine manual and all instructions
enclosed with the optional accessories, and on all decals posted on the
equipment
b. Are well rested
c. Are in good physical health with good eyesight
d. Have not consumed alcohol or drugs and/or
e. Not taking medication that can impair judgement, reaction times,
mobility, alertness or otherwise cause negative side effects.
Individuals who fail to meet any of these requirements are not qualified to
use the equipment or handle blades.
Personal Protection Equipment (PPE) that meet the Australian standard
should always be worn when operating the equipment and handling
blades. This include:
-Protective gloves as there is a risk of cutting injuries when handling
blades, and blades and the engine can be hot immediately after
sawing.
-Wear approved hearing protection when operating the equipment.
Hearing can be permanently impaired after only short exposure to high
frequency sounds.
-Wear Approved safety goggles when working with the equipment or
handling blades.
-Wear approved protective footwear with saw protection, steel toe-cap
and non-slip sole when working with the equipment or handling
blades.
-Wear full length protective pants and hi-vis gear when working with or
operating the equipment or blades. Never wear loose fittings clothing,
scarves, jewelry or similar long items that could get caught when
working with the equipment. Always secure loose hair before working
with the equipment.
-Wear respiration protection when working with the equipment. Long
term inhalation of sawdust and the engines exhaust fumes can
represent a health risk.

Page | 5
WORK SITE SAFETY
Operate the equipment and handle blades in full daylight or under
adequate site lighting, cast from at least four sides to minimize shadows.
Keep the work area clean, free of clutter, pets, children, obstacles, hazards
or distractions.
Keep all children and animals well away from the equipment, blades and
worksite.
A broken blade can be ejected out of the sawdust chute at high velocity.
Keep all people and pets completely clear of the path of the sawdust chute.
Remember that, as the carriage moves, so foes the blade and the path of
the sawdust chute.
Risk of a blade breaking increases when it is not properly and regularly
profiled and maintained and/or when a blade is used past its service life.
The illustration below depicts a view of a work site as seen from above. It
sets out the minimum safety distance for persons other than the operator.
While operating the equipment, the operator must be within the stipulated
area, bounded between the broken line and the nearest side of the
sawmill.
While the equipment is running, persons other than the operator must
observe the safety distances stipulated in the illustration. The minimum
safety distance away from the equipment for persons other than the
operator on the left side of the sawmill (opposite the operator) is 15m due
to the risk of blades being ejected out of the sawdust chute. On all other
sides of the equipment, the minimum distance away for persons other than
the operator is 6m.
Keep hands, limbs and all body parts completely clear of the blade, cables
and any other moving parts. Remember that, as the carriage moves so do
the blade, cables and other moving parts. Keep clear of all danger areas.
Never operate the petrol powered engine in an enclosed area. Operate
petrol-powered engine outside only, in a well ventilated area. The exhaust
gases of the engine can cause nausea, delirium, and potentially death
unless adequate ventilation is present.
Never walk on the rails or cross bunks.
Never step across the rails.
Set up the equipment on level ground so that there is at least 3m of level
ground around the rails and that there are no obstacles within that area.
Do not stand between the pile of logs and the equipment.
Always stand at the side of the pile of logs when handling the logs. Never
stand where you are at risk of being hit by a rolling log.
Keep a fully charged dry-chemical fire extinguisher visible and easily
accessible at the worksite.
Keep a fully stocked first air kit visible and easily accessible at the worksite.
Never work alone. Make sure that there are other adults within hearing
distance should you need to call for help.
OPERATING
THE
EQUIPMENT
Cutting tools: Stand behind the carriage and keep both your hands on the
push handle while operating the equipment. Never stand in front of the
carriage or blade. Never pull the carriage through the cut.
Saw head drop danger: Releasing, even slightly on the adjustment winch
will release the winch brake. Releasing the winch break will cause the saw-
head to drop quickly and violently causing serious injury.
Clutch: The clutch mechanism is extremely sensitive. Even the slightest
touch when the engine is idling can engage the clutch and thereby cause

Page | 6
OPERATING
THE
EQUIPMENT
the blade to spin. Never open the blade and band wheel guards while the
engine/motor is running. Never put your hands on the blade and band
wheel guards while the engine/motor is running.
Before opening the blade and band-wheel guards, turn the engine off. If
your machine is fitting with an electric motor, disconnect the power supply
from the electrical outlet.
Coiled blades can spring apart with considerable force and unpredictably in
any direction. Handle coiled blades, including those packaged with the
utmost care.
The blade and band wheel guards are shatter resistant to temperatures as
low as -28oC. Never operate the equipment in temperatures at or
below -28oC
Ensure that the equipment is assembled and maintained in accordance
with this manual, the engine manual and any instructions enclosed with
the optional accessories.
Never use the equipment to cut anything other than clean logs or timber.
Never add hardware or attachments of any kind to the equipment other
than those manufactured by Hardwood Mills specifically for the
equipment. Never modify the equipment.
Before operating the equipment, ensure that:
-All maintenance procedures have been properly carried out;
-The blade is disengaged;
-The equipment stands firmly and securely and the rails are fully
supported along their full length;
-The carriage retaining under-wheels and bed end stops are properly
and securely installed;
-All components, fasteners, cables and parts are properly and securely
installed and in good working order;
-All safety sheets are filled out
-All safety features are properly and securely installed and in good
working order including, but not limited to, the engine circuit breaking
safety switch, the blade/band wheel brake, the sawdust chute cage,
and blade and band wheel guards are correctly installed and securely
locked; and
-The blade is correctly installed, properly tensioned and aligned, and
can rotate freely in the correct direction.
Before each cut, ensure that:
-No person other than the operator and no pets are within the
minimum safety distances;
-The work site is free of objects that the operator can trip over, hazards
or distractions.
-The blade will clear the log posts and log dogs;
-The rails and track are free of debris;
-The log is firmly secured with the log clamping mechanisms;
-The blade and band wheel guards are correctly installed and securely
locked; and
-The operator is wearing all personal protective equipment.
At regular intervals during operation, ensure that no person other than
the operator and no pets are within the minimum safety distances.

Page | 7
OPERATING
THE
EQUIPMENT
Turn the engine/motor off if you are going to leave the operating station
behind the carriage, even just temporarily, for example when loading or
repositioning logs or removing lumber.
Never overreach. Keep proper footing at all times.
Discontinue operating the equipment or handling blades if you become
fatigued or distracted.
Stay focused and alert. Watch what you are doing. Use common sense.
BURN DANAGER: The engine and muffler get very hot during operation
and remain very hot for a long time after operation. Do not touch.
When operating the petrol powered engine:
-FIRE DANGER! Petrol, its vapors an oil are extremely flammable. Burn
injuries can be life-threatening.
-Never operate the petrol powered engine with a fuel or oil leak. The
leaking fuel or oil could potentially come in contact with hot surfaces
and ignite into flames. If you spill fuel, turn off the engine immediately
and clean the area right away. If you get furl on your clothing, change
immediately.
-To avoid fire or explosion, never smoke while refueling or handling
fuel. Never permit smoking, welding, grinding, blade sharpening or any
sparks or flames near the engine, fuel tanks or fuel.
-To avoid fire or explosion, always turn the engine off before refueling.
-Refuel before operating the sawmill when the engine is cold; never
refuel when the engine is hot.
-To avoid fire or explosion, always remove the fuel tank before installing
or removing the battery.
When operating the electric powered motor:
-RISK OF ELECTRIC SHOCK –Hazardous voltage inside the disconnect
box, starter box and at the electric motor can cause shock, burns or
death.
-Electrical short danger! Ensure that you do not short out any part of
the electrical system. Shorting out the electrical system can cause both
of the saw head support cables to simultaneously break suddenly and
the saw head to drop violently causing serious injury.
-Only a qualified electrician can open the electrical equipment. All
electrical installation, service and maintenance work must be
performed by a qualified electrician and must be performed in
accordance to applicable Australia electrical codes. Failure to do so can
result in serious injury or death.
-Before installing, servicing or maintaining any of the electrical
equipment, turn the key to the OFF position and remove the ignition
key, disconnect the sawmill battery ground terminal and disconnect
the power supply electrical cable from the electrical outlet (unplug it).
Follow all applicable Australia safety standards.
-If you have any reason to suspect that there is anything wrong with the
electrical system, immediately disconnect (unplug) the power supply
electrical cable from the electrical socket, turn the ignition key to the
OFF position and remove it, disconnect the sawmill battery ground
terminal and contact a qualified electrician to service the electrical
equipment. DO NOT OPERATE the equipment until it has been serviced
by a qualified electrician and certified fully safe to operate.

Page | 8
STORING THE
EQUIPMENT
When storing the equipment, make sure the engine is off with the fuel
shut off at the engine or the ignition switch turned to OFF position and
removed and remove the blade. Consult your engine manual for safe
shutdown procedures to prevent accidental ignition, and take any further
measures necessary to prevent unauthorised operators from accessing or
starting the equipment. If your sawmill is equipped with an electric motor,
also disconnect the power supply electrical cable from your electrical
socket (unplug).
Ensure the blade and band wheel guards are correctly installed and
securely locked.
Lower the saw head to its lowest position.
Always store the equipment in a secure and locked location completely in
accessible by children or any other individuals.
When not in sure or when unattended, even for short periods of time such
as during breaks, remove the blade from the sawmill and store it in a
location inaccessible by children or any persons. In addition to being a wise
safety precaution, removing the blade from the sawmill ensures that it is
not stored under tension and so prevents premature blade fatigue.
When not in use, take measures to secure the carriage to the bed to
prevent the carriage from being blown or inadvertently rolled along the
track
Always store all blades in a secure and locked location, completely
inaccessible by children or any persons.
MAINTAINING
THE
EQUIPMENT
Always ensure that all the equipment, its components, fasteners, cables
and parts are properly maintained and adjusted and in good working order
before operation.
Before performing any service, maintenance, cleaning, repairs or
adjustments, before opening the blade and band-wheel guards, before
removing or installing blades, before moving the sawmill and before storing
the equipment, turn the engine ignition key to the OFF position, remove
the ignition key from the engine, and shut the fuel off at the engine Consult
your engine manual for safe shutdown procedures to prevent accidental
ignition. If your sawmill is equipped with an electrical motor, also
disconnect (unplug) the power supply electrical cable from your electrical
outlet.
Before performing any service, maintenance, cleaning, repairs or
adjustments, before opening the blade and band-wheel guards, before
removing or installing blades, before moving the sawmill and before storing
the equipment, lower the saw head to its lowest position.
Only service the engine before operating the sawmill when the engine is
cold, never service the engine when the engine and muffler are hot.
Keep operating handles dry, clean and free of oil.
Use only original parts from Hardwood Mills.
Keep saw blades sharp and clean. Properly maintained band saw blades are
less likely to bind and are easier to control.
Cleaning and lubrication. Use only soap and a damp cloth to clean your
sawmill. Many household cleaners are harmful to plastic and rubber
components on the sawmill.
Always operate sawmill with all safety devices and guards in place and in
working order. DO NOT modify or make changes to safety devices. DO NOT
operate sawmill if any safety devices or guards are missing or inoperative.

Page | 9
MOVING
THE
EQUIPMENT
The saw carriage and the bed must not be lifted or transported
simultaneously; the saw carriage and the bed must each be lifted and
transported separately and by forklift or the like.
RISK of being crushed by the carriage and bed. Keep all people and pets at
least 6m from the equipment while it is being loaded, suspended, moved,
and unloaded.
Danger of tipping –do not transport on uneven terrain.
Before moving the sawmill, lower the saw head to is lowest position.
Lifting the saw carriage: Disconnect the carriage under wheels and lift the
saw carriage with reliable rated straps affixed to both lifting points located
at the top of the saw carriage.
Lifting the bed: Lift the bed slowly and carefully with the use of tines of a
forklift or the like positioned under the bed rails. Place a protective layer of
weed securely on the top surface of the tines. Centered along the side of
the bed, insert the tines all the way under the bed so that both rails are
securely balanced and supported. Securely strap the rails to the tines.
WARNING
WARNING: Cutting tools: Incorrect use of the equipment or unsafe blade handling
can cause life-threatening injuries. Blades are extremely sharp and dangerous.
Safety instructions are found in this section of this manual, in other sections
throughout this manual, in the engine manual, in the instructions enclosed with
optional accessories and on the decals posted on the equipment.
Risk of being crushed by the carriage.
Risk of tripping on the rails or the cross bunks
Risk of being crushed between the sawmill and a moving log
WARRANTY
Hardwood Mills warrant that each new GT26 sawmill will be free, under normal use
and maintenance, from any defects in workmanship and materials for a period of
ONE YEAR from the date of purchase by the ORIGINAL purchaser. Should any
trouble develop during this period, return of the defective part (and any other
parts called for), freight prepaid, to Hardwood Mills warranty coverage commences
from the date of purchase by the original purchaser.
If, after inspection, Hardwood Mills determines that the trouble is attributable to
faulty workmanship or material at the time of manufacture, Hardwood Mills with
repair or, at its option, replace the part at no charge.
The warranty does not cover:
1. The engine which is warranted directly but the engine manufacturer.
2. Normal maintenance services
3. Repairs required where alterations have been made to the equipment, or
as a result of the attachment or installation of any parts or devices on the
equipment other than those manufactured by Hardwood Mills specifically
for the equipment.
4. Repairs required after repairs have been made or attempted to be made by
an unauthorised individual.
5. Repairs required as a result of collision, accident, misuse or abuse or lack of
required maintenance.
6. Repairs required because he equipment has not been assembled correctly;
and
7. Consumable items such as belts or blades.
8. Chips, scratches, rust or blemishes in finish.
•It is always a good idea to keep spare parts on hand to ensure that your
milling operation stays on schedule, particularly if you intend to mill

Page | 10
WARRANTY
commercially. At a minimum, you should keep adequate stock of blades,
spare belts, bearings, blade guides and track sweepers.
Hardwood Mills warrant that the new GT26 spare parts (except consumables such
as but not limited to blades and belts), will be free under normal use and
maintenance, from any defects in workmanship and materials for a period of forty-
five days from the date of purchase by the original purchaser.
To obtain warranty service: Contact Hardwood Mills via
sales@hardwoodmills.com.au with the part number and issue, your name and best
contact number.
Engine warranty: Hardwood Mills does not warrant the engine; the engine is
warranted directly by the engine manufacturer. Refer to your engine owner’s
manual for the warranty policy regarding your engine. Contact your engine
manufacturer’s customer service department or your local authorised engine
dealer directly with any questions regarding your engine.
Kohler Australia 1800 564 537
Or check their website.
START UP PROCEDURE - EQUIPMENT OPERATION
1. Wear heavy-duty work gloves, ANSI-approved goggles behind a full face shield, steel-toed work
boots, and a dust mask.
2. Operate only with assistance.
3. Ensure guide blocks are tight and track is level
3. Fill the lubrication tank with clean water and washing up detergent.
5. Start and operate the engine according to the provided engine manual.
6. Depress the throttle to bring the blade up to full speed.
7. Throttle should be fully depressed when the saw is under load.
8. Cut branches off the lumber to be processed.
9. WARNING: to avoid death or serious injury. Do not cut lumber with foreign objects in it such as
nails, any metal pieces, etc.
10. Place the lumber to be cut on the supports.
11. WARNING: The operator and any assistants must stay clear of the front and back of the blade
whenever the engine is on.
12. Move the saw head slowly along the track and against the lumber to make the cut.
13. Trim off the rounded sides of the log.
14. When the log is squared-off, boards or posts can be cut to custom specifications.
15. To prevent accidents, turn off the engine and disconnect its spark plug wire after use. Wait for the
engine to cool, clean external parts with a clean cloth, then store the equipment out of children’s
reach.

Page | 11
MAINTENANCE
Proper and routine maintenance is critical to operator safety, achieving good milling results and to
prolonging the life of your investment.
1. Band wheel Bearings —Should be inspected before use to ensure they are not worn.
Bearings are sealed and do not need to be greased.
2. Blade Guide Bearings —Inspect before use for excessive grooves or scoring in the
bearing case. Replace if necessary.
3. Blade Tension —Grease threads of tensioning “T”handle when dry or as required. Use multi-
purpose, extreme-pressure grease.
4. Log Screws —Grease frequently.
5. Belts —Periodically check the condition and wear of the drive and idler belt. Ensure that
the blade does not ride on the bandwheels.
6. Drive Belt —Periodically check the tension of the drive belt. It should deflect by no more than
1/2".
7. Sawhead Locking Cam Handles —Grease assembly every 30 days or as required.
8. Sawhead Vertical Posts —Spray posts before use with a silicone spray lubricant such as 3-
in-1 or Jig-A-Loo.
9. Bandwheel Guards —Routinely remove any build-up of sawdust that may collect
inside the bandwheel guards.
10. Lubrication Tank —Only fill with a water/washing up detergent mixture(one to two caps) or in
winter months, use windshield washer fluid. Do not leave lubricant in tank if temperatures fall
below 0 degrees Celsius.
11. Blade Lubricant —Never use diesel fuel or kerosene as blade lubricant. These substances
lead to premature wear of your belts and poor sawing performance. For winter operations,
replace the water lubricant with windshield washer fluid.
12. Engine —Check the engine oil level before each use and maintain the engine as per the
instructions set out by the engine manufacturer in the engine manual.
13. Sawhead Lifting Cables —Regularly before, during and after operations, inspect the cables
for any wear or kinks. Ensure that the cables are in perfect condition. Oil coiled part of cable
often to prevent premature wear. Replace with new cables as necessary.

Page | 12
SAWMILL ASSEMBLY
#1 –INSPECTION
Take all of the parts out of the shipping crate and lay them out.
#2 –TRACKS
Assemble track system and secure loosely with provided nuts & bolts. It is important not to fully tighten
the bolts at this stage. This will be done after the head is assembled and rolled along the track. It is
ideal to assemble the tracks on a solid and level footing that is a minimum of 4” off of the ground –We
recommend you attach the leveling legs to sleepers which we discuss later in the instruction manual).
This will allow for easy cleanup of sawdust from under the tracks and height adjustment of the log
supports and also easier leveling of the track.

Page | 13
Attach track cross supports to “L” channel with the provided nuts & bolts. The joining plate is used
at the seam joint to join the two sections together (shown in top right image). Ensure to only hand tighten
at this stage. The bolts will be fully tightened once the head assembly is free to roll on the tracks and
provide the correct track width.
Assemble carriage stops at the ends of the tracks (4 stops total) and tighten.

Page | 14
#3 –LOG DOG & SUPPORTS
Assemble log dog pieces as shown below and use water proof grease on threaded handle and
“T”handle.Attach assembly to the track using the provided nuts & bolts and tighten.
Attach log dog assembly to track as shown below with the 4 nuts and bolts provided. Note that there
are various locations along the track where this assembly can be bolted. Depending on
how many track sections are being used, select a log clamp position that will secure the log firmly
against the log supports.
Insert log supports into track cross supports and secure with “T”handles. The “T”handle threads should
be coated with waterproof grease. The sawmill includes two sets of log supports –a short set and a long
set. The longer set is ideal for larger logs and the shorter set is ideal for small logs and square cants.

Page | 15
We recommend tex screwing the leveling legs to sleepers once the mill has been made level. So before tex
screwing the mill to the sleepers, it is highly recommended that you run a string line down both sides of the
mill, to make sure the track is straight and level. (The string line is in pink in the above picture).
The red arrows indicate where the locations of the leveling legs are. There are six per 2 metres of track. 18 in
total on the machine. On the intermediate bunks the leveling legs alternate. We recommend placing the mill
leveling legs on sleepers running left to right as shown above. You need to make sure the bunks are also level.
To do this you use a spirit level going left to right on top of each bunk and also using a string line down the
length of the track. The string line needs to be approx. 10mm above the bunks.

Page | 16
#4 –CARRIAGE ASSEMBLY
Lay the above carriage pieces out.
Assemble round vertical post (shown on left) to wheel assembly using the two bolts and back plate.
Repeat same step for the square vertical post assembly (shown on right).
Place a moving blanket on the shipping pallet that the sawmill crate was strapped to. The blanket will
prevent the blade guard covers from becoming scratched. Using a minimum of two people or a
mechanical advantage system, remove the head assembly from the sawmill crate and place face down
on the blanket. The head assembly is very heavy, proper technique must be used to
avoid injury or damage.

Page | 17
Insert vertical post assemblies into corresponding locations in head assembly and insert the rear square
frame into the carriage base until it hits the bottom as shown in pictures above.
Lock the cam handles on both the round and square post to prevent the head from moving when it is
stood up in the coming steps. Ensure that when activating the cam handles, the clamps securely lock on
the round and square vertical post. If they don’t, a 13mm wrench will need to be used to tighten the
adjustment nut. This will allow the clamps to lock on the post better.
With one person on each post, stand the head assembly up on the wheels as shown above. Again,
using a minimum of two people, set the saw head assembly on the track system ensuring the
carriage wheel grooves rest on the “L” rails. The square vertical post should be on the same side as
the log supports.

Page | 18
Slide the top cross support over the round post and insert the pulley,
collar and bolt assembly into the hole.
Install the nut on the inside of the round post to secure the pulley.
Using a 16mm wrench to hold the nut, tighten the bolt.
Insert the bolts into the back plate as shown in above image. Align the square post holes with the
corresponding black top cross support holes. Tighten using an 18mm socket.
Place the measuring scale bracket as shown above and insert bolts and nuts. It is important to alternate
tightening of the nuts (top then bottom) to ensure the black round clamp begins to compress evenly on
both the top and bottom until flanges meet at outer edge. Tighten nuts using
a 13mm socket.

Page | 19
Install the square indicator rod to the sawmill using the two bolts and tighten using a 10mm
socket. Slide the scale indicator over the square rod and tighten.
.
Route the cables on both sides as shown in the above image.

Page | 20
Using a tape measure, take a measurement from the blade to the top of the log bunk on both the left
and right side. The distance should be equal on both sides. If it isn’t, you will need to adjust the cable
ends at the rear handle to either raise or lower one side.
Install the lube tank brace to the top cross support as shown. Insert lube tank bottle into the brace and
attach the hose to the copper spout near the blade guide assembly (as shown below). Please Note:
We recommend adding some dishwashing liquid to the tank to help lubricate the wood –two to
three capfuls.
Table of contents