Harger Ultraweld GD User manual
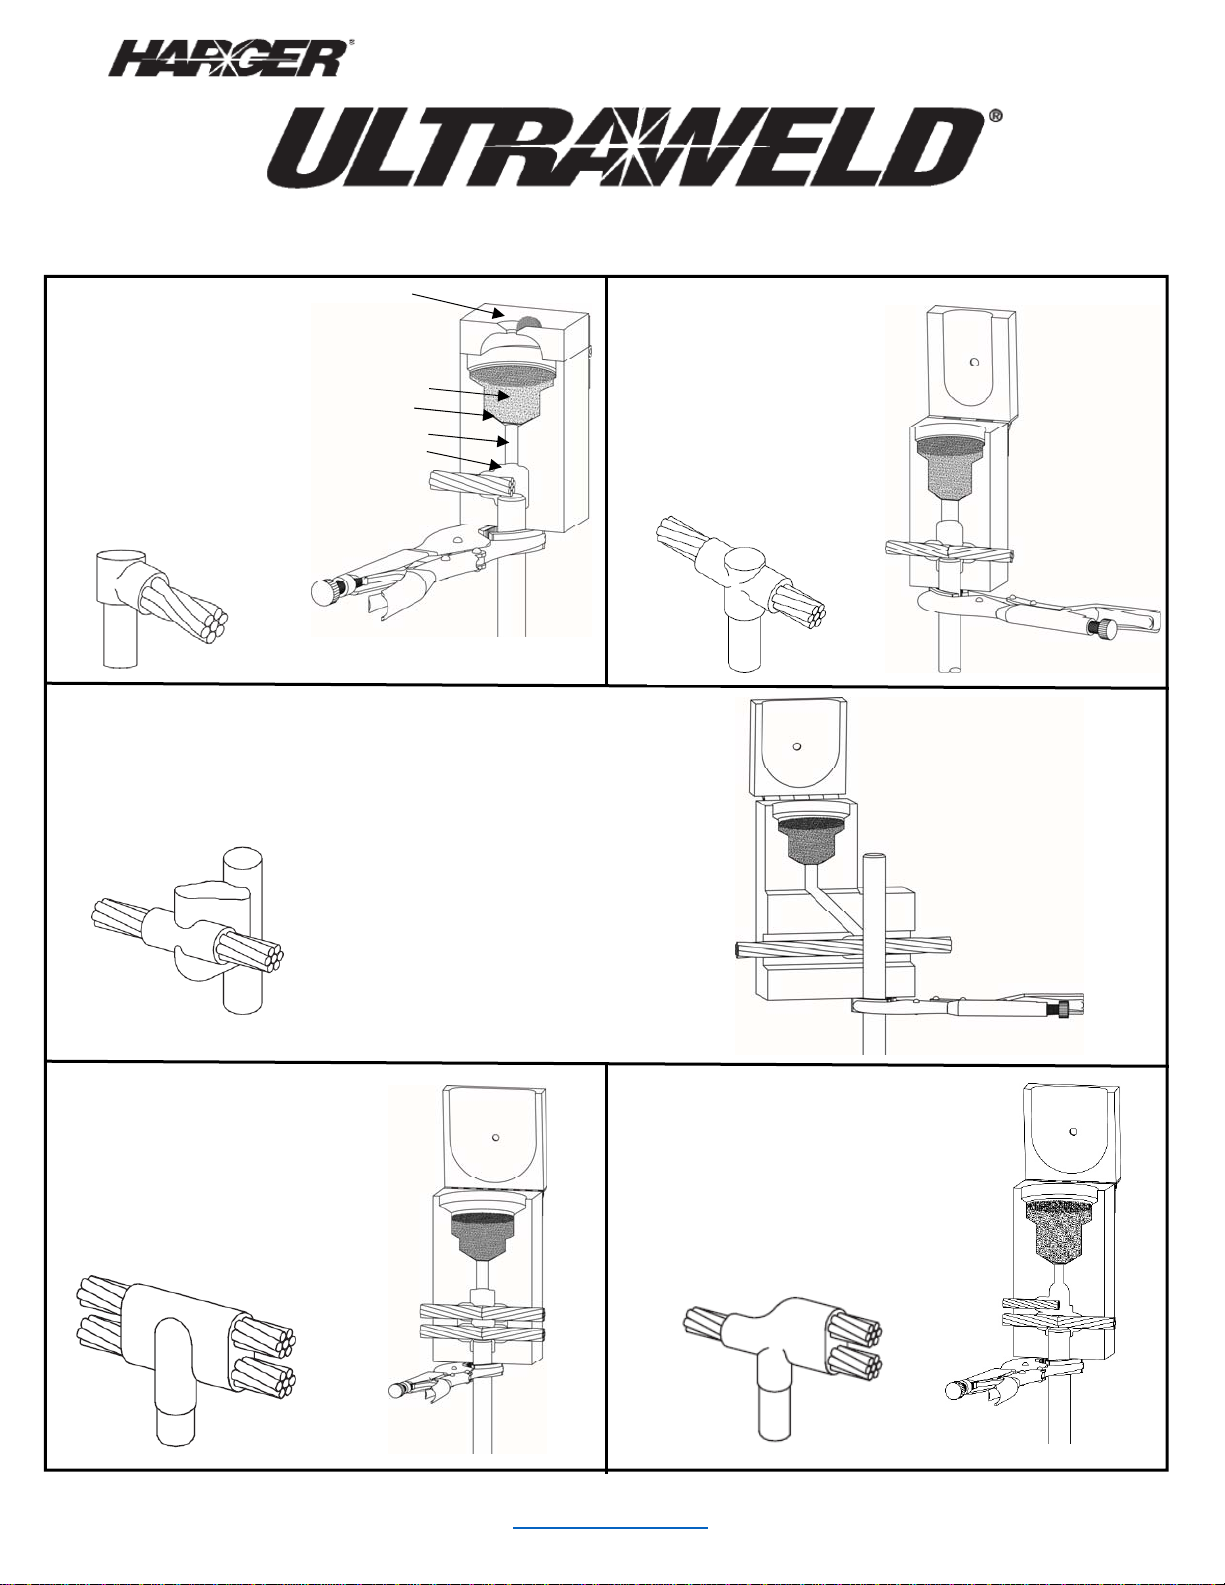
INSTRUCTIONS FOR ULTRAWELD® GROUNDING CONNECTIONS - CABLE TO GROUND ROD
GD
Place end of cable under
the center of the tap hole.
Cable must sit on top of
ground rod. Use locking
pliers or a clamp on the
rod below the mold to
prevent it from slipping
when the mold is fired.
StartingPowder
WeldPowder
SteelDisc
TapHole
WeldCavity
Cable
GroundRod
GO
Place cable in the mold.
Cable must sit on top of
ground rod. Use locking
pliers or a clamp on the rod
below the mold to prevent it
from slipping when the
mold is fired.
GS
Place cable into mold and secure mold to ground rod with handle clamp.
Support mold to keep it from sliding down the ground rod
when welding with locking pliers or clamp below mold.
GF
Place cables in mold. Bottom
run cable must sit on top of the
ground rod. Use a pair of
locking pliers or a clamp below
mold on ground rod to support
the mold and prevent slipping.
GT
Place end of tap cable under
center of tap hole. Run cable
must sit on top of the ground
rod. Use a pair of locking pliers
or a clamp below mold on
ground rod to support the mold
and prevent slipping.
Revised1/3/2014 Visitourwebsiteatwww.harger.com forfurthertipsandvideos.

GENERALSAFETYINSTRUCTIONS
1. Alwayswearproperclothing,safetyglassesandgloveswhen
exothermicwelding.
2. Onlywelditemsthatthemoldisdesignedfor.
3. Donotusewornorbrokenmoldswhichcouldcauseleakage
ofmoltenweldmetal.
4. Alwaysuseproperhandleclampsorframeworkrequiredfor
themoldandmakesureitisadjustedproperlytoclosethe
moldcompletely.
5. Makesurethattheconductorsbeingweldedfitinthemold
properlyandthatthemoldwillclosetightlyaroundthem.
6. Donotaltermoldsoraccessorieswithoutfactory
authorization.
7. Avoidbreathingconcentrationsofsmoke,asitmaybe
hazardoustoyourhealth.
8. Avoidcontactwithhotmaterials.
9. Removeorprotectfirehazardsintheweldingarea.
10. Avoidmoistureandcontaminantsinthemoldandconductors
beingwelded.Contactofmoltenweldmetalwithmoistureor
contaminantsmaycauseweldmetaltospewoutofmold.
11. Whenweldingtopipeorvessels,youshouldconsiderthe
following:
A. theeffectweldingmayhaveonstructuralmembersand
thinwallpipeorvessels.
B. pipeorvesselsthatarepressurizedorcontain(orhave
contained)flammable,explosiveorhazardousmaterials
shouldbeevaluatedinthecaseofameltthroughorhot
moltenweldmetalcomingincontactwithany
flammable,explosiveorhazardousmaterials.
12. Failuretoabidebytheaboveandfollowweldingprocedures
mayresultinimproperwelds,damagetothematerialbeing
weldedorcreatehazardoussituationsfortheindividual.
PREPARATIONOFCABLE
1. Cablemustbebright,cleananddry.
2. Cablethatissaturatedwithoilorgreasemustbecleaned.
Cablemaybecleanedbyburningitoffwithapropaneor
oxy‐acetylenetorch.Afterburningoffoilorgrease,awire
brushshouldbeusedtoremoveresidue.Wetcablemustbe
driedout.Useahandpropanetorch.
3. Corrodedcablemustbecleaned.UsetheCCBRSH2cable
cleaningbrushorCCBRSH1cardclothbrush.Itisimportant
thattheendsoftheindividualstrandsareclean.Thiscan
bestbeaccomplishedbymakingafreshcutontheendof
thecable.
4. Cableshouldbestraightenedbeforeclampingmoldinplace.
Bentoroutofroundcablewillholdmoldopenandcause
leaks.
5. Removeinsulationfrominsulatedcablebeforecuttingwith
hacksaw.Otherwise,endsofstrandswillbecomecoated
withinsulatingmaterialwhichmaycausedefectivewelds.
6. FLEXIBLECABLE:Asleevemustbeusedwhenwelding
flexiblecable.WRPSLVwrapsleevesarerecommendedfor
300MCMandsmallercable orcheckwithfactoryfor
premadesleeves.
PREPARATIONOFGROUNDRODSAND
GROUNDRECEPTACLES
1. Endsthatarethreaded,mushroomedfromdriving,or
drilledandtapped,mustbecutoffbeforeweldingtothe
end.Contactfactoryaboutgroundroddrivingsleeves.
2. Thesiteoftheweldonthegroundrodsandreceptacles
mustbeclean.Useacoarsefiletoremoverustandoxide
beforewelding
3. SlightlyUNDERSIZEDRODMAYBEBUILTUPWITHWRPSLV
WRAPSLEEVES.Thiswillnotworkforlargedifferencesin
size.
WELDINGPROCEDURE
1. Readallinstructionsandsafetywarningsbeforestarting.
2. Checkmoldtagforconductorstobeweldedandproper
weldmetalcartridgesizetouse.
3. Insertproperhandlesintothemoldandlockmoldshutif
applicable.
4. Makesureallsurfacesandconductorsareclean,dryand
arethepropersizesforthemold’sapplicationpermoldtag.
5. Moldscanbedriedbyheatingtoapproximately250°F.
Moldsmaybedriedwithahandoperatedpropanetorchor
byfiringachargeinthemoldbeforemakingthedesired
weld.
6. Positionconductor(s)intothemold.Seefrontofthissheet
forpositioningofconductorsintomold.Lockmoldwith
handleclampsorframe,whicheveristhecase.Checkto
makesuremoldiscompletelyclosed.
7. NuwTube:
A. Insertsteeldiskbeingsureitisdirectlycenteredover
thetaphole.Failuretoinsertdiskintomoldwillcreate
improperweldsandspewingofweldmetal.
B. Pourcartridgeorcartridgesintothecruciblebeing
carefulnottoupsetthesteeldisk.
C. RemoveOrangebottomlidinNuwTube toremove
startingpowder.Closelidandpourstartingpowder
intocupinthetopofthelid,allowingsometofallthru
theignitionholeinthelid.
D. Ignitestartingpowderwithflintgun.Pullflintgun
awayquicklytopreventfoulingflint.
8. UltraShot
A. InsertUltrashotcupintomoldcruciblealigningmetal
igniterwiththesmallgroveinthetopofthemold.
Closelid.
B. Insertmetaligniterintobatteryignitioncord.
C. Pressbothignitionbuttonsonbatterypackwhile
standingclearofexhaustportonmold.Moldshould
firerightaway.
9. Waitapproximately30secondsbeforeopeningmoldto
permitmetaltosolidify.
10. Tocleanthemold,useaMCBRSH1naturalbristlebrush,
softclothornewspaperbeforemakingnextweld.Do NOT
usewireorplasticbrushestocleanthemold!
11. Onhorizontallysplitmolds,useendofmoldcleaningspade,
asmalldiameterrod,orscrewdrivertoremoveslagfrom
taphole.Cautionshouldbeusedwhencleaningmoldsto
avoidburnsfromcontactwithhotmold.
NOTE:
1.Afouledflintgunmaybecleanedbysoakinginhouseholdammonia.
2.Properweldmetalcartridgesizeismarkedonmoldtagandshownonthecapofthecartridgetube.
3.Cartridgesizeistheapproximateweightofthepowderingrams.Whenthecartridgesizespecifiedisnotavailable,twoormore
smallercartridgesorpartofalargercartridgemaybeused.
4.HandleClampadjustmentsmaybemadebyremovingadjustingscrewandturningeyebolt180° clockwisetotightenor180° counter
clockwisetoloosen.
This manual suits for next models
4


