1. POWER AND PROTECT INDICATORS
The PWR indicator will illuminate when the BassPro Hub
is
receiving power and signal, and playing normally. The PRT
indicator will illuminate if the amp enters Protect mode
in
the
event
of
conditions such as over/under voltage, short circuit,
amplifier output circuit failure, or excessive heat.
2 & 3. REMOTE INPUT AND BASSPRO HUB REMOTE
CONTROLLER
Sound controls for the BassPro Hub are
all
adjusted using
the included remote controller. Start by plugging the remote
controller
(3.)
into the REMOTE input
(2.)
on the BassPro Hub.
4 & 5. INPUT/POWER TERMINAL AND WIRING HARNESS
Plug the included wiring harness
(5.)
into the INPUT/POWER
terminal
(4.)
of
the BassPro Hub.
• FOR POWER, connect the red power wire from
the harness
to
your vehicle's + (positive) battery
terminal.
You
must also install a fuse holder with a
40A fuse in-line and within 18"
of
the battery.
• FOR GROUND, connect the black ground wire from
the harness a solid, metal point on the vehicle's chassis
using a ring terminal. Use sandpaper to clear the paint
from the metal surface at the chassis location. Use a
star-type lock washer to secure the wire.
• FOR REMOTE TURN-ON, connect the blue wire
from the harness
to
the remote output wire on your
head unit, if it has one, and if you're using the line-level
inputs.
+12vo1
t
a,mote
f
u"
t
o o
To
in-dash
receiver
_J
~~~~~11---------
■
Power
wire
Fuse
~
1J:6cm)
,-,=-~a,..,l_
+
Vehicle
battery
Vehicle
chassis
Ground
wire
LINE-LEVEL SIGNAL INPUTS
If
your head unit has a subwoofer output, connect
to
the
line-level inputs
of
the BassPro Hub wiring harness using
an
RCA cable.
_
........
._....
~
_____.
--1
□
a::==--~
SPEAKER-LEVEL SIGNAL INPUTS
If
your head unit only has speaker-level outputs, splice into its
left and right speaker wires (front or
rear),
then connect the
spliced wires to the corresponding L+, L-,
R+,
and
R-
wires
on the BassPro Hub harness. Splice taps not included.
Important: Some factory-installed audio system amplifiers
include electronic filters that limit the amount
of
bass sent
to the system's smaller speakers. This filtering will adversely
affect the performance
of
the BassPro Hub.
To
get the
most bass possible from your subwoofer, splice the high-
level
harness into the factory system speaker outputs that
~
HARMAN
~
HARMAN
International Industries,
Incorporated 8500 Balboa Boulevard,
Northridge,
CA
91329
USA
www.jbl.com
are connected
to
the system's largest speakers (the ones
designed
to
reproduce the most bass).
6. FUSE
If
necessary replace the fuse with one
of
matching amperage:
30A.
USING THE REMOTE CONTROLLER TO
ADJUST AUDIO SETTINGS
II
BAW'ROHUB
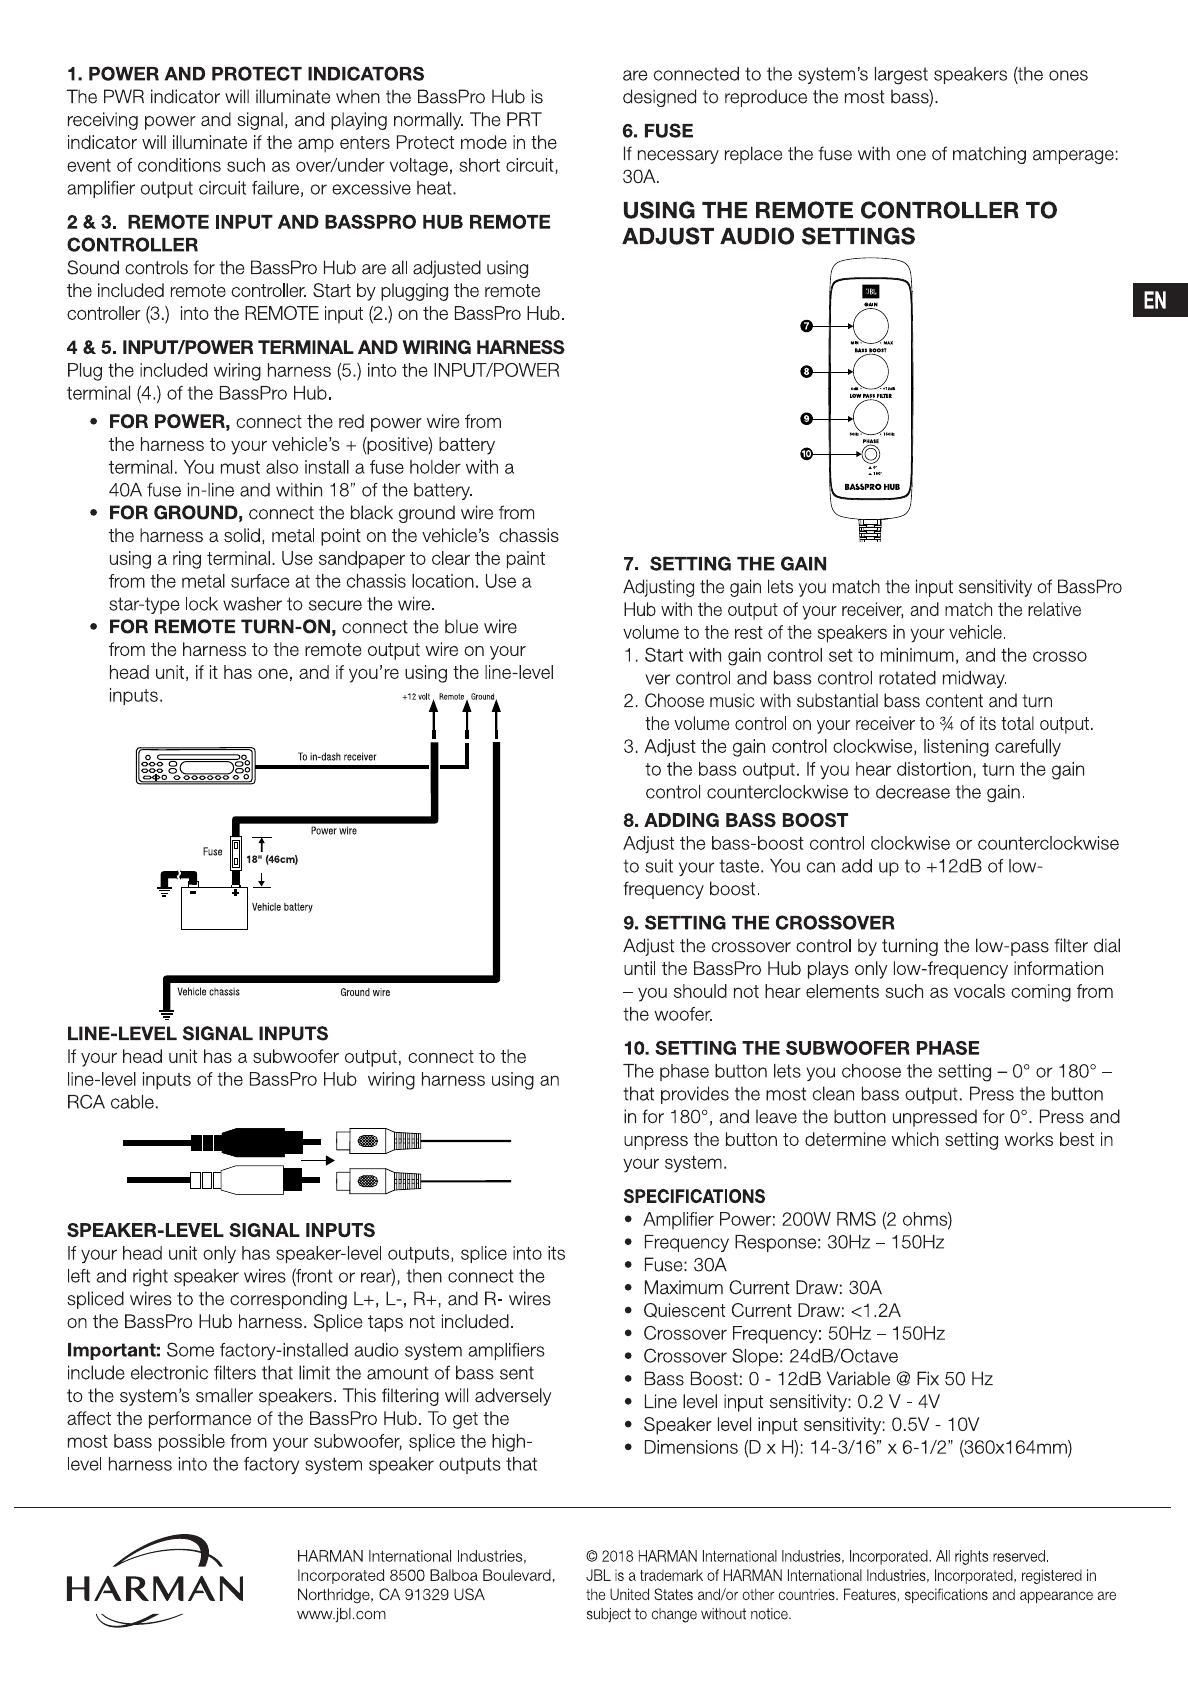
7. SETTING THE GAIN
Adjusting the
gain
lets you match the input sensitivity of BassPro
Hub with the output ofyour
receiver,
and
match the relative
volume to the
rest
of the speakers
in
your vehicle.
1. Start with gain control set
to
minimum, and the crosso
ver control and bass control rotated midway.
2. Choose music with substantial bass content
and
turn
the volume control
on
your
receiver
to ¾ of
its
total output.
3. Adjust the gain control clockwise, listening carefully
to
the bass output.
If
you hear distortion, turn the gain
control counterclockwise
to
decrease the gain.
8. ADDING BASS BOOST
Adjust the bass-boost control clockwise or counterclockwise
to
suit your taste.
You
can add up
to
+12dB
of
low-
frequency boost.
9. SETTING THE CROSSOVER
Adjust the crossover control by turning the low-pass filter dial
until the BassPro Hub plays only low-frequency information
-you should not hear elements such as vocals coming from
the woofer.
10. SETTING THE SUBWOOFER PHASE
The phase button lets you choose the setting -0° or 180° -
that provides the most clean bass output. Press the button
in
for 180°, and leave the button unpressed for 0°. Press and
unpress the button
to
determine which setting works best
in
your system.
SPECIFICATIONS
• Amplifier Power: 200W RMS
(2
ohms)
• Frequency Response: 30Hz -150Hz
• Fuse: 30A
• Maximum Current Draw:
30A
• Quiescent Current Draw: <1.2A
• Crossover Frequency: 50Hz -150Hz
• Crossover Slope: 24dB/Octave
• Bass Boost: 0 -
12dB
Variable @
Fix
50 Hz
• Line level input sensitivity: 0.2 V - 4V
• Speaker
level
input sensitivity: 0.5V - 10V
• Dimensions
(D
x
H):
14-3/16" x
6-1
/2" (360x164mm)
©
2018
HARMAN
International
Industries,
Incorporated.
All
rights
reserved.
JBL
is
a
trademark
of
HARMAN
International
Industries,
Incorporated,
registered
in
the
United
States
and/or
other
countries.
Features,
specifications
and
appearance
are
subject
to
change
without
notice.
-


