TUNING BASSPRO SL2
BassPro SL2 provides several controls that simplify sonic
integration with virtually any vehicle's unique acoustic properties.
Please read the following section carefully to familiarize yourself
with the function of each control.
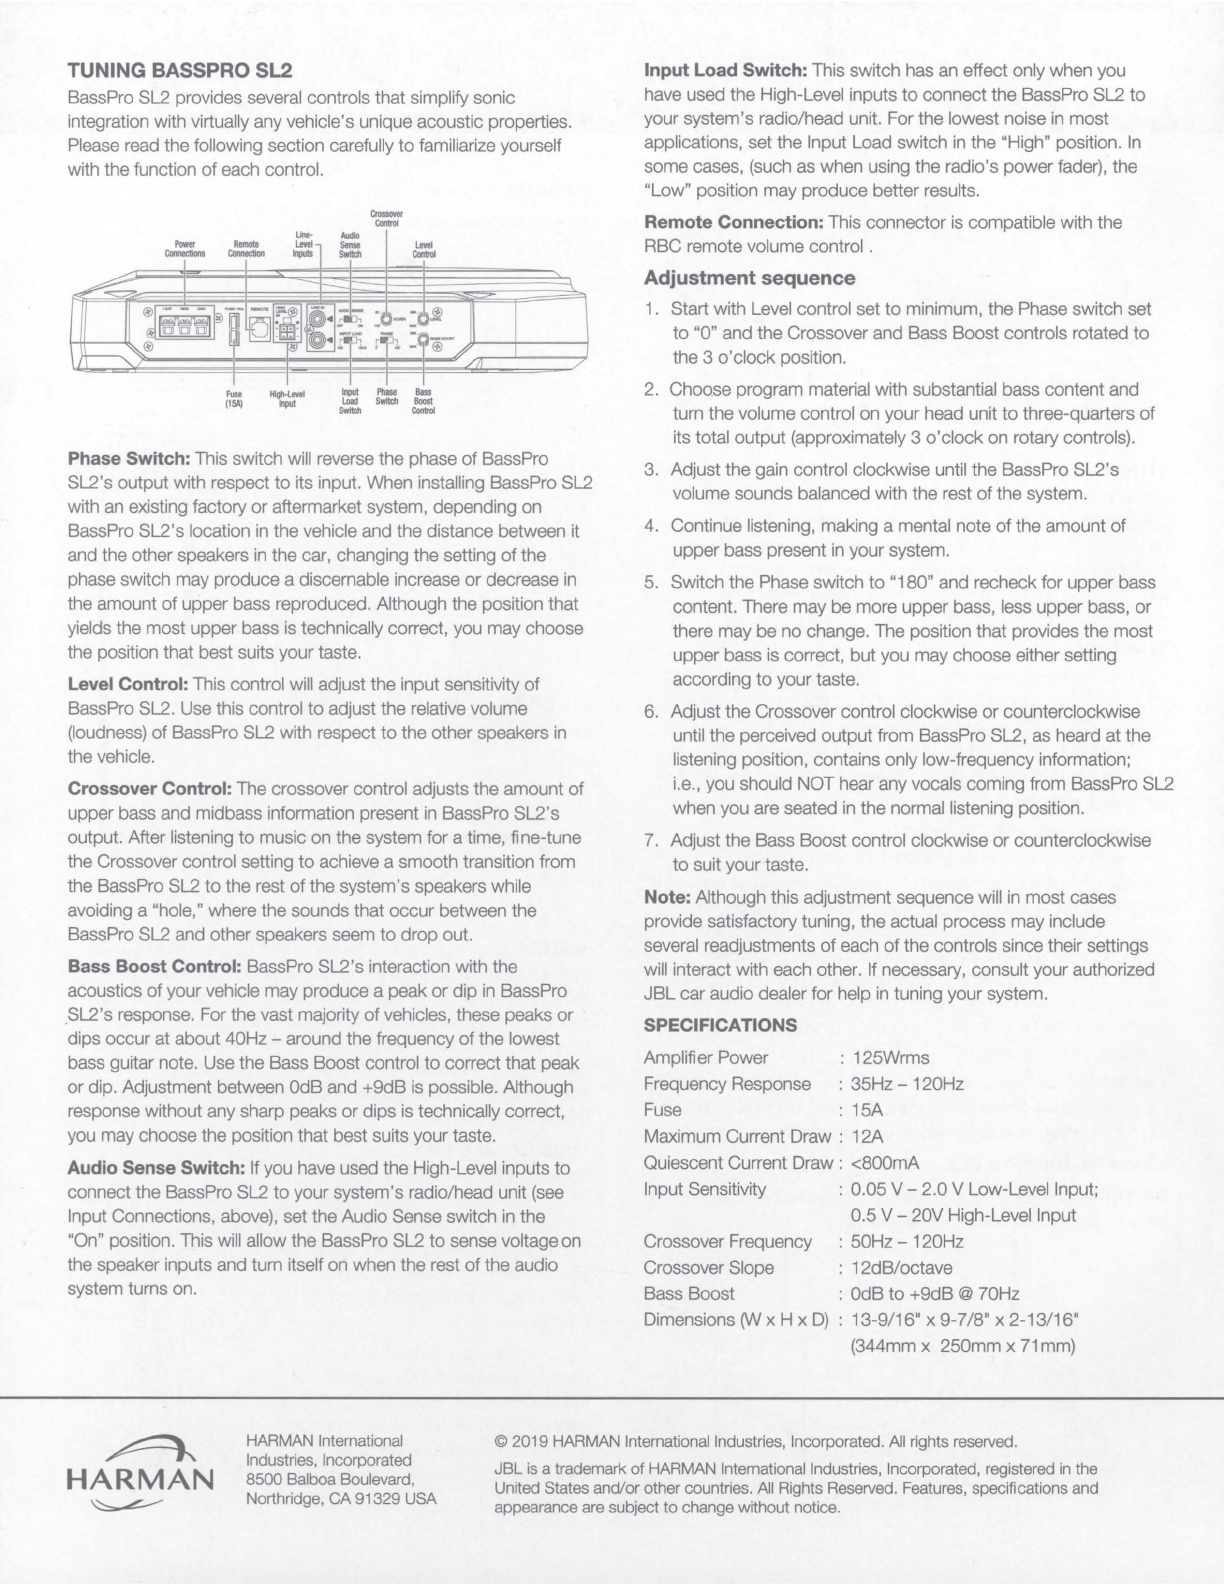
Crossover
Con1rol
Line-
N.ldlo
Power
Remote
Level
Sense
Level
Connections
Comectioo
lnpulS
SWlll:h
Con1rol
Fuse
High-Level
(15A)
Input
Input
Phase
Bass
Load
Switch
Boost
Switch
Control
Phase Switch: This switch will reverse the phase of BassPro
SL2's output with respect
to
its input. When installing BassPro SL2
with
an
existing factory
or
aftermarket system, depending on
BassPro SL2's location
in
the vehicle and the distance between it
and the other speakers
in
the car, changing the setting of the
phase switch may produce a discernable increase or decrease
in
the amount
of
upper bass reproduced. Although the position that
yields the most upper bass
is
technically correct, you may choose
the position that best suits your taste.
Level Control: This control will adjust the input sensitivity of
BassPro SL2. Use this control
to
adjust the relative volume
{loudness) of BassPro SL2 with respect to the other speakers
in
the vehicle.
Crossover Control: The crossover control adjusts the amount
of
upper bass and midbass information present
in
BassPro SL2's
output. After listening
to
music on the system for a time, fine-tune
the Crossover control setting to achieve a smooth transition from
the BassPro SL2 to the rest
of
the system's speakers while
avoiding a "hole," where the sounds that occur between the
BassPro SL2 and other speakers seem to drop out.
Bass Boost Control: BassPro SL2's interaction with the
acoustics of your vehicle may produce a peak
or
dip
in
BassPro
_SL2's response. For the vast majority of vehicles, these peaks or
dips occur at about 40Hz -around the frequency of the lowest
bass guitar note. Use the Bass Boost control
to
correct that peak
or dip. Adjustment between
0dB
and +9dB
is
possible. Although
response without any sharp peaks
or
dips
is
technically correct,
you may choose the position that best suits your taste.
Audio Sense Switch: If you have used the High-Level inputs
to
connect the BassPro SL2 to your system's radio/head unit
(see
Input Connections, above), set the Audio Sense switch
in
the
"On" position. This will allow the BassPro SL2 to sense voltageon
the speaker inputs and turn itself on when the rest
of
the audio
system turns on.
Input Load Switch: This switch has an effect only when you
have used the High-Level inputs to connect the BassPro SL2 to
your system's radio/head unit. For the lowest noise
in
most
applications, set the Input Load switch
in
the "High" position.
In
some cases, (such as when using the radio's power fader), the
"Low" position may produce better results.
Remote Connection: This connector
is
compatible with the
RBC remote volume control .
Adjustment sequence
1.
Start with Level control set to minimum, the Phase switch set
to
"0" and the Crossover and Bass Boost controls rotated
to
the 3 o'clock position.
2.
Choo.se program material with substantial bass content and
turn the volume control on your head unit to three-quarters
of
its total output (approximately 3 o'clock on rotary controls).
3. Adjust the gain control clockwise until the BassPro SL2's
volume sounds balanced with the rest
of
the system.
4. Continue listening, making a mental note
of
the amount
of
upper bass present
in
your system.
5. Switch the Phase switch
to
"180" and recheck for upper bass
content. There may be more upper bass, less upper bass, or
there may be no change. The position that provides the most
upper bass
is
correct, but you may choose either setting
according to your taste.
6.
Adjust the Crossover control clockwise or counterclockwise
until the perceived output from BassPro SL2, as heard at the
listening position, contains only low-frequency information;
i.e., you should NOT hear any vocals coming from BassPro SL2
when you are seated
in
the normal listening position.
7.
Adjust the Bass Boost control clockwise or counterclockwise
to suit your taste.
Note: Although this adjustment sequence will
in
most cases
provide satisfactory tuning, the actual process may include
several readjustments
of
each of the controls since their settings
will interact with each other. If necessary, consult your authorized
JBL
car audio dealer for help
in
tuning your system.
SPECIFICATIONS
Amplifier Power : 125Wrms
Frequency Response : 35Hz -120Hz
Fuse : 15A
Maximum Current Draw : 12A
Quiescent Current Draw : <800mA
Input Sensitivity : 0.05 V - 2.0 V Low-Level Input;
0.5 V - 20V High-Level Input
Crossover Frequency : 50Hz -120Hz
Crossover Slope : 12dB/octave
Bass Boost :
0dB
to
+9dB
@ 70Hz
Dimensions
0N
x H x
D)
: 13-9/16" x 9-7/8" x 2-13/16"
{344mm x 250mm x
71
mm)
~
HARMAN
HARMAN International
Industries, Incorporated
8500 Balboa Boulevard,
Northridge, CA 91329 USA
© 2019 HARMAN International Industries, Incorporated. All rights reserved.
~
JBL
is
a trademark of HARMAN International Industries, Incorporated, registered
in
the
United States and/or other countries.
All
Rights Reserved. Features, specifications and
appearance are subject
to
change without notice.