© 2019 HARMAN International Industries, Incorporated. All rights reserved.
Features, specifications and appearance are subject to change without notice.
Issued 12/5/2019
HARMAN Professional 8500 Balboa Blvd. Northridge, CA 91329 USA
OPERATING INSTRUCTIONS (CONTINUED)
WARRANTY INFORMATION
CONTACT INFORMATION
SAFETY INSTRUCTIONS
1. Read these instructions.
2. Keep these instructions.
3. Heed all warnings.
4. Follow all instructions.
5. Do not use this apparatus near water.
6. Clean only with a dry cloth.
7. Do not block any ventilation openings. Install in accordance with manufac-
turer’s instructions.
8. Do not install near any heat sources such as radiators, heat registers, stoves
or other apparatus that produce heat.
9. Do not defeat the safety purpose of the grounding type plug. A polarized
plug has two blades with one wider than the other. A grounding type plug
has two blades and a third grounding prong. The wide blade or the third
prong is provided for your safety. If the provided plug does not t into your
outlet, consult an electrician for replacement of the obsolete outlet.
10. Protect the power cord from being walked on or pinched particularly at
plugs, convenience receptacle and the point where the power cord con-
nects to the apparatus.
11. Only use attachments/accessories specied by the manufacturer.
12. Unplug this apparatus during lightning storms or when unused for long pe-
riods of time.
13. Refer all servicing to qualied service personnel. Servicing is required when
the apparatus has been damaged in any way, such as power-supply cord
or plug is damaged, liquid has been spilled or objects have fallen into the
apparatus, the apparatus has been exposed to rain or moisture, does not
operate normally or has been dropped.
14. The appliance coupler of the power supply cord is used as the ultimate dis-
connect device from the mains. The appliance coupler shall remain readily
operable.
15. The apparatus shall be connected to a mains socket outlet with a protective
earthing connection.
16. Any changes or modications not expressly approved by the party responsi-
ble for compliance could void the user’s authority to operate the equipment.
WARNING:
• To reduce the risk of re or electrical shock, do not expose the apparatus
to rain or moisture.
• Do not expose the apparatus to dripping or splashing, and do not place
objects lled with liquids, such as vases, on the apparatus. No naked ame
sources, such as lighted candles, should be placed on the apparatus.
CAUTION:
To reduce the risk of electronic shock, do not remove cover. No user serviceable
parts inside. Refer servicing to qualied personnel. Do not expose this apparatus
to rain or moisture.
Mailing Address:
JBL Professional
8500 Balboa Blvd.
Northridge, CA 91329
Customer Service:
Monday through Friday
8:00am – 5:00pm
Pacic Coast Time in the U.S.A.
(800) 8JBLPRO (800.852.5776)
www.jblproservice.com
On The World Wide Web:
www.jblpro.com
Shipping Address:
JBL Professional
8500 Balboa Blvd., Dock 15
Northridge, CA 91329
(Do not return product to this address without rst obtaining prior authoriza-
tion from JBL)
Professional Contacts, Outside the USA:
Contact the JBL Professional Distributor in your area. A complete list of JBL
Professional international distributors is provided at our U.S.A. website: www.
jblpro.com
Product Registration:
Register your product online at www.jblpro.com
Tuning tips:
After connecting the subwoofer and turning on the power, rst
adjust the main speaker volume to an ideal level, and then ad-
just the subwoofer volume to balance it with the main speak-
ers. To select the optimal subwoofer location, disconnect or
power down the main speakers and audition the subwoofer
alone. Once the desired subwoofer location is determined,
reintroduce the main speakers and adjust the crossover and
phase settings until the desired sound quality is achieved.
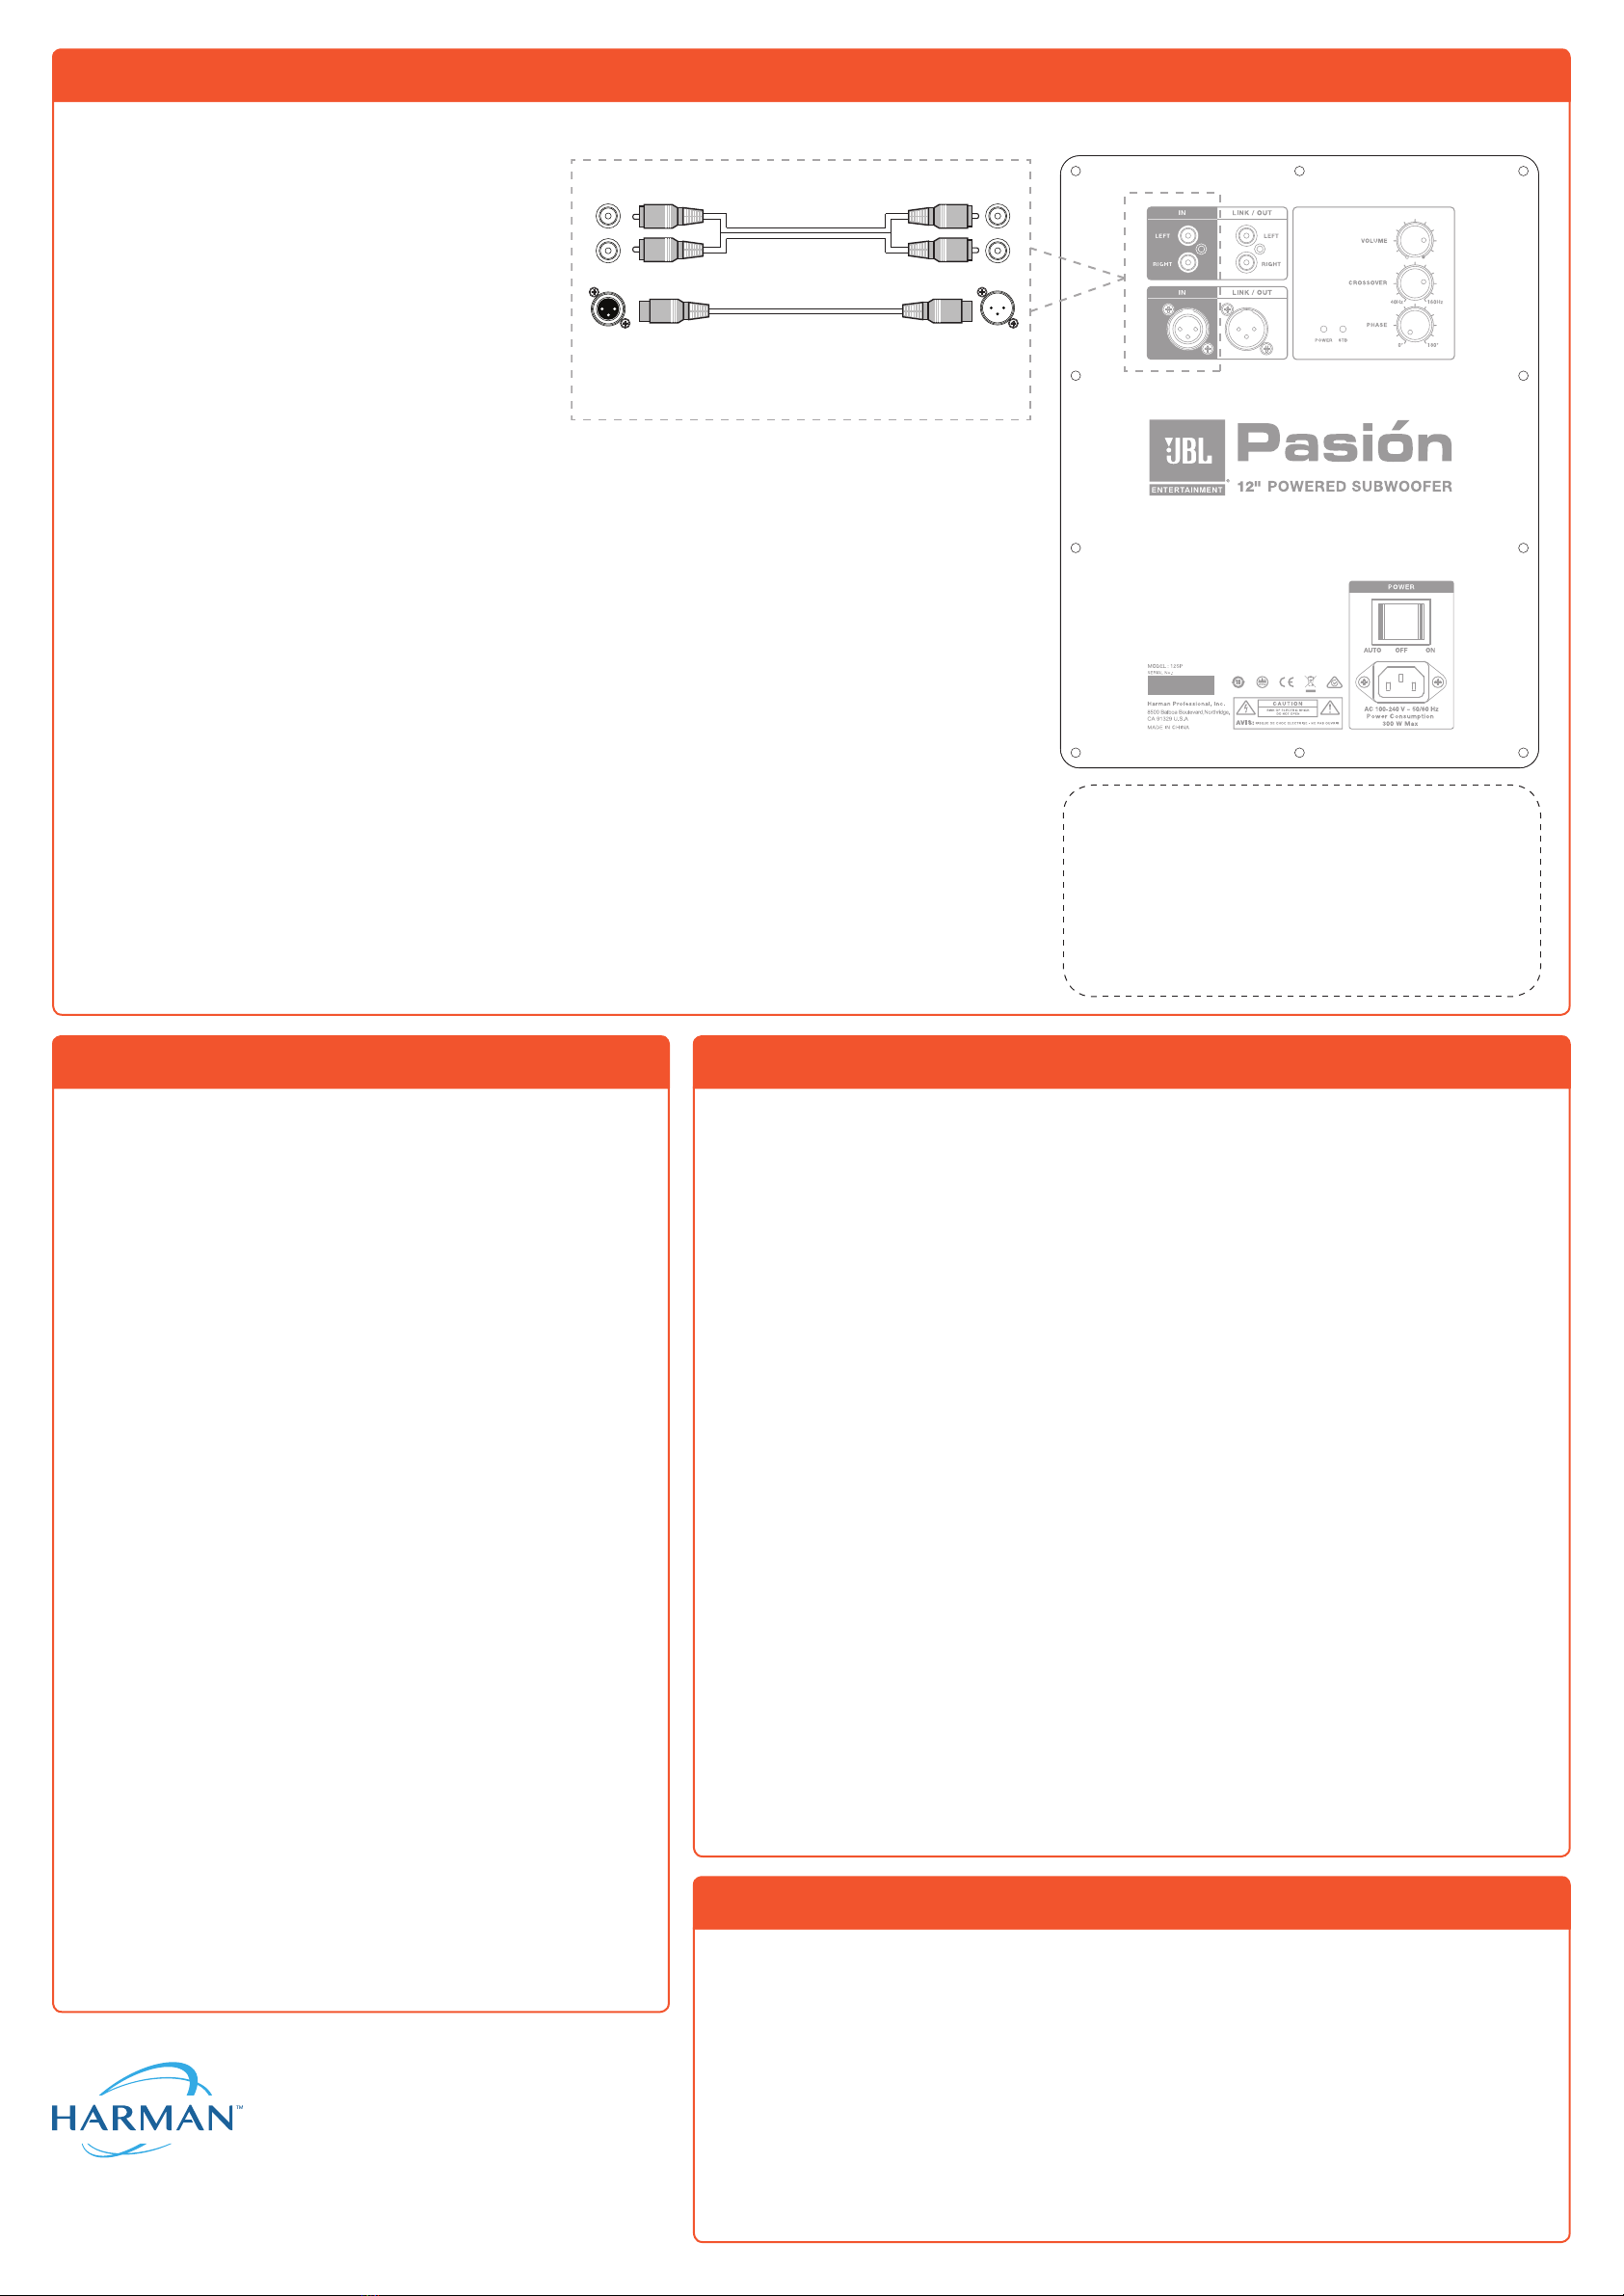
Operation Introduction
This subwoofer provides four controllable functions: power
switch mode, volume, crossover and phase (as shown in the
diagram to the right).
1) Power switch mode:
The power switch has three positions, corresponding to the
three power modes. The middle (“OFF”) position powers o
the subwoofer. When switched to the “ON” position, the sub-
woofer remains on. When switched to the “AUTO” position,
the subwoofer automatically enters standby mode when no
audio signal is detected for ~15 minutes; when audio signal is
detected, the subwoofer automatically turns back on. When
the subwoofer is powered on, the “POWER” LED lights; in
standby, the “STB” LED lights.
2) Volume:
This control is used to control the volume of the subwoofer.
Turning the knob clockwise increases the volume; turning it
counterclockwise decreases the volume.
The subwoofer volume should be adjusted to achieve the de-
sired balance between the subwoofer and the left and right
main speakers. Since humans hear loudness across the fre-
quency spectrum according to researched equal-loudness
contour curves, the sound pressure level of the subwoofer
should be optimal at approximately 2–5dB higher than the
main speakers. However, it should be adjusted according to
the program source. For example, when watching program
material that primarily contains dialog, too much low-end will
aect speech intelligibility. If this occurs, turn down the sub-
woofer volume or try turning it o. If watching a movie, you
can turn up the subwoofer volume to increase the impact
of the low-frequency eects (LFE). If reproducing singing or
music that is vocal intensive, the subwoofer level may need
to be moderate to provide a natural sound quality.
3) Crossover:
This control is used to adjust the cuto frequency of the sub-
woofer’s built-in low-pass lter and is adjustable from 40Hz
to 160Hz. The purpose of this adjustment is to provide a
smooth transition through the frequency range where the
subwoofer and main speakers overlap.
To achieve a full and natural frequency response transition, ad-
just the subwoofer’s crossover control to match the -6dB cuto
frequency of the left and right main speakers, if known. If the
low-frequency cuto point of the main speakers is unknown,
audition full bandwidth reference program and adjust the cross-
over to taste.
4) Phase:
The phase control is used to adjust the subwoofer’s phase to
match the phase of the main speakers. This phase correlation
can be aected by the oset in distance between the main
speakers and subwoofer in relation to the listening position,
which results in cancellation of low frequencies and a hollow
sound quality.
Generally, if the subwoofer and main speakers are placed along
the same front-wall plane (as shown using placement #2 in the
diagram on the reverse page), the phase control can be set to
0°. To judge proper phase alignment, sit in the listening position
and have someone adjust the subwoofer’s phase control until
the bass sounds it’s fullest.
JBL oers a limited warranty on the 12SP Powered
Subwoofer from the date of the original purchase.
WHO IS PROTECTED BY THIS WARRANTY?
Your JBL Warranty protects the original owner and all
subsequent owners for one year, so long as: A.) Your
JBL product has been purchased in China, Japan
and/or other Asian countries. (This Warranty does not
apply to JBL products purchased elsewhere except
for purchases by military outlets. Other purchasers
should contact the local JBL distributor for warranty
information.); and B.) The original dated bill of sale is
presented whenever warranty service is required.
WHAT DOES THE JBL WARRANTY COVER?
Except as specied below, your JBL Warranty covers
all defects in material and workmanship. The following
are not covered: Damage caused by accident, mis-
use, abuse, product modication or neglect; damage
occurring during shipment; damage resulting from
failure to follow instructions contained in your Instruc-
tion Manual; damage resulting from the performance
of repairs by someone not authorized by JBL; claims
based upon any misrepresentations by the seller; any
JBL product on which the serial number has been de-
faced, modied or removed.
WHO PAYS FOR WHAT?
JBL will pay all labor and material expenses for all re-
pairs covered by this warranty. Please be sure to save
the original shipping cartons because a charge will be
made if replacement cartons are requested. Payment
of shipping charges is discussed in the next section
of this warranty.
HOW TO OBTAIN WARRANTY PERFORMANCE
If your JBL product ever needs service, please con-
tact your local dealer, Harman Authorized Service
Center or Harman China Professional Product Cus-
tomer Service Hotline (400 166 7806). We may direct
you to an authorized JBL Service Agency or ask you
to send your unit to the factory for repair. Either way,
you’ll need to present the original bill of sale to es-
tablish the date of purchase. Please do not ship your
JBL product to the factory without prior authorization.
If transportation of your JBL product presents any un-
usual diculties, please advise us and we may make
special arrangements with you. Otherwise, you are
responsible for transporting your product for repair
or arranging for its transportation and for payment of
any initial shipping charges. However, we will pay the
return shipping charges if repairs are covered by the
warranty.
LIMITATION OF IMPLIED WARRANTIES
All implied warranties, including warranties of mer-
chantability and tness for particular purpose, are lim-
ited in duration to the length of this warranty.
EXCLUSION OF CERTAIN DAMAGES
JBL’s liability is limited to the repair or replacement,
at our option, of any defective product and shall not
include incidental or consequential damages of any
kind. Some states do not allow limitations on how
long an implied warranty lasts and/or do not allow the
exclusion of incidental or consequential damages, so
the above limitations and exclusions may not apply
to you. This warranty gives you specic legal rights,
and you may also have other rights, which vary, from
state to state.
*Connection cable sold separately.
Source Output Subwoofer Input
Subwoofer InputSource Output
RCA
XLR
*Connection cable sold separately.
Source Output Subwoofer Input
Subwoofer InputSource Output
RCA
XLR


