Hatari IP18M1 User manual

User Manual
Thank you for choosing to buy a Hatari appliance.
To ensure safety and optimal usage, please read the instructions carefully before using. Retain this manual for future reference.
Item code: 1002261 REV.02
Industrial Fan
Model: IP18M1, IP20M1, IP22M1
PRODUCT SPECIFICATIONS
Model
Size
Voltage
Electric Power
Electric Current
Service Value
IP20M1
500 mm
220-240V 50/60Hz
145-174W
0.69-0.75A
1.10 m3/min/W
IP18M1
450 mm
220-240V 50/60Hz
125-162W
0.63-0.68A
1.10 m3/min/W
IP22M1
550 mm
220-240V 50/60Hz
197-264W
0.93-1.14A
0.92 m3/min/W
1 2
Plug in the fan and press the fan speed button 1, 2, 3 respectively. If the fan makes a loud noise, check if the blade cap is fitted tightly
and whether the grooves on the blade fits the corresponding catches of the motor shaft.
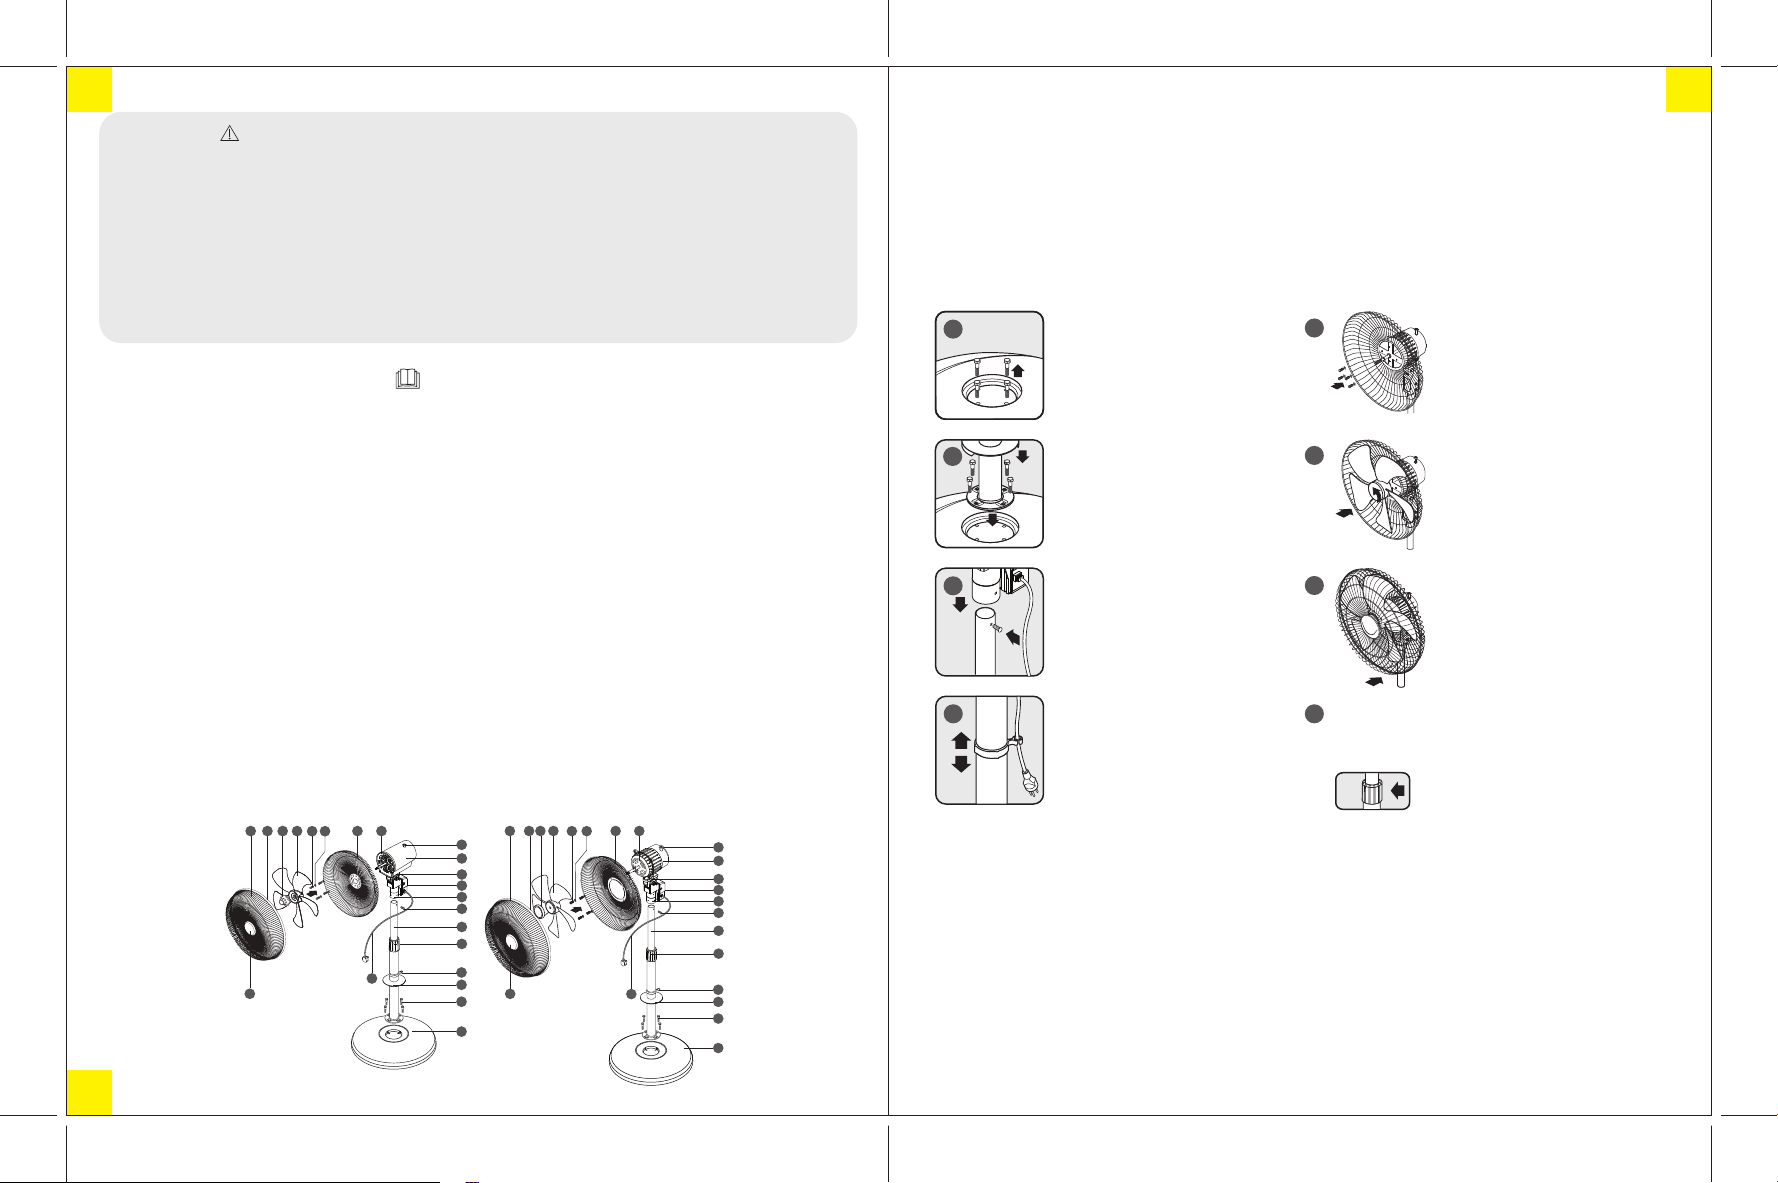
ASSEMBLY INSTRUCTIONS
Remove the screws (21) at the fan base
from the 4 indicated positions with
arrows.
1
Remove the rear grille screws (6) from the
4 indicated positions with arrows. Insert
the rear grille and tightly attach the
screws (6) and spring washers (7) to the
front motor cover according to the 4
indicated positions.
5
Attach the lower stand (17) to the fan base
(22) and tightly fasten the screws (21).
Lower the upper base cover (20) down to
seal it.
2
Place the blade onto the motor shaft,
ensuring that grooves of the blade fit with
the catch, then place the blade cap over
the blade, tightening it by twisting it in the
direction as shown by the arrow
(TIGHTEN).
6
Remove the screws (16) and connect the
upper stand (15) to the assembled lower
stand set. Tightly fasten the screws (16).
3
Place the front grille onto the fan with the
lock on the edge of the grille interlocking
with the top part of the rear grille. Use
your hands to press the grille ring in all
directions, then tighten the screw on the
grille ring using a screwdriver.
7
The power cord hook (19) can slide up
and down for your convenience.
4 8
Twist the height adjustment cover to adjust the height
as desired, and twist again to lock it in place.
Plug power supply cord into a 220-240V, 50/60Hz power socket.
DIRECTION OF USE
3 adjustable fan speed settings 0: off, 1: low speed, 2: medium speed, 3: high speed
Push the oscillation knob down to activate left-right movements. Pull the oscillation knob up to cease
movement.
Tilt the grille upwards or downwards according to the desired wind direction.
Fan Speed Adjustment
Swing Adjustment
Fan Angle Adjustment
1.
2.
3.
CARE AND CLEANING INSTRUCTIONS
1.
2.
3.
Use a damp cloth to wipe stains, and then dry the area by wiping.
When cleaning fan, be careful not to let the wire, switch, motor and other electrical components get wet.
Do not use chemical products, thinner solvents, alcohol, kerosene or petrol to clean the fan.
CAUTION
Unplug the fan before cleaning or changing fan components, and when not in use for a long period of time.
Do not use the fan if not all components are assembled or if components such as blade cap, blade or grille are found to be
defective.
The appliance is not to be used by persons (including children) with reduced physical, sensory or mental capabilities, or lack of
experience and knowledge, unless they have been given supervision or instruction.
This appliance can be used by children aged from 8 years and above and persons with reduced physical, sensory or mental
capabilities or lack of experience and knowledge if they have been given supervision or instruction concerning use of the appliance
in a safe way and understand the hazards involved.
Children shall not play with the appliance.
Cleaning and user maintenance shall not be made by children without supervision.
1.
2.
3.
4.
5.
6.
FAN COMPONENTS
DECO
FRONT GRILLE
GRILLE RING
BLADE CAP
FAN BLADE
REAR GRILLE SCREW
1.
2.
3.
4.
5.
6.
IP18M1, IP20M1 IP22M1
1
23
32 811
10
12
13
14
15
17
18
19
20
22
4 5 6 7
21
16
1
32 89
10
12
13
14
15
16
17
18
19
20
22
4 5 6 7
21
23
USAGE RECOMMENDATIONS
1.
2.
3.
4.
5.
6.
7.
The fan components should be assembled correctly according to the manual to prevent possible harm that may occur while in
use.
The fan should not be placed or installed in areas that are of extreme temperatures or near stoves, or in areas that are wet with
high humidity, or has hydrocarbon vapors such as petroleum.
The fan should not be operated near curtains or mosquito nets because the fan may suck in the light material and entangle them
with the blades, possibly causing harm.
Do not spray all types of spray into the fan; for example, hairspray or cleaning spray.
Do not insert fingers, pencils or other objects into the grille while the blades are spinning as it may result in possible injury or
physical damage.
If a component such as blade, grille, blade cap, or the rear grille lock is damaged, replacement can be made using a new component.
Please refer to the assembly instructions.
If an electrical component such as power cord, motor, or switch is damaged, it must be replaced by the manufacturer, its service
agent or a qualified person in order to avoid hazards. It is not advisable to fix the fan at home.
SPRING WASHER
REAR GRILLE
MOTOR
OSCILLATION KNOB
FRONT MOTOR COVER
REAR MOTOR COVER
7.
8.
9.
10.
11.
12.
NECK JOINT SET
FAN SPEED BUTTONS
UPPER STAND
SCREW FOR SECURING FAN STAND
LOWER STAND
HEIGHT ADJUSTMENT COVER
13.
14.
15.
16.
17.
18.
POWER CORD HOOK
UPPER BASE COVER
SCREW FOR SECURING
FAN BASE
FAN BASE
POWER SUPPLY CORD
19.
20.
21.
22.
23.
This manual suits for next models
2
Other Hatari Fan manuals

Hatari
Hatari HA-P18M1 User manual

Hatari
Hatari IQ22M1 User manual

Hatari
Hatari HD-P16M3 User manual

Hatari
Hatari HT-TW20R1 User manual

Hatari
Hatari HT-T18M3 User manual

Hatari
Hatari HT-W16M6 User manual

Hatari
Hatari HE-S18M1 User manual

Hatari
Hatari HT-T16M4 User manual

Hatari
Hatari IT18M2 User manual

Hatari
Hatari HT-S16M7 User manual


Popular Fan manuals by other brands

ELTA FANS
ELTA FANS H03VV-F installation guide

Hunter
Hunter 20714 Owner's guide and installation manual

Emerson
Emerson CARRERA VERANDA CF542ORB00 owner's manual

Hunter
Hunter Caraway Owner's guide and installation manual

Panasonic
Panasonic FV-15NLFS1 Service manual

Kompernass
Kompernass KH 1150 operating instructions


