Havit HV3791T-BLK User manual

Product Specications
Model No. HV3791T-BLK HV3791T-WHT HV3792T-BLK HV3792T-WHT HV3793T-BLK HV3793T-WHT HV3794T-BLK HV3794T-WHT
Name Revo
Material Aluminium
Colour Black White Black White Black White Black White
IP Rating IP65
Input Voltage 240v AC
Protection Class 2 (No Earth Required)
Lamp Base Built in LED
Lamp Wattage 1x 15w 2x 15w
Colour Temp TRI Colour - 3000k, 4000k, 5500k TRI Colour - 3000k, 4000k, 5500k
Lumens 1200lm, 1275lm, 1350lm 2x 1200lm, 2x 1275lm, 2x 1350lm
Sensor Type Microwave - 5.8Ghz +/- 75Mhz
Sensor Detection Area 180°
Sensor Detection Range Up to 12m
Lux Settings 2, 10, 25, 50, 100, 200 Lux
Time 30 seconds, 90 seconds, 5 minutes, 10 minutes, 30 minutes
Stanby Mode 3 minutes, 10 minutes, 30 minutes, 60 minutes
Sensitivity 25% = 3m, 50% = 6m, 75% = 9m, 100% = 12m approximately
CRI > 80
Dimmable No
Warranty 3 Years Replacement*
HV3791+ HV3792 Dimensions
52
Ø132
106
Ø74
90°Tilt /
270° Swivel
Focus Adjustable Spot Lights Installation Instructions
Important Safety Issues:
• This product must be installed by a qualied electrician according to AS/NZS 3000.
• Ensure all electrical mains are disconnected before any installation.
• Modication of this product will void any warranty.
• Havit Lighting does not take responsibility for wrong installation, incorrect use, or use of installation material that does not belong to the system.
• All o-rings and seals must be in place correctly to maintain warranty
• The unit should be wired to its own light switch only. No two way switching. Do not interconnect with other lights on the same switch.
• Ideally the security lamp should be mounted 1.8 to 3m above the ground to be scanned.
• To avoid damage to the sensor unit- DO NOT aim the sensor towards the sun or the photo electric cell will be damaged.
• To avoid nuisance triggering, the sensor should be directed away from heat sources such as barbecues, Air-conditioners, other outside lighting, moving cars and flue vents.
• To avoid nuisance triggering, keep away from areas of strong electromagnetic disturbance.
• Do not aim towards reflective surfaces such as smooth white walls, swimming pools, etc. The security lamp scanning specifications (approximately 10 metres at 180°) may vary slightly depending
on the mounting height and location. The detection range of the unit may also alter with temperature change. Before selecting a place to install your security lamp you should note that movement
across the scan area is more effective than movement directly toward or away from the sensor. If movement is made walking directly towards or away from the sensor and not across, the apparent
detection range will be substantially reduced.
• This form may be updated at any time due to product improvements, please check online installation form for most current version.
Steps for Installation:
1. Make sure that the electrical circuit is free of voltage (master switch off)
2. Remove base plate from tting, insert cable into cable entry hole and attach base plate in desired location using appropriate screws for application
3. Seal all holes including cable entry and screw points to avoid any water penetration.
4. Connect the cable - If wire has earth; connect the earth rst, then live and neutral wire, (can be connected with no earth)
5. Fitting is preset to 3000k, to change slide switch to desired colour temperature located in back of tting.
6. Reattach tting to baseplate making sure screws are tight to avoid water penetration. Insert caps provided to cover screws.
7. Apply silicon around edge of tting to prevent any water from getting inside to electrical connections.
8. To adjust heads, loosen screw on side of head and gently move into postion to where you want tting pointed and tighten screw, Do not overtighten.
9. For sensor models, Refer next page for remote instructions.
10. All connections must be carried out carefully, inspect all contacts before switching back on the electric circuit.
Contact Details: Warranty Terms & Conditions*
143 Beauchamp Road
Matraville NSW 2036
Australia
Tel: 02 9381 8300
Fax: 02 9666 8881
Web: www.havit.com.au
Must be installed by a licensed electrician
Additional Information
HV3793 + HV3794 Dimensions
Ø132
47
106
Ø74
90°Tilt / 270° Swivel
Mounting Bracket
Ø132
44 44
8
2x4
18
1OmFiFn
200lux
DDiissababllee
0
C
%
10%
5252 %%
u05 u05 xx
22lluuxx
33SS
TTeesstt
0101 lluuxx
0303 SS
0909 SS
001 001 xxuull
55mmiinn
33mmiinn
0606 mmiinn
++∞
0101 nniimm
0101 nniimm
0303 nniimm
0303 nniimm
yyaaDD ilil hghg sstt nene rrooss
SS nene yyttiivviittiiss
eemmiittddllooHH ttSS bdna bdna eemmiittyy
5252 xxuull
xxuull
iibbmmAA nene t t
S
St
tandb
andby
y
&
&
D
DI
IM
M
l
le
ev
ve
el
l
eded ttcceett
0505 %% 5757 %% 100
100%
%
N
W
RReesseett
1
5
6
7
9
2
3
4
8
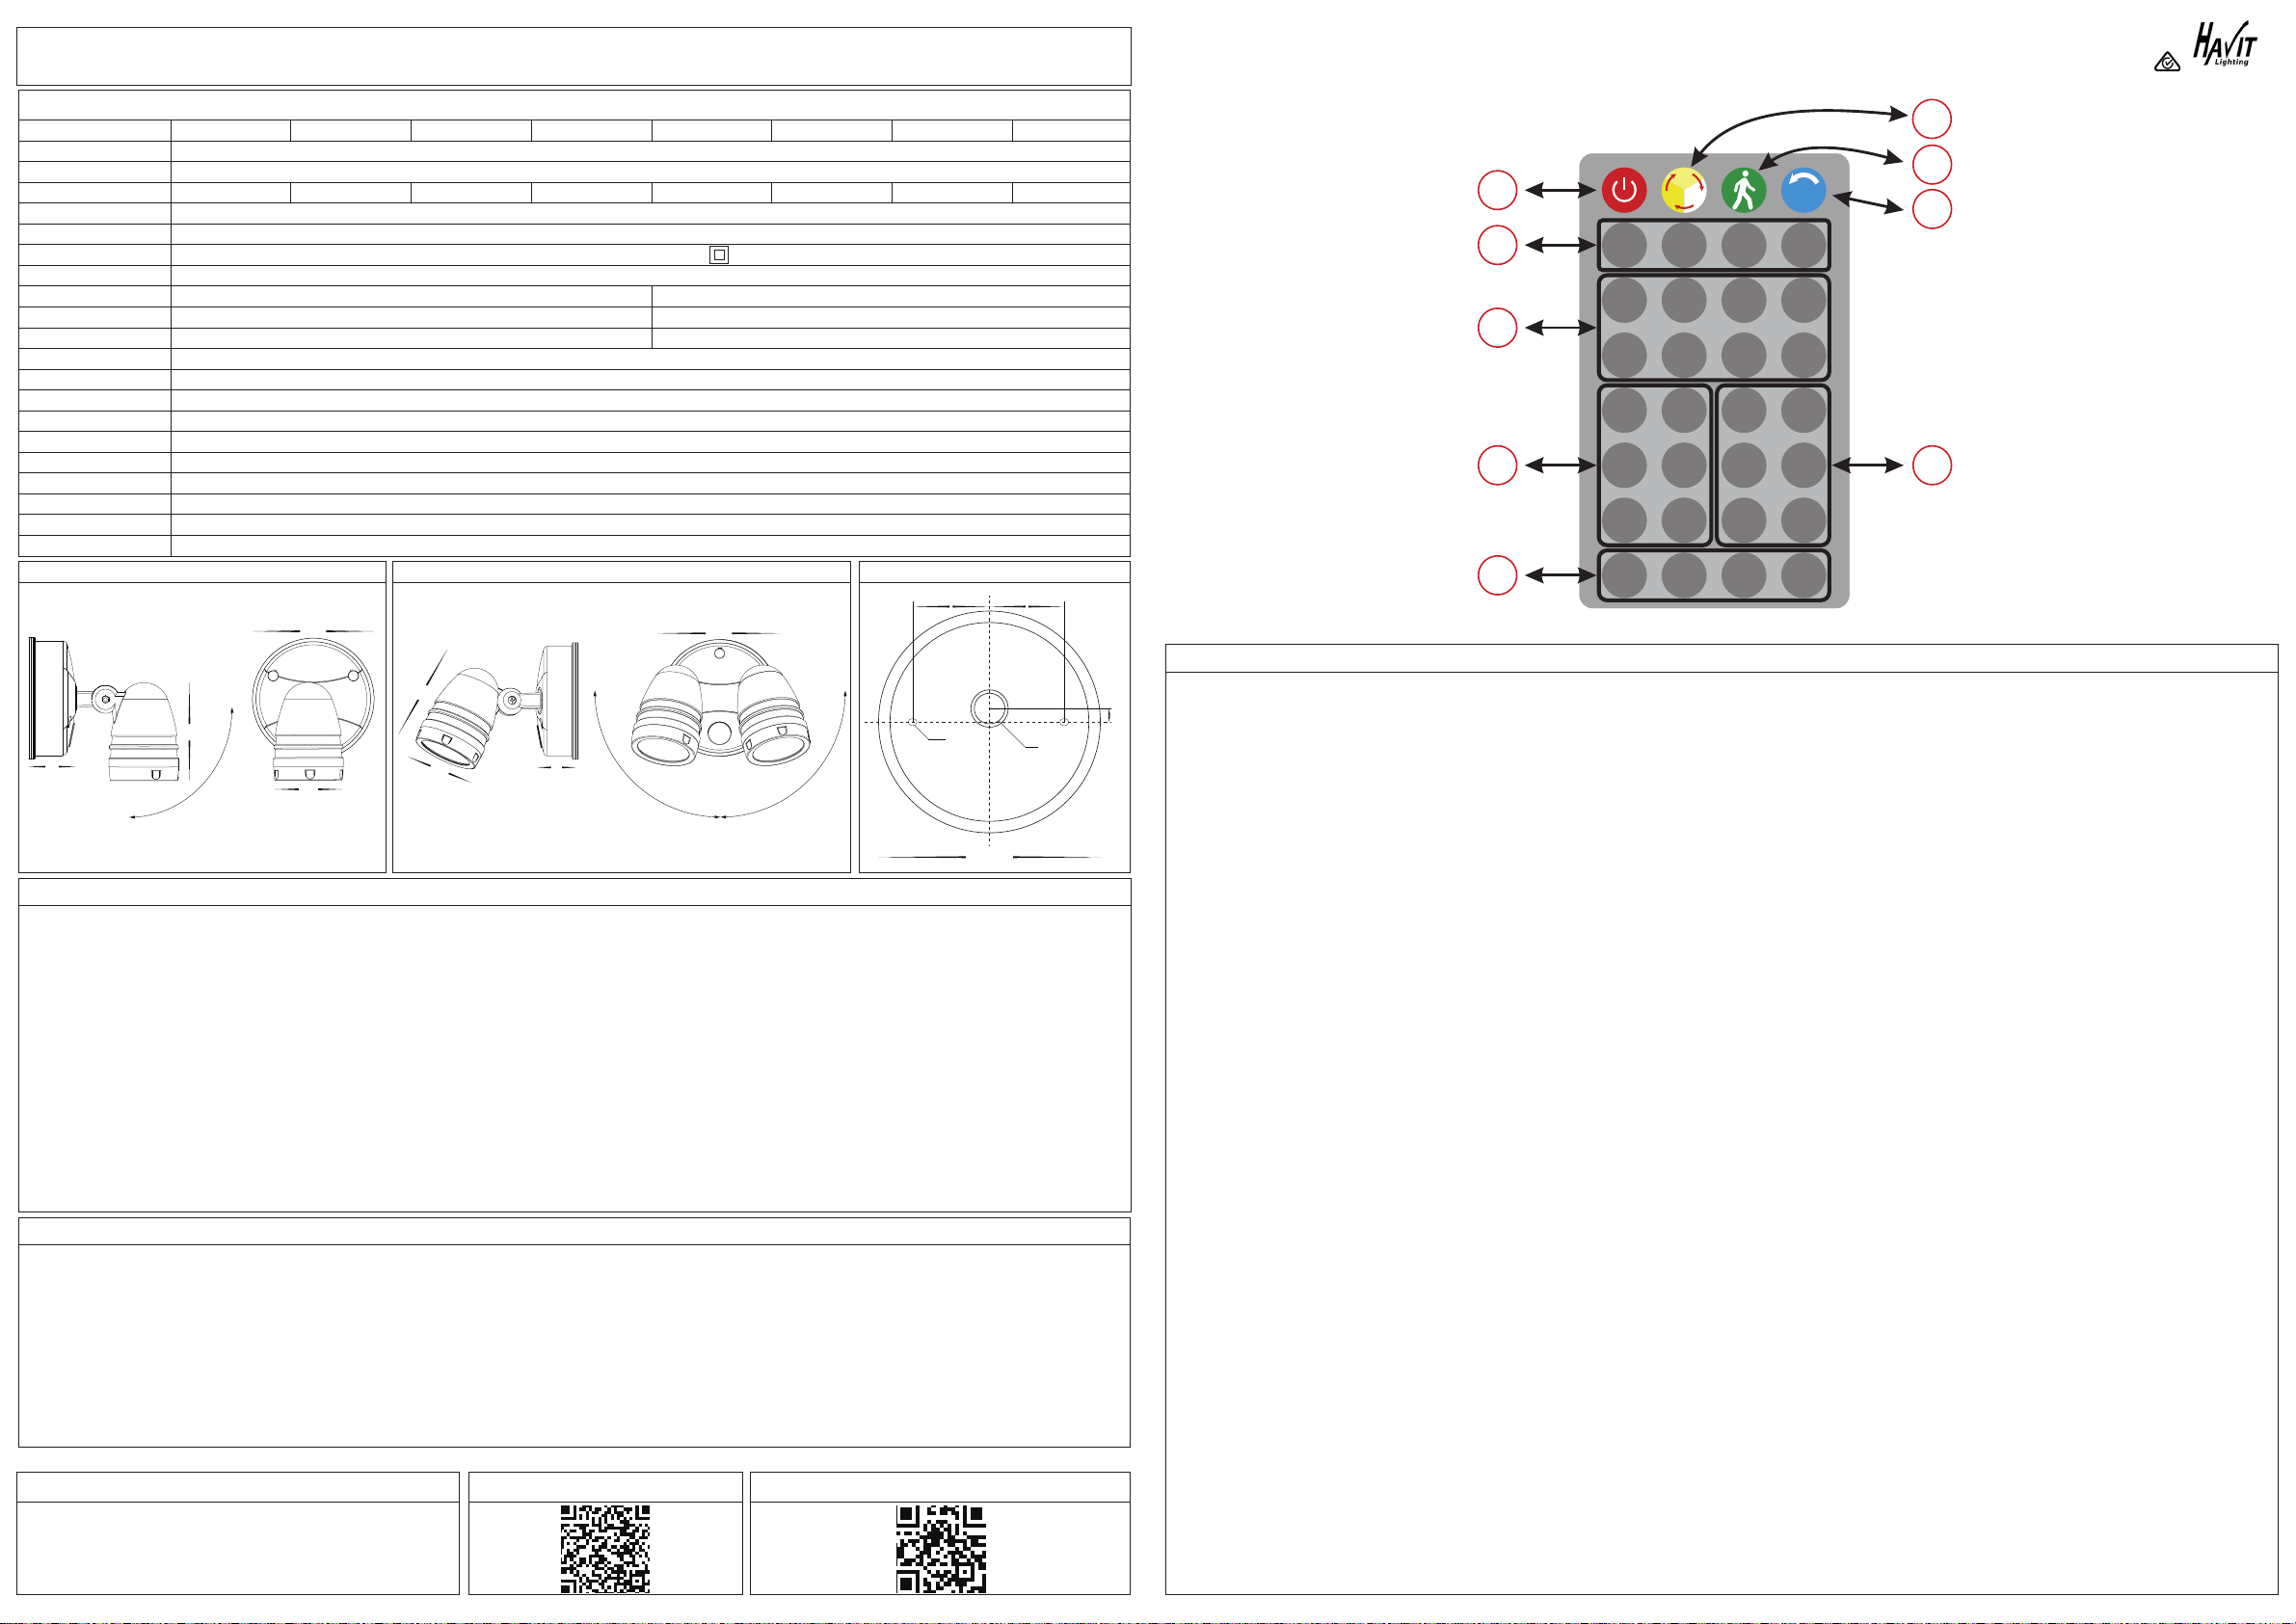
Manual Mode /
Auto Mode
Standby & Dim Level
Hold Time
Daylight Sensor
(Photocell Sensor)
Standby Time
AUTO
C
50%75%100%
0000
2xxuull
Disable
Off
N/A
Remote Instructions for Sensor Models Only:
1. Pressing this button will switch tting to Manual Mode, Press it repeatedly to switch the light to On/Off. In Manual Mode, tting can only be
controlled by the remote control, the tting won’t be controlled by the photocell sensor and radar motion sensor, the brightness of the light can be
adjusted by pressing“Standby & Dim Level” buttons.
2. No Function - Pressing this button will not cahnge colour temperature, To do this you must select colour temperature inside base.
3. Auto Mode: Light tting is controlled by radar motion detector and photocell sensor.
4. Reset button returns tting to factory default settings: The default parameters are:
Mode = Auto / Daylight Sensor = 50Lux / Hold time = 30S / Standby time = OFF (0S) / Sensitivity = 100%
5. Standyby & Dim Level: Adjusts the standby Level on Auto Mode; Adjust the Dim Level on Manual Mode.
6. Daylight (Photocell) Sensor: In Auto Mode, the light is not only controlled by motion detection, it is also controlled by the ambient light brightness
and depends on the setting values, the light will be restricted when the brightness of ambient light exceeds the set values.
“Disable”: to disable the daylight sensor function, tting will only be controlled by motion detection.
“Ambient Lux detection”: Set the current brightness as the daylight threshold.
7. Hold Time: The length of time that the sensor switches the light “on”after activation.
In Auto mode, when the daylight threshold is set to light-on, and the unit detects a valid motion, the light will turn on. After the hold time, the light
will be back to the set up accordingly.
“Standby & Dim Level”or turn off (depends on the settings on “Standby Time”).
“Test 3S” button is a test mode, the duration time is 3 seconds, which is convient for testing the motion detection distance and the daylight threshold.
The “Hold Time” will not be saved when power is turned off.
8. Standby Time: To Adjust the standby time.
“OFF”is to turn off the standby function, the light will be turned off direcly after the hold time expires.
“+∞” means the standby light is always on (affected by setting value of the Daylight Sensor, when the brightness of ambient light is higher than
the setting value of Daylight sensor, the light will turn off ). All other settings will allow light to stay in standby mode for time period set and then
completely switch off.
Photocell control Mode: When Standy time is set to +∞ and Standby & Dim Level is set to 100%, the light is only controlled by daylight (photocell)
sensor. The unit will turn on at full power when the brightness of ambient light is lower than the setting value of daylight sensor.
9. Sensitivity: How sensitive the sensor is to movement. you can set to operate the unit at the desired level by pressing this button.
Sensitivity and detection distance (approx.): 25%: detection distance = 3m, 50%: detection distance = 6m, 75%: detection distance = 9m,
100%: detection distance = 12m.
This manual suits for next models
7


