Hawaiian Telcom TV Set top box User manual

Hawaiian Telcom TV
User Guide

1
Hawaiian Telcom TV Introduction 2
Your Hawaiian Telcom TV Set Top Box 4
Your Remote Control 6
Settings 8
Screen Aspect Resolution 8
Digital Audio Output 9
Using Your Hawaiian Telcom TV Service 10
High Definition TV 10
Managing Live TV Feeds 11
Using The Menu 12
Using The Onscreen Guide 14
Picture-in-Picture Browsing 15
Customizing Your Guide 16
Set-Up Favorites 17
Using Search 18
Video On Demand (VOD) 19
Pay Per View (PPV) 21
Parental Control 22
Using Your Hawaiian Telcom TV Digital Video Recorder 24
Whole Home DVR 24
Controlling Live TV 24
DVR Menu 25
Recording Programs 25
Managing Recording Conflicts 30
Frequently Asked Questions 31
Troubleshooting Your Hawaiian Telcom TV System 33
Before Calling Technical Support 34
Key Customer Records and Contact Information 35
How to Contact Hawaiian Telcom 35
Service and Maintenance 35
Cleaning 35
Terms and Conditions 35
Index 36
Table of Contents

2
Say hello to the next generation of home entertainment in Hawai‘i. Welcome
to Hawaiian Telcom TV, an innovative new way to watch television. Get ready
for more enhanced features, more channel choices and more control. Plus,
our Whole Home DVR allows you to record more — up to four shows at once
— and connect every TV in your house. All delivered on our advanced fiber
network with 100% digital picture and sound. It’s time to immerse yourself in
a powerful new entertainment experience.
Hawaiian Telcom TV. A Better Choice.

3
With a Hawaiian Telcom TV Digital Video Recorder (DVR), you can record, pause
and replay live TV with the press of a button. What’s more, with Whole Home DVR,
one DVR is all you need. That means you have the power to schedule and watch
your recordings from any TV connected to your Hawaiian Telcom TV service. It’s
the same as having a DVR in every room.
Make sure this guide is always nearby. It’s full of tips and easy-to-follow instructions
that will help you get the most out of your television viewing.
For more information, visit hawaiiantel.com/tv or call 643-4888.

4Your Hawaiian Telcom TV Set Top Box
The following illustrations outline your Set Top Box (HD or HD DVR) functions
and connections. Set Top Boxes may not be exactly as shown below.
1Power – Turns your Set Top Box on or off and is lit when power is on
2Link – Lit when the Set Top Box is connected to the Hawaiian Telcom network
3HD – Lit when the Set Top Box is configured to display HD content
4Record – Lit on all Set Top Boxes when a DVR recording is in progress
5Menu – Displays onscreen menu
6Navigation – Moves selection up, down, left or right
7USB – Not currently enabled
FRONT VIEW
Your Hawaiian Telcom TV Set Top Box
1 2 76543

5
1Video In – For Hawaiian Telcom installer use only
2Video Out – Connects to the antenna jack on the TV
3Network In – Connects the network cable from your home network or modem
4Component Video Out – Component video cables can be used for high quality signals to
either HD or non-HDTVs
5S-Video Out – S-Video is preferred for older TVs
6RCA Video / Audio 1 Out – These connections are ideal for VCRs and older TVs
The audio ports can be used independently if other video connections have been used
7RCA Video / Audio 2 Out – These duplicate connections are available for users
with multiple devices
8Optical – This is an all digital audio connection and it is ideal for audio receivers
9HDMI (Out) – HDMI is the HD connection that contains both audio and video signals
used for HDTVs
10 USB – Not currently enabled
11 Power In – Connects to the supplied adapter to power the unit
BACK VIEW
1 2 7 8 9 10 116543

6Your remote control
One Remote Control is all you need
Your Hawaiian Telcom TV Remote Control is universal. That means
it works with just about any television set as well as most DVD
players, VCRs and A/V receivers. We’ll show you how to program
your remote at hawaiiantel.com/tv.
7
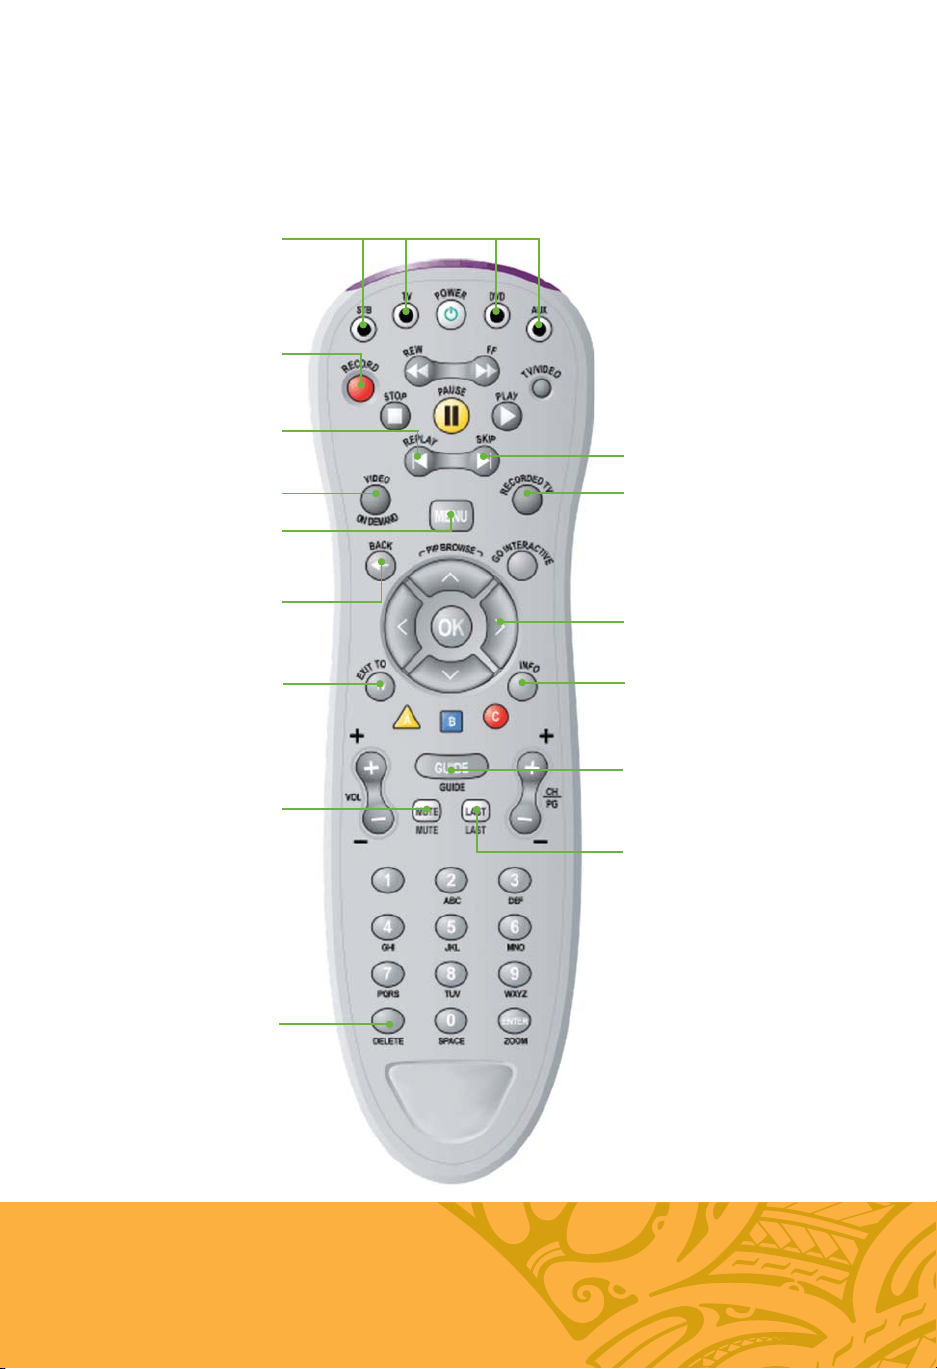
How to Use Your
Hawaiian Telcom TV Remote Control
Control devices with
mode buttons
Record TV with one click
Fast-forward in
30 second increments
Skip back in 7 second
increments
Go to recorded TV
program list
Go to Video On Demand
(VOD) library
Go to main menu screen
Return to previous
menu screen or
TV channel
Exit from a
menu screen or
return to live TV
Mute the sound
on your TV
Edit text on the
search screen
Navigate channels,
menus and screens
Go to program
info screen
Go to interactive
program guide
screen
Return to
previously viewed
live TV channel

8Settings
SCREEN ASPECT RESOLUTION
Using your TV’s user guide as a reference, you can adjust your screen settings by choosing
the most suitable resolution from this list and then following steps 1 to 8:
4:3 standard definition
Widescreen standard definition
720p on high-definition screens
1080i on high-definition screens
1. Press .
2. Use to highlight Settings.
3. Use to select Television and press OK .
4. Use to select Screen aspect ratio and high definition and press OK .
5. Use to select the setting that is appropriate for your TV.
6. Navigate to Continue and press OK .
7. Navigate to Start Test and press OK . The system will verify whether your TV can display the
selected setting.
8. If you can see the video on your screen, use to select Keep Setting and press OK to save.
Or if you see a black screen, your TV may not be able to display the selected setting. Use to choose
another setting or check your cables to ensure proper connection between your TV and Set Top Box.
Settings

9
DIGITAL AUDIO OUTPUT
Digital audio output allows you to adjust your audio settings.
1. Press .
2. Use to select Settings.
3. Use to select Audio and press OK .
4. Use to select Digital audio output and press OK .
5. Navigate to select Stereo or Surround sound and press OK .
6. Navigate to select Save and press OK .
10 Using your Hawaiian Telcom TV service
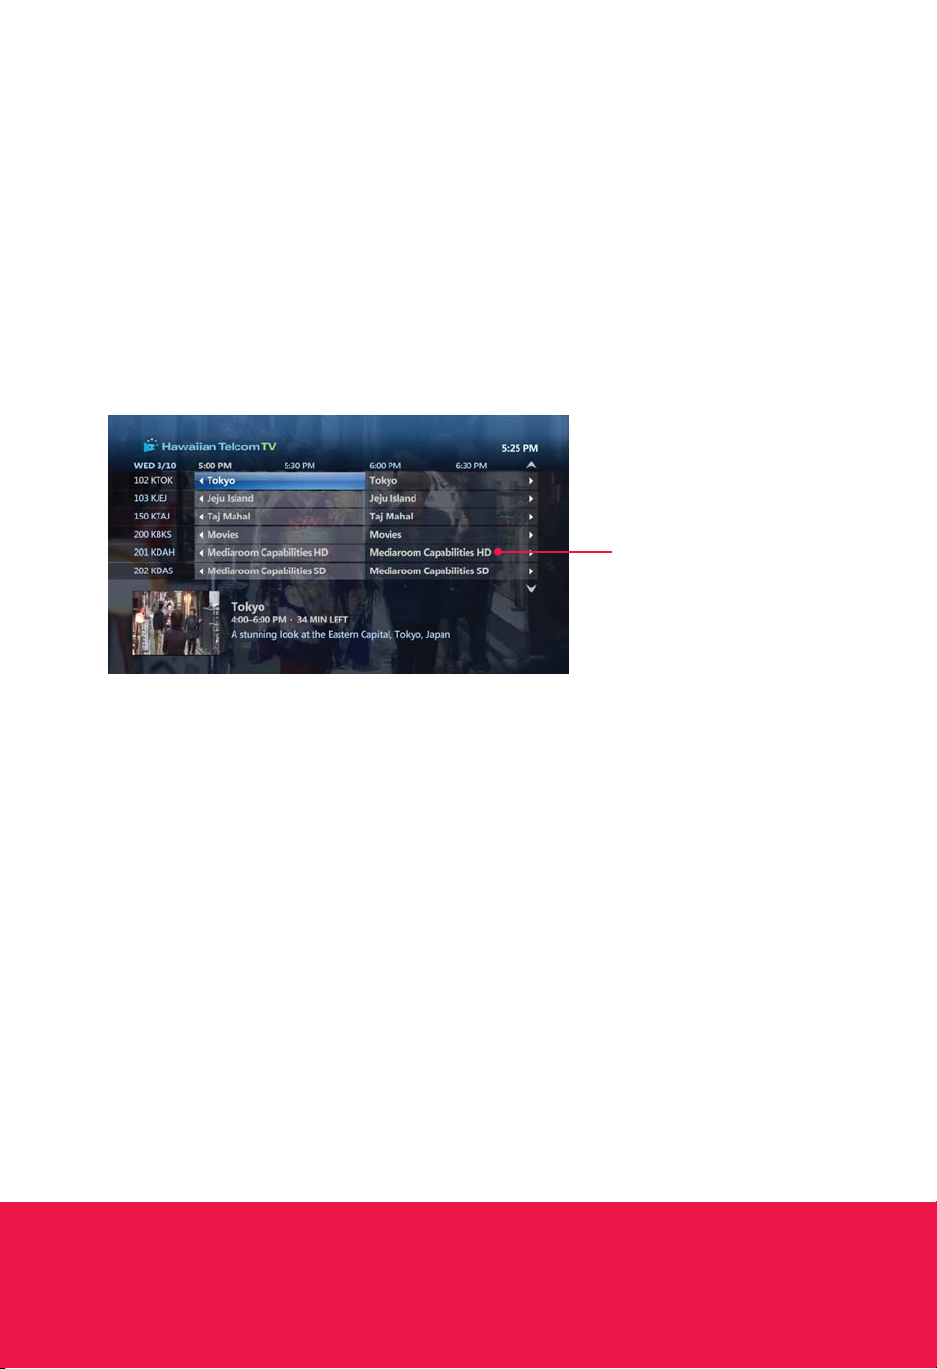
HIGH DEFINITION TV
It’s television as you’ve never seen it before. With Hawaiian Telcom’s High Definition (HD), you’ll
experience true widescreen picture quality that’s 10 times better than standard television. Add 5.1
Dolby® Digital sound for theatre-quality viewing in the comfort of your home.
All Hawaiian Telcom Set Top Boxes are HD-ready.
Using Your Hawaiian Telcom TV Service
In the guide, HD programs
are identified by an HD icon
after the program title.

11
MANAGING LIVE TV FEEDS
Hawaiian Telcom TV supports up to 8 TVs and delivers 4 live TV feeds to your household. A TV feed
can be a live TV show, a Video on Demand (VOD) program or a Pay Per View (PPV) event. If you have
a DVR, you can watch or record 4 live TV programs simultaneously among the TVs in your household.
For example, you can do one of the following:
Watch 4 different live TV programs
Record 1 live program on your DVR and watch 3 other live programs
Record 3 live programs on your DVR and watch a fourth live program
Record 4 live programs on your DVR
You can also watch up to 2 of the 4 available live TV programs in HD and the rest in standard
definition (SD). And if you have 2 or more TVs tuned to the same live TV program you’ll only be using
1 live TV feed.
If you try to watch or record more live TV
programs than you have available feeds, your
Hawaiian Telcom TV service will present you
with options to select the programs that you
wish to watch or record. For example, if 4 live
TV programs are being watched and a fifth TV is
turned on to watch another program; you will be
prompted to choose which programs you want
to continue to watch or record. If you choose to
interrupt a program on another TV, a message
will be displayed on both affected TVs.
With your Hawaiian Telcom TV DVR, while the live TV feeds are being used to watch or record live
programs, you can watch up to 4 recorded programs on your other TVs. Viewing a recorded program
does not use a live TV feed as it is stored on your DVR.
QUICK TIP
Turning off one of your Set Top Boxes will free up a live TV feed.
12 Using your Hawaiian Telcom TV service
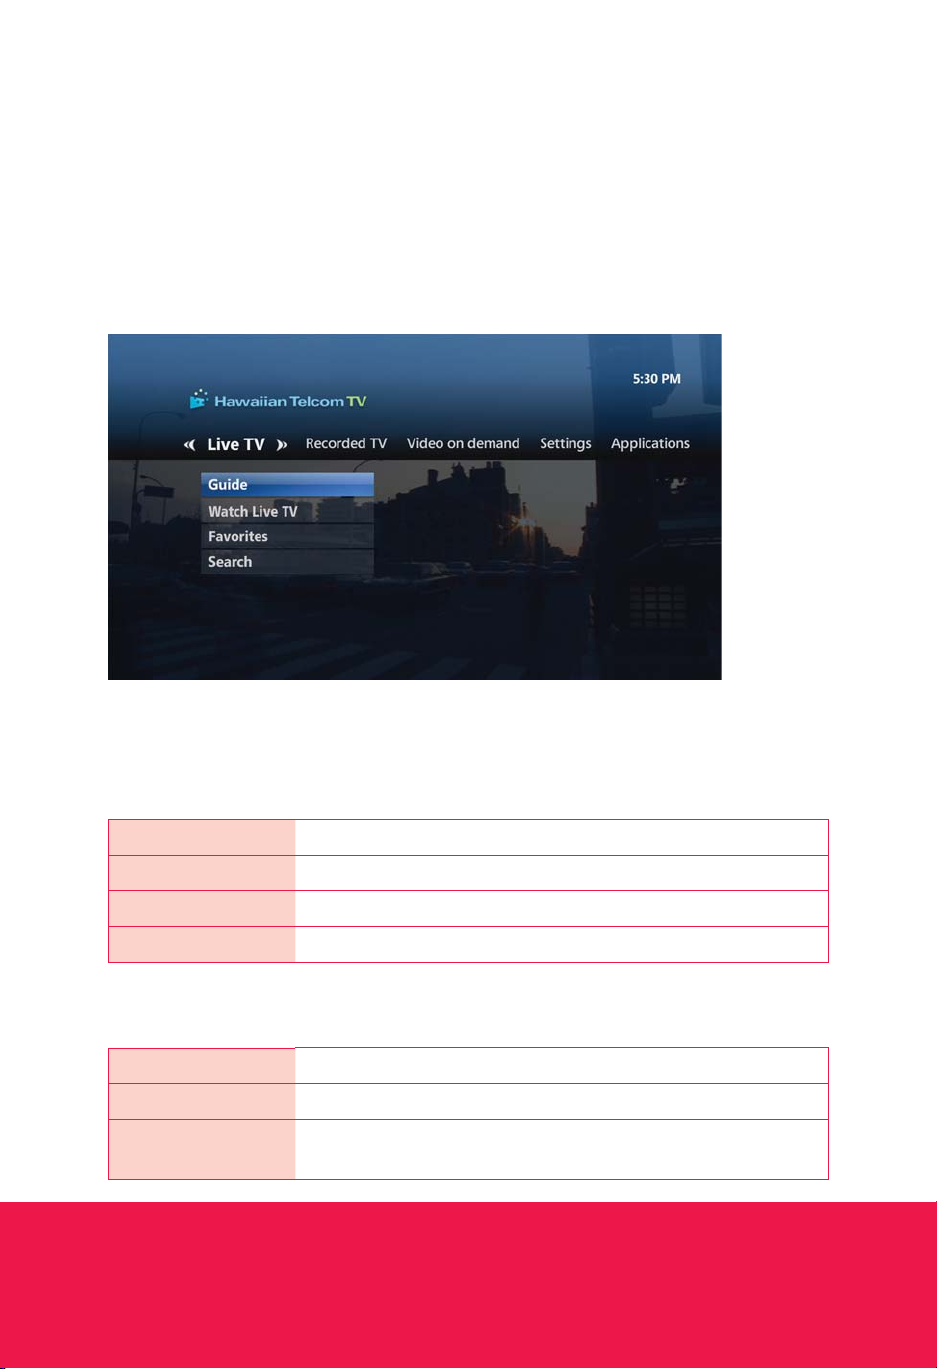
USING THE MENU
Use the menu to quickly access the Live TV, Recorded TV, Video On Demand, Settings and
Interactive drop down menus.
RECORDINGS (DVR ONLY)
VIEW RECORDINGS Lists all in progress and complete recordings.
SCHEDULED Lists all future recordings.
ADD A RECORDING Allows you to record a program using search, the guide or by entering
the channel number and recording time.
Here is a brief description of each drop down menu:
LIVE TV
GUIDE Accesses the program guide.
WATCH LIVE TV Allows you to watch a live TV program.
FAVORITES Accesses your customized favorites list.
SEARCH Allows you to easily find your favorite.
Using Your Hawaiian Telcom TV Service

13
VIDEO ON DEMAND
BROWSE VIDEOS Lists all videos by category.
CURRENT RENTALS Lists all your rented titles and those that are still available to view.
SEARCH Allows you to easily find your favorite VOD titles.
SETTINGS
GENERAL Allows you to turn system sound effects on or off, access system
information and troubleshoot your connection.
TELEVISION Allows you to customize your guide, favorites list, screen aspect ratio
and closed captioning.
AUDIO Allows you to change your digital audio output settings.
PARENTAL CONTROLS Allows you to block VOD titles, PPV events and programs by
channel, rating or content.
RESTART SYSTEM Reboots your Set Top Box. All your user settings will be saved.

14 Using your Hawaiian Telcom TV service
Using Your Hawaiian Telcom TV Service
USING THE ONSCREEN GUIDE
Use the guide to find out which shows are on and which ones are coming up.
Guide
Displays program listings by time
and channel.
Programming view
Displays 2 hours of program
listings.
Information
Provides details about a
highlighted program including the
title, time, rating, description and
cast information if available.
1. Press .
2. Use to scroll through and highlight a program.
3. Press OK to change the channel to that program.
QUICK TIP
To go forward in the guide in 24-hour intervals, press .
QUICK TIP
To view a list of all programs on a channel, scroll using until you highlight the station channel and
press OK .

15
PICTURE-IN-PICTURE BROWSING
Find out what’s playing on other channels without missing a moment of what you are currently
watching.
1. Press to scroll through channels while watching live TV.
2. Press to scroll through time-slots while watching live TV.
3. Press OK to select a program or to get more information about an upcoming program.
4. Press (EXIT TO) to close the browse panel.

16 Using your Hawaiian Telcom TV service
CUSTOMIZING YOUR GUIDE
Customize your guide so that it shows only the channels you watch the most.
1. Press .
2. Use to select Settings.
3. Use to select Television and press OK .
4. Use to select Customize channel guide and press OK .
5. Use to highlight available channel(s) and press OK to add or remove the channel(s).
A checkmark will appear next to the channel(s) that are included in the guide.
6. Navigate to Save and press OK to save your changes.
Using Your Hawaiian Telcom TV Service

17
SET UP FAVORITES
You can customize your onscreen guide to display only the channels you want to view by creating a
favorites list. A separate favorites list can be created on each Set Top Box.
Creating your favorites list
1. Press .
2. Use to select Favorites under Live TV and press OK .
3. Use to select Set up favorites and press OK .
4. Use to highlight the available channels and press OK to add it to the favorites list.
5. Navigate to Save and press OK to save your changes. A checkmark will appear next to the
channels that are included in your favorites list.
Selecting your favorites list
1. Press .
2. Use to select Favorites under Live TV and press OK .
Editing your favorites list
1. Press .
2. Use to select Settings.
3. Use to select Television and press OK .
4. Use to select Set up favorites and press OK .
5. Use to highlight the available channels and press OK to add or remove the channel(s).
A checkmark will appear next to the channels that are included in your favorites list.
6. Navigate to Save and press OK to save your changes. A checkmark will appear next
to the channels that are included in your favorites list.

18 Using your Hawaiian Telcom TV service
Using Your Hawaiian Telcom TV Service
USING SEARCH
Use search to quickly and easily find your favorite TV shows, VOD titles and PPV events.
1. Press .
2. Navigate to Search and press OK . Now search by one of the following:
Title of a TV show, VOD or PPV program
Name of a person (actor/actress/director)
3. Navigate to highlight the first letter you are entering and press OK .
4. Repeat step 3 to enter more letters.
a. To enter a number, navigate to 123 and press OK .
b. Navigate to highlight a number and press OK .
c. To return to the alphabet, navigate to ABC and press OK .
5. Navigate to highlight the desired search result and press OK to view upcoming episodes of the
same program or different programs with the same cast.
6. Use to highlight the program title and press OK .
7. Use to highlight the desired option and press OK .
QUICK TIP
Quickly search by using the number keypad on your remote to spell the name of the person
or program you are looking for.

19
HAWAIIAN TELCOM VIDEO ON DEMAND (VOD)
Want to watch it now? With Hawaiian Telcom’s VOD, you can order and watch movies whenever
you want. There are hundreds of titles to choose from, including the latest Hollywood blockbusters,
timeless classics and more. Plus, VOD lets you pause, stop, play, rewind and fast-forward your
movie so you never miss a beat. You’ll also love the crystal-clear true wide-screen picture and rich
5.1 Dolby® Digital sound. With so many options, you may never leave your couch again.
If you want to prevent unauthorized rentals, create a rental locking PIN. Refer to page 22 to learn how.
RENTING A VOD PROGRAM
1. Press (VIDEO ON DEMAND).
2. Use to select a video category. For those with subcategories, use to select the desired
subcategory and press OK .
3. Use to select a video and press OK . A Summary screen will appear for you to watch a
preview or rent the video.
4. Use to select Rent for $ and press OK .
5. Use to select Rent for $ and press OK . The video will begin playing immediately.
You will see the charge for your purchase on your next Hawaiian Telcom bill.
If you have blocked adult-rated content, the titles of the adult films will not appear in the VOD menu within
the adult category. To view these titles, refer to page 23 to learn how to disable your Parental Controls.
Table of contents


