© 2008 Hawking Technologies, Inc. All rights reserved. All trademarks herein are the property of
their respective owners. Apple and Mac are registered trademarks of Apple Computer, Inc. No
affiliation implied or expressed.
Cont’d
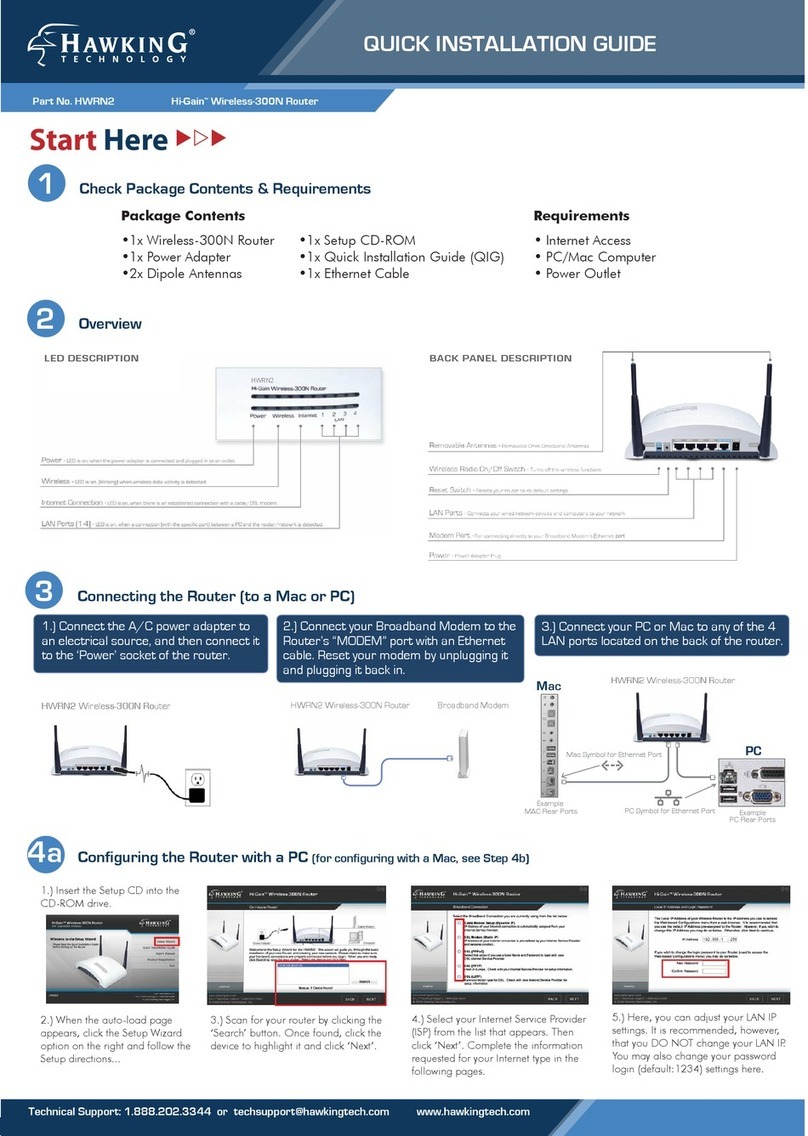
4b Configuring the Router with a Mac
5 Connecting to your New Wireless Network (with a PC or Mac)
6.) Choose to setup your Wireless Network by
either enabling or disabling it. Then decide on
an ID name (default: Hawking_300N) for your
router and enter it in. Click ‘Next’ when you
have completed the page.
7.) If you would like to add Wireless Security,
choose your security type and click ‘Next’. This
QIG will go over how to configure a basic
security setup with a ‘WPA pre-shared key’
encryption.
11.) This page displays your Setup Summary of
the router and shows all configured settings.
Click the ‘Set’ button to apply these settings to
the router. The router will take some time to
reboot, please be patient.
1.) Insert the Setup CD into the
computer’s CD-ROM drive.
2.) When the auto-load page
appears, click the Setup Wizard
option on the right. Your web
browser should automatically launch
and open up to the router’s web-
based Quick Setup Wizard (URL
address: http://192.168.1.254).
3.) When prompted by a
pop-up window asking
you to login, enter:
Name: admin
Password: 1234
4.) First, set the time zone in which you
are using the router. When completed
with the page, click ‘Next’.
5.) Choose the the type of internet
connection provided to you by your
Internet Service Provider. The
following page will ask you to com-
plete the configuration of your
specific internet connection. If you
are unsure about some of the
requirements, please contact your
network administrator or ISP.
6.) For Wireless Settings click the
‘Wireless’ tab button at the top of
the web user interface. Please
choose to ‘Enable’ or ‘Disable’
wireless and click ‘Apply’. It is rec-
ommended that you leave the
default values as they are. Click
‘Apply’ when finished.
4a
8.) In the ‘WPA Unicast Cipher Suite’ field select
the option labled as ‘WPA (TKIP)’.
9.) In the ‘Pre-shared Key Format’ field, select
‘Passphrase’ from the drop down menu and
below that enter at least an 8 character value
for the ‘Pre-shared Key’. E.g. hawkingtech
10.) After selecting your personalized pass-
phrase, you may apply the Wireless Security
settings by clicking ‘Next’. If you wish to cancel
your security settings, click ‘Back’ to the “Set-
ting Up Wireless Security...” page and disable
security settings. This will leave the network
open to all users.
1.) To connect to your new
wireless network using a
PC, click the wireless net-
work icon in your system
tray.
2.) Click the ‘View
Wireless Networks’
button.
Connecting with PC
3.) Find your new network
(default ID: Hawking_300N)
and click on it twice or click
‘Connect’. You can now
enjoy your new wireless
network!
Connecting with Mac
1.) Click the wireless network
icon in the upper right hand
corner of the Finder.
2.)From the drop-down menu
select your wireless network
(default ID: Hawking_300N).
You can now enjoy your new
wireless network!
NOTE: If you have WPA Security enabled you will be prompted to
enter your password.
