Hawx Pro DG User manual


Table of Contents
Components 2
How the system works 2
Quick Operation Guide 4
Key Denitions and Operation 6
Master Transmitter 6
Collar Receiver 7
Dog & Gun Control 9
Prepare devices 10
Charge the Master Transmitter 10
Charge the Receiver 10
Operation 11
LED Indicator Chart 11
Find the Best Intensity Level for your Dog 12
Range of Dog & Gun Control and Best Location of your Transmitter 13
Fitting the E-Collar 14
Performance Comfort Wing Technology 15
Operation of Dog & Gun 16
Setting Dog & Gun Transmitter Intensity Level 17
Installing Dog & Gun Button on your Gun 17
Congure a New Mode / Selecting or Changing Modes 19
Mode Chart and Remote Training Systems 20
Add a New Collar (Pairing) and Selection of Tone or Vibrate 23
Selecting Beeper or Tone Control 24
Pairing a Dog & Gun Button 25
Add a Remote Launcher (Pairing) 26
Auto Run Operation 27
Pairing a Dog & Gun button for Auto Run 28
Changing the Master Transmitter ID Manually 28
Master Transmitter and E-Collar Rechargeable Batteries 29
Troubleshooting 31
FCC Compliance 33
1

Owner’s Manual
For Pro DG/Hunter trainer and DG/Hunter trainer
Components
How the system works
The Hawx Dog & Gun is a multipurpose training and hunting solution. The Master Transmitter and the Dog
and Gun control provide the ultimate exibility and control whether you are hunting or training. The Dog
and Gun control (DG) allows split second correction or reinforcement. This enables your dog to have better
understanding. It’s simple to use in any hunting or training environment – up to 1 mile away, depending on
the model.
There is an old saying about animal training, which I am sure you have heard. If you can’t reinforce or correct
at the instant of the desired behavioural change, don’t bother. Timing is the big advantage for Dog & Gun
control.
2

The Master Transmitter operates like most e-collars today: it sends a signal, activating the collar receiver to
deliver an adjustable stimulation. It can be tailored to the correct level for your dog’s temperament. Stimula-
tion can range from a pinch to a higher discomfort for stubborn dogs. Try the system yourself on your nger.
Hawx Dog & Gun provides an all-in-one training and hunting system. All Hawx e-collars oer adjustable
stimulation levels. They oer stubborn dog features, tone, vibration and control of other devices (such as
remote throwers or bird release systems), plus the patented Dog & Gun system.
All Hawx systems come as Dog & Gun ready systems (DG receiver is embedded in the Master Transmitter).
Dog & Gun mode sends a signal from your Gun mounted button to your Master Transmitter and then acti-
vates the dog-worn receiver. It’s all done in less than a split second. Dog & Gun control and mounting kit can
be added at the time of purchase, or any time thereafter.
The Pro DG hunter/trainer has a 1 mile range. The DG hunter/trainer has a 1/2 mile range. The range may
vary depending on how high you hold the Master Transmitter; vegetation and weather conditions can also
aect the range. When operating the system in Dog & Gun mode, the Master Transmitter should be in a
pocket, on the belt clip, or in a pack that is within direct line of sight. The system should be located within 3
to 4 ft of your Dog & Gun control.
Line of
sight
Training Dog & Gun
Gun Control
Transmitter should not be located behind your body (line of sight).
3

Quick Operation Guide
Your Hawx system is ready to go and is set on default factory Hunter Mode 11.
- Upper Button = Continuous
- Lower Button = Momentary
- Side Button = Tone
- Toggle switch Up = Dog 1
- Toggle switch Down = Dog 2
- Dog & Gun or Training mode selector.
Receiver
Turn On / O – To turn on, press rmly and release. Press to turn on, two conrming tones will sound. Collar light
will ash periodically. Press to turn o, and one long conrming tone will sound. Collar light will stop ashing.
4

Operation of Dog & Gun Button
In Hunter mode the Dog & Gun button is paired to the Lower button - Momentary.
Turn O when not in use, move selector back to Training (T) mode to save power.
Set or Change Intensity
The factory default Dog & Gun button is paired on the momentary button (lower button)
Note -
You can change intensity levels at any time by repeating the instructions above.
You can move back and forth from training to Dog & Gun mode and the DG button will remember the
stimulation level. Do not forget when moving into Dog & Gun mode, you must press any button to activate,
and the lights will ash green.
However, if you’ve selected another mode, with dierent key functions, then the Dog & Gun function may change.
5

Key Denitions & Operation
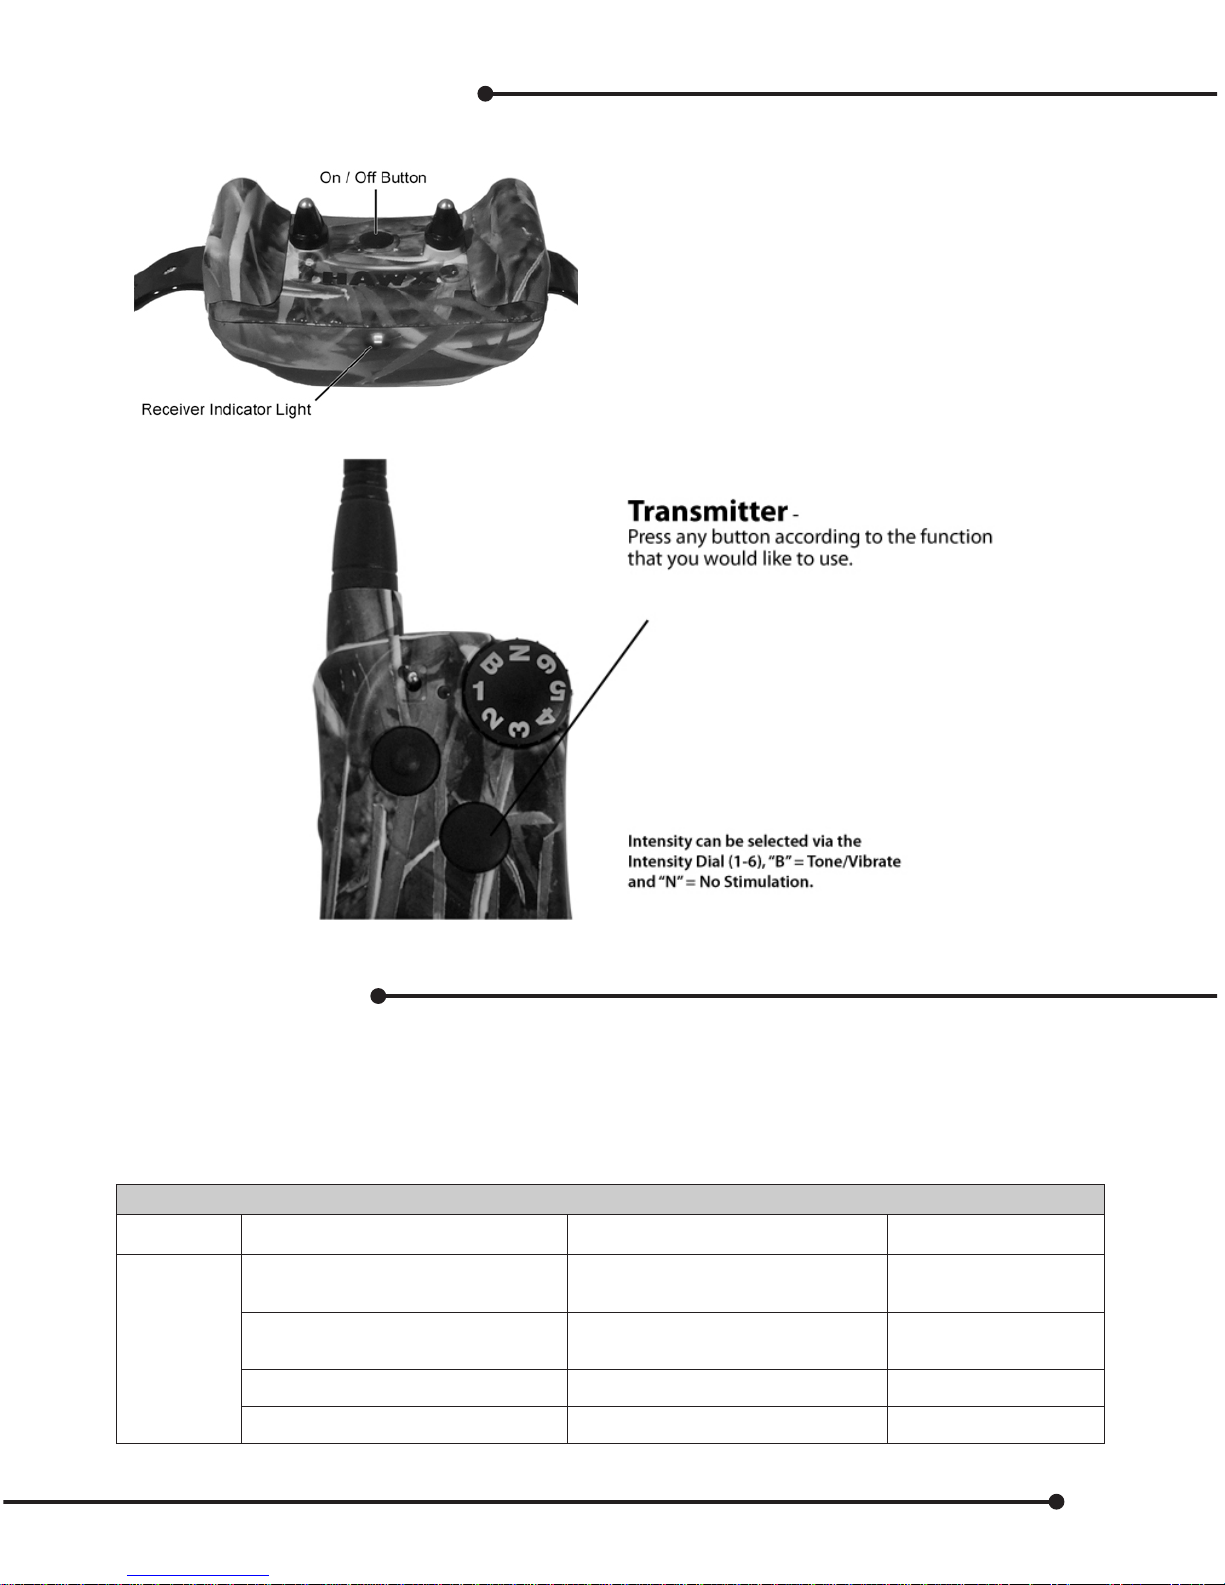
Master Transmitter
The Master Transmitter sends a signal to activate the e-collar which delivers a harmless stimulation to the
dog. The transmitter is waterproof and submersible, it also incorporates a 2.4 GHZ receiver for Dog & Gun
remote control. All transmitters are Dog & Gun ready, so that Dog & Gun transmitters can be added at any
time. The unit comes set on factory mode default (Hunter mode 11).
Front
1. Selector Dial
• Provides multiple stimulation levels (1-6), so you can match the correction to your dog’s temperament.
“N” (no stimulation) or “B” (Tone or Vibrate) or (beeper) setting, depending on mode and setting.
2. Dual Function Indicator light
• Indicates that a signal has been sent to activate a command on the receiver. In
addition serves as a low-battery indicator.
3. Toggle Switch
• This switch is factory set to control two collar receivers.
Mode 11 – Hunter Mode (Default)
4. Upper Button
• This button is factory set to deliver
Continuous stimulation.
5. Lower Button
• This button is factory set to deliver
Momentary stimulation or “nick”.
6. Side Button
• This button is factory set to deliver
Tone.
Note: All buttons’ functions can be
changed based on mode chosen. (See
pages 19-22)
6

Back
7. Dog & Gun Switch/Training Selector Switch
• This activates the control for the Dog & Gun
transmitter. DG = Dog & Gun mode.
T= Training mode.
8. Customizing Mode Button
• This allows you to customize the system from
factory settings. Customization for dierent
key positions, stimulation levels, types of
stimulation, vibrate/tone, multiple dogs, and
bird launchers.
(See pages 19 through 22 for customizing your unit.)
9. Charging Jack
• Plug in charger to start charging.
NOTE: Charge transmitter & collar BEFORE FIRST USE.
Collar Receiver
The collar receives a signal from the Master Transmitter and delivers stimulation, tone or vibration for
correcting or rewarding your dog. The collar is 100% waterproof.
On/O Button
To turn on, press rmly and release. Press to turn on, two conrming tones will sound. Collar light will ash
periodically. Press to turn o, and one long conrming tone will sound. Collar light will stop ashing.
Dual-Purpose Collar Indicator Light
Indicates when the collar is on or o, indicates a received command from the transmitter, and serves as low
battery indicator.
Contact Points
The contacts through which the collar receiver delivers stimulation.
7

Performance Comfort Wings (PC Wings)
The design that provides comfort and better contact performance. The performance of long contacts with
the feel of short contacts. See page 17 for tting.
Stretch E-Strap
Stretches as your dog breathes. Auto pressure gauge for ultimate performance and comfort. See page 14 for
tting.
Charging Contacts
Use when placed on charging cradle.
The collar receiver is capable of providing the following:
•Low/Medium/High Stimulations: Delivers stimulation continuously when the button is pressed and
held. After 8 seconds, the stimulation will stop (safety time out) and the button needs to be released
and then pressed again before additional stimulation can be delivered.
•Low Momentary Stimulation: This is a low duration of momentary pulses, which stays on briey no
matter how long the button is pressed.
•Medium Momentary Stimulation: This is a medium duration of momentary pulses, which stays on
briey no matter how long the button is pressed.
•High Momentary Stimulation: This is a high duration of momentary pulses, which stays on briey no
matter how long the button is pressed.
•Tone: The collar receiver makes a beeping noise when a selected Button is pressed – up to maximum of
8 seconds. Tone can be controlled by button control in modes xx or via the“B”selection on the intensity dial.
•Vibrate: The collar receiver will vibrate when a selected Button is pressed – up to maximum of 8
seconds. Vibrate can be controlled by button control in modes xx or via the“B”selection on the intensity dial.
NOTE: Charge collar receiver BEFORE FIRST USE.
Rechargeable Batteries
The transmitter and collar use rechargeable Lithium Ion (Li-Ion) batteries are not memory sensitive, do not
require depletion before charging and cannot be over charged.
The batteries come partially charged from the factory, but will require a full charge before rst use.
Remember - Always keep batteries away from open ames.
When storing the unit for long periods, remember to regularly give batteries a full charge.
This should be done once every 3 to 4 months.
You should expect hundreds of recharge cycles from your batteries. However, all rechargeable batteries lose
capacity over time relative to the number of recharge cycles they experience. This is normal.
If your operating time drops to half of the original life, contact Customer Service to purchase a new battery.
When a battery needs replacement, you can order a new pack by calling Customer Service at
1-800-610-4299.
Do not charge the Collar Receiver in areas with high temperature (100° F+).
8

Dog & Gun Control (DG)
Dog and Gun control oers you the ability to mount a control on your gun, or keychain, and put the master
training transmitter in your pocket. This micro button sends control signals to the collar receiver, providing
fast reaction and ease of use. Gun buttons can be congured to provide the same function as any or all of
the three buttons on the Master Transmitter. Multiple dogs, multiple stimulation types (including sound and
stimulation level) can be adjusted. Up to 10 Dog & Gun controllers can be paired to one Master Transmitter,
so you can install multiple gun or multiple control buttons. (See page 25 for set up)
Concept
The basic concept of Dog & Gun control is that the Dog & Gun button doubles as one of the buttons on your
transmitter, and stores a stimulation that you pre-set.
When paired, the Dog & Gun button acts the same way as any button on your Transmitter, if paired that way.
However, the intensity is set dierently than it is in training mode to provide benets during hunting.
(See Changing Intensity on the Quick Reference Guide on page 5)
9

Prepare the Devices
Charge the Master Transmitter
•Lift the rubber cover protecting the Charging Jack.
•Connect the Transmitter Charging Wire to the Master Transmitter.
•Connect the AC adapter or car adapter to the Charging Cradle.
•Plug the AC adapter into a 120V AC outlet, or plug the car charger into car power.
•LED ashes red every 2 seconds.
•The charging takes about 2 to 3 hours for the rst charge.
•LED stops ashing when the Master Transmitter is fully charged and will
automatically turn o when charging is complete.
•Replace rubber cover.
Charge the collar receiver
•Place the collar receiver in the Charging Cradle as shown.
•Connect the AC adapter or car adapter to the Charging Cradle.
•Plug the AC adapter into AC outlet, or car adapter into car power.
•The collar LED ashes every 3 seconds during charging.
•The charging takes about 2 to 3 hours for the rst charge.
•LED stops ashing when the receiver collar is fully charged.
10
Operation (Training Mode)
To turn collar receiver ON:
Press, then wait for two conrming
tones, and release the Power Button.
The light will ash periodically.
To turn collar receiver OFF:
Press, wait for the one long conrming
tone and release the power button.
Light will stop ashing.
LED Indicator Chart
The following chart indicates what the transmitter will do when certain buttons are pressed in relation to
setting mode selections, programming, and charging, in both Dog & Gun mode, as well as training mode.
Note – Low battery is indicated by any light going red. Re-charge your unit.
Transmitter Indication LED
Mode Operation LED Color LED Status
Train
Charging Red ÁDVKHVHYHU\
VHFRQGV
0RGH6HOHFWLRQ Green ÁDVKHVWKHRI
PRGHVHOHFWHG
%XWWRQSUHVVHG Green ÁDVKHVRQFH
%XWWRQSUHVVHG Red ÁDVKHVRQFH
11

Transmitter Indication LED
'RJ
*XQ
3URJUDP,QLWLDOL]HG Green OLJKWLVVROLG
3URJUDP3HQGLQJ Orange OLJKWLVVROLG
5XQ0RGH Green ÁDVKHVWZLFHHYHU\
VHFRQGV
5XQ0RGH Red ÁDVKHVWZLFHHYHU\
VHFRQGV
&KDQJH6WLPXODWLRQ/HYHOLQ
5XQ0RGH Orange ÁDVKHVWZLFH
Collar / Receiver Indicator
Note – Low battery is indicated by any light going red. Re-charge your unit.
Operation LED Color LED Status
Charging Red ÁDVKHVHYHU\VHFRQGV
3URJUDP0RGH Orange OLJKWLVVROLG
5XQ0RGH Green ÁDVKHVHYHU\VHFRQGV
&RQWLQXRXV6WLPXODWLRQ Green VWD\VRQIRUWKHGXUDWLRQRI
WKHVWLPXODWLRQ
0RPHQWDU\6WLPXODWLRQ Green ÁDVKRQFH
Find the Best Intensity Level for your Dog
All dogs respond dierently to dierent levels of stimulation. Also consider that a dog will get used to a level
and may require you to increase it over time. The most important thing is to start at a very low level. Twitch-
ing ears can be a great indication that the dog is reacting to the level. The Master Transmitter should be set
to this level for some time, so you can monitor behaviour change.
Timing of stimulation is the most important thing. Dogs are place-oriented animals, and the faster you can
reinforce or correct, the better chance the dog has to link the stimulation to its behaviour. We are talking
about one-quarter of a second or less. Be prepared.
I am sure you have heard: if you can’t reinforce or correct at the instant of the desired behavioural change,
don’t bother trying.
For most eld users, it is best to use a momentary stimulation. It provides a short, repeatable stimulation
regardless of the user’s experience.
12
Find your dog’s recognition level:
Every dog is dierent, so you can’t predict where your dog’s recognition level will be. Watch closely for any
slight change in behaviour that may tell you the dog is feeling the stimulation.
1. Set the Master Transmitter’s intensity at level 1 and press Continuous stimulation button for 1 to 2
seconds.
2. If your dog shows no reaction to level 1, go to level 2 and repeat the process.
3. Using Tone or Vibrate:
Tones or vibrations can be used in a positive or negative way, depending on how the dog is
conditioned and what the dog associates with them. A tone conditioned with low level stimulation
would be an example of negative reinforcement, while a tone conditioned with a treat would equal
a positive reinforcement.
At this point, remote training and hunting system is ready for use. However, you may want to customize your
system to oer dierent stimulations, multiple dogs, Dog & Gun control, or even control for other devices
like launchers. See page 20 through 22 for customization modes.
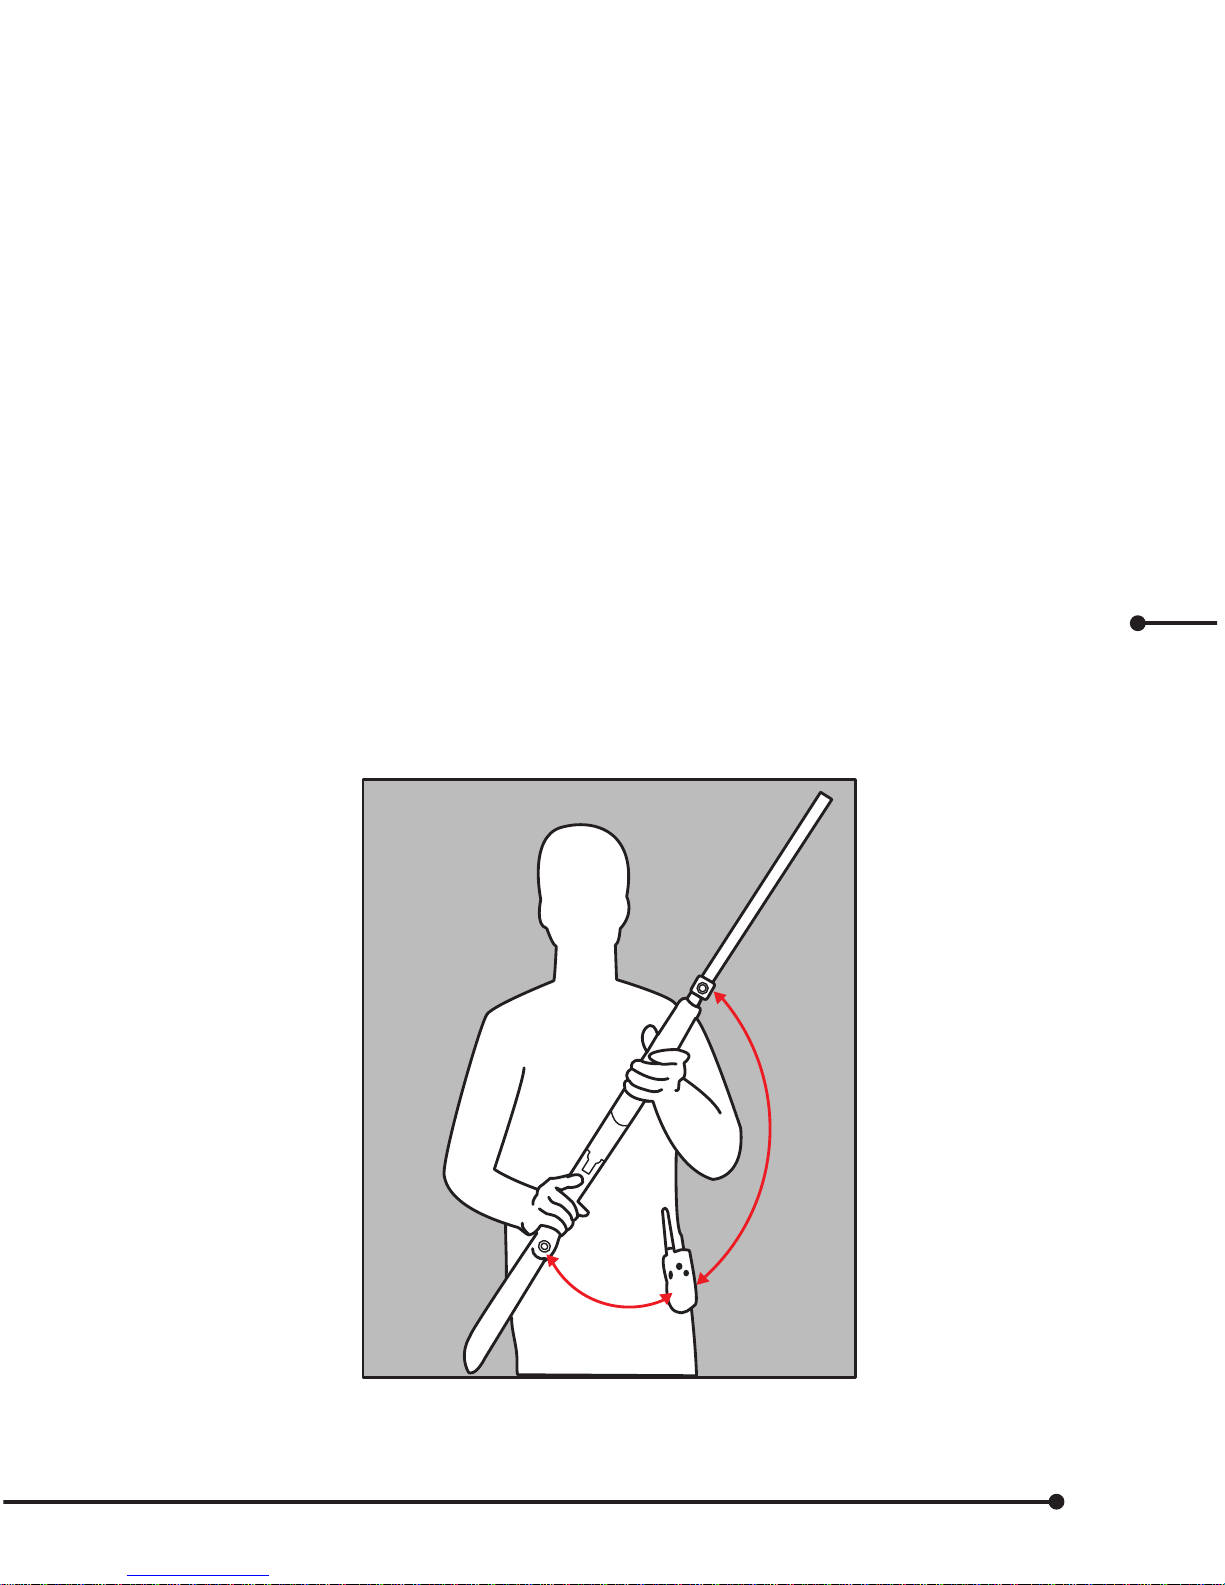
Range of the Dog Gun Control and the Best Location for the Master Transmitter
The Gun control communicates to the Master Transmitter. Master Transmitter should be located in line of
sight with the Gun control and within a 1 yard range. Ideal locations are on a lanyard, belt clip, front pocket
of coat, or front equipment sack.
Line of
sight
Radio frequencies do not like going through human bodies, so don’t put the Master Transmitter in your back
pocket or in a location that is not within the line of sight. You can always check operation by pressing the
Dog & Gun control and observing the collar receiver command indication light.
13

Replaceable batteries for Dog & Gun button
This unit uses replaceable Li-ion batteries and will last for more than 5,000 operations. See page 29 for
battery size and changing instructions.
Low battery
Low battery indication is not available due to the micro size. If not operating correctly check pairing, replace
battery, or call customer support.
Fitting the E-Collar
Ninety-nine percent of all collar issues are caused by improper tting of the collar. The contact points must
have direct contact with your dog’s skin at all times. To ensure proper t, comfort and performance Hawx
e-collars provide two exclusive technologies.
Stretch E-Strap
Key to performance is making sure the contacts do not move o the skin. With conventional e-collars, this is
usually traded o for comfort. Conventional e-collar designs, due to the cone shape of a dog’s neck, have many
issues. If the collar rides up, it gets loose. It’s very easy to over tighten or under tighten.
The stretch e-strap retracts or expands either as the dog breathes, or through muscle movement. Therefore, it is
always maintaining contact and providing comfort as the dog’s muscles move. The stretch e-strap extends wear,
but should not be worn for longer than 8 hours. Never use a leash with the strap, as you may tear the dog’s skin
or damage the strap. The stretch e-strap allows you to repeat the t every time by using the on strap gauge.
Gauge
Fit Line
The e-collar should fit snugly.
However, there should still
be room for stretch capability.
14

Performance comfort wing technology (PC wings)
This technology acts like long contacts, but feels like short contacts. The skin/coat penetration depth is the same
as a conventional collar with long contacts. However, the large wings’ surface area takes 90% of the pressure o
of the contacts and distributes it to the dog’s neck. This is due to the wings having several thousand times more
surface area. Therefore, the square inch pressure on the dog’s neck is considerably less, but still provides good
skin contact. This provides greater comfort, better t, extended wear, and less movement; great benets for any
dogs, especially working dogs.
Another set of wings is included for additional custom tting on dogs with thicker or thinner coats, or
smaller necks.
General Concept
Performance / Comfort Technology
Each wing is marked L & R (Left and Right) on the underside.
Position the collar so you can read Hawx, then insert Right and Left wings.
Removing or changing wings
Hawx provides three styles of t: no wings, (conventional mode), small wings, or large wings. These can be
used for all types of dogs with dierent coats and neck sizes.
Remove
Insert minimum 1/4” screwdriver into the lower slot against the tab, press rmly, and the wing will pop out.
Install
Align wings for left and right side, as the left and right wings are identied on the underside of the wing.
Insert the wing tabs into the body of the collar and press rmly until the wing snaps into place.
15
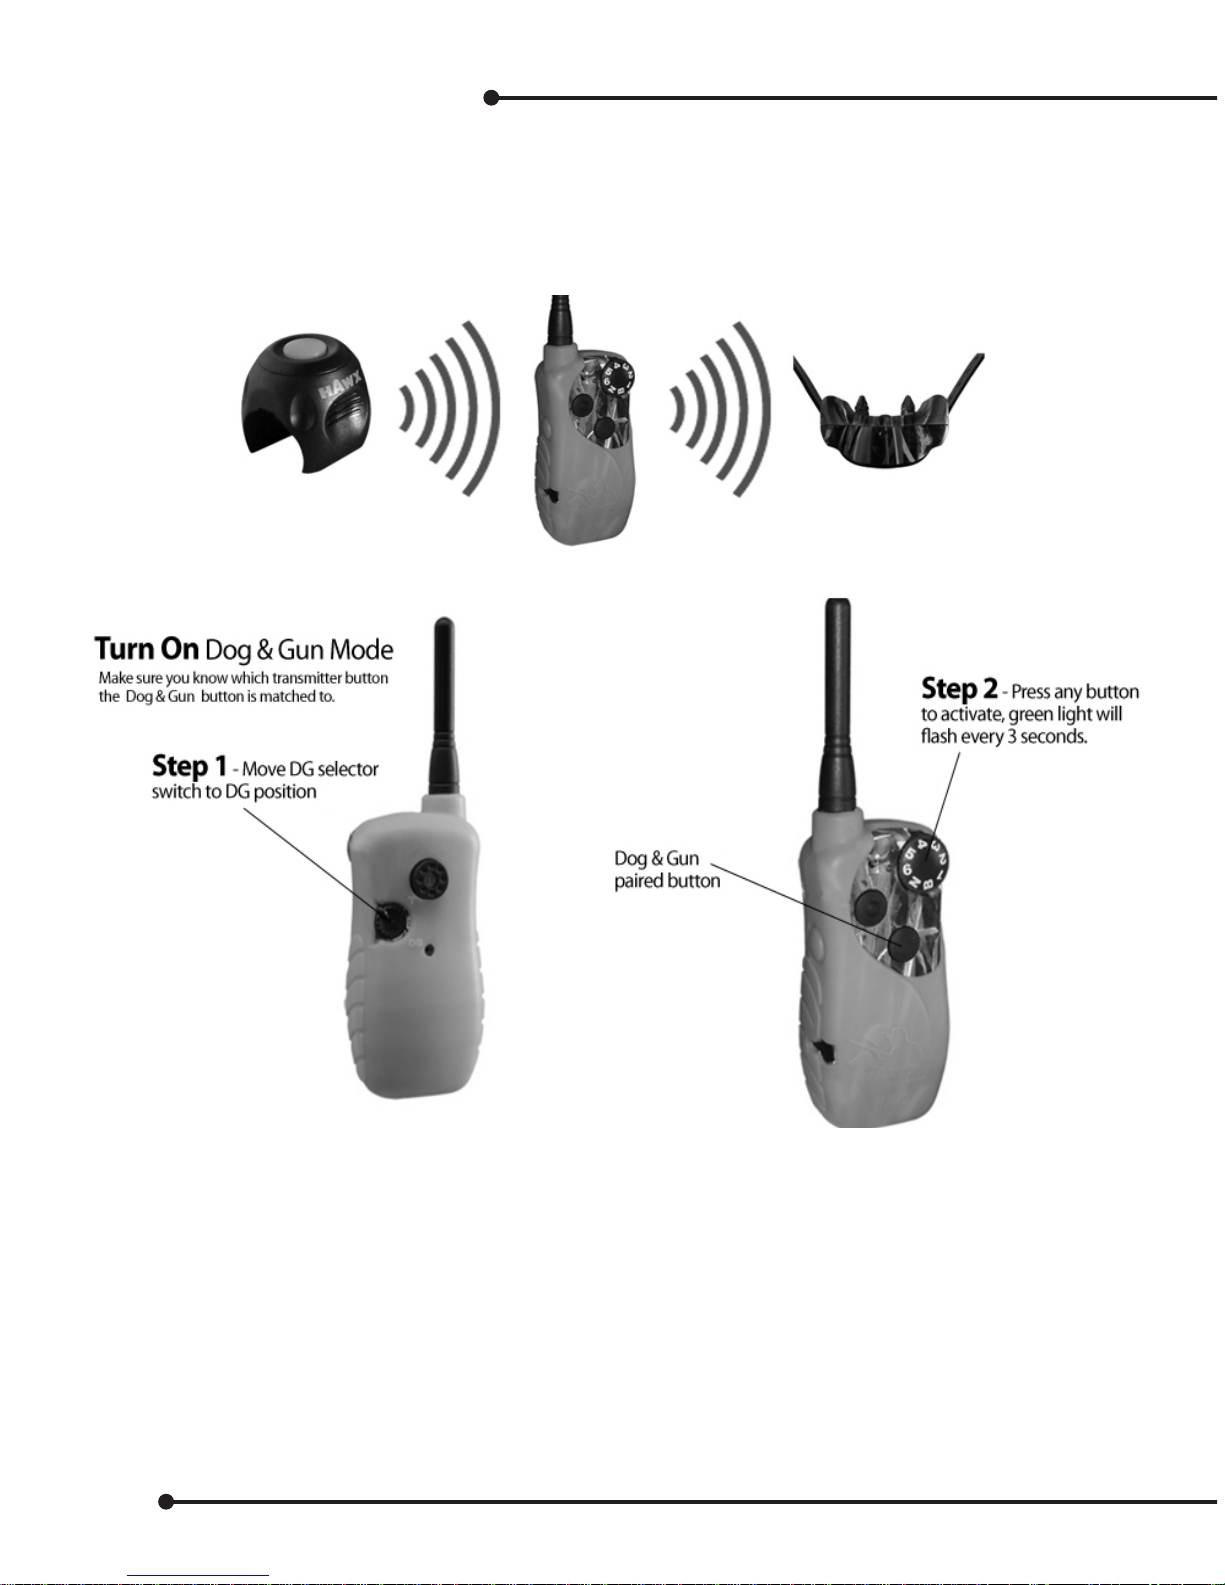
Operation of Dog & Gun
Dog & Gun mode allows the gun mounted button to send a signal to the collar receiver via the Master Transmit-
ter. The Dog & Gun switch allows easy transition between training mode and Dog & Gun mode. After pairing &
setup, the Dog & Gun button(s) will have the same function(s) as the Upper Button, Lower Button, Side Button
and Toggle Switch of the Master Transmitter. (See page 25 for pairing and setup). If your DG button was included
in the Hunter model, D&G is paired and set on medium momentary (lower button)
Turn O when not in use, move selector back to Training (T) mode to save power.
If DG is not used within an 8 hour period, it will automatically turn o.
Press any button to reactivate.
16

Setting Dog & Gun Transmitter Intensity Level
Once paired and setup, your Gun transmitter will be matched to one of the buttons on your transmitter.
Note: You can change intensity levels at any time by repeating the above. You can move back and forth from training
mode to D&G mode by moving the selector button. Don’t forget when moving into D&G mode, you must press a but-
ton to activate and the lights will ash green. You must use the matched button to change intensity as it is the paired
button. No other button will change the level.
Note (Optional): Move the Selector Intensity dial to “N” to stop accidental stimulation, depending on the environment.
Installing Dog & Gun Button on your Gun
•Stick the double-sided tape mounting ring to the bottom of the DG Button.
•Remove the adhesive backing.
•Insert the DG into the gun clip or keychain.
Double Sided
Mounting
Fitting Dog & Gun button on your gun
Gun clip comes with spacers to t dierent sized barrels. The following procedure will ensure the correct
barrel t.
•Remove all spacers.
•Test t – place gun clip above the forearm stock and press rmly.
•Check t – if loose, insert one spacer and try again.
•Check t – if loose, insert second spacer and try again.
17

Removin
g
t
h
e
b
arre
l
c
l
ip
T
r
y
to remove
by
h
an
d
, or insert a sma
ll
screw
d
river into t
h
e notc
h.
Th
e Dog & Gun
b
uttons can
b
e mounte
d
d
irect
l
y into t
h
e stoc
k
. We recommen
d
t
h
at you ta
k
e your gun to
a
n approved installation dealer in your area
f
or pro
f
essional installation and warranty. Dealers are shown on
t
h
e Hawx we
b
site (www.
h
awx
d
oggun.com) un
d
er
S
u
pp
ort
.
T
he
f
ollowing is a do-it-yoursel
f
mounting instruction. You should only attempt this a
f
ter a number o
f
prac
-
tice insta
ll
ations on woo
d.
•
Using a 15/16” Forstner
d
ri
ll
b
it,
d
ri
ll
a
h
o
l
e t
h
at is 3/8”
d
eep. T
h
is wi
ll
b
e s
l
ig
h
t
l
y
d
eeper t
h
an t
h
e
mounting cup, but will allow room
f
or some epoxy glue. For hollow synthetic gunstocks, just drill
t
hrough the sur
f
ace.
•
Test the mounting cup to ensure proper
t.
•
A
pply 5-minute epoxy glue to the inside sur
f
aces o
f
the hole you drilled
.
•
I
nsert the cup, wipe o
excess glue, and hold in place until the glue dries
.
•
A
pp
l
y a
dh
esive o-ring to contro
l
b
utton. Use o-ring to insta
ll
t
h
e Dog & Gun contro
l
b
utton into t
h
e
mounting cup
.
Installed D&G
Button
18

Conguring a new mode
The Hawx system provides up to 27 dierent modes to provide custom key functions for any kind of training
or hunting environment. In addition, if you can’t nd the mode that meets your requirements, you can re-
quest a custom mode. Hawx can custom program your unit. The transmitter comes factory set on the hunter
default (mode 11). See page 20 for mode chart.
Hawx collars oer control for Ecollar features:
High Continuous, Medium Continuous, Low Continuous, High Momentary, Medium Momentary
Low Momentary, Vibrate, Tone, Beeper
Launcher control:
Launch, Sound (duck, Pheasant, human, goose), Sound/Launch, Motion, Aux – third party, Auto run
Selecting mode or changing modes
Refer to the mode conguration chart on the next page and select the mode that best ts your requirement.
Note: Tone/Vibrate is available on all 2 dog modes by using the “B” on the intensity dial, or selecting Tone/Vibrate
mode.
19
This manual suits for next models
3
Table of contents


