HB-THERM M8148-EN User manual

Temperatur Control Technology
www.hb-therm.ch
M8148-EN 2017-08 1/6
2017-08
-
Assembly Instructions
M8148-EN
Spare parts VFC-51, power supply and fan electrical part Vario-5
Contents
Precondition...................................................................................2
Procedure .......................................................................................2
Preparation.....................................................................................3
Fan power supply (O/ID 27596) ....................................................4
Power supply (O/ID 27582)............................................................4
Printed circuit VFC-51 (O/ID 27305) .............................................5
Inspection.......................................................................................6
Parts list..........................................................................................6

Assembly Instructions M8148-EN
M8148-EN 2017-08 2/6
Precondition
WARNING!
Danger for unauthorized persons!
Conversion work may only be carried out by
specialist staff who have been trained accordingly.
Therefore:
–Keep unauthorized persons away from the work
area.
NOTE!
Knowledge of the Instruction Manual is a
precondition for carrying outconversion work on the
unit.
Procedure
DANGER!
Danger to life caused by electric current!
Touching conductive parts causes a direct danger
to life.
Therefore:
–Remove the plug from the mains before carrying
out any work on the unit.
WARNING!
Danger of crushing due to rolling away or
tipping
With an uneven floor or when the castors are not
locked, there is a danger that the unit tips over or
rolls away causing crushing.
Therefore:
–Only install the unit on an even floor.
–Ensure that the castors are locked.

Assembly Instructions M8148-EN
M8148-EN 2017-08 3/6
Preparation
1. Proceed as follows to cool down the system and carry out
mould evacuation:
Select module no. "VCn" with the or key.
Display menu page Functions.
Select the Cooling parameter and activate with the key.
Select the parameter Mould evacuation and press the key.
The activated function is indicated with the symbol.
2. Switch off all main switches, unplug the mains plug and empty
the switching unit.
3. Removing the covers of the switching unit (see Operating
instructions: chapter Maintenance).
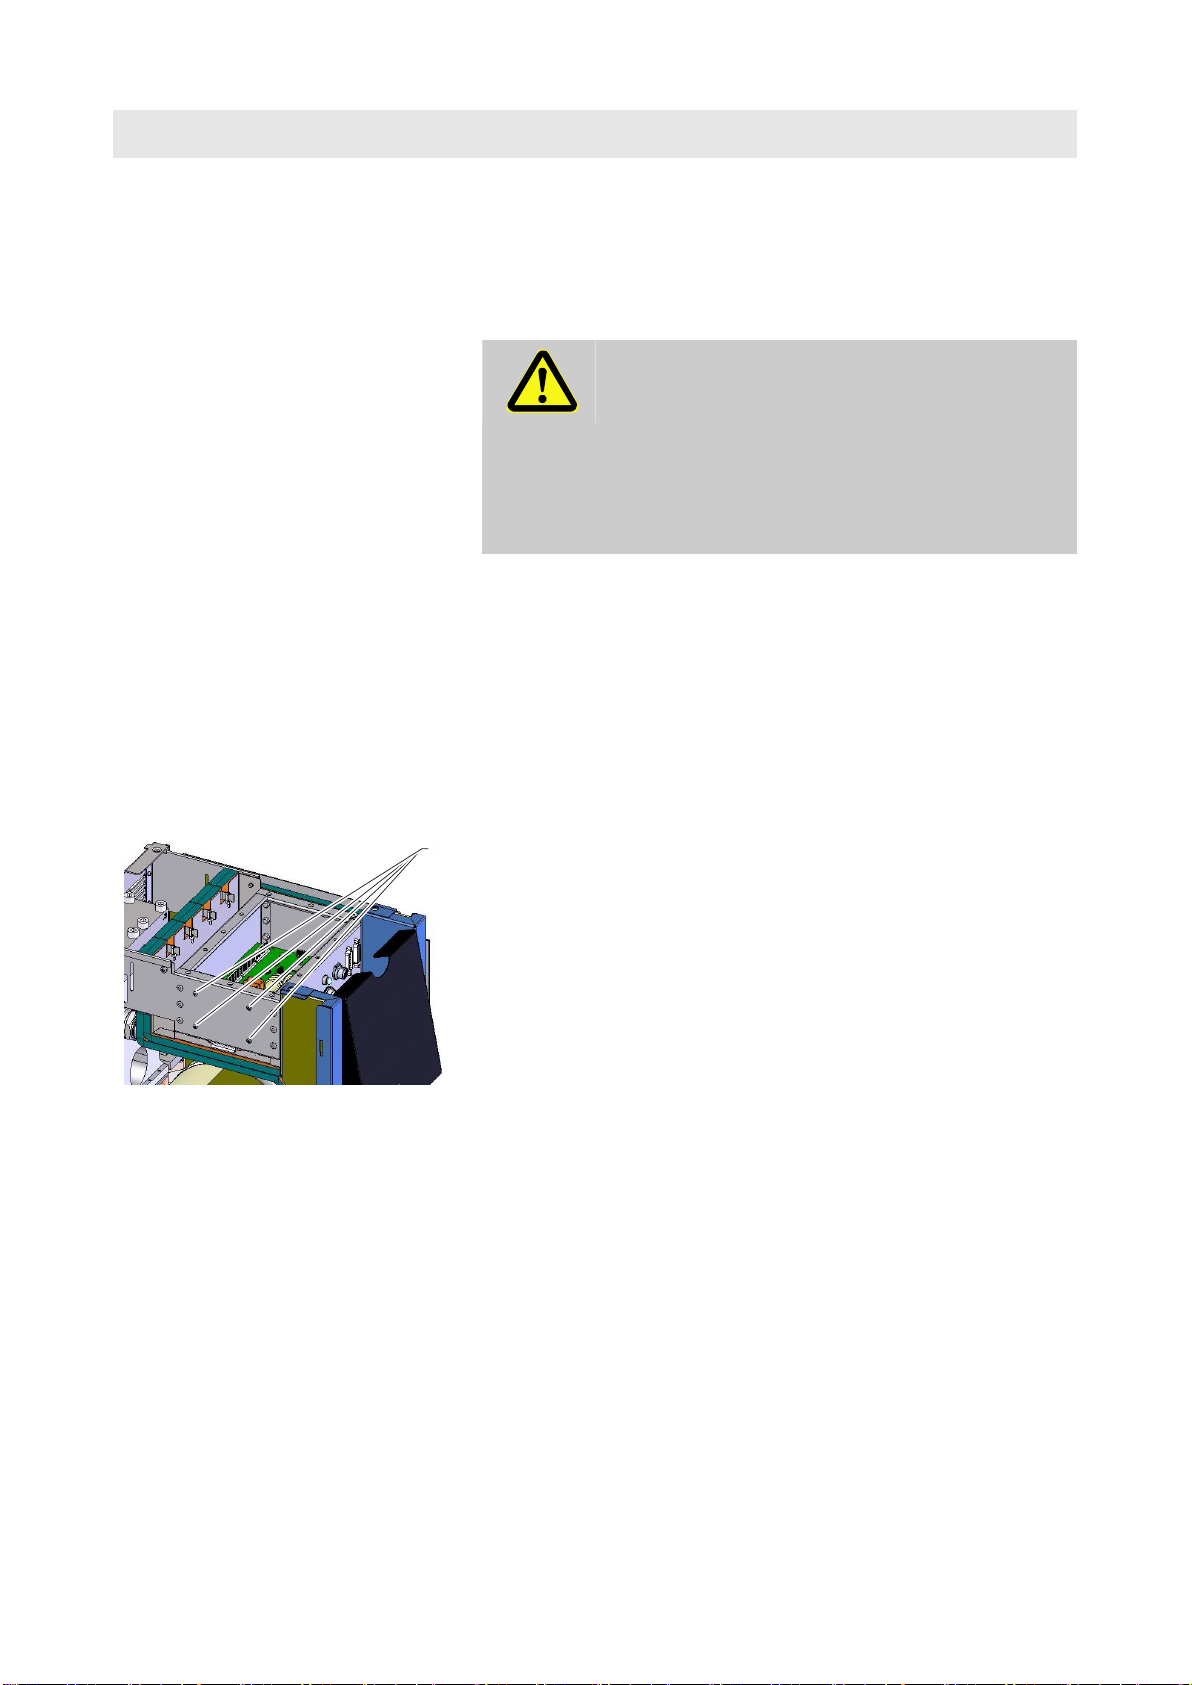
Fig. 1: Access to electrical part
components
4. Remove the 12 screws, (label 1 Fig. 1) from the electrical
part and then lift the cover (label 2 Fig. 1).
5. Disconnect fan cable from VFC-51 (A11) and remove cover
(label 2 Fig. 1).
2
1
Assembly Instructions M8148-EN
M8148-EN 2017-08 4/6
Fan power supply (O/ID 27596)
1. Carry out preparation (page 3).
2. Proceed as follows in order to replace the fan (EV 1):
Remove the 4 screws of the fan (EV 1).
WARNING!
Safety risk due to wrong mounting of the fan!
Wrongly mounted fans can lead to overheating or
to total breakdown of the electronics.
Therefore:
–Mount the fan with the air exit (arrow) in
direction of the ventilation slots in the cover.
Mount the replacement fan (EV 1) with the 4 screws.
3. Connect fan cable from VFC-51 (A11) and fit the cover.
4. Fix the cover of the electrical part with the 12 screws.
5. Carry out inspection (page 6).
Power supply (O/ID 27582)
1. Carry out preparation (page 3).
Fig. 2: Power supply Vario-5
2. Proceed as follows to disassemble the power supply (TC 3):
Remove all connectors from the power supply (TC 3).
Remove 4 screws (label 1 Fig. 2)
Remove the power supply (TC 3) from the housing.
3. Proceed as follows to mount the power supply (TC 3):
Fix the replacement VFC-51 (A 3) in the electrical part with 5
screws (label 1 Fig. 2).
Connect all connectors to the power supply (TC 3).
4. Connect fan cable from VFC-51 (A11) and fit the cover.
5. Fix the cover of the electrical part with the 12 screws.
6. Carry out inspection (page 6).
1

Assembly Instructions M8148-EN
M8148-EN 2017-08 5/6
Printed circuit VFC-51 (O/ID 27305)
1. Carry out preparation (page 3).
Fig. 3: Top view electrical part Vario-5
2. Proceed as follows in order to remove the VFC-51 (A11):
Remove all connectors of the VFC-51.
Remove 5 screws (label 1 Fig. 3) on the
VFC-51 (A 11).
3. Proceed as follows in order to mount the VFC-51 (A11):
Fix the replacement VFC-51 (A 11) in the electrical part with 5
screws (label 1 Fig. 3).
Connect all connectors to the VFC-51 (A 11).
4. Connect fan cable from VFC-51 (A11) and fit the cover.
5. Fix the cover of the electrical part with the 12 screws.
NOTICE!
After replacing the VFC-51 (A11) a new switching
unit is recognized (
operating instructions,
chapter, Registering new switching units)
6. Carry out inspection (page 6).
1

Assembly Instructions M8148-EN
M8148-EN 2017-08 6/6
Inspection
1. Proceed as follows for inspection:
2. Plug all main plugs and switch on the main switch.
3. Switch the system on with the key and check functioning.
4. Switch the system off with the key.
5. Switch off all main switches.
6. Fit the covers correctly on the switching unit.
Parts list
Pos
Description
O/ID
O/ID
27305
27582
27596
Pcs
Pcs
Pcs
01
Printed circuit VFC-51
27304
1
-
-
02
Power supply 90-264 VAC/24 VDC, 60 W
27528
-
1
-
03
Fan axial 24 V
27530
-
-
1
04
Assembly instructions German
M8148-DE
1
1
1
05
Assembly instructions English
M8148-EN
1
1
1
06
Assembly instructions French
M8148-FR
1
1
1
Table of contents
Other HB-THERM Power Supply manuals


Popular Power Supply manuals by other brands


Premier
Premier Solar IntelliShock 30 Operating instruction

Gold Note
Gold Note PSU-1250 owner's manual

TSL
TSL Tally Man PSU-22 manual

Banner
Banner FlexPower DX81P6 Specification sheet

Moxa Technologies
Moxa Technologies DRP-240 Series Hardware installation guide

EPS Stromversorgung
EPS Stromversorgung PS 5040-10 A operating guide