HBM ME250 S6 User manual

A0827-4.1 en/de
Dual−channel
C−F measuring amplifier
ME250 S6
Operating manual
Bedienungsanleitung
2-Kanal-TF-
Messverstärker

English Page 3 −18...............................................
Deutsch Seite 19 −34..............................................

3
ME250S6
HBMA0827-4.1 en/de
Contents Page
Safety instructions 4..............................................
1 Euro cards −ME250S6 measuring amplifier 7....................
2 Pin assignment 8..............................................
2.1 Transducer connection 8.....................................
2.2 Supply voltage 9............................................
2.3 Measurement signal output 9.................................
2.4 Pin assignment: Channel 1 and Channel 2 10....................
3 Operation 11...................................................
3.1 Select the measuring range 11.................................
3.2 Zero balance the bridge 11....................................
3.3 Measuring range: fine adjustment 11............................
4 Individual set-up options 13.....................................
4.1 Setting the operating function 13...............................
4.2 Measuring range adjustment 13................................
4.3 Bridge zero balance 14.......................................
4.4 Calibration signal 14..........................................
4.5 Measurement frequency range / cut-off frequency fg 15...........
4.6 Synchronization 15...........................................
5 Interference effects 15..........................................
6 Specifications 16...............................................
7 Component layout 18...........................................

4ME250S6
HBM A0827-4.1 en/de
Safety instructions
To ensure adequate immunity from interference, use only Greenline shielded
ducting (see HBM offprint ”Greenline shielding design, EMC-compliant
measuring cable; G36.35.0 ).
The connecting cables (50 V) must have an insulating strength of at least
350 V(AC).
Use in accordance with the regulations
The ME250S6 with connected transducers is only to be used for
measurement tasks and directly associated control functions. Use for any
purpose other than the above shall be deemed to be not in accordance with
the regulations.
To ensure safe operation, the amplifier may only be operated in accordance
with the information given in the Operating Manual. It is also essential to
comply with the legal and safety requirements for the application concerned
during use. The same applies to the use of accessories.
General dangers due to non-observance of the safety instructions
The ME250S6 is a state-of-the-art device and is fail-safe. The device may
give rise to further dangers if it is inappropriately installed and operated by
untrained personnel.
Any person instructed to carry out installation, commissioning, maintenance or
repair of the device must have read and understood the Operating Manual
and in particular the technical safety instructions.
Conditions on site
Protect the ME250S6 from damp and weather influences such as rain, snow,
etc.
Maintenance and cleaning
The measuring amplifier is maintenance free. Please note the following points
when cleaning the front panel:
Before cleaning, disconnect the ME250S6 from the mains power supply.
Clean the front panel with a soft, slightly damp (not wet!) cloth. You should
never use solvent, since this could damage the labelling on the front panel.
When cleaning, ensure that no liquid gets into the device or connections.

5
ME250S6
HBMA0827-4.1 en/de
Remaining dangers
The scope of supply and list of components provided with the ME250S6 cover
only part of the scope of measurement technique. In addition, equipment
planners, installers and operators should plan, implement and respond to the
safety engineering considerations of measurement technique in such a way
as to minimise remaining dangers. Prevailing regulations must be complied
with at all times. There must be reference to the remaining dangers connected
with measurement technique.
In this manual, the following symbols are used to point out residual dangers:
Symbol: DANGER
Meaning: Maximum danger level
Warns of an imminently dangerous situation in which failure to comply with
safety requirements will result in death or serious bodily injury.
Symbol: WARNING
Meaning: Dangerous situation
Warns of a potentially dangerous situation in which failure to comply with
safety requirements can result in death or serious bodily injury.
Symbol: CAUTION
Meaning: Potentially dangerous situation
Warns of a potentially dangerous situation in which failure to comply with
safety requirements could result in damage to property or some form of
bodily injury.
Symbols pointing out notes on use and waste disposal as well as useful
information:
Symbol: NOTE
Points out that important information about the product or its handling is being
given.

6ME250S6
HBM A0827-4.1 en/de
Symbol:
Meaning: CE mark
The CE mark enables the manufacturer to guarantee that the product com-
plies with the requirements of the relevant EC directives (the declaration of
conformity is available at http://www.hbm.com/HBMdoc).
Conversions and modifications
The amplifier must not be modified from the design or safety engineering point
of view except with our express agreement. Any modification shall exclude all
liability on our part for any resulting damage.
In particular, any repair or soldering work on motherboards is prohibited.
When exchanging complete modules, use only original parts from HBM.
Qualified personnel
This instrument must only to be installed and used by qualified personnel,
strictly in accordance with the technical data and the safety requirements and
regulations listed below.
Qualified personnel means persons entrusted with the installation, assembly,
commissioning and operation of the product who possess the appropriate
qualifications for their function.
Maintenance and repair work on an open device with the power on must only
be carried out by trained personnel who are aware of the dangers involved.

7
ME250S6
HBMA0827-4.1 en/de
1 Euro cards −ME250S6 measuring amplifier
The ME250S6 card (Euro format) is a 4.8-kHz carrier-frequency
dual-measuring amplifier for S.G. transducers.
Module boards are routinely supplied without an enclosure and without a
power pack, and can be individually mounted in an existing 19” rack. Because
the module boards are relatively narrow (4TE = 20.32 mm), up to 21 such
boards can be inserted in a 19” enclosure. The sizes and assembled
dimensions conform to DIN standards 41 494 and 41 612.
NOTE:
We recommend mounting the ME250S6 in an HF protected enc-
losure/control cabinet.
Control elements are accessible from the front.
Individual set-up options are described in Chapter 4. The ex-factory settings
are detailed on the back of the Euro card.

8ME250S6
HBM A0827-4.1 en/de
2 Pin assignment
2.1 Transducer connection
S.G. transducers are connected in a four-wire circuit.
Measurement signal (−) 30a 11a........
Excitation voltage (−) 32a 32c..........
Measurement signal (+) 30c 10a........
Excitation voltage (+) 28a 28c..........
Shield 31a+31c.....................
(alternatively 29a+c)
Pin
RD
BK
WH
BL
YE
Channel 1 Channel 2
Fig. 2.1: Pin assignment
The required excitation voltage according to the factory settings is 5 V
(balanced abour earth). You can change it to 1 V with the aid of switch S25.
UBBridge resistance Switch S25
5 V
(factory settings) RB110 to 4000
1 V
(for operation with SD01) RB60 to 4000

9
ME250S6
HBMA0827-4.1 en/de
2.2 Supply voltage
+14.5 to +15.5 V (max.120 mA) .....
−14.5 to −15.5 V (max.120 mA) .....
Zero operating voltage .............
The supply voltage ripple should not exceed 0.1 V (peak-to-peak). In the
event of incorrect polarity the connections are internally disabled and the
amplifier is protected from damage. Single-pole connection should be
avoided. In order to keep power loss to a minimum, the chosen supply voltage
should not be unnecessarily high. The permissible range is "15.6 to "25 V.
2.3 Measurement signal output
Output voltage: "10 V; RL5 k
Zero operating voltage .............
The output is provided for connection to a display and/or recording device.
Pin 15a
Pin 16a
Pin 19c
+
−
Channel 1 + Channel 2
Pin 18c 19a
Pin 19c 20a
−
Channel 1 Channel 2

10 ME250S6
HBM A0827-4.1 en/de
2.4 Pin assignment: Channel 1 and Channel 2
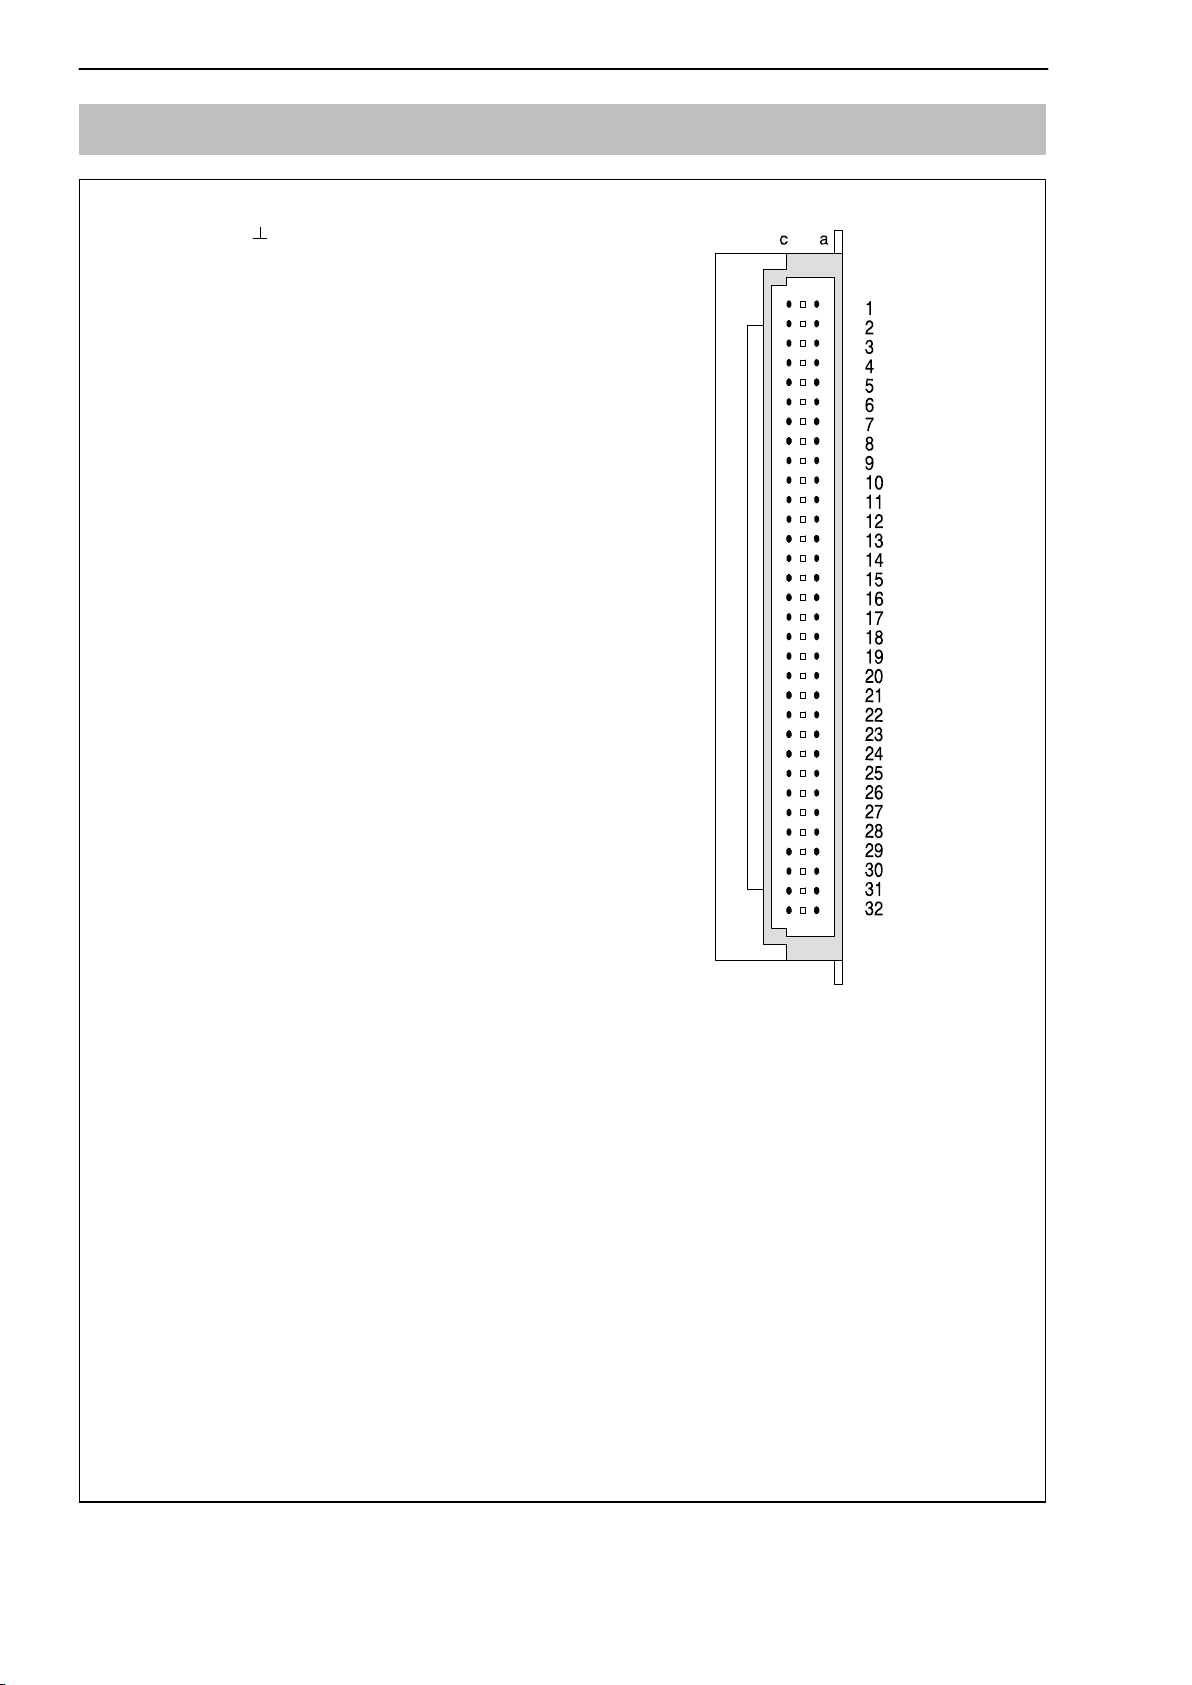
64-pin edge connector
1c Housing
2c free
3c free
4c free
5c free
6c free
7c free
8c free
9c free
10c free
11c Synchronization
12c Synchronization
13c free
14c free
15c Zero operating voltage
16c free
17c free
18c Output "10 V; R>5 kOhm Channel 1
19c Zero operating voltage
20c free
21c free
22c free
23c free
24c free
25c Switch meas. range 1 / meas. range 2: externally Channel 1
26c free
27c free
28c Excitation voltage (+) Channel 2
29c Zero operating voltage
30c Measurement signal (+) Channel 1
31c Zero operating voltage (YE)
32c Excitation voltage (−) Channel 2 St 21
1a Zero function: external to Channel 2
2a Calibration function: external to Channel 2
3a Switch meas. range 1 / meas. range 2: exter-
nal to Channel 2
4a free
5a free
6a free
7a free
8a free
9a Zero operating voltage
10a Measurement signal (+) Channel 2
11a Measurement signal (−) Channel 2
12a Zero operating voltage
13a free
14a free
15a Supply voltage +15 V (standard)
16a Supply voltage −15 V (standard)
17a free
18a free
19a Current output "10 V Channel 2
20a Zero operating voltage
21a Zero function: external to Channel 1
22a free
23a free
24a free
25a Calibration function: external to Channel 1
26a free
27a free
28a Excitation voltage (+) Channel 1
29a Zero operating voltage
30a Measurement signal (−) Channel 1
31a Zero operating voltage
32a Excitation voltage (−) Channel 1

11
ME250S6
HBMA0827-4.1 en/de
3 Operation
If the factory defaults for settings such as Measuring Range or Zero Balance
are retained, product operation consists of the following points only:
NOTE: Values in brackets (bold) apply to Channel 2.
3.1 Select the measuring range
Measuring range 1 ("1 mV/V) is always set up as the factory setting.
Measuring range 2 (factory setting "0.2 mV/V) can be selected internally with
the aid of DIP switch S24/4 (S34/4) or externally by closing a single-pole
switch on pin 25c against zero operating voltage (see Chapter 4.2).
3.2 Zero balance the bridge
You can zero balance the bridge with the aid of screwdriver potentiometer P23
(P33) (fine) and switches S22 (S32) (coarse) and S23 (S33) (polarity) (see
also Chapter 4.4).
3.3 Measuring range: fine adjustment
Set up the fine setting separately for each measuring range by using
screwdriver potentiometers P21 (P31) (for meas. range 1) and P22 (P32) (for
meas. range 2). The potentiometers in the front panel allow you to make
corrections of approx. 35 % relative to the measuring range you are setting
up. For meas. range 1 you also have the option to carry out fine adjustment
with the aid of an external potentiometer (see Chapter 4.3).
Caution: In order not to detune the factory setting for meas. range 2
("0.2 mV/V), do not adjust P22 (P32) (see also Chapter 4.5).

12 ME250S6
HBM A0827-4.1 en/de
P31 Meas. range 1: fine adjustment
P32 Meas. range 2: fine adjustment
S31 Zero, Measure, Calibrate
P33 Bridge zero balance: fine
S32 Bridge zero balance: coarse
S33 Polarity for adjustment direction
P21 Meas. range 1: fine adjustment
P22 Meas. range 2: fine adjustment
S21 Zero, Measure, Calibrate
P23 Bridge zero balance: fine
S22 Bridge zero balance: coarse
S23 Polarity for adjustment direction
Fig.3.1 ME250S6: front view

13
ME250S6
HBMA0827-4.1 en/de
4 Individual set-up options
Various settings can be modified on the measuring amplifier card. It is a
simple matter to carry out these adaptations yourself using the DIP switches
on the motherboard or even using externally connected switching elements,
or you can order them ex-factory.
NOTE: Values in brackets (bold) apply to Channel 2.
4.1 Setting the operating function
Zero Measure Calibrate
Switch S21 or connect pin 21a (1a) to pin 15c
or connect pin 25a (2a) to pin 15c
In the ”Zero” function the transducer signal is switched off and the ”zero value”
of the measuring amplifier is present at the output. This function enables
amplifiers in measurement chains to be exchanged without having to
rebalance the bridge whilst the transducer is under load. All you need do is
note the balancing value of the amplifier concerned, and then if necessary set
up this value on another amplifier with the aid of P23 (P33), S22 (S32) and
S23 (S33).
4.2 Measuring range adjustment
Measuring range 1 is set up ex-factory. To activate measuring range 2 you
can use DIP switch S24/4 (S34/4) or an external switching element.
Measuring range S 24/4 (S34/4) External
Meas. range 1 = "1 mV/V
(factory settings) −
Meas. range 2 = "0.2 mV/V From meas. range 1 to
meas. range 2;
join 25c (3a) and 15c
You can preset the measuring ranges in the range "0.2 mV/V to "4 mV/V
when UB= 5 V or "1 mV/V to "20 mV/V when UB= 1 V with the aid of DIP
switches S26 (S36) and S27 (S37) as shown in the table. For fine adjustment
see Chapter 3.3.

14 ME250S6
HBM A0827-4.1 en/de
UB=5 V Meas. range 1:S26 (S36); Meas. range 2:S27
(S37)
Factory settings
Measuring range
(mV/V) 1 2 3 4 5 6 7 8
0.17 0.24... x o o o o o x o Meas. range 2
"0.2 mV/V
0.22 0.32... x o o o o o o x
0.30 0.42... o x o o o o x o
0.39 0.55... o x o o o o o x
0.52 0.73... o o x o o o x o
0.68 0.97... o o x o o o o x
0.90 1.28... o o o x o o x o Meas. range 1
"1 mV/V
1.18 1.69... o o o x o o o x
1.56 2.23... o o o o x o x o
2.07 2.94... o o o o x o o x
2.73 3.88... o o o o o x x o
3.61 5.13... o o o o o x o x
o = open, x = closed
4.3 Bridge zero balance
a) Coarse balance
You can carry out a coarse balance by using the 16-position switch S22 (S32)
on the front, at the same time using switch S23 (S33) to select the polarity of
the adjustment direction. The range of adjustment amounts to approx.
"2 mV/V.
b) Fine balance
You can carry out a fine balance ("0.08 mV/V) with the aid of potentiometer
P23 (P33).
4.4 Calibration signal
For measuring ranges exceeding 1 mV/V, the sensitivity of the measuring
amplifier can be adjusted if necessary by means of an internal +1 mV/V
calibration signal. To do this, keep switch S21 (S31) in the calibration position
and use potentiometer P21 (P31) to set up the appropriate value for meas.
range 1, or P22 (P33) for meas. range 2 (see also Chapter 3.3).

15
ME250S6
HBMA0827-4.1 en/de
4.5 Measurement frequency range / cut-off frequency fg
The Butterworth low pass on the amplifier is set at 0...250 Hz (−1 dB) at the
factory. This can be changed to 0...40 Hz (−1 dB) with the aid of DIP switch
S24/3.
Measurement frequency range S 24/3 (S34/3)
0...250 Hz (−1 dB)
(factory settings)
0...40 Hz (−1 dB);
4.6 Synchronization
If several ME250S6 measuring amplifiers are operated together (i.e. in the
same enclosure), one of them must be switched to Master mode. Its carrier
frequency then determines the clock pulse. Meanwhile the other amplifiers
have to be switched to Slave mode. To ensure synchronization, pins 12c and
15c must be joined on all amplifiers. The Master amplifier is selected with the
aid of switch S28.
Synchronization Switch S28
Slave amplifier (factory setting)
Master amplifier
5 Interference effects
Certain regulations have to be observed in connection with the electrical
installation, particularly when the device is being used in a production
environment where there is heavy interference on the power supply network.
The most important points are listed in an HBM notice. A comprehensive
summary is given in the installation guidelines VDI/VDE 3551. The extent to
which some of these measures need to be taken depends on the particular
conditions of use.

16 ME250S6
HBM A0827-4.1 en/de
6 Specifications
Series ME250S6
Accuracy class 0.1
Number of channels 2
Carrier frequency Hz 4800"0.5 %
Excitation voltage V 1"2 % 5"0.2 %
Connectable transducers
S.G. transducer (full bridge) 2 S.G. full bridges per 120...4000;
220...4000 four-wire connection
Maximum cable length m 500
Number of measuring ranges 2
Measuring ranges, adjustable in 12 steps mV/V 1...20 0.2...4
Continuously variable fine adjustment; % 35
Factory settings: Measuring range 1 mV/V "1
Measuring range 2 mV/V "0.2
Calibration signal mV/V +1"0.1 %
Bridge balance range
Coarse bal., adjustable in 16 steps & polarity mV/V "2
Fine bal., using screwdriver potentiometer mV/V "0.08
Measurement frequency range (Butterworth low pass 3rd order,
switch-selected)
At −1 dB Hz 0...40 0...250
At −3 dB Hz 50 300
Phase transit time ms 7 1.1
Rise time ms 10 1.6
Overshoot on voltage surge % <10 <10
Residual carrier voltage % <0.02 <0.2; typically 0.1
Input (symmetric)
Input impedance M
par.
pF
>10
470
Permitted common-mode voltage V12 (peak-to-peak); ("6 V)
Common-mode rejection (>50 dB) Hz 0...600
Output (asymmetric)
Nominal voltage V"10
Permissible load resistance k>5
Internal resistance <5

17
ME250S6
HBMA0827-4.1 en/de
Specifications Continued
Noise, calculated by reference to the input V/V <0.2 (peak-to-peak); typically 0.1
Linearity variation
in relation to nominal voltage %<0.02; typically 0.01
Effect of temperature
per 10 K in nominal temperature range
on sensitivity %<0.1; typically 0.05
on zero point at the amplifier output
in measuring range 2 mV/V when UB=5 V
(4x350 )
in measuring range 0.2 mV/V when UB=5 V
mV
mV <4, or
<13; additionally
<0.05 % of the tare value
suppressed by R compensation
Long-term drift over 48 h (after 1 h warm-up time) V/V <0.05
Nominal temperature range C−20...+60
Operating temperature range C−20...+60
Storage temperature range C−25...+70
Stabilised voltage
for operating additional units V"15
Maximum current consumption mA <50
Power supply Standard; stable
Supply voltage V"14.5...15.5
Maximum current consumption mA 120
Effect of supply voltage upon changing range
on sensitivity % <0.8
on zero point V/V <0.1

18 ME250S6
HBM A0827-4.1 en/de
7 Component layout
P31
P32
S31
S32
P33
S33
P21
P22
S21
S22
P23
P23
S36 S37
S34
S26 S27
S24
Channel 2
Channel 1
S28
S25
P31; P21 Meas. range 1: fine Potentiometer
P32; P22 Meas. range 2: fine Potentiometer
P33; P23 Bridge zero balance: fine Potentiometer
S31; S21 Zero, Measure, Calibrate Push button
S32; S22 Bridge zero balance: coarse Potentiometer
S33; S23 Polarity for adjustment direction Potentiometer
S28 Master/Slave SlaveMaster
S25 Excitation voltage 1V 5V
S36; S26 Measuring range 1: coarse
18
S37; S27 Measuring range 2: coarse
18
S34; S24 Select measuring range 1 or 2; switch cut-off fre-
quency
16

19
ME250S6
HBMA0827-4.1 en/de
Inhalt Seite
Sicherheitshinweise 20.............................................
1 Europakarten −Messverstärker ME250S6 23......................
2 Anschlussbelegung 24..........................................
2.1 Aufnehmeranschluss 24......................................
2.2 Versorgungsspannung 25....................................
2.3 Messsignalausgang 25.......................................
2.4 Anschlussbelegung Kanal 1 und Kanal 2 26.....................
3 Bedienen 27....................................................
3.1 Messbereich wählen 27......................................
3.2 Brückennullabgleich 27......................................
3.3 MB-Feineinstellung 27.......................................
4 Individuelle Einstellmöglichkeiten 29.............................
4.1 Einstellen der Betriebsfunktion 29.............................
4.2 Messbereichseinstellung 29..................................
4.3 Brückennullabgleich 30......................................
4.4 Kalibriersignal 30............................................
4.5 Messfrequenzbereich / Grenzfrequenz fg 31....................
4.6 Synchronisierung 31.........................................
5 Störeinflüsse 31................................................
6 Technische Daten 32............................................
7 Bauteillageplan 34..............................................

20 ME250S6
HBM A0827-4.1 en/de
Sicherheitshinweise
Um eine ausreichende Störfestigkeit zu gewährleisten, nur die Greenline-
Schirmführung verwenden (siehe HBM-Sonderdruck ”Greenline-Schirmungs-
konzept, EMV-gerechte Messkabel; G36.35.0 )
Die Isolationsfestigkeit der Anschlussleitungen (50 V) muss mindestens
350 V(AC) betragen.
Bestimmungsgemäße Verwendung
Der ME250S6 mit den angeschlossenen Aufnehmern ist ausschließlich für
Messaufgaben und direkt damit verbundene Steuerungsaufgaben zu
verwenden. Jeder darüber hinausgehende Gebrauch gilt als nicht
bestimmungsgemäß.
Zur Gewährleistung eines sicheren Betriebes darf der Messverstärker nur
nach den Angaben in der Bedienungsanleitung betrieben werden. Bei der
Verwendung sind zusätzlich die für den jeweiligen Anwendungsfall erforderli-
chen Rechts- und Sicherheitsvorschriften zu beachten. Sinngemäß gilt dies
auch bei Verwendung von Zubehör.
Allgemeine Gefahren bei Nichtbeachten der Sicherheitshinweise
Der ME250S6 entspricht dem Stand der Technik und ist betriebssicher. Von
dem Gerät können Restgefahren ausgehen, wenn es von ungeschultem Per-
sonal unsachgemäß eingesetzt und bedient wird.
Jede Person, die mit Aufstellung, Inbetriebnahme, Wartung oder Reparatur
des Gerätes beauftragt ist, muss die Bedienungsanleitung und insbesondere
die sicherheitstechnischen Hinweise gelesen und verstanden haben.
Bedingungen am Aufstellungsort
Schützen Sie den ME250S6 vor Feuchtigkeit oder Witterungseinflüssen wie
beispielsweise Regen, Schnee usw.
Table of contents
Languages:
Other HBM Measuring Instrument manuals