HCIFitness PhysioMill User manual
Owner
s
Manual V.2
HealthCare International, Inc.
PO Box 1509, Langley, WA 98260
www.HCIFitness.com - sales@hcifitness.com
P: (360) 321-7090 or (800) 398-9121

Table of Contents
Safety Precautions....................................................................................................2
Warranty Information.................................................................................................3
Assembly Instructions ...............................................................................................5
PhysioMill Display Console.......................................................................................9
Button Functions..................................................................................................... 10
General Maintenance..............................................................................................10
Exploded Diagram................................................................................................... 11
Parts List................................................................................................................. 12

2
Safety Precautions
This exercise equipment was designed and built for optimum safety. However,
certain precautions apply whenever you operate a piece of exercise equipment.
Be sure to read the entire manual before assembly and operation of this
machine.
Also, please note the following safetyprecautions:
1. Read all instructions carefully before using the machine.
2. Consult your physician or other health care professional before beginning this
or any type of exercise program.
3. Always wear proper exercise apparel when using the machine.
4. If at any time you feel faint, light-headed or dizzy while operating the machine,
stop exercise immediately. You should also stop exercising if you are
experiencing pain or pressure.
5. Keep children and pets away from the machine while in use.
6. Only one person can use the machine at a time.
7. Make sure your machine is correctly assembled before you use it. Be sure all
screws, nuts, and bolts are tightened prior to use and retighten periodically.
8. Do not operate this or any exercise equipment if it is damaged.
9. Keep hands and feet awayfrom any moving parts. Do not insert any objects
into any openings.
10.Keep clothes, jewelry and loose items away from moving parts.
NOTE:
MAXIMUM WEIGHT CAPACITY FOR THE PHYSIOMILL
IS 500 LBS. (227 KGS)
WARNING:
BEFORE BEGINNING ANY EXERCISE PROGRAM CONSULT YOUR
PHYSICIAN. THIS IS ESPECIALLY IMPORTANT FOR INDIVIDUALS OVER THE
AGE OF 35 OR PEOPLE WITH PRE-EXISTING HEALTH PROBLEMS. READ
ALL INSTRUCTIONS BEFORE USING THIS FITNESS EQUIPMENT. WE
ASSUME NO RESPONSIBILITY FOR PERSONAL INJURY OR PROPERTY
DAMAGE SUSTAINED BY OR THROUGH THE USE OF THIS PRODUCT.

3
。
Dear Valued Customer,
Thank you for your recent purchase of the
PhysioMill
from HCI Fitness. We
believethatyou have purchased one ofthe highestquality andaffordable
rehabilitation treadmillson the market today. Priorto usingyour new
PhysioMill
please review the owner's manual and product tips to maximizeyour experience.
Wishing you the best of luck in reaching your health and fitness goals!
HealthCare Internationalis
a
leadingsupplieranddistributor ofinnovativeproducts forHealth,
Wellness, Fitness
&
Active Aging.
Visit our website
-
www.HCIFitness.com
for
information on all of our products.
Warranty Information
(Your Serial Number is found on a white sticker at the rear base of the unit, the
front of the user manual, and on the box)
Serial #: Purchase Date:
5 Year Parts Warranty, 1 Year Labor, Lifetime Main Frame
NOTE
Before you start to assemble this unit, please note that some of the parts and
screws needed for assembly are already in place on the unit.
4
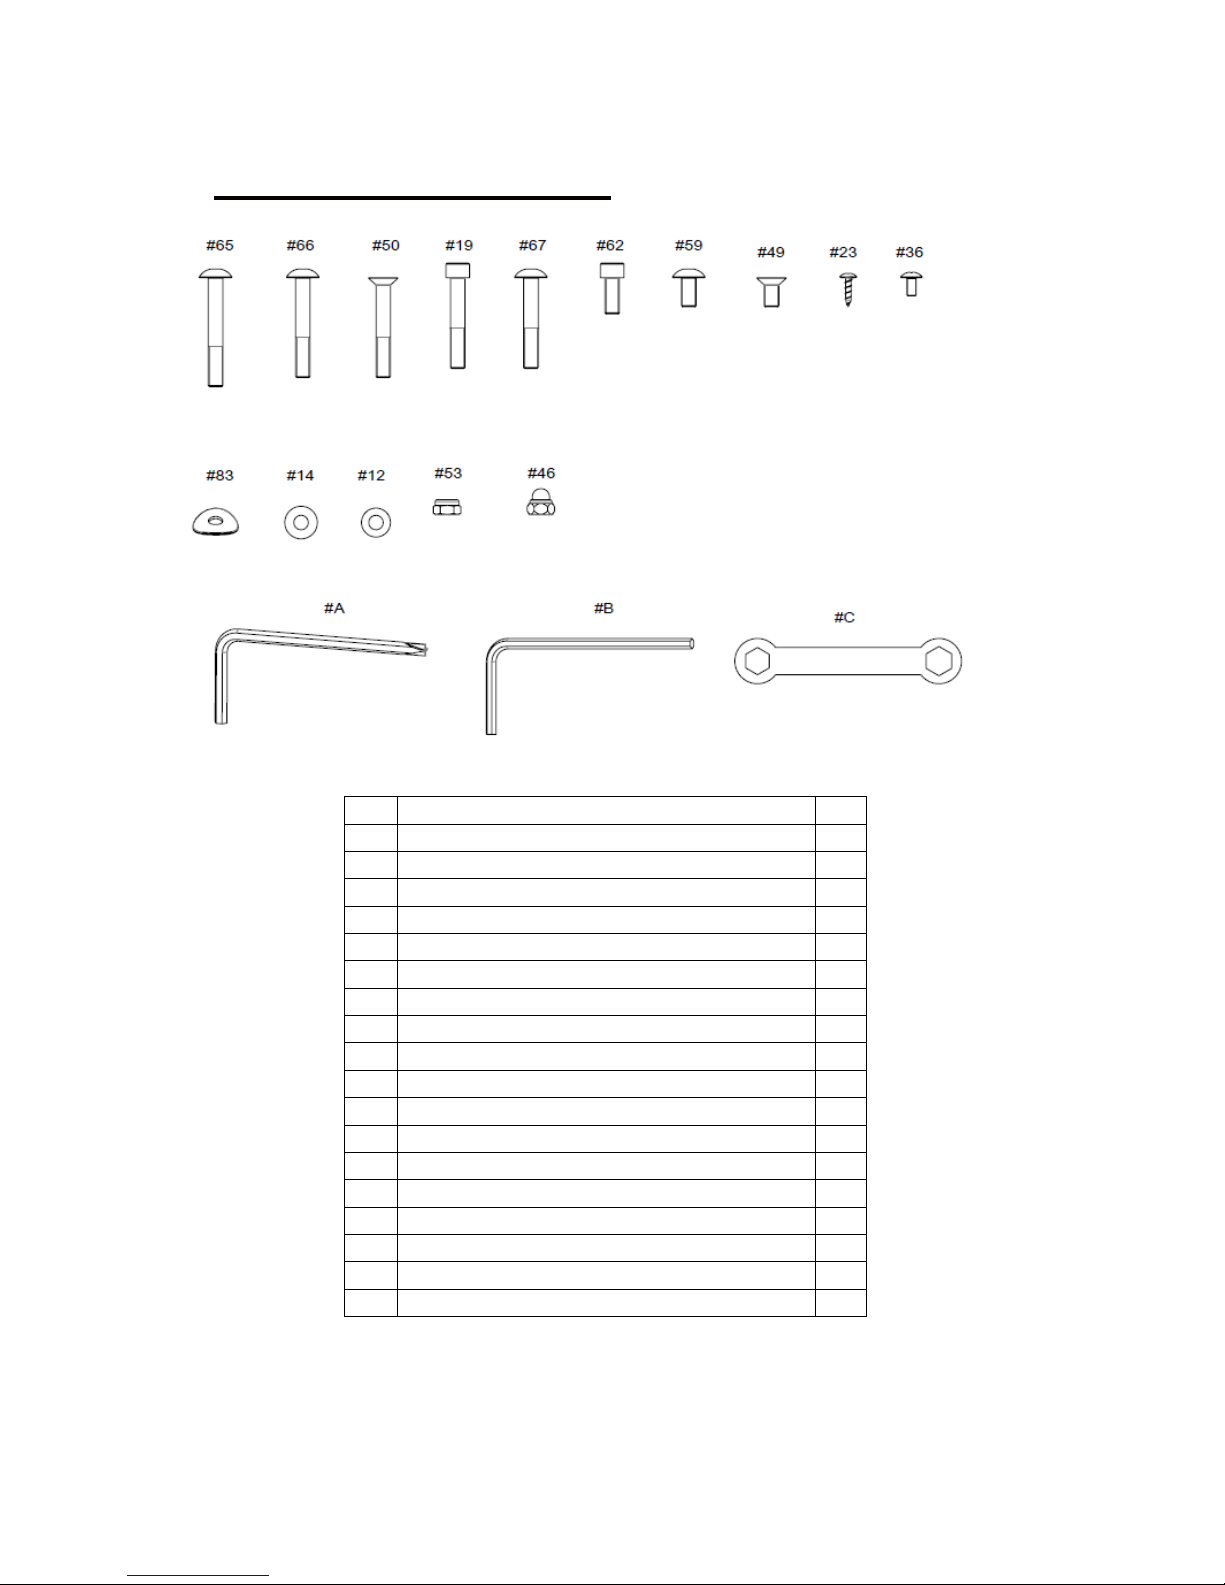
SCREW AND TOOL SET
NO.
Description
Qty
065
Mushroom Head Hexagonal Bolt M8*60L
2
066
Mushroom Head Hexagonal Bolt M8*55L
2
050
Hexagonal Bolt M8*55L
4
019
Mushroom Hexagonal Bolt M8*50L
8
067
Mushroom Head Hexagonal Bolt M8*50L
4
062
Mushroom Head Hexagonal Bolt M8*20L
4
059
Mushroom Head Hexagonal Bolt M8*16L
4
049
Hexagonal Bolt M8*16L
4
023
Metal screws TP4*16L
8
036
Cross Screw M5*10L
4
083
Washer 8*25*1.5T
10
014
Washer 8*18*1.5T
20
012
Washer 8*16*1.2T
2
053
Nylon Nut M8
4
046
Nylon Nut M8
4
A
Allen Key 6 mm "+"
1
B
Allen Key 5 mm
1
C
Wrench 13*14mm
1
5
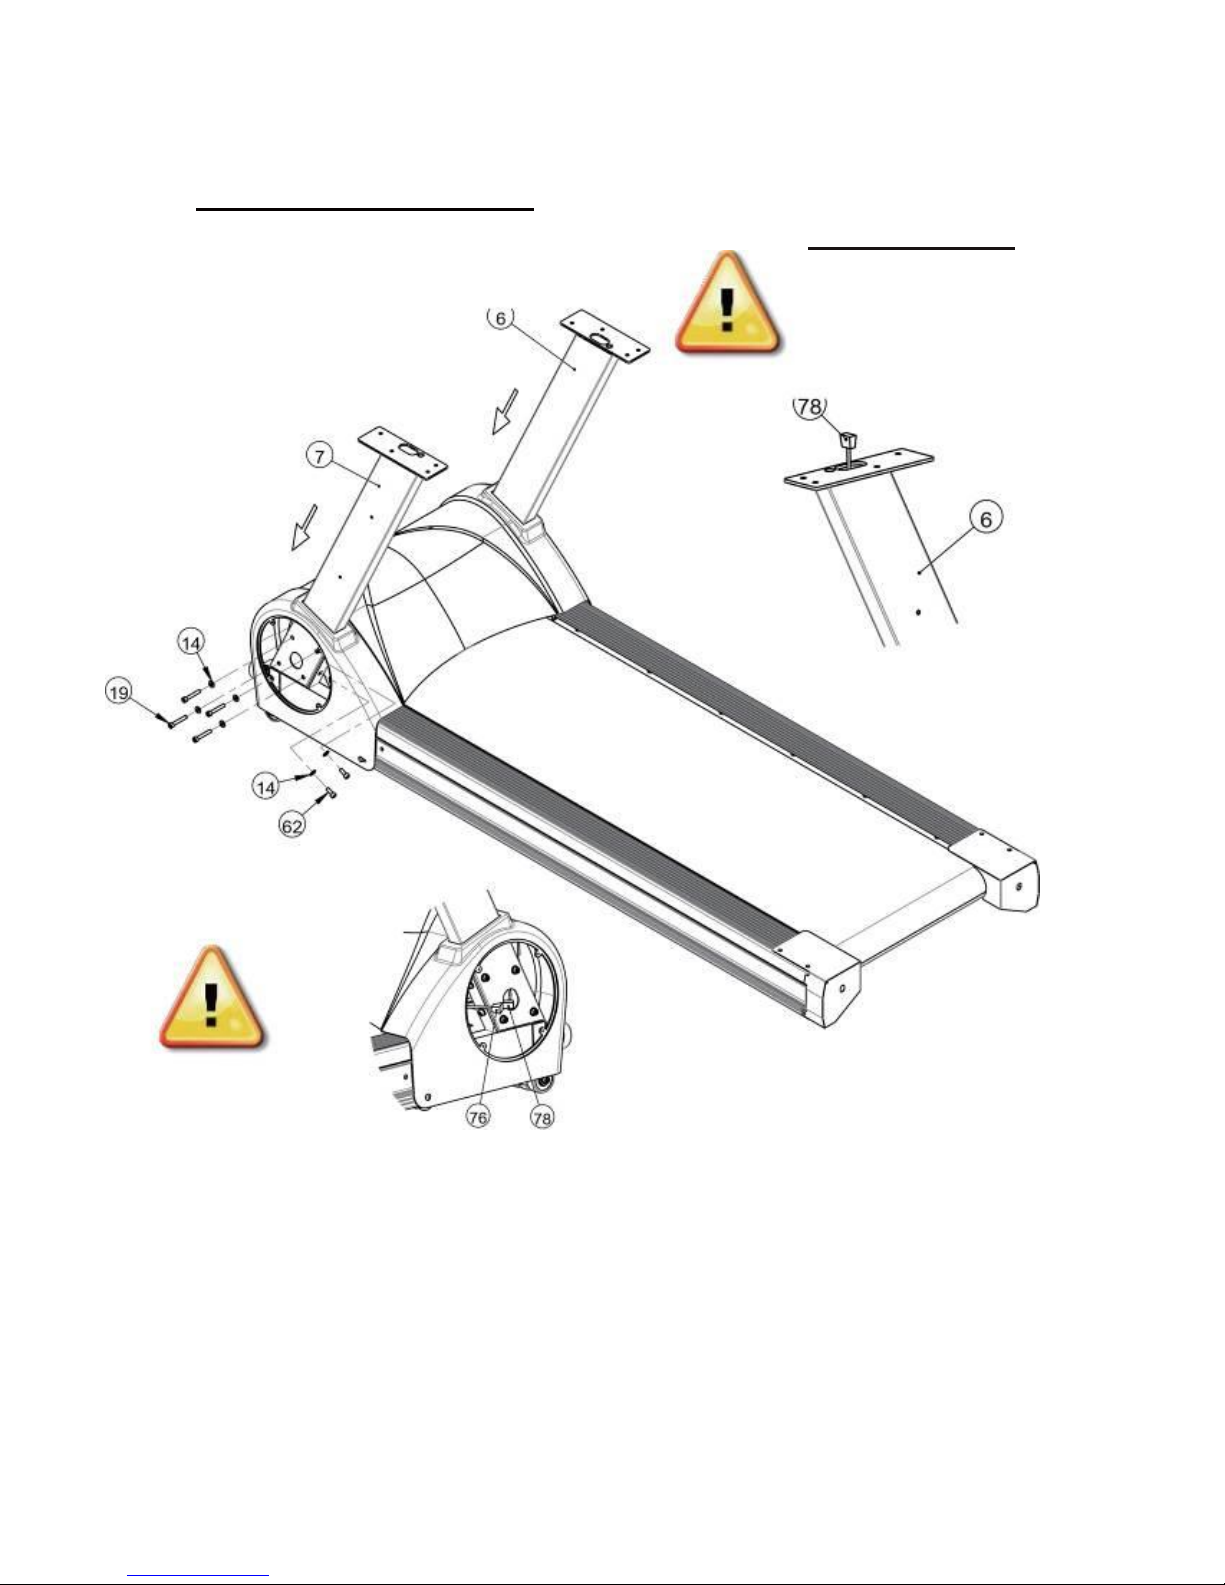
AssemblyInstructions
STEP 1: Wire Pinch Point:
Insert the Upright Posts (6) (7) to the main base, then loosely tighten
the Hexagon Head Bolts (19) (62) and FlatWasher (14) to
temporarily
secure.
Do Not Tighten Bolts Completely Until Step 4
6
Wire Pinch Point:
STEP 2:
Do Not Tighten Computer Rack Completely Until Step 4
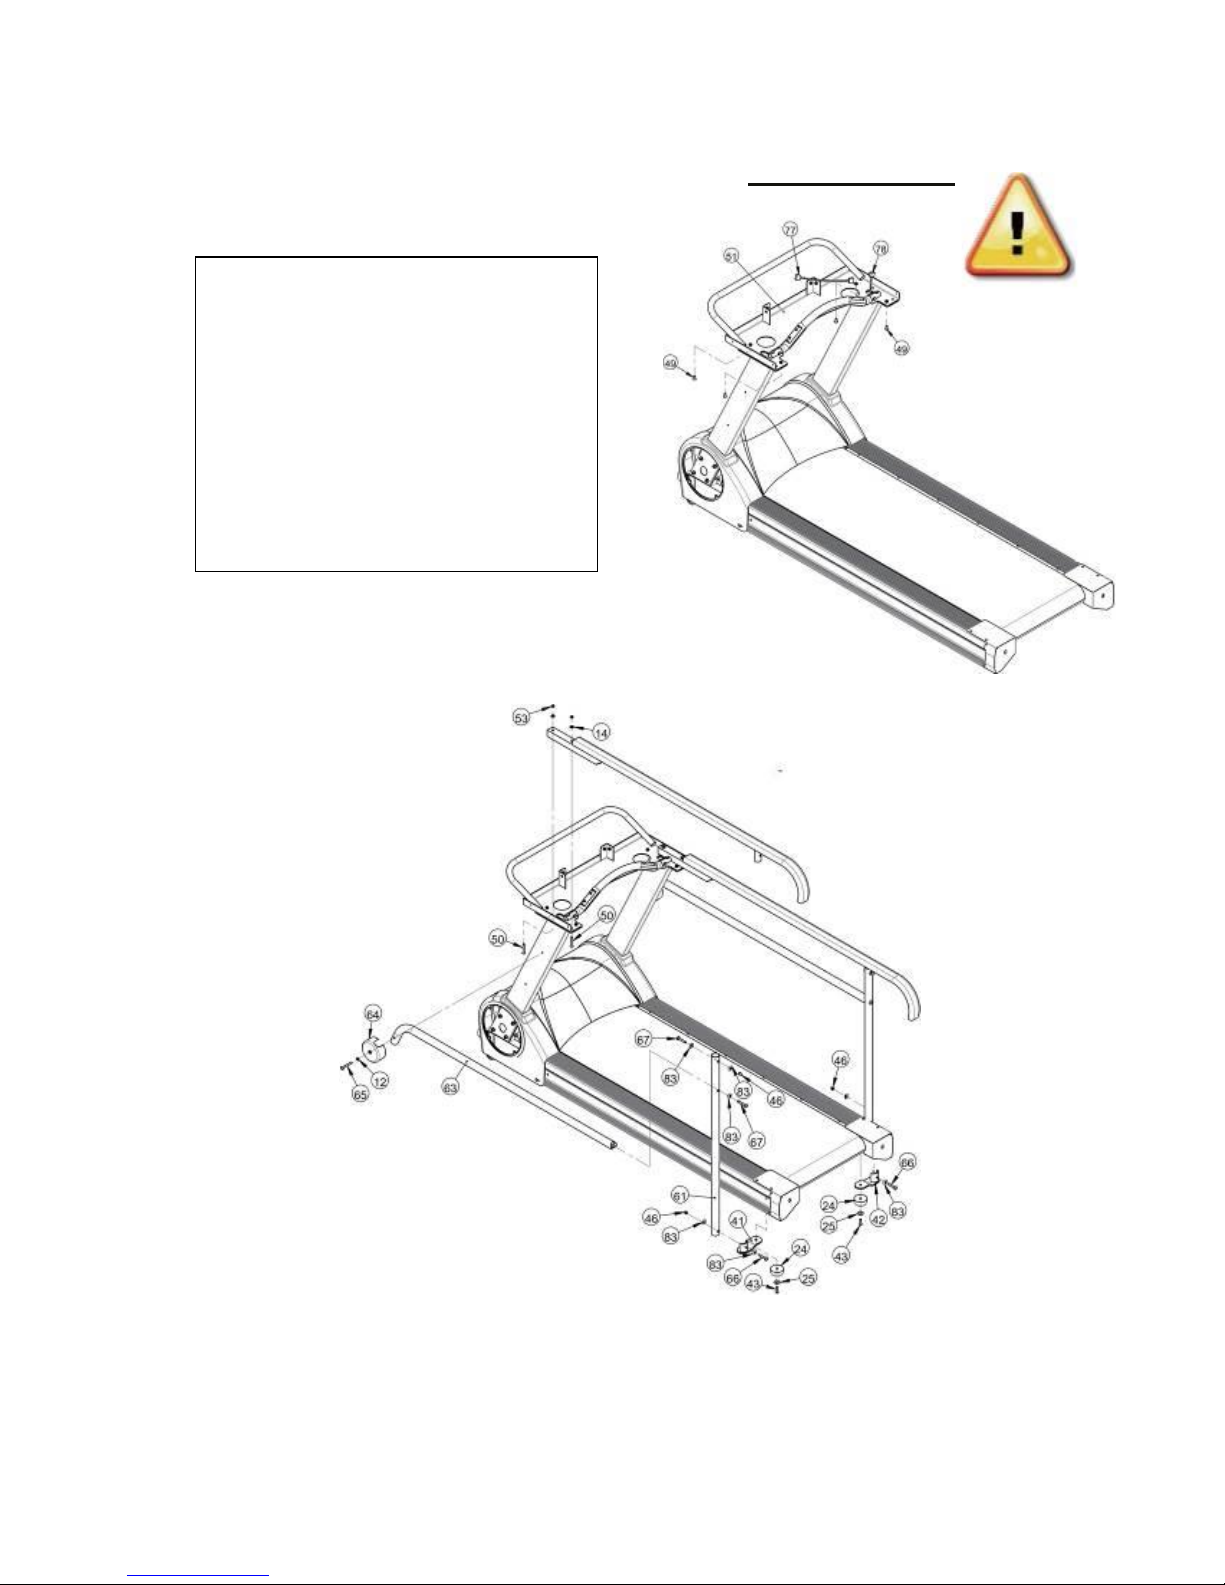
STEP 3:
Loosely connect the Hand Rails (52) to the computer rack with
the nut on the top. Then secure the handrails to the upright posts
with side caps (64), washers (12) and hex bolts (65).
1. Place Computer Rack (51)
o
ntop of Upright poles and
loosely screw in the Hexagonal
Bolts (49).
2. Take hold of Middle
Sensor Cable Wire (78)
connect with
the Upper Sensor
Cable Wire (77) firmly.

7
STEP 4:
Completely tighten the nuts and bolts from Steps 1-3.
Start with Step 1and tighten down the bolts that support the Upright Posts.
Then tighten the bolts in Step 2 that hold the computer rack in place.
Finally, tighten the nuts and bolts that secure the handrails in Step 3.
STEP 5:
Wire Pinch Point:
Place the display rack cover
(57) as per drawing. Use
screws (36) to secure the
shroud. Make sure not to
pinch any electrical wires.

8
STEP 6:
Hold the display (58) and connect the computer sensor wire with the
upper pulse sensor wire in advance. Install the display on to the
display brackets using the Mushroom Head Hexagonal Bolt (59) and
Washer (14) screw tightly.
STEP 7:
Before useplease read the safety precautions carefully.
Periodically retighten screws and bolts as needed.
Electrical Connection
The PhysioMill needs to be plugged into a standard electrical outlet. The
AC adaptor is connected at the front of the unit. The power switch must be
on for operation.
After the treadmill is
assembled, reattach the
Motor Side Covers (22)
with screws (23).
Your PhysioMill is now
completed.

PhysioMillDisplay Console
Hand-Held Therapy Start / Stop Remote
Allows for therapists to start and stop the
treadmill while performing hands on
rehabilitation.
Simply press the button once to pause the
session.
Then press the button again to resume the
treadmill belt.
In case of an Emergency, use the Emergency
Stop Button located on either side of the console
to quickly stop the treadmill belt.
9

Button Functions
1.
STARTBUTTON
1.1.
Pressing the START button starts the treadmill.
2.
STOP BUTTON
2.1.
Pressing the STOP button strops the treadmill.
3.
PAUSE BUTTON
3.1.
Pressing the PAUSE button pauses your session.
4.
[+] BUTTON
4.1.
. Pressthe [+]
button to increase values.
4.2.
. Holdingthe [+]
buttonwill rapidly increase values.
5.
[-] DOWN BUTTON
5.1.
Pressthe
[-]
buttonto decrease values.
5.2.
Holdingthe
[-]
buttonwill rapidly decrease values.
6.
DISPLAYBUTTON
6.1.
Scrolls through Pulse, Distance, Calories, & METs.
7.
ENTER BUTTON
7.1.
The ENTER button allows for data entry.
8.
REVERSE BUTTON
8.1.
To switch the belt direction to reverse follow this sequence.
8.1.1. Press the PAUSE button.
8.1.2. Press the REVERSE button.
8.1.3. Press the START button.
To Return to Forward Repeat 8.1.1 - 8.1.3
General Maintenance
1.
Cleaning - Use soap and warm water or antibacterial wipes to clean
the outside of the unit.
2.
Tightenng - Periodically inspect your unit to ensure that all screws, nuts, and
bolts are tightened and retighten if necessary.Do not over tighten.
10
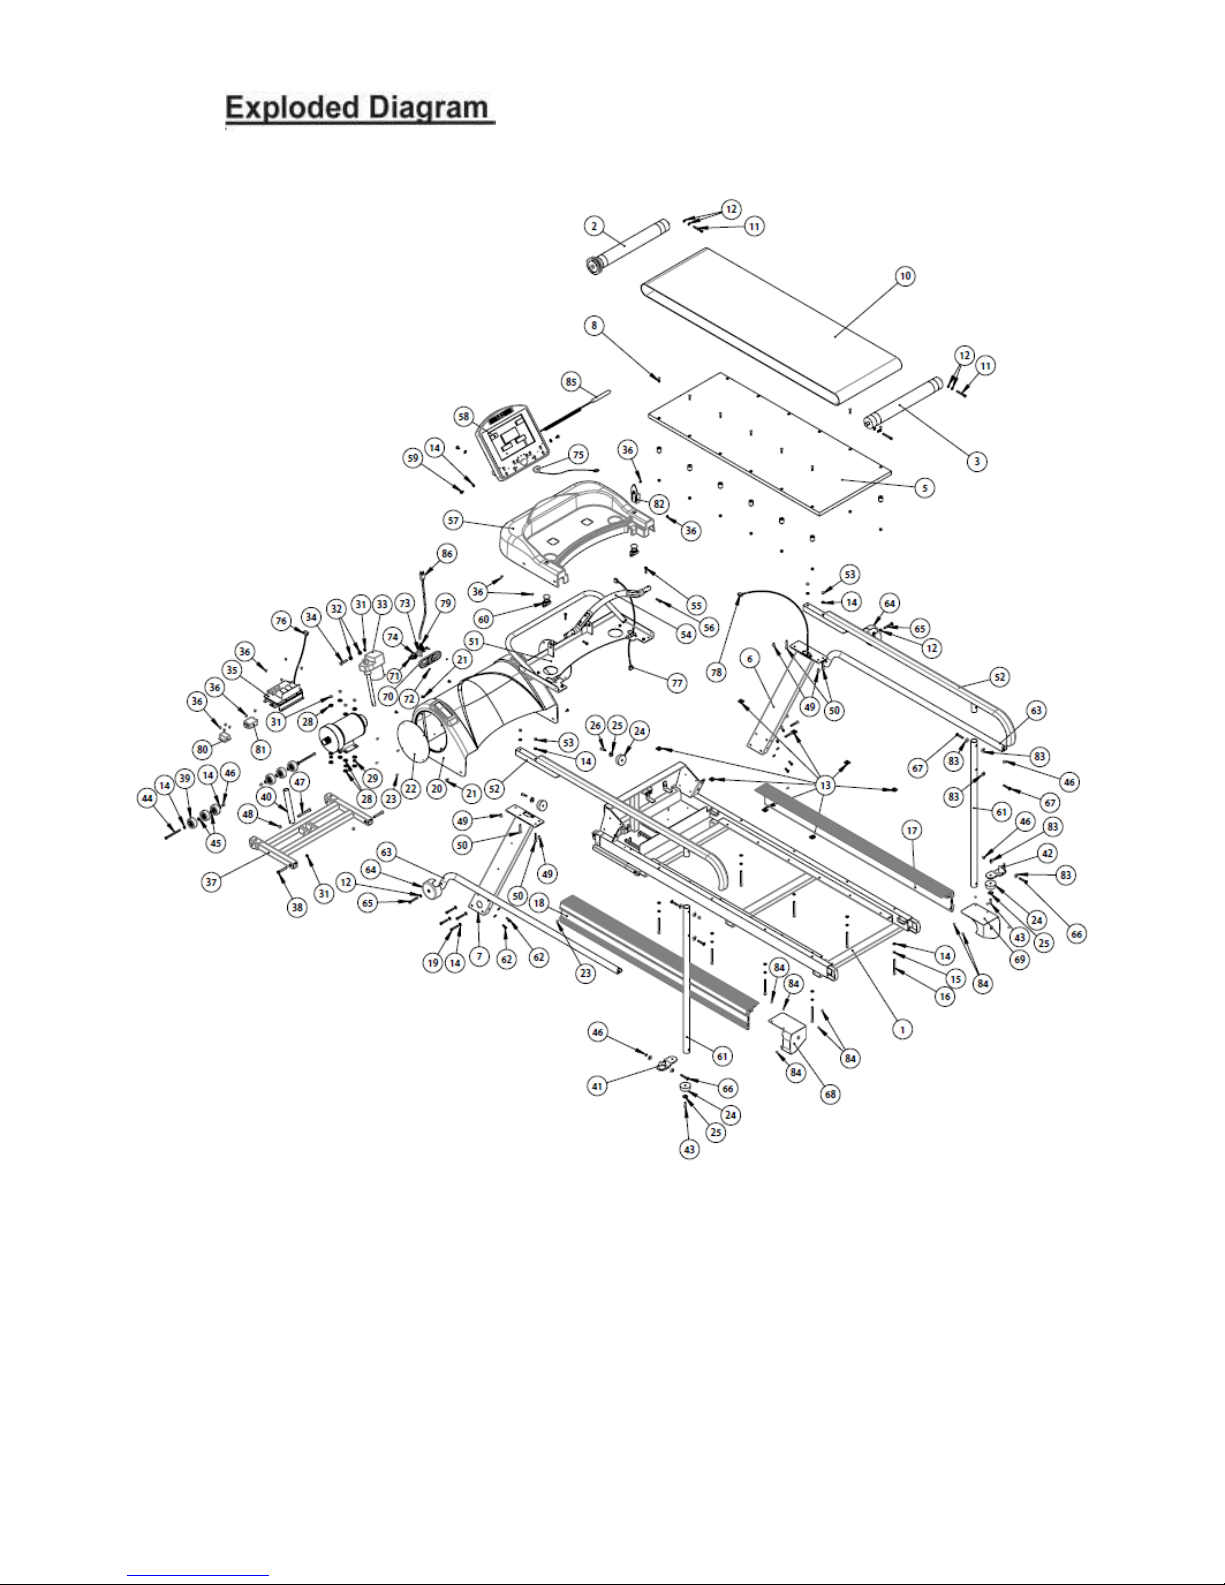
11

Parts List
NO.
Description
Qty
001
Main Frame
1
002
Front Roller
1
003
Rear Roller
1
004
Suspension
12
005
Running Deck
1
006
Upright Pole(R)
1
007
Upright Pole(L)
1
008
Cross Screw M8*30L
12
009
Nut M8
12
010
Running Belt with logo
1
011
Mushroom Head Hexagonal Bolt M8*65L
3
012
Washer 8*16*1.2T
8
013
25 tapping Iron plates
8
014
Washer 8*18*1.5T
32
015
Spring Washer M8
8
016
Mushroom Head Hexagonal Bolt M8*100L
8
017
Side Rail(R)
1
018
Side Rail(L)
1
019
Mushroom Hexagonal Bolt M8*50L
8
020
Motor Cover
1
021
Cross Screw M6*15L
5
022
Acrylic adjust
2
023
Metal screws TP4*16L
10
024
Concave Buffer
4
025
Washer 8*28*2T
4
026
Mushroom Head Hexagonal Bolt M8*30L
2
027
Clips
5
028
Washer 10*25*2T
12
029
Washer 10*18*2.5T
4
030
AC Servo Motor
1
031
Nylon Nut M10*7L
7
032
Motor cushion plug
2
033
Incline Motor
1
034
Hexagonal Bolt M10*50L
1
035
Lower control board
1
036
Cross Screw M5*10L
14
037
Frame Tubing Set
1
038
Hexagonal Bolt M10*67L
2
039
PVC Roller
6
040
Incline Motor Tube
1
041
Handle Support Base(L)
1
042
Handle Support Base(R)
1
043
Mushroom Head Hexagonal Bolt M8*25L
2
12

Parts List
NO.
Description
Qty
044
Mushroom Head Hexagonal Bolt M8*115L
2
045
Washer 8*18*2T
4
046
Nylon Nut M8
6
047
Mushroom Head Hexagonal Bolt M8*115L
1
048
Nylon Nut M10*7L
1
049
Hexagonal Bolt M8*16L
4
050
Hexagonal Bolt M8*55L
4
051
Computer Rack
1
052
Hand Pole - Long type
2
053
Nylon Nut M8
4
054
Heart Rate Handle Bar
1
055
Hexagonal Bolt M8*35L
2
056
Hexagonal Bolt M8*25L
2
057
Computer Rack Cover
1
058
Console
1
059
Mushroom Head Hexagonal Bolt M8*16L
4
060
Emergency Stop Button
2
061
Handle Support Tube - Long type
2
062
Mushroom Head Hexagonal Bolt M8*20L
4
063
Lower Hand Pole
2
064
Side handle Bar Cover
2
065
Mushroom Head Hexagonal Bolt M8*60L
2
066
Mushroom Head Hexagonal Bolt M8*55L
2
067
Mushroom Head Hexagonal Bolt M8*50L
4
068
Dipping Iron Cover(L)
2
069
Dipping Iron Cover(R)
2
070
Power Set
1
071
Cross Screw M5*25L
2
072
Nylon Nut M5
2
073
15A Circuit Breaker
1
074
ON/OFF Light Switch - large
1
075
Safety Key
1
076
Lower Control Wire
1
077
Upper Control Wire
1
078
Middle Control Wire
1
079
Wire Holder
1
080
Inductor
1
081
Filter
1
082
Fixed Holder
1
083
Washer 8*25*1.5T
10
084
Metal screws TP4*12L
12
085
Control Wire
1
086
Plug
1
13


Pair your PhysioMill with the PhysioGait
Dynamic Unweighting System!
Over Ground or with a Treadmill!
www.PhysioGait.com
Table of contents
Popular Treadmill manuals by other brands


Tool Fitness
Tool Fitness RUN1000 user guide
ICON Health & Fitness
ICON Health & Fitness Pro-Form SPORT 4.0 user manual

Fitness Avenue
Fitness Avenue FA-7967 user manual

PaceMaster
PaceMaster Platinum Pro VR owner's manual

habitat et jardin
habitat et jardin Courso manual

Mortara
Mortara Quinton CR60 Service manual