GND
TXD
RXD
line
line
line
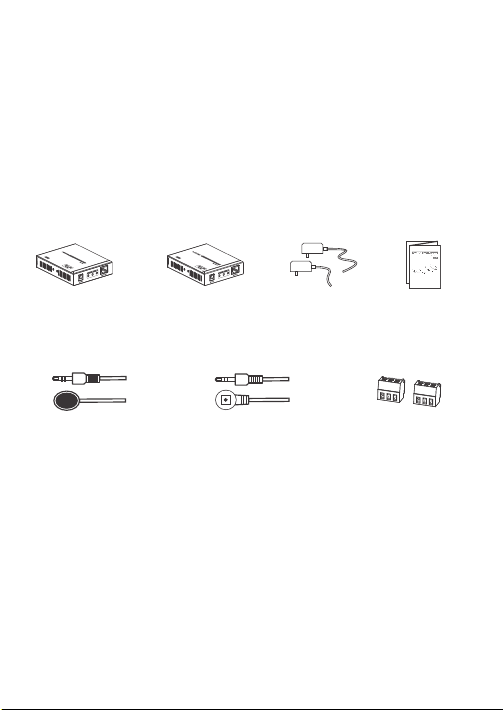
User manual
70m HDMI HDBaseT2.0 Extender
2. Connections
3. Bi-directional IR pass back
1 ) It supports bi-directional IR pass back . User can control DVD at RX
end and control TV at TX end.
2 ) If control at RX end, please connect IR blaster extension cable with
IR OUT of TX and connect IR receiver extension cable with IR IN of
RX. If control at TX end, please connect IR receiver extension cable
with IR IN of TX and connect IR blaster extension cable with IR OUT
of RX.
· FAQ
Disclaimer
· Specification
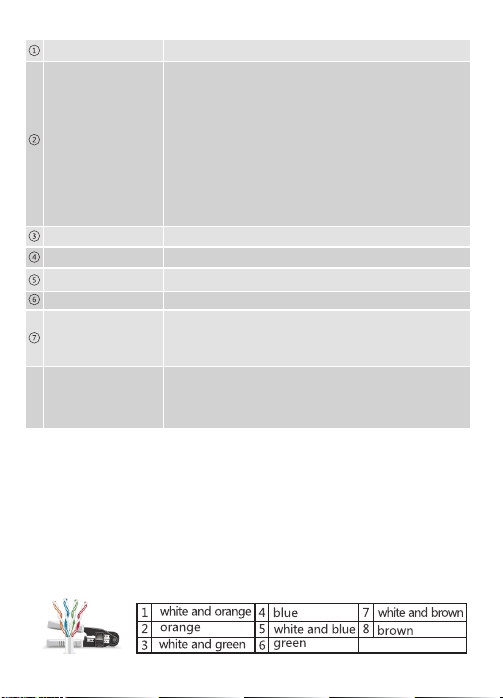
4. RS232 serial bi-direction passback function
1 ) Baud rate
Different encoding mechanism can not mix-connect, the baud rate
of RS232 serial of these transmitter unit and receiver unit, support
2400, 4800, 9600, 19200, 28800, 38400, 57600, and 115200
2 ) Line order
Check and make sure the RS232 serial line connect firmly and well,
and make sure serial data line is connected correctly as below:
If the RS232 serial does not work by following above connection,
please try to change the order of TXD line and RXD line.
60Hz
3 ) Check baud rate
If need to check the baud rate at last time, firstly, set the baud rate
to 115200 on your serial port test tool before power on . Then power
on, when the RS232 serial of product connects to serial port test tool,
the software will read out the baud rate at once.
e.g: software show information “ Baud rate: 9600”, means 9600
is the current baud rate.
4 ) Set baud rate
For example: the current baud rate is 9600, but the baud rate of
control equipment is 19200, so the baud rate should be set as 9600.
At this time, in serial port tool, choose baud rate "9600", then input
command "set: 19200" in character format and send it out.
Q: No output on screen?
A: 1 ) Firstly, please check and make sure the power supply is connected
well. Then, check and make sure all cables are connected correctly.
2 ) Please check and make sure the right HDMI input port of the
TV/ screen has been chosen.
3 ) Please check and make sure there is HDMI signal to be fed into
transmitter unit, and check and make sure the receiver unit has
been connected well with the display device.
Q: Indicator LED 2 keeps off and no output?
A: Check and make sure the HDMI display device has been switched to
the right HDMI input channel.
Q: Indicator LED 3 keeps off?
A: Check whether the TX’s HDMI IN has signal input and make sure RX’s
OUT is well connected with HDMI display.
Q: Output image with snow point?
A: Change the HDMI cable between the transmitter unit and the source
device, it will be better to use a shorter HDMI cable for re-testing.
The product name and brand name may be registered trademark of
related manufactures. ™ and ® may be omitted on the user manual.
The pictures in this user manual are just for reference. The terms HDMI,
HDMI High-Definition Multimedia Interface, and the HDMI Logo are
trademarks or registered trademarks of HDMI Licensing Administrator, Inc.
We reser ve the rights to make changes without further notice to a product
or system described herein to improve reliability, function or design.
Power supply DC12V/1A x 2pcs
Items Specifications
HDMI signal Support HDMI 2.0 HDCP 2.2, support CEC and 24bits deep color
Resolution supported 480i/480P/576i/576P/720P/1080i/1080P/3D/4Kx2K
Audio LPCM、DTS Digital, Dolby Digital
Network cable CAT6、CAT6A、CAT7
Transmission length
IR control Support 20~60kHz wide frequency devices and Bi-directional
IR transmission
Power consumption TX: <6W; RX: <8W
Product dimension 109.49(L)x87.0(W)x23.4(H)mm
Weight TX:240g RX:250g
Color Black
CAT6A 70m
70m
70m
CAT6
CAT7
Working temperature 0~55℃
Storage temperature -10~70℃
Humidity 0~90%(no condensation)
Material
1080p@60Hz 48bpp, 1080p@60Hz 3D,
4Kx2K@60Hz
Iron alloy material
HDBaseT compliance HDBaseT 2.0