HDFury Maestro TX User manual

4K Maestro TX/RX 18Gbps
User Manual 4K Maestro Rev 1.00

Disclaimer: 3rd party and/or custom firmware providing extra features are not covered in this manual.
2
4K Maestro TX/RX –User Manual

Disclaimer: 3rd party and/or custom firmware providing extra features are not covered in this manual.
3
4K Maestro TX/RX –User Manual
Table of content
TX Overview .............................................................................................................................................. 5
RX Overview.............................................................................................................................................. 6
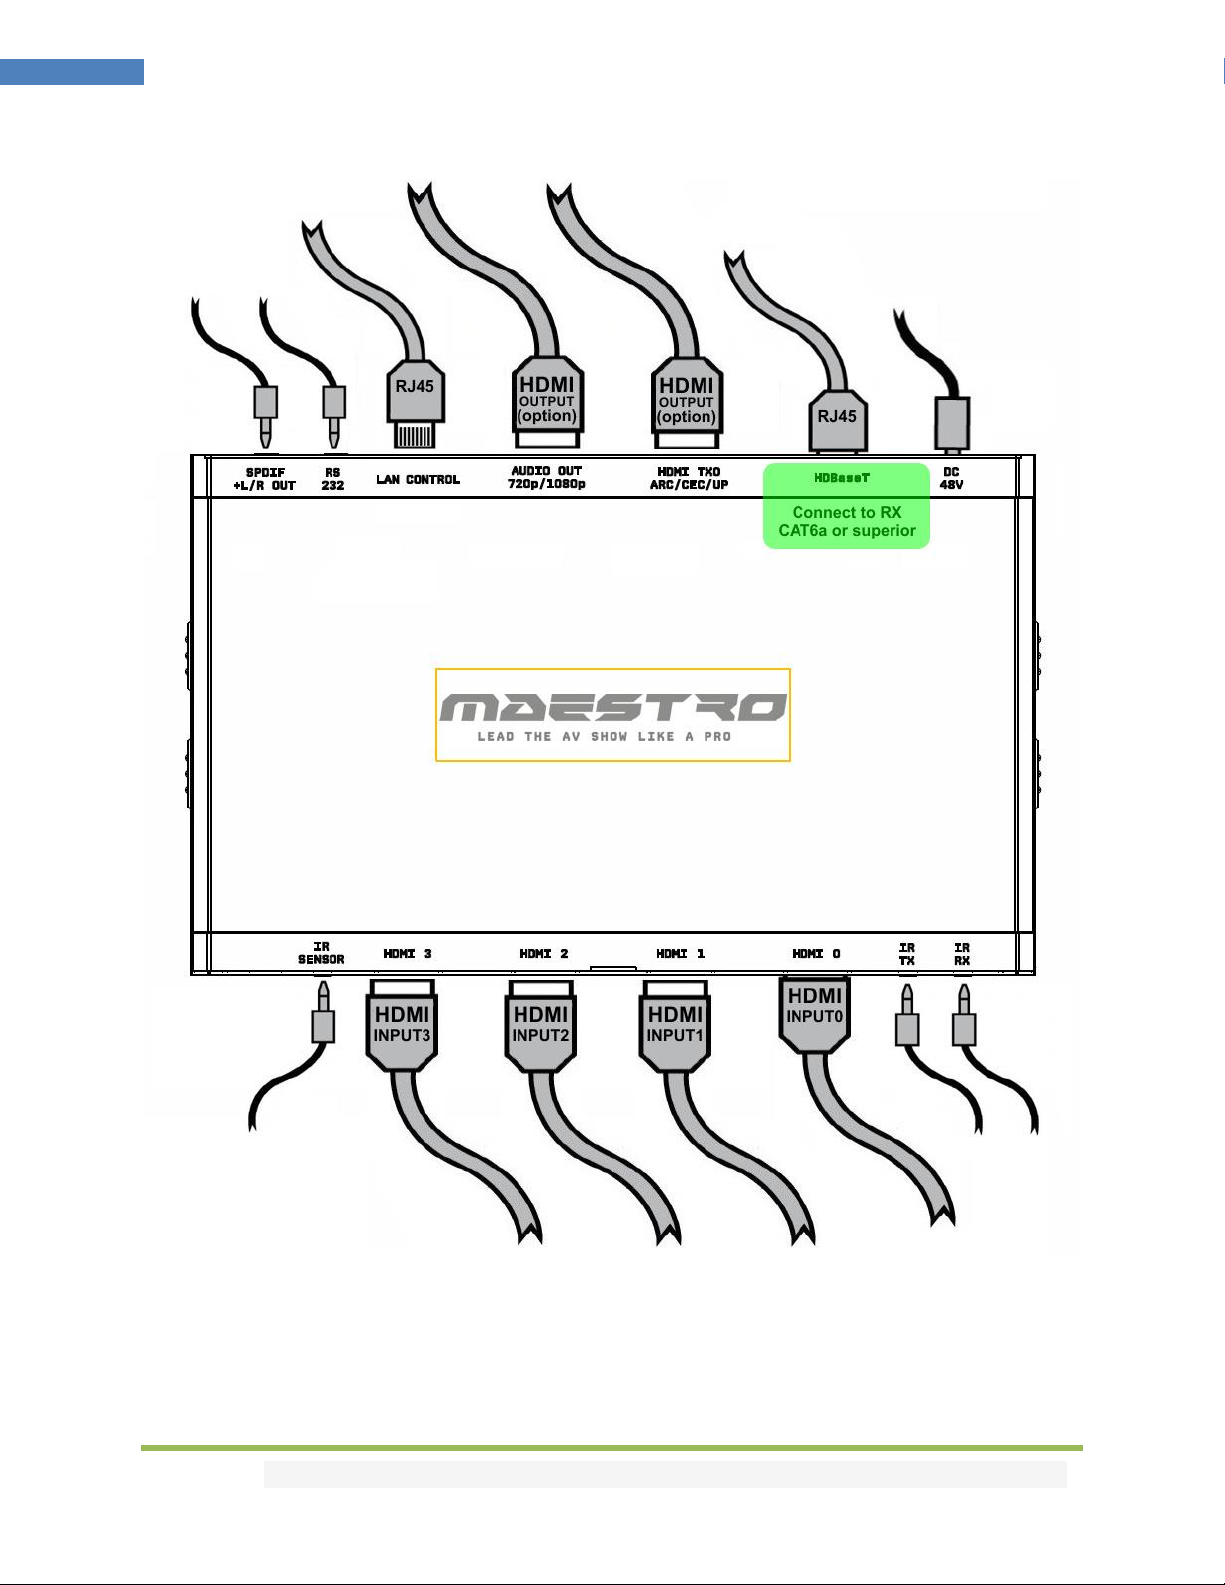
Connecting Cables to TX Central for a standalone use (without RX unit) ................................................ 7
Connecting Cables to TX Central............................................................................................................... 8
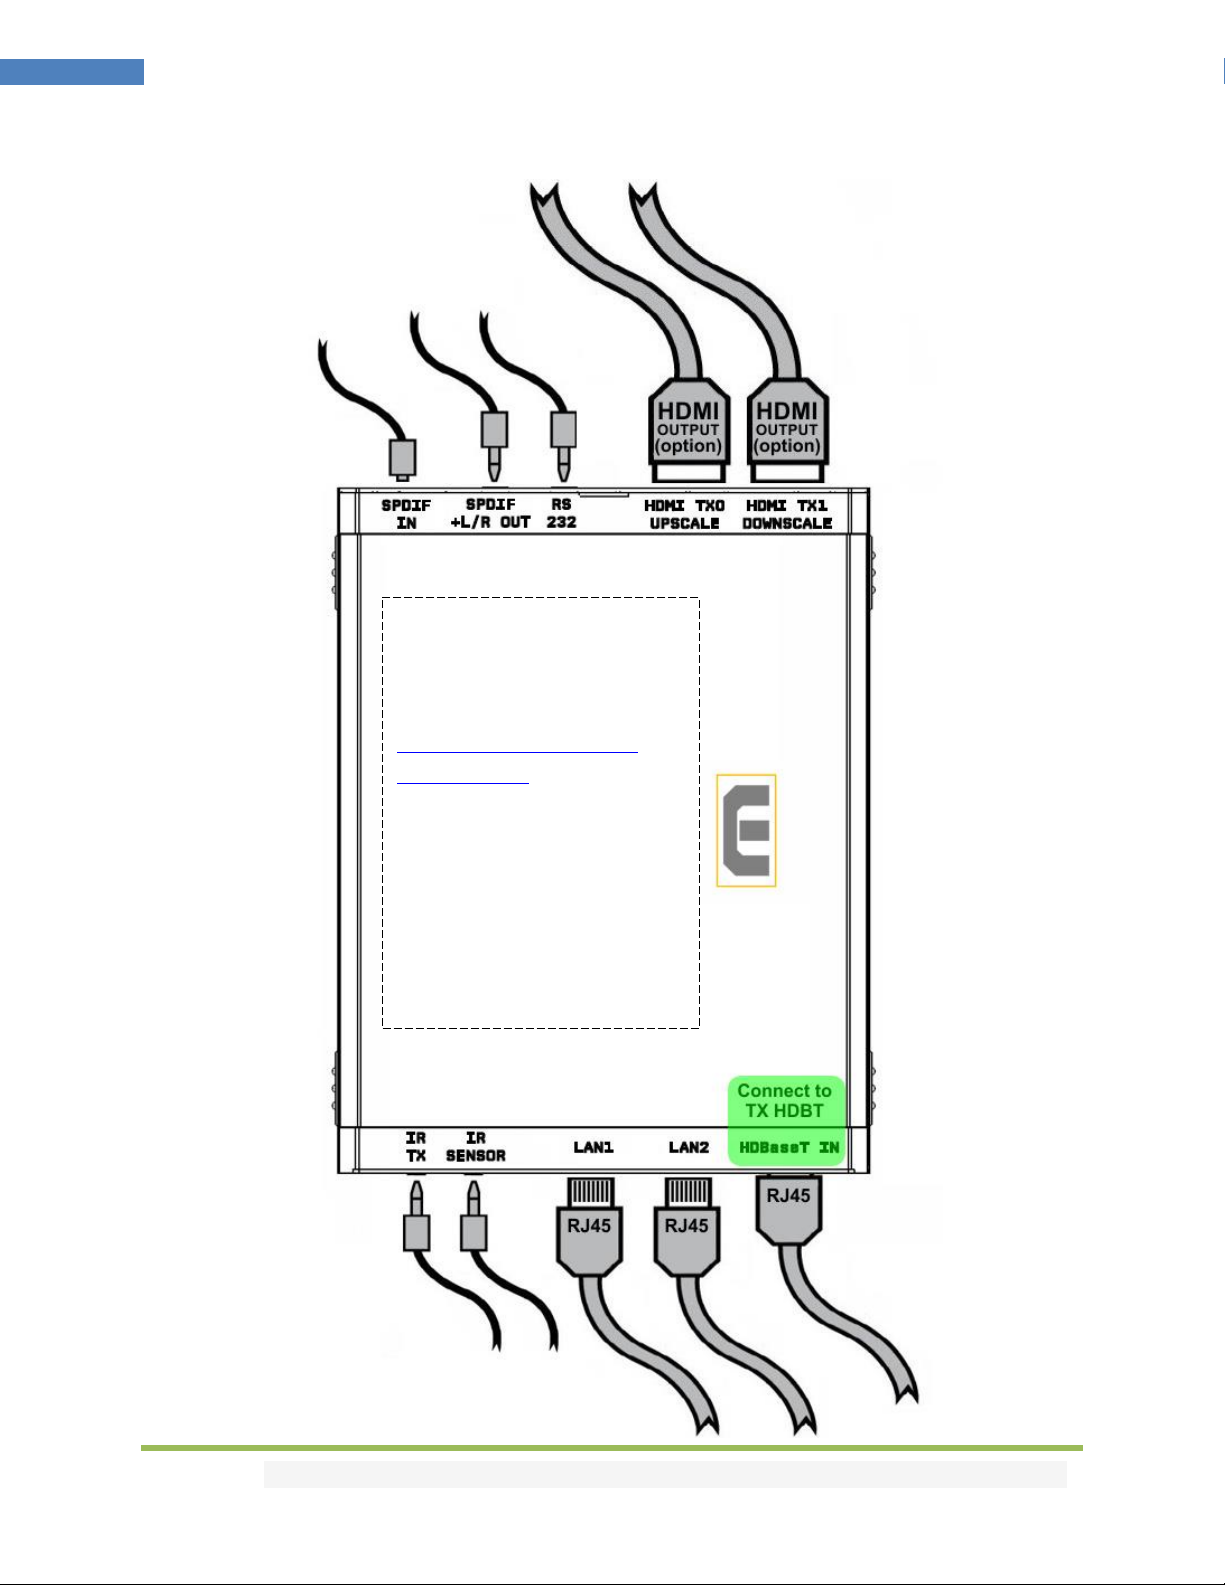
Connecting Cables to RX unit.................................................................................................................... 9
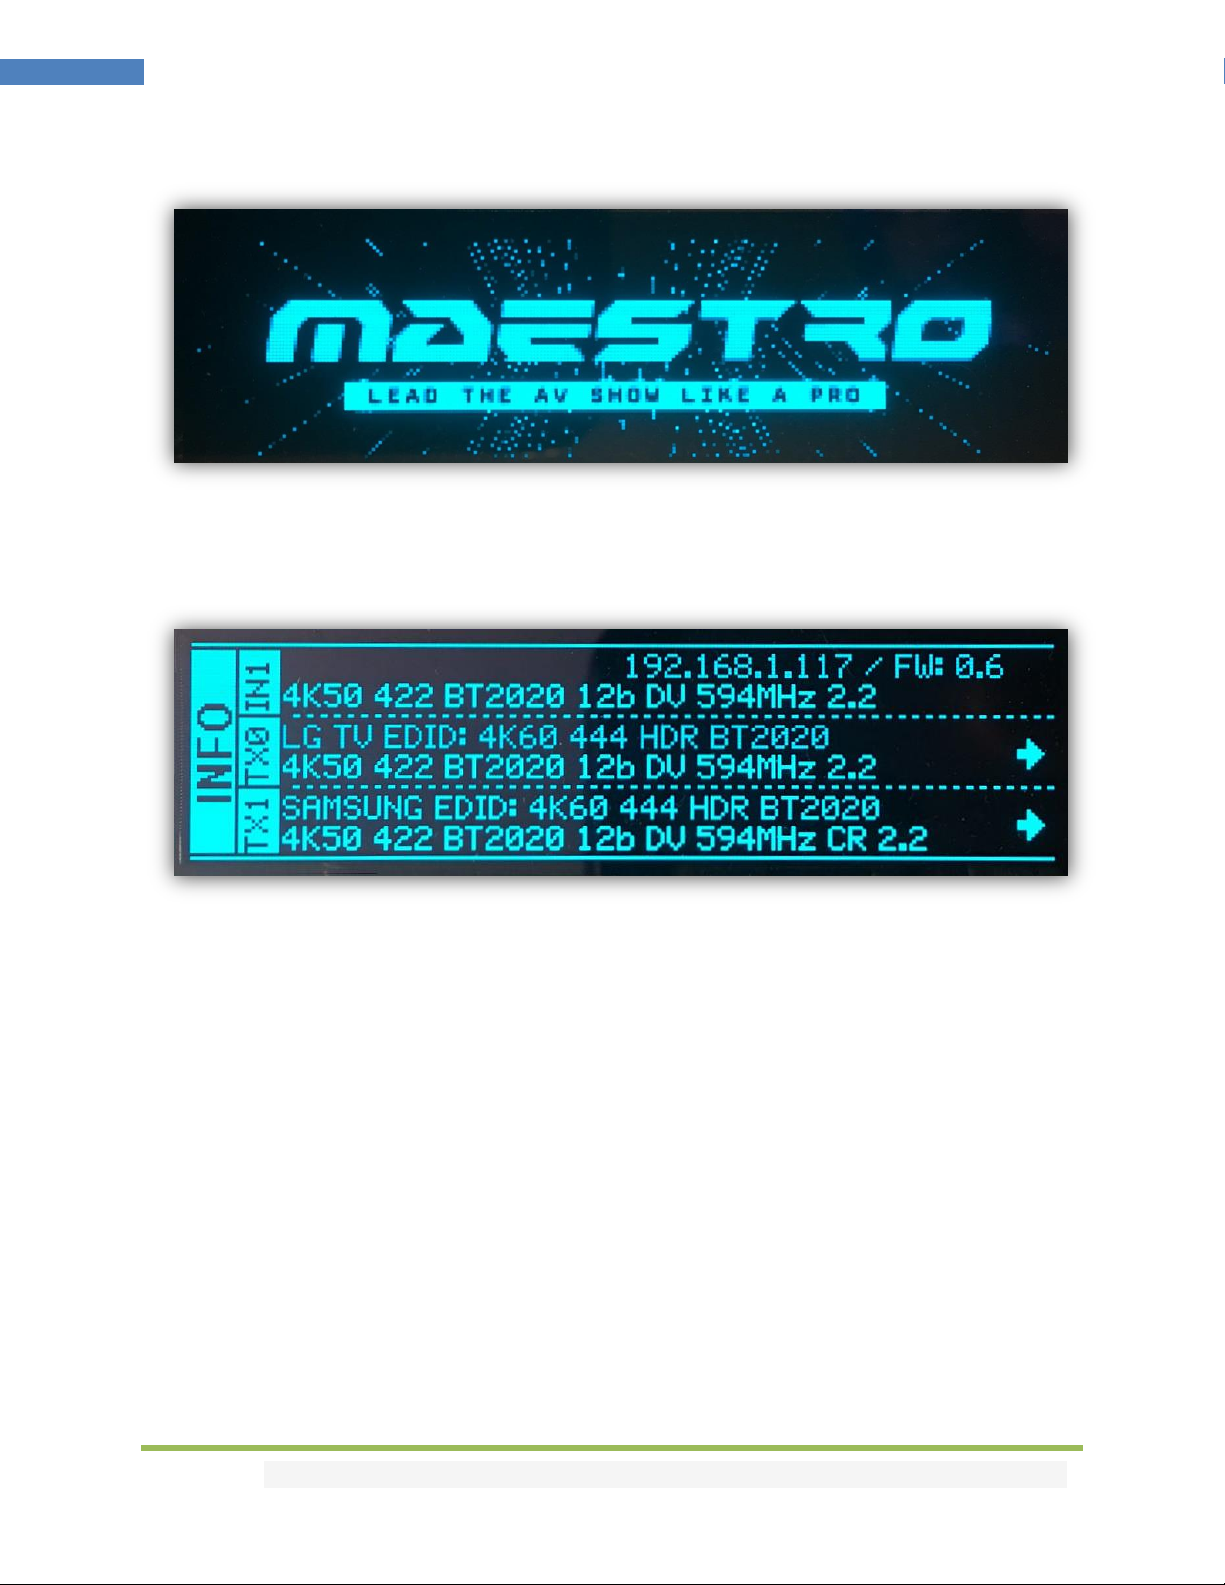
TX Power/Status OLED............................................................................................................................ 10
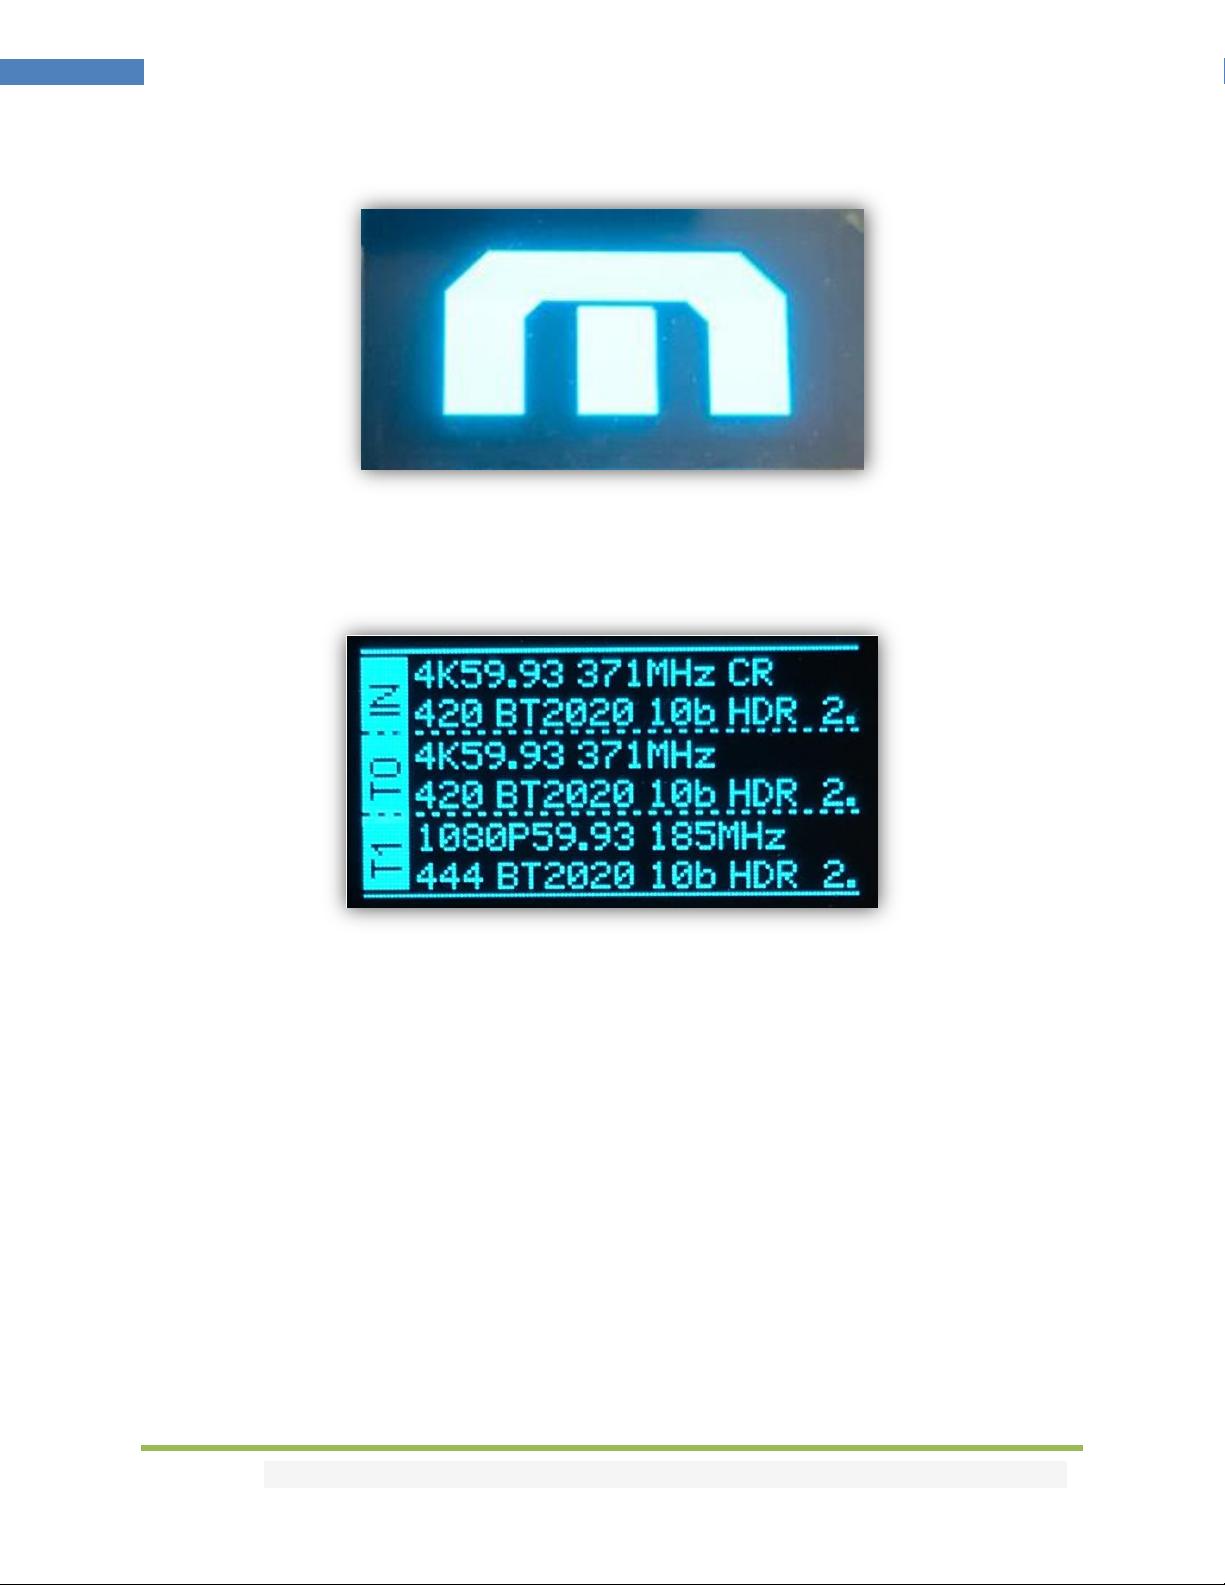
RX Power/Status OLED............................................................................................................................ 11
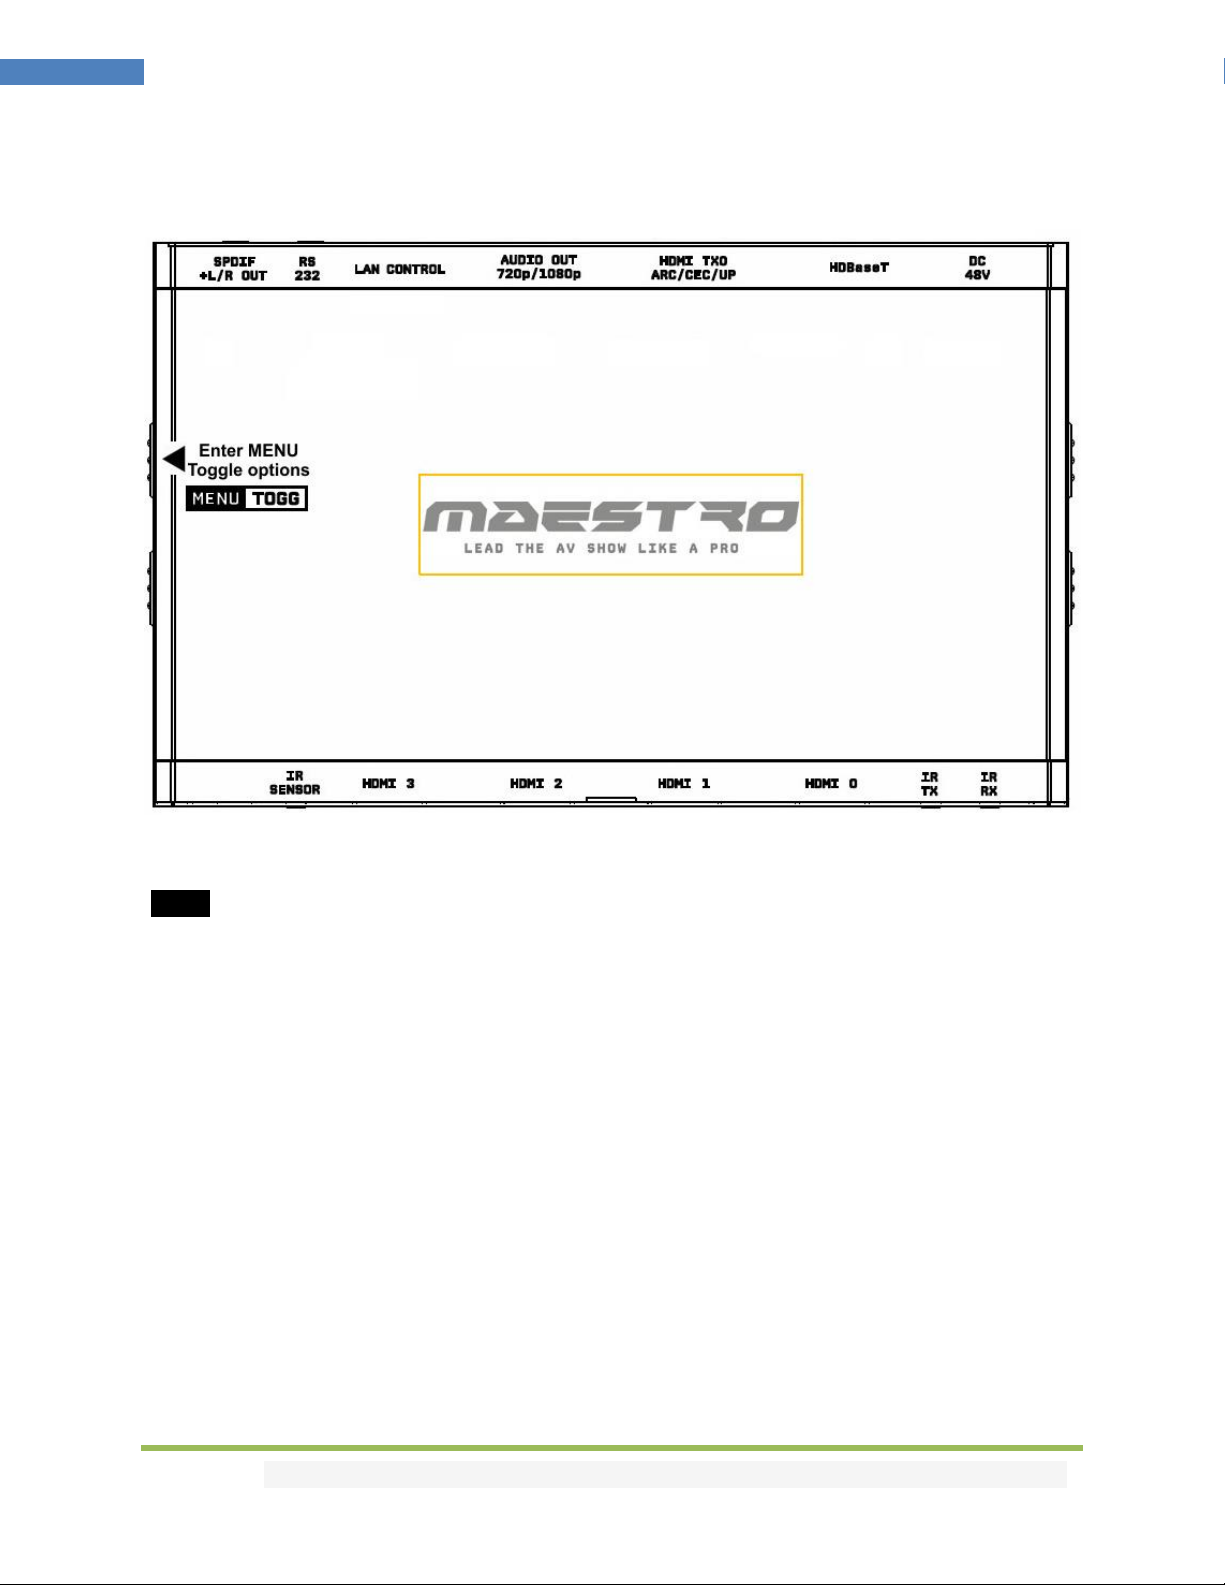
TX Menu/Toggle Button.......................................................................................................................... 12
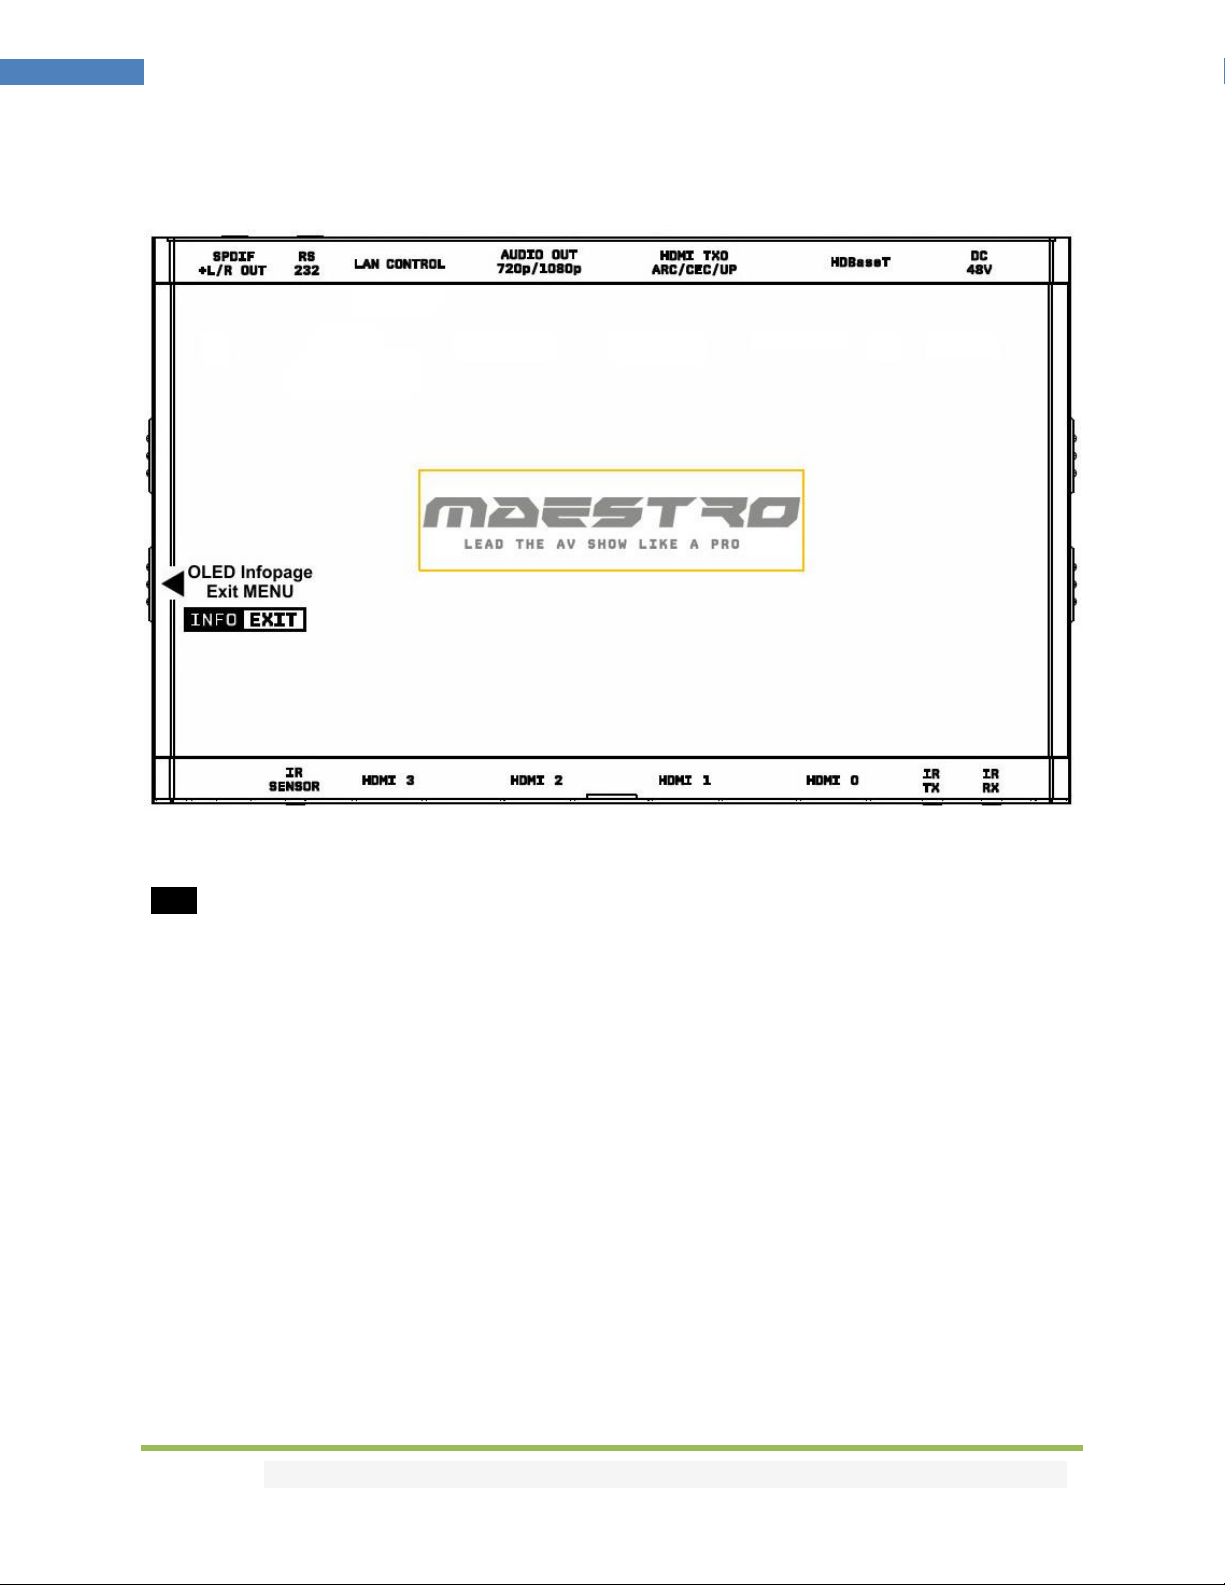
TX Info/Exit Button..................................................................................................................................13
TX Out1/Up Button ................................................................................................................................. 14
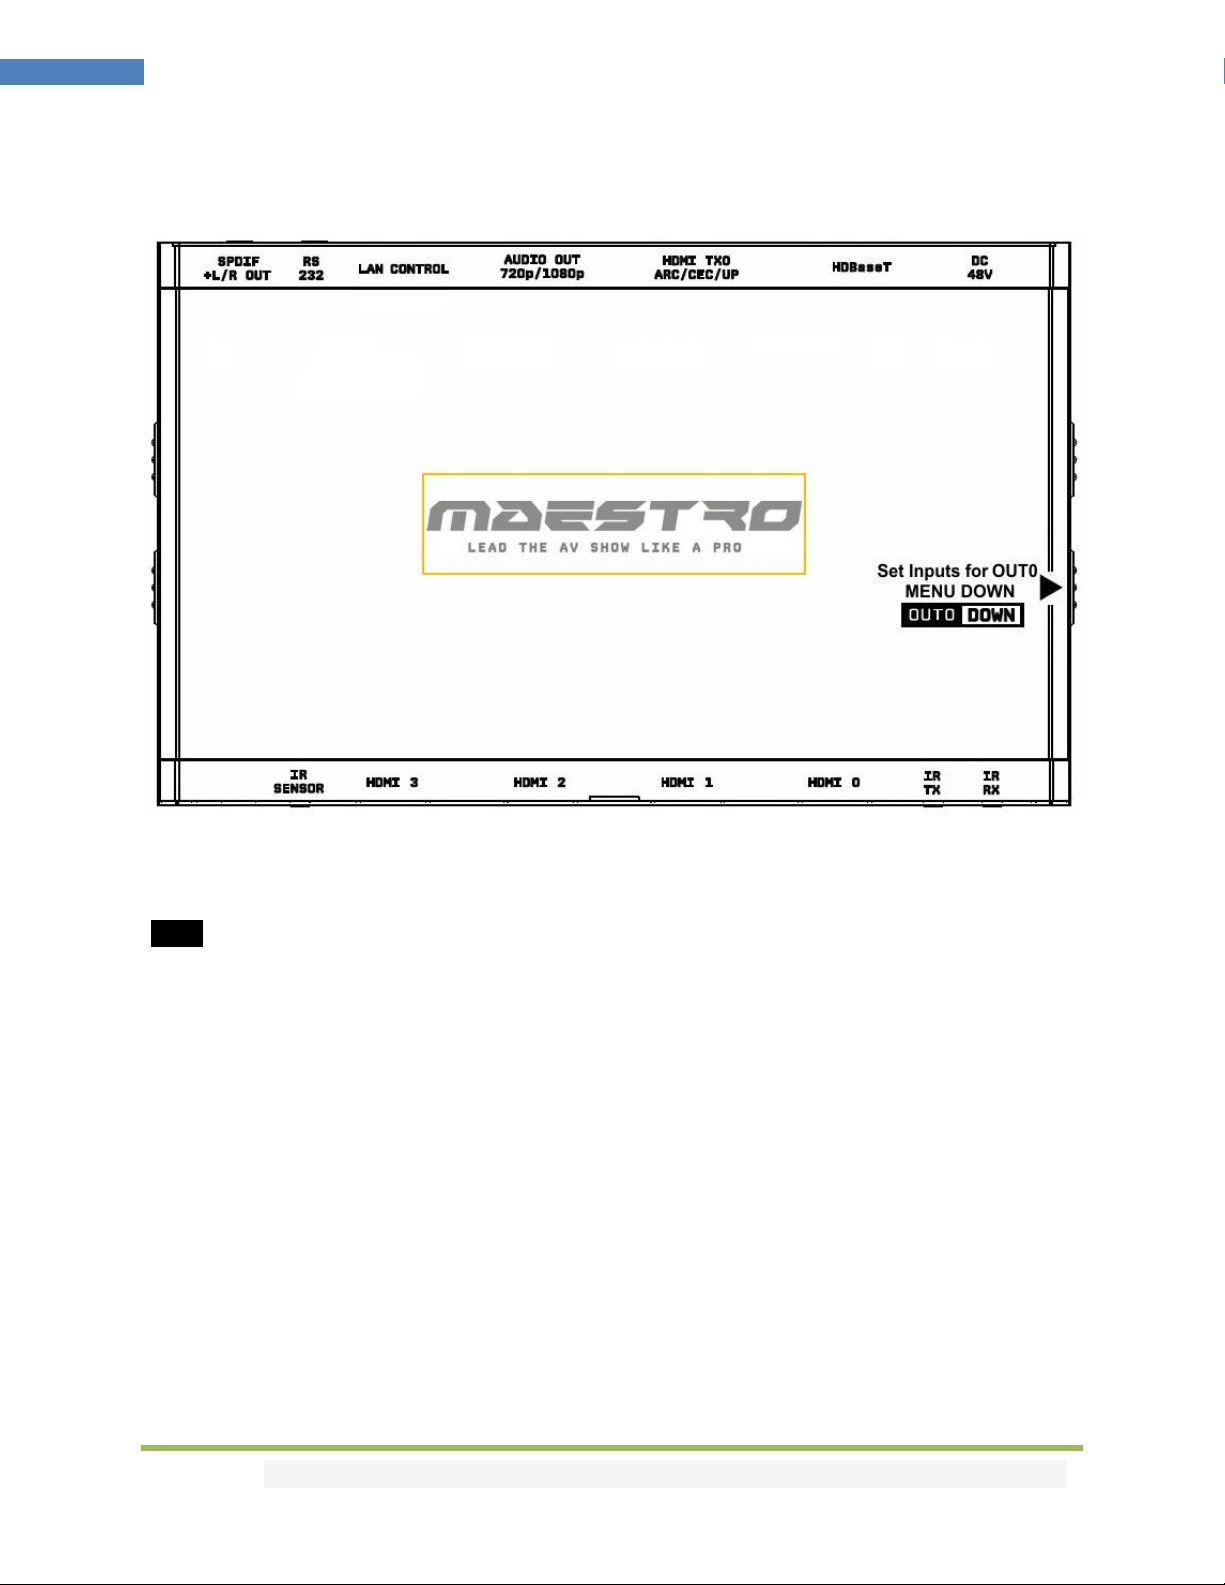
TX Out0/Down Button ............................................................................................................................ 15
RX Menu/Toggle Button ......................................................................................................................... 16
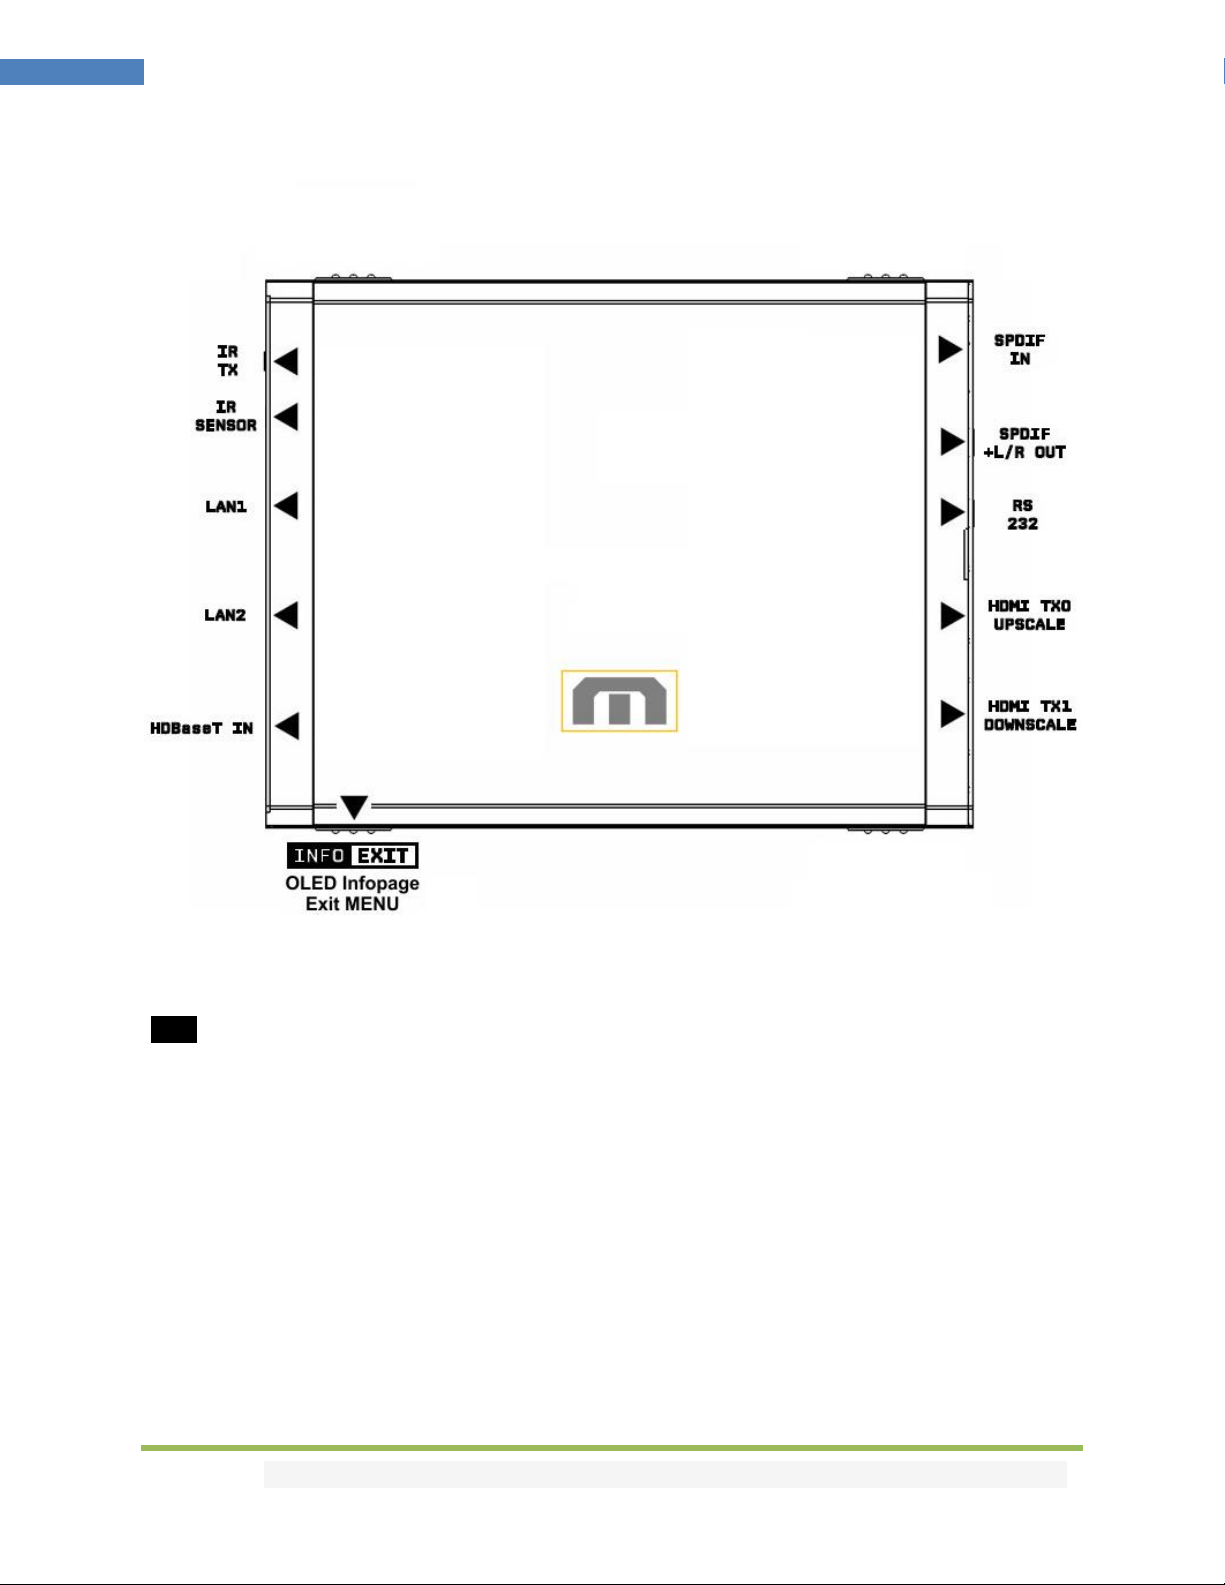
RX Info/Exit Button ................................................................................................................................. 17
RX Out0/Up Button................................................................................................................................. 18
RX Out1/Down Button ............................................................................................................................ 19
Help on IR connections ........................................................................................................................... 20
Help on LAN/RJ45 connections............................................................................................................... 21
Help on AUDIO/CEC/ARC/eARC connections ......................................................................................... 22
TX OLED Menu ........................................................................................................................................23
RX OLED Menu ........................................................................................................................................ 25
Accessing TX Web Server ........................................................................................................................ 27
Accessing RX Web Server........................................................................................................................28
TX Web Server Top section..................................................................................................................... 29
RX Web Server Top section..................................................................................................................... 30
TX Web Server INFO Section...................................................................................................................31
RX Web Server INFO Section...................................................................................................................32
TX Web Server EDID Section ...................................................................................................................33
RX Web Server EDID Section...................................................................................................................34
List of Custom EDID available. ................................................................................................................35
TX Web Server SCALER Section............................................................................................................... 39
RX Web Server SCALER Section...............................................................................................................40

Disclaimer: 3rd party and/or custom firmware providing extra features are not covered in this manual.
4
4K Maestro TX/RX –User Manual
TX Web Server HDR/DV Section..............................................................................................................42
RX Web Server HDR/DV Section .............................................................................................................46
TX Web Server OSD Section.................................................................................................................... 50
RX Web Server OSD Section.................................................................................................................... 52
TX Web Server CEC/RS232 Section ......................................................................................................... 54
RX Web Server CEC/RS232 Section......................................................................................................... 56
TX Web Server MACROS Section ............................................................................................................57
TX Web Server CONFIG Section ..............................................................................................................58
RX Web Server CONFIG Section..............................................................................................................61
Updating your Maestro TX/RX Firmware via web browser ....................................................................64
CONFIG Export section of the web server: .............................................................................................66
RS232 Control .........................................................................................................................................70
IR Code List.............................................................................................................................................. 80
FAQ........................................................................................................................................................122
Highlight Hardware Features:...............................................................................................................125
Highlight Video Features:...................................................................................................................... 126
Highlight Audio Features: .....................................................................................................................127
Highlight Convenience Features: .......................................................................................................... 128
Highlight HDCP Features:...................................................................................................................... 129
Main Specifications...............................................................................................................................130
Supported Audio/Video Signals ............................................................................................................ 131
Technical Specifications ........................................................................................................................131
Certifications.........................................................................................................................................132
Pro Tips ................................................................................................................................................. 133

Disclaimer: 3rd party and/or custom firmware providing extra features are not covered in this manual.
5
4K Maestro TX/RX –User Manual
TX Overview
Team HDfury would like to thank you personally for purchasing the 4K Maestro TX!
This unique HDMI2.0b and HDCP2.3 HDBaseT device supports up to 4 inputs for true full
4K60 4:4:4 600MHz 18Gbps bandwidth signals over HDMI or HDBaseT transmission up to 330ft. It will
allow you to solve any HDCP error, extract full HDMI audio and ARC/eARC up to Atmos HBR over TrueHD
from ARC and eARC TVs to feed older AVR and Matrix any SD/HD/FHD/UHD/HDR/DV or PC signals up to
600MHz. Upscale or downscale any channel individually, display relevant information on OLED/OSD,
select between multiple edid banks for each inputs. Inject, replace or translate HDR metadata and AVI
infoframe. It is also capable of auto switching any sources including X1X, ATV4K, Shield, etc… Based on
incoming content type it can send relevant RS232 commands to any RS232 controllable display. Control
can be completed with IR codes, push buttons on the unit, via RS232 (MAC/WIN/Linux) or through
embedded Webserver (for any web browser based device such as MAC/WIN/Linux computer or
Android/iOS phones, tablets and others).

Disclaimer: 3rd party and/or custom firmware providing extra features are not covered in this manual.
6
4K Maestro TX/RX –User Manual
RX Overview
Team HDfury would like to thank you personally for purchasing the 4K Maestro RX!
This unique HDMI2.0b and HDCP2.3 HDBaseT RX device supports true full 4K60 4:4:4 600MHz 18Gbps
bandwidth signals. Self-powered by Maestro TX thru POE, one HDbaseT input cable is enough to
transmit Audio, IR signals, RS232, video signals and share Ethernet thru LAN Hub embedded. It will allow
you to solve any HDCP error, Split or Matrix any SD/HD/FHD/UHD/HDR/DV or PC signals up to 600MHz,
scale up or scale down any channel individually, display relevant information on OLED/OSD, Inject
Infoframe and more. Control can be completed with IR codes, push buttons on the unit, via RS232
(MAC/WIN/Linux) or through embedded Webserver (for any web browser based device such as
MAC/WIN/Linux computer or Android/iOS phones, tablets and others).
When not in use Maestro RX automatically goes in Power Saving mode to run cooler and save energy.

Disclaimer: 3rd party and/or custom firmware providing extra features are not covered in this manual.
7
4K Maestro TX/RX –User Manual
Connecting Cables to TX Central for a standalone use (without RX unit)
• Connect Power connector from Power supply (110-240V 1.2A IN & 48V 1A OUT).
• Connect a source via HDMI input cable to ANY HDMI input.
• Connect any other HDMI, sound, IR or RS232 cable that you might need (optional)
• HDbaseT and IR TX output shall not be used or connected (In RED on the above pic.)

Disclaimer: 3rd party and/or custom firmware providing extra features are not covered in this manual.
8
4K Maestro TX/RX –User Manual
Connecting Cables to TX Central
• Connect Power connector from Power supply (110-240V 1.2A IN & 48V 1A OUT).
• Connect a source via HDMI input cable to ANY HDMI input.
• Connect any other HDMI, sound, IR or RS232 cable that you might need (optional)
• Connect a RJ45 network cable CAT6a or superior between HDBT OUT on TX to HDBT IN on RX
• HDMI cable must support 18Gbps if any 18Gbps source or sink is connected (except for Audio Out)

Disclaimer: 3rd party and/or custom firmware providing extra features are not covered in this manual.
9
4K Maestro TX/RX –User Manual
Connecting Cables to RX unit
•HDMI/HDCP 1.x devices must
be connected to Downscale
Output port.
•Make sure that you are using
600MHz certified or tested
HDMI 4K cable if you plan to set
up a 4K60 4:4:4 8b or 4K60
4:2:2 12b 600MHz/18Gbps link
in your setup.
•Maestro RX operating temp
can be as high as 50 Celsius
degrees when processing 18
Gbps signals. It is normal.

Disclaimer: 3rd party and/or custom firmware providing extra features are not covered in this manual.
10
4K Maestro TX/RX –User Manual
TX Power/Status OLED
The Maestro TX OLED will turn ON when power supply is applied; Maestro Logo will be displayed
followed by a similar default infopage to the one represented below.
[192.168.1.117]: Maestro TX IP address will be displayed here if LAN CONTROL RJ45 output is connected
to your LAN/WAN router/switcher. mDNS and other way are available if you cycle OLED infopage.
[FW: 0.6]: Firmware Version of Maestro TX is reported here.
If any active input is connected, the default TX OLED infopage will indicate which input is active (IN1 on
above pic). Maestro will process handshake with the active input and once completed the signal
information will be displayed. 4K50 4:2:2 BT2020 12b LLDV 594MHz 2.2 on above pic.
If any sink is connected at TX0 output, TX0 section of the default OLED infopage will report its EDID
name (LG TV on above pic) and its max supported resolution (4K60 4:4:4 8b BT2020 HDR on above pic)
on the first line. Second line will display the current signal going to it, the small arrow on the right
indicate if signal is upscaled ↑, Downscaled ↓or passing thru untouched →
Please note that TX1 info will only be displayed when RX unit is connected.
[OLED OFF]: Insufficient power, OLED timer expired (default 60s) or OLED OFF. Use the Maestro power
supply; press any button if OLED timer expired and make sure the OLED is ON (refer to p.58).
[OLED ON]: The Maestro TX unit is receiving power and is ready to accept an HDMI signal.

Disclaimer: 3rd party and/or custom firmware providing extra features are not covered in this manual.
11
4K Maestro TX/RX –User Manual
RX Power/Status OLED
The Maestro RX OLED will turn ON when power supply is applied; Maestro Logo will be displayed
followed by a similar default infopage to the one represented below.
If any HDBT link from HDBT output of TX Central unit is connected to RX HDBT input and if any active
input is connected to TX and routed to RX, the default RX OLED infopage will indicate the incoming
signal information (IN on above pic).
If any sink is connected at TX0 or TX1 output of the RX unit, T0 and T1 sections of the default OLED
infopage will report the current signal going to each of them.
The status of the RX OLED may be used for troubleshooting:
[OLED OFF]: Insufficient power, OLED timer expired (default 60s) or OLED OFF. Use the Maestro
power supply; press any button if OLED timer expired and make sure the OLED is ON (refer to
p.61). If OLED stay OFF please make sure you are using at least CAT6a or superior Ethernet cable
from TX HDBT or RX HDBT (min 6ft max 330ft for 18Gbps transmission)
[OLED ON]: The Maestro RX unit is receiving power and is ready to accept an HDMI signal via
HDBT from TX Central.

Disclaimer: 3rd party and/or custom firmware providing extra features are not covered in this manual.
12
4K Maestro TX/RX –User Manual
TX Menu/Toggle Button
The 4K Maestro TX/RX offers 2 functions per push button.
[MENU]Wake up from sleep/fade mode and/or Enter Maestro OLED MENU.
[TOGG] When you are in Maestro OLED MENU, the TOGGLE button allows you to change and cycle any
setting value.
Note: You can also control and change settings with IR codes, through RS232 for MAC/WIN/Linux or
from the embedded TX Webserver for MAC/WIN/Linux PC or via Android/iOS smartphone/tablet or any
web browser based device.

Disclaimer: 3rd party and/or custom firmware providing extra features are not covered in this manual.
13
4K Maestro TX/RX –User Manual
TX Info/Exit Button
The 4K Maestro TX/RX offers 2 functions per push button.
[INFO]Wake up from sleep/fade mode and/or Cycle OLED infopage: INFO > LAN INFO > HDR INFO > …
[EXIT] When you are in Maestro OLED MENU, the EXIT button allows you to exit OLED MENU.
Note: You can also control and change settings with IR codes, through RS232 for MAC/WIN/Linux or
from the embedded TX Webserver for MAC/WIN/Linux PC or via Android/iOS smartphone/tablet or any
web browser based device.

Disclaimer: 3rd party and/or custom firmware providing extra features are not covered in this manual.
14
4K Maestro TX/RX –User Manual
TX Out1/Up Button
The 4K Maestro TX/RX offers 2 functions per push button.
[OUT1]Wake up from sleep/fade mode and/or set and switch active or inactive inputs for HDBT output.
[UP] When you are in Maestro OLED MENU, the UP button allows you to navigate upward.
Maestro TX OLED/OSD will report info for up to two active inputs in default Matrix mode while only the
current HDBT input is reported via OLED/OSD on Maestro RX.
Note: You can also control and change settings with IR codes, through RS232 for MAC/WIN/Linux or
from the embedded TX Webserver for MAC/WIN/Linux PC or via Android/iOS smartphone/tablet or any
web browser based device.

Disclaimer: 3rd party and/or custom firmware providing extra features are not covered in this manual.
15
4K Maestro TX/RX –User Manual
TX Out0/Down Button
The 4K Maestro TX/RX offers 2 functions per push button.
[OUT0]Wake up from sleep/fade mode and/or set and switch active or inactive inputs for TX0 HDMI
output.
[DOWN] When you are in Maestro OLED MENU, the DOWN button allows you to navigate downward.
Maestro TX OLED/OSD will report info for up to two active inputs in default Matrix mode.
Note: You can also control and change settings with IR codes, through RS232 for MAC/WIN/Linux or
from the embedded TX Webserver for MAC/WIN/Linux PC or via Android/iOS smartphone/tablet or any
web browser based device.

Disclaimer: 3rd party and/or custom firmware providing extra features are not covered in this manual.
16
4K Maestro TX/RX –User Manual
RX Menu/Toggle Button
The 4K Maestro TX/RX offers 2 functions per push button.
[MENU]Wake up from sleep/fade mode and/or Enter Maestro RX OLED MENU.
[TOGG] When you are in Maestro RX OLED MENU, the TOGGLE button allows you to change and cycle
any setting value.
Note: You can also control and change settings with IR codes, through RS232 for MAC/WIN/Linux or
from the embedded RX Webserver for MAC/WIN/Linux PC or via Android/iOS smartphone/tablet or any
web browser based device.

Disclaimer: 3rd party and/or custom firmware providing extra features are not covered in this manual.
17
4K Maestro TX/RX –User Manual
RX Info/Exit Button
The 4K Maestro TX/RX offers 2 functions per push button.
[INFO]Wake up from sleep/fade mode and/or Cycle RX OLED infopage: INFO > LAN INFO > RX INFO >
HDR1 INFO > HDR2 INFO > IF INFO > …
[EXIT] When you are in Maestro RX OLED MENU, the EXIT button allows you to exit RX OLED MENU.
Note: You can also control and change settings with IR codes, through RS232 for MAC/WIN/Linux or
from the embedded RX Webserver for MAC/WIN/Linux PC or via Android/iOS smartphone/tablet or any
web browser based device.

Disclaimer: 3rd party and/or custom firmware providing extra features are not covered in this manual.
18
4K Maestro TX/RX –User Manual
RX Out0/Up Button
The 4K Maestro TX/RX offers 2 functions per push button.
[OUT0]Wake up from sleep/fade mode and/or set rules for active or inactive outputs on TX0 HDMI
output.
[UP] When you are in Maestro RX OLED MENU, the UP button allows you to navigate upward.
Maestro RX OLED/OSD will report info for HDBT active input and up to two active outputs.
Note: You can also control and change settings with IR codes, through RS232 for MAC/WIN/Linux or
from the embedded RX Webserver for MAC/WIN/Linux PC or via Android/iOS smartphone/tablet or any
web browser based device.

Disclaimer: 3rd party and/or custom firmware providing extra features are not covered in this manual.
19
4K Maestro TX/RX –User Manual
RX Out1/Down Button
The 4K Maestro TX/RX offers 2 functions per push button.
[OUT1]Wake up from sleep/fade mode and/or set rules for active or inactive outputs on TX1 HDMI
output.
[DOWN] When you are in Maestro RX OLED MENU, the DOWN button allows you to navigate
downward.
Maestro RX OLED/OSD will report info for HDBT active input and up to two active outputs.
Note: You can also control and change settings with IR codes, through RS232 for MAC/WIN/Linux or
from the embedded Webserver for MAC/WIN/Linux PC or via Android/iOS smartphone/tablet or any
web browser based device.

Disclaimer: 3rd party and/or custom firmware providing extra features are not covered in this manual.
20
4K Maestro TX/RX –User Manual
Help on IR connections
INPUT IR JACK
For an IR RX cable with LED receiver.
For Maestro TX Central and RX control
and distributed control. This
connection will be forwarded to
Maestro RX via HDBT.
OUTPUT IR JACK
For an IR TX cable with LED
transmitter (blaster or
individual). Signal received by
Maestro Central to RX via
HDBT is output here.
Ex: LED cable attaches to TV
to control TV volume with a
RF remote (connected to
system controller near
Maestro Central)
OUTPUT IR JACK
For an IR TX cable with a LED transmitter
(blaster or individual). Signal that was
received by Maestro RX to TX via HDBT
is output here.
Ex: LED cable attaches to AVR to control
volume from near the TV where the
Maestro RX is located.
INPUT IR JACK
For an IR RX cable with LED
receiver. This connection will be
used to control Maestro Central
and RX as well as it is forwarded
to Maestro Central over HDBT.
INPUT IR WINDOW
For local Maestro Central
control. Not forwarded
anywhere. A system
controller will connect an IR
TX LED on top here.
INPUT JACK
For a direct connection
from system controller. It
does not use LED/Light. For
local Maestro Central and
RX or distributed control.
This connection will be
forwarded to Maestro RX
via HDBT
TX
RX
This manual suits for next models
1
Table of contents
Popular Switch manuals by other brands

DOTECH
DOTECH DPX300 user manual

Techlogix
Techlogix TL-5X1-HDV user manual

Linksys
Linksys EG005W - Instant Gigabit Workgroup Switch user guide

Cisco
Cisco Cisco Small Business Unmanaged Switch SR2016 quick start guide

Siemens
Siemens SIRIUS 3SE2283 GA4 Series operating instructions

Tyco
Tyco TOSY-1 quick start guide

Western Telematic
Western Telematic IPS-800-D20, IPS-800E-D20, IPS user guide

Elsner
Elsner KNX eTR M1 quick start guide

D-Link
D-Link DGS-1210-28P Guide

Dwyer Instruments
Dwyer Instruments 1950G Series Installation and operating instructions

Omron
Omron D40ML Series operating instructions

Weidmüller
Weidmüller IE-SW-EL08-6TX-2SC Hardware installation guide