Heaco ECG600G User manual

ECG600G Electrocardiograph - User Manual
I
Statement
Our company owns all rights to this unpublished work and intends to maintain this work as
confidential. We may also seek to maintain this work as an unpublished copyright. This
publication is to be used solely for the purpose of reference, operation, maintenance, or repair of
our equipment. No part of this can be disseminated for other purposes.
In the event of inadvertent or deliberate publication, our company intends to enforce its rights to
this work under copyright laws as a published work. Those having access to this work may not
copy, use, or disclose the information in this work unless expressly authorized by us to do so.
All information contained in this publication is believed to be correct. Our company shall not be
liable for consequential damages in connection with the furnishing, performance, or use of this
material. This publication may refer to information and protected by copyrights or patents and
does not convey any license under the patent rights of our company, nor the rights of others. Our
company does not assume any liability for arising out of any infringements of patents or other
rights of the third parties.
The content of this manual is subject to change without prior notice.

ECG600G Electrocardiograph - User Manual
II
Contents
Chapter 1 Overview.......................................................................................................................1
Chapter 2 Security Notice..............................................................................................................2
Chapter 3 Maintenance Regulation................................................................................................3
Chapter 4 Instrument Characteristics.............................................................................................4
Chapter 5 Panel Sketch Map..........................................................................................................6
5.1 The Sketch Map and Components Name.........................................................................6
5.2 Key Definition..................................................................................................................7
5.3 Indicator Definition..........................................................................................................8
Chapter 6 Attention before Operating............................................................................................9
Chapter 7 Preparation Work before Instrumentation....................................................................10
Chapter 8 Precaution during Operation........................................................................................11
Chapter 9 Instruction of Recording Paper....................................................................................12
Chapter 10 Electrode Placement..................................................................................................13
10.1 Chest Electrode............................................................................................................13
10.2 Limb Electrode.............................................................................................................13
10.3 Check-List for Electrode Connection and ECG cable..................................................14
Chapter 11 Grounding and Power Connection of Instrument......................................................15
Chapter 12 Precaution for Battery Operation...............................................................................16
Chapter 13 Control Panel and Key Instruction ............................................................................17
13.1 Main Interface..............................................................................................................17
13.2 Sampling Interface.......................................................................................................18
13.3 Inputing Archive Information ......................................................................................19
13.4 History Archive Management ......................................................................................21
13.5 Archive Querying.........................................................................................................21
13.6 Archive Review............................................................................................................22
13.7 Date and Time Settings................................................................................................24
13.8 System Settings............................................................................................................25
13.9 Sampling Settings ........................................................................................................26
13.10 Analysing Parameter Settings. ...................................................................................26
13.11 Print Settings..............................................................................................................27
13.12 Checking Electrodes Placement.................................................................................28
13.13 About Us....................................................................................................................29
14.1 Turn off Automatically.................................................................................................30
14.2 AC Interference............................................................................................................30
14.3 EMG Interference ........................................................................................................30
14.4 Baseline Drift...............................................................................................................31
14.5 Troubleshooting List....................................................................................................32
Chapter 15 Maintenance and Preservation...................................................................................33
Chapter 16 Main Technical Specification....................................................................................34
Appendix.........................................................................................................................................36

ECG600G Electrocardiograph - User Manual
1
Chapter 1 Overview
This product is such a kind of electrocardiograph, which samples 12 leads ECG signals
simultaneously and prints out the ECG waveforms with thermal printing system. Its functions are
as follows: recording and displaying ECG waveforms in auto/manual mode; auto-measuring and
auto-diagnosing the ECG wave parameters; prompting the state of lead off and paper lack;
Switching several kinds of interface languages; managing the case database.
Display on seven inch, 800*480, screen of high resolution; print 832 wide, six channels ECG
wave. Operate with keyboard and touch, more convenience and shortcut.

ECG600G Electrocardiograph - User Manual
2
Chapter 2 Security Notice
2.1 The power supply should be grounded properly before operation.
2.2 If the ground cable is not integrated, the device must run with built-in power supply.
2.3 Please pull out power supply plug before changing the fuse.
2.4 This device must be operated and preserved by professional personnel.
2.5 The operator must read this user manual carefully before operation, and operate the device
according to operation regulation strictly.
2.6 The design of this device has fully considered security, but operators should never neglect to
device state and patient’s situation.
2.7 Please turn off the instrument and pull out power supply plug before cleaning and disinfection.
2.8 Please don’t operate this device in environment which contains flammable anaesthesia gas.
2.9 If this device is used with cardiac defibrillator or other electric stimulate devices at the same
time, please choose Ag/AgCl chloride chest electrode and ECG lead with prevent-fibrillation
function. To prevent the metal electrode burn patients' skin, the disposable chest electrode should
be used if the defibrillation time is over 55 seconds. It is better that do not use this device with
other electric stimulate devices at the same time. If it must be used at the same time, there must be
professional technician guide on the scene.
2.10 When other devices are connected with this ECG instrument, they must be Type I devices
which accord with IEC60601-1. Because the total amount of leakage current may hurt patients, the
monitoring of leakage current is carried out and taken charge by connect devices.
2.11 Following descriptions concern special attentions in ECG measurement and interpretation:
(1) P wave and Q wave are not always reliable in the archive of intensive muscle artifact or AC
interference. So are the ST segment and T wave.
(2) Winding and unclear ends of S wave and T wave may lead to tolerance in measurement.
(3) In archive R wave is left out due to the low voltage of QRS wave or any leads falling off, the
measured heart rate may deviate greatly from the correct one.
(4) Axis calculation and identify the QRS borderline are not always reliable in the archive of the
low voltage of QRS wave.
(5) Occasionally, frequent ventricular premature complexes may be identified as dominant beat.
(6) Merging of versatile arrhythmia may result in untrustworthy measurement because of the
difficulty in distinguishing P wave in such situation.
(7) The device is designed to carry on ECG trace interpretation immediately after the
measurement. It is this interpretation that does not give report on all possible heart problems
and may sometimes not comply with the doctor’s diagnosis. Therefore, the final conclusion
concerning each patient is up to the doctor basing on patient symptom, the unit’s
interpretation and other examination.

ECG600G Electrocardiograph - User Manual
3
Chapter 3 Maintenance Regulation
3.1 Under the condition of normal use according to the user manual and operation notice, if this
instrument has any problem, please contact with our customer service department. Our company
has the sales record and customer archives for each instrument. The customer has one year's
warranty service from the beginning of shipping date according to the below time and condition.
To supply all-around and fast maintenance service to our customers, please mail the maintenance
card to us in time.
3.2 Our company may adopt the ways of instruction, mailing to company by courier, visiting
customers' company, etc to carry out the maintenance promise.
3.3 Even in the period of free maintenance, we charge for reparation in the following archives:
3.3.1 Faults or damnification caused by misuse because not operate according to user manual and
operation notice.
3.3.2 Faults or damnification caused by dropping accidently when users move after purchasing.
3.3.3 Faults or damnification caused by preparation, reconstruction, decomposition, etc outside of
our company.
3.3.4 Faults or damnification caused by natural disasters such as fire, flood, earthquake, etc.
3.3.5 Faults or damnification caused by unapt thermal recording paper.
3.4 The free maintenance period for spare parts and fray parts is half a year. Power cable,
recording paper, operation manual and packing material are excluded.
3.5 Our company is not responsible for the faults of other connecting instruments cause by the
faults of this device directly or indirectly.
3.6 The free maintenance service will be canceled if we find the protection label has been
destroyed.
3.7 For charge maintenance beyond the warranty period, our company advise to continue to use
"Maintenance contract regulation". Please consult our customer service department for specific
situation.

ECG600G Electrocardiograph - User Manual
4
Chapter 4 Instrument Characteristics
4.1 TFT colour screen is 800*480, touch screen and function key control at the same time, more
convenient and shortcut.
4.2 It is high resolution thermo sensitive printer and thermal-array (8 dots/mm), you should not
adjust anything Frequency Response is up to 150Hz.
4.3 The device can record real time clear and exact six channel ECG waveform and remark
continually. The remark includes: lead sign, sensitivity, paper speed, filter state, etc.
4.4 Full digital filter for resisting the baseline drift, AC and interference.
4.5 Adjust the baseline automatically, optimize the print setting, and choose the rhythm leads.
4.6 Under automatic mode, just press the button once, it starts record procedure, which can
enhance your work efficiency.
4.7Soft keyboard and touch screen control at the same time, more convenient for operation. TFT
screen shows the working status, more clear for observation.
4.8 The power supply includes both AC/DC. This device includes built-in lithium rechargeable
battery, automatic protection circuit, and it will shut automatically if there is no operation for 5
minutes.
4.9 This instrument can record 150 pieces of ECG waveform and print 90 minutes continually
under the best DC state.
4.10 This instrument can store more than 1000 pieces patient’s data, more convenient for data
review and statistic.
4.11 The figure of whole device is elegant and gliding.
4.12 One key to operate,and one key to print and store.
4.13 Digital signal processor for effective inhibition of baseline drift, interference, and the like.
4.14 The instrument has function with regular auto-measurement of ECG waveform parameter,
auto-analyze and auto-diagnostic, it will help to reduce doctor’s burden and improve working
efficiency.
4.15 Sampling twelve leads ECG signal at the same time, analyzing 2×6+1 (rhythm lead), 2×6,
3×4, 3×4+1 (rhythm lead), 4×3, 4×3+1 (rhythm lead), 6×2, 6×2+1 (rhythm lead), rhythm 2,
rhythm 3, rhythm 4, rhythm 5, rhythm 6, rhythm 7 recording mode at the same time, and reporting
with multi-formats.
4.16 Multi-lead styles for observing the real-time wave of three leads, six leads or twelve leads,
and displaying Lead Off and Lacking of paper. it can test the ECG parameter and analyze the
report, register the wave with automatic or manual mode, it also can store the patients' information
by data storeroom.
4.17 Safety Class: Class I, Type CF applied part. there is defibrillation circuit.
ECG600G Electrocardiograph - User Manual
5
4.18 According to defense degree of deleterious fluid: IPX0
4.19 According to the safe degree used under the condition with flammable anaesthesia gas mixed
with air (or oxygen, nitrous oxide), this device belongs to the device which can’t be used under the
condition with flammable anaesthesia gas mixed with air (or oxygen, nitrous oxide).
4.20 According to the working mode class, this device belongs to continuous working device.
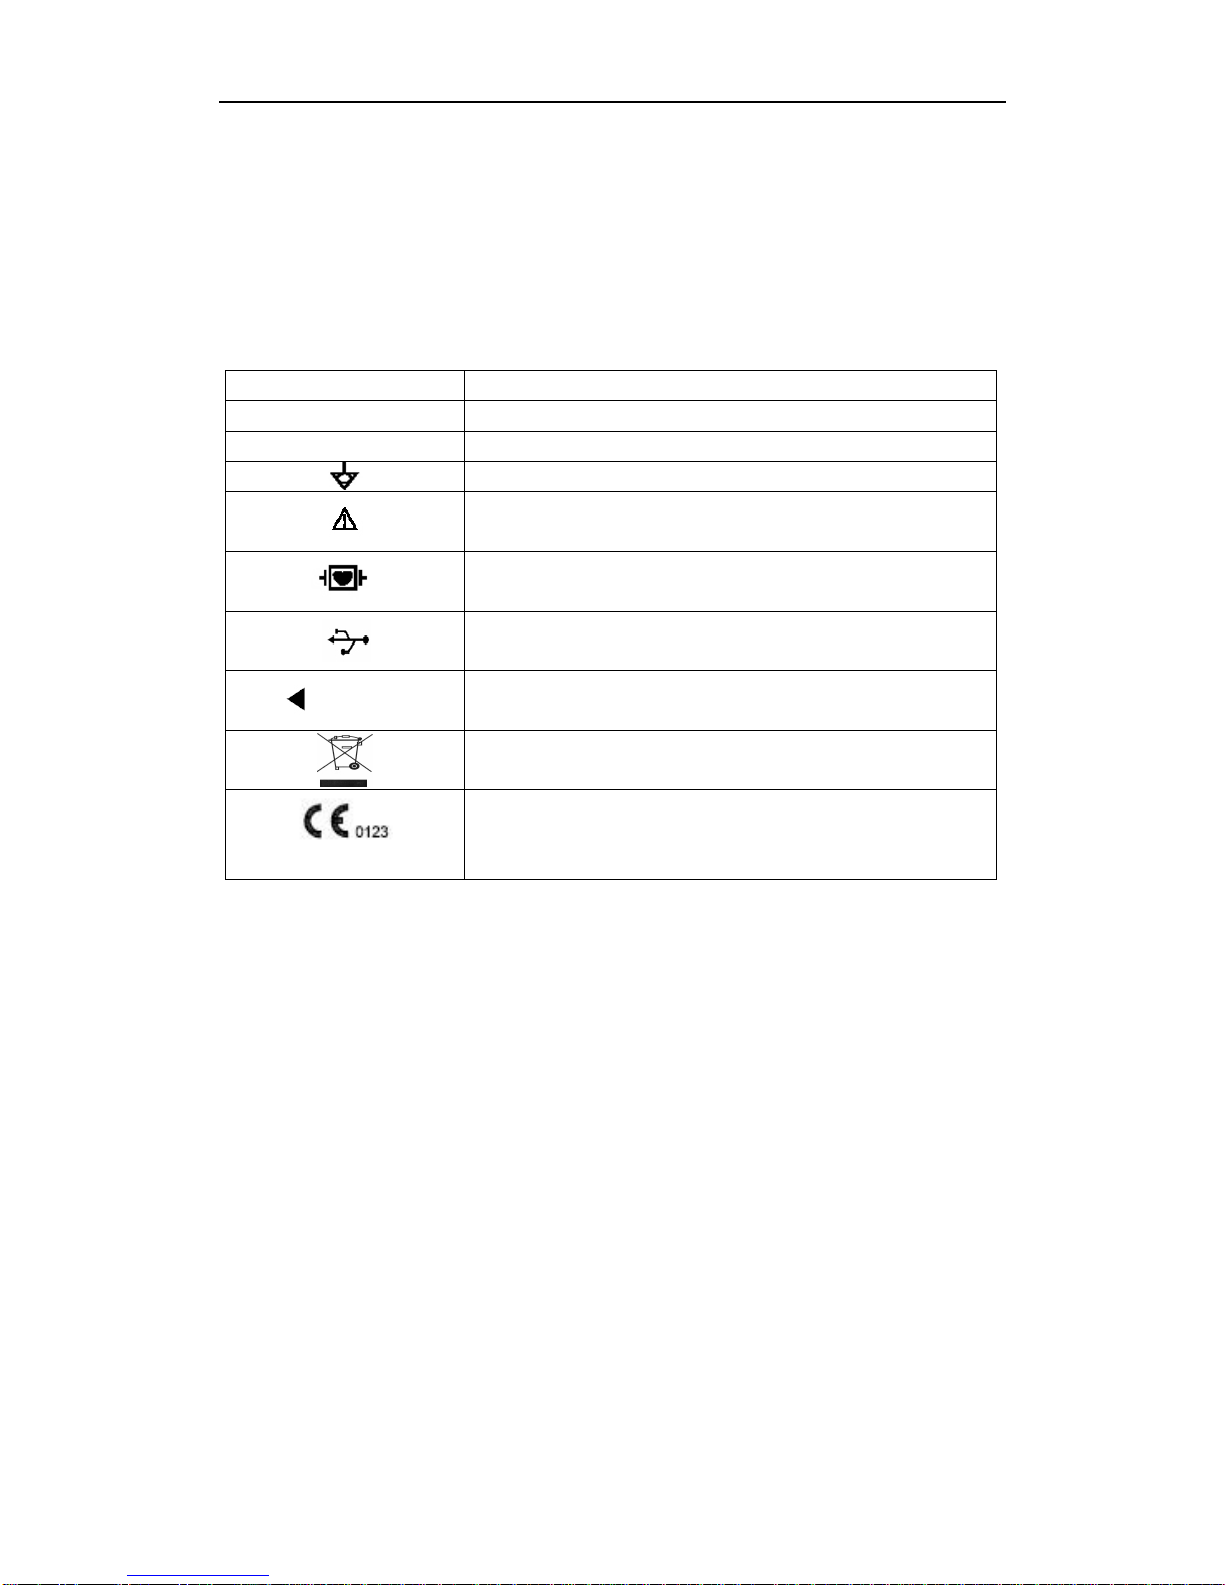
4.21 Explanation of some symbols in this device:
~AC AC work mode
OFF Power supply is disconnected
ON Power supply is connected
Equipotential point
Places need to be noticed, please refer to user manual
Device type is CF, which has defibrillation protection function
USB connector
PATIENT Lead connector
WEEE (2002/96/EC)
This item is compliant with Medical Device Directive
93/42/EEC of June 14,1993,a directive of the European
Economic Community.

ECG600G Electrocardiograph - User Manual
6
Chapter 5 Panel Sketch Map
5.1 The Sketch Map and Components Name
Figure 5-1 Front view
Figure 5-2 Rear view
Power Switch Power Plug Earth Terminal
Button
Display Screen
Paper
Cabinet Cover
Control Panel

ECG600G Electrocardiograph - User Manual
7
Figure 5-3 Side view
Figure 5-4 Bottom view
5.2 Key Definition
Function key: on/off
Fuse Holder
Lead Connector

ECG600G Electrocardiograph - User Manual
8
Function key: Start Sampling/stop controling
Function key: menu
Function key: switch printing mode
Function key: print
Function key: upwards
Function key: downwards
Function key: leftwards
Function key: rightwards
5.3 Indicator Definition
The indicator turns green when there is AC power supply, and when the indicator turns
green and red same time it is being recharged.
Indicator for instrument when power on.

ECG600G Electrocardiograph - User Manual
9
Chapter 6 Attention before Operating
6.1 You are required to read this operation manual carefully before operating so as to ensure
taking safe and effective operation of the instrument.
6.2 Installation and maintenance of the instrument should be carried out as the following
6.2.1 There should be no high voltage cable, X radial instrument, ultrasound instrument and
electrotherapeutics instrument, etc around the ECG instrument.
6.2.2 Do not use or reserve the instrument in the place where the air pressure is too high,
temperature and humidity are over the common standard, the ventilation is not good, dust is too
much, there is gas containing salt and alkali and chemical medicine.
6.3 The instrument should be put on flat place. Take and put it lightly when move it. Avoid too
strong vibration and shock.
6.4 AC frequency and voltage value should accord with requirement, and has enough current
capacity.
6.5 Please put the device at the place where is easy to be grounded. Do not connect the patients
and the patients connecting cables with other conductors including ground or beds which can be
conducted well with ground.

ECG600G Electrocardiograph - User Manual
10
Chapter 7 Preparation Work before Instrumentation
7.1 Check that the instrument properly grounded and that cable connections safe or not.
7.2 Make sure all electrodes directly connected with patient are properly and firm.
7.3 Check the output voltage when choose the DC UPS.
7.4 Smear the gel separately, avoiding the short circuit caused by the chest electrode touch one
another.
7.5 AC power cable can not be enlaced with ECG cable.

ECG600G Electrocardiograph - User Manual
11
Chapter 8 Precaution during Operation
8.1 Pay attention to the patient and instrument condition constantly.
8.2 Patient and instrument can only be connected ECG cables.
8.3 Keep close observation of the patient and instrument, to make sure they are not moved during
operation.
8.4 Turn off the instrument after using.
8.5 Turn off the power, and remove the ECG cables slightly without force.
8.6 Properly keep the instrument and spare parts for operation next time.
8.7 Paper Loading
8.7.1 Dimension of the high-speed thermal Recording paper used in this instrument is:
110mm(W)*20m(L)
8.7.2 Open the cover of paper cabinet, take out the paper axis and install recording paper
according to the figure into the proper position inside.
8.7.3 Close the cover of paper cabinet. It's recommended to leave 2 cm of recording paper outside.
ECG600G Electrocardiograph - User Manual
12
Chapter 9 Instruction of Recording Paper
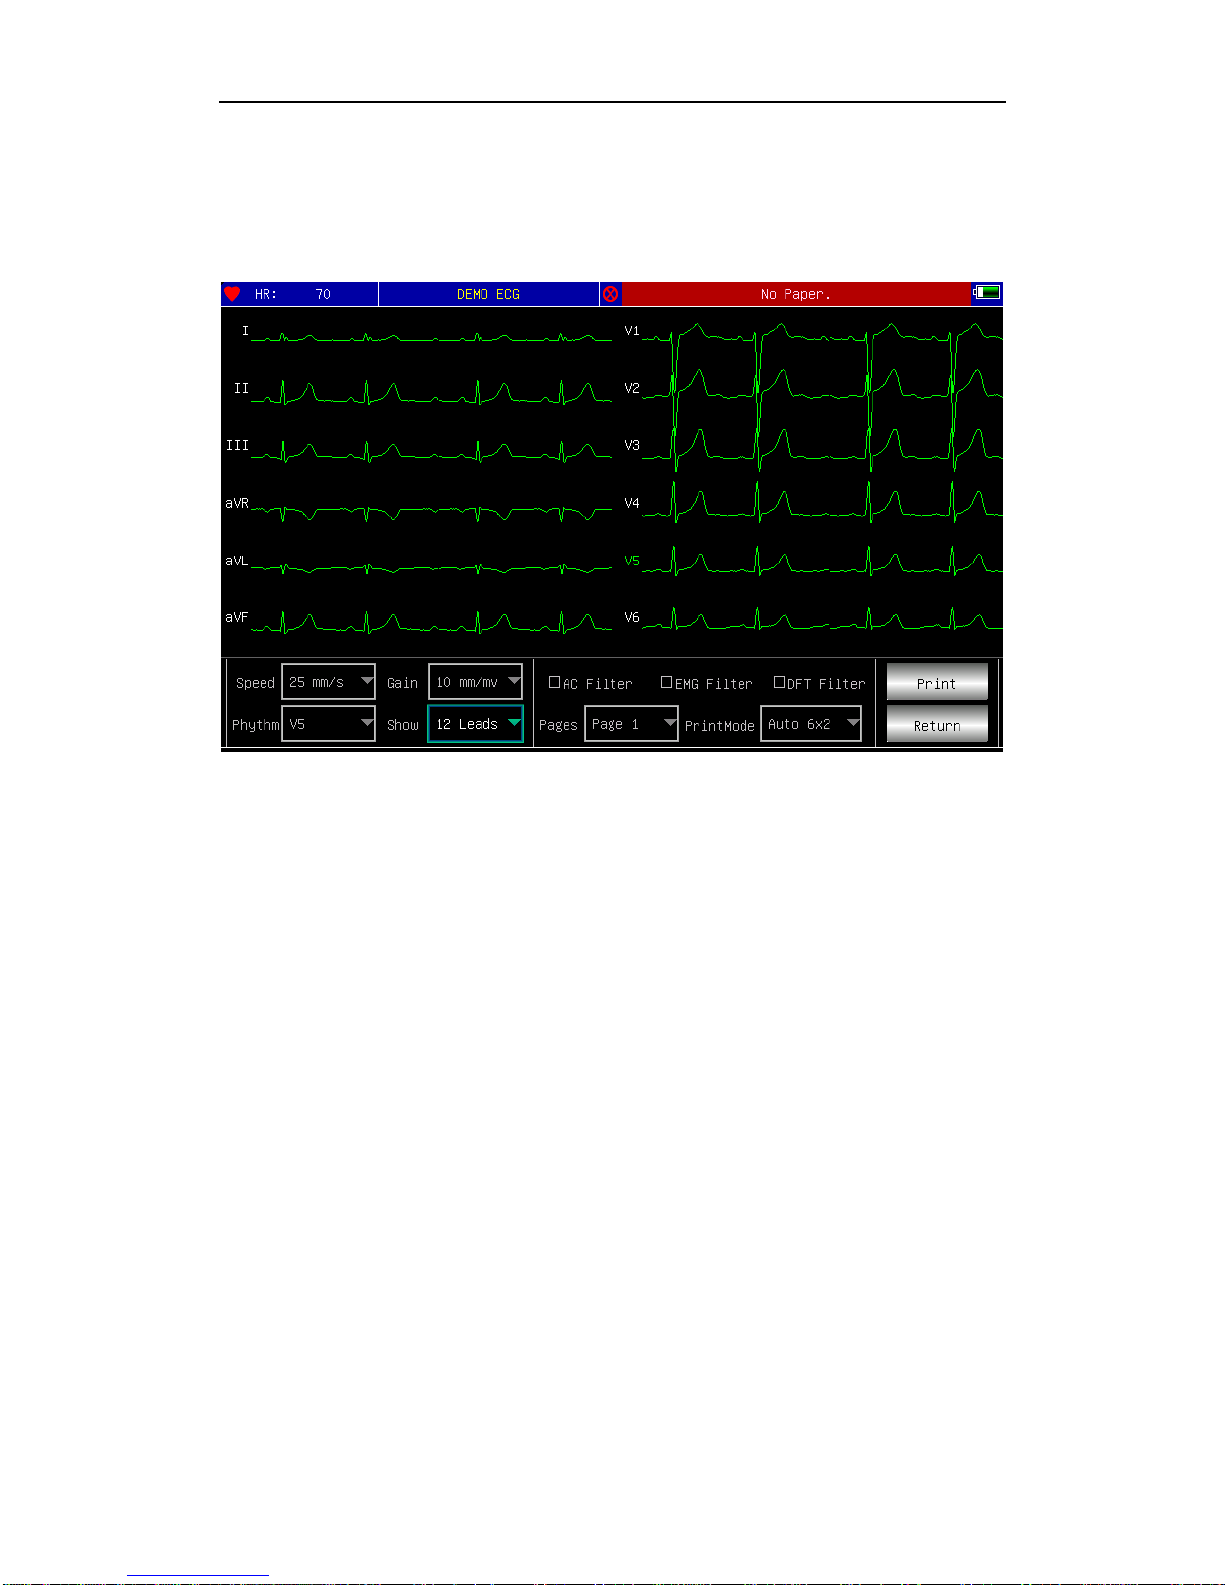
9.1 Message "No Paper." will be displayed on the LCD whenever recording paper is run out. (See
Figure 9-1)
Figure 9-1
9.2 Specified paper of high sensitivity is recommended for high-quality prints. Other kind of paper
may not render a clear permanent trace and may damage the printing mechanism. Please consult
distributor or manufacture for detail of how to purchase the paper.
9.3 Failure of the recording paper might be affected by high temperature, bad humidity or direct
sunlight. For long storage, the recording paper should be placed in dry, dark and cool area.
9.4 Substance may caused stain of the recording paper:Gel, glue, and wet diazo compound paper
including their organic solvent.
9.5 Substance may caused the waves fade away:
File folders made of soft PVC material, plastic etc; eraser and magnetic tape contains plasticizer;
fluorescence, and stamp-pad ink.

ECG600G Electrocardiograph - User Manual
13
Chapter 10 Electrode Placement
Advice: Set the chest electrode first, then the limb electrode.
10.1 Chest Electrode
See Figure 10-1:
Figure 10-1
Attach the chest electrodes to the locations as following:
V1: Fourth inter-costal space at right border of sternum.
V2: Fourth inter-costal space at left border of sternum.
V3: Midway between V2 and V4.
V4: Fifth inter-costal space at left mid-clavicular line.
V5: Left anterior axillary line at the horizontal lever of V4.
V6: Left mid-axillary line at the horizontal lever of V4.
Clean the skin where chest electrodes are to be attached with alcohol, then apply ECG cream to
here around 25mm in diameter and to the edge of chest electrodes, and press and attach the
electrodes to the positions from V1-V6.
Note: Keep in mind that the electrodes’ coming into contact with each other or cream’s
overlap from one position to another is not allowed.
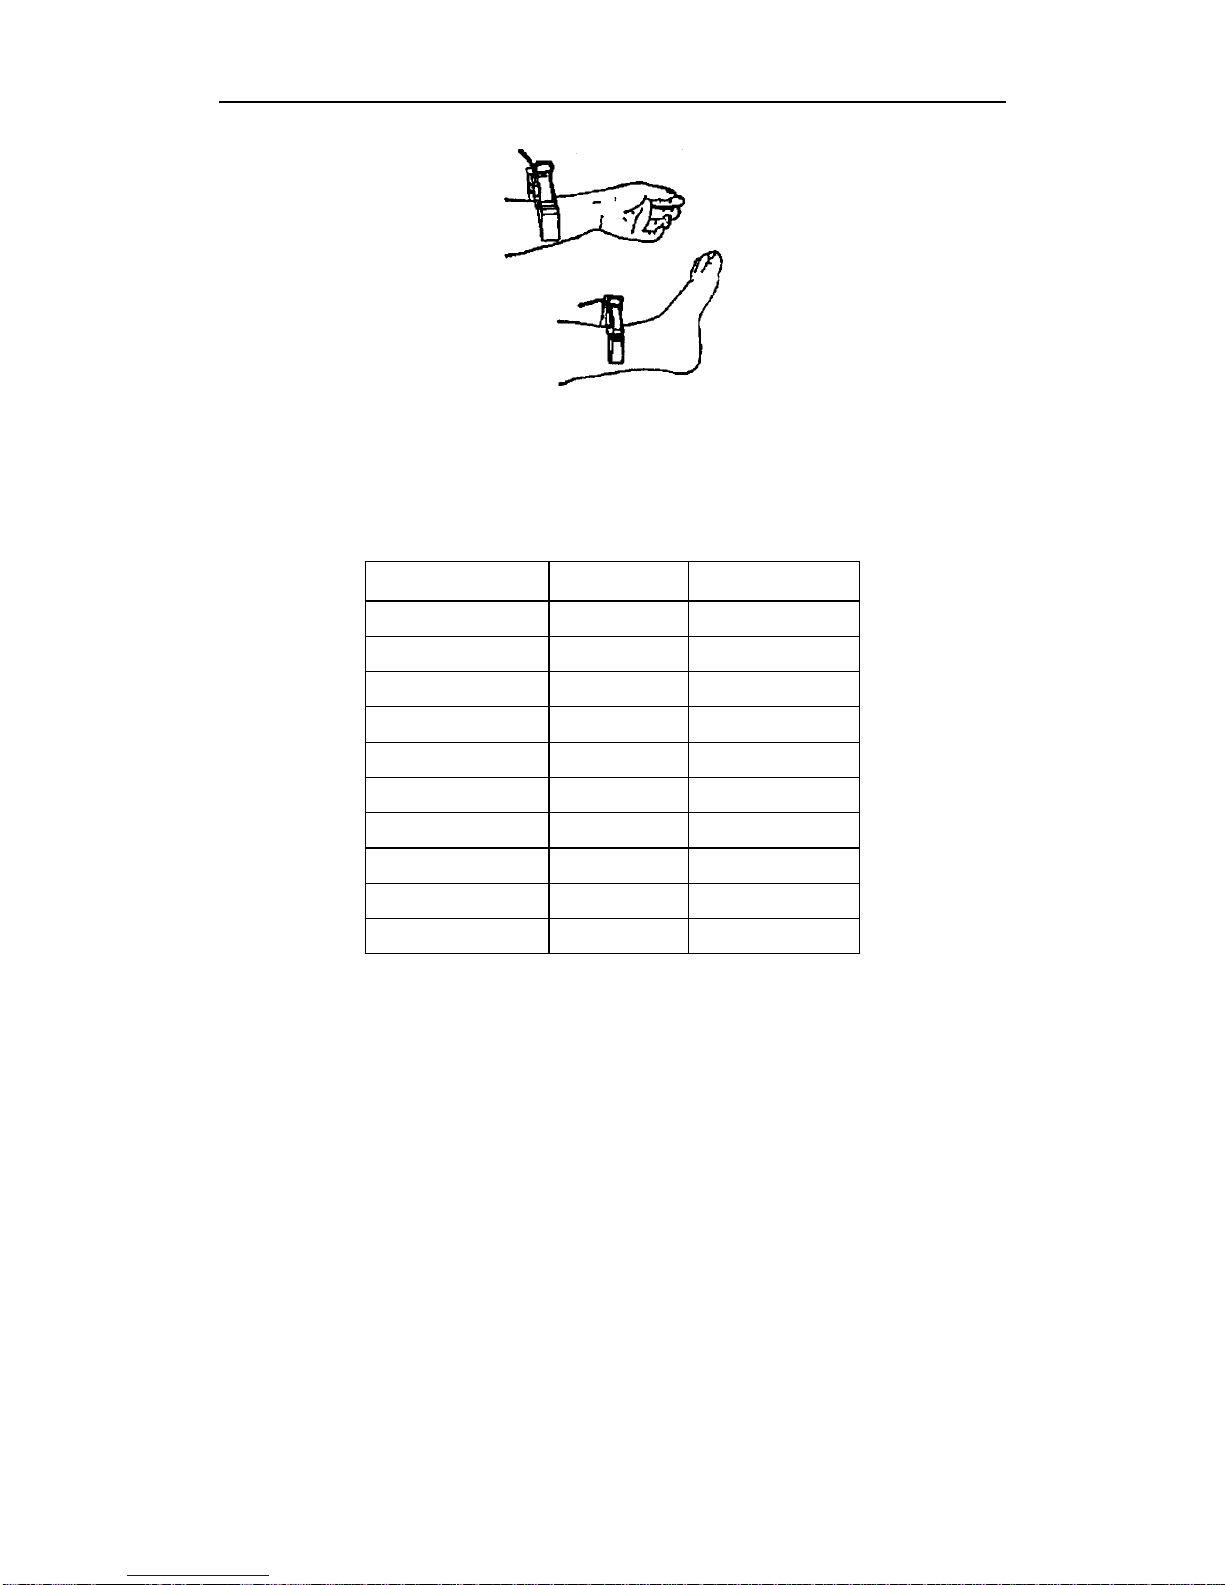
10.2 Limb Electrode
Electrodes should be placed on the soft skin of hands and feet. Clean all the limb electrodes and
the positions around to which limb electrodes are to be attached with alcohol before applying ECG
cream to them, then firmly attach the electrodes to the positions. (See Figure 10-2)
ECG600G Electrocardiograph - User Manual
14
Figure 10-2
Caution: Screw tightly the knob of ECG cable's plug after it inserted to the instrument.
10.3 Check-List for Electrode Connection and ECG cable
Electrode Location Electrode Code
Socket Number
Right Alarm RA/R 9
Left Alarm LA/L l0
Left Leg LL/F 11
Right Leg RL/N 14
Chest 1 Vl/Cl 12
Chest 2 V2/C2 1
Chest 3 V3/C3 2
Chest 4 V4/C4 3
Chest 5 V5/C5 4
Chest 6 V6/C6 5

ECG600G Electrocardiograph - User Manual
15
Chapter 11 Grounding and Power Connection of Instrument
Make sure the status of the instrument is power off, and then make the instrument be properly
grounded through a 3-prong outlet. When the outlet, a grounding cable may be utilized to connect
the grounding terminal of the instrument. Do not use other pipeline. Properly grounding could
guarantee the safety and prevent from the interference ofAC power and electromagnetic wave.
ECG600G Electrocardiograph - User Manual
16
Chapter 12 Precaution for Battery Operation
12.1
This instrument is designed with the built-in sealed maintenance-free rechargeable lithium
battery, and has automatic charge and discharge monitoring system. The instrument recharges the
battery automatically when connect to AC power supply. The LCD screen will show the current
power state at the top right corner when the instrument turns on (see 12.4). It needs about 4 hours
for battery charge after discharge absolutely.
12.2 The device can continuously print 90 minutes and work 4 hours without printing after the
battery fully charged. When it working, the LCD screen displays the signal of the battery
status in 5 degree. When the power of battery is too low to operate, the instrument will turn
off automatically to avoid damage to the battery.
12.3 The battery should be recharged in time after exhausted using. For long storage, the battery is
to be recharged every 3 months. The battery life can be extended by doing so.
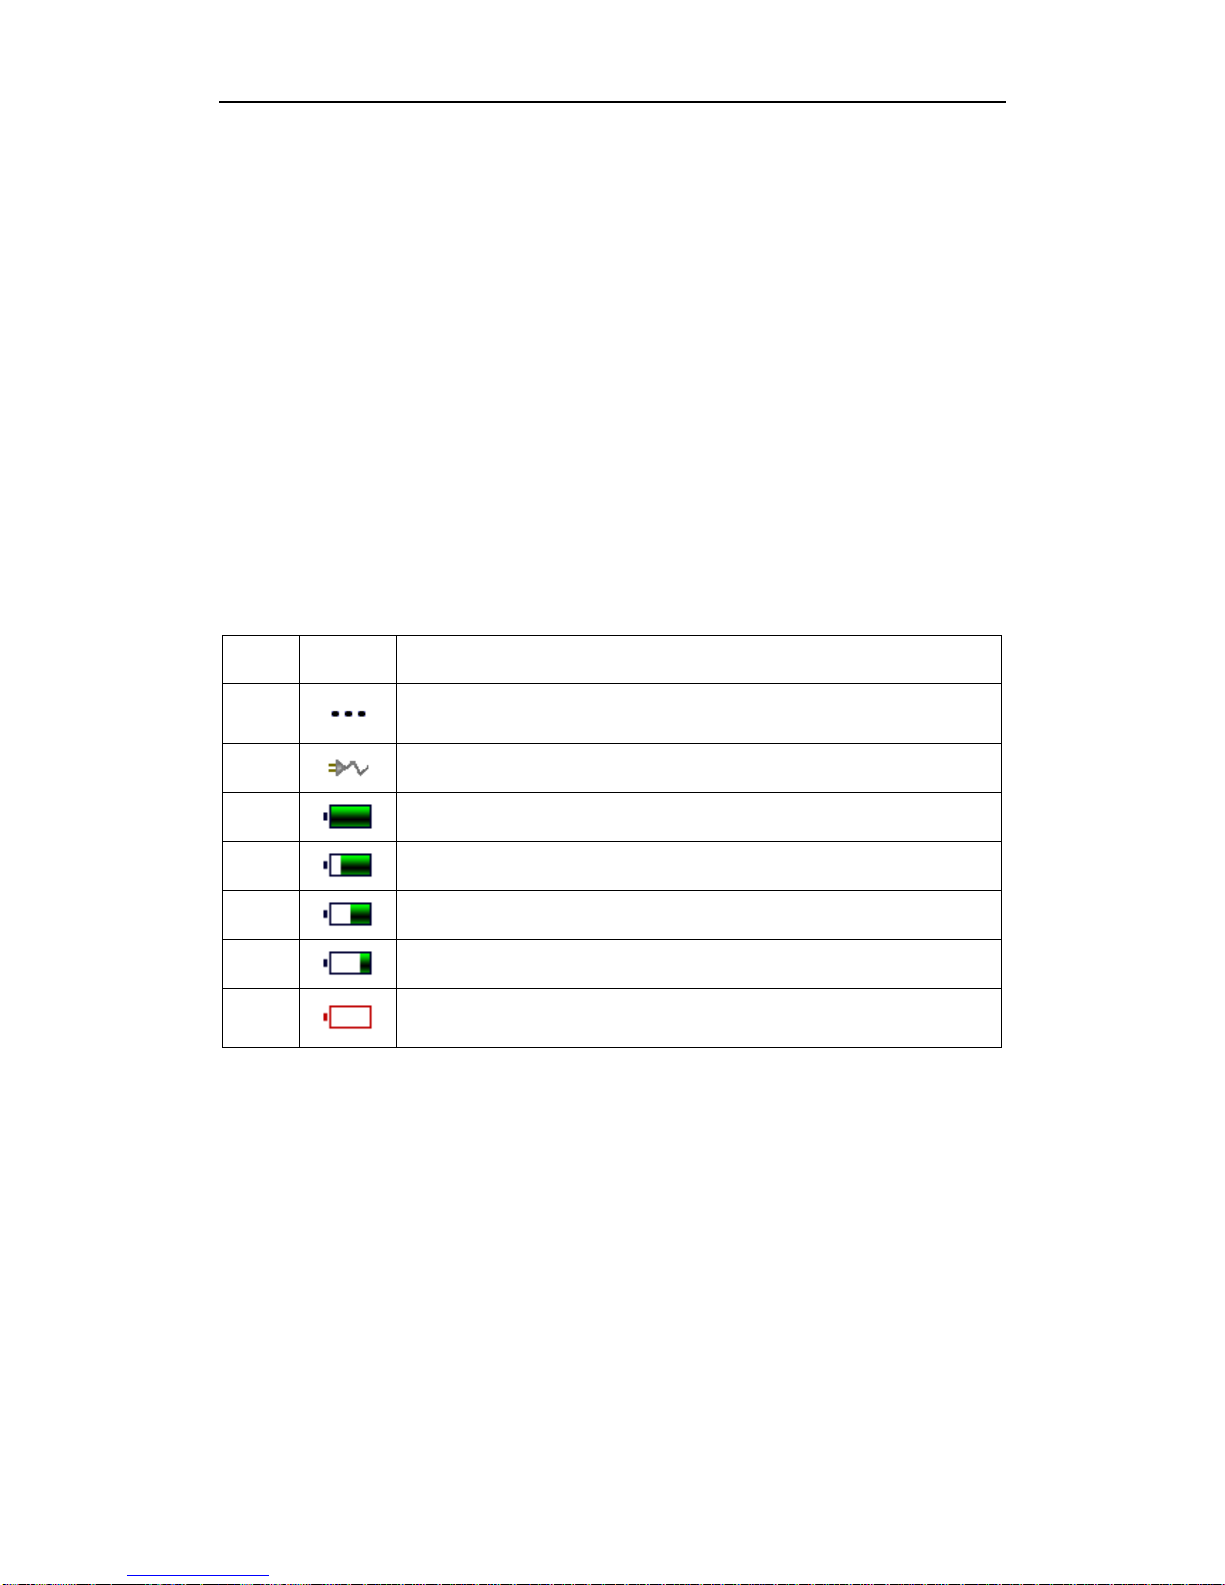
12.4 Seven status of the battery power displayed on LCD as following:
Note: When charging, the battery icon shift from f to c.
12.5 When the battery can not be recharged or works no more than 10 minutes after fully charged,
please change the battery.
Attention:
Do not directly connect both "+" and "-" polars of battery with wire, otherwise it might cause
fire hazard.
Possible explosion hazard if it kept nearby the ablaze area.
You should not open or disassemble the battery.
No. mark description
a Unknown status, normally displayed while the instrument being turned
on within 1 minute
b Using AC power
c Using battery, and full power
d Using battery, volume : 3/4
e Using battery, volume: 1/2
f Using battery, volume : 1/4
g Using battery, but lower power, suggest to recharge the battery or use AC
power supply
ECG600G Electrocardiograph - User Manual
17
Chapter 13 Control Panel and Key Instruction
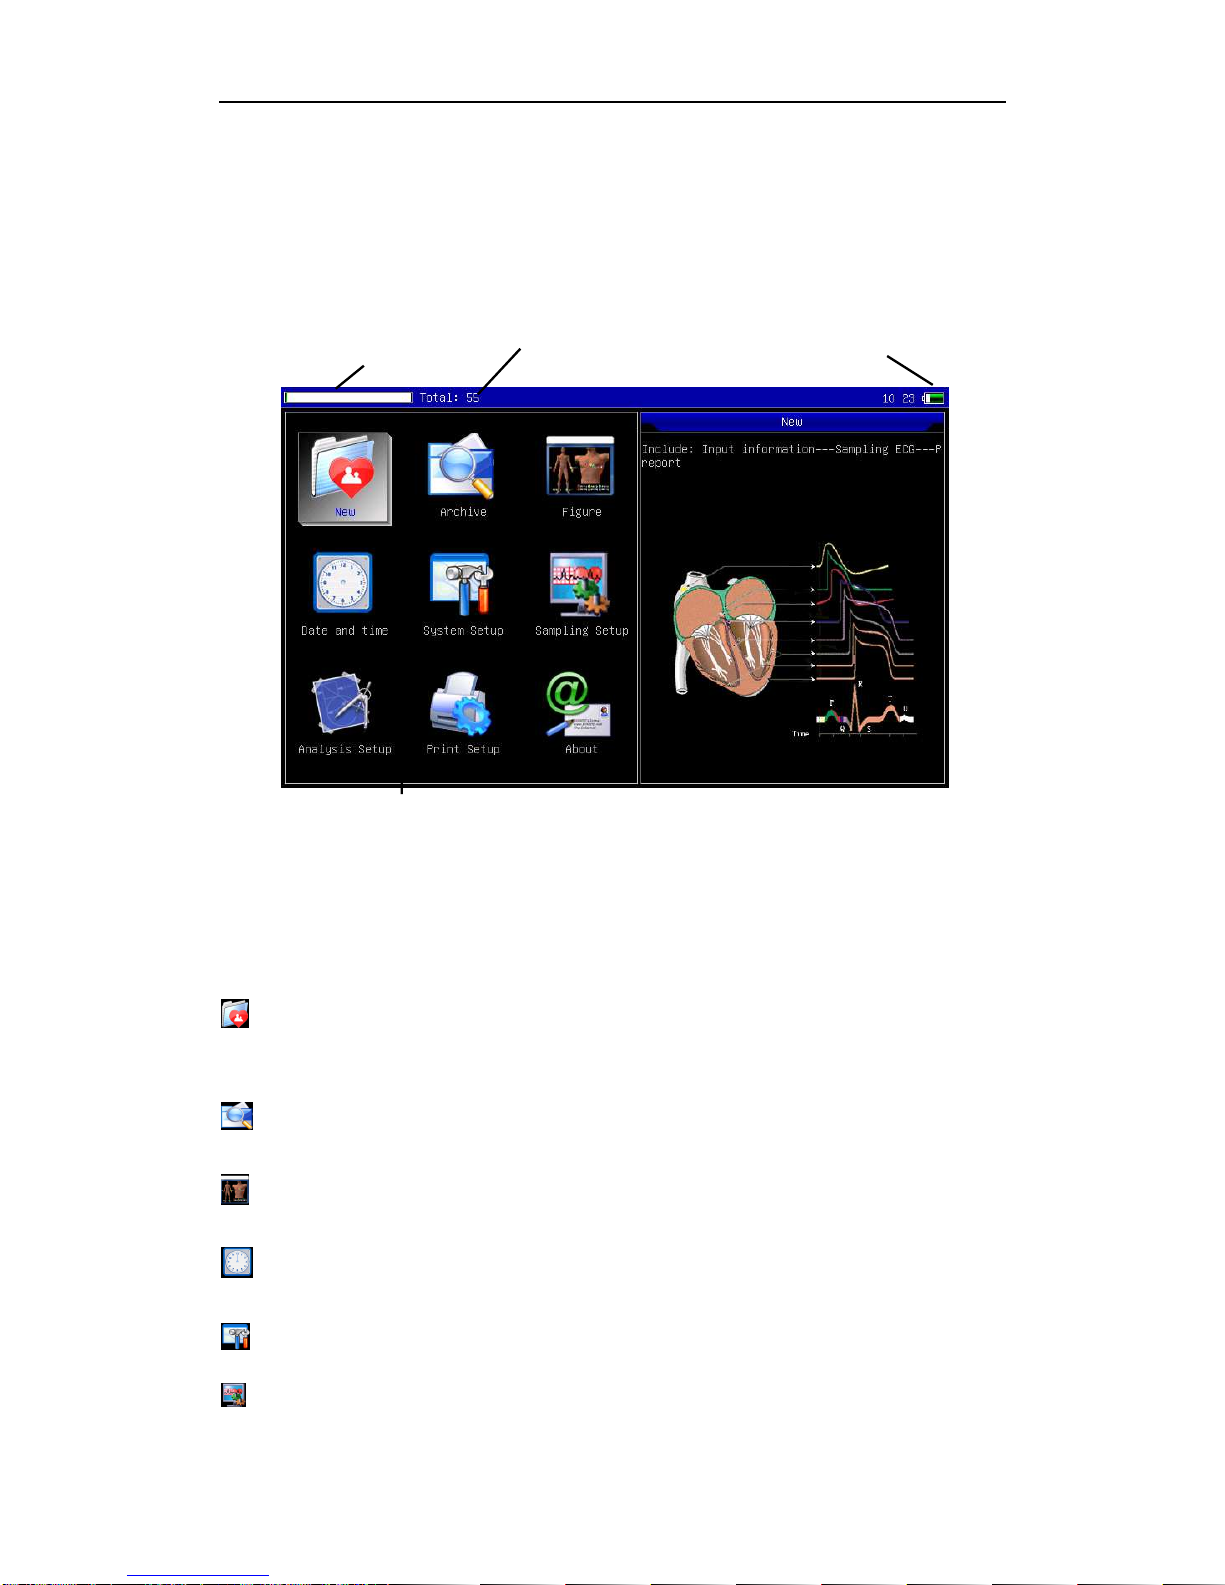
13.1 Main Interface
Show as following:
Figure 13-1
Power status: Please refer to 12.4
Keypad:
Enter sampling interface. when the instrument is powered on, it will automatically start this
operation.
EnterArchive management interface, query, modify or delete archive information
See sketch map for electrodes placement
Date and time settings
System settings
Sampling settings
Disk storage usage
Current patient file account
Power status
Function buttons

ECG600G Electrocardiograph - User Manual
18
Analysis parameters settings. settings for each parameter using for automatic analysis.
Printing settings,set printing mode, style and content.
About us, display information about our company and software version.
Switch rapidly: switch each functions rapidly by using the on the keyboard, and
set the relative functions by pressing .
Quick setup: press each function module to complete the relevant function setup.
13.2 Sampling Interface
Select on the main menu or choose shortcut key to enter sampling interface.
Attention: Because of the "setting", Patient information may be input before sampling
signal, rest with the option: inputting archive information.
It displays multiform lead waves, including 3 Leads per screen, 6 Leads per screen, 12 Leads per
screen.Sampling interface of 12 leads style can be displayed as following:
Figure 13-2
Stop Sampling: Press key on the keypad to stop sampling and return to main interface.
Current heart rate Lead off Status Current
Function
Table of contents
Popular Medical Equipment manuals by other brands


Tetcon
Tetcon Bodypod Manual Handling

IndeeLift
IndeeLift HFL-300 user manual

Drive DeVilbiss Healthcare
Drive DeVilbiss Healthcare CHAD CH4808-L-BLUE PRODUCT INFORMATION AND INSTRUCTIONS

Partial Hand Solutions
Partial Hand Solutions Titan Flex Series user guide

Team Products
Team Products RC1007 owner's manual

REH4MAT
REH4MAT AKVOSEGO user manual