Health Care International CardioStep User manual
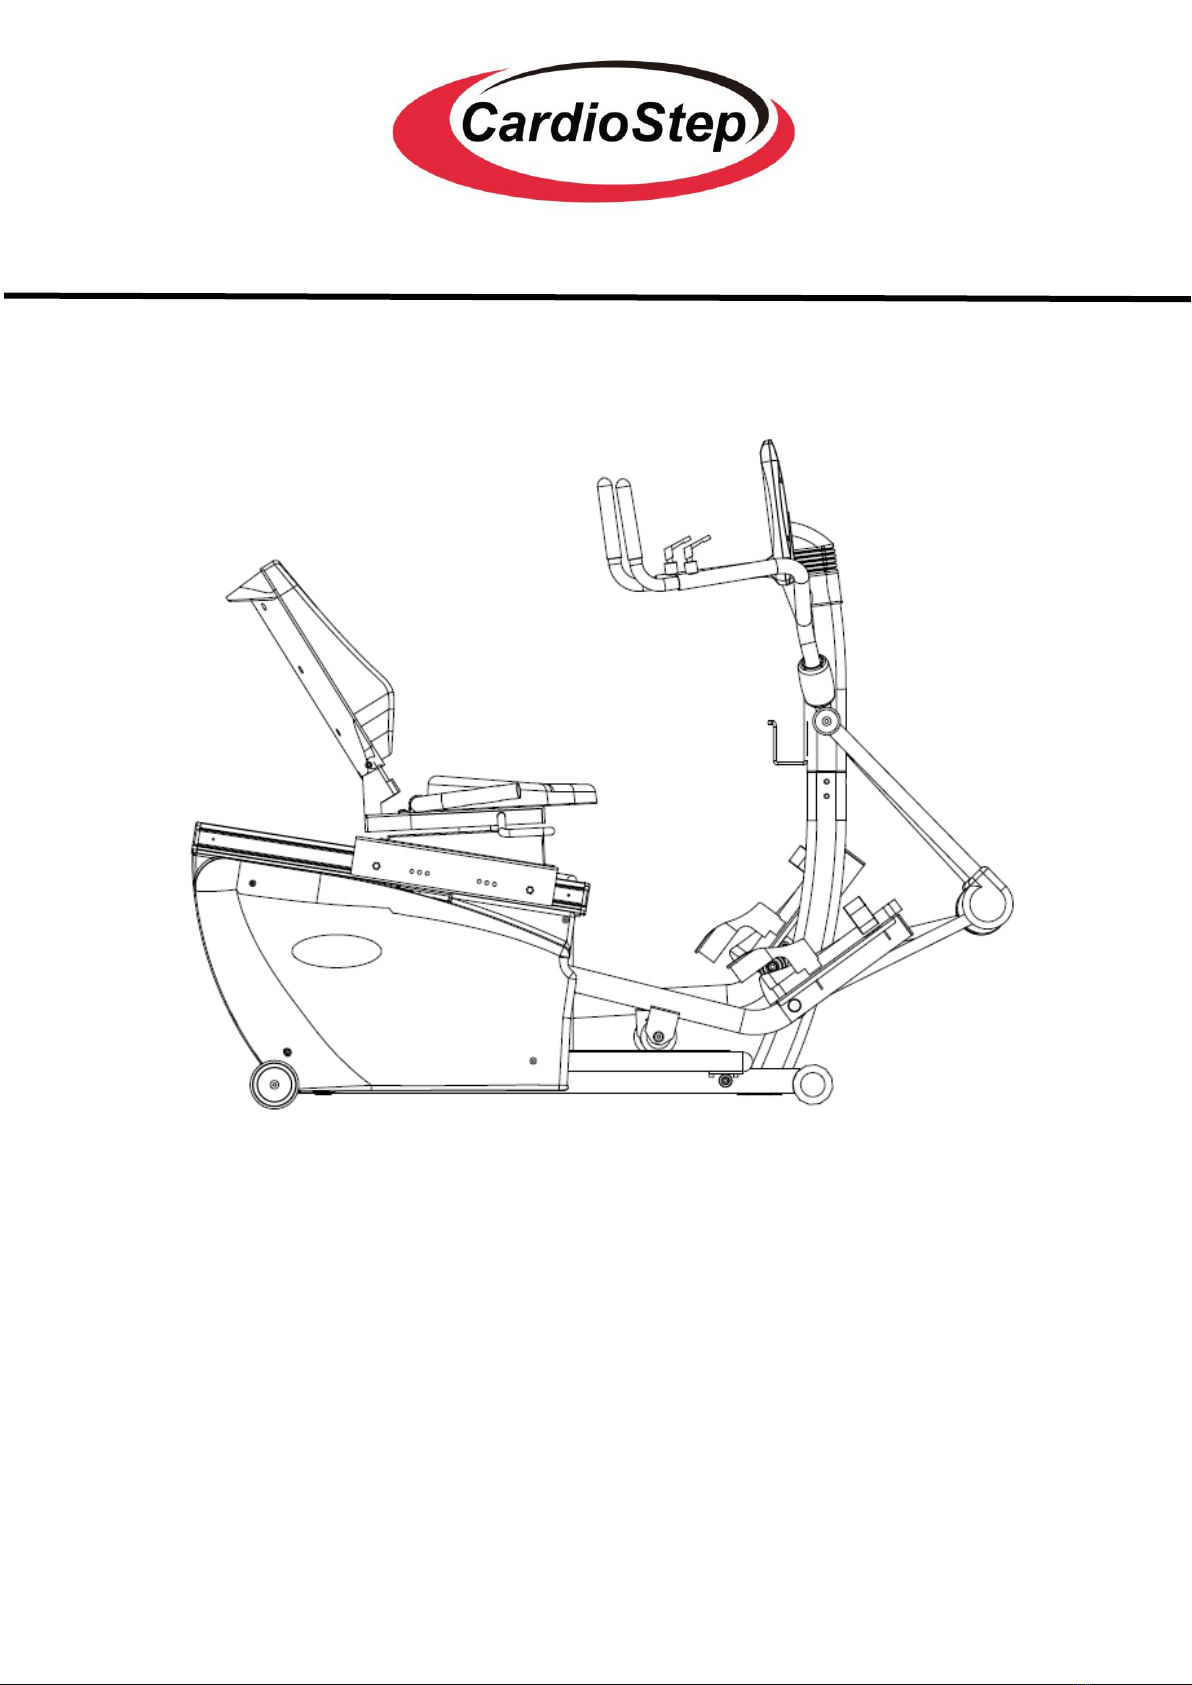
Recumbent Semi-Elliptical Cross Trainer
Owner’s Manual
HealthCare International, Inc.
PO Box 1509, Langley, WA 98260
P: (206) 739-5400 or (800) 398-9121


1
Contents
Safety Precautions..................................................................................................... 2
Warranty Information
.............................................................................................. 3
Tool Set
..................................................................................................................... 3
Assembly Instructions
.............................................................................................. 4
Quick Tips .................................................................................................................. 7
CardioStep Display Console....................................................................................... 8
Button Functions ....................................................................................................... 9
Quick Start –Sit, Start, & Step!................................................................................. 11
Select a Workout Program......................................................................................... 11
Setup your Workout Programs................................................................................ 12
User Setup: .............................................................................................................. 12
Basic Programs..................................................................................................... 13
Heart Rate Programs (HR 65% / HR 85%)............................................................. 14
Constant Programs (Isokinetic / WATTS) ............................................................. 15
Goal Set Programs (Calories / Distance) .............................................................. 16
Cool Down Mode........................................................................................................ 17
Workout Summary Mode........................................................................................ 18
Export Workout Summary to USB –Pause, Reset, Report ........................................ 18
Sleep Mode.............................................................................................................. 19
Recovery Mode........................................................................................................ 19
Using Optional Heart Rate Monitors ....................................................................... 19
General Maintenance.............................................................................................. 20
General Display Information.................................................................................... 21
Display Settings –Engineering Mode ...................................................................... 22
Exploded Diagram ................................................................................................... 23
Parts List .................................................................................................................. 24
Service Notes........................................................................................................... 26
Stabilization Accessories.......................................................................................... 27

2
Safety Precautions
This exercise equipment was designed and built for optimum safety. However, certain
precautions apply whenever you operate a piece of exercise equipment. Be sure to read the
entire manual before assembly and operation of this machine.
Also, please note the following safety precautions:
1. Read all instructions carefully before using the machine.
2. Consult your physician or other health care professional before beginning this or any type
of exercise program.
3. Always wear proper exercise apparel when using the machine.
4. If at any time you feel faint, light-headed or dizzy while operating the machine, stop
exercise immediately. You should also stop exercising if you are experiencing pain or
pressure.
5. Keep children and pets away from the machine while in use.
6. Only one person can use the machine at a time.
7. Make sure your machine is correctly assembled before you use it. Be sure all screws,
nuts, and bolts are tightened prior to use and retighten periodically.
8. Do not operate this or any exercise equipment if it is damaged.
9. Keep hands and feet away from any moving parts. Do not insert any objects into any
openings.
10.Keep clothes, jewelry and loose items away from moving parts.
NOTE:
MAXIMUM WEIGHT CAPACITY FOR THE CARDIOSTEP IS 450 LBS. (204 KGS)
WARNING:
BEFORE BEGINNING ANY EXERCISE PROGRAM CONSULT YOUR PHYSICIAN. THIS IS
ESPECIALLY IMPORTANT FOR INDIVIDUALS OVER THE AGE OF 35 OR PEOPLE WITH
PRE-EXISTING HEALTH PROBLEMS. READ ALL INSTRUCTIONS BEFORE USING THIS
FITNESS EQUIPMENT. WE ASSUME NO RESPONSIBILITY FOR PERSONAL INJURY OR
PROPERTY DAMAGE SUSTAINED BY OR THROUGH THE USE OF THIS PRODUCT.
THE HEART RATE, WATTS, METS, AND CALORIES DISPLAYS ARE NOT SUITABLE FOR
USE IN APPLICATIONS WHERE THE HEALTH AND SAFETY OF A PATIENT MAYBE
DEPENDENT ON THE ACCURACY OF THOSE PERAMETERS.

3
。
DearValuedCustomer,
Thank you for your recent purchase of the CardioStep from HCI Fitness.
We
believe that you have purchased one of the highest quality and affordable
recumbent
semi-ellipticals on the market today. Prior to using your new CardioStep
please
review the owner’s manual and product tips to maximize your workout
experience.
Wishing you the best of luck in reaching your health and fitness goals!
HealthCare International is a leading supplier and distributor of innovative
products for
Health, Wellness, Fitness & Active Aging . Visit our website
-
www.HCIFitness.comfor
information on all of ourproducts.
Warranty Information
(Your Serial Number is found on a white sticker at the rear base of the unit, the
front of
the user manual, and on the box)
Serial#:
Purchase Date:
3
Year Parts Warranty, 1 Year Labor, Lifetime Main Frame
NOTE
Before you start to assemble this unit, please note that some of the parts and
screws
needed for assembly are already in place on the unit.
Tool Set
Tool
QTY
3 mm L type AllenWrench Tool
1
5 mm L type AllenWrench Tool
1
6 mm L type AllenWrench Tool
1
13x15 Screwdriver/Wrench Combo Tool
1
4
Wire Pinch Point
Assembly Instructions
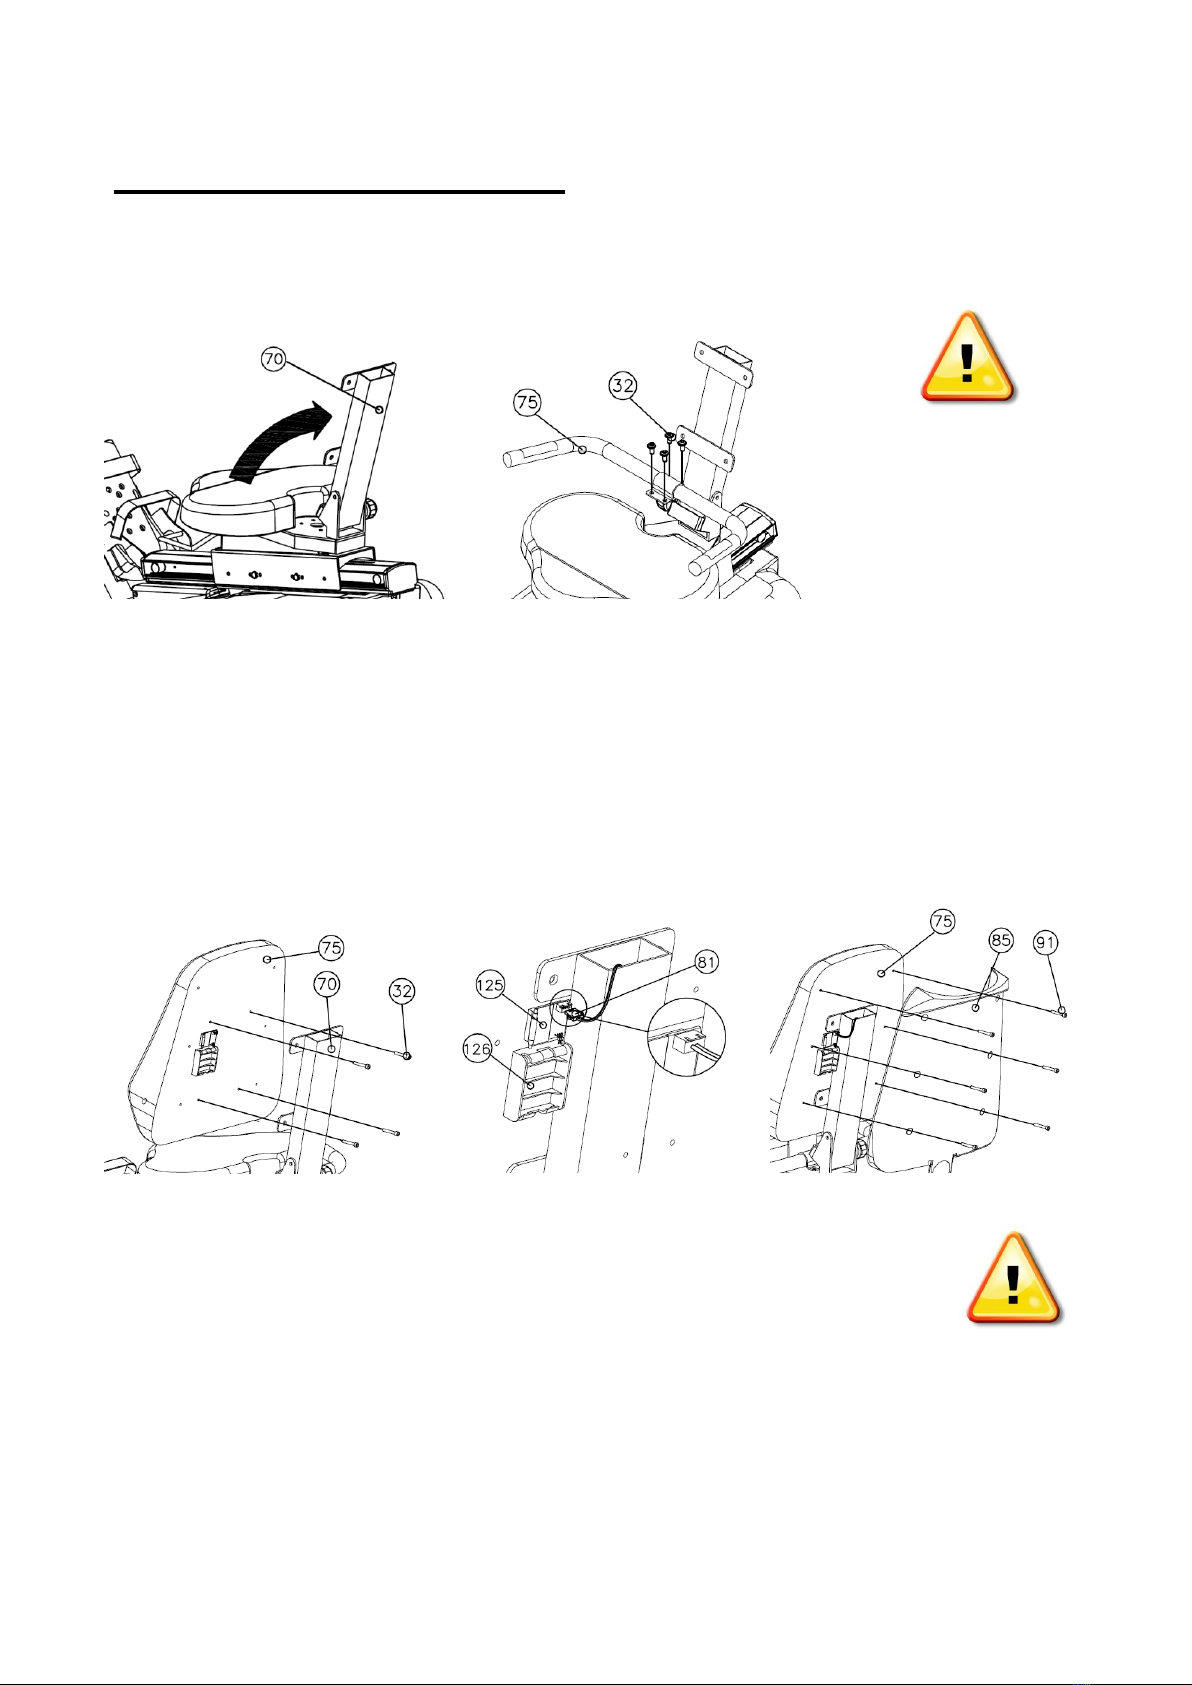
STEP 1: Attaching the Seat Handles
Put the seat back support tube (70) in the upright position and lock the pop pin in
place. Connect the contact heart rate wire coming from bottom of the seat handle
set through the hole in the seat base frame to the wire coming from the bottom of
the seat back support tube (70) Attach the seat handle set (75) to seat base
frame using 4 bolts (32).
STEP 2: Assembling the Seat Back
Attach the seat back cushion (75) to the seat support tube (70) using the
4 screws that are already in place in the seat back cushion (32). Then
connect the pulse sensor wire (81) to the receiver (125). Place 3 AA
batteries in the battery pack (126).
Next attach the seat back cover (85) to the back (75) using the 6 screws
that are already in the seat back cushion (91).
Gently Test the Seat Recline Angle to Ensure the Pulse Wire Moves Freely
Note: If Heart Rate Measurement Appears Inaccurate –Replace Batteries
Wire Pinch Point
5
STEP 3:Assembling the Display Post
Unpackage the Display Post and leave the white guide wire in
place. Attach the bottom of the guide wire to the Display Wire
(90) then gently pull the white guide wire and display wire (90)
up through the display post (27) while inserting the Display
Post (27) into the Main Frame (1).
Make sure the display mount is facing the seat. Leave the
Display Wire (90) attached to the white guide wire until step 5.
Secure the display post using the bolts (32) & washer (73) (97) (109) that
are already in place.
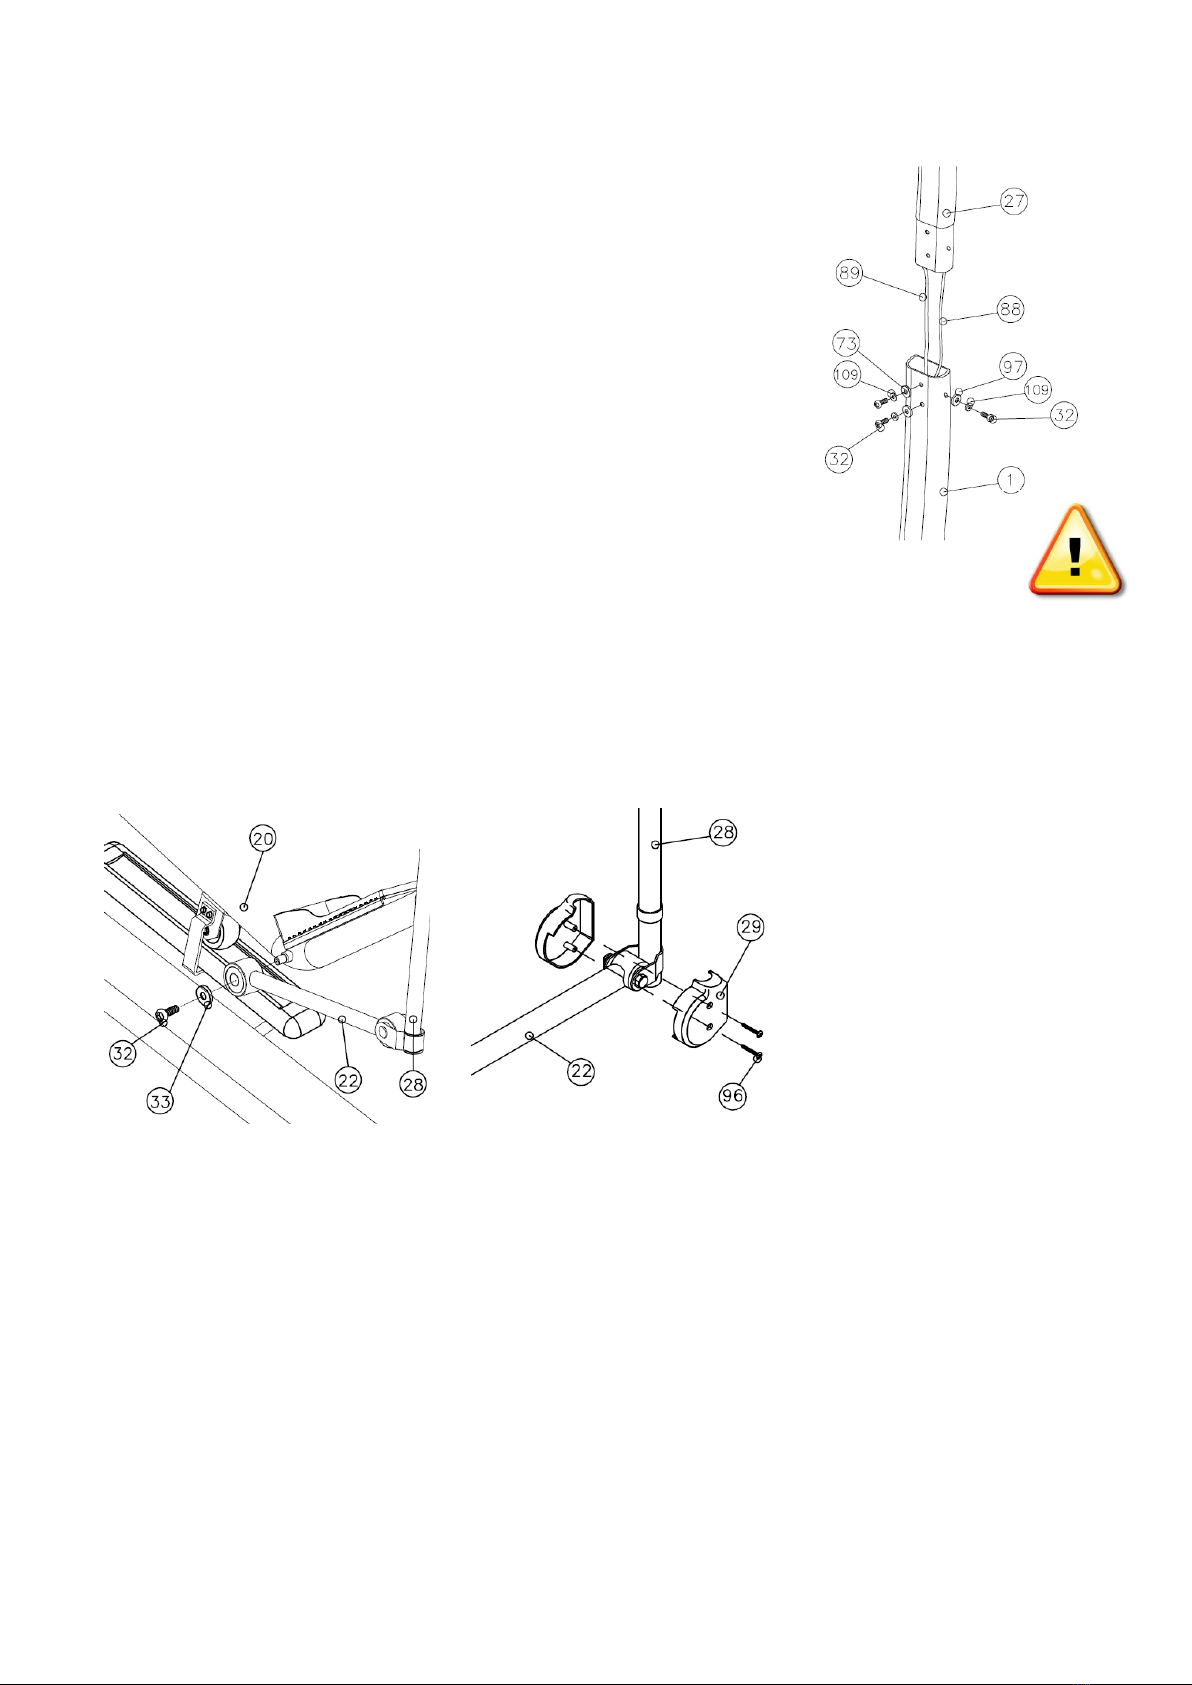
STEP 4: Attaching the Connecting Arms
Attach the Connecting Arms (22) to the Foot Pedal (20) by using the bolt (32). Gently pull the
Foot Pedal (20) to the outside of the machine to make the connection.
Next attach the Cover (29) to the joint from the Moving Handle Set (28) and the Connecting
Parts (22) by using the screws (96).
Wire Pinch Point
6
Wire Pinch Point
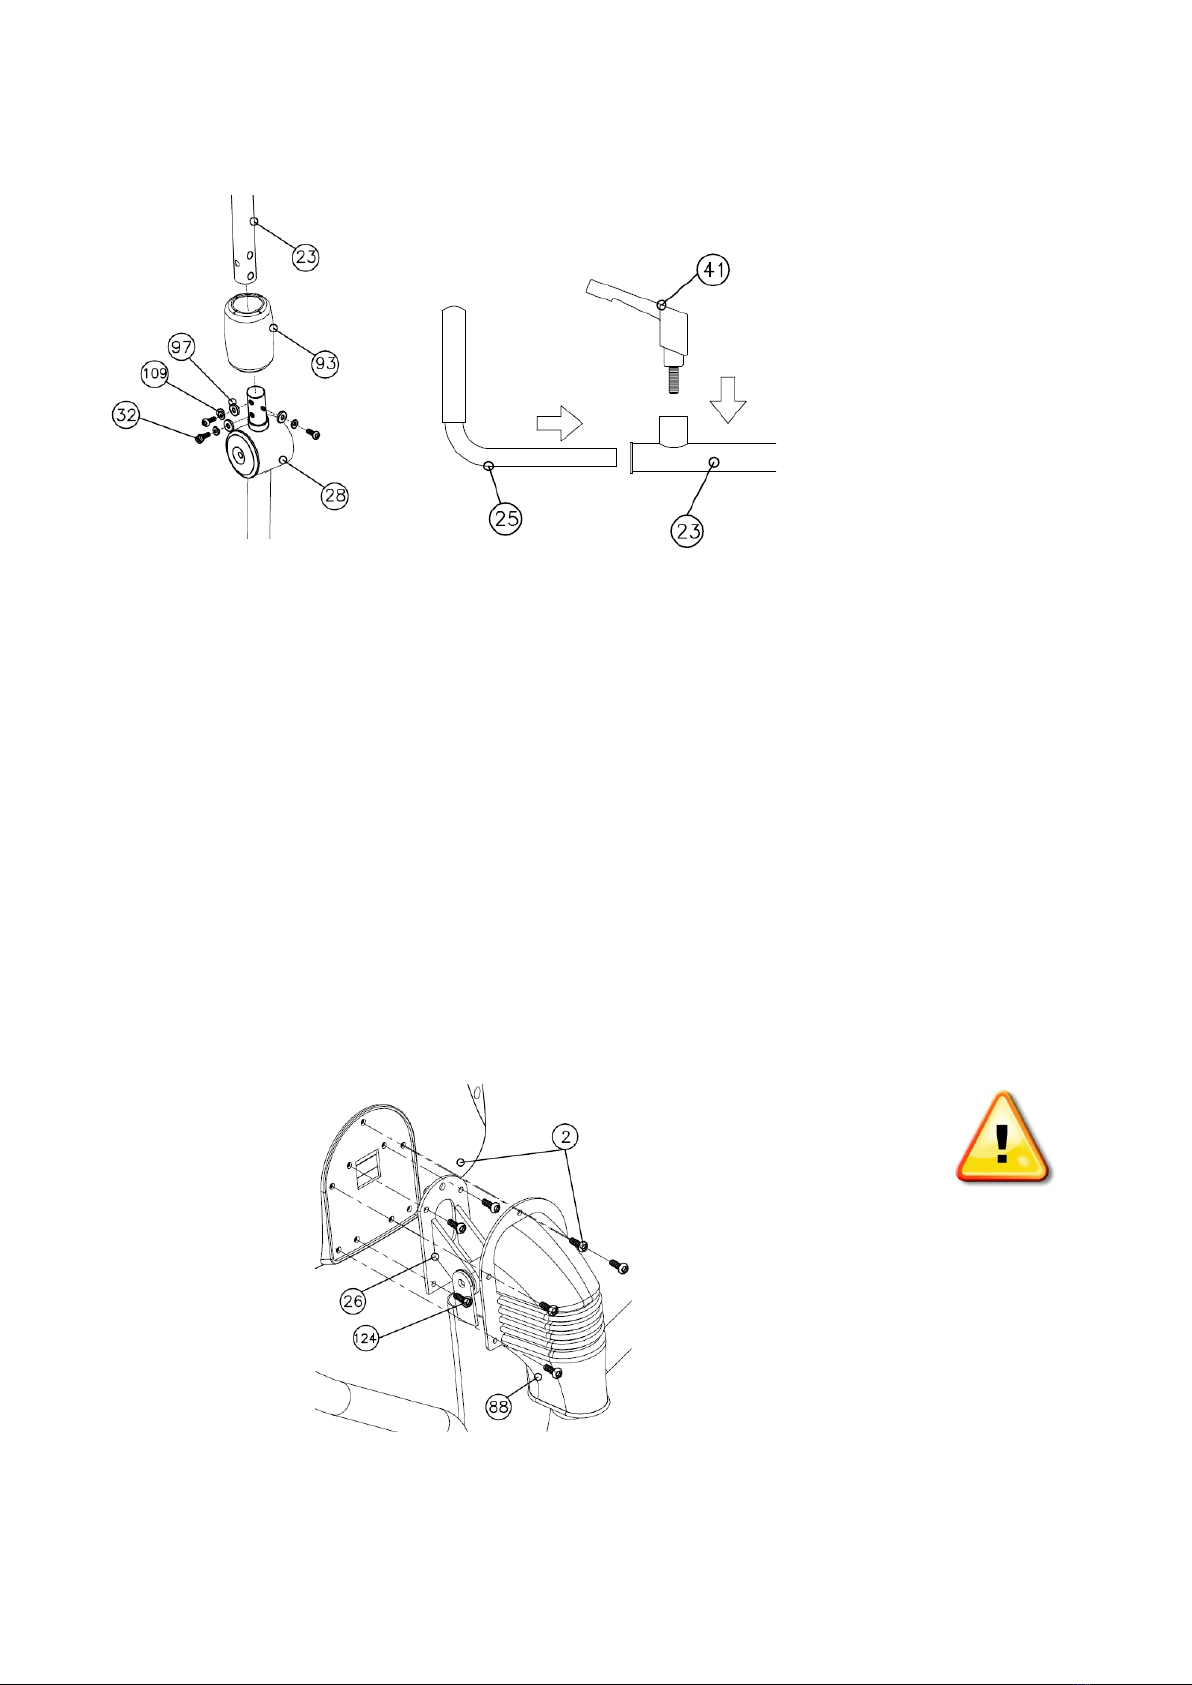
STEP 5: Attaching the Handles
Slip the Rubber Cover (93) up onto the Handle tube (23) above the screws. Then attach
the Handle Tube (23) to the top of the Moving Handle Set (28) using bolts and washers
(32).
Insert the Handles (25) to the handle tube (23). Turn knob (41) to lock the handles in place.
To change the angle of the handles, loosen the knob (41) turn the handle to the
desired angle. Then tighten knob (41) to lock the handle at the desired angle.
To move the knob (41) with out loosening the handles, press the red button and pull
up on the knob to change the knob angle while keeping the handles locked.
STEP 6:Attach the Display
Attach the Display (2) to the Display holder (26) using the screws (124). Finally attach the
back rubber cover (88) to the Display (2) using screws.

7
STEP 7:Connect to Power
Plug the Adapter (46) into the machine first (45) then plug the adapter (46) in the wall outlet.
Congratulations on Setting up Your New CardioStep!

8
Slide Forward /
Backward
360° Swivel
Tilt Adjust Knob
Quick Tips
AC Adaptor:
The CardioStep needs to be plugged into a standard electrical outlet. The AC adaptor
connects at the rear base of the unit, at ground level, on the end of the unit that is
beneath the seat. Connect the AC adaptor to the unit and then plug it into the wall. The
display is powered by the adaptor and does not need batteries to facilitate low watt
training.
Seat Adjustments:
The CardioStep seat position can be adjusted forward and backward by pulling up on
the long yellow bar located under the seat. The handle on the left of the seat allows the
seat to swivel for easy access. In addition you can adjust the tilt of the CardioStep seat
back by pulling the knob located on the back cushion support.
Quick Start:
If you would like to start a simple workout, press the Quick Start Button and use the [+] /
[-] arrows to set the resistance. It will automatically start you at level 1. See page 11 for
more detail.
Heart Rate:
To check your heart rate, place both hands on the seat handles. If your heart rate does
not appear on the display, move the display closer to your body. If the heart rate reading
appears inaccurate or signal is low, replace the AA batteries in the back of the seat.
Custom User Protocols:
You can create custom protocols in the USER 1 program with WATT controlled stages.
Please view page 17 for more detail.
USB Workout Summary Report:
The CardioStep features a USB workout summary report. The USB slot is located on
the back of the display. Simply insert a USB into the back of the display before you start
your work out and press the REPORT button when you are finished with your workout.
Please view page 17 for more detail.
The USB workout summary feedback reports total time, total calories, total distance,
total steps as well as Averages and Peaks for METS, WATTs, Heart Rate, Steps Per
Minute, and Speed
9
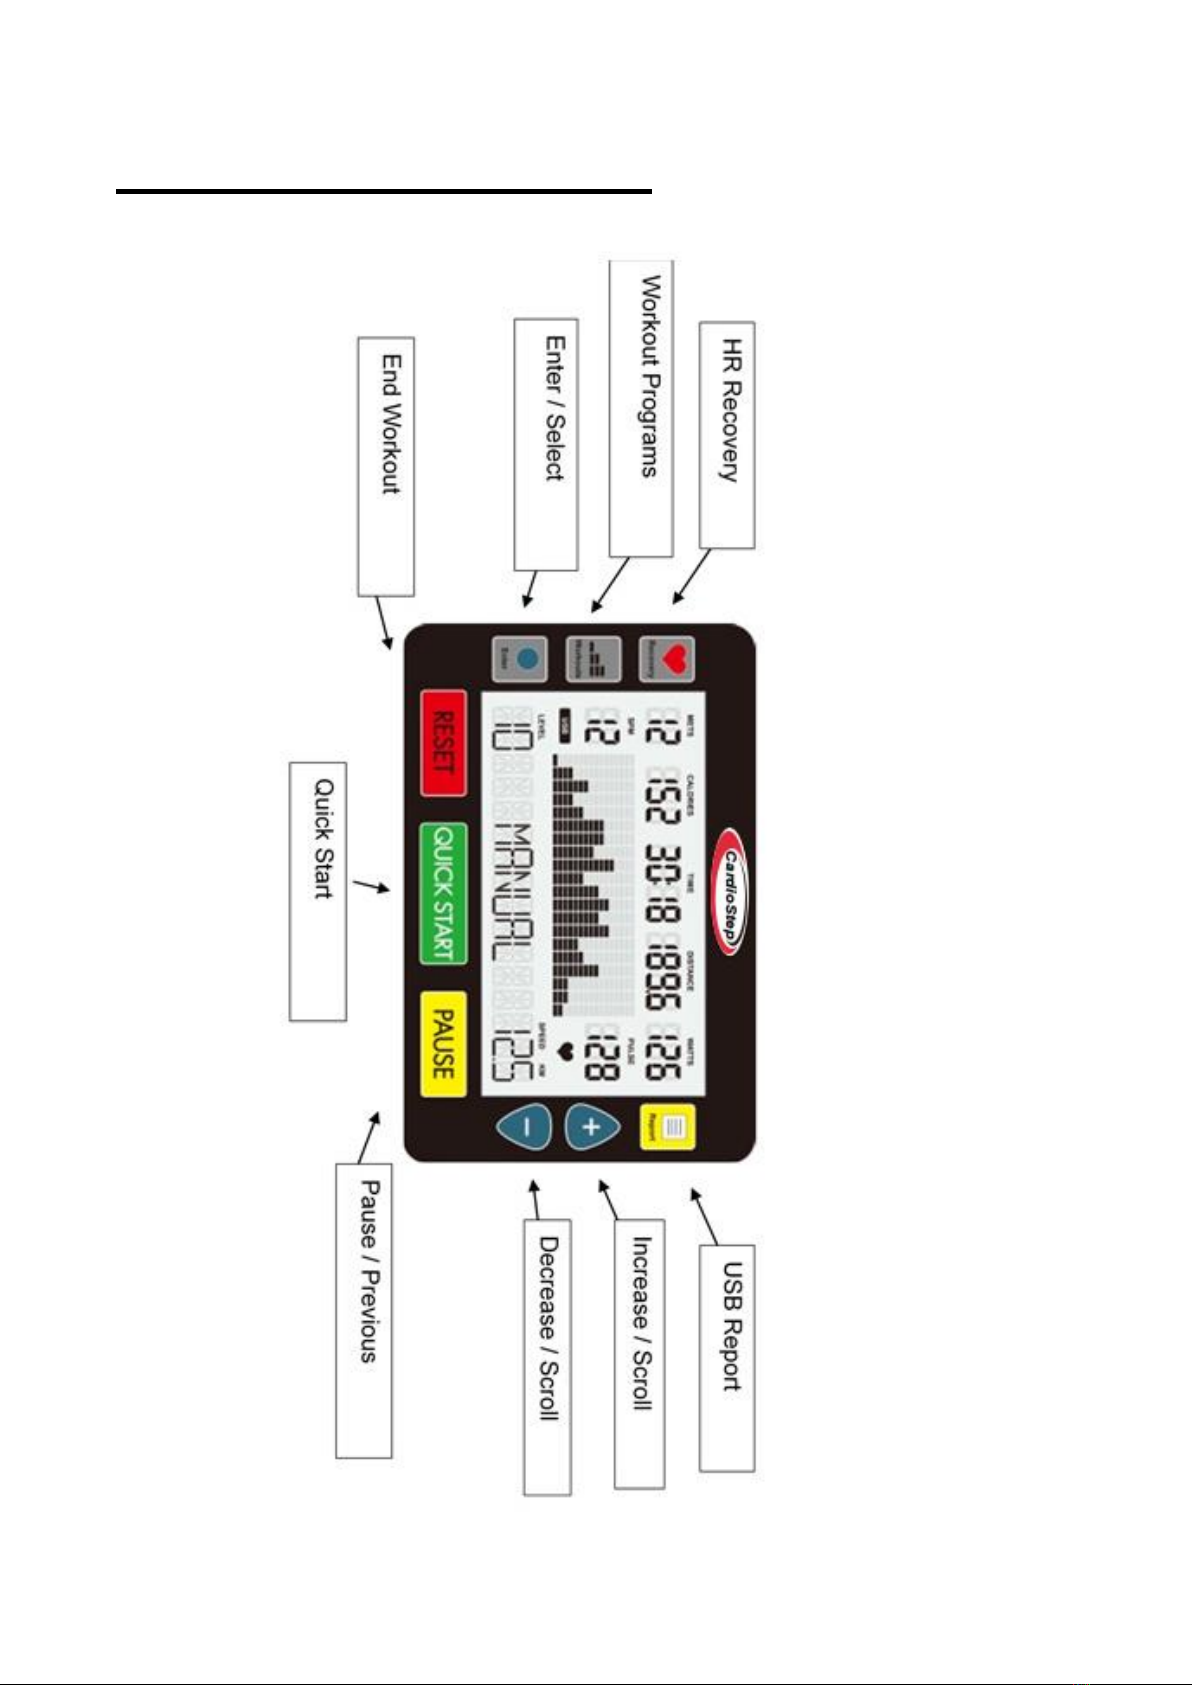
CardioStep Display Console

10
Button Functions
1. QUICK START BUTTON
1.1.Pressing the QUICK START button starts a manual workout.
2. ENTER BUTTON
2.1.The ENTER button selects programs and confirms data entry.
3. [+] / UP BUTTON
3.1.Press the [+] button to increase values.
3.2.Holding the [+] button will rapidly increase values.
4. [-] / DOWN BUTTON
4.1.Press the [-] button to decrease values.
4.2.Holding the [-] button will rapidly decrease values.
5. WORKOUTS BUTTON
5.1.Before you start your workout, press the WORKOUTS button to choose a preset
program. Continue to press the WORKOUTS button to cycle through the programs.
5.2.If you have already started a workout, press RESET twice then use the
WORKOUTS button as explained above.
6. RECOVERY BUTTON
6.1.The recovery function is only available when using a HR monitor.
6.2.Press the RECOVERY button to enter the cool down mode.
6.3.When in the recovery mode, all other buttons are disabled.
7. PAUSE BUTTON
7.1.While exercising press the PAUSE button to pause your workout. The display will
show ““Total Steps ___ Press QUICKSTART to resume or RESET for workout
summary”.
7.2.Press the QUICKSTART button to resume your workout.
7.3.Press the RESET button to view your workout summary.
7.4.In the Report Mode, the PAUSE button will return you to the last step.
8. RESET BUTTON
8.1.To end your workout and view your workout summary press the RESET button.
8.2.Holding down the RESET button for 3 seconds will reset the display.
9. REPORT BUTTON
9.1.Enables the USB workout report export function in summary mode.
11
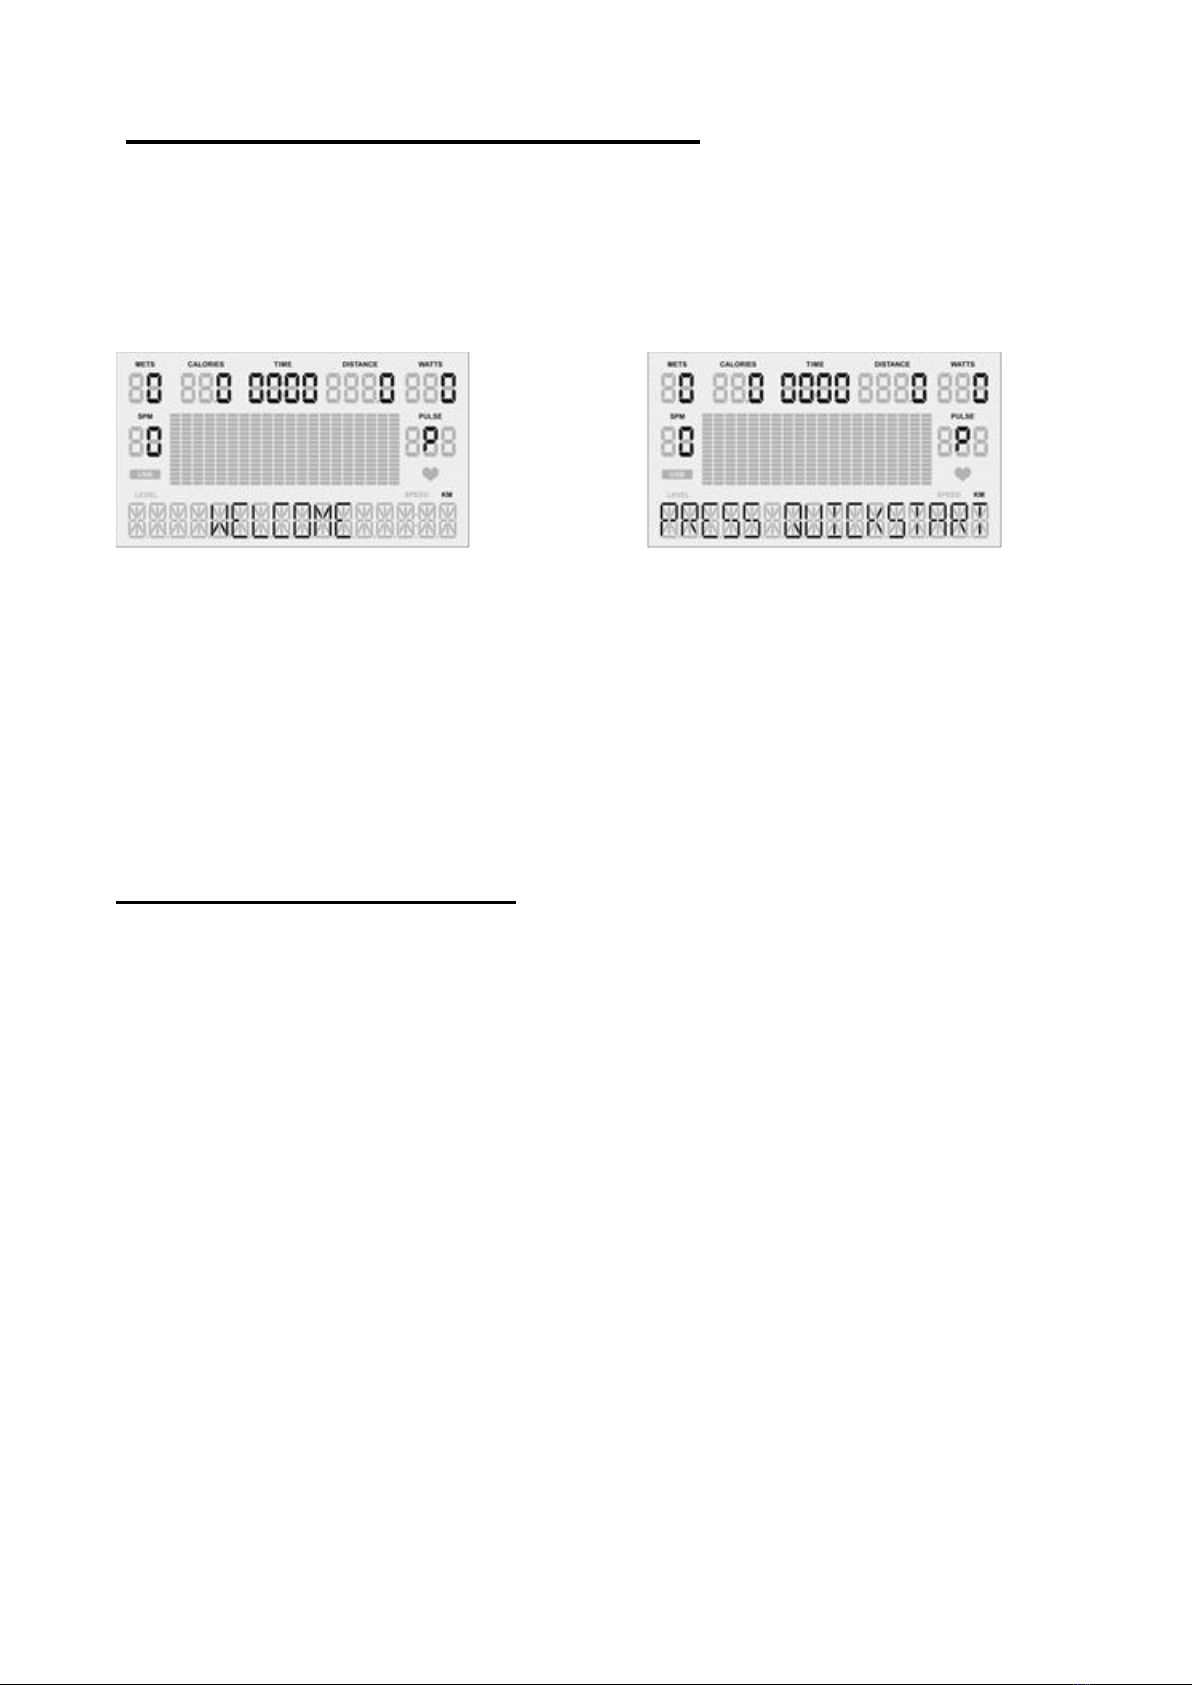
Quick Start –Sit, Start, & Step!
1. Adjust your seat, display and handles to a comfortable position allowing your legs
and arms to use the full range of motion.
2. Press the QUICK START button.
3. Start Stepping! You can use [+] / [-] buttons to adjust the resistance level at any time
during your workout.
OR
Select a Workout Program
1. Press the WORKOUTS button to view programs.
2. To scroll through the different programs, continue to press the WORKOUTS button.
3. Then press the Enter button to select your desired workout program.
4. Follow the steps described in the next section to start your desired workout.
*If you have not selected anything after 5 minutes the display will automatically power off.

12
Setup your Workout Programs
Before starting your workout make sure that your seat is comfortably adjusted.
NOTE: Use the WORKOUTS button to cycle through programs. Press the WORKOUTS
button again to view the next workout. Press ENTER to select your desired workout.
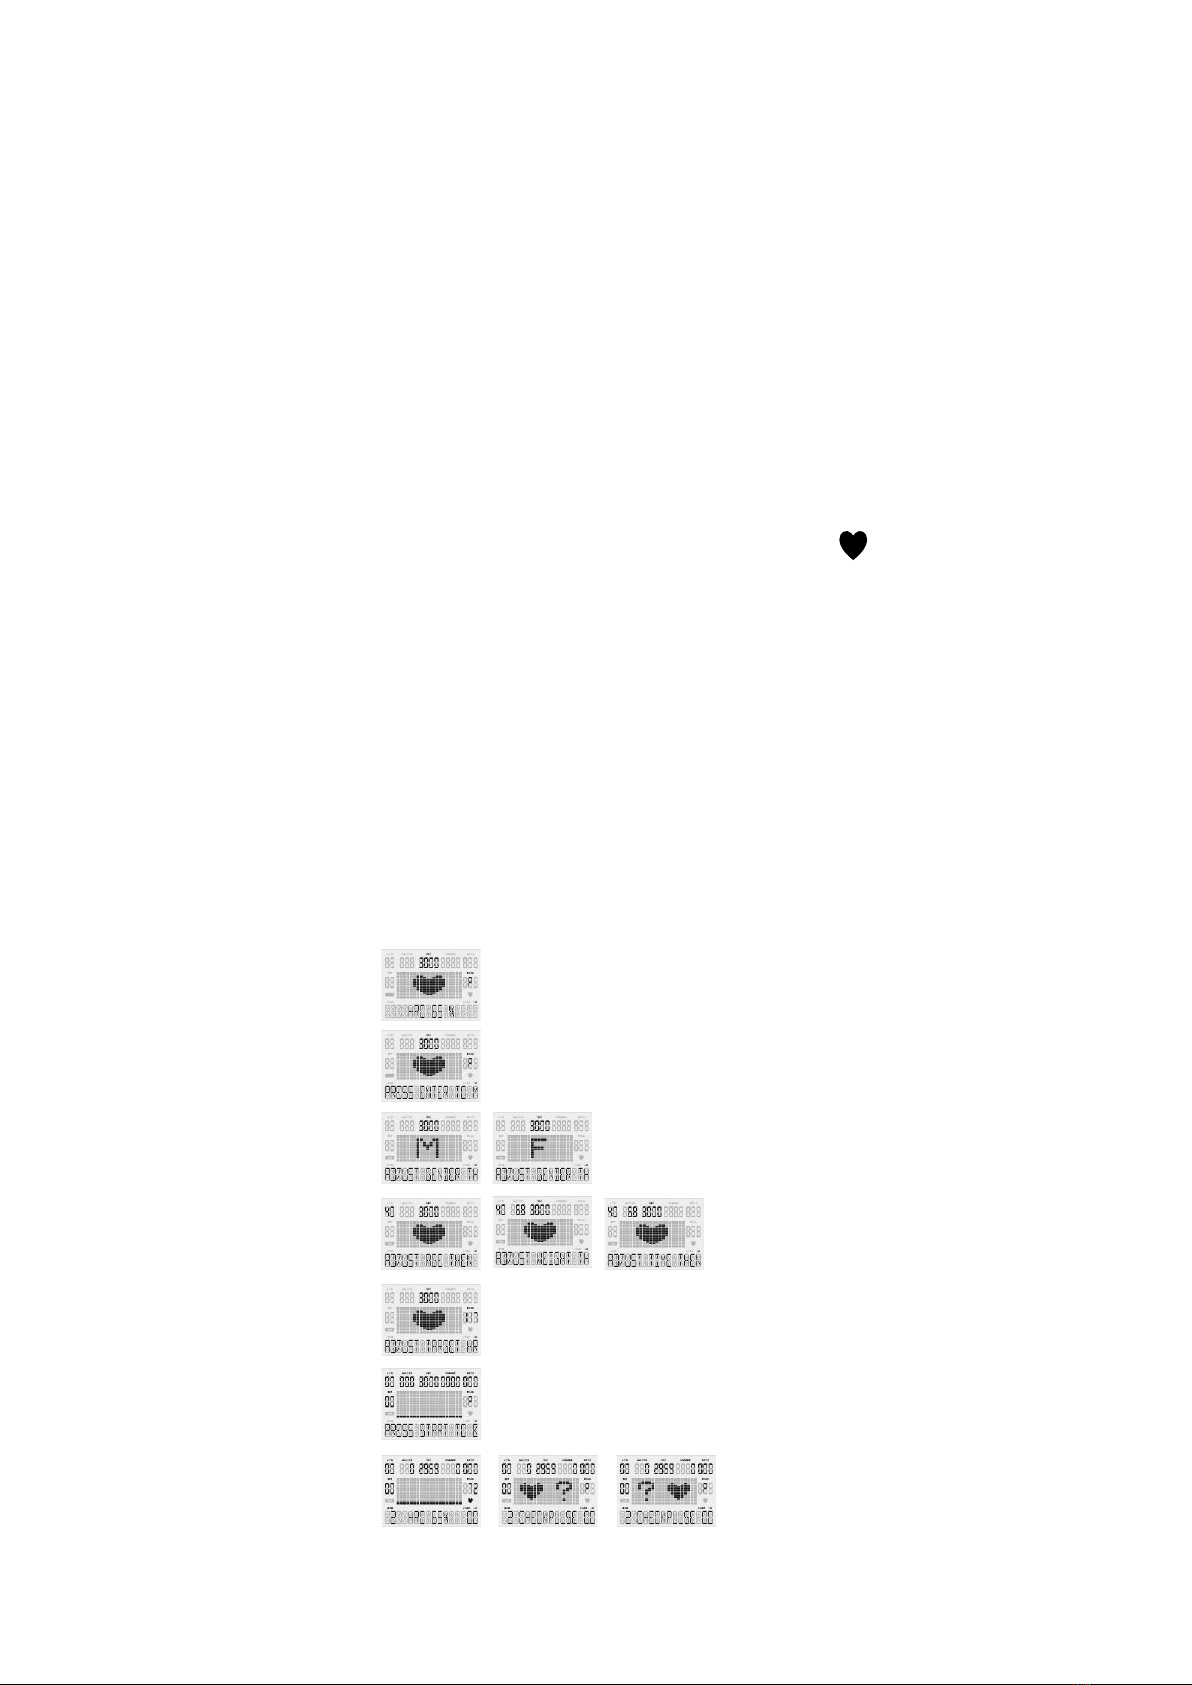
User Setup:
After selecting your desired workout the first step is to enter your user information. This
step will be the same for all workouts.
Use the PAUSE button to return to the previous step when entering user info.
Gender: Use the [+] / [-] buttons to change Male (M) or Female (F).
Press the ENTER button to set gender.
Age: Use the [+] / [-] buttons to change your age.
Press the ENTER button to set age.
Weight: Use the [+] / [-] buttons to change your weight.
Press the ENTER button to set weight.

13
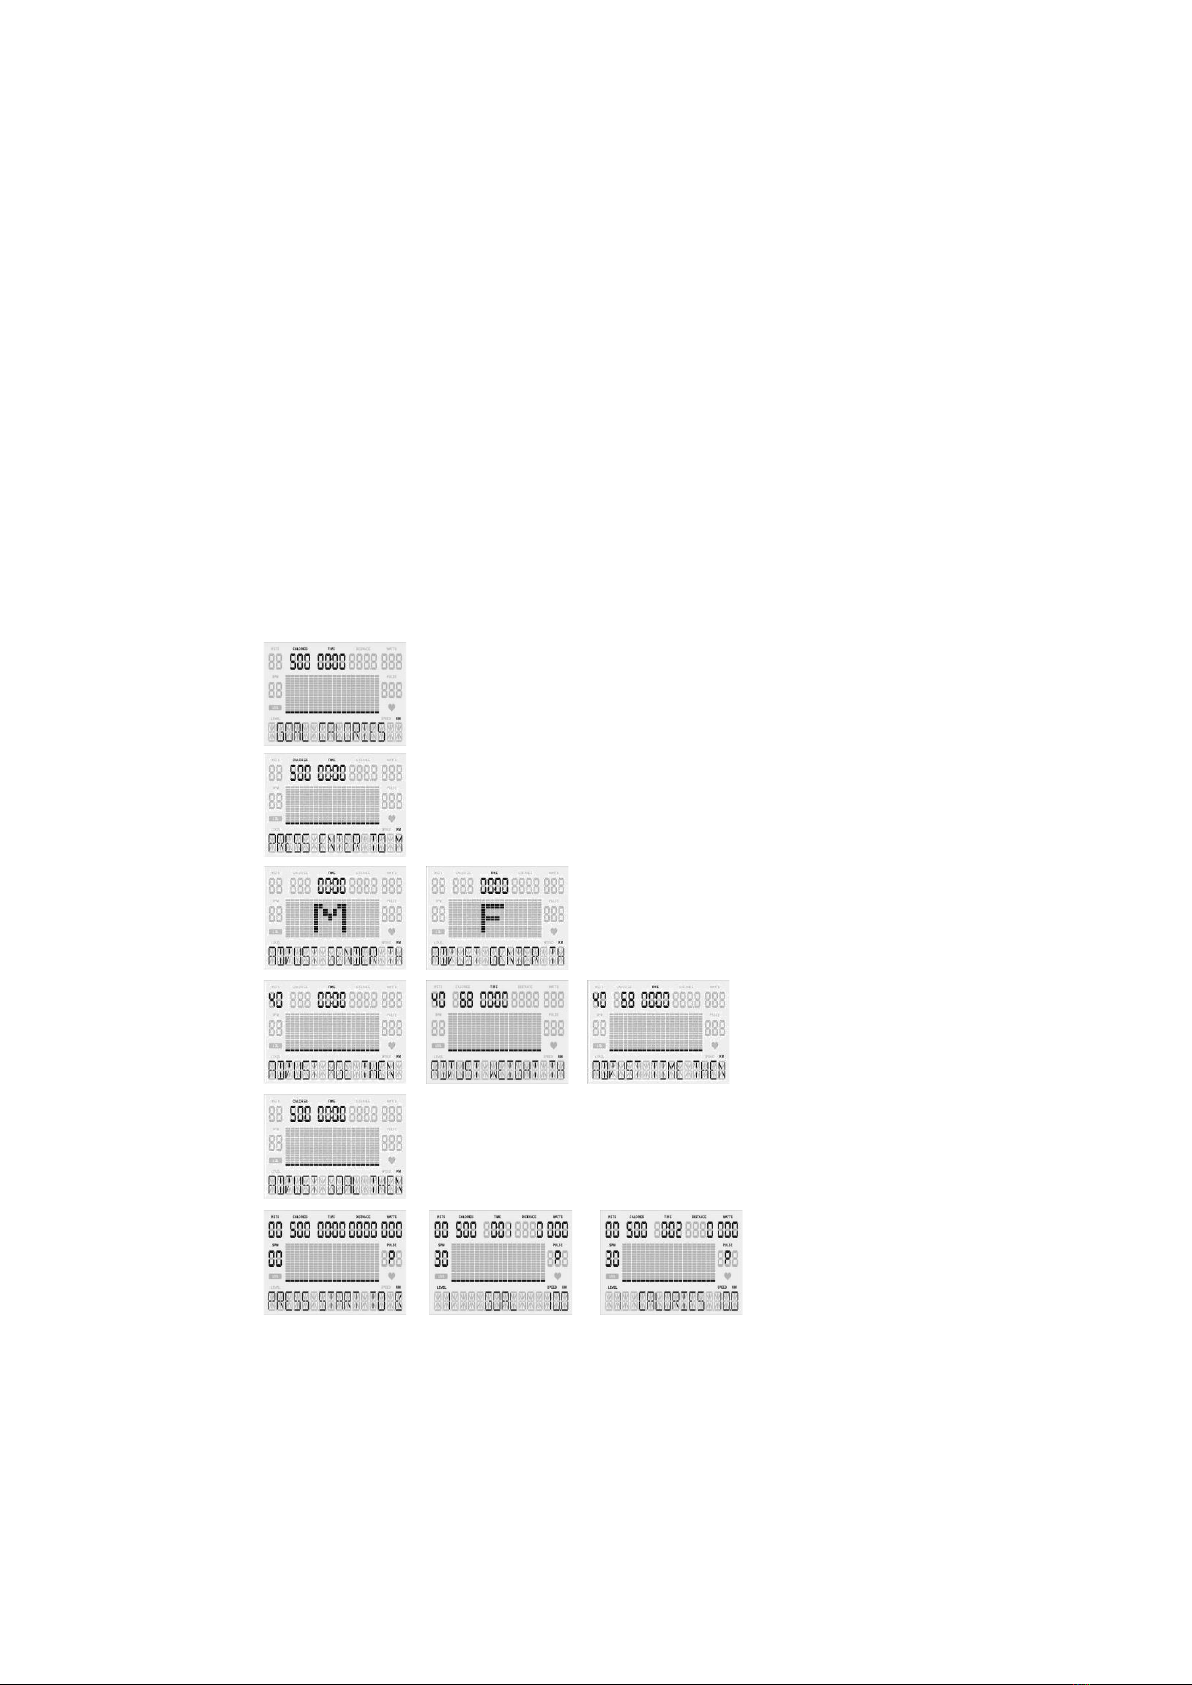
Basic Programs
Manual, Warm Up, Interval, Valley, Ramp, Mountain, Rolling, Climb, Random, Hill, Fat
Burn, Cardio, and Strength.
1.1.User Setup - You will be prompted gender, age, weight, and time.
Use the PAUSE button to return to the previous step when entering user info.
1.2.Set Time: Use the [+] / [-] buttons to set workout time. (Counting Down)
1.2.1.1. Press the ENTER button to set workout time.
1.3.Once your user information has been entered press Quick Start!
1.4.In the basic programs you can use the [+] / [-] buttons to change the resistance level.
1.5.Once your workout is completed a 3 minute Cool Down will begin.
Basic Programs Screens
14
Heart Rate Programs (HR 65% / HR 85%)
*Requires Contact Heart Rate or Heart Rate Monitor
1.6.User Setup - You will be prompted gender, age, weight, time, & HR.
Use the PAUSE button to return to the previous step when entering user info.
1.6.1. Set Time: Use the [+] / [-] buttons to set workout time. (Counting Down)
1.6.1.1. Press the ENTER button to set workout time.
1.6.2. Pulse: Use the [+] / [-] buttons to change your target heart rate.
(Shown as percentage [65% or 85%] of full target heart rate)
1.6.2.1. Press the ENTER button to set your target heart rate.
1.7.Once your user information has been entered press Quick Start!
1.8.If your heart rate cannot be detected, the screen will show [? ] and reset to the
home screen.
1.9.In the Heart Rate programs your resistance level will automatically increase or
decrease to help reach your target heart rate.
1.10. Once your workout is completed a 3 minute Cool Down will begin.
Heart Rate Programs Screens
15
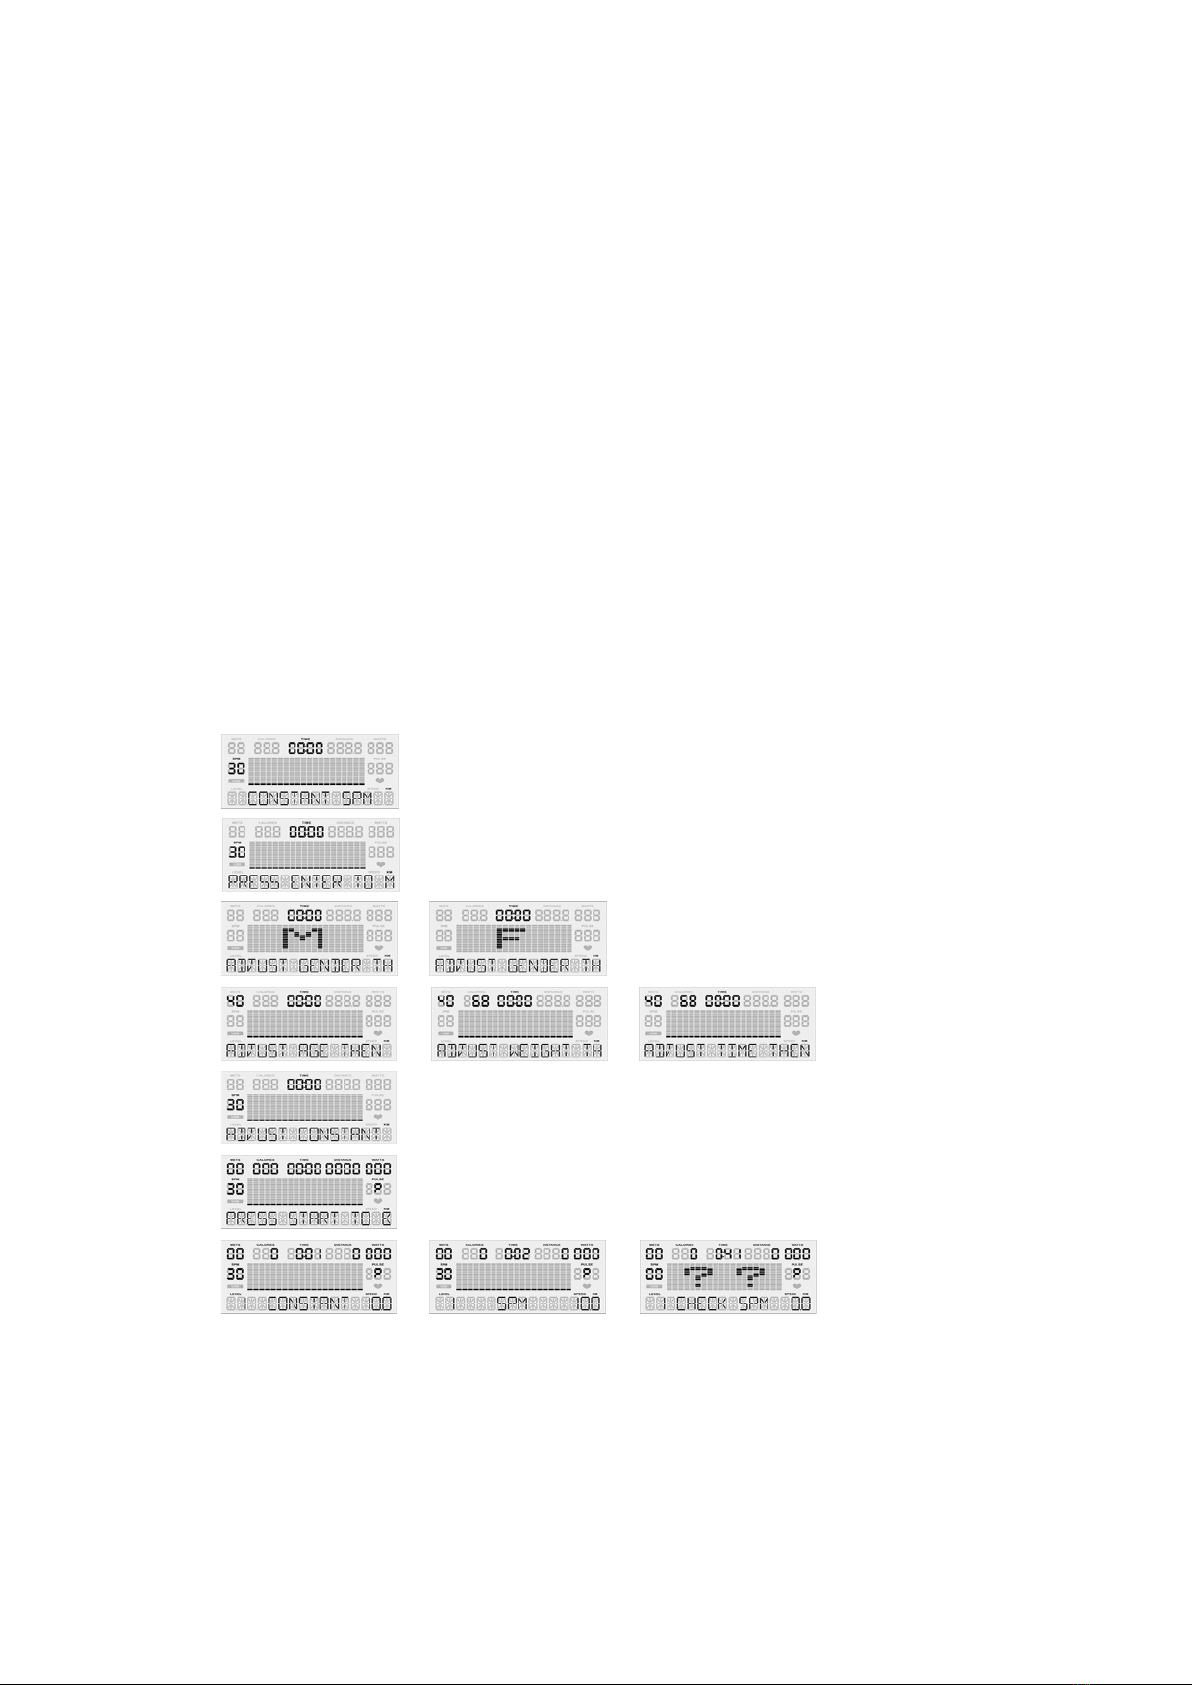
Constant Programs (Isokinetic / WATTS)
1.11. User Setup - You will be prompted gender, age, weight, time & constant.
Use the PAUSE button to return to the previous step when entering user info.
1.11.1. Set Time: Use the [+] / [-] buttons to set workout time. (Counting Down)
1.11.1.1. Press the ENTER button to set workout time.
1.11.2. Set SPM / WATTS: Use the [+] / [-] buttons to change your constant
metric.
1.11.2.1. Press the ENTER button to set your constant metric.
1.12. Once your user information has been entered press Quick Start!
1.13. If you are not using the machine, the screen will show “[?] Check SPM”
1.14. In the constant programs your resistance level will automatically increase or
decrease to maintain constant SPM or WATTS.
1.15. Once your workout is completed a 3 minute Cool Down will begin.
Constant Programs Screens
16
Goal Set Programs (Calories / Distance)
1.16. User Setup - You will be prompted gender, age, weight, time, & goal.
Use the PAUSE button to return to the previous step when entering user info.
1.16.1. Set Time: Use the [+] / [-] buttons to set workout time. (Counting Down)
1.16.1.1. Press the ENTER button to set workout time.
1.16.2. Set Calories / Distance: Use the [+] / [-] buttons to change your goal.
1.16.2.1. Press the ENTER button to set your goal.
1.17. Once your user information has been entered press Quick Start!
1.18. In the Goal programs your workout will complete once your goal is reached.
Use the [+] / [-] buttons to change the resistance level.
1.19. Once your workout is completed a 3 minute Cool Down will begin.
Goal Set Programs Screens

17
Cool Down Mode
1. After completing your workout program a 3 minute cool down will automatically start.
2. Press the PAUSE button to pause your cool down, and QUICK START to resume your
cool down.
3. Press the RESET button to skip the cool down and view workout summary.
18
Workout Summary Mode
* After cool down mode, the display shows workout summary*
1. The workout summary mode displays your personal data as shown below: Total Time,
Distance, Calories and Steps; as well as Average/Peak METs, WATTS, Steps per
Minute (SPM) and Pulse.
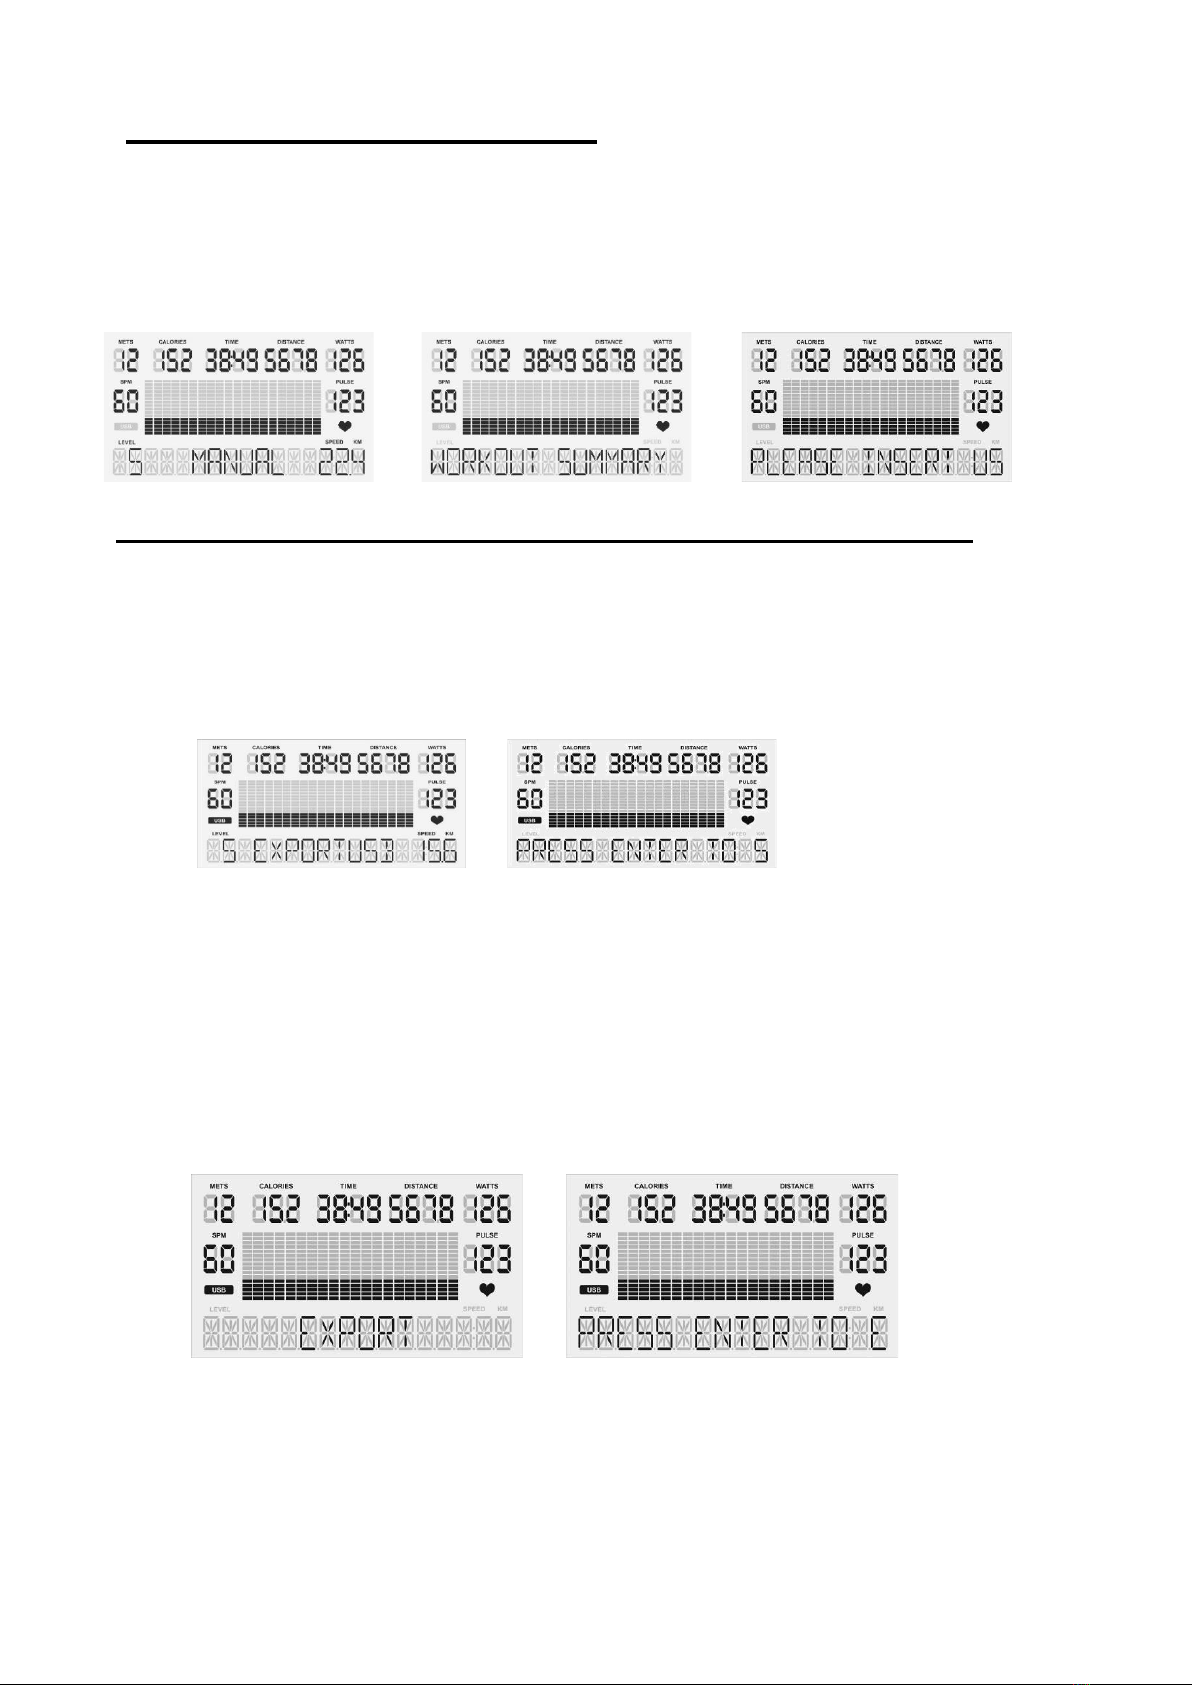
Export Workout Summary to USB –Pause, Reset, Report
*USB Slot Located on Back of Display*
1. Insert your USB into the USB slot on the back of the display.
2. When the USB is correctly inserted the display will show the symbol “USB.”
3. When you have completed your workout and are on the Workout Summary Mode
screen, press the REPORT button to begin the export process.
4. Press the ENTER button twice to set your Workout ID.
5. Use the [+] / [-] buttons
to scroll through values (a-z and #0-9). Press the ENTER button to select a value and
move to the next space.
6. Set your ID by pressing the ENTER button until you reach the last space.
PLEASE NOTE: At any time you can press PAUSE to return to the previous step.
7. After you have set your personal ID, press ENTER to select the date (Day / Month /
Year). Use the [+] / [-] buttons to scroll through the values [a-z and #0-9]. Once the date
is selected, press the ENTER button to confirm and complete.
8. Once the
date is
completed, the
display will show the messages “Export” and “Press Enter to Export Data”. Press the
ENTER button to export your workout summary report to USB. Saving your workout
summary will take a few seconds.
9. Your workout summary report will be saved in a .csv file that you can open in excel. The
display will read “Complete” when it has been exported successfully.
Table of contents
Other Health Care International Elliptical Trainer manuals


Popular Elliptical Trainer manuals by other brands

NordicTrack
NordicTrack AudioStrider 990 PRO NTEL09811.2 user manual

Weslo
Weslo Momentum 4.0 Elliptical Manuale d'istruzioni

Progear Fitness
Progear Fitness Air elliptical pro 1307 owner's manual

Torque Fitness
Torque Fitness XPLLP owner's manual

Octane Fitness
Octane Fitness PRO3700C Operation manual

Xterra
Xterra FS5.8e owner's manual


