Health Care International PhysioTrainer User manual

- 1 -
INSTRUCTION MANUAL

- 2 -
SAFETY PRECAUTIONS
Before You Begin
This exercise equipment was designed and built for optimum safety. However,
certain precautions apply whenever you operate a piece of exercise equipment. Be
sure to read the entire manual before you assemble and operate this machine. Also,
please note the following safety precautions:
1. Read the following instructions carefully before using this machine.
2. Consult your physician before beginning this or any other exercise program.
3. Always wear proper exercise apparel when using this machine.
4. If you feel faint, dizzy or pain while operating this machine, stop exercising
immediately!
5. Keep children and pets away from this machine while in use.
6. Only one person can use this machine at a time.
7. Make sure your machine is correctly assembled before using.
8. Do not operate this machine if it is damaged.
9. Do not insert any objects into the machines openings.
10. Keep clothes, jewelry or loose items away from moving parts.
WARNING
BEFORE BEGINNING ANY EXERCISE PROGRAM CONSULT YOUR PHYSICAN.
THIS IS ESPECIALLY IMPORTANT FOR INDIVIDUALS OVER THE AGE OF 35
OR PERSONS WITH PRE-EXISTING HEALTH PROBLEMS. READ ALL
INSTRUCTIONS BEFORE USING THIS EQUIPMENT. WE ASSUME NO
RESPONSIBILITY FOR PERSONAL INJURY OR PROPERTY DAMAGE
SUSTAINED BY OR THROUGH THE USE OF THIS OF PRODUCT.
WARNING
Read all instruction carefully before operating this machine.
Retain this Owner’s Manual for future reference.

- 3 -
Thank you for your purchase of the PhysioTrainer Bi-Directional UBE
At HealthCare International, our goal is to provide high-quality and affordable
products for Health, Wellness, Fitness & Active Aging. The PhysioTrainer can be
used as a Upper Body Trainer or a Bike and will give you a versatile cardio workout
while strengthening your muscles. Whatever your fitness level may be, the
PhysioTrainer will work for you. We wish you continued success in your journey
towards optimum health and fitness!
We would love to hear from you! Please feel free to post a review with the dealer
you purchased from or send it to us directly, sales@hcifitness.com.
Assembly Overview:
When you receive your new PhysioTrainer, some assembly is required. Assembly
consists of attaching the support tubes, pedals/handles and display. The following
instructions explain the assembly. There are also detailed instructions on the
display. If you need assistance during assembly please call us at 360.321.7090 or
Please Note:
All of the parts and screws needed for assembly are already in place on the unit.

- 4 -
EXPLODED DRAWING

- 5 -
PARTS LIST
No.
Qty
Description
NO.
Qty
Description
1
1
Frame
22
1
Sensor & Magnet
2
1
Magnetic Flywheel
23
1
Plastic Cover
3
3
Flange Nut 3/8*5T
24
2
Plastic Cover
4
2
Adjustment Bolt
25
2
Plastic Cover
5
2
Bolt stopper
26
1
Tension Knob
6
1
Idler Support
27
1
Pedal -LH
7
2
Idler (A)
28
1
Pedal -RH
8
2
Bearing 6000ZZ
29
1
Computer
9
1
Rear Support Tube
30
1
Chain Cover (L)
10
3
Self Drill Screw
(M6*10)
31
1
Chain Cover (R )
11
2
Allen Key Bolt
M8*65
32
2
Acrylic Cover (L/R)
12
1
Locking Nut 3/8*3T
33
2
Plastic Cover
13
2
bowl for crank
34
6
"+" Screw 3/16"*45L
14
2
Steel ball bearing
rings
35
8
"+" Screw M5*10L
15
1
Steel ball rings-L
36
2
"+" Screw M5*15L
16
1
Steel ball rings-R
37
2
"+" Screw M3*10L
17
2
Washer
38
1
Foot Belt Cover with
steel-L
18
1
Screw
39
1
Foot Belt Cover with
steel-R
19
1
Crank
40
2
Washer D6.6*D16
20
1
Pulley
41
1
Screwdriver
21
1
Belt (6J-340)
42
1
Allen Key
NOTE
All of the parts and screws needed for assembly are already in place on the unit.
TOOL SET:
Screw Driver
L Tooling

- 6 -
ASSEMBLY
Step 1
1. Use the Allen Key Bolt M8*65 (#11)
to attach the rear support tube (#09)
to the frame.
Step 2
1. Meter Assembly: Insert two AA
batteries into the back of the
display panel. Attach the
computer meter, (No.29) to the
meter stand using the (No.36)
Screws. Plug the meter cord into
the back of the display panel.
2. Pedal Assembly: Use (No.27) for
Left side and No.28 for Right side.
Each pedal crank is marked with
either an L or R. It is Important to
note that the Left side pedal is a
reverse thread which means to
tighten use a counter clockwise
rotation. After 10 hours of use
retighten both pedals and then
check periodically for tightness
*Left Pedal –Is a Reverse Thread
Do not strip the thread!

- 7 -
COMPUTER INSTRUCTIONS
A.MAIN DISPLAY
B.FUNCTIONS:
1. SCAN : Press the “mode” key to select “scan” Scan will appear in the lower left
corner of the monitor.
2. TIME : Automatically accumulates workout time
3. SPEED : Displays the current speed during your workout.
4. DISTANCE : Displays the distance you have gone during your workout.
5. CALORIE : Displays the total burned calories during your workout.
6. PULSE : Requires optional Chest Strap
PRESS MODE KEY:To select functions of time, speed, distance, calories, pulse or scan.
Hold Mode Key down for 2 seconds to reset the monitor.
NOTES:
1. If the display panel does not work: replace the batteries and check to see if the monitor
is connected. * Use 2 AA,1.5v batteries.
2. The monitor will automatically shut off, if inactive for 4 to 5 minutes.
3. The monitor starts automatically when exercising or pushing buttons.
4. “K” or “M” indicates either kilometer or mile.
D. KEYS AND FUNCTIONS

- 8 -
Mode Key: Pressing the “Mode” key to cycle through the functions and display each consecutively.
To press and hold “ MODE” key down for 2 second to go into distance unit model
(metric Mor English ML), and then to press “SET” key to select the unit you preferred.
To activate the automatic scan function, the scan symbol will appear on the display,
when the scan function has been activated, the data for each function will be updated
in 5-second interval throughout your exercise session.
Set Key: Pressing “SET” key to the data will flash to show the computer in setting mode to
program your Row time, Row distance and Heart Rate High Limit.
a.) PROGRAMMING EXERCISE TIME:
Pressing ‘’ MODE” key to enter Time function, and pressing “SET” key to set up the time you
desired. You can adjust the time by pressing and holding “SET” key. The time set symbol ”
((.))” will appear on display. When you start to rowing, the timer will start to count down, the
computer will beep for 4 seconds after the timer counts down to 0:00.
b.) PROGRAMMING EXERCISE DISTANCE:
Pressing ‘’ MODE” key to enter Distance function, and pressing “SET” key to set up the
distance you desired. You can adjust the distance by pressing and holding “SET” key. The
distance set symbol” ((.))” will appear on display. When you start to row, the exercise distance
will start to count down, the computer will beep for 4 seconds after the exercise distance
counts down to 0 meter/feet.
c.) PROGRAMMING MAXIMUM HEART RATE: Optional with Chest Belt Transmitter.
The range of Maximum heart rate is between 50 and 200. Press the “MODE” key to enter
maximum heart rate function, and pressing “SET” key to set up your maximum heart rate. You
can adjust the maximum heart rate by pressing and holding the “SET” key. The pulse rate limit
set the symbol” ((.))” will appear on display. When your heart rate is above maximum heart
rate during exercise, the computer will beep to warn you to stop exercise.
Reset Key: The reset key will clear data for Time, Distance, and Heart Rate High Limit
individually. When you press and hold “Reset” key for 2 seconds, all data will be cleared
simultaneously.
Note:
. 1. The computer will start automatically when receiving signal from chest belt or pressing
any key.
2. The display will turn off automatically after 3 minutes without any activity.
3. The computer will clear data of 500M, Time, SPM, Distance and Calories/hour
automatically without receiving any speed signal after 40 seconds.
4. Under normal condition, make sure the symbol appear on the display before
measuring your heart rate. The symbol will disappear automatically when the
computer does not receive any signal from transmitter after 30 seconds. Press “SET”
- 9 -
or “RESET” to wake up heart rate function, the symbol will turn on again.
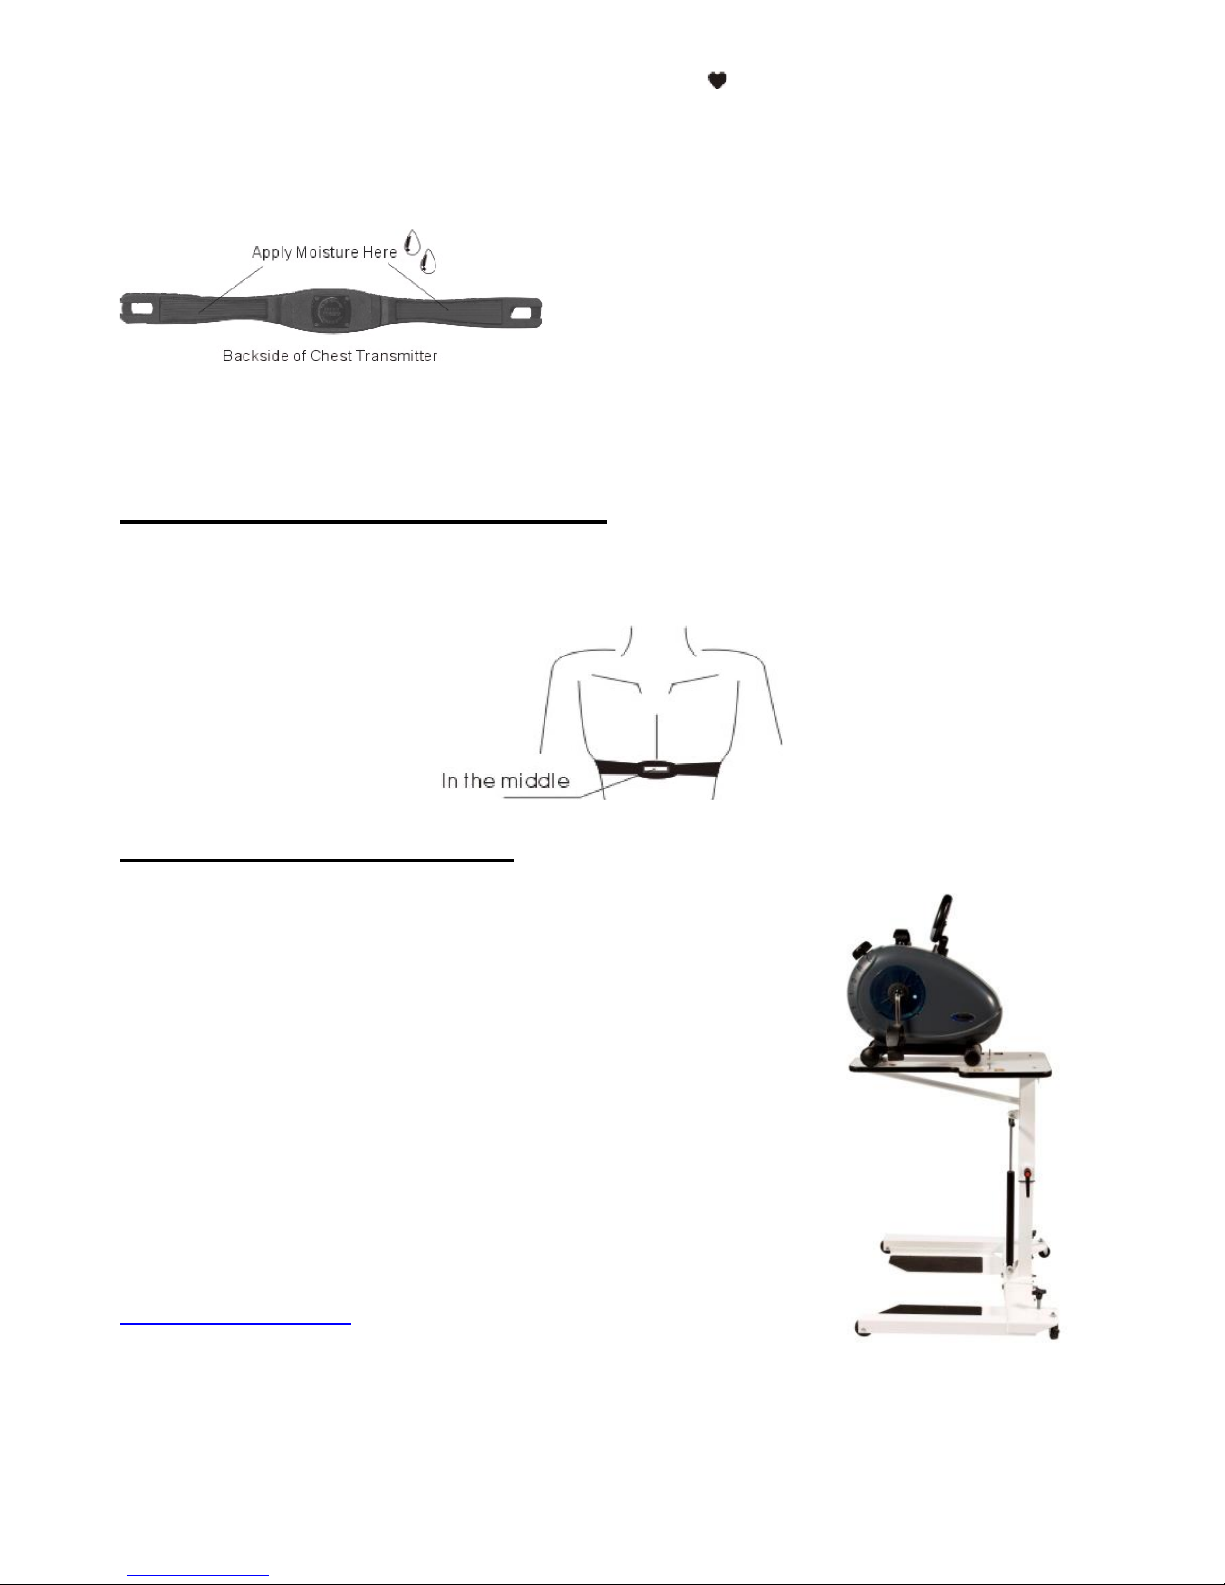
Tips: Moisten Transmitter Contacts (for dry skin user)
Before wearing the transmitter strap, moisten the 2 rectangular rubber pads (electrodes) located
on the inside surface of the chest transmitter. Use water, glue or saliva to moisten these pads.
Adjusting the strap
The strap should be worn tight enough to prevent the transmitter from bouncing or sliding, but not
so tight as to be uncomfortable.
POSITIONING THE TRANSMITTER
The transmitter should be positioned below the breast or pectoral muscles with the middle
centered on the chest, and fasten. The transmitter starts to send a signal after worn.
PhysioTrainer Accessories:
Rehab Table with Hydraulic Adjustment
Easy- Lift one touch height adjustment. Hydraulically assisted
lift raises your tabletop from 27” to 37”easily.
Commercial caster system with locking no skid floor plates
stabilizes the table for the most strenuous workouts.
For more information contact us:
Healthcare International, Inc.
PO Box 1509
Langley, WA 98260
www.HCIFitness.com
p.360.321.7090
Table of contents
Other Health Care International Exercise Bike manuals


