Hear+Hi Acuity User manual
AcuityWireless
RIC Digital Hearing Amplifier Earphones


................................................ P1
................................................ P2
.......................................... P4
............................................P5
............................................... P5
................................................ P8
........................ P8
..............................P11
..................................P14
...............P19
................................................. P24
........................................ P24
.............................................P26
Content
WELCOME
FEATURES
ACCESSORIES
DESCRIPTION
BATTERIES
DAILY USE
SET UP (GETTING STARTED)
EARBUDS AND TUBES
PAIR AND CONNECT
CONTROL YOUR HEARING DEVICE
SAFETY
MAINTENANCE
WARRANTY

1
WELCOME
Congratulations and thank you for choosing the
Hear+Hi Acuity Wireless Stereo Assistive Hearing
Amplied Headset! You’ve made an excellent
decision and you will enjoy using this product for
many years to come! This guide will help you get
started and show you all the great features, so
that you get the most out of your investment.
QUESTIONS? VISIT Hear+Hi.com/support OR
EMAIL US AT info@Hear+Hi.com

2
FEATURES
• Discrete and Invisible Receiver-In-the Canal (RIC)
styling
• Compatible with Apple® Mobile Devices
• Wireless Audio Streaming for phone calls and
music
• Built-in Noise Reduction
• Advanced Digital 16-Channel DSP processing,
Right & Left Ear
• Long Battery Life
NOTE:
Not for users under 18 years of age.
Always consult your hearing healthcare
professional for any hearing loss conditions.
Any serious hearing conditions should be
examined and diagnosed by a licensed
physician (preferably an ear specialist).

3
The ACUITY Wireless RIC Digital Hearing Amplier
Earphones connect to your iPhone or iPad, so you
can stream audio, answer phone calls, adjust
settings, and more.
Use one of these models and versions to get
started:
• iPhone 5s and later
• iPad Pro 9.7-inch and later
• iPad Air and later
• iPad mini 2 and later
• iPad (5th generation) and later
iPhone, iPad mini, iPad Pro, iPad, and iPad Air are registered
trademarks of Apple Inc.
Hear+Hi is a trademark and brand of GMEMS Technologies.

4
ACCESSORIES
Hearing Aid (Left - Blue)
Hearing Aid (Right - Red)
Eartips: Open style (6) / Closed style (6)
Batteries (2)
Storage Case
Cleaning Brush
Magnet helps remove
and insert battery
Loop helps clean out ear wax
5
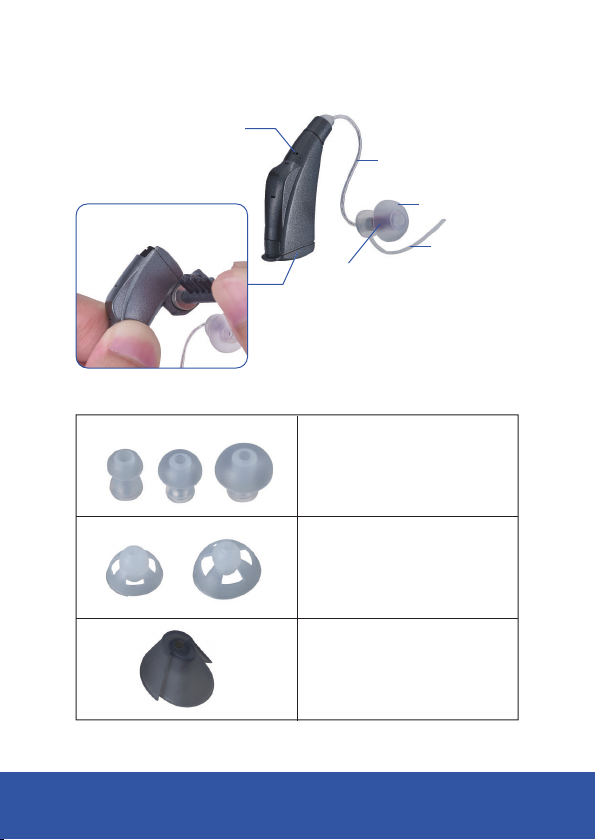
DESCRIPTION
Open style
S /M size
Open style
L size
Closed style
S/M/L size
Microphone
Retainer
Battery compartment
(Turning On/O)
Earbud
Thin tube
Receiver

6
Inserting the battery
If the battery has a protective lm, remove it
before inserting into the unit.
Insert the battery with the"+"
symbol facing upwards.
Carefully close the battery compartment. If you
feel resistance, the battery is not inserted
correctly. Do not attempt to close the battery
compartment by force, as it may get damaged
as a result.
BATTERIES

7
To remove the battery:
Open the battery
compartment
Remove the battery
hand/helper
When the battery is low the sound becomes
weaker or you will hear an alert signal.
Remove empty batteries immediately and
follow your local recycling rules for disposal.
Always carry spare batteries.
Remove the batteries when not in use for
several days.
Open the battery compartment door at night.
Store batteries in a cool, dry place.

88
To turn your hearing aids on, close the battery
compartment.
Powering up takes several seconds; you can insert
the hearing aids during this
time and avoid unpleasant feedback or whistling.
To turn your hearing aids o, open the battery
compartment.
1. Make sure your ears are clean.
2. Place the unit securely behind your ear.
3. Place the eartip inside your ear and make sure
it ts snugly.
The ACUITY RIC Earphones come with a choice of
6 open and 6 closed style Eartips.
SET UP (GETTING STARTED)
DAILY USE

99
It is recommended to try the dierent options,
since the size of your ear canals might not be the
best guide.Often a smaller Eartip will t better
because it can go in deeper or a larger one
might be more comfortable and still provide
proper occlusion.
When you insert the Eartip, aim it forward and up,
to match the angle of the ear canal. Then try
dierent angles with dierent size Eartips, to
maximize comfort and seal.
Proper Eartip insertion will ensure the very best
sound quality, minimize the amount of volume
required, prevent leakage and avoid feedback
(will emit a whistling sound if not tted
properly).
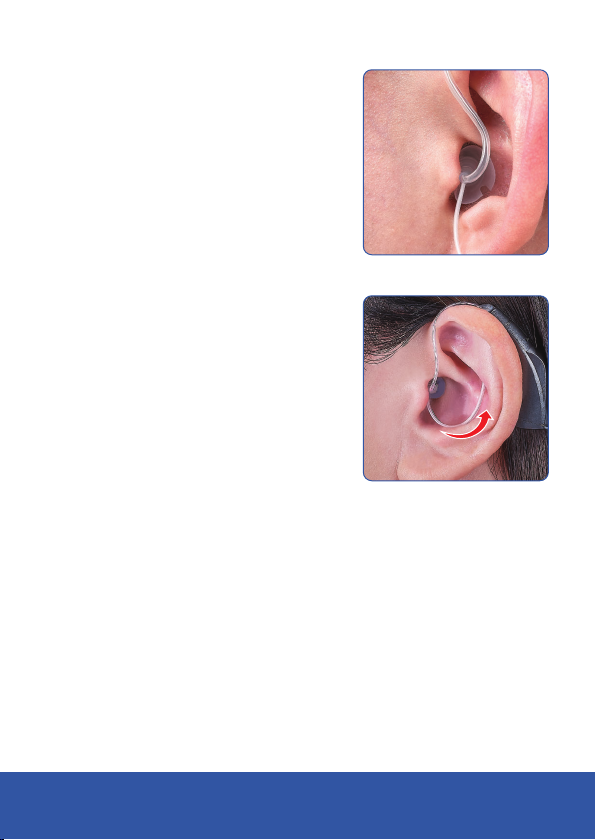
10
4. Open and close your mouth
to remove any air in the ear
canal and gently push the
Eartip into the canal & twist
it until it sits securely.
5. Place the retainer around
the outer part of your ear,
so that it follows its contour,
making sure it’s not sticking
out from the ear.
To remove the ACUITY RIC device, lift and slide it
over the top of your ear, hold the tube close to
the Eartip and remove it carefully.

11
EARTIPS AND TUBES
Open Style-suitable for mild hearing loss.
Openings allow for Sound to pass through from
outside. Some users will nd the sound more
natural, when volume is set to maximum;
feedback may occur.
Closed Style-suitable for moderate to severe
hearing loss.
Complete seal of the ear canal, to help block
minor external sounds and greatly enhance the
sound quality. Feedback may or may not occur
when volume is set to maximum.
May not be suitable or most comfortable for users
with small/narrow ear canals.

12
Sizing-Three sizes of eartips: Large, Medium and
Small(1 of each)
Select the size that ts most comfortably in your
ear.
Cerumen (ear wax) may accumulate on the eartip.
This may aect sound quality. Clean the earbuds
daily.
For hearing aids with a standard eartip:
Replace the eartips approximately every three to
six months, or sooner if you notice cracks or other
changes. Ask your Hearing Care Professional to
clean the tubes or to replace them as needed.
For hearing aids with custom-made eartip:
Ask your Hearing Care Professional to clean the
tubes or to replace the eartips and tubes as
needed.

13
Cleaning the eartips:
Clean the eartip on removal with a soft, dry tissue
to prevent build up of ear wax. Never use running
water or immerse the eartip in water.
Replacing standard eartip:
Gently remove used eartip and replace with the
new one.
14
When you pair your Acuity RIC hearing aids to
your Apple device, the audio from your Apple
device goes to your hearing device. Should the
Bluetooth be disconnected due to range or any
other reason, reconnect the goHearing R1 withthe
device that you wish to pair with.
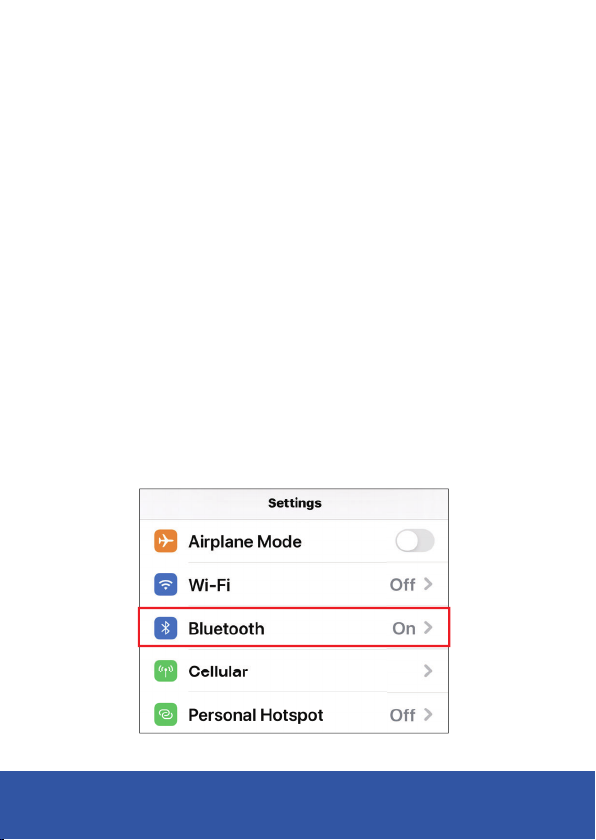
To pair your hearing device, follow these steps:
1. Make sure that Bluetooth is ON on your Apple
device. Go to Settings, and select Bluetooth.
PAIR & CONNECT
15
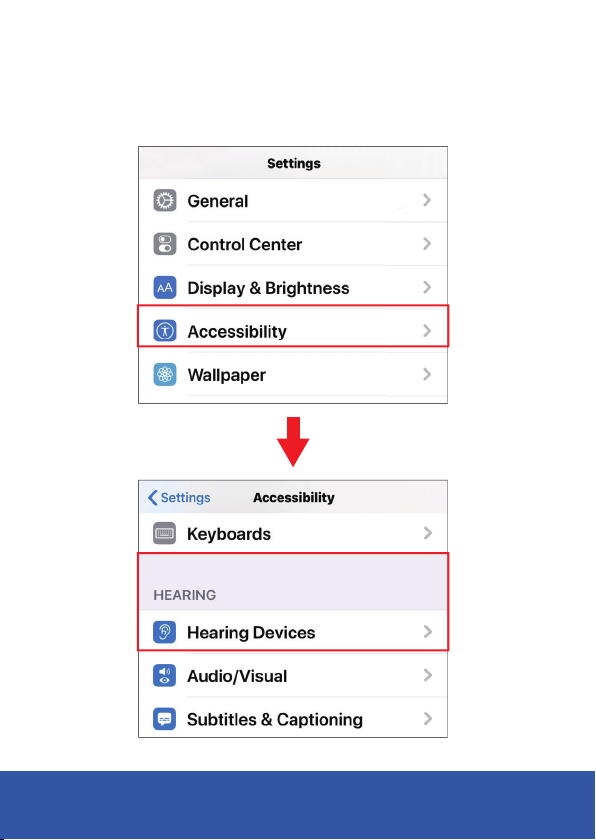
2. Go to Settings > Accessibility > Hearing >
Hearing Devices.

16
3. Your Apple device will search for your hearing
device. Under M Hearing Devices, select the
device name “Acuity RIC”.
4. Tap Pair when you see the pairing request on
the screen. If you have two hearing devices,
you'll get two requests. Pairing could take up
to a minute.

17
You can start using your Acuity RIC hearing aids
when you see it in the M Hearing vices screen.
Pairing with more than one device
When you pair your Acuity RIC unit with more
than one Apple device, the connection for your
hearing devices switches from one device to the
other when you use audio. The connection also
switches when you receive a call on your phone. If
you make changes to your hearing device
settings on one device, they're sent to your other
devices.
Other manuals for Acuity
2
Table of contents


