Heartwood CALYPSO CAL-E1-2LEG User manual

CALYPSO
A
T
T
E
N
T
I
O
N
PAGE 1 of 8 PAGE 1 de 8
Model: CAL-E1-2LEG
Modèle: CAL-E1-2LEG
IF ASSEMBLING A 3 LEG MODEL OF THIS DESK CALE13LEG, PLEASE REFER TO THE
ASSEMBLY INSTRUCTION INCLUDED WITH THE 3 LEG MODEL.
POUR ASSEMBLER UN MODÈLE À 3 PATTES DE CE BUREAU CALE13LEG, VEUILLEZ
CONSULTER LE GUIDE D’ASSEMBLAGE INCLUS AVEC LE MODÈLE À 3 PATTES.
Assembly Instruction
Guide d’assemblage
QUESTIONS OR CONCERNS?
PHONE Customer Service
1-800-567-3060
M-F 6am - 4:30 pm PST
QUESTIONS OU PRÉOCCUPATIONS?
COMMUNIQUER avec le Service à la clientèle
Tél: 1-800-567-3060
du lundi au vendredi entre 6h00 et 16h30
(Heure Normale du Pacique HNP)
NOVEMBER 21, 2019, REV D LE 21 NOVEMBRE, 2019, RÉV D
Video Instruction /
Instruction
vidéo

21
3
5
6
4
4
A (4pcs)
M6x12mm
B (8pcs)
M8x20mm
D (2pcs)
ST3.5x16mm
C (12pcs)
ST5x23mm M5
E
PAGE 2 of 8 PAGE 2 de 8
PARTS:/LISTE DES PIÈCES:
HARDWARE/QUINCAILLERIE:
1. FOLDING FRAME/SUPPORT REPLIABLE
2. LEFT LEG TOP PLATE/BRAS EN PORTE À FAUX GAUCHE
3. RIGHT LEG TOP PLATE/BRAS EN PORTE À FAUX DROITE
4. LEG FOOT/PIÈTEMENT
5. KEY PAD/TÉLÉCOMMANDE
6. POWER CABLE/CÂBLE D’ALIMENTATION
7. DESKTOP (ORDERED SEPARATELY - SHOWN PAGE 7, STEP 9)/DESSUS DU BUREAU
(COMMANDÉS SÉPARÉMENT - VOIR PAGE 7, ÉTAPE 9)
NOVEMBER 21, 2019, REV D LE 21 NOVEMBRE, 2019, RÉV D

1
3
A
T
T
E
N
T
I
O
N
PAGE 3 of 8 PAGE 3 de 8
STEP 1
ÉTAPE 1
STEP 2
ÉTAPE 2
TAP IN PLACE IF FIT IS
TIGHT
FRAPPER LÉGÈREMENT
SI C’EST SERRÉ
BE CAREFUL OF THE CABLE!
FAIRE ATTENTION AU CÂBLE!
D
ESKFRONT
/
DEVANT
D
U
B
UREA
U
NOVEMBER 21, 2019, REV D LE 21 NOVEMBRE, 2019, RÉV D

2
1
E
A
E
A
A (2pcs)
M6x12mm
M5
E
A (2pcs)
M6x12mm
M5
E
PAGE 4 of 8 PAGE 4 de 8
STEP 3
ÉTAPE 3
STEP 4
ÉTAPE 4
ROTATE SLIGHTLY UNTIL BOLT “A” ALIGNS
PIVOTER DOUCEMENT JUSQU’À
L’ENLIGNEMENT DU BOULON ‘’A’’
ROTATE SLIGHTLY UNTIL BOLT “A” ALIGNS
PIVOTER DOUCEMENT JUSQU’À
L’ENLIGNEMENT DU BOULON ‘’A’’
D
ESKFRONT
/
DEVANT
D
U
B
UREA
U
TAP IN PLACE IF FIT IS
TIGHT
FRAPPER LÉGÈREMENT
SI C’EST SERRÉ
D
ESKFRONT
/
DEVANT
D
U
B
UREA
U
NOVEMBER 21, 2019, REV D LE 21 NOVEMBRE, 2019, RÉV D

E
1
4
4
B
B
A
T
T
E
N
T
I
O
N
PAGE 5 of 8 PAGE 5 de 8
STEP 5
ÉTAPE 5
STEP 6
ÉTAPE 6
TIGHTEN BOLTS
SERRER LES BOULONS
B (8pcs)
M8x20mm
M5
E
D
ESKFRONT
/
DEVANT
D
U
B
UREA
U
D
ES
KFRONT/DEVA
N
T
DU
B
U
R
E
A
U
IF ASSEMBLING A 3 LEG MODEL OF THIS DESK CALE13LEG, PLEASE REFER TO
THE ASSEMBLY INSTRUCTION INCLUDED WITH THE 3 LEG MODEL.
POUR ASSEMBLER UN MODÈLE À 3 PATTES DE CE BUREAU CALE13LEG, VEUILLEZ
CONSULTER LE GUIDE D’ASSEMBLAGE INCLUS AVEC LE MODÈLE À 3 PATTES.
NOVEMBER 21, 2019, REV D LE 21 NOVEMBRE, 2019, RÉV D

1
E
SLIDE FRAME APART IN EQUAL INCREMENT UNTIL THE DESIRED SIZE
IS REACHED.
EXAMPLE: FOR 72 TOP SIZE ON DESK SIDE, EXPAND FRAME TO 72
ON FRAME SIZE
INDICATOR
NOTE: FOR 48 TOP SIZE DESK, DO NOT SLIDE APART.
ÉCARTER À ÉGALE DISTANCE POUR OBTENIR LE FORMAT DÉSIRÉ
EXEMPLE: POUR UN BUREAU DE 72, ÉCARTER LE SUPPORT À 72 TEL
QU’INDIQUÉ SUR LE SUPPORT
NOTE: POUR UN BUREAU DE 48, NE PAS ÉCARTER DEVANT DU
BUREAU
D
ES
KFRONT/DEVA
N
T
DU
B
U
R
E
A
U
72
D
ES
KFRONT/DEVA
N
T
DU
B
U
R
E
A
U
STEP 7
ÉTAPE 7
STEP 8
ÉTAPE 8
TO ADJUST FRAME SIZE, LOOSEN BOLTS
POUR RÉGLER LE FORMAT DU SUPPORT, DÉSERRER LES BOULONS
PAGE 6 of 8 PAGE 6 de 8NOVEMBER 21, 2019, REV D LE 21 NOVEMBRE, 2019, RÉV D

12 x C
5
5
2 x D
A
T
T
E
N
T
I
O
N
KEYPAD CAN BE INSTALLED LEFT OR RIGHT. FOR CORRECT
INSTALLATION, SEE DETAIL A.
LA TÉLÉCOMMANDE PEUT ÊTRE INSTALLÉE À GAUCHE OU À
DROITE. POUR L’INSTALLATION, VOIR DÉTAIL A.
KEYPAD IS INSTALLED WITH THE BACKSIDE OF THE KEYPAD FLUSH
WITH FRONT EDGE OF THE DESKTOP
L’ARRIÈRE DE LA TÉLÉCOMMANDE SE FIXE AU REBORD DU BUREAU
PAGE 7 of 8 PAGE 7 de 8
PLUG KEYPAD INTO CONTROL BOX
BRANCHER LA TÉLÉCOMMANDE À LA
BOÎTE DE CONTRÔLE
STEP 10
ÉTAPE 10
D (2pcs)
ST3.5x16mm
LAMINATE
DESK TOP/
DESSUS
LAMINÉ
DEVANT/FRONT
LIP OF KEYPAD/
REBORD DE LA
TÉLÉCOMMANDE
DETAIL A/DÉTAIL A
KEYPAD/
TÉLÉCOMMANDE
NOTE: PLACE DESKTOP ON A PROTECTIVE SURFACE PRIOR TO
INSTALLING THE HEIGHT ADJUSTABLE BASE TO PREVENT DAMAGE
TO THE DESKTOP SURFACE.
NOTE: DÉPOSER LE BUREAU SUR UNE SURFACE SÉCURITAIRE
PENDANT L’INSTALLATION DE LA BASE AFIN DE PRÉVENIR DES BRIS
DU DESSUS DU BUREAU.
STEP 9
ÉTAPE 9
C (12pcs)
ST5x23mm ATTACH HEIGHT ADJUSTABLE BASE TO
UNDERSIDE OF DESKTOP.
FIXER LA BASE SOUS LE DESSUS DE BUREAU
NOVEMBER 21, 2019, REV D LE 21 NOVEMBRE, 2019, RÉV D

6
E
6
A
T
T
E
N
T
I
O
N
IMPORTANT! BEFORE PLUGGING INTO POWER, SEE QUICK
GUIDE FOR UNIT SETUP AND KEY PAD OPERATION.
AVIS IMPORTANT! AVANT DE BRANCHER À UNE PRISE DE
COURANT, CONSULTER LE GUIDE DE RÉFÉRENCE RAPIDE POUR
LA MISE EN FONCTION DES TOUCHES DE LA TÉLÉCOMMANDE.
STEP 12
ÉTAPE 12
IMPORTANT! DESK IS HEAVY, USE TWO OR MORE PEOPLE
WHEN FLIPPING DESK.
AVIS IMPORTANT! BUREAU ET LOURDE ET NÉCESSITE DEUX
PERSONNES OU PLUS POUR LE METTRE SUR SES PATTES.
PAGE 8 of 8 PAGE 8 de 8
STEP 11
ÉTAPE 11
TIGHTEN BOLTS
SERRER LES BOULONS
NOVEMBER 21, 2019, REV D LE 21 NOVEMBRE, 2019, RÉV D

CALYPSO Series
Height Adjustable Keypad Quick Guide
Basic Touchscreen Keypad Operation
• The touchscreen keypad buttons lockout after inactivity. If the buttons are not touched for 30 seconds, the M1, M2 and
Home buttons will lock. To unlock, touch either the up or down button once and all buttons will re-activate.
• Two preferred heights can be set using the two Memory buttons M1 and M2.
• The Home button has been pre-programmed for the optimal height location of 28.3” (72cm) and is non-adjustable.
• This height adjustable base is equipped with an anti-collision feature. If the desk encounters an immovable object while
going up or down, the desk will automatically reverse.
Up & Down Buttons
When the Up or Down buttons
are touched, the desk will move
until pressure is removed from
the button.
Memory Buttons (M1 & M2)
Using the Up & Down buttons,
position the desk at a desired
height. Press and hold either
M1 or M2 for 5 seconds. Once
a “beep” is heard, the height is
saved.
Home Button
Press the Home button to move
to the optimal height of 28.3”.
Display Screen
Displays the current height of
the desk.
NOVEMBER 22, 2019 REV C Page 1 of 2
M1
28.3 M2
HOME
UP & DOWN MEMORY
DISPLAY
HOME
QUESTIONS OR CONCERNS?
Please contact Customer Service
T 1-800-567-3060
M-F 6am - 4:30 pm PST
Note/Caution:
• If you encounter an issue with your desk, unplug for 2 minutes and plug back into a conrmed power source.
• Saved height presets will not be lost in the event of a power outage.
• Do not exceed recommended weight limit of: 2 LEG MODEL (CAL-E1-2LEG) - 120kg (265lbs)
3 LEG MODEL (CAL-E1-3LEG) - 145kg (320lbs)
• Recommended weight limit must also include the weight of the desktop/worksurface.
• Install with 2.5cm (1”) clearance around work surface to prevent nger pinch.
• Ensure vertical motion is clear of obstruction
• Duty cycle: 10% of the industry standard run cycle. For example, two minutes of constant operation should be
followed by 18 minutes of inactivity.
• The design of Calypso does not support the lifting of extreme weight loads, for example, a person.
• Do not open electrical components (controller, motor housing or keypad).
• Calypso is designed for indoor use only.
• In the unlikely event that the desk becomes loose/shaky, check that all screws and bolts are securely installed
and tight.
Quick guide should remain with the product after
assembly for user reference.
M1
28.3 M2
HOME
M1
28.3 M2
HOME
M1
28.3 M2
HOME
M1
28.3 M2
HOME
Video Instruction /
Instruction
vidéo

CALYPSO Series
NOVEMBER 22, 2019 REV C Page 1 of 2
Error Code Problem Solution
ER1 Motor error Power off for 2 min and restart. If fault still exists,
contact customer service
ER2 Synchronization error
Power off for 2 min. Keypad will display ASR. Press
and hold until desk reaches lowest position and
continue to hold until display resets
ER3 Cable error Power off for 2 min. Check all connections and
restart
ER4 Communication error Power off for 2 min. Check keypad cable and restart
ER5 Overload protection 2 legs Load> 265lbs or 3 legs load>320lbs.
Lighten the load, power off for 2 min and restart
HOT Motors have overheated Overheat protection, desk will resume after ve
minutes
ASR Reset/Recalibrate
controller
Press and hold until desk reaches lowest position
and continue to hold until display resets
Keypad Error Codes:

Série CALYPSO
Guide rapide du clavier d’ajustement de la hauteur
Opération de base du clavier
• Les boutons du clavier se verrouillent après être inactifs. Si les boutons ne sont pas touchés après 30 secondes, les
boutons M1, M2 et Home seront verrouillés. Pour déverrouiller, toucher soit le bouton haut ou bas et tous les boutons
seront réactivés.
• Deux hauteurs préférées peuvent être choisies en utilisant les boutons de mémoire M1 et M2.
• Le bouton Home a été préprogrammé à la hauteur optimale de 28,3’’ (72cm) et n’est pas réglable.
• Cette base réglable en hauteur est munie d’une fonction anti-collision. Si le bureau rencontre un obstacle en montant ou
en descendant, l’action s’inversera automatiquement.
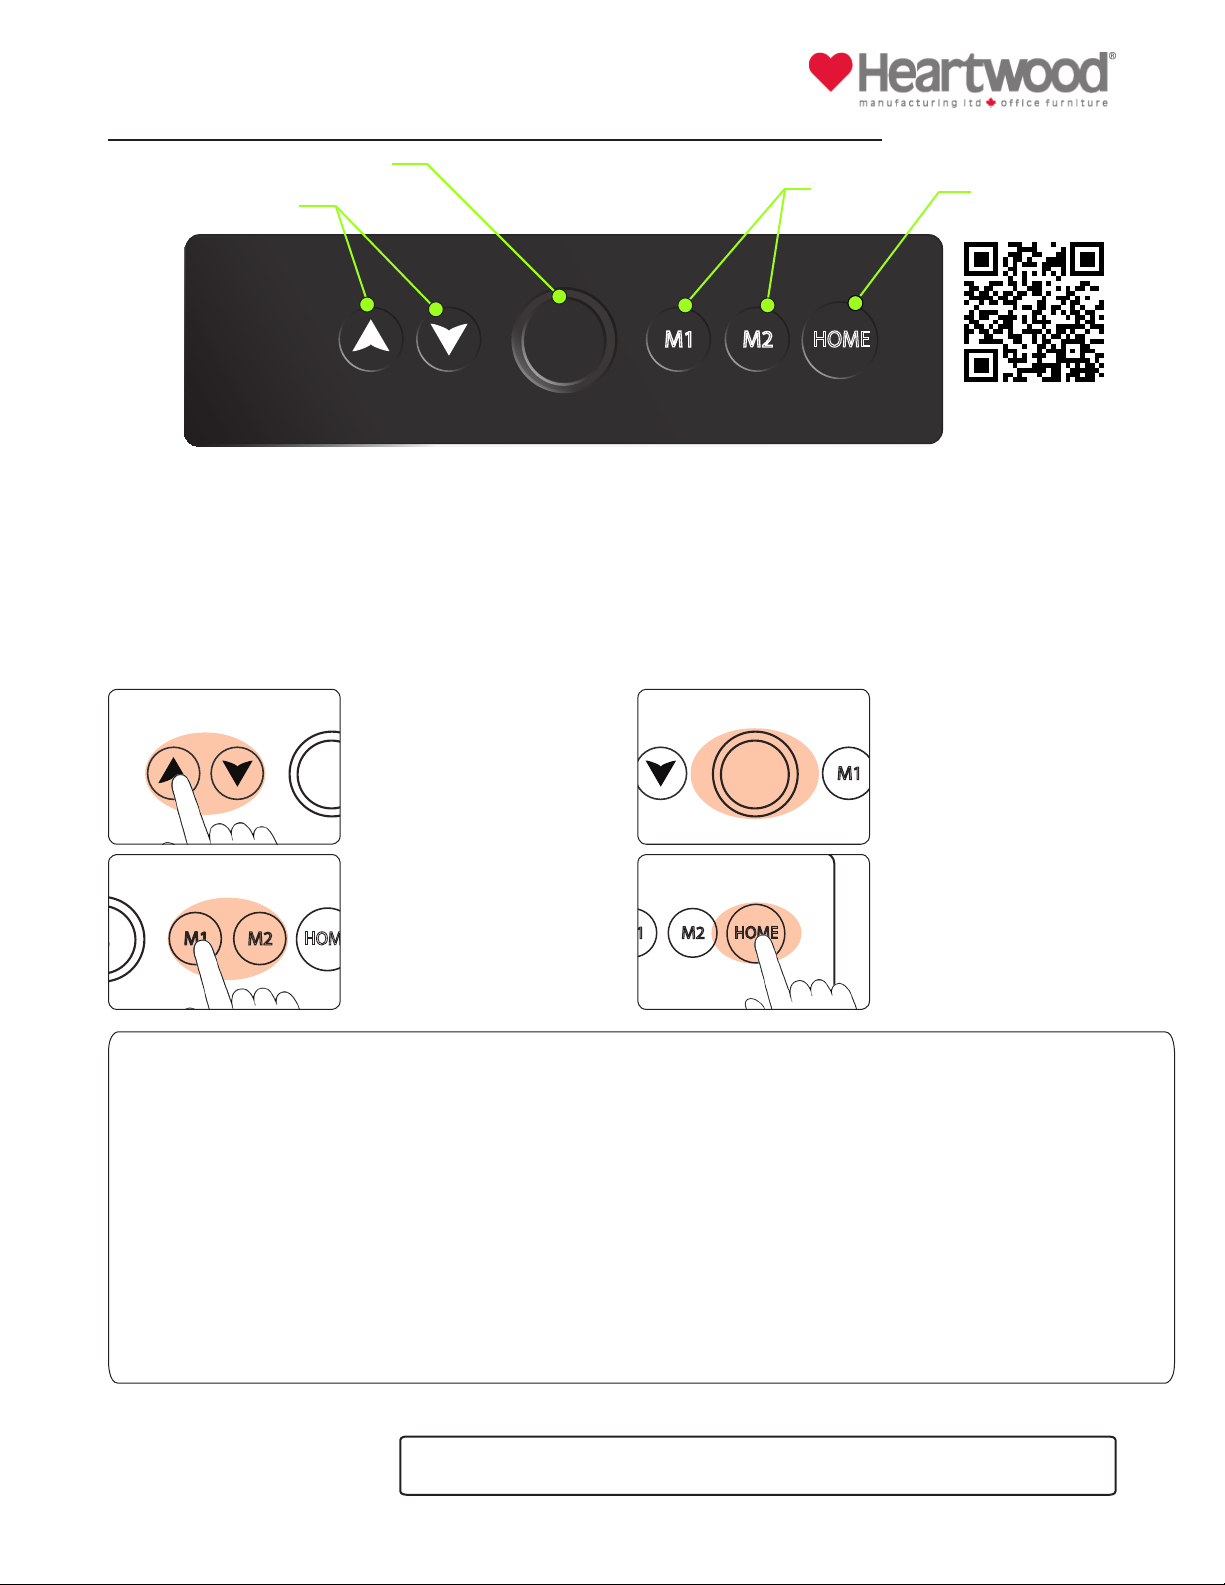
Boutons haut et bas
Quand vous touchez les
boutons haut ou bas, le bureau
sera en mouvement tant que
vous presserez les boutons.
Boutons de mémoire (M1
& M2)
En utilisant les boutons haut et
bas, vous obtenez la hauteur de
bureau désirée. Pressez et tenez
le bouton M1 ou M2 pendant 5
secondes. Après le ‘’beep’’, la
hauteur est enregistrée.
Bouton Home
Pressez le bouton Home pour
obtenir la hauteur optimale de
28,3’’.
Afficheur
Affiche la hauteur actuelle du
bureau.
22 NOVEMBRE, 2019 REV C Page 1 d 2
M1
28.3 M2
HOME
HAUT & BAS MÉMOIRE
AFFICHEUR
HOME
QUESTIONS OU PRÉOCCUPATIONS?
COMMUNIQUER avec le Service à la clientèle
Tél: 1-800-567-3060
du lundi au vendredi entre 6h00 et 16h30
(Heure Normale du Pacifique HNP)
Note/Mise en garde
• Si vous rencontrez un problème avec votre bureau, débranchez-le pendant 2 minutes, puis rebranchez-le à une source
d’alimentation fonctionnelle.
• Les hauteurs enregistrées ne seront pas perdues dans l’éventualité d’une panne de courant.
• Ne pas excéder la limite de poids recommandée:
MODÈLE 2 PATTES (CAL-E1-2LEG) – 120kg (265lbs)
MODÈLE 3 PATTES (CAL-E1-3LEG) – 145kg (320lbs)
• La limite de poids recommandée doit aussi inclure le poids de la surface de travail.
• Conserver 2,5cm (1’’) d’espace libre autour de la surface de travail pour prévenir de se pincer les doigts.
• S’assurer que l’espace vertical est libre de toute obstruction.
• Cycle d’utilisation: Le standard d’utilisation de l’industrie est de 10%. Par exemple, deux minutes d’opération devraient être
suivies par 18 minutes d’inactivité.
• Le design de Calypso ne supporte pas la levée de poids extrêmes comme une personne par exemple.
• Ne pas ouvrir les composantes électriques (contrôle, moteur ou clavier).
• Calypso est conçu pour usage interne seulement.
• Dans l’éventualité que le bureau devient instable, vérier toutes les vis et les écrous pour qu’ils soient serrés en toute sécurité.
Le guide rapide devrait demeurer à la portée de la
main après l’assemblage pour référence.
M1
28.3 M2
HOME
M1
28.3 M2
HOME
M1
28.3 M2
HOME
M1
28.3 M2
HOME
Video Instruction /
Instruction
vidéo

Série CALYPSO
22 NOVEMBRE, 2019 REV C Page 1 d 2
Code d’erreur Problème Solution
ER1 Erreur du moteur Eteindre pendant 2 min. et redémarrer. Si le prob-
lème persiste, contactez le service à la clientèle.
ER2 Erreur de synchronization
Éteindre pendant 2 min. Le clavier afchera ASR.
Appuyez et maintenez enfoncé jusqu’à ce que
le bureau atteigne la position la plus basse et
maintenez-le enfoncé jusqu’à ce que l’afchage se
réinitialise.
ER3 Erreur de câble Éteindre pendant 2 min. Vérier toutes les
connexions et redémarrer.
ER4 Erreur de communication Éteindre pendant 2 min. Vérier le câble du clavier
et redémarrer.
ER5 Protection de surcharge
2 pattes - capacité> 265lbs ou 3 pattes capacité>
320lbs. Alléger la charge, éteindre pendant 2 min et
redémarrer.
HOT Surchauffe du moteur Protection contre la surchauffe, le fonctionnement
reprendra après cinq minutes.
ASR
Contrôle de
réinitialisation /
recalibration
Appuyez et maintenez enfoncé jusqu’à ce que
le bureau atteigne la position la plus basse et
maintenez-le enfoncé jusqu’à ce que l’afchage se
réinitialise
Codes d’erreur du clavier:
Other manuals for CALYPSO CAL-E1-2LEG
1
This manual suits for next models
1
Table of contents
Other Heartwood Indoor Furnishing manuals

Heartwood
Heartwood 900-CRANK-SL User manual

Heartwood
Heartwood Hazel MONTESSORI CLIMBING TRIANGLE User manual

Heartwood
Heartwood ATL-E1-1LEG User manual

Heartwood
Heartwood CALYPSO CAL-E1-3LEG User manual

Heartwood
Heartwood CALYPSO CAL-E1-2LEG User manual

Heartwood
Heartwood RIS-E1-2LEG User manual

Heartwood
Heartwood ATHENA ATH-E1-3LEG User manual