Heat Design EHP-06O User manual

EHP-06O / EHP-10O / EHP-15O / EHP-18O
1
Instruction manual
Aluminium radiator
Smart Electric Heaters
READ THIS CAREFULLY BEFORE USING THIS DEVICE FOR
THE FIRST TIME.
PAY ATTENTION: to avoid overheating, do not cover the appliance.

EHP-06O / EHP-10O / EHP-15O / EHP-18O
2
SAFETY ADVICE
READ THIS NOTICE CAREFULLY BEFORE
OPERATING THE APPLIANCE.
• This product is not intended to be used by persons
(including children) whose physical, sensory or
mental capacities are reduced or by persons without
experience or knowledge, unless if they have been
given help, from someone responsible for their
safety, supervision or giving the instructions
concerning the use of the device.
• Make sure that the voltage indicated on the
nameplate of the appliance corresponds to that of
your electrical installation. If this is not the case,
contact your dealer and do not connect.
• Regularly check the condition of the power cable. Do
not use if the power cord, plug or appliance is
damaged
• The device should not be placed underneath a
power outlet.
• The power cable should never be in contact with hot
parts of the device.
• CAUTION: To prevent overheating, do not cover the
heater.
• Never immerse the appliance in water or other

EHP-06O / EHP-10O / EHP-15O / EHP-18O
3
liquids.
• Keep a minimum distance of one meter from
flammable objects such as curtains, textiles etc.
• Do not clean the unit with abrasive chemicals.
• Do not place sharp metal objects or your fingers into
the unit to prevent damage and reduce the risk of
electric shock.
• Do not use accessories other than those supplied or
recommended by the manufacturer. This can be
dangerous and may damage the device.
• Never repair the unit yourself. Otherwise you will
lose the benefit of the guarantee. Like any electrical
appliance, it must be repaired by a qualified person.
If the power cable is damaged, it must be replaced
by the manufacturer, his service agent or similarly
qualified person in order to avoid danger.
• A repair involving the opening of the radiator can be
made by the manufacturer or its distribution network.
• The heating device is filled with a specified quantity
of oil. The repair requiring the opening of the oil tank,
can be carried out by the manufacturer or the
manufacturer's after-sales service to avoid the event
of oil leak.
• The heating device is disposed with the rules
concerning the elimination of the oil.
THE MANUFACTURER IS NOT RESPONSIBLE FOR
THE MISUSE OF THE EQUIPMENT. KEEP THESE
EHP-06O / EHP-10O / EHP-15O / EHP-18O
4
INSTRUCTIONS CAREFULLY FOR FUTURE
REFERENCE.
1 / SPECIFICATIONS
• Digital LCD display
• Temperature control by digital display
• Clock
• Weekly schedule
• 2 modes:
o Manual
o Automatic with weekly presetting
- 24h programmer, custom setting.
- 7 different daily presets
• Frost protection function - automatically switches on if temperature drops
below 7° to protect pipes from frost
ONLY FOR USE INDOORS
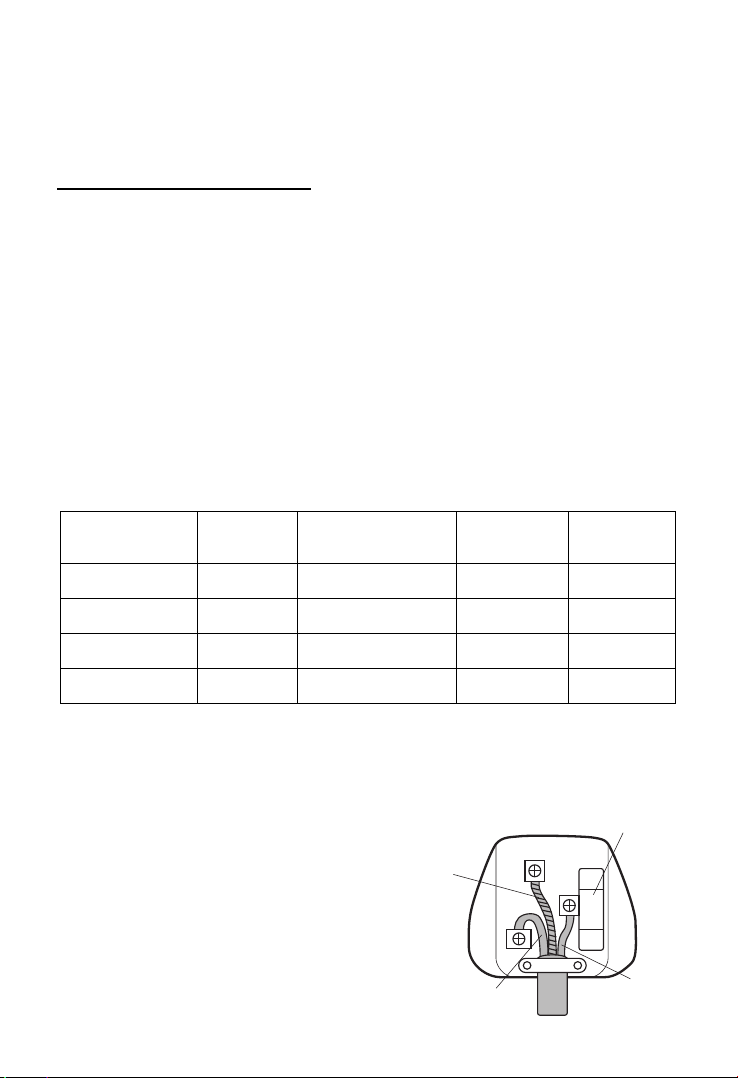
Replacing the Plug
If the Plug is damaged or requires
replacement, follow the wiring
instructions supplied with the new Plug.
The Green and Yellow wire must be
connected to the terminal marked with
the Earth symbol or coloured Green &
Yellow.
The Brown wire must be connected to the
Model
Power
Voltage
Number of
elements
Insulation
class
EHP-06O
600W
AC 230 50Hz
5
Class II
EHP-10O
1000W
AC 230 50Hz
6
Class II
EHP-15O
1500W
AC 230 50Hz
9
Class II
EHP-18O
1800W
AC 230 50Hz
10
Class II
N
L
E
Green and
Yellow (Earth)
Fuse
(13 amp)
Brown (Live)
Blue (Neutral)
FUSE

EHP-06O / EHP-10O / EHP-15O / EHP-18O
5
terminal marked with the letter L or coloured Red.
The Blue wire must be connected to the terminal marker with the letter N or
coloured Black.
A 13amp Plug to BS 1363 must be fitted with a 13amp fuse to BS 1362.
How to install the device
Make sure that the distance from walls and objects is
respected.
Figure 1a
1 – Drill holes in the wall by following the steps in
Figure 1. Make sure they are all correct.

EHP-06O / EHP-10O / EHP-15O / EHP-18O
6
Distance H and L between the fixation points.
Radiator
EHP-06O
EHP-10O
EHP-15O
EHP-18O
H (mm)
240
240
240
240
L (mm)
160
240
480
560
Figure 1b
2 - Place all the Rawl plug in the holes in the wall, as
in the previous step
3 - Attach the upper brackets using screws
4 - Place the radiator on the brackets
5 - Attach the lower brackets with screws and place the
radiator to the wall
Warning: Before plugging in the unit make sure the
radiator is properly attached to the wall. Otherwise
problems can occur.
Wall Rawl plug
Hook Screw Heater
Hook

EHP-06O / EHP-10O / EHP-15O / EHP-18O
7
2 / DESCRIPTION
2.1 / The Control Panel
__ Power switch
__ Power on / stand by
+ __ Hold both buttons for 3 Seconds to unlock control panel
__ Select mode or program
__ Setting / OK
__ Increasing; Keep pressing for quick increasing; Forward the hour in 24
hour program setting.
__ Decreasing; Keep pressing for quick decreasing; Backward the hour in
24 hour program setting.
__ Open-window on/off
2.2 / LCD display
1 - Hour
2 - Day
3 - Program number
4 - Open-window
5 - Frost mode
6 - Economic mode
7 - Comfort mode
8 - Heating on
9 - Locking radiator
10 - Programmed temperature
11 - Program content
12 - Time scale
3
6
4
5
7
12
10
11
8
9
12
EHP-06O / EHP-10O / EHP-15O / EHP-18O
8
2.3 / Quick start:
Turn on the power button and press to turn on the screen, the
equipment will work under COMFORT mode, press to set the desired
temperature.
2.4 / Clock setting:
For first using of program, the clock will required setting before use the
P1/P2/P3, only when the clock setting is finished, the program can work.
When in clock setting, the hour will twinkle first, press +/- to set the right time
(0-23) and press to get into minute setting, press +/- to set the right time
(0-59) and press to get into date setting, press +/- to set the date from 1-
7, press to finish the date setting.
Clock modification: Long press 3 seconds to modify the clock.
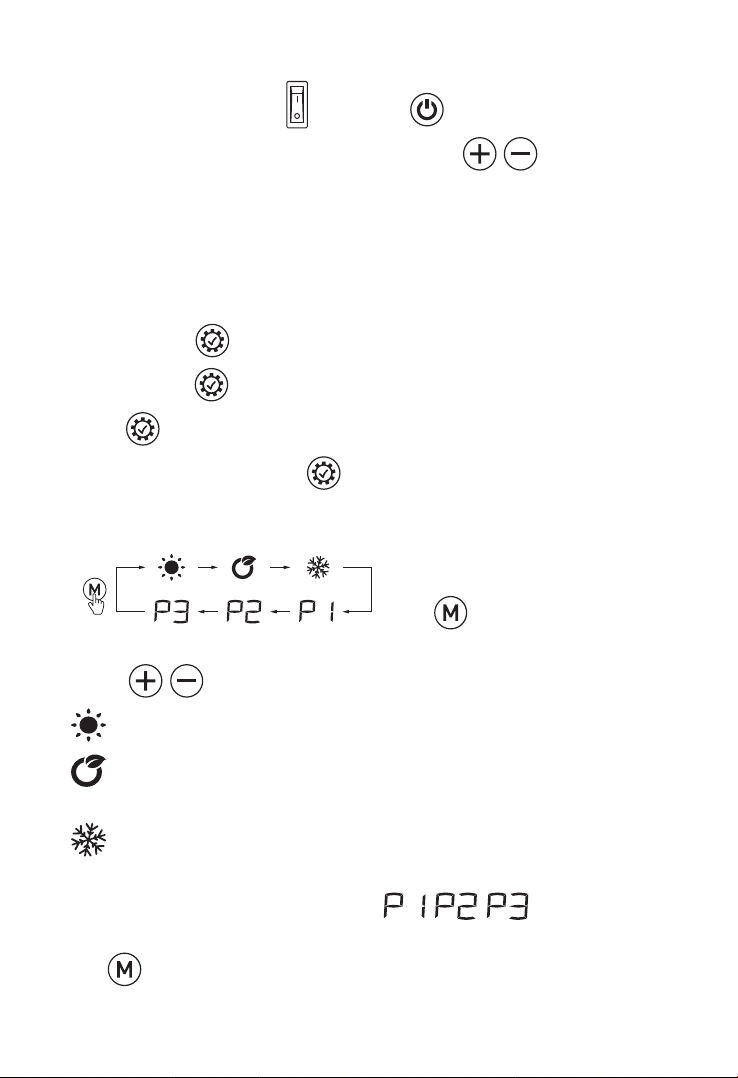
2.5 / Function setting:
1) Press to choose the mode or the
program;
2) Press to choose the temperature.
• Comfort mode: Setting temp. from 5ºC to 35ºC
• ECO mode: Setting temp. from 1.5ºC to 31.5ºC; 3.5ºC less than comfort
mode, when you set up the temp. of comfort mode.
• Anti-frost mode: Setting 7ºC for room temp; Cannot change the temp.
3) Program modification:
It’s with factory presetting of the program , this program can
get modified according to the requirement of customer.
Press to choose the program, only when the program get selected, press

EHP-06O / EHP-10O / EHP-15O / EHP-18O
9
to modify the program.
When you’re in , press once, LOGO and the fist hour LOGO
start to twinkle. Use to choose the mode for each hour and use
to move the twinkle hour LOGO till finish 24 hour mode setting. Press
to confirm the 24 hour setting and quit the setting status.
When you’re in , press once, LOGO and the fist hour LOGO
start to twinkle. Use to choose the mode for each hour and use
to move the twinkle hour LOGO till finish 24 hour mode setting.
Press to confirm the 24 hour setting and turn from working days program
to weekend program setting. When finish the
setting press to confirm and quit.
When you’re in , press once, LOGO and the fist hour LOGO
start to twinkle. Use to choose the mode for each hour and use
to move the twinkle hour LOGO till finish 24 hours mode setting. Press
to confirm the 24 hour setting and turn from Monday program to Tuesday
program setting. When finish 7 days setting press to confirm and quit.
means comfort mode;
means ECO mode;
means Anti-frost mode;
NOTE: the block against the clock will twinkle when the block
corresponding the program is working.

EHP-06O / EHP-10O / EHP-15O / EHP-18O
10
2.6 / Program factory presetting:
: Same program from Monday to Sunday, custom can modify the program.
: Same program from Monday to Friday and same program from Saturday
to Sunday.
Working day Weekend
: Can set different program for each day.
Factory presetting is with same program from Monday to Friday, same program
from Saturday to Sunday.
Working day Weekend

EHP-06O / EHP-10O / EHP-15O / EHP-18O
11
2.7 / Windows detector function:
Press to turn on/off the windows function, when the logo display in the
screen, it means window function is on.
When the function is active, a drop in temperature by 2ºC in less than 2 minutes,
heater will stop working and the window logo is twinkling.
Press , the heater will go back to former running program, then the
windows logo stop twinkling.
2.8 / Screen lock
No operation for 1 min, keyboard lock automatically.
Press together unlock the keyboard.
will show only the unit is heating
3 / Maintenance :
To switch off the device
Place the function button on the back of the unit in position « 0FF »
Clean with a damp cloth
Caution: Do not use abrasive products. They could
damage the unit.
Clean the device at least once a year with a vacuum cleaner to remove any
accumulated dust.
Never immerse the appliance in water or other liquids.
This product is marked with the crossed wheelie bin symbol relating
to waste electrical and electronic equipment. This means that this
product should not be disposed of with household waste but must be
supported by a system of collection in accordance with EU Directive
2002/96/EC. It will then be recycled or dismantled to minimize impacts on the
environment. Electrical and electronic products are potentially harmful to the
environment and human health due to the presence of hazardous substances.
190911V 1
12
Warranty
This product has a warranty of two years on Electrics and 10 years on the body
of the radiator from the date of purchase. The warranty covers failures and
malfunctions of the device through a use consistent with the intended use and
information of the user manual. To be covered under warranty, proof of
purchase is required (receipt or invoice) and the product must be complete with
all its accessories.
The guarantee clause does not cover damage resulting from normal wear, lack
of maintenance, negligence, faulty mounting or improper use (shocks, non-
compliance with recommendations of power, storage, conditions of use ...) Also
excluded from the guarantee are any issues arising from the use of accessories
or spare parts that are not part of the original device, and removal or
modification of the device.
For Information please contact: [email protected]
Please fill in the warranty form below to register your product. Once
completed please send to Hothouse Inspired Products, Stonehill Road,
Farnworth, Bolton, Lancashire, BL4 9TN, United Kingdom
Serial Number of Radiator: ____________________________________________
Model: ___________________________________________________________
Customer Name: ___________________________________________________
Customer
Address:_________________________________________________________
_________________________________________________________________
Customer Contact
Number: ________________________________________________
Date of Purchase:
_________________________________________________________
This manual suits for next models
3
Table of contents
Popular Heater manuals by other brands


Winterwarm
Winterwarm XR installation manual

Dimplex
Dimplex DXLWP800TI B Installation and operating instructions

STIEBEL ELTRON
STIEBEL ELTRON CK 20 S euro Operating and installation instructions

Argo
Argo CREOLA Q3 operating instructions

Alpine
Alpine Stirling F Information Leaflet

Mi-T-M
Mi-T-M Kerosene Portable Heaters Operator's manual