Heat Outdoors Shadow Diffusion Operation and maintenance manual
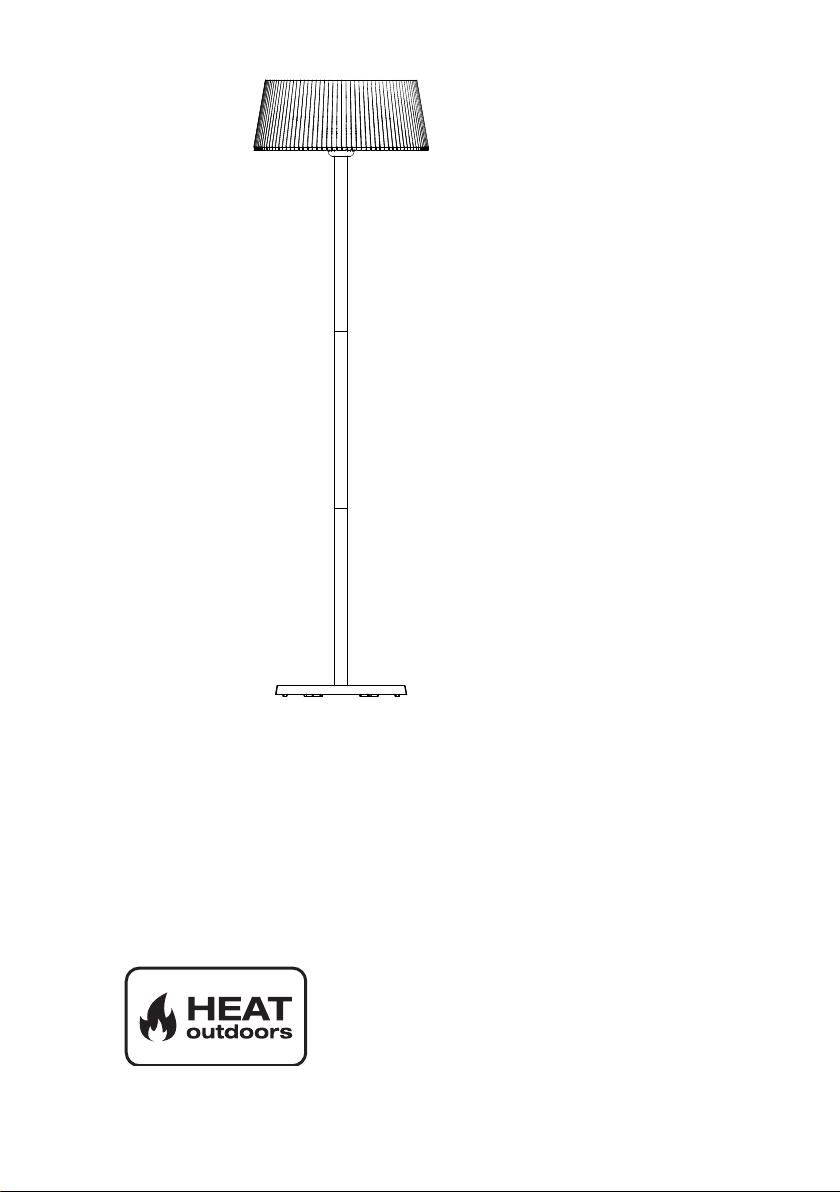
Shadow Diffusion
Shade Lamp Patio Heater
Safety Instructions and Operation Manual
902113
Heat Outdoors
Unit 9, Stort Valley Industrial Estate
Stansted Road, Bishop’s Stortford
Hertfordshire, United Kingdom
CM23 2TU
www.heat-outdoors.co.uk
01279 466500

2Contents
Contents
Brief Introduction . . . . . . . . . . . . . . . . . 3
Important Information . . . . . . . . . . . . . . . 3
Safety Instructions . . . . . . . . . . . . . . . . . 4
Assembly Instructions . . . . . . . . . . . . . . . 7
Operation . . . . . . . . . . . . . . . . . . . . . 9
Cleaning & maintenance . . . . . . . . . . . . . 10
Storage . . . . . . . . . . . . . . . . . . . . . 11
Technical Specication . . . . . . . . . . . . . . 11
Customer Service . . . . . . . . . . . . . . . . 11

3
Brief Introduction
Brief Introduction
Thank you for choosing our Shadow Diffusion Shade Patio Heater. This instruction
manual will provide you with valuable information necessary for the proper assembly,
care and maintenance of your new product. Please take a few moments to thoroughly
read the instructions and familiarize yourself with all the operational aspects of your
new heater.
Important Information
Please carefully read all instructions provided before using this appliance. This heater
must be installed in accordance with the instructions and local regulations.
This Operation Manual contains the important information on your safety, as well
as some recommendations on the correct use, installation and maintenance of the
appliance.
When operating this infrared heater be sure to observe necessary precautions as
improper operation with disregard of these precautions may result in harm to health of
the user, other people or objects.
Ensure to keep this manual along with sales receipt, and if possible, cardboard package
and packing material in case return of the unit is necessary.
• Unpack the halogen heater making sure that all the items are
present, there are no components left in the box and the heater head
is free from any packing material.
• Using the detailed diagrams follow the steps to assemble your
halogen heater.
• Do not connect the halogen heater to the electrical supply until the
assembly is complete.
• Do not connect the halogen heater to the electrical supply if any of
the components or the power cord is damaged in any way.

4Safety Instructions
Safety Instructions
Read these instructions before using.
WARNING
Potential re risk if the heater is covered by any material or positioned close to curtains
or other ammable materials.
Caution
Some parts of this product can become very hot and cause burns. Particular attention
has to be given where children and vulnerable people are present.
This heater is not equipped with a device to control the room temperature. Do not use
this heater in small rooms when they are occupied by persons not capable of leaving the
room on their own, unless constant supervision is provided.
Children and vulnerable people should be kept away from the heater unless
continously supervised.
• Only use the halogen heater on a rm solid horizontal area where all the feet on the
base are in contact with the oor. (Should the heater be tilted or fall over the auto
cut off switch will activate)
• Site the heater outside or in a large open area and well away from any obstructions
such as branches or where the heater is near any objects that can be affected by
heat, such as furniture, curtains or other inammable objects (minimum distance 1
metre).
• DO NOT use near bath tubs, wash areas or swimming pools.
• DO NOT use in unventilated areas
• DO NOT use where gas, petrol, paint or other inammable goods are stored.
• DO NOT push any items through, obstruct or cover the grill of the heater head.
• DO NOT position immediately above or below an electrical socket.
• DO NOT move when connected to an electrical supply and always wait for the patio
heater to cool down before storing away.
• DO NOT touch the heater head when in use.
• DO NOT leave turned on and unattended especially when children, vulnerable people
and or animals are in the vicinity.
• The indication of the different positions of switches should be visible from a
distance of 1M at all times.
• The marking concerning covering should be left visible after the heater has been
installed. It should not be placed on the back of portable heaters.

5
Safety Instructions
• The unit must be placed with a minimum clearance of 100cm to the wall and 30cm
to the ceiling.
• The unit must be correctly installed according to the instructions. Make sure the
head is at least 1.8m from the oor.
• The unit must be securely placed on a horizontal and at surface.
• The unit operates at high temperature during operation. The unit will stay hot for
a period of time after shut down. There is potential danger if touching the heater
during this period.
• Don’t place the unit close to a curtain and/or other ammable objects. Otherwise,
there will be a danger of re.
• Don’t cover the unit with anything during operation or a short time after it’s
shut down.
• Don’t wrap the power supply cord on the unit.
• The unit must be handled with care, and avoid vibration or suddent impacts.
• The unit must be securely grounded during operation.
• If the unit gets damaged, it must be repaired by professional electricians.
• When the power supply cord is damaged, it must be replaced by authorised agent
or other professional people to avoid danger.
• The unit must not be positioned under a socket.
• When assembling, keep clear from any packaging or ammable material.
• The unit must be supervised by adults if it’s used by a child.
• It is not safe to install the unit by a swimming pool, in a bathroom or shower area.
• The unit is for household use only. It is not safe to use on a building site,
greenhouse, barn or stable where there’s ammable dust.
• The head of the unit is at high temperature during operation. Unplug the unit and
wait till it cools before cleaning.
• Don’t use this unit in a place where causticity or volatile air exists, i.e. dust, steam,
gas, etc.
• Don’t use this unit as a cloth, towel or other textile material drier.
• Don’t use this unit as a sauna heater.
• Don’t use this unit as a room heater.
• Don’t use this unit in a place of animal propagating and raising.
• Don’t immerse this unit into water for cleaning.
• The unit should be plugged in a socket, which is easily visible and reachable.
• Two dark points may exist on the surface of the heating elements during the rst
few minutes after it is turned on. This is normal, and will not affect the performance
of the unit.
• A tilt switch is tted inside the unit for safety purposes.
• The unit should be plugged in a socket, which is easily visible and reachable.

6Safety Instructions
• The wheels are only for the purpose of moving the heater, once the heater is in the
right position, the wheels should be removed for safety purposes.
• Do not use this heater with a programmer, timer or any other device that switches
the heater on automatically, since a re risk exists if the heater is covered or
positioned incorrectly.
• This appliance is not intended for use by persons (including children) with reduced
physical ability, sensory or mental capabilities, or lack of experience and knowledge,
unless they have been given supervision or instruction concerning use of the
appliance by a person responsible for their safety.
• Children should be supervised at all times, keep a safe distance from the unit and
must not touch with the appliance.

7
Assembly Instructions
Assembly Instructions
Warning:
Please ensure all the hyaline protective lm around the large decorative shade is
completely removed.
1. Fix the bottom tube onto the base by
screwing.
2. Connect the middle tube with bottom
tube by screwing them together.
3. Connect the top tube with middle tube
by screwing them together (same as
Step 2).
4. Place the power cord plug through the
base , bottom tube, middle tube and
top tube. Connect the power cord plug
to the socket in the heater head.

8Assembly Instructions
5. Insert the Heater Head onto the top
tube and x in position using the
4*8mm screws
6. Fix the Power Cord on the Base by
using the 4*12 Screws.
7. Fix the heater on the oor. Bore
three holes in the oor, x the heater
by three wedge bolts on the oor
tightening the screws by spanner.
Complete!
bottom pole
wedge bolt
fixing plate
weight base
complete!
1.bore three holes in the floor
2.fix the heater by three wedge bolts on the floor.
3.tighening the screws by spanner.
fixing on the floor:

9
Operation
Operation
Connect the power cable to a 13 amp supply that is located in a safe, dry area.
• The touch switch on the heater head is used to control the three heat settings.
(I) for 900w, (II)for 1200W, (I&II) for 2100W heat outputs. The (0) position is OFF.
• Although the patio heater is shower proof, do not use when raining or in
wet conditions.
• Always disconnect the power cable from the electrical supply when the patio
heater is not in use.
10 Cleaning & maintenance
Cleaning & maintenance
Heater housing, grills and internal reector
• Disconnect the appliance from the power supply system.
• After the appliance has cooled down, the housing can be wiped clean with a
damp cloth.
• Do not touch the bulb element with your ngers, since stains could build up from
such a contact and may cause malfunction of the blub.
• Do not use any abrasive or hard cleaning products on any part of this heater.
• Do not immerse the appliance in water.
• Wait until the unit is completely dry before use.
Cleaning of heater lamp
• Disconnect the appliance from the power supply system.
• Wipe the lamp over with a damp cloth ensure no detergents or cleaning uids are
used as they may cause damage to the lamp coating.
https://www.heat-outdoors.co.uk/help-desk/useful-articles/heater-and-lamp-
maintenance.html
Any maintenance or repairs should only be carried out by a qualied electrician if you’re
unsure how to do so. For further information and guidance, visit our online help articles
and videos.
Disposal
In accordance with European Directive 2001/96/EG concerning used
electrical and electronic appliances (waste electrical and electronic
equipment – WEEE), please return any electrical equipment that you will no
longer use to the collection points provided for their disposal.
This symbol indicates that the appliance cannot be treated as normal
domestic trash, but must be handed to a collection point for recycling electric and
electronic appliances.
Information concerning where the equipment can be disposed of can be obtained from
your local authority.

11
Storage
Storage
If the heater will not be used for a long period of time, store it in a cool, dry location. To
prevent dust and dirt build-up, use the original packaging to repack the heater.
Technical Specication
Ratings: 220-240V AC 50-60Hz
Wattage max: 2100W
Net weight: 14.6 kg
Insulation: Class 1
Height: 210cm
Ingress rating: IP54
Customer Service
• Repairs must be carried out by authorised specialists, thus ensuring electrical safety.
• Please contact us or a suitably qualied electrician.
• Improper repairs could lead to danger to the user.
Warranty does not cover damage or failure which results from alteration, accident,
misuse, abuse, neglect, commercial use or improper maintenance. In line with our policy
of continuous product development we reserve the right to change the product and
documentation specications without notice.
Heat Outdoors
Unit 9, Stort Valley Industrial Estate
Stansted Road, Bishop’s Stortford
Hertfordshire, United Kingdom
CM23 2TU
www.heat-outdoors.co.uk
01279 466500
Other manuals for Shadow Diffusion
1
Table of contents
Other Heat Outdoors Patio Heater manuals

Heat Outdoors
Heat Outdoors Goliath User manual

Heat Outdoors
Heat Outdoors CH18A11W2 901698 Operation and maintenance manual

Heat Outdoors
Heat Outdoors 901735 Operation and maintenance manual

Heat Outdoors
Heat Outdoors Shadow Nirvana Instruction Manual

Heat Outdoors
Heat Outdoors LONDON User manual

Heat Outdoors
Heat Outdoors Athena Plus+ Operation and maintenance manual

Heat Outdoors
Heat Outdoors 902112 Operation and maintenance manual

Heat Outdoors
Heat Outdoors SHADOWFB2400 Operation and maintenance manual

Heat Outdoors
Heat Outdoors UMBRA Tulip Operation and maintenance manual

Heat Outdoors
Heat Outdoors 902114 Operation and maintenance manual


