manuals.online logo
Brands
  1. Home
  2. •
  3. Brands
  4. •
  5. Heatilator
  6. •
  7. Fire And Smoke Damper
  8. •
  9. Heatilator DG3 User manual

Heatilator DG3 User manual

Heatilator • DG3 Damper • 4048-221 Rev A • 03/06 1
Models:
DG3 Thermally Activated
Automatic Damper
Installation
Instructions
The DG3 damper has been tested in accordance with ANSI standard Z21.66-1966 in the United States and with the cur-
rent CGA 6.14-M96 in Canada, and has been listed by Underwriters Laboratories Inc. for installation as described in these
instructions. All components are UL, AGA, CGA or CSA safety certified. If you need clarification of any of the instructions
contained her, contact the Heatilator Technical Services Department at 1-800-927-6841.
Note: An arrow () found in the text signifies change in content.
Sharp Edges
• Wear protective gloves and safety
glasses during installation.
CAUTION
Tools Needed
Safety Gloves
#8 Phillips
Screwdriver
A. General Information
• This device must be installed by a qualified installing agency.
• This device is intended for use with RBV4236 and RBV4842 Series appliances or the GGB36 and GGB42 Series
appliances only and must be installed only on an appliance connected to a factory built chimney or vent complying with
a recognized standard.
• This device must be located in a venting system serving only the single appliance for which it is installed.
• This device must be installed in accordance with local codes, or in the absence of local codes, in accordance with the
National Fuel Gas Code, ANSI Z23.1, or the Natural Gas Installation Code, CAN/CGA B149.1, or the Propane
Installation Code, CAN/CGA B149.2, where applicable.
B. DG3 Operating Characteristics
The DG3 is a thermally activated automatic damper device.
• When at room temperature, the damper will have slight spring pressure keeping it in a closed position.
• When placed in a heat source (i.e., when the appliance is turned on), the damper will open as the thermally activated
spring heats.
Heatilator • DG3 Damper • 4048-221 Rev A • 03/06
2
C. Installation Instructions
• Shut off the manual gas shutoff valve, turn the appliance
to “OFF” and allow it to cool before proceeding.
• Remove log assembly: Have a copy of the appliance
installation instructions for proper removal and replacement
of the logs.
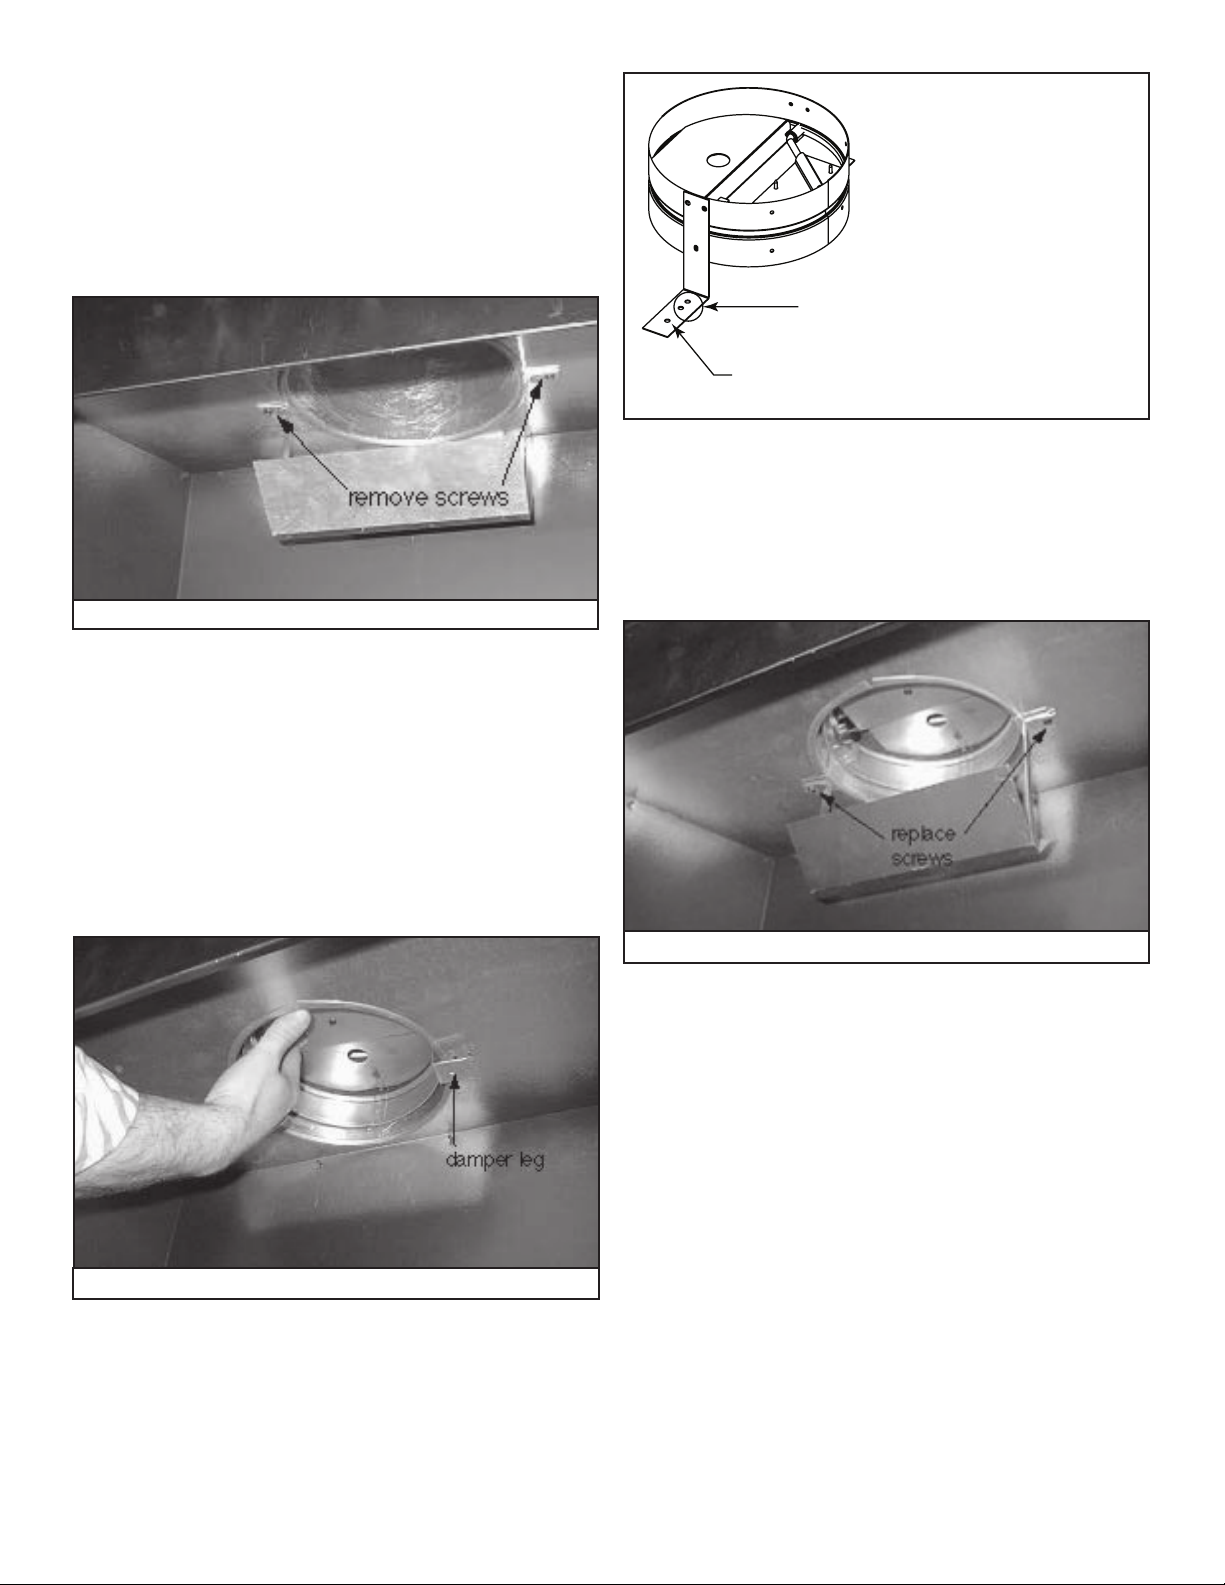
•Remove the draft hood attached to the firebox top by
removing the screws securing it in place. See Figure 1.
Figure 1 Remove Draft Hood
Figure 2 Install Damper
Figure 4 Attach Damper and Draft Hood
D. Venting Inspection
• The appliance venting system and the damper device
should be inspected prior to use and at least annually by
a qualified field service technician. To ensure that the flow
of combustion air and ventilation air are not obstructed.
Particular attention should be given to any deterioration
of the damper or venting system due to corrosion or other
sources of damage.
• Remove the damper from the package and inspect for
visible damage. Check that damper blade moves freely
and does not scrape or bind on any of the damper
components.
• The damper is to be installed with the flow direction arrow
facing up toward the vent system. The damper legs will
be at the bottom of the damper.
• From inside the appliance, gently push the damper into
the appliance collar until the support legs are flush with
the firebox top. See Figure 2.
• The damper should be oriented so that the holes located
in the damper legs align with the holes in the firebox top.
Refer to Figure 3.
5SETHESEHOLESFOR''"''"
5SETHISHOLEFOR2"62"6
Figure 3 Damper Legs
• The draft hood is to be installed upstream of the damper
as close as possible to the damper without modification
to the draft hood. Position the draft hood by aligning the
holes in the support legs of the draft hood with the holes
in the damper support legs and in the firebox top. Secure
the parts with the screws removed earlier. See Figure 4.
• With the damper installed, check that the damper
mechanism moves freely and does not bind or scrape.
• Replace the log assembly following instructions found in
the appliance’s installation instructions.
• Open the manual gas shutoff valve and light the appliance
following the lighting instructions found in the appliance’s
installation instructions.
• As the appliance heats, visually check that the damper
opens. It will take approximately 3-4 minutes for the spring
to reach normal operating temperature and the damper to
reach a fully open position.

Popular Fire And Smoke Damper manuals by other brands

Wildeboer FK90 quick start guide

Wildeboer

Wildeboer FK90 quick start guide

Greenheck HTD Series Installation, operation and maintenance manual

Greenheck

Greenheck HTD Series Installation, operation and maintenance manual

mercor mcr Prosmoke FS Operation and maintenance manual

mercor

mercor mcr Prosmoke FS Operation and maintenance manual

Trox Technik FK-EU manual

Trox Technik

Trox Technik FK-EU manual

Rf-t SC-S manual

Rf-t

Rf-t SC-S manual

System air A-FDR-3G-OF instruction manual

System air

System air A-FDR-3G-OF instruction manual

Rf-t CU2-15 manual

Rf-t

Rf-t CU2-15 manual

System air F-B90 manual

System air

System air F-B90 manual

Komfovent UVS 60 H Installation instruction

Komfovent

Komfovent UVS 60 H Installation instruction

SMAY WKP-O Technical documentation

SMAY

SMAY WKP-O Technical documentation

Trox Technik AKK Assembly and operating instructions

Trox Technik

Trox Technik AKK Assembly and operating instructions

Komfovent UVA60 H installation manual

Komfovent

Komfovent UVA60 H installation manual

ETS NORD FDMA-PM Series manual

ETS NORD

ETS NORD FDMA-PM Series manual

mercor mcr FID 240 Operation and maintenance manual

mercor

mercor mcr FID 240 Operation and maintenance manual

Mandik FDMC installation instructions

Mandik

Mandik FDMC installation instructions

Mandik FDMR 60 manual

Mandik

Mandik FDMR 60 manual

Lindab RECTANGULAR Series Installation booklet

Lindab

Lindab RECTANGULAR Series Installation booklet

aldes Isone manual

aldes

aldes Isone manual

manuals.online logo
manuals.online logoBrands
  • About & Mission
  • Contact us
  • Privacy Policy
  • Terms and Conditions

Copyright 2025 Manuals.Online. All Rights Reserved.