HEATin MC15 User manual
KULLANIM KILAVUZU
USER MANUAL
BEDIENUNGSANLEITUNG
ELEKTRİKLİ KONVEKTÖR ISITICI
ELECTRIC CONVECTOR HEATER
ELEKTRISCHE KONVEKTORHEIZUNG
MC10, MC15, MC20

2 3
2. ÇALIŞTIRMA TALİMATLARI
2.1 Ürünün Tanıtımı
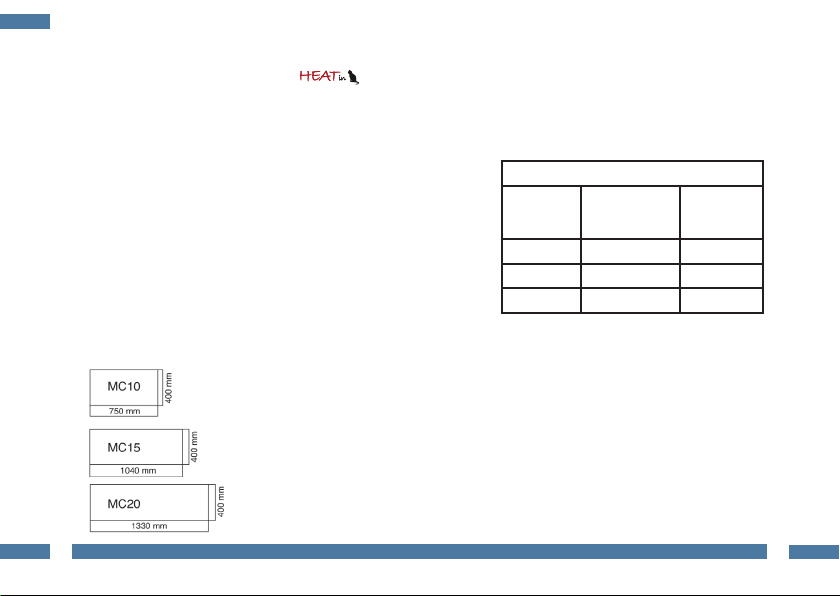
ELEKTRİKLİ KONVEKTÖR ÖZELLİKLERİ
Elektrikli
Konvektör
Modelleri
Isıtma Gücü (W) Oda Alanı (m²)
MC10 1000 6-10
MC15 1500 12-15
MC20 2000 15-20
Elektrikli ürünlerin kullanılması, herhangi bir yangın, elektrik
çarpması ya da yaralanma tehlikesinden korunmak için dikkat
gerektirir. Bu nedenle, ürün sadece bu talimatlarda belirtildiği
şekilde kullanılmalıdır. Üretici tavsiyesinin dışındaki herhangi bir
kullanım, hasara ya da yaralanmaya yol açabilir.
Değerli Müşterimiz,
Ürünümüzü seçtiğiniz için teşekkür ederiz. Konvektör Isıtıcı
kullanıcıları arasına hoş geldiniz.
Yüksek kalite ve teknoloji ile üretilmiş olan ürünümüzün size en iyi verimi
sunmasını istiyoruz. Bu nedenle, kullanım kılavuzunun tamamını, ürünün
montaj, kullanım ve bakım işlemlerinden önce dikkatlice okuyunuz ve bir
başvuru kaynağı olarak saklayınız.
Yeni konvektör ısıtıcınızla sıcak, konforlu ve keyii günler dileriz.
İÇİNDEKİLER
1. Ürün Ölçüleri
2. Çalışma Talimatları
2.1 Ürünün Tanıtımı
2.2 Ürün Kullanımı
2.3 Güvenlik Talimatları
2.4 Bakım ve Servis
3. Montaj ve Kurulum Talimatları
3.1 Duvar Montajı
3.2 Ayak Montajı
4. Garanti
........................................................2
..................................................3
............................................3
..............................................3
.......................................4
...............................................6
..................................6
..............................................6
.................................................7
..................................................................7
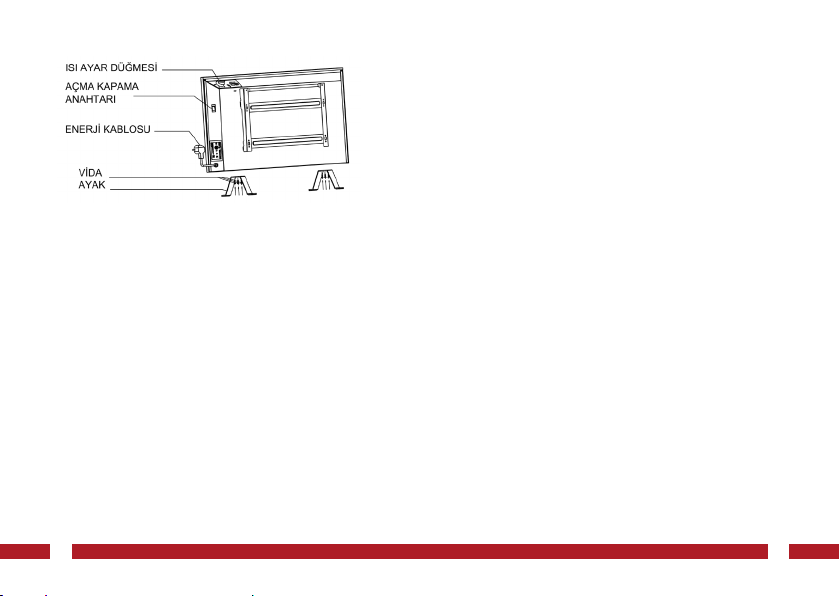
1. ÜRÜN ÖLÇÜLERİ Konvektör ısıtıcı, güç kablosu prize takıldıktan sonra, yan
yüzeyinde bulunan açma kapama anahtarı ile açılır. Açma
kapama anahtarının açılması için düğmenin 0 ’dan 1 konumuna
getirilmesi gerekmektedir. Sıcaklık, ısıtıcının sağ üst tarafındaki
ısı ayar düğmesi ile ayarlanır. Isı ayar düğmesi saat yönüne
çevrildiği zaman sıcaklık artışı sağlanır. Kullanım kolaylığı için
tek bir ısı ayar düğmesi bulunmaktadır. Isı ayar düğmesinin
kapatılmasının unutulması durumunda, aşırı ısınma oluşmaz. Bu
sayede oluşabilecek yangın tehlikelerinin önüne geçilmiştir. Cihazı
kapatmak için öncelikle ısı ayar düğmesini saat yönünün tersine
çevirerek başlangıç konuma getiriniz. Ardından açma kapama
anahtarını 1’den 0 konumuna getiriniz ve son olarak güç kablosunu
prizden çekiniz.
2.2 Ürün Kullanımı
Şekil 1: Ürün Ölçüleri
Şekil 2.1: Ürün Özellikleri
45
2.3 Güvenlik Talimatları
Ürün;
»Alt ve ön taraftaki hava kanallarının önü her zaman açık olacak
şekilde çalıştırılmalıdır.
»Çalıştırılmadan önce güç kablosunun hasarlı olup olmadığı
kontrol edilmeli, hasar var ise yetkili servise bildirilmelidir.
»Çalıştırılmadan önce ana elektrik hatlarının 220 V - 240 V ve 50
Hz olduğu ve elektrik sigortaya bağlı olduğu kontrol edilmelidir.
»Banyo, duş veya yüzme havuzunun yakın çevresinde ve diğer
ıslak zeminlerde kullanılmamalıdır.
»Başka bir ürünle beraber aynı prizde kullanılmamalıdır.
»Mutlaka topraklı priz ile kullanılmalıdır.
»Isınan, koku yapan ve korozyona uğramış prizlerle
kullanmayınız.
»Asla yanıcı yüzeylere (ahşap, karton vb.) monte edilmemelidir.
»Kimyasal maddeler, toz, gaz, duman nedeniyle yangın, vb.
patlama riskinin bulunduğu ortamlarda kesinlikle kullanılmamalıdır.
»Çamaşır, battaniye, gazete ve dergi, yer cilası kapları, benzin ve
türevlerini içeren kaplar, sprey kutuları gibi yanıcı ve kısa zamanda
tutuşabilen malzemeler, ürünün yakınına yerleştirilmemelidir.
»Elektrikli Konvektör Isıtıcıyı kullanırken mevcut yasalarla
belirlenmiş güvenlik kurallarına uyunuz.
»Bitişik obje yüzeylerine asgari uzaklıkların sağlanmadığı
yerlerde kullanılmamalıdır.
»Montaj (elektrik tesisatı), ilk çalıştırma ve bu cihazın bakım
işlemleri, bu talimatlara uygunluk içinde sadece yetkili bir uzman
tarafından yerine getirilmelidir.
»Üzerinde hiçbir nesne bulundurulmamalıdır.
»Yüzeyi ve ortaya çıkan hava, çalıştırma esnasında sıcaktır. ( 80 ºC
üzeri ).
»Bu ürün, güvenli bir şekilde kullanılmasıyla ilgili kendilerine
gözetim veya talimat verilmişse ve içermiş olduğu tehlikeler
kendileri tarafından anlaşılmışsa 8 yaş ve üzeri çocuklar ve ziksel,
duyusal veya zihinsel yetenek eksikliği bulunan veya tecrübe ve
bilgi eksikliği olan kişiler tarafından kullanılabilir.
»Çocuklar cihaz ile oynamamalıdır.
»3 yaşından küçük çocuklar sürekli gözetim altında tutulmadıkça
üründen uzak tutulmalıdır.
»8 yaş altındaki çocuklar şi prize takmamalı, cihazı
düzenlememeli veya bakımını yapmamalıdır.
»UYARI— Bu ürünün bazı bölümleri çok sıcak olabilir ve
yakabilir. Çocukların ve yetersiz kişilerin olduğu yerlerde özellikle
dikkat edilmelidir.
»UYARI— Aşırı ısınmayı önlemek için ısıtıcının üzerini
örtmeyiniz.
»UYARI— Prizin hemen altına yerleştirilmemelidir.
»Ayaklı kullanım versiyonu halı, kilim, karton gibi yanıcı
ürünlerin bulunmadığı, düz bir zemin üzerinde kullanılmalıdır.
»Hava menfezlerinden içeri yabancı maddeler girmemesine
dikkat edilmelidir, aksi halde bu durum elektrik çarpmasına veya
yangına sebep olabilir veya ısıtıcıya zarar verebilir.
»Yanma / tutuşma tehlikesi vardır.
Şekil 2.2: Ürün Kullanımı
67
2.4 Bakım ve Servis
»Kuru bez yardımıyla temizlenmelidir. Kazıyıcı ve aşındırıcı
temizleyicilerden sakınılmalıdır. Kış sezonu öncesi cihazın alt hava
girişindeki toz elektrikli süpürge ile temizlenmelidir.
»Güvenlik elemanlarının, bir uzman tarafından periyodik kontrol
edilmesi tavsiye edilmektedir.
3. MONTAJ VE KURULUM TALİMATLARI
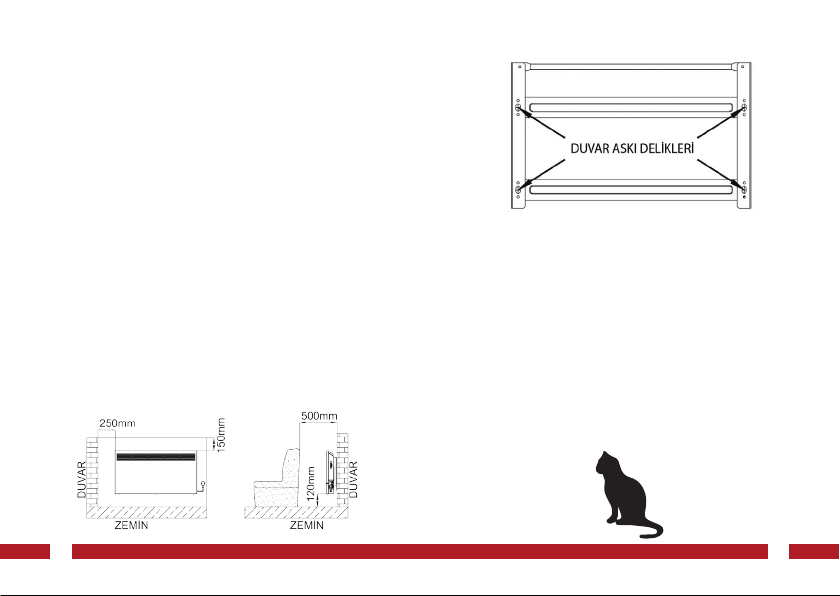
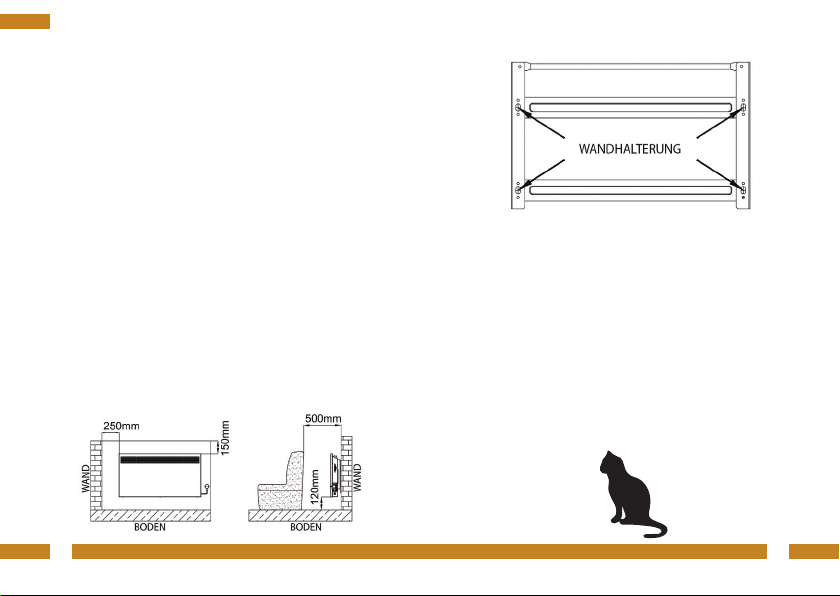
3.1 Duvar Montajı
»Duvar askı konsolunun kendisi aynı zamanda bir duvar
işaretleme şablonudur. Delik delme işlemi, konsolun üzerindeki
oval deliklerden işaretlenerek yapılır.
»Duvar askı konsolu, yerden 38 cm referans alınarak, duvar
üzerinde tutularak, delikler işaretlenir. Tuğla duvara, 10’luk beton
matkap ucu ile 6,5 cm derinliğinde delik açılır ve bu deliklere dübel
yerleştirilir.
»Duvar askı konsolu, deliklere hizalanarak vidalanır.
»Ürün, konsolun öncelikle alt çıkıntılarına eğimli bir şekilde
yerleştirilip, haf bir şekilde kaldırıldıktan sonra dik konuma
getirilerek üstteki çıkıntılara da oturtulması sağlanır.
»Sonrasında üst kısımlarından bastırılarak ürünün konsol
yuvasına tam oturması sağlanır.
»Konvektör ısıtıcı ürünün montajına başlamadan önce, monte
edilen yerde Şekil 3.1’de gösterilen asgari uzaklıkların sağlandığına
dikkat ediniz.
3.2 Ayak Montajı
» Cihazın ayaklı kullanılması durumunda, ambalajda bulunan
ayaklar tornavida yardımı ile cihaza, alt kısımda bulunan deliklerden
Şekil 2.2 ‘de gösterildiği gibi ambalajın içinden çıkan vidalar ile
monte edilebilir.
4. GARANTİ
Montaj, elektrik tesisatı, bakım ve cihazın ilk çalıştırılması sadece
kaliye uzmanlar tarafından yerine getirilmelidir. Garanti hak
iddiası, cihazın satın alındığı ülke içerisinde geçerlidir.
Garanti kapsamında arıza ile karşılaşılması durumunda, lütfen ilgili
satıcıya başvurunuz. Ürünü aldığınızda garanti belgesini yetkili
satıcıya onaylatınız.
Faturanız garanti belgesi yerine geçer. Arıza durumunda ibraz
edilmesi zorunludur.
Ürünün garanti süresi 2 yıldır.
Şekil 3.2: Duvar Montajı
Şekil 3.1: Dikkat edilmesi gereken zemin ve duvar uzaklığı
89
2. OPERATING INSTRUCTIONS
2.1 Product Introduction
FEATURES OF ELECTRIC CONVECTOR HEATER
Electrical
Trench Heater
Models
Heating Power (W) Room Area (m²)
MC10 1000 6-10
MC15 1500 12-15
MC20 2000 15-20
The use of electrical appliances requires care to avoid the risk of
re, electric shock or injury. For this reason, the product should
only be used as specied in these instructions. Any other use apart
from the manufacturer’s recommendations may result in serious
damage or injury.
Dear Customer,
Thank you for preferring our product. Welcome to the community of.
convector heater users. We would like to give you the best satisfaction
with HEATin, produced with high quality and technology. For this
reason, please read this guide thoroughly before installing, operating
and maintaining the product and keep it as a reference. We wish you a
warm, comfortable and enjoyable day with your new convector heater.
TABLE OF CONTENTS
1. Product Dimensions
2. Operating Instructions
2.1 Product Inroduction
2.2 Product Usage
2.3 Safety Instructions
2.4 Maintenance and Service
3. Assembly and Installation Instructions
3.1 Installation of Wall Mounting Bracket
3.2 Freestanding
4. Warranty
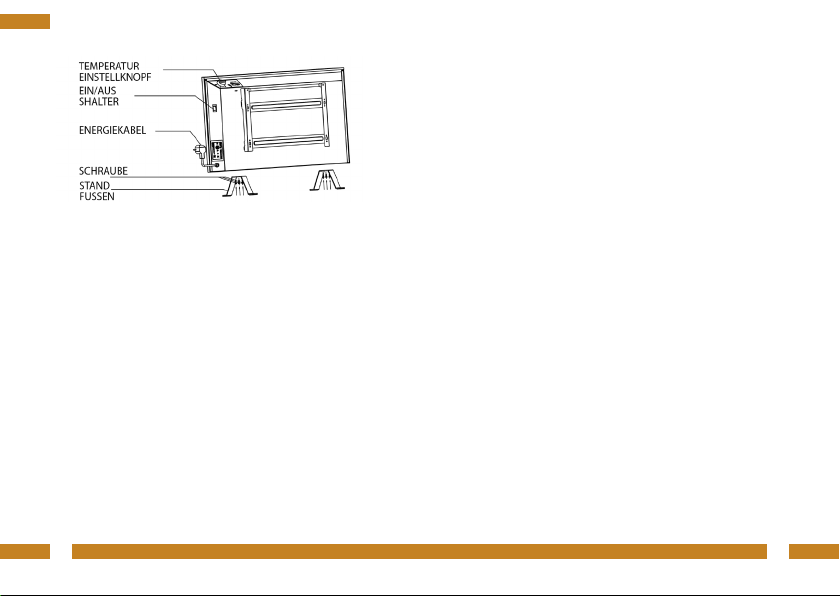
1. PRODUCT DIMENSIONS The convector heater is switched on with the on / off switch on the
side surface after power cable is connected to the prize. To turn
on the on / off switch, the button must be moved from position 0
to position 1. The temperature is adjusted with the temperature
control knob on the top right of the heater. The temperature
increase is achieved when the temperature adjustment knob is
turned clockwise. There is only one temperature control knob
for ease of use. If you forget to turn off the heat setting knob, the
convector heater prevents overheating. Thus, re hazards that may
occur have been avoided. To turn off the appliance, rst turn the
temperature control knob clockwise to the start position. Then
turn the on / off switch from position 1 to position 0 and nally
disconnect the power cord from the socket.
2.2 Product Usage
Figure 1: Product Dimensions
Figure 2.1: Product Features
........................................................8
..................................................8
............................................9
..............................................9
.......................................10
...................................12
...........................12
..................12
.................................................13
.................................................................13
EN

10 11
2.3 Safety Instructions
»The product must be operated in such a way that the air vents
located underneath the device and the ventilation grids at the front
are always open.
»Check that the power cord is not damaged before the product
is run, and if there is damage, the authorized service should be
notied.
»Before the product is run it should be checked that the main
power lines are 220 V - 240 V and 50 Hz and connected to the
electrical fuse.
»It must not be used in the immediate surroundings of a shower,
a bath, a swimming pool or any wet surfaces.
»To prevent overload and blown fuses, do not plug other
appliance in the same power outlet.
»The device must be used with earthed sockets.
»The device must never be mounted on ammable surfaces
(wood, cardboard, etc.).
»Do not use in environments where there is a risk of re or
explosion due to chemical substances, dust, gasses or smoke.
»It should not be used near ammable or explosive materials.
»Flammable and briey ammable materials, such as laundry,
blankets, magazines, containers with oor polish, containers
containing gasoline and its derivatives, spray cans, etc., should not
be placed near the product.
»Always obey the related safety regulations and legislations.
»Do not insert or allow foreign objects or metal parts to enter
any grill opening and air vents, as this may cause an electric shock
or re damage to the appliance.
»The product should not be used in places where minimum
distances to adjoining object surfaces are not achieved.
»Installation (electrical installation), initial start-up and
maintenance of this device must only be performed by a qualied
specialist in accordance with these instructions.
»No objects should be kept on the device. Do not place cloth
thereon.
»The surface of product and the released air are hot during the
operation. ( more than 80 ºC )
»The device may be used by children aged 8 years and over
and people with physical, sensory or mental impairment or lack of
experience and knowledge, only if supervised carefully and under
constant surveillance for safe use and only if it is made certain that
they understand the risks involved.
»Children should not play with the device.
»Children under the age of 3 should be kept away from the
product unless they are constantly supervised.
»Children under 8 years of age should not plug, unplug,
arrange, clean or maintain the device.
»WARNING — Some parts of this product can be very hot
and can burn. Particular attention should be paid to places where
children and people with disabilities are present.
»WARNING — To avoid overheating, do not cover the heater.
»WARNING — Do not place the heater directly under the
plug socket.
»Always operate heater in an upright position. Before operating
read installation instructions carefully. When oor mounted,
the product should be used on at surfaces and kept away from
carpets, rugs, cardboard. Operate the heater in the normal upright
position only with the feet attached to the bottom. Any other
position could create a hazardous situation. The feet must be
removed before mounting the appliance on the wall.
»There is a danger of burning / ignition.
Figure 2.2: Product Usage
EN
12 13
2.4 Maintenance and Service
»The product should be cleaned with dry cloth only.
Corrosive,abrasive, chemical, explosive, ammable substances
and. cleaners should be avoided.
»Before winter season, the air vents which are located under the
convector must be cleaned by vacuum cleaner.
»It is recommended that security elements be checked
periodically by an expert.
3. ASSEMBLY AND INSTALLATION INSTRUCTIONS
3.1 Wall Assembly
3.2 Freestanding
»If on-feet version is preferred, the feet of the convector which
are enclosed in the package, can be assembled with a screwdriver
to the holes located underneath the device as shown in Figure 2.2.
4. WARRANTY
Assembly, electrical installation, maintenance and initial operation
of the device must only be performed by qualied personnel.
A warranty claim is only valid in the country of purchase of the
device. Please contact your local company.
Have the certicate of warranty stamped by the seller while
purchasing the product. If the product is acquired through
promotion, have the certicate of warranty stamped by our nearest
authorized seller.
Your invoice is also a warranty document and is obligatory to
submit in case of any service inquiries. The warranty period for this
product is 2 years.
Figure 3.1: Distance to be Considered
Figure 3.2: Wall Assembly
EN
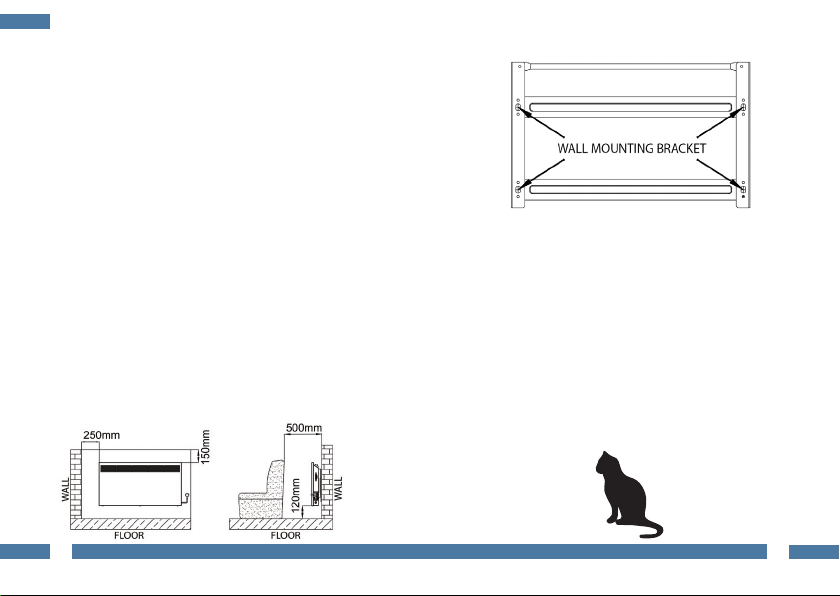
»The wall mounting bracket itself is a wall marking template at
the same time. Drilling is done by marking through the oval holes
on the console.
»The wall mounting bracket is held on the wall with reference
to 38 cm from the oor and the holes are marked. The brick wall is
drilled with a depth of 6.5 cm with a 10 mm concrete drill bit and
the dowels are placed in these holes.
»The wall mounting bracket is bolted by aligning it with the
holes.
»The product is rstly tted in the sub-parts of the bracket with
incline and brought in upright position after slightly lifted and
nested into upper part.
»Afterwards the product is pressed (lighty) from the top and
completely nested.
»Wall mounting bracket is also a carrying handle itself.
»Before starting to install the convector heater, note that the
minimum distances shown in Figure 3.1 are achieved at the place
of installation.

14 15
2. BEDIENUNGSANLEITUNG
2.1 Produkteinführung
EIGENSCHAFTEN DER ELEKTRISCHEN
KONVEKTORHEIZUNG
Elektrische
Grabenheizungsmodelle
Heating Power
(W)
Room
Area (m²)
MC10 1000 6-10
MC15 1500 12-15
MC20 2000 15-20
Bei der Verwendung von elektrischen Geräten ist es wichtig auf
Brandgewahr, Stromstoß oder Verletzungen Acht zu nehmen. Aus
diesem Grund sollte das Gerät nur laut der Anleitung verwendet
werden. Verwendungen außerhalb der Herstellerempfehlung kann
zu Schaden oder Verletzungen führen.
Serhr geehrte Kunden,
Wir bedanken uns, dass Sie unser Produkt ausgewählt haben.
Sein Sie herzlich willkommen zu den Konvektorheizungsbenutzer.
Wir möchten, dass unsere Produkt, welches mit hoher Qualität und
Technologie hergestellt wurde, Ihnen die höchste Leistung anbietet. Aus
diesem Grund bitten wir Sie die gesamte Gebrauchsanweisung vor der
Montage, Verwendung und Wartung sorgfälltig durchlesen heben Sie die
Gebrauchsanweisung als eine Referenzquelle auf.
Wir wünschen Ihnen mit der neuen Konvektorheizung
warme, komfortabele und angenehme Tage.
INHALT
1. Produktmaße
2. Bedienungsanleitung
2.1 Produkteinführung
2.2 Produktverwendung
2.3 Sicherheitsanleitung
2.4 Wartung und Service
3. Montage und Installationsanleitung
3.1 Montage an die Wand
3.2 Montage der Füße
4. Garantie
..........................................14
...................................15
................................15
................................15
.........................16
...............................18
....................18
..................................18
..................................19
...........................................19
1. PRODUKTMAßE
Die Konvektorheizung wird nach dem Einstecken des
Versorgungskabels in die Steckdose durch den On-Off Schalter,
welches sich an der Seite des Gerätes bendet, in Betrieb
genommen. Um den Schalter auf On zu bekommen, muß der
Schalter von 0 auf 1 gestellt werden. Die Wärme wird durch
den Wärmeeinstellungsknopf, welches sich rechts oben am
Gerät bendet, eingestellt. Wenn der Wärmeeinstellungsknopf
Richtung der Uhr gedreht wird, erhöht sich die Temperatur.
Für die Benutzerfreundlichkeit bendet sich nur ein
Wärmeeinstellungsknopf. Bei Vergessen des Abstellens des
Wärmeeinstellungsknopfes, entsteht keine Überhitzung. Somit
vermeidet man ein Brandriziko. Zum Abstellen des Gerätes muss
man zuerst den Wärmeeinstellungsknopf entgegen die Richtung
der Uhr drehen. Dannach Sollte der On-Off Schalter von 1 auf 0
gedreht werden und zum Schluss wird die Versorgungskabel aus
der Steckdose entfernt.
2.2 Produktverwendung
Bild 1: Produktmaße
Bild 2.1: Eigenschaften des Produktes
DE
16 17
2.3 Sicherheitsanleitung
Produkt ;
»Das Gerät sollte in Betrieb genommen werden, indem die
vorderen und hinteren Luftkanäle ständig offen bleiben.
»Vor der Inbetriebnahme muss kontrolliert werden, ob der
Versorgungskabel beschädigt ist. Falls eine Beschädigung
vorhanden ist, sollte man sich an einen autorisierten Service
wenden.
»Vor der Inbetriebnahme sollte man kontrollieren, ob die
Stromleitung eine Spannung von 220 V - 240 V und 50 Hz hat und
ob der Strom an die Sicherung verbunden ist.
»Es sollte nicht in der Nähe von Badezimmer, Dusche oder
Schwimmbad und sonstige nasse Flächen verwendet werden
»Sollte nicht zusammen mit einem anderen Gerät an der selben
Steckdose benutzt werden.
»Unbedingt an einer geerdeten Steckdose benutzen
»Sollte nicht an beschädigte Steckdosen benutzt werden
»Sollte niemals an brennbare Flächen (Holz, Karton usw.)
montiert werden.
»Sollte niemals in Umgebungen benutzt werden, wo das Riziko
auf Brand wegen chemisches Material, Staub, Gaz, Rauch besteht
»Es sollten keine brennbare Materialen wie Kleidung, Decke,
Zeitung und Zeitschrift, Bodenlackbehälter, Benzin und änhliches,
Spreydosen neben das Produkt gestellt werden.
»Bei der Benutzung der elektrischen Konvektorheizung befolgen
Sie bitte die gesetzliche vorgegebenen Sicherheitsvorschriften.
»Es sollte nicht an Orten benutzt werden, wo der minimale
Abstand zu weiteren Objekten eingehalten wird.
»Die Montage (elektrische Verbindung), Erstinbetriebnahme
und die Wartungen dieses Gerätes sollten nach der Anweisung nur
durch einen authorisierten Service durchgeführt werden
»Es sollten sich auf dem Produkt keine Gegenstände benden.
»Die Oberäche und die erzeugte Luft ist während der
Inbetriebnahme heiß. (über 80 ºC ).
»Dieses Gerät sollte durch Kinder mit 8 Jahren oder mehr,
durch Kinder mit physikalischen, emotionalen oder geistlichen
Störungen oder mit fehlerhafter Erfahrung oder Wissen nur mit
Beaufsichtigung benutzt werden oder nur mit Beibringen der
Anweisungen für die sichere Benutzung und der Gefahr erträglichen
Situationen.
»Die Kinder sollten nicht mit diesem Gerät spielen.
»Kinder unter 3 Jahren sollten ferngehalten werden, solange
keine ständige Beaufsichtigung vorhanden ist.
»Kinder unter 8 Jahren sollten nicht den Stecker in die
Steckdose einsetzen, das Gerät einstellen oder die Wartung
durchführen.
»HINWEIS — Einige Stellen dieses Gerätes können heiß sein
und zu Verbrennungen führen. Man sollte vorallem dann Acht
darauf geben, wenn Kinder das sind und Die Personenanzahl nicht
ausreichend ist.
»HINWEIS — Um die Überhitzung zu vermeiden, bitte nicht
abdecken.
»HINWEIS — Nicht genau unter die Steckdose platzieren.
»Die Benutzerversion mit den Füßen, sollte auf einer geraden
Fläche ohne Teppich, Vorleger oder Karton benutzt werden.
»Man sollte achten, dass durch die Luftöffnungen keine
Fremdkörper in das Gerät gelangen.Ansonsten kann es zu
Stromschlag oder Brand kommen oder es kann die Heizung
beschädigen.
»Es besteht Brand-/Entzündungsgefahr.
Bild 2.2: Produktverwendung
DE
18 19
2.4 Wartung und Service
»Es sollte mit einem trockenen Tuch gereinigt werden. Ätzende
Reinigungsmittel sollten vermeidet werden. Vor der Wintersaison
sollten die unteren Luftlöcher des Gerätes mit einem Staubsauger
gereinigt werden.
»Es wird empfohlen, dass die Sicherheitskomponenten durch
einen authorisierten Service kontrolliert werden.
3. MONTAGE UND ISTALLATIONSANLEITUNG
3.1 Montage an die Wand
3.2 Fußmontage
»Bei der Benutzung der Füße können die sich in der Verpackung
bendenden Füße mit Hilfe eines Schrauberndrehers von den
unteren Löchern (siehe Bild 2.2) montiert werden.
4. GARANTIE
Die Montage, die elektrische Verbündung, Montaj, Wartung
und die Inbetriebnahme sollte nur durch qualiziertes Personal
durchgeführt werden. Anspruch auf Garantie ist nur im Land, wo
das Gerät gekauft wurde gültig.
Bei einer eventuellen Störung im Berech der Garantie, wenden
Sie sich bitte an den Verkäufer. Beim Kaufen des Gerätes lassen
Sie bitte das Garantieschein bestätigen. Die Rechnung gilt als
Garantieschein. Bei einer Störung muss es vorgelegt werden. Die
Garantie beträgt 2 Jahre.
Bild 3.1: Die notwendigen Abstände die zu beachten sind
Bild 3.2: Wandmontage
DE
»Für die Montage der Konvektorheizung benden sich auf dieser
Seite an den Ecken Löcher, die als Schablone für die Wandkonsole
dienen. Das Bohren sollte nach dieser Schablone folgen.
»Die oberen Schablonen-Löcher werden mit einem
Referenzpunkt von 38 cm vom Boden aus durch einen 10’er Bohrer
6.5cm Löcher gebohrt. Nach den oberen Referenzpunkten werden
auch die unteren Löcher gebohrt und in diese Löcher kommen
Dübel rein.
»Die Wandkonsole wird an die Löcher angebracht und
verschraubt.
»Das Gerät wird erst an die unteren Ansätze platziert und
dann mit ein wenig heben wird das Gerät an die oberen Ansätze
angebracht.
»Dann wird mit ein wenig drücken dafür gesorgt, dass das Gerät
in der Konsolfassung sitzt.
»Vor der Montage der Konvektorheizung sollte man darauf
achten, dass die Mindestabstände, die auf dem Bild 3.1 angegeben
sind, eingehalten werden.

İn Tech Pazarlama İthalat İhracat San. Tic. Ltd. Şti.
MOSB 4. Kısım Keçiliköy OSB Mah. İsmail Sarıgözoğlu Cad. No:9
Yunusemre/ Manisa - TÜRKİYE
Tel: 0090 236 2131333 e-posta: [email protected]
This manual suits for next models
2
Table of contents
Languages:
Popular Electric Heater manuals by other brands

Helo
Helo Rocher DES Installation and user manual

Faber
Faber Varda Installation and operating instructions

Harvia
Harvia PP70E Instructions for installation and use

Chromalox
Chromalox PG433-1 Installation, operation and renewal parts identification

Broan
Broan 6201 manual

Rinnai
Rinnai ES750 Operation manual

Heatscope
Heatscope ZERO Original installation and instruction manual

Bionaire
Bionaire BRH840 owner's guide

Dyson
Dyson AM03 operating manual

Tylo
Tylo SENSE SPORT installation guide

Bionaire
Bionaire SmartTouch BFH3414 Instruction leaflet

GHP Group
GHP Group Dyna-Glo EG10000DG Installation & maintenance instructions


