Heatsail DOME User manual

suMmer
Nights
sHould last
foReVEr
heat ail
by
outdoor light & heating
Do not throw away this manual, as it contains your device’s serial number!
EN / NL / FR / DE
USER MANUAL


USER MANUAL
DOME PENDANT
Operating, maintenance and installation guide.
! PLEASE NOTE !
Please read through these instructions carefully before using the device!
Do not throw away this manual, as it contains your device’s serial number!
English

4Heatsail DOME®
English
General
is user manual is inextricably connected to the DOME® and must always be kept by the user or
by another authorised responsible person.
Please read through this user manual carefully. It contains essential information regarding the
safety, operation, cleaning and maintenance of the DOME®. Heatsail will not be held responsible
for injury and/or damage to people, animals and subjects resulting from non-compliance with
the instructions in this user manual.
Heatsail reserves the right to make changes to the product, the technical features and the user man-
ual at any time and without the need for prior notice.
If you decide to sell the DOME®, transfer it to another user or leave it behind with a house move,
this manual must be made available to the new user.
We would like to wish you plenty of warm and pleasant evenings with our DOME®!
e HEATSAIL team.
!Do not throw away this manual, as it contains your device’s serial number.
Thank you for
purchasing the DOME®!

5User manual
English
Thank you for
purchasing the DOME®!
1. Electrical safety procedures & requirements
e use of the DOME® requires an electrical installation with reliable safety grounding. e in-
stallation’s electrical safety can only be guaranteed if the device has been correctly connected to an
earthing system built in accordance with the safety instructions. A preliminary inspection is ab-
solutely essential. In the event of any uncertainty, a careful inspection must be made by a qualied
and authorised technician. Heatsail will not be held responsible for injury and/or damage resulting
from an ungrounded installation.
einstallationof the DOME®’selectrical componentsrequiresa mainsconnectionof230V-50/60Hz
(16 Amp fuse EN 30 mA RCD): the connection must be properly implemented in accordance with
the applicable IEC-CEI standards. Please note: statutory and other regulations may apply locally.
e electrical power supply will need to be interrupted before the connection or other work on the
electrical components can be carried-out and everyone must satisfy themselves that the power can’t
be switched on again accidentally.
e use of adapters, power strips and extension leads may not be used for the DOME®’s electrical
supply. A switch must be installed between the DOME® and the fuse box at all times. Non-com-
pliance with these instructions may compromise the safety of the device. Heatsail will not be held
liable for any damage resulting from this.
2. Safety
A compulsory minimum clear height of 1.8 meters must be observed for the DOME®,
measured between the ground and bottom of the lowest heating element.
Children below the age of 3 must be kept away from the DOME® unless under full-time supervi-
sion.
Children aged between 3 and 8 can only operate the DOME® providing this has been placed in its
normal operating position and providing they have been given clear instructions regarding the
DOME®’s safe use and that they are capable of properly assessing any risks. ey are not permitted
to push and pull the plug in and out, or to clean the DOME® and carry out maintenance activities.
e DOME® must be kept out of reach of anyone incapable of assessing the risks which can arise
from the (improper) use of electrical equipment.
CAUTION – The heat can rise to extremely high temperatures and can cause
burns. The DOME® should never be touched as soon as it has been switched on.

6Heatsail DOME®
English
Particular attention should be paid when children and vulnerable people are present.
e DOME® will remain hot for a considerable period of time aer it has been switched o. Do not
touch the DOME® for a period of 30 minutes aer it has been switched o. Please note! Caution
should be exercised at all times. e grill does not oer protection against the heat.
e DOME® must never be used when the glass is damaged.
e DOME® may not be used with a timer or any device which can automatically switch on the
heating, as there is a risk of re if the DOME® has been incorrectly positioned.
Never use the DOME® in the immediate vicinity of a bath, Jacuzzi, shower, swimming pool or
conservatory.
Never position the DOME® close to curtains, canopies or other ammable materials. Never cover it
up without pulling the plug from the socket!
e DOME® must never be touched with naked, wet or moist body parts.
e DOME® is made up of 6 high radiance ceramic heating elements, mounted in a certain di-
rection on a reective plate. As soon as the ceramic elements begin to heat up, the full operating
temperature will be reached within a time span of 10 minutes. Please note: there is no noticeable
glow in the infrared area.
Never use the DOME® to light anything. e ceramic elements are fragile and must be handled with
due care. e same also applies to the glass casing.
Heatsail will not be held responsible for damage resulting from non-compliance with the instruc-
tions regarding use and maintenance.
3. Maintenance
3.1 Cleaning

7User manual
English
Your DOME® must be cleaned on a monthly basis.
e electrical supply must be disconnected via the installation’s mains switch or by disconnecting
the plug before cleaning activities can commence. Cleaning may only be done with a dry and so
cloth. Do not use any abrasive cloths. Do not use detergents. Using a high pressure and/or steam
cleaner is prohibited. Cleaning is only permitted once the DOME® has completely cooled down.
Non-compliance with these rules may compromise the safety of the device. Heatsail will not be held
responsible for damage resulting from non-compliance with the instructions regarding cleaning.
3.2 Replacing the bulb
Your DOME® is supplied with a R7S 230V/120 Watt (78mm) halogen bulb as standard. e maxi-
mum permitted output power is 120 Watt.
e electrical supply must be disconnected via the installation’s mains switch or by disconnecting
the plug before the bulb can be replaced.
You can replace the bulb by carefully sliding the glass upwards. Use tools like a screwdriver to hold
the glass up. e bulb is held in place by a spring. Take the bulb out by rst pushing it to the le or
right and thereby releasing it from its socket. Subsequently insert another bulb. Please be careful
never to touch the halogen bulb with your own bare ngers, as this will signicantly reduce the
bulb’s life.
3.3 Inspection
e DOME® must be subjected to an annual inspection.
e user is not authorised to carry out his own inspections and repairs. Inspection of the DOME®
must exclusively be carried out by qualied and authorised technicians, in accordance with Heat-
sail’s applicable standards and regulations. Qualied people are understood to mean: people who
have completed a technical training course for the installation of outdoor heating and who are
familiar with the applicable electricity laws and regulations.
e electrical supply must be disconnected via the installation’s mains switch or by disconnecting
the plug before any work can be carried out.
• All repairs must be requested via Heatsail.
• A repair is only valid when original parts have been used.
• e entire control panel should be returned in case of a defective cable, once written approval
has been provided by Heatsail.

8Heatsail DOME®
English
Heatsail will not be held responsible for damage resulting from non-compliance with the instruc-
tions regarding maintenance.
4. Guarantee conditions
4.1 Guarantee
e original invoice will serve as your proof of guarantee for the legal two year guarantee. is
guarantee does not aect the buyer’s rights by virtue of the national legislation regarding the sale
of consumer goods.
is guarantee is only valid if the DOME®’s installation and maintenance have been carried out in
accordance with the applicable standards and regulations and instructions for the installation, use,
maintenance and cleaning of the product, by qualied people who satisfy the legal requirements.
e guarantee term will commence from the date the goods were delivered.
Any replacement or repair will principally be done for free, but the shipping costs will be at the
buyer’s expense, unless agreed otherwise. Any defective goods will be sent to Heatsail by the buyer,
once Heatsail has granted its written permission to do so. Heatsail will not award any compensation
for any direct or indirect damage resulting from, or relating to, using the product.
No compensation will be awarded for the period during which the product isn’t working.
e replaced parts will be guaranteed for the remainder of the guarantee period, from the date the
goods are delivered.
4.2 Guarantee exclusions
• e conditions for activating the guarantee were not met.
• e parts appear to be defective as a result of negligence or inappropriate use or incorrect
maintenance.
• e installation has not been carried out in accordance with the legal standards and not in
accordance with the instructions provided in the user manual.
• Any damage caused as a result of weather conditions, chemical and electrochemical reactions,
improper use, natural disasters, electrical discharge, re, a defective electrical installation,
modications or mishandling to packaging, the handle and the electrical wiring.

9User manual
English
• Any damage caused by transport.
We recommend you thoroughly check the goods upon receipt, allowing you to instantly notify the
seller of any possible damage and to record any such damage on the transport document and the
courier’s copy. For example:
• Physical damage aer the installation, including glass breakage, scratches on the DOME® and
accessories.
• Tinkering with the DOME® and/or other causes which can’t be attributed to the product’s
manufacture.
• e use of non-original replacement parts.
• Damage caused through normal wear and tear.
4.3 What to do in case of a fault?
In case of a fault, you must contact Heatsail immediately, and no later than two months aer the
fault was rst found, for a repair or replacement. e guarantee can only be initiated aer written
permission has been granted.
Heatsail declines any form of liability for any possible damage and/or injury which has been either
directly or indirectly caused to people, animals or objects as a result of non-compliance with the
instructions in the user manual and which specically concern the warnings in relation to the in-
stallation, use and maintenance of the device.
5. Applicable law – competent court
e general terms and conditions and the agreement are governed by Belgian law. e courts of
the judicial district of Antwerp shall have exclusive jurisdiction to settle any dispute arising from
the agreement.
6. Visual installation & connection diagrams
7. Operation
8. Troubleshooting
10 Heatsail DOME®
English
6. Visual installation & connection diagrams
Open the box and follow these instruction guidelines for a quick installation.
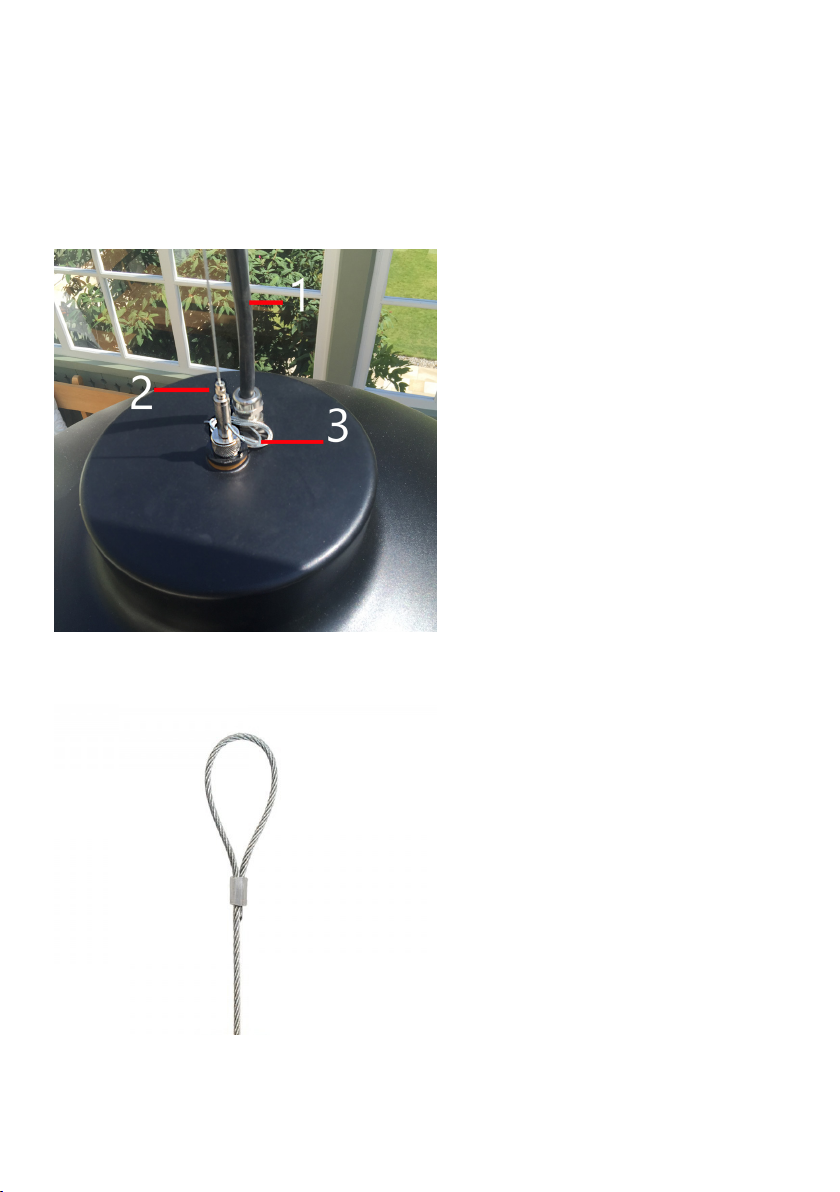
1
Never hold the Dome by the
power cable. e internal
connections might become
loose and you will have to
return the Dome.
1.
2.
3.
Unscrew the cap with a few turns,
but leave it on. It has a build in
gripper. By pushing the cap down
you can adjust steel cable and
the the height of the the Dome.
Minimum required height is 1.8
m. above the ground,
maximum height 2m. Fix the cap
again when done.
You can cut the cable when too long.
Leave a few centimeters for safety.
e other side of the cable has
a loop so you can easily hang
the Dome to dierent kind of
ceilings.
Never hang the Dome closer than
25cm from the ceiling, walls or
other surroundings.

11User manual
English
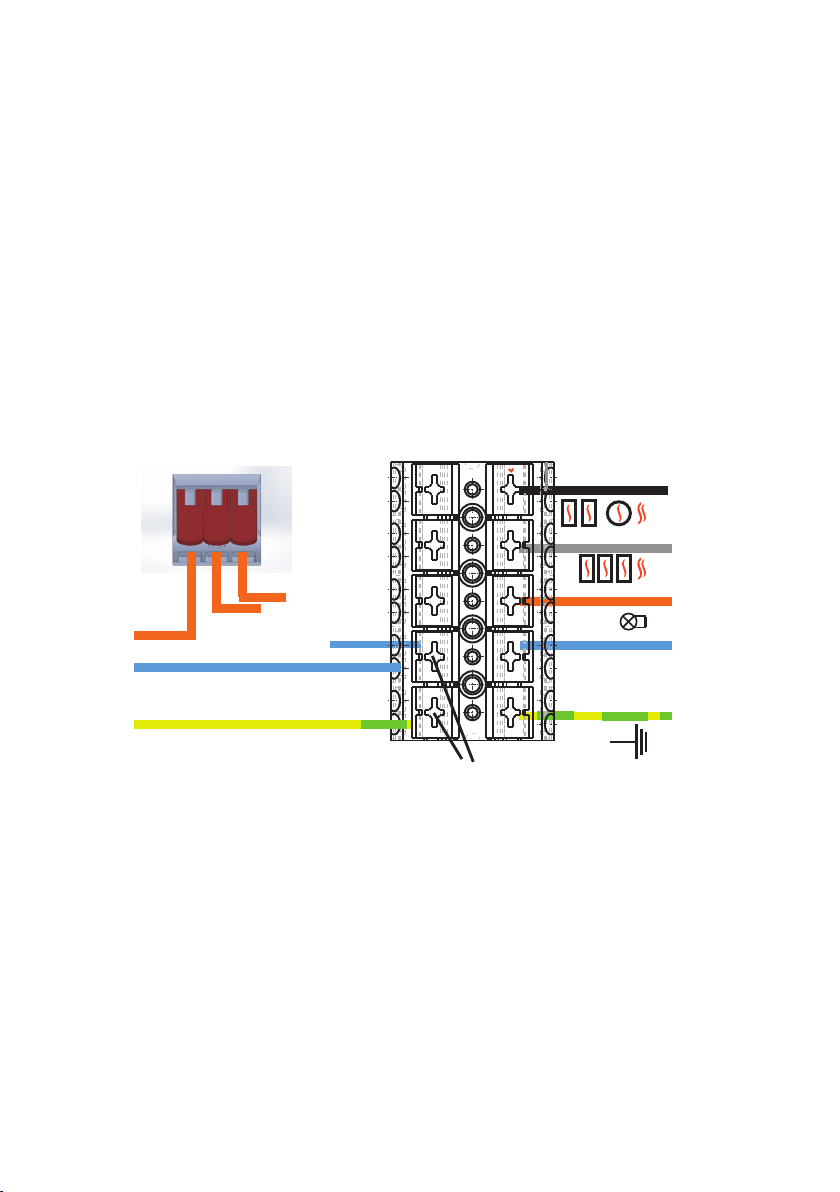
Electric connection:
ere is a heat resistant power cable coming out of the Dome.
e cablesconsists out of 5 wires of 1.5mm².
e 5 wire cable has 5 dierent colours, each color has the following function:
• Grey: 3 rectangular ceramic heaters (1500W)
• Black: 2 rectangular heaters and the round bottom heater (1600W)
• Brown: Light
• Blue: common (neutral) wire
• Green/yellow: Earth/Ground
If you have not bought a control box: You can place 3 switches on the wall: 1 for
the light, 1 for heater circuit 1,and 1 for heater circuit 2. An example of such a
connection you see below:
L
N
SWITCH 1
LIGHT
SWITCH 3
SIDE HEATER
TO DOME
contact box
Dome possible electric connection:
3 x wall switches
SWITCH 2
BOTTOM HEATER
N
12
12 Heatsail DOME®
English
If you have bought the control box:
e control box is a black case you can easily x against the wall or ceiling.
It has the advantage of a remote that lets you control the light and its intensity, and switches the
heating in 2 levels. e control box has an IP43 rating, if you use the box in the open you will
need to order an extra joint to make the box IP65. e joint will t in the lid. e lid closes with 6
delivered screws.
BEWARE: Because o European law it is forbidden to rely on an electronic means to switch
heaters on and o, so you will need to install a separate power switch further down the circuit.
The connection of the control box for the Pendant version is a s follows:
N
Power
Dome
Open
and
insert
brown wire
push rmly to insert cables
PUSH FIRMLY WITH A SCREWDRIVER ON THE CONNECTOR BLOCK,
THE WIRES SHOULD BE WELL INSERTED!
13User manual
English
7. Operation
When you switch on the Dome, it takes up to 30 minutes before the Dome reaches it full tempera-
ture. Also when switch o, it may take up to 40 minutes before the Dome has completely cooled
down.
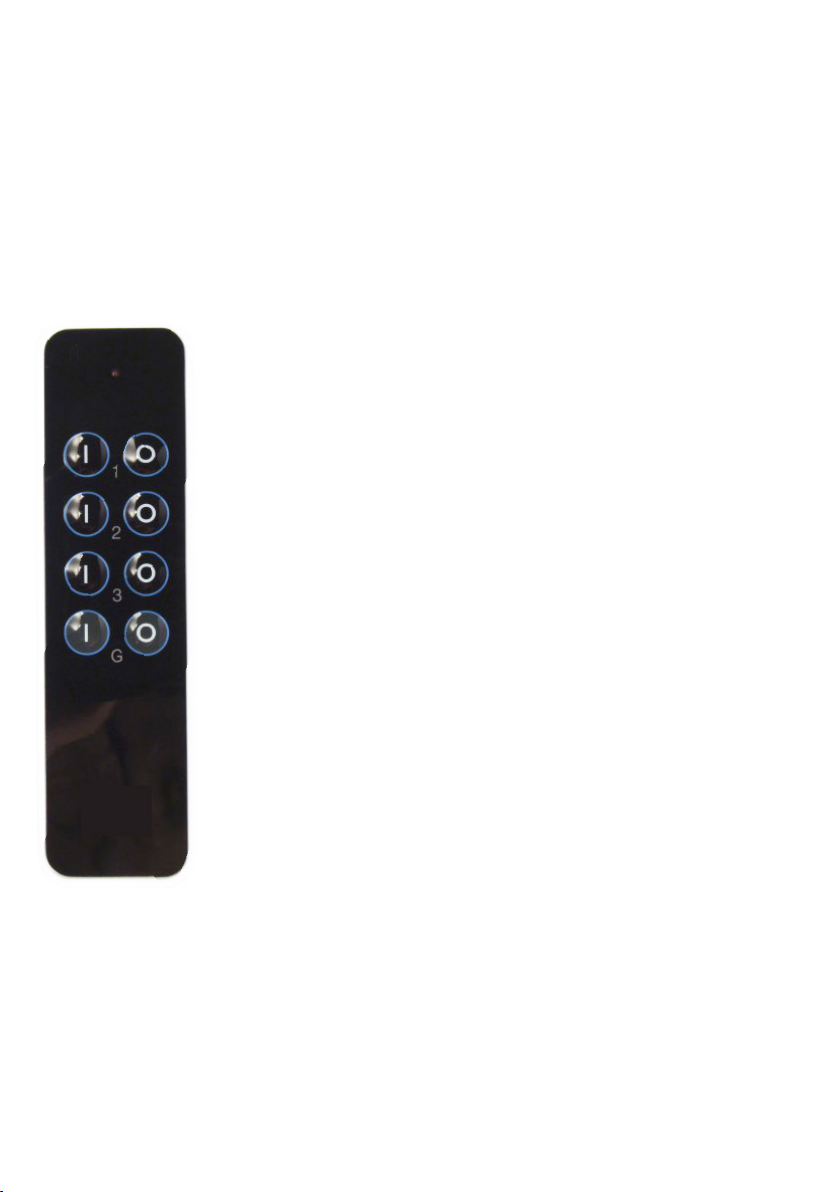
If you have purchased the control box, the remote buttons work as follows:
BUTTON 1 (LIGHT) : Press 1 to switch on, 0 to switch o.
Hold ‘1’ to dim, press 1 again to stop dimming. e system will
remember the last intensity the next time.
BUTTON 2 (HEATER 1) : Press 1 to switch on, 0 to switch o.
BUTTON 3 (HEATER 2) : Press 1 to switch on, 0 to switch o.
BUTTON G: Not used
Enjoy your DOME Heater!

14 Heatsail DOME®
English
8. Troubleshooting
1) e light does not work:
Switch of power. Li the glass of the the Dome upwards. put something underneath
to keep it upwards. Now you have access to the halogen bulb. Verify it is well inserted
and not broken. If you need to change the bulb replace it with a standard
R7S 78mm, 120W.
Use a cloth or gloves to replace the bulb, touching it with hands shortens the life
considerably.
If the problem is not solved, verify that the blue and brown wires are well inserted in
the connection block. See picture on p12.
If still not working try to reprogram the remote. (see next page)
2) No heat. (none of the heating elements is working) Most probably there is no power.
Verify all wires are well connected. (See P12)
3) Heater is only partly working.
(either 3 side elements, or 2 side elements and bottom element)
• Black or Grey wire not well connected. See P12
• Open control box, verify that the module makes a clicking sound
when switching on or o. If on, there shoud be a small red light on the
module.
• If no ‘click’, try to reprogram the module, see next page. ere are 3
modules in the control box, 2 are exactly the same and responsible for
heater 1 and 2.
4) Nothing works.
• Verify all wires are well connected and inserted in the connector block.
See P.12
• Try to reprogram the remote (see next page)
15User manual
English
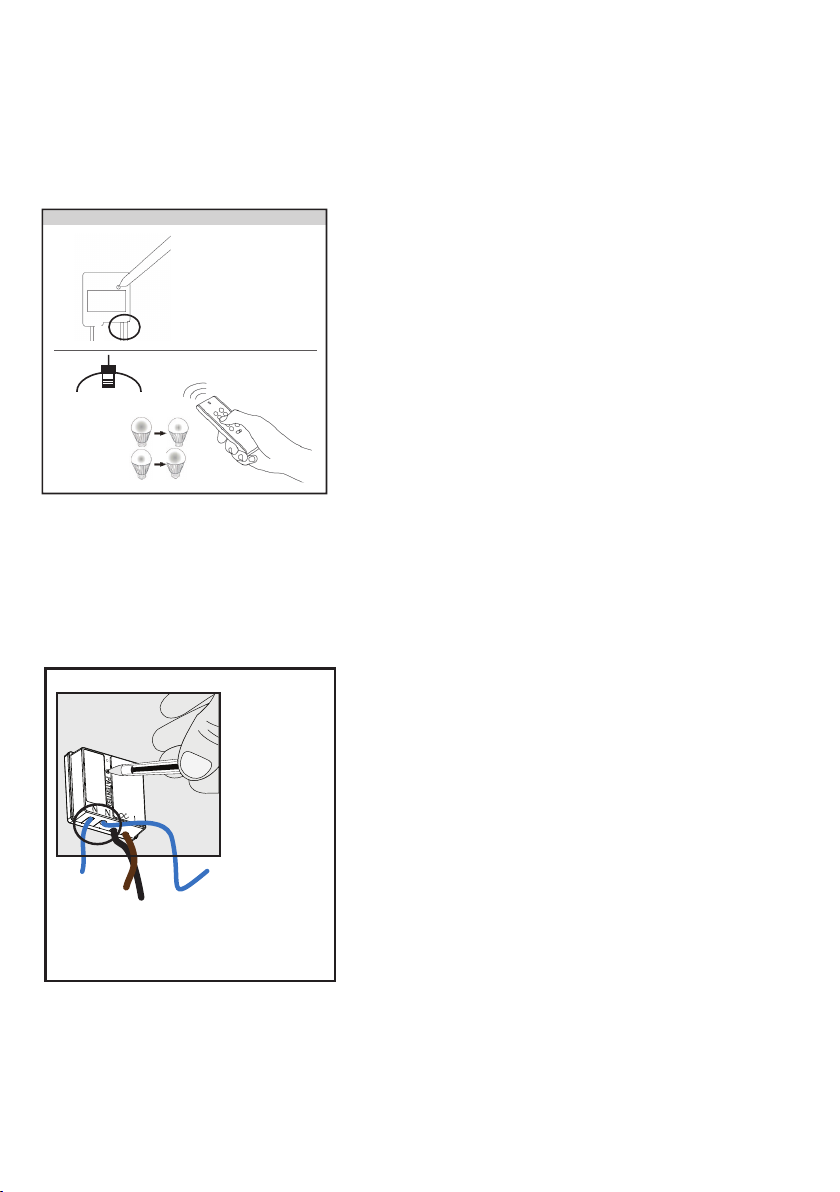
Reprogramming the remote
Open the control box and locate the dimmer module.
It has 2 white wires cut-off.
(1) Switch on the mains power
(2) Beware of any exposed wiring
(3) e LED indicator on the receiver will be permanently lit when
there is power.
! If there is no lit LED indicator, either the light is disconnected
or bulb is broken!
Register transmitters with the recipient
(1) Press on the connect button for 1 second with a pen. e search mode
will be active for 15 seconds and the LED indicator on the receiver will
ash slowly.
(2) Send an on-signal by pressing the ‘1 - ON’ button on the remote whilst
the search mode is active in order to store the applicable transmission code
in the receiver’s memory. is will normally be the button at the top le.
You can also choose a dierent button.
(3) e connected lights will switch on/o 2x to conrm the code has been
stored.
Repeat this procedure to register several remotes, if so required. e re-
ceiver can store 6 dierent transmission codes in its memory. e memory
will be retained if you install the receiver somewhere else or if the power
goes o.
1°
2°
OFF:
ON:
Dimmer has 2 white
wires cut o
Press with ball
point to reprogram
Reprogram the light
Open the control box and locate the heater switches.
They have 2 blue wires each
(1) Switch on the mains power
(2) Beware of any exposed wiring
Register remotes with the switches
(1) Press on the connect button for 1 second with a pen. e search mode
will be active for 15 seconds and the LED indicator on the receiver will
ash slowly.
(2) Send an on-signal by pressing the ‘2 - ON’ for heater 1 and ‘3 - ON’
button for heater 2 on the remote whilst the search mode is active in order
to store the applicable transmission code in the receiver’s memory. is
will normally be the button at the top le. You can also choose a dierent
button.
e led light on the module wil switch on to conrm the code has been
stored.
Repeat this procedure to register several remotes, if so required. e re-
ceiver can store 6 dierent transmission codes in its memory. e memory
will be retained if you install the receiver somewhere else or if the power
goes o.
heater switch
has 2 blue wires
Reprogram the Heater modules

16 Heatsail DOME®
English

Nederlands
GEBRUIKERSHANDLEIDING
Bedienings-, onderhouds-, installatiehandleiding.
! OPGELET !
Lees de handleiding aandachting alvorens het apparaat te gebruiken!
Gooi deze handleiding niet weg, ze bevat het serienummer van uw toestel!

18 Heatsail DOME®
Nederlands
Algemeen
Deze gebruiksaanwijzing is onlosmakelijk verbonden met de DOME en dient altijd bewaard te
worden door de gebruiker of door de bevoegde verantwoordelijke.
Lees de gebruiksaanwijzing aandachtig door. Ze bevat essentiële informatie over veiligheid,
gebruik, reiniging en onderhoud van de Dome. Heatsail kan niet aansprakelijk worden
gesteld voor schade aan personen, dieren en voorwerpen die het gevolg is van niet-naleving
van de voorschriften in de gebruiksaanwijzing.
Heatsail behoudt zich het recht voor om op ieder moment en zonder voorafgaande mededeling
eventuele wijzigingen aan te brengen aan het product, de technische kenmerken en de gebruik-
saanwijzing.
Indien u de DOME doorverkoopt, overdraagt aan een andere gebruiker of achterlaat bij een verhu-
is, dient de handleiding ter beschikking te worden gesteld van de nieuwe gebruiker.
Wij wensen U veel warme en aangename avonden met onze DOME!
Het HEATSAIL team.
!Gooidezehandleidingnietweg,zebevathetserienummervanuwtoestel.
Wij danken u voor
uw aankoop van DOME®!

19Gebruikershandleiding
Nederlands
Wij danken u voor
uw aankoop van DOME®!
1. Elektrische veiligheidsvoorschriften & vereisten
Het gebruik van de DOME vereist een elektrische installatie met deugdelijke veilighe-
idsaarding. De elektrische veiligheid van de installatie is slechts verzekerd indien de instal-
latie correct is aangesloten op een aardingssysteem dat volgens de veiligheidsvoorschriften is
gebouwd. Een voorafgaande controle is noodzakelijk. In geval van twijfel, dient een nauwkeurige
controle te worden verricht door gekwaliceerde en geautoriseerde personen. Heatsail is niet ver-
antwoordelijk voor schade die het gevolg is van een niet geaarde installatie.
De installatie van elektrische onderdelen van de DOME vergt een netaansluiting van 230V-50/60Hz
(zekering 16 Amp EN 30 mA verliesstroomschakelaar): de aansluiting dient naar behoren te worden
uitgevoerd in overeenstemming met de geldende IEC-CEI-normen.
Let op: lokaal kunnen wettelijke en andere voorschrien gelden.
Alvorens de verbinding of andere werkzaamheden aan de elektrische onderdelen te realiseren moet
de elektrische stroomtoevoer worden onderbroken en moet men zich ervan vergewissen dat de
stroom niet per ongeluk opnieuw ingeschakeld kan worden.
Voor de stroomvoorziening van de DOME op het elektrische net, is het gebruik van verloopstek-
kers, stekkerdozen en verlengsnoeren niet toegestaan. Er moet steeds een schakelaar geïnstalleerd
worden tussen de DOME en de zekeringskast. Niet-naleving van deze voorschrien kan de veil-
igheid van het apparaat in gevaar brengen. Heatsail kan niet aansprakelijk worden gesteld voor de
schade die hieruit voortvloeit.
2. Veiligheid
De verplichte minimum vrije hoogte van de Dome bedraagt 1.8 meter, gemeten tussen de
grond en de onderkant van het onderste verwarmingselement.
Kinderen jonger dan 3 jaar moeten weg gehouden worden van de Dome tenzij onder voltijdse
supervisie.
Kinderen tussen 3 en 8 jaar zullen de Dome enkel mogen bedienen onder voorbehoud dat
deze geplaatst is in zijn normale werkingspositie en zij duidelijk richtlijnen hebben ontvangen
omtrent het veilig gebruik van de DOME en de risico’s goed kunnen inschatten. Het is hen niet
toegestaan de stekker in en uit te trekken of de DOME te reingen en onderhoudshandelingen
te verrichten.
De DOME buiten het bereik houden van elke persoon die niet in staat is de gevaren in te schatten

20 Heatsail DOME®
Nederlands
die kunnen ontstaan door het (oneigenlijk) gebruik van elektrische apparaten.
OPGELET - De verwarming loopt op tot zeer hoge temperaturen en kan brand-
wonden veroorzaken. De DOME mag in geen enkel geval aangeraakt worden zodra
hij ingeschakeld wordt.
Bijzondere attentie moet gegeven worden wanneer kinderen en kwetsbare per-
sonen aanwezig zijn.
Na uitschakeling blij de DOME nog warm voor een aanzienlijke periode. Raak de DOME niet aan
gedurende een periode van 30 minuten na uitschakeling. Let op! Voorzichtigheid blij geboden. De
grille biedt geen bescherming tegen de hitte.
De Dome nooit gebruiken wanneer het glas beschadigd is.
De Dome niet gebruiken met een timer of eender welk ander toestel dat de verwarming automa-
tisch kan aanschakelen, aangezien er risico op brand is als de Dome verkeerd gepositioneerd staat.
Gebruik de Dome nooit in de onmiddelijke omgeving van een bad, jacuzzi, douche, zwembad of
serre.
Zet de Dome nooit dicht bij gordijnen, overkappingen of andere brandbare materialen. Dek hem
nooit af zonder de stekker uit het stopcontact te trekken!
Het is verboden de DOME met blote, natte of vochtige lichaamsdelen aan te raken.
De DOME bestaat uit 6 hoog stralende keramische verwarmingselementen gemonteerd in een
bepaalde richting op een reecterende plaat. Van zodra de keramische elementen beginnen op te
warmen, wordt de volledige bedrijfstemperatuur bereikt binnen een tijdspanne van 10 minuten.
Let op: er is geen merkbare gloed in het infrarood gebied.
Gebruik de DOME nooit om wat dan ook aan te steken De keramische elementen zijn breek-
baar en dienen met de nodige voorzichtigheid behandeld worden. Dit geldt eveneens voor het
glazen omhulsel.
Heatsail is niet verantwoordelijk voor schade die het gevolg is van het niet naleven van de
voorschrien betreende gebruik en onderhoud.
3. Onderhoud
3.1 Reiniging
Other manuals for DOME
4
Table of contents
Languages:
Other Heatsail Patio Heater manuals


