Heatsail BEEM User manual

For the most recent version of this manual, check our website.
Do not discard this manual, as it contains your device’s serial number.
BEEM® WITH MISTING MANUAL
7. 8.
9.


HANDLEIDING
_
USER MANUAL
MODE D’EMPLOI
BETRIEBSANLEITUNG
4
17
30
43
NL
EN
FR
DE

4Heatsail BEEM® with misting
EN
Thank you for your purchase!
This manual is inextricably linked to the misting system of
the BEEM®and must always be kept by the user or by the
responsible person.
Read the user instructions carefully. It contains essential
information about safety, use, cleaning and maintenance
of the pump and the misting system of the BEEM. Heatsail
cannot be held liable for damage to persons, animals and
objects resulting from non-compliance with the instructions in
the user manual.
Heatsail reserves the right to make changes to the product,
technical features and instructions at any time and without
prior notice.
If you resell the BEEM with misting system, transfer it to another
user or leave it behind when relocating, the manual must be
made available to the new user.
We wish you many warm, cool and pleasant days with our
BEEM.

5User manual
EN
User manual
Operating, maintenance and installation.
Note
Read this manual carefully before using the device! Do not throw this
manual away; it contains the serial number of your device!

6Heatsail BEEM® with misting
EN
1. Safety regulations & requirements
The use of the misting system requires an an electrical outlet and a water
connection with tap. The electrical safety of the device is only assured if
it is correctly connected to a grounding system built in accordance with
safety regulations. It must be inspected before use. If anything is unclear,
a qualified and authorised person must be consulted. Heatsail is not
responsible for damage caused by an ungrounded device.
The installation of the misting system of the BEEM requires a mains
connection of 110-120V: the connection must be properly implemented in
accordance with the applicable IEC-CEI standards.
Please note: This product must by installed by a licensed electrician
and the power supply connection should be in accordance with the
requirements of NFPA 70 and OSHA Regulations 29 CFR 1910.304(b)(2)
Statutory and other local regulations may apply.
If the engine is defective and/or unsafe, switch o the machine and do not
let it run. Have the machine repaired or replaced.
2. Safety
The user should carefully read and understand this manual before any
installation and/or operation of the misting system. The user need to
follow the installation procedure, working procedure, safety measures and
maintenance as standard.
Use only clean water. It is forbidden to use spring water, river water, pond
water and other dirty water. Once dirty water has been used the nozzles
may block or it may cause blockage this can lead to a shortening of life
expectancy.
The misting system must be connected directly to a water tap. The misting
system has a self-priming function, prevent air from entering the machine.
The number and size of the nozzles must be within a related range.
Otherwise there will not be enough pressure for the misting. It is strictly
forbidden to touch machine, thread, machine valve and replace or touch
other related parts when the machine is turned on.

7User manual
EN
3. Maintenance
3.1 General cleaning
Cleaning of the parts and the hood of the machine may only been done
with a dry and soft cloth. Do not use detergents. All volatile and flammable
detergents are not allowed.
The nozzles are consumer goods, replace them with new ones as soon
as they are blocked.
3.2 Monthly cleaning
• Clean or replace the nozzles
• Clean or replace the water filter
• Change the pump oil after the first 20hours to increase pump life
3.3 Maintenance after 1000 hours or after 1 year
• Start with the monthly cleaning staps
• Clean or replace the flexible high-pressure hose.
• Check if the L-shaped connectors and T-shaped connectors should
be replaced
• Check the pump pressure
• Change the oil of the machine
• Replace the rubber water seal
3.4 Maintenance after 2000 hours
• Start with the maintainance after 1000 hours
• Change the carbon brush
3.5 Maintenance after 4000 hours
• Start with the maintainance after 2000 hours
3.6 Special maintenance for winter or if not used for over two months
• Take out the fittings and dry them out by sunshine
• Drain all water from the system

8Heatsail BEEM® with misting
EN
4. Warranty conditions
4.1. Warranty
The original invoice will serve as your proof of purchase. This warranty
does not aect the buyer’s rights by virtue of the national legislation
regarding the sale of consumer goods. This warranty is only valid
if the misting system of the BEEM installation and maintenance
have been carried out in accordance with the applicable standards
and regulations and instructions for the installation, use, cleaning and
maintenance of the product, by qualified individuals who satisfy the
legal requirements.
The warranty term will commence from the date the goods were delivered.
Any defective goods will be reveiwed by Heatsail or an authorized Heatsail
distributor. Once Heatsail has deemed a fault as a warranty situation, the
Heatsail unit(s) will be brought to Heatsail or a local distributor for repair
and returned in a timely manner.
Heatsail and its distributors will not award any compensation for any direct
or indirect damage resulting from, or relating to, using the product.
The replaced parts will be under warranty for the remainder of the warranty
period from the date the goods are delivered.
4.2. Warranty exclusions
• The conditions for activating the warranty were not met.
• The parts appear to be defective as a result of negligence or
inappropriate use or incorrect maintenance.
• The installation has not been carried out in accordance with the legal
standards and not in accordance with the instructions provided in the
user manual.
• Any damage caused as a result of weather conditions, chemical and
electrochemical reactions, improper use, natural disasters, electrical
discharge, fire, a defective electrical installation, modifications or mis-
handling to packaging, the handle and the electrical wiring.
• Any damage caused by transport.

9User manual
EN
We recommend you thoroughly check the goods upon receipt, allowing
you to immediately notify the seller of any possible damage and to record
any such damage on the transport document and the courier’s copy.
For example:
• Physical damage after the installation, including, scratches on the
misting system of the BEEM, machine and accessories.
• Suspicious tampering with the misting system of the BEEM and/or
there causes which can’t be attributed to the product’s manufacture.
• The use of non-original replacement parts.
• Damage caused through normal wear and tear.
4.3. What to do in the event of a defect?
In case of a fault, you must contact Heatsail or an authorized distributor
immediately (and no later than two months after the fault was first identified)
for a repair or replacement. The warranty can only be initiated after written
permission has been granted.
Heatsail declines any form of liability for any possible damage and/or in-
jury which has been either directly or indirectly caused to people, animals
or objects as a result of non-compliance with the instructions in the user
manual and which specifically concern the warnings in relation to the in-
stallation, use and maintenance of the device.
5. Applicable law
The general terms and conditions and the agreement are governed
by Belgian law. The courts of the judicial district of Antwerp shall have
exclusive jurisdiction to settle any dispute arising from the agreement.

10 Heatsail BEEM® with misting
EN
6. Assembly and wiring instructions
Open the box and follow these instruction guidelines for a quick installation.
You’ll find this inside:
1x pump
1x flexible high-pressure hose of 197 inches (5m)
1x manual
Below you will find an overview.
7. 8.
9.

11User manual
EN
STEP 1
Open the box carefully.
Place the box on a flat surface and
carefully open the cardboard box.
STEP 2
A water filter is recommaned.
Connect the water filter to the
water tap.
STEP 3
Take o the handle. Fill the pump
with 80ml 15W-40 oil by means
of the syringe.
7. 8.
9.
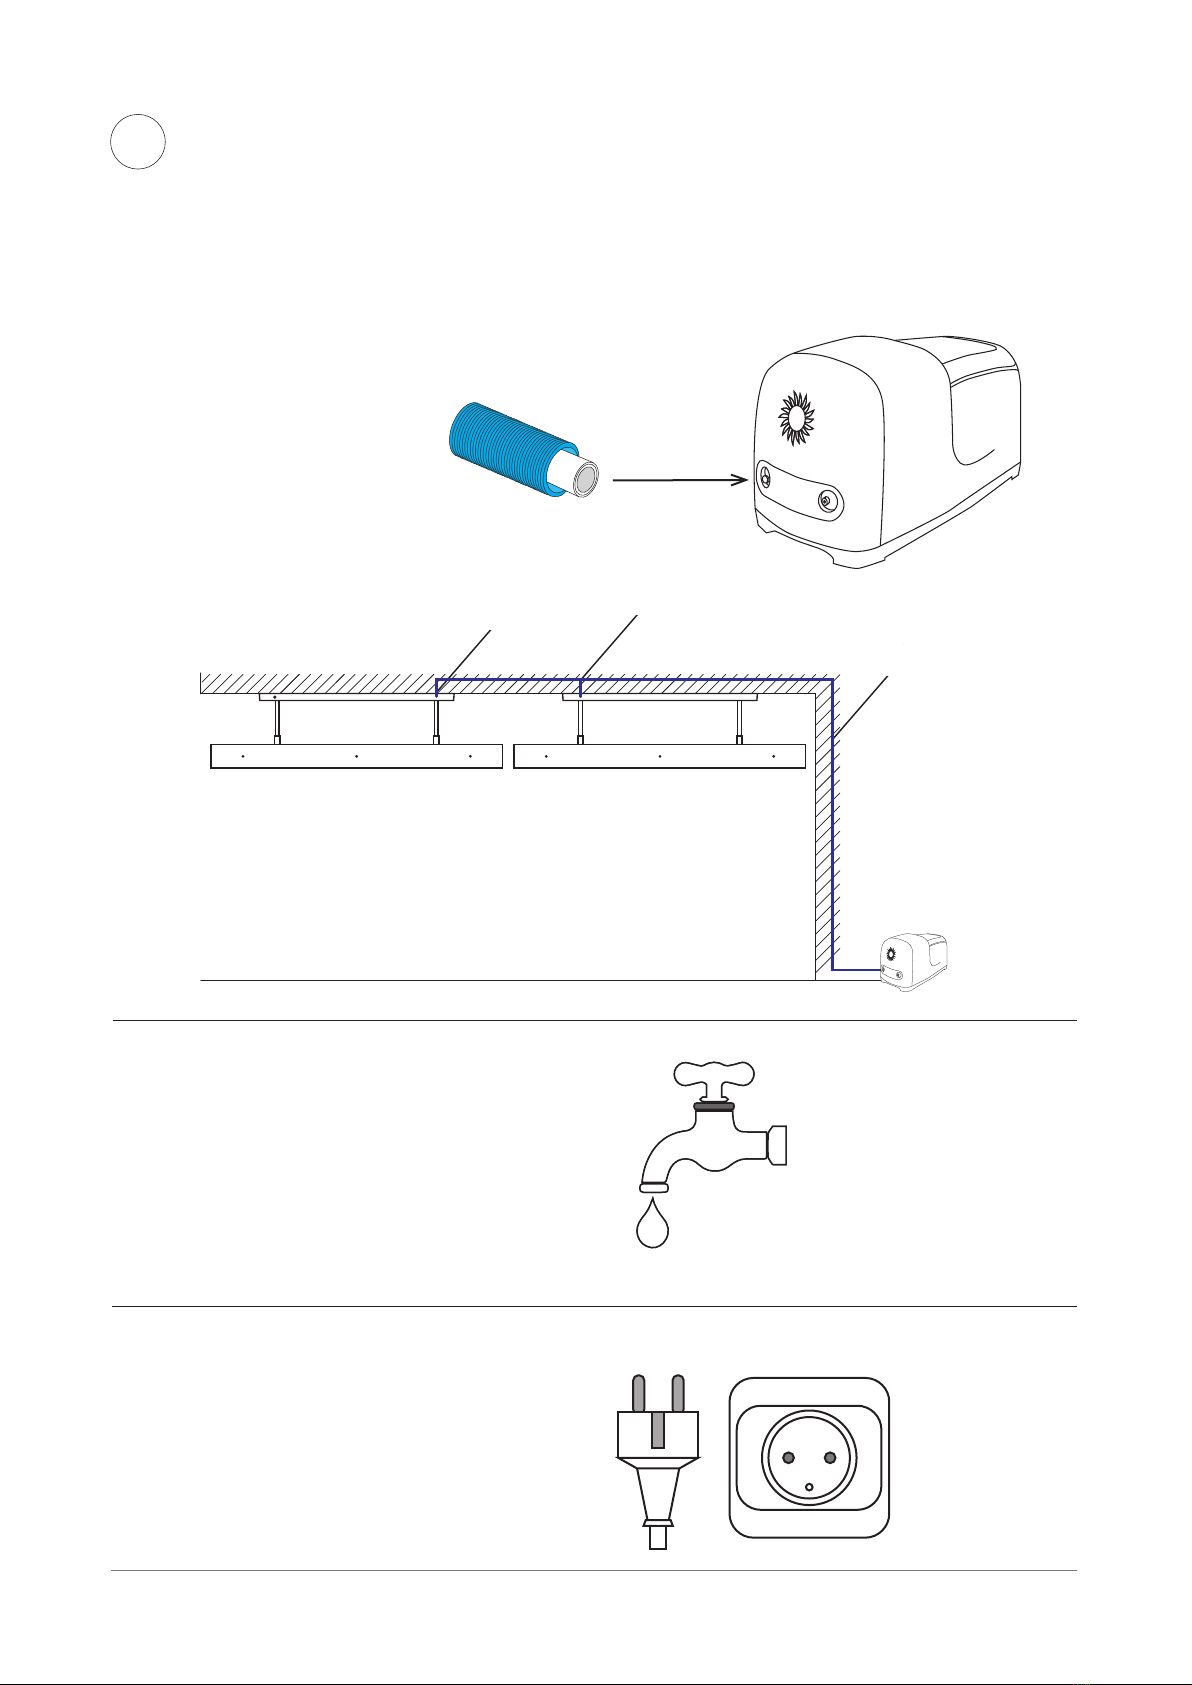
STEP 4
Connect the flexible high-
pressure hose of maximum 40
inches (1 meter) to the water filter
and use the right connection on
the machine. Make sure there is
no air in the hose.
7. 8.
9.
7. 8.
9.
7. 8.
9.
12 Heatsail BEEM® with misting
EN
STEP 4
Insert the flexible high-pressure
hose (1) of the BEEM through the
provided pipe/opening. Connect
the flexible high-pressure hose
(1) to the machine using the
left connection. You can use an
L-connector (3) if you have sharp
corners. If you want to connect
several BEEMs to 1 pump, you
must use a T-connector (2). 7. 8.
9.
1
2
3
7. 8.
9.
7. 8.
9.
STEP 5
Check that all water connections
are properly connected and turn
the tap halfway open.
ATTENTION: do not open the
water tap fully.
7. 8.
9.
1
7. 8.
9.
STEP 6
Plug the pump into a suitable
110V outlet and turn on the
machine.
7. 8.
9.

13User manual
EN
7. Operation
Activate the misting system of your BEEM.
After plugging the pump into a suitable outlet and turning the water tap
halfway open, you can turn on the pump. You have two options to use the
fogging system of your BEEM; either you use the remote control or you
use the buttons below. These work as follows:
• (A) display for dierent pressures.
• (B) display for dierent spray and pause time.
• (C) power ON/OFF button
• (D) choose dierent pressure displayed on (A).
• (E) choose dierent spray and pause time displayed on (B).
• (E) maintainance lamp will go on every 1,000 hours to remind your for
maintainance.
• If all lamps are flashing the water is not connected or the pressure is low.
4
5.5 70/0 3/10 10/10
20/10
Mpa Time
Maintain
CDEE
AB

14 Heatsail BEEM® with misting
EN
8. Troubleshooting
The pump does not start
Check that the plug is not damaged and that it is plugged into a suitable
outlet.
The working pressure of the machine is below 4Mpa (40Bar)
• There is air in the pump, remove the flexible high-pressure hose from
the pump and let the pump run for a few seconds.
• The water filter is blocked.
• The flexible high-pressure hose for the inlet is longer than 1m.
• There is a problem with the pump cover.
The misting system does not work
• The working pressure of the pump is lower than 4Mpa (40Bar).
• Check that all L-connectors and T-connectors are properly connect-
ed. Make sure nothing leaks.
• The water filter is blocked.
• There is a problem with the pump cover.
• The one-way suspension of the nozzle is broken.
Some nozzles don’t work
• The one-way suspension of the nozzle is broken.
• Replace the nozzle.
The mobile APP is not working
• Check if you are connected to the bluetooth of the pump.
• Check if you have the latest version of the APP.
• Check if your smartphone is up to date.
The pump makes a strange and loud noise
• There is air in the pump, take out the flexible high-pressure hose and
let the pump run for a few seconds.
• There are problems with the pump. Have the machine repaired or
replaced.
The pump temperature is very high
• The quality of the oil is not suitable for the machine.
• The machine has to work too hard reduce the pressure.
The pump and connectors are leaking
• Replace the oil.
• Check whether a nut and/or bolt is loose.

15User manual
EN
BEEM® TIMELESS LIGHTING
WITH HEATING AND MISTING FOR YOUR GARDEN OR TERRACE
RUSTPROOF &
WEATHERPROOF
LOW ENERGY USAGE
ZERO CO2 EMISSION
MINIMUM OF MAIN
TENANCE

SERIAL NUMBER
Corporate Headquarters
HEATSAIL NV
Prins Boudewijnlaan 7 Unit A 08
2550 Kontich
Belgium
+32 3 502 99 88
www.heatsail.com
US Oce
HEATSAIL USA Inc.
10440 N Central Expressway,
Suite 800
Dallas, Texas 75231
United States
www.heatsail.com/usa
Other manuals for BEEM
2
Table of contents
Other Heatsail Patio Heater manuals


