HECKLER H720 User manual
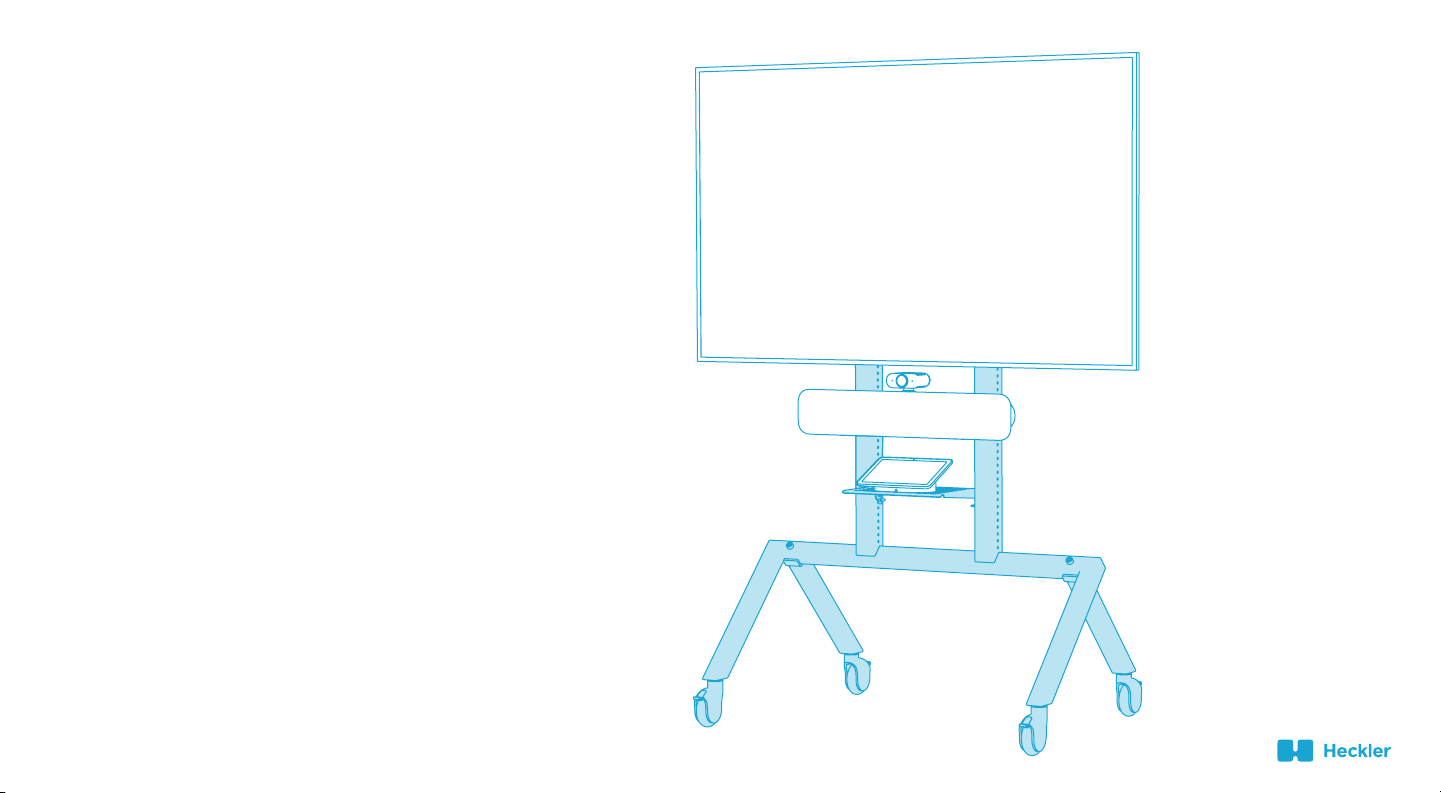
H720 - Heckler AV Cart for
Google Meet Series One Room Kits
Supports displays with a VESA 400 (horizontal) mounting pattern,
and up to 300 pounds of total display weight. Recommended for
use with 50-inch to 75-inch displays.
Designed & made in Arizona
Patented

If you have any questions, please contact Heckler.
service@hecklerdesign.com
844-432-5930
To reduce the risk of severe injury or death to persons,
or damage to equipment, review these installation safety
steps before proceeding:
A minimum of two people should install the display to the cart.
Caster brakes should be applied during the installation of the display.
Do not over-tighten the wingnuts when mounting the display.
Do not exceed 300 pounds of total display weight.
Whenever rolling the cart with a large display installed, two people
should guide the cart to prevent wall and doorframe collisions, and
tripping on sidewalk expansion joints.
1.
2.
3.
4.
5.
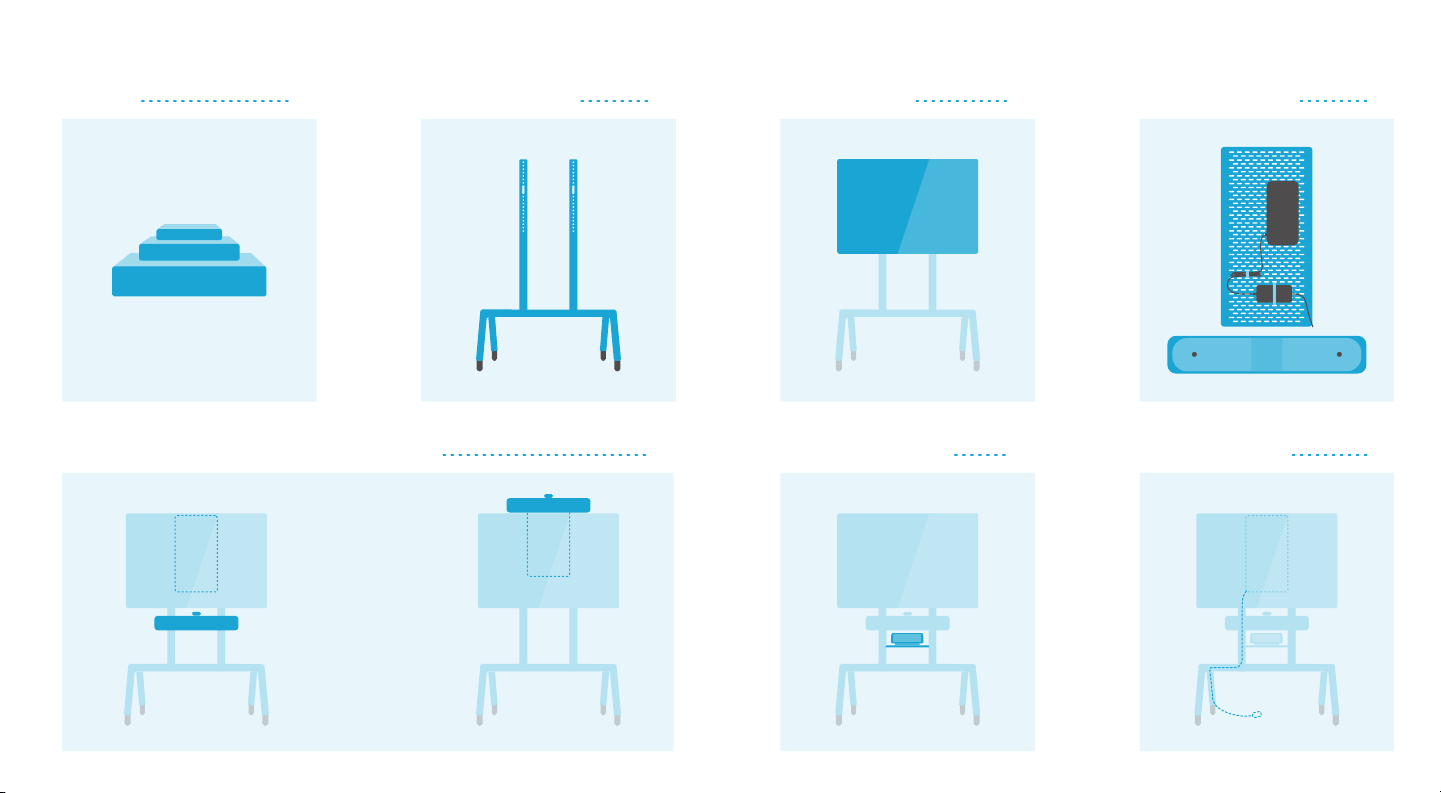
QUICK START
In the box 1 Set up the Base Cart 5
Install Touch Controller 30 Organize the cables 31
Install the display 11
Configure Meet Compute System
and Smart Audio Bar 17
Install Meet Compute System and Smart Audio Bar 21
or
ABC
D E F G H I J K L M N O
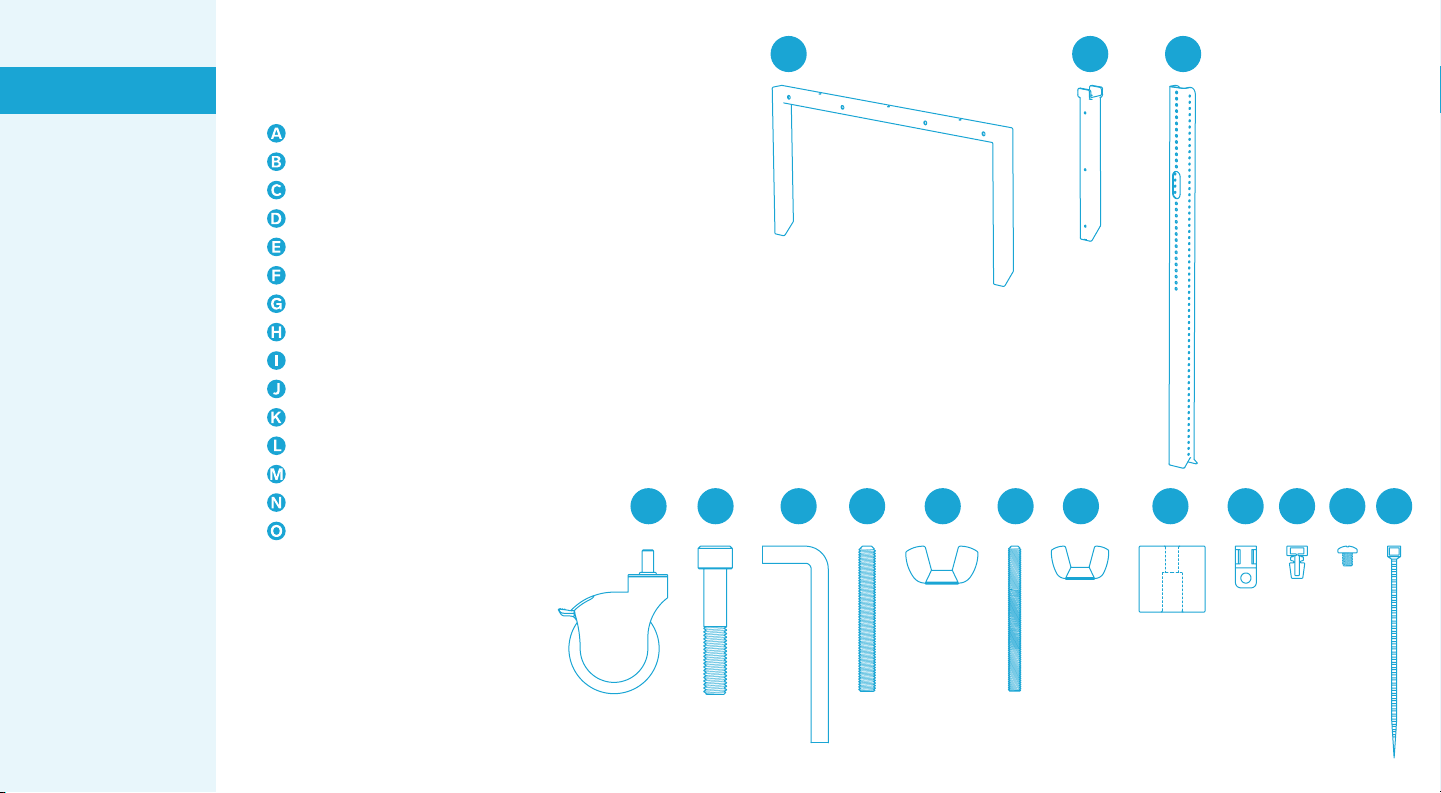
1
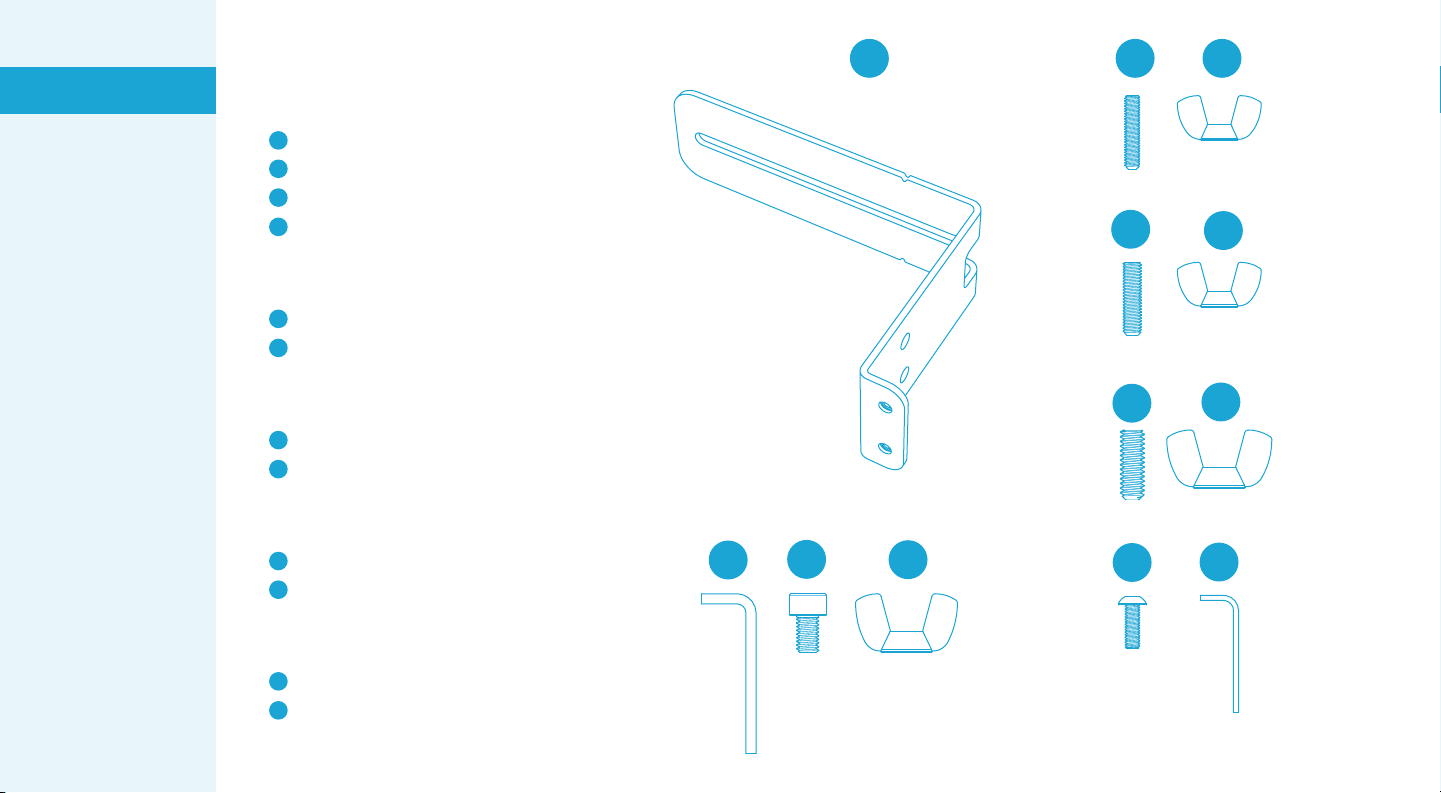
Front Base
1 x
Rear Leg
2 x
Display Rail
2 x
Socket Head Screw, 1/2"-13, 2.75" Long
4 x
Assembly Key, Hex, 3/8”
1 x
Set Screw, M8, 70mm Long
4 x
Wingnut, M8
4 x
Caster
4 x
Set Screw, M6, 70mm Long
4 x
Wingnut , M6
4 x
Rubber Spacer
4 x
Screw-in Cable Mount
8 x
Push-in Cable Mount
4 x
Pan Head Screw, 10-32, 0.25” Long
8 x
Cable Tie
8 x
Heckler AV Cart Base
Set up the Base Cart
Install the display
Configure Meet
Compute System and
Smart Audio Bar
Install Smart Audio Bar
below the display
Install Smart Audio Bar
above the display
Install Meet Compute
System and Smart
Audio Bar
Install Touch Controller
Organize the cables
In the box
AB
JK
J
K
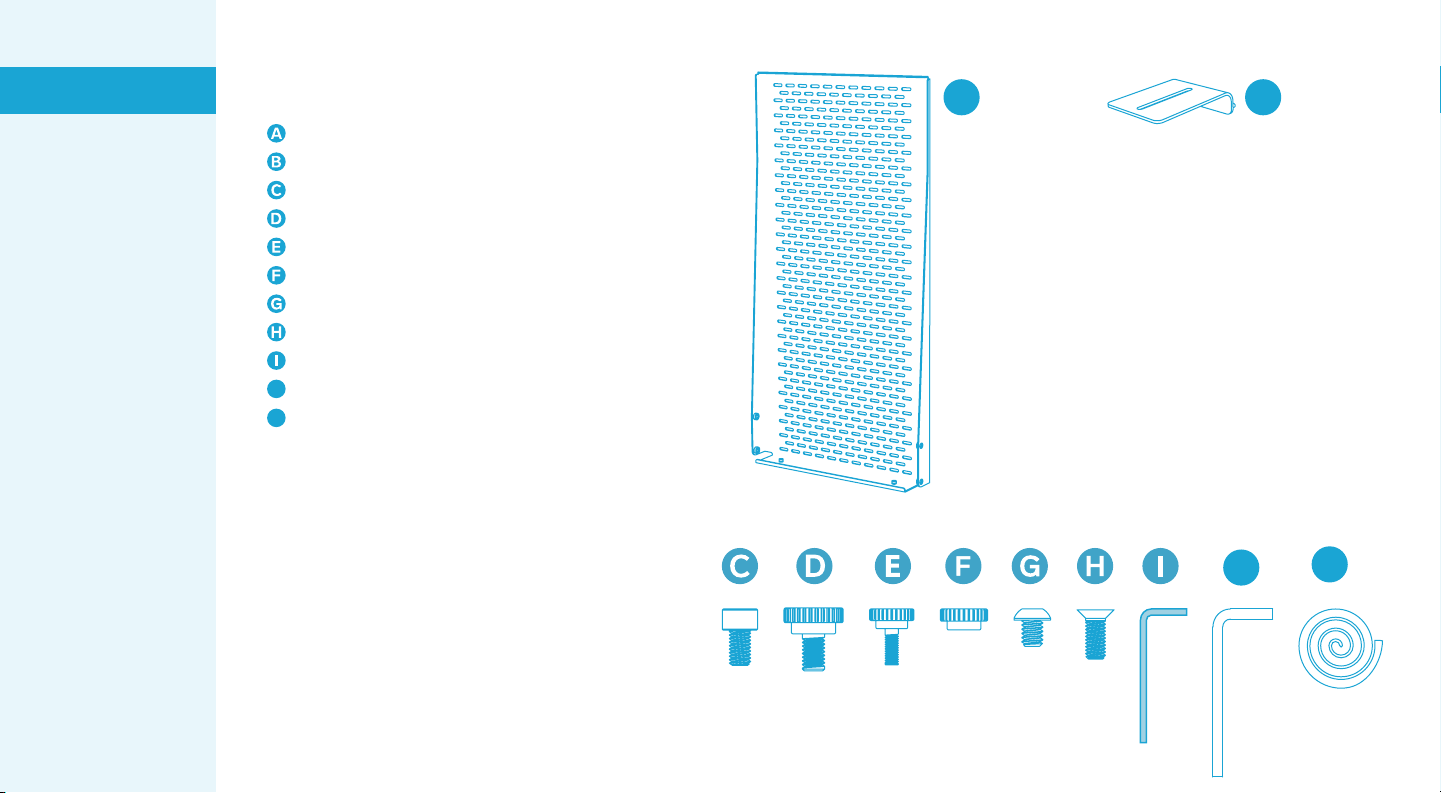
2
Device Panel XL for Heckler AV Cart
1 x
Camera Adapter
1 x
Cart-mounting screws
2 x
Device-mounting thumb nuts
4 x
Camera-mounting screw
1 x
Camera-mounting key
1 x
Meet compute-mounting screws
4 x
Cart-mounting assembly key1 x
Device-mounting thumb screws
4 x
Cart-mounting thumb screws
2 x
Velcro for strapping devices. Two feet.
1 x
H708 Device Panel XL
Set up the Base Cart
Install the display
Configure Meet
Compute System and
Smart Audio Bar
Install Smart Audio Bar
below the display
Install Smart Audio Bar
above the display
Install Meet Compute
System and Smart
Audio Bar
Install Touch Controller
Organize the cables
In the box

Control Shelf for Heckler AV Cart
1 x
Cart-mounting wingnuts
2 x
Cart-mounting screws
4 x
Velcro for strapping devices. 12 inches
1 x
Cart-mounting assembly key
1 x
H709 Control Shelf
3
Set up the Base Cart
Install the display
Configure Meet
Compute System and
Smart Audio Bar
Install Smart Audio Bar
below the display
Install Smart Audio Bar
above the display
Install Meet Compute
System and Smart
Audio Bar
Install Touch Controller
Organize the cables
In the box
4
A
BCD
GH
IJ
KL
EF
Soundbar Mounting Bracket
2 x
A
Hex Key, 5mm
1 x
B
Screw, M6, 10mm
4 x
C
Wingnut, M6
4 x
D
M4 Soundbar-mounting Hardware
Set Screw, M4, 20mm
2 x
E
Wingnut, M4
2 x
F
M5 Soundbar-mounting Hardware
Set Screw, M5, 20mm
2 x
G
Wingnut, M5
2 x
H
1/4”-20 Soundbar-mounting Hardware
Set Screw, 1/4-20, 3/4”
2 x
I
Wingnut, 1/4-20
2 x
J
For Mounting to H708 Device Panel
Screw, M4, 12mm
4 x
K
Hex Key, 2.5mm
1 x
L
H707 Soundbar Mount
Set up the Base Cart
Install the display
Configure Meet
Compute System and
Smart Audio Bar
Install Smart Audio Bar
below the display
Install Smart Audio Bar
above the display
Install Meet Compute
System and Smart
Audio Bar
Install Touch Controller
Organize the cables
In the box

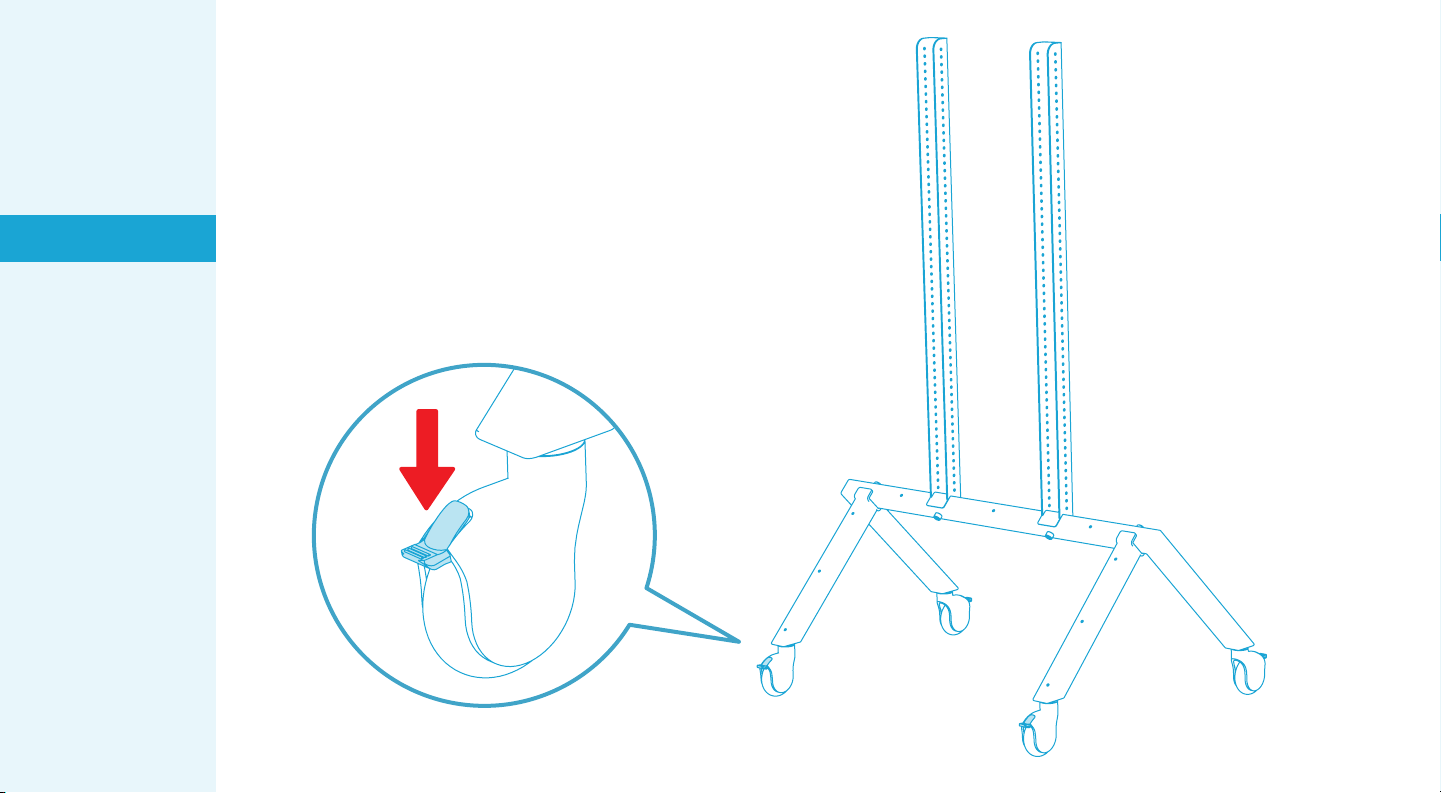
STEP 1
Remove the wheels from all four casters.
5
Set up the Base Cart
Install the display
Configure Meet
Compute System and
Smart Audio Bar
Install Smart Audio Bar
below the display
Install Smart Audio Bar
above the display
Install Meet Compute
System and Smart
Audio Bar
Install Touch Controller
Organize the cables
In the box

STEP 2
Install all casters.
6
Set up the Base Cart
Install the display
Configure Meet
Compute System and
Smart Audio Bar
Install Smart Audio Bar
below the display
Install Smart Audio Bar
above the display
Install Meet Compute
System and Smart
Audio Bar
Install Touch Controller
Organize the cables
In the box

STEP 3
Reinstall caster wheels.
7
Set up the Base Cart
Install the display
Configure Meet
Compute System and
Smart Audio Bar
Install Smart Audio Bar
below the display
Install Smart Audio Bar
above the display
Install Meet Compute
System and Smart
Audio Bar
Install Touch Controller
Organize the cables
In the box

STEP 4
Engage all caster brakes.
8
Set up the Base Cart
Install the display
Configure Meet
Compute System and
Smart Audio Bar
Install Smart Audio Bar
below the display
Install Smart Audio Bar
above the display
Install Meet Compute
System and Smart
Audio Bar
Install Touch Controller
Organize the cables
In the box
STEP 5
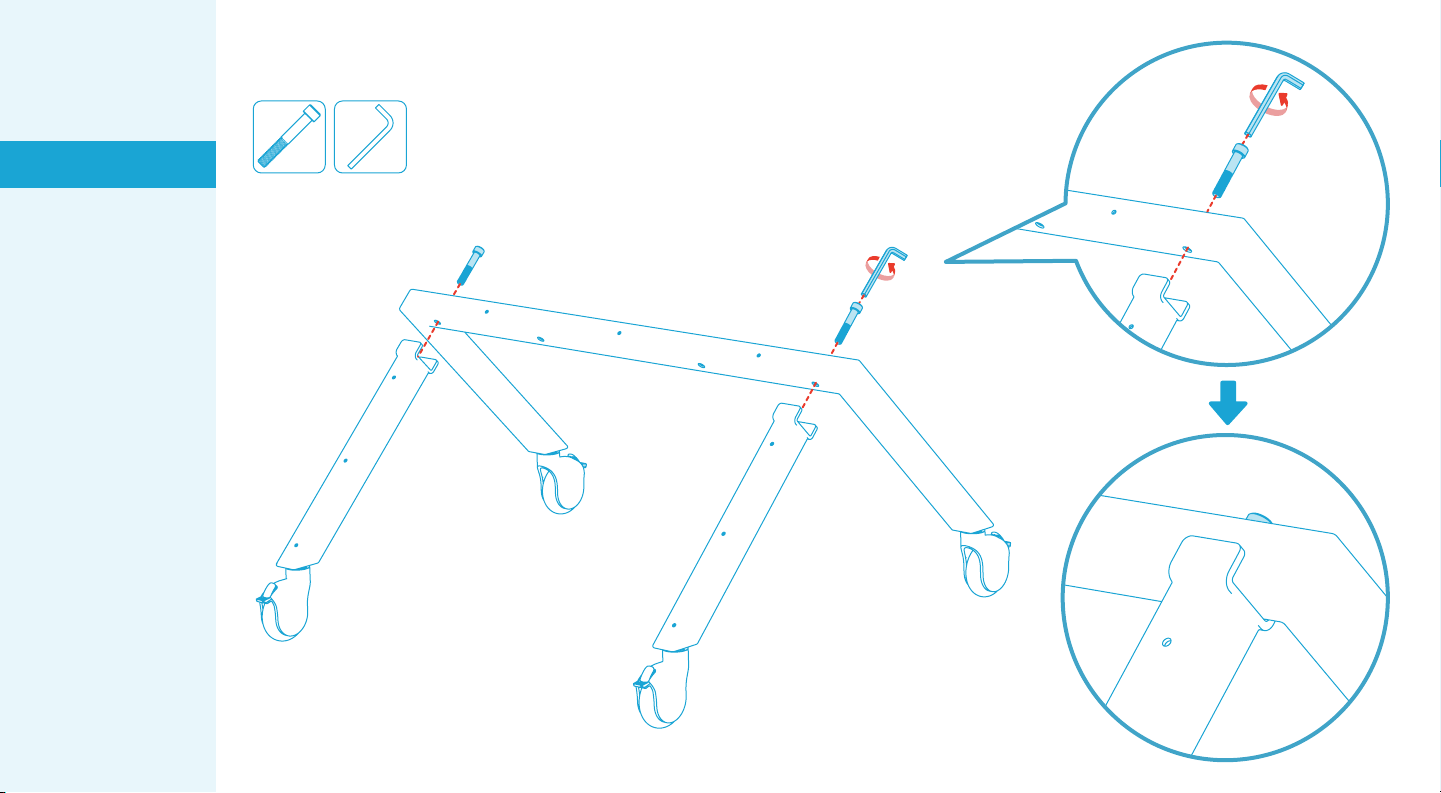
Fasten Rear Legs to Front Base.
9
x2 x1
Set up the Base Cart
Install the display
Configure Meet
Compute System and
Smart Audio Bar
Install Smart Audio Bar
below the display
Install Smart Audio Bar
above the display
Install Meet Compute
System and Smart
Audio Bar
Install Touch Controller
Organize the cables
In the box
STEP 6
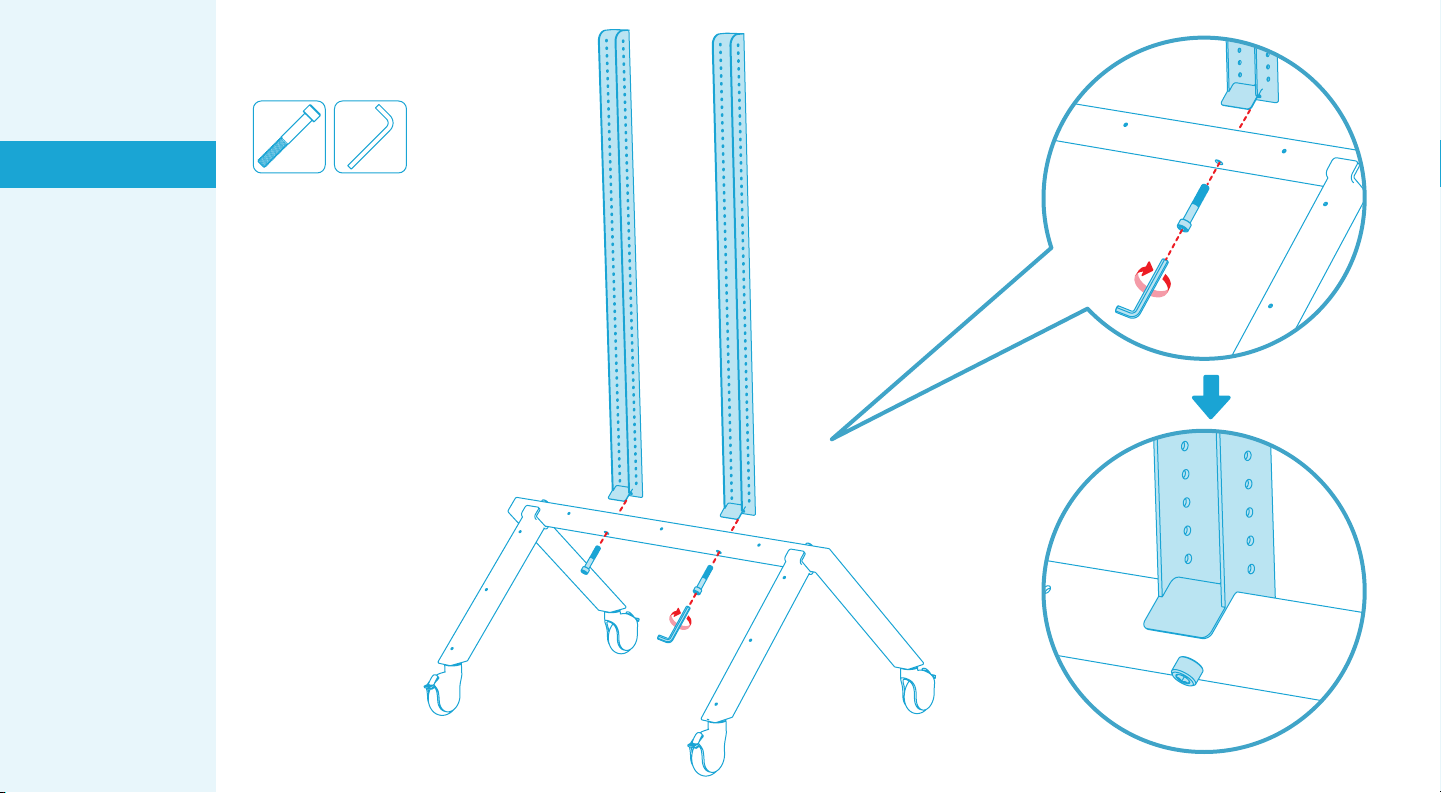
Fasten Display Rails to Front Base.
x2 x1
10
Set up the Base Cart
Install the display
Configure Meet
Compute System and
Smart Audio Bar
Install Smart Audio Bar
below the display
Install Smart Audio Bar
above the display
Install Meet Compute
System and Smart
Audio Bar
Install Touch Controller
Organize the cables
In the box
STEP 7
Determine whether your display has M8 or M6 mounting holes.
11
Set up the Base Cart
Install the display
Configure Meet
Compute System and
Smart Audio Bar
Install Smart Audio Bar
below the display
Install Smart Audio Bar
above the display
Install Meet Compute
System and Smart
Audio Bar
Install Touch Controller
Organize the cables
In the box

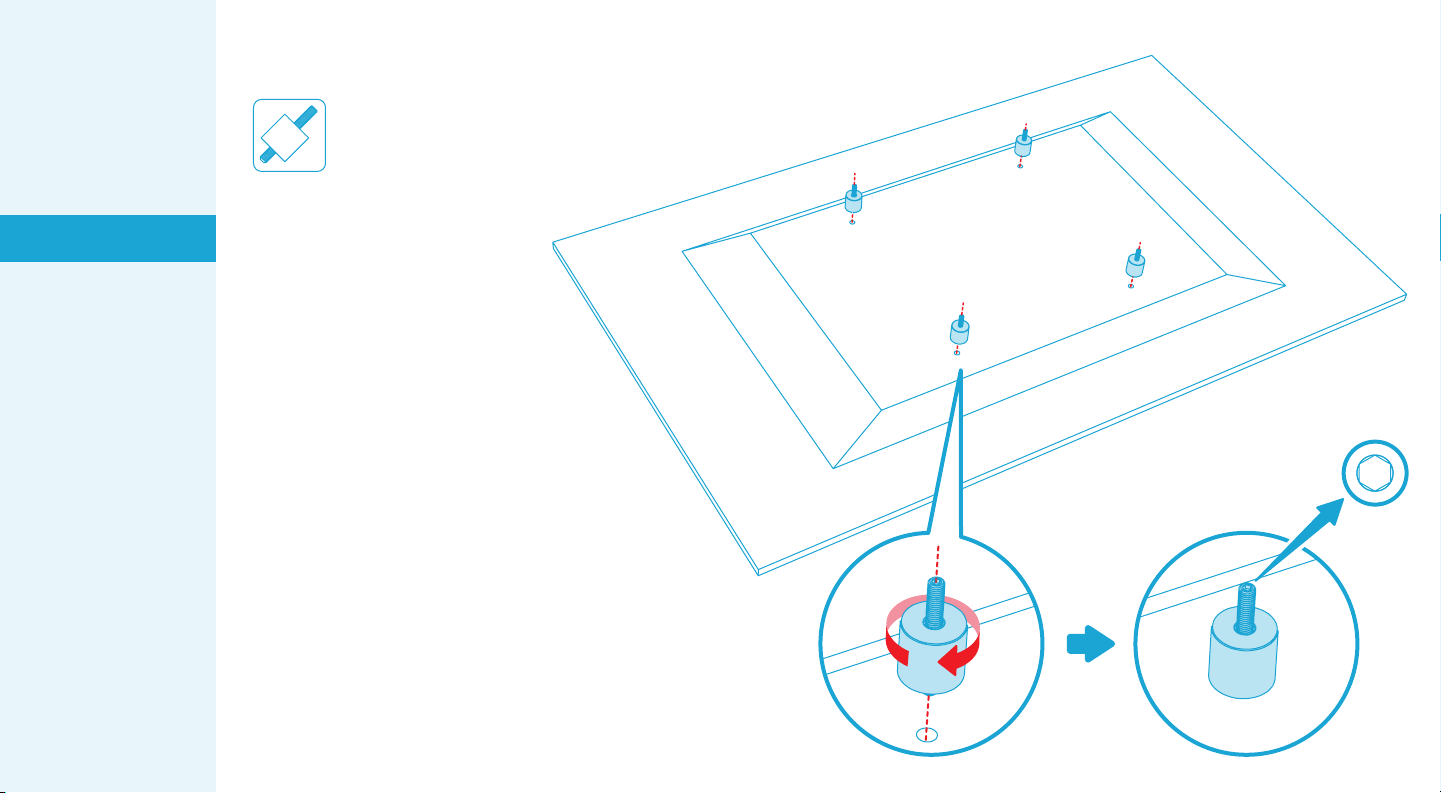
Prepare the display-mounting hardware.
Insert the M6 or M8 set screws through the rubber spacers.
Position the set screw relative to the spacer as shown.
x4 x4 x4
M6 M8
Important Notes:
The set screws are a tight fit.
To push the set screw into the
spacer, place cardboard on a solid
surface then slowly and carefully
push the spacer onto the set screw.
1 inch(25mm)
STEP 8
12
Set up the Base Cart
Install the display
Configure Meet
Compute System and
Smart Audio Bar
Install Smart Audio Bar
below the display
Install Smart Audio Bar
above the display
Install Meet Compute
System and Smart
Audio Bar
Install Touch Controller
Organize the cables
In the box
Fasten the mounting hardware to the display.
x4
Important notes:
Fasten the set screw into
the display at the depth
recommended by the
display manufacturer. Do
not overtighten these
mounting screws.
Ensure the spacers rest
snuggly against the rear
surface of the display.
The hex drive of each set
screw should face away
from the display.
1.
2.
3.
STEP 9
13
Set up the Base Cart
Install the display
Configure Meet
Compute System and
Smart Audio Bar
Install Smart Audio Bar
below the display
Install Smart Audio Bar
above the display
Install Meet Compute
System and Smart
Audio Bar
Install Touch Controller
Organize the cables
In the box

Note
x2x2 x4
M6
x4
M8
If your display feature a curved rear surface,
the display likely shipped with special mounting
spacers. If so, use the display manufacturer's
mounting spacers rather than the spacers
included with Heckler AV Cart Prime.
14
Set up the Base Cart
Install the display
Configure Meet
Compute System and
Smart Audio Bar
Install Smart Audio Bar
below the display
Install Smart Audio Bar
above the display
Install Meet Compute
System and Smart
Audio Bar
Install Touch Controller
Organize the cables
In the box
Ensure all caster brakes are engaged.
STEP 10
15
Set up the Base Cart
Install the display
Configure Meet
Compute System and
Smart Audio Bar
Install Smart Audio Bar
below the display
Install Smart Audio Bar
above the display
Install Meet Compute
System and Smart
Audio Bar
Install Touch Controller
Organize the cables
In the box
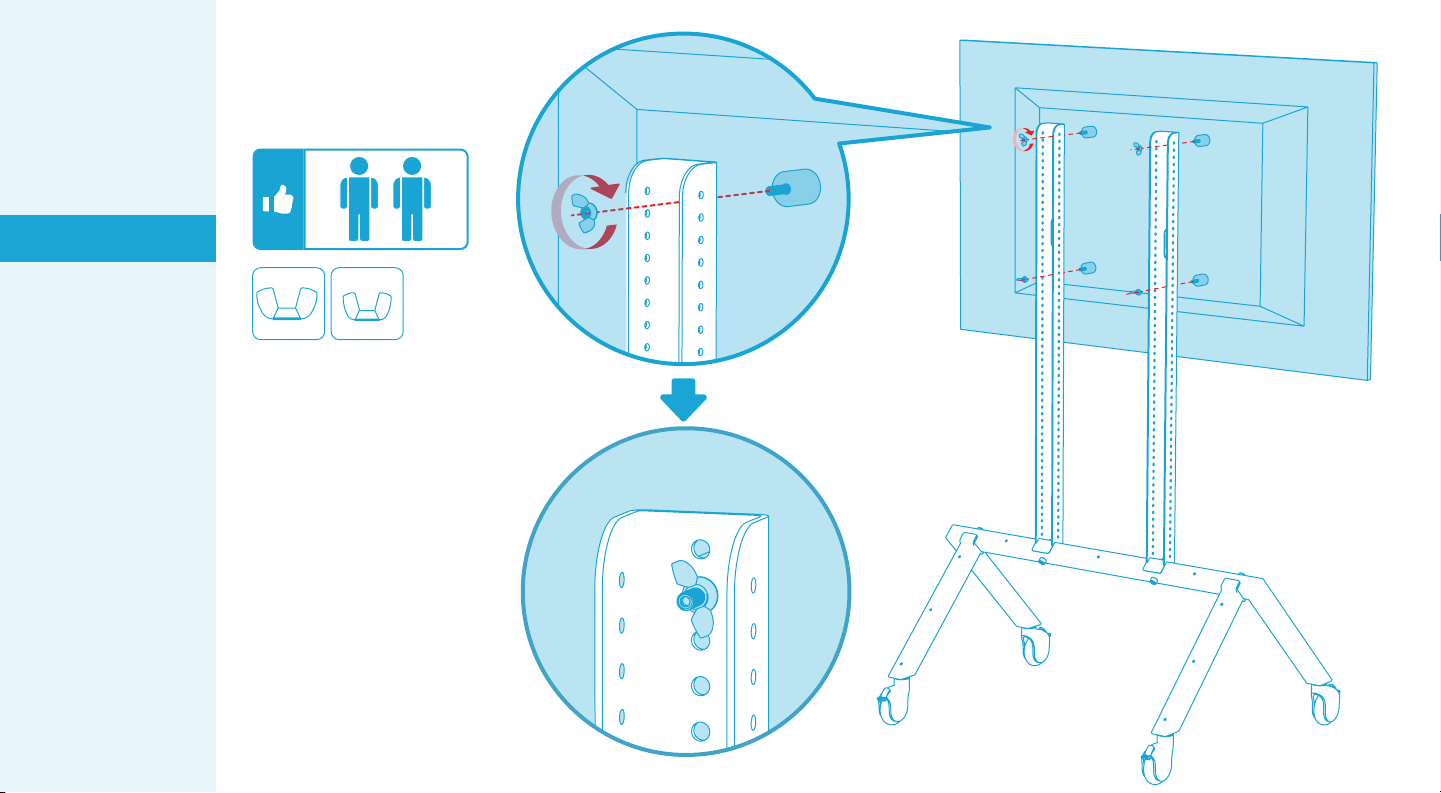
Install the display to
Display Rails by
fastening wingnuts.
STEP 11
x4
M8
x4
M6
16
Set up the Base Cart
Install the display
Configure Meet
Compute System and
Smart Audio Bar
Install Smart Audio Bar
below the display
Install Smart Audio Bar
above the display
Install Meet Compute
System and Smart
Audio Bar
Install Touch Controller
Organize the cables
In the box
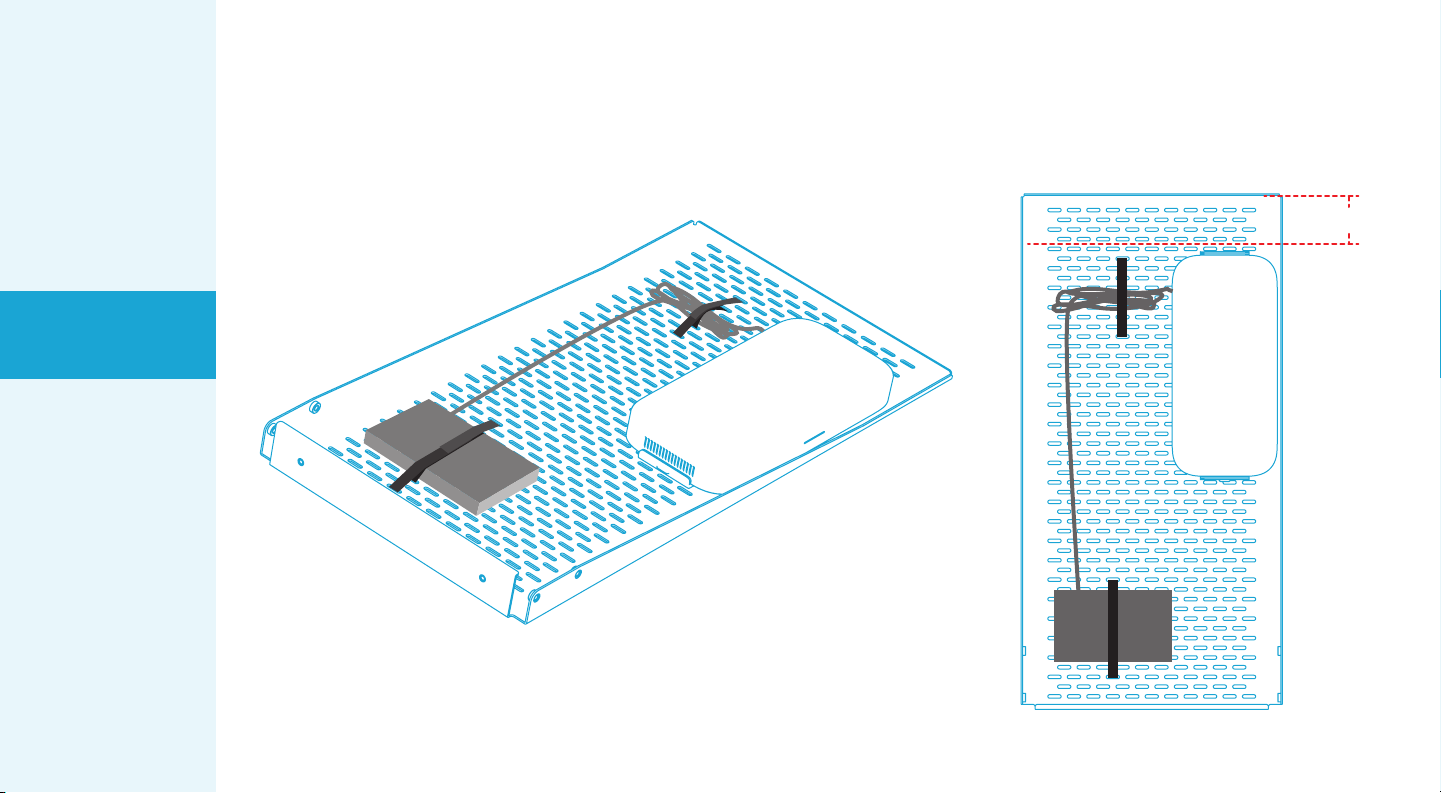
Pre-configure Meet Compute System and wiring
to Device Panel XL.
STEP 12
17
Important Note:
Keep about 2.5 inches of
clearance for mounting
Smart Audio Bar above the display.
2.5 inches
Set up the Base Cart
Install the display
Configure Meet
Compute System and
Smart Audio Bar
Install Smart Audio Bar
below the display
Install Smart Audio Bar
above the display
Install Meet Compute
System and Smart
Audio Bar
Install Touch Controller
Organize the cables
In the box
Table of contents
Popular Outdoor Cart manuals by other brands


Opti-Med
Opti-Med JM025-017 user manual

Wolfcraft
Wolfcraft TS 2500 Translation of the original operating instructions

Dinex
Dinex TQ1T1D6 operating & maintenance manual

Copernicus
Copernicus Tech Tub 2 FTT432 Assembly guide

Touchboards
Touchboards ANTHRO 075BK Assembly instructions

AmazonBasics
AmazonBasics B07TBGH48M Guide


