Heddys HEBT210 User manual
HEBT210
Bluetooth®
Touch Control
Rechargeable
Heddys
Model
Owner’s Guide

2
Safety Information
• Always turn the volume control down on your sound source before
plugging in your headphones; then increase it to a comfortable level.
• Do not wear these headphones near traffic or in any other activity
where a failure to hear surrounding sounds could be dangerous.
• Maintenance and service operations are only to be carried out by
authorized dealers. Damage caused by manual modifications of the
product is not subject to warranty.
• If the product is used for purposes other than originally intended it may
suffer damage. Doing so will void its warranty.
• Long-term exposure to loud music may cause hearing damage.
It is best to avoid extreme volume when using these headphones,
especially for extended periods.
• Keep batteries out of reach of children.
• Avoid immersing or exposure to liquids otherwise failure may result.
• Do not drop your headphones as damage or failure may result.
Compliances
Declarations
All product specifications are subject to change without notice.

3
Contents
Introduction ......................................................................................4
Package Contents ...........................................................................4
Product Overview .............................................................................5
Controls ..........................................................................................5
Adjusting the Headband .................................................................5
Using your new HEBT210 Headphones:
Charging the Battery.......................................................................6
Switching POWER ON/OFF .............................................................6
Connecting/Pairing to your Bluetooth® device ..............................7
Touch Panel Control functions .......................................................8
Telephone functions.......................................................................9
Connecting via an Audio cable......................................................10
Cleaning and Maintenance/Battery Care........................................10
Troubleshooting..............................................................................11
Technical Specifications ..................................................................12
Warranty.........................................................................................12

4
Introduction
Introduction
Thank you for choosing headphones. This product has
been manufactured to the highest standards to ensure comfort and
trouble-free performance for years to come.
Package Contents
Included with your new headphones are the following items:
Detachable 3.5mm Audio cable
USB to micro USB Charging cable
Hard Shell protective case
Owner’s Manual
5
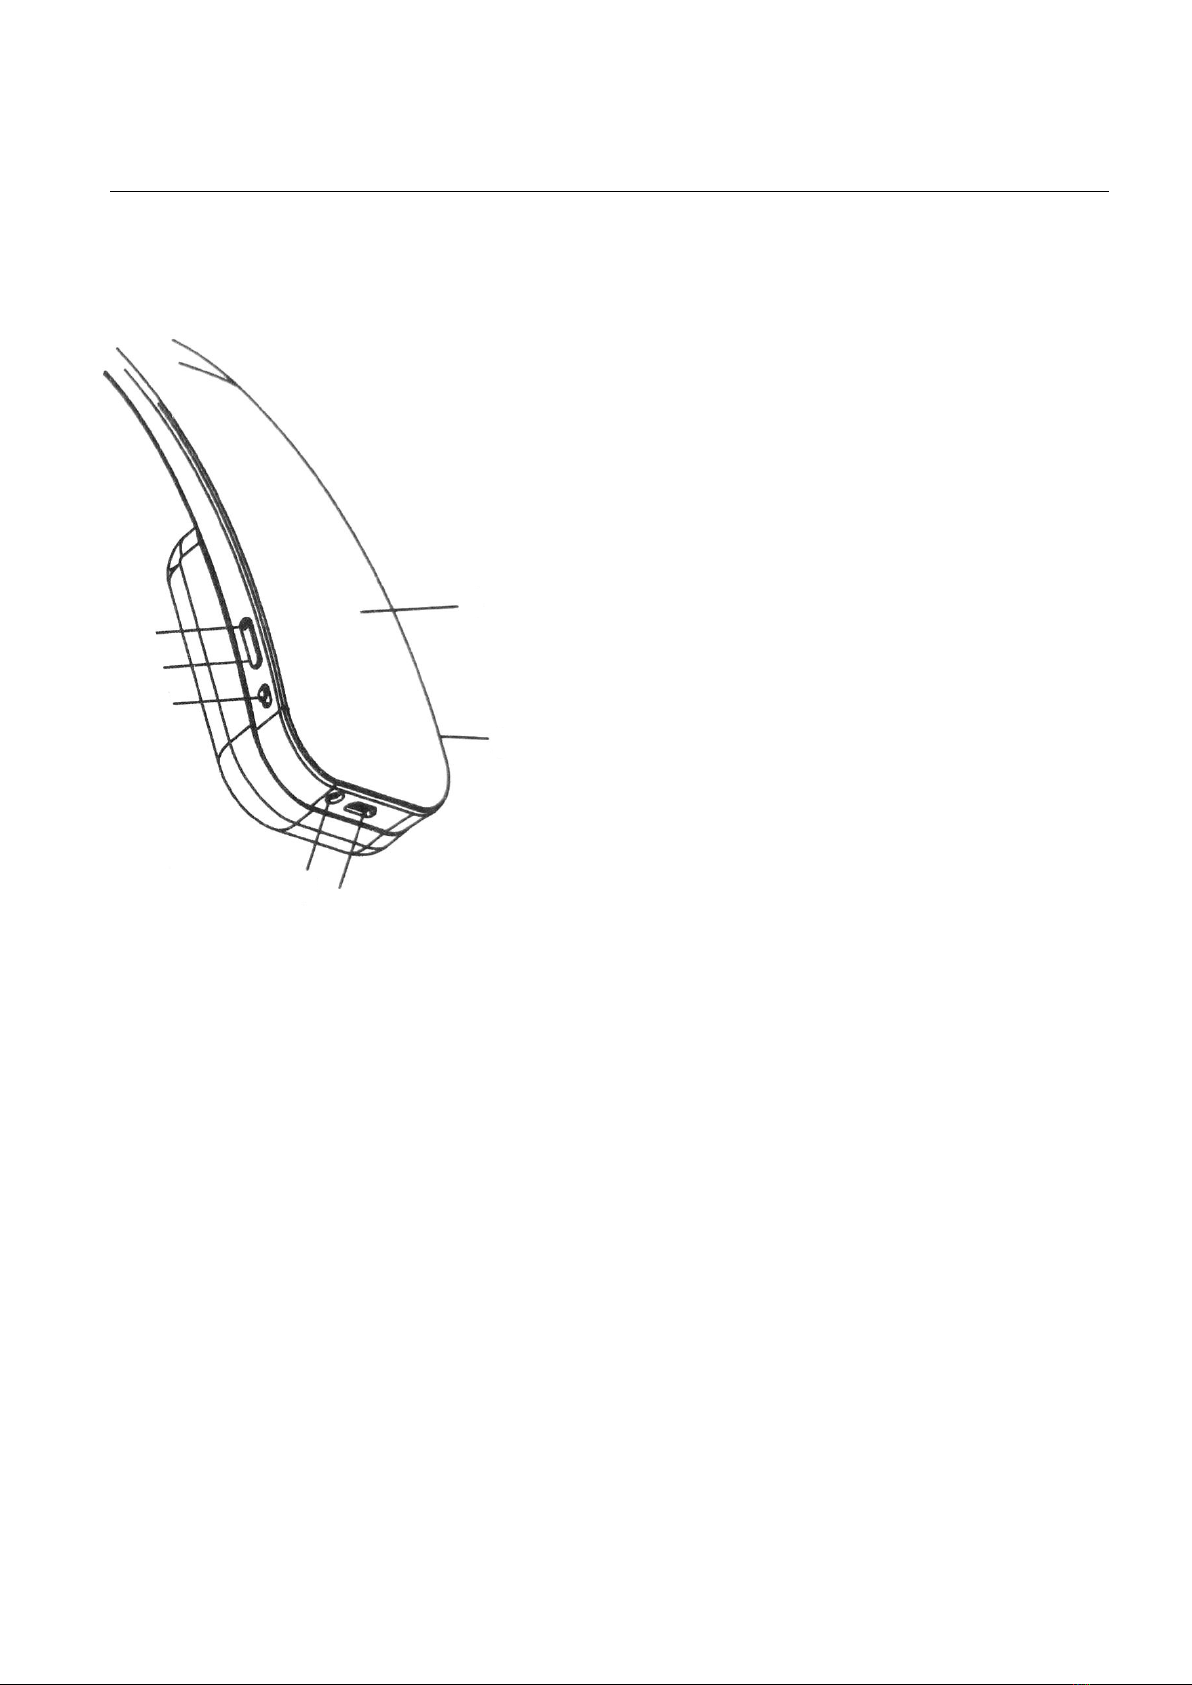
Product Overview
Controls
Adjusting the Headband
To achieve maximum comfort ensure the retractable headband is
adjusted to provide you with a firm but comfortable fitting onto
your head with your headphones located over your ears.
Ensure you wear your HEBT210 headphones according to the
embossed Land Rsymbols located above each ear pad on the
inside of your earphones. This will ensure you are enjoying your
music with the correct Left and Right orientation.
Headphone Controls: Right side
1 –Multi-Function Button (MFB).
Power ON/OFF, Telephone
Functions & Bluetooth® Pairing.
2 –Charging port via micro USB.
3 –Microphone.
4 –Touch Panel (See Page 8).
5 –LED Bluetooth® & Battery Indicator.
6 –Touch Panel Lock switch
(See Page 8).
7 –3.5mm Audio cable socket.
7
2
5
1
6
4
3

6
Using your new headphones
Charging the Battery (Refer to the diagram shown on Page 5)
When the battery in your HEBT210 headphones is almost
exhausted the LED Bluetooth® and Battery indicator (5) will flash
RED and an audible "beep" will be heard. Using the USB Charging
cable supplied with your headphones, plug the micro USB
connector into the Charging port (2). Connect the remaining USB
connector into a standard USB charger or USB computer port.
The LED Bluetooth® and Battery indicator (5) will glow RED,
showing that the internal battery is charging.
When charging is complete this LED will switch off automatically.
Note this may take up to 3 hours if the battery is fully exhausted.
Switching Power ON/OFF
1. Power ON
Press and hold the MFB button (1) for approx. 2 seconds.
The LED Bluetooth® and Battery indicator (5) will rapidly flash
alternately from RED to BLUE. This indicates it is in Bluetooth®
Pairing Mode (Please refer to Page 7).
2. Power OFF
Press and hold the MFB button (1) for approx. 6 seconds.
The LED Bluetooth® and Battery indicator (5) will flash RED and a
audible "beep" will be heard.

7
Using your new headphones
Connecting/Pairing your Bluetooth® device
Your HEBT210 headphones will work with Bluetooth® enabled
mobile phones and applicably featured audio devices. Prior to using
and pairing your headphones for the first time, please check to
make sure that the Bluetooth® function on your mobile phone or
device is enabled. In general it is recommended that you refer to
the pairing instructions provided with your mobile phone/device.
The following instructions are for typical Bluetooth® enabled
mobile phones/audio devices. It is recommended you distance your
headphones and device no more than 1 metre apart to pair:
1. Starting from the Power OFF condition (See Page 6) press and
hold the MFB button (1) for approx. 3 seconds until the
Bluetooth LED Bluetooth® and Battery indicator (5) rapidly
flashes alternately between BLUE and RED.
Your headphones are now in PAIRING MODE.
2. Enable searching of nearby Bluetooth® devices on your device.
When you see HEBT210 listed as FOUND on your device you can
now select CONNECT to pair with them.
Note: If your device prompts you for a password, enter 0000.
3. When pairing is successful, the LED Bluetooth® and Battery
indicator (1) will emit a BLUE flash every 4 seconds approx.
If pairing is unsuccessful please turn off your headphones and
repeat these pairing steps.
4. Your headphones will automatically re-connect to the last
paired device when switched ON.

8
Using your new headphones
Touch Panel Control functions: Right Side only.
Your HEBT210 headphones are equipped with Touch Panel controls
so you can easily adjust the volume or select your music tracks.
SWIPE
UP
TO
INCREASE
VOLUME
SWIPE
DOWN
TO
DECREASE
VOLUME
SWIPE
FORWARD
TO SELECT
NEXT TRACK
SWIPE
BACKWARD
TO SELECT
PREVIOUS TRACK
TAP TO
PAUSE
TAP AGAIN TO
PLAY
SELECT UNLOCK TO ALLOW
TOUCH FUNCTIONS.
SELECT LOCK TO PREVENT
TOUCH FUNCTIONS.

9
Using your new headphones
Telephone functions via Bluetooth®
The LED Bluetooth® and Battery indicator (5) will flash BLUE and
an audible "beep" will be heard whenever a call is received.
Answer a call Briefly press the MFB button (1) once to ANSWER.
End a call Briefly press the MFB button (1) once again to END.
Ignore a call Press and hold the MFB button (1) for 3 sec. until
you hear a long tone. Then release the MFB button.
Voice Dialing, Siri® & If your phone supports voice dialing,
Voiceover functions. voiceover or Siri® features you may be able
to activate them when a call is not in
progress.
Press and hold the MFB button (1) for
approx. 3 seconds, until an audible tone is
heard. You may voice a command upon
hearing a second tone.
Note: Compatibility with such features is
subject to the software and version of your
phone device.
Calling the last Double-click the MFB button (1).
selected number.
Swap calls between While speaking, press the MFB button (1)
HEBT210 Headphones for 3 seconds. When a “BEEP sound is
and a Smartphone. heard, release the MFB button.

10
Using your new headphones
Connecting via an Audio cable
A Detachable 3.5mm Audio cable is provided for use with
multimedia devices that do not have Bluetooth capabilities.
Connect via the 3.5mm Audio socket (7).
Plug the 6.3mm to 3.5mm Stereo Adapter onto the end of this
Audio cable to provide compatibility with Stereo Headphone
Output sockets found on many Audio devices.
Cleaning and Maintenance
It is not necessary to regularly clean your headphones, however if
you believe they do need cleaning please use a soft, dry cloth.
Avoid using chemical cleaners of any description.
Battery Care
Always charge your headphones using only a standard USB port or
charger and not any high current/fast charger devices.
Failure to observe this may result in permanent damage or fire.
The Lithium-Polymer batteries inside your headphones are not user
replaceable. Do not attempt to do so.
Failure to observe these warnings will void your warranty.

11
Troubleshooting
If you are unable to connect your headphone and your mobile
phone, please try the following:
• Ensure your headphone is turned OFF and properly charged
before commencing the Bluetooth® Pairing procedure on Page 7.
• Ensure the headphone is properly paired with your mobile
phone or device.
• Ensure the headphone is within a 10 metre range of your paired
Bluetooth device and that there are no obstructions, such as
walls or other electronic devices in between.
• Ensure your mobile phone’s Bluetooth feature is activated.
Please refer to your mobile phone user guide for specific
instructions.
• To reset the default functions of the HEBT210 headphone you
can simply plug-in to recharge then disconnect.
• If control of your HEBT210 headphones is not possible ensure the
Touch Panel Lock switch - (6) is not in the OFF position.
Please refer to Page 8.

12
Technical Specifications
Bluetooth version: 4.1
Audio impedance: 32 Ohms
Charging time: Approx. 3.0 hours
Charging: Via Micro USB to USB Adapter (included)
BT operating range: ≥10 m
Wired Audio Option: Via an Audio cable (included).
Music Playback time: 12 - 15 hours
Talk (Phone) time: 15 - 20 hours
Standby time: Approx. 350 hours
Battery Type: Rechargeable/Non-replaceable
Lithium-Polymer
Dimensions: 17.8(L) × 15.4(W) × 4.3(H) cm
Weight: 148 g
Limited Warranty
Your headphones come complete with a 12 month
limited warranty. Please keep your receipt as proof of purchase.
Table of contents


