Hedson Drester GP Filter eQ User manual

Drester GP Filter eQ
PRODUCT MANUAL
EN
© Hedson Technologies AB 2019
231135 rev.3 2019-06-26
PRODUKTHANDBUCH
DE
PRODUKTMANUAL
SE

231135 rev.3 2019-06-26
Drester GP Filter eQ
CONTENTS
1. GENERAL INFORMATION ......................................... 3
2. AREAS OF USE............................................................ 3
3. SAFETY INFORMATION............................................. 3
4. CONSUMABLES.......................................................... 3
5. INSTALLATION............................................................ 3
6. USER MANUAL............................................................ 6
7. WATER FLOW ADJUSTMENT.................................... 6
8. USER INTERFACE........................................................ 7
9. PREVENTATIVE MAINTENANCE............................... 9
10. CORRECTIVE MAINTENANCE................................ 13
11. FILTER MANAGEMENT ............................................ 15
12. SOFTWARE UPDATE ................................................ 15
13. TECHNICAL SPECIFICATION .................................. 15
SE
DE
EN
2
INHALT
1. ALLGEMEINE ANGABEN......................................... 16
2. EINSATZBEREICHE ................................................... 16
3. SICHERHEITSINFORMATIONEN............................. 16
4. VERBRAUCHSMATERIALIEN ................................... 16
5. INSTALLATION.......................................................... 16
6. BEDIENUNGSANLEITUNG...................................... 19
7. EINSTELLUNG DES WASSERFLUSSES ................... 20
8. BENUTZEROBERFLÄCHE ........................................ 21
9. VORBEUGENDE WARTUNG ................................... 22
10. ABHELFENDE WARTUNG ....................................... 27
11. FILTERHANDHABUNG ............................................. 29
12. SOFTWARE-UPDATE................................................ 29
13. TECHNISCHE SPEZIFIKATIONEN ........................... 29
INHÅLLSFÖRTECKNING
1. ALLMÄN INFORMATION......................................... 30
2. ANVÄNDNINGSOMRÅDE ....................................... 30
3. SÄKERHETSINFORMATION .................................... 30
4. FÖRBRUKNINGSARTIKLAR ..................................... 30
5. INSTALLATION.......................................................... 30
6. BRUKSANVISNING ................................................... 33
7. INJUSTERING AV VATTENFLÖDE........................... 33
8. ANVÄNDARGRÄNSSNITT........................................ 34
9. FÖREBYGGANDE UNDERHÅLL.............................. 36
10. AVHJÄLPANDE UNDERHÅLL.................................. 40
11. FILTERHANTERING................................................... 42
12. PROGRAMUPPDATERING ....................................... 42
13. TEKNISK SPECIFIKATION ........................................ 42

231135 rev.3 2019-06-26
Drester GP Filter eQ
ENGLISH
1. GENERAL INFORMATION
This Product Manual contains important information
about the GP Filter eQ and describes how to use the
device in a proper and safe manner. Read the user
manual thoroughly before using the machine. It is
essential that the GP Filter EQ is properly handled for
safe use. It is just as important that the instructions are
followed thoroughly and that all users have been initiated
in how to handle GP Filter eQ. Please study all the figures
in this document to fully understand the information.
GP Filter eQ must not be used together with detergents
(BIO-291) as this affects the flocculation and water
purification process.
2. AREA OF USE
GP Filter eQ is built for purification of water and is
intended to be coupled to wheel washer models
GP10/12/24 and W750. These wheel washers must be
equipped with a clean rinse function.
GP Filter eQ further increases the service level and
efficiency of your workshop with a more automated and
environmentally friendly overall solution. Dirty water
from the wheel washer is suctioned up by GP Filter eQ
and undergoes a chemical process before it passes a
filter that captures heavy metals, plastic particles and
other fibres. The purified water is then led or pumped
on to a drain or a container. The water consumption per
cleaning cycle is low, about 1-1.5 litres/wheel.
3. SAFETY INFORMATION
Safety will be affected if GP Filter eQ is used in an
improper manner. In order to maintain a high degree
of safety for the user and the machine, it is essential to
follow the instructions below:
• Do not use the machine until you have read and fully
understand this Product Manual.
• The machine must be installed in the prescribed
manner.
• The machine must be used in the prescribed manner.
• The machine must be maintained in the prescribed
manner.
• Only original spare parts may be used.
• This Product Manual must always be available at the
machine and in a legible condition.
• Each user should know where this Product Manual is
located.
• The machine must not be changed or modified in any
way other than with original parts intended for the
purpose.
IMPORTANT: The following safety symbols can be found
on parts of the machine or in this product manual, and
shall be obeyed.
4. CONSUMABLES
Filter bags and flocculation powder are included with
the machine on delivery and they are specially designed
so GP Filter eQ is able to achieve the best possible
purification results.
A packet of filter bags (15x) can be ordered with part
number 231210 and flocculation powder (5kg) with part
number R12076.
IMPORTANT: Using GP Filter eQ without flocculation
powder and/or a filter bag is prohibited as this will result
in polluted waste water being released to the drain and
flooding inside the machine.
5. INSTALLATION
Remove the packaging and make sure the GP Filter
eQ is not damaged during transport. If the goods are
damaged, report it as soon as possible to the carrier.
1. Handle GP Filter eQ according to figures below. If
there is no forklift available, two people should help
to lift the GP Filter eQ off the pallet and onto a hand
truck. Make sure the forks of the forklift go all the
way under the unit before lifting it.
Use protective mask
Use eye protection
Use protective gloves
Risk of pinching
3

231135 rev.3 2019-06-26
Drester GP Filter eQ
GP 24/W-750
GP 10/GP 12
4. Couple the lower wheel washer drain hose (where
the strainer is attached) to GP Filter eQ with the
provided couplings, hoses and clamps. See figure
below.
NOTE: If the distance between GP filter eQ and the
wheel washer is between 5 metres and 10 metres,
a supplementary extension kit (not included in the
standard version of GP filter eQ) with part number
231146 is required. This extension kit contains
supplementary components for both the drain hose
and the clean rinse function.
5. Connect water (in, position 1) and compressed
air (in, position 2) to GP Filter eQ as shown below.
Use the provided silicone for sealing the hose
connections.
IMPORTANT: Hose incl. accessories for connecting
water and compressed air are assumed to be
prepared by the end user before installation! (See
“Technical Specification” for more information).
6. Water (out, position 3) is connected to the clean
rinse function of the wheel washer with the
provided hose and couplings (similar sticker for
2. Place the GP Filter eQ in the desired position (no
further than 10 metres from the wheel washer)
and make sure it is stable and at the same level as
the wheel washer. The GP Filter eQ has feet that
can be adjusted vertically to compensate for any
unevenness.
IMPORTANT: Please consider the placing of GP Filter
eQ relative the wheel washer. Improper placing can
obstruct usage and maintenance of the machine.
3. Depending on the wheel washer the GP Filter eQ
is being coupled to, connect the supplied filter
strainer to the wheel washer as shown below (GP24/
W750 top figure, GP10/12 bottom figure).
NOTE: At this stage, the wheel washer should be
clean and empty of water and granules.
IMPORTANT: No matter whether the wheel washer
is used or new, depending on the type, it will need
to be adapted to the GP Filter eQ through an
adaptation kit which should be mounted according
to separate instructions (and therefore not included
in this manual). Exceptions are GP10/12.
The same applies to the clean rinsing function of
the wheel washer if it is not already installed. It is
installed according to separate instructions (and is
therefore not included in this manual).
4

231135 rev.3 2019-06-26
Drester GP Filter eQ
ENGLISH
connecting the drain hose to the wheel washer, see
figure below). The wheel washer should only be
supplied with water from GP Filter eQ.
7. Then route the drain hose (position 4) from GP Filter
eQ to a nearby drain. Ensure that no water can be
trapped in the hose.
NOTE: If GP Filter eQ is equipped with a pump
function, this drain hose is replaced by another
hose located above position 4. Route this hose to a
nearby drain/container.
NOTE: If the distance between GP filter eQ and
the drain is between 5 metres and 10 metres, a
supplementary extension kit (not included in the
standard version of GP filter eQ) with part number
231141 is required.
IMPORTANT: Make sure no hoses are bent sharply
after installation. Any excess hose should be cut off
as unnecessarily long hoses can lead to reduced
water runoff.
8. Connect the power cable.
9. Fill GP Filter eQ with the supplied flocculation
powder as shown below.
10. Open the door and hang one of the provided filter
bags on the hooks of the blue beam.
IMPORTANT: Make sure that the filter bag is
fastened with each loop and that it is hanging inside
the lower vessel. Since there is a sensor inside
the door, it is also important that the door closes
properly after the filter bag has been hung in place.
11. Press the black power switch to turn on the power,
see the figure below. The display will now light up
and it is recommended to set the date and time (see
“User Interface”).
12. Before GP filter eQ can be put into use, the level
sensor needs to be adjusted in relation to the water
level in the wheel washer. This to ensure that the
correct amount of dirt water is transferred to GP 5

231135 rev.3 2019-06-26
Drester GP Filter eQ
6. USER MANUAL
Activate GP Filter eQ by pressing the green button, see
the figure below. The selection will be confirmed on the
display with the status text “Purifying” and the filtration
process will now begin automatically.
IMPORTANT: As long as GP Filter eQ is in active mode,
and no alarms or fault codes occur and the wheel
washer is active, all filtration cycles will take place
automatically at intervals (15 litres of water/15–20 wheels
per interval) - until GP Filter eQ is disabled (red button
or if error code occurs).
For GP filter eQ to function properly, the filter bag needs
to be changed periodically and the flocculation powder
refilled (see “Preventative Maintenance”).
IMPORTANT: Using GP Filter eQ without flocculation
powder and/or a filter bag is prohibited as this will result
in polluted waste water being released to the drain and
flooding inside the machine.
7. WATER FLOW ADJUSTMENT
The water pressure in workshops may vary between
different facilities and thus affect how often the machine
performs a filtration cycle.
Excessive pressure and inflow of water can cause the
filter bag to become overfull during the day and thus
causing a risk of flooding. Furthermore, the depletion of
flocculation powder will increase intensely.
Low water flow and pressure to GP Filter eQ (e.g. if
same water supply is distributed to several machines)
affects the rinse function inside the upper vessel,
causing dirt to build up faster, which means a more
frequent demand of maintenance.
It is therefore important once GP Filter eQ is first started
to check/note how many wheels are washed in relation
to each filtration cycle. If the wheel washer becomes
empty too often, it means that the water flow into the
system is too high.
The number of washed wheels should be between 15
and 20 washes before GP Filter eQ starts a filtration
cycle. This corresponds to a water consumption of
Filter eQ. Therefore fill the wheel washer with water
(and granules) so that the water level is at maximum
according to the wheel washer level marking. See
example in the figure below.
13. Loosen the wing nuts as shown in the figure below
and adjust the height of the level sensor to a
position where the diode turns yellow.
IMPORTANT: It is essential to find the correct
position where the sensor receives a signal before
tightening the wing nuts. Therefore, move the
sensor up and down until the correct position is
found, i.e. exactly when the diode comes on
NOTE: GP Filter eQ, part no. 231000, is intended to
be installed with a drain in direct proximity (max. 10
metres away) and the possibility of natural fall (max 150
millimetres above floor level).
GP Filter eQ, part no. The 231000-T has an integrated
pump function which allows installation with drain/
container farther from the machine (up to 30 metres)
and greater height difference (up to 2 metres).
GP Filter eQ, part no. 231000 can be supplemented,
if necessary, with a pump kit (part no. 231140) later to
allow installation as described for 231000-T.
6

231135 rev.3 2019-06-26
Drester GP Filter eQ
ENGLISH
1-1.5 litres per washed wheel. After installing GP filter
eQ, it should therefore be noted how many wheels are
washed before it starts a filtration cycle.
Water pressure regulator, see figure below.
NOTE: Due to the sensitivity of the level sensor, the
activation level may vary slightly. Activating the filtration
cycle will therefore vary slightly during normal operation
in relation to the number of washed wheels.
7.1 SETTING OF WATER REGULATOR
NOTE: Before the water regulator is set a parameter for
the wheel washer must first be adjusted.
• GP10, GP12, GP24: Change the clean rinse time to
10 seconds for all the washing programs
• W-750: Change the return stroke (air blowing) to 10
seconds
-Enter the adjustment mode: Press TOTAL+RESET
-Browse in the adjustment mode: Press DOOR
OPEN / CLOSED
-Change a parameter: Press MIXER
-Change the parameter value: Press LARGE / SMALL
WHEEL
-Store value: Press MIXER
-Exit the adjustment mode: Press STOP (for 3
seconds)
ADJUSTMENT OF WATER REGULATOR:
1. Make sure that GP Filter eQ is inactive.
2. Enter the self-test function on GP Filter eQ and
activate the clean rinse relay (P26).
3. Start self-test on the wheel washer and activate clean
rinse. Make sure that water is coming out of all the
clean rinse nozzles.
4. The dynamic water pressure is now shown on the
water regulator manometer. Presuppose 1.4 bar.
5. Exit the wheel washer self-test.
6. Make sure that the water level in the wheel washer is
at its maximum and that the level sensor in GP Filter
eQ is adjusted correctly (se section Installation, bullet
12 and 13).
7. Activate GP Filter eQ – a filtration cycle will then start
automatically.
8. Now start washing and counting number of wheels
up until the next filtration cycle begins.
• If the water pressure needs to be lowered (<15
washed wheels per filtration cycle) the pressure
regulator must be adjusted at the same time as
Clean Rinse is activated in the wheel washer, to set
correct dynamic water pressure.
• If the water pressure needs to be increased (>20
washed wheels per filtration cycle) the pressure
regulator must be adjusted at the same time as
Clean Rinse is activated in the wheel washer, to set
correct dynamic water pressure.
8. USER INTERFACE
The display usually shows four defined options in the
field at the bottom. Use the buttons under the display to
adjust the values.
At the top right of the main menu is the time (which
should be set as soon as GP Filter eQ is taken into
use) and at the top left, the total number of completed
filtration cycles, see figure below.
Press the button corresponding to the menu icon on the
far left to get a list of the menus that are configurable.
8.1 MENU – INFORMATION
Alarm log – This lists all alarms that occurred, with
associated fault codes and times. For more information
about an alarm, select the desired alarm and then
confirm with the button on the far right.
Counter – The following variables are listed in this menu:
• Flockcount – The number of dispenses made since
the last time the unit was filled with flocculation
power (the value resets each time the operator
presses “OK” when prompted to fill the flocculation
powder).
• Filtercount – The number of cleaning cycles
performed since the last filter change (the value
resets each time the operator presses “OK” when
prompted to change the filter).
• Totflockcnt – Total number of dispenses made with
flocculation powder.
• Totfiltercnt – Total number of consumed filter bags.
NOTE: The above values assume that the operator
changes the filter and fills the flocculation powder when
prompted in the display. GP Filter eQ therefore has no
actual way of detecting whether a replacement or a fill-
up has actually occurred. 7

231135 rev.3 2019-06-26
Drester GP Filter eQ
Version: x.x.x - The display shows the software version
installed on the device.
8.2 MENU – SETTINGS
Time – Function to set the clock.
Date – Function to set the date.
Language – Selection of available languages.
Main Parameters – Lists all the parameters that control
the basic machine functions. The basic settings are
protected with a lock code and should, if necessary, be
changed only by authorised personnel.
WC Auto Parameters – This lists all the parameters that
control the process of automatic water change, see
“Menu - Water Change”. The basic settings are protected
with a lock code and should, if necessary, be changed
only by authorised personnel.
WC Manual Parameters – This lists all the parameters
that control the process of the manual (and final) part of
the water change, see “Menu - Water Change”. The basic
settings are protected with a lock code and should, if
necessary, be changed only by authorised personnel.
8.3 MENU – WATER CHANGE
When the wheel washer is to undergo a change of
water, GP Filter eQ should be used for automatic
draining and filtration of the water (it is also
recommended to read through the sections dealing
with water change under “Seasonal Preventative
Maintenance”).
Start – To immediately start an automatic water change -
confirm the selection and follow the instructions on the
display.
Manual – After an automatic water change described
above has been completed, some manual steps remain
before the process is complete - confirm the selection
and follow the instructions on the display.
Schedule – Scheduling when an automatic water change
should start.
8.4 MENU – SELF-TEST
The various sub-functions of the machine can be tested
in this menu. Testing is done manually and each self-test
function can be verified separately.
NOTE: Self-test cannot be performed when the unit is in
an active mode, i.e. during normal operation.
SELF-TEST
FUNCTION EXPLANATION TYPE POS.
Dosing Cylin-
der Valve
Moves dosing cylinder
back and forth
Digital output P22
Bottom Cyl-
inder Valve
Moves bottom cylinder up
and down
Digital output P23
Drain pump Activates the drain pump
(if installed on the unit)
Digital output P24
Blow Clean Activates the blow function
in front of the level sensor
in the upper vessel
Digital output P25
Spare Relay Activates relay to clean
rinsing function in the
wheel washer
Digital output P26
Mixing Valve Activates the blow function
stirring water in the upper
vessel
Digital output P27
Vacuum
Pump Valve
Activates the vacuum func-
tion in the upper vessel
Digital output P28
Vessel Rinse
Valve
Activates rinsing in the
upper vessel
Digital output P29
WW Water
Level
Indicates whether the level
sensor in the level tube is
activated
Digital input P11
Water Level
Upper Vessel
Indicates whether the level
sensor in the upper vessel
is activated
Digital input P12
Dosing Cylin-
der +
Indicates whether the dos-
ing cylinder has completed
a stroke
Digital input P13
Dosing
Cylinder -
Indicates whether the
dosing cylinder is in home
position
Digital input P14
Bottom
Cylinder +
Indicates whether the
bottom cylinder is in home
position
Digital input P15
Bottom
Cylinder -
Indicates whether the
bottom cylinder has com-
pleted a stroke
Digital input P16
Door Sensor Indicates whether the door
is open/closed
Digital input P21
Water Level
High
Indicates the upper limit of
the water level in the lower
vessel (if a drain pump is
installed on the unit)
Analogue
input
P7:2
Vacuum
Sensor
Indicates the vacuum level
in the upper vessel
Analogue
input
V51
Internal
Buzzer
Enables warning sounds
(buzzer on circuit board)
Ext. BZ1
NOTE: Apart from the self-test functions listed above,
there are also digital reserve inputs and reserve outputs
visible on the display. Ignore these during a self-test as
they are not linked to any function.
8.5 MENU – FACTORY RESET
Confirm the selection to restore the unit with factory
defaults.
NOTE: A factory reset will not reset the variables
“totflockcnt” and “totfiltercnt”, see “Menu - Information”
under “User Interface”.
8

231135 rev.3 2019-06-26
Drester GP Filter eQ
ENGLISH
9. PREVENTATIVE MAINTENANCE
9.1 DAILY PREVENTATIVE MAINTENANCE
9.1.1 Refill Flocculation Powder
IMPORTANT: Follow directions in section “Safety
Information”.
In order for GP filter eQ to filter the dirt water from
the wheel washer, the flocculation powder must be
available. Therefore, check the level of flocculation
powder daily and refill when the red level is reached. GP
Filter eQ will suggest refilling the flocculation powder
periodically via a message on the display.
NOTE: Flocculation powder tends to get stuck
on the inside wall of the tube in warm and humid
environments. In some cases, it may appear as if the
tube has enough powder even though it is in fact almost
empty. Therefore, gently tap the tube before adding the
flocculation powder to ensure that the level indication is
correct.
9.1.2 Changing the Filter Bag
Replacement of filter bags in GP filter eQ is dependent
on the number of wheels that have been washed in the
wheel washer and how dirty the water is. Therefore, the
need to change filter bags can vary greatly between
different workshops. During the low season, changing
the filter bag sometime during the week will be
sufficient, while during high season, it is recommended
to change the filter bag every day. GP Filter eQ will
suggest replacing the filter bags periodically via a
message on the display.
NOTE: If the filter bag is to be changed it should be
confirmed by the user.
Open the door and hang a filter bag on the hooks of the
blue beam as shown below.
IMPORTANT: Make sure that the filter bag is fastened
with each loop and that it is hanging inside the lower
vessel before closing the door. If the door is not
closed within 15 seconds, an alarm will start to sound.
As long as the door is open, the bottom valve in the
upper vessel cannot allow water to pass through (this
is to enable the actual change of filter bag) and in
connection with this, the clean rinse function in the
wheel washer is stopped not to risk flooding. Only when
the door is closed will GP Filter eQ automatically return
to a normal state. Ensure that GP Filter eQ is in active
status (“Purifying”) and thus in operating mode.
NOTE: If the filter bag is overfull it is recommended that
two persons help each other with lifting the filter bag
out of the machine and further to a drainage box.
9.2 WEEKLY PREVENTATIVE MAINTENANCE
9.2.1 Cleaning the Upper Vessel
During high season we recommend cleaning the upper
vessel 2 times per week.
Follow directions in section 9.3.2.
9.3 SEASONAL PREVENTATIVE MAINTENANCE
After a high season, it is very important to carry out
preventive maintenance of the unit to ensure it is
operational at the start of next season.
Before such predetermined preventative maintenance is
carried out and depending on the type of maintenance,
the guards should be removed as shown below to
enable access to the different areas of the unit.
A
B
C
D
E
F
9

231135 rev.3 2019-06-26
Drester GP Filter eQ
4. Turn off WW Main Switch
Ensure that the main switch on the wheel washer is
turned off. Confirm with “Enter” on the GP Filter eQ
display.
5. Refill Flocculation Powder and Replace Filter
Check the status of the filter and flocculation
powder and confirm with “Enter”.
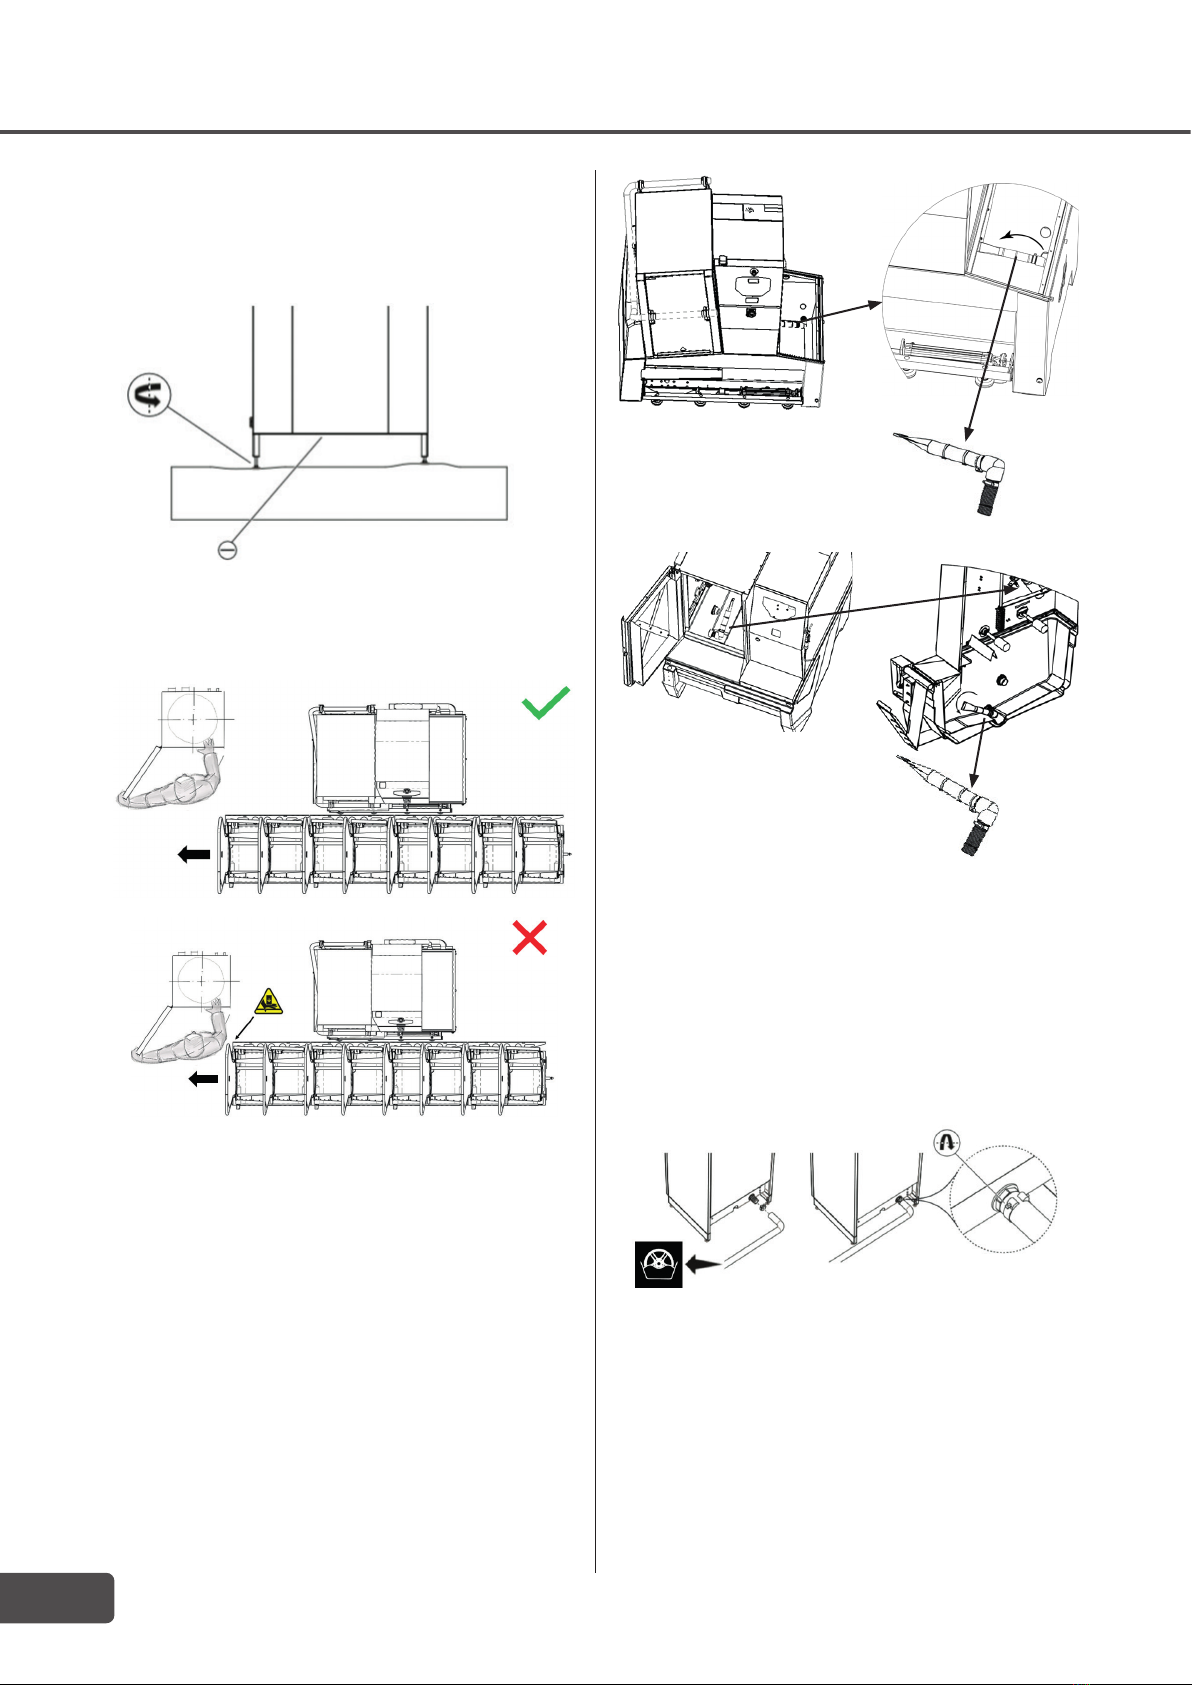
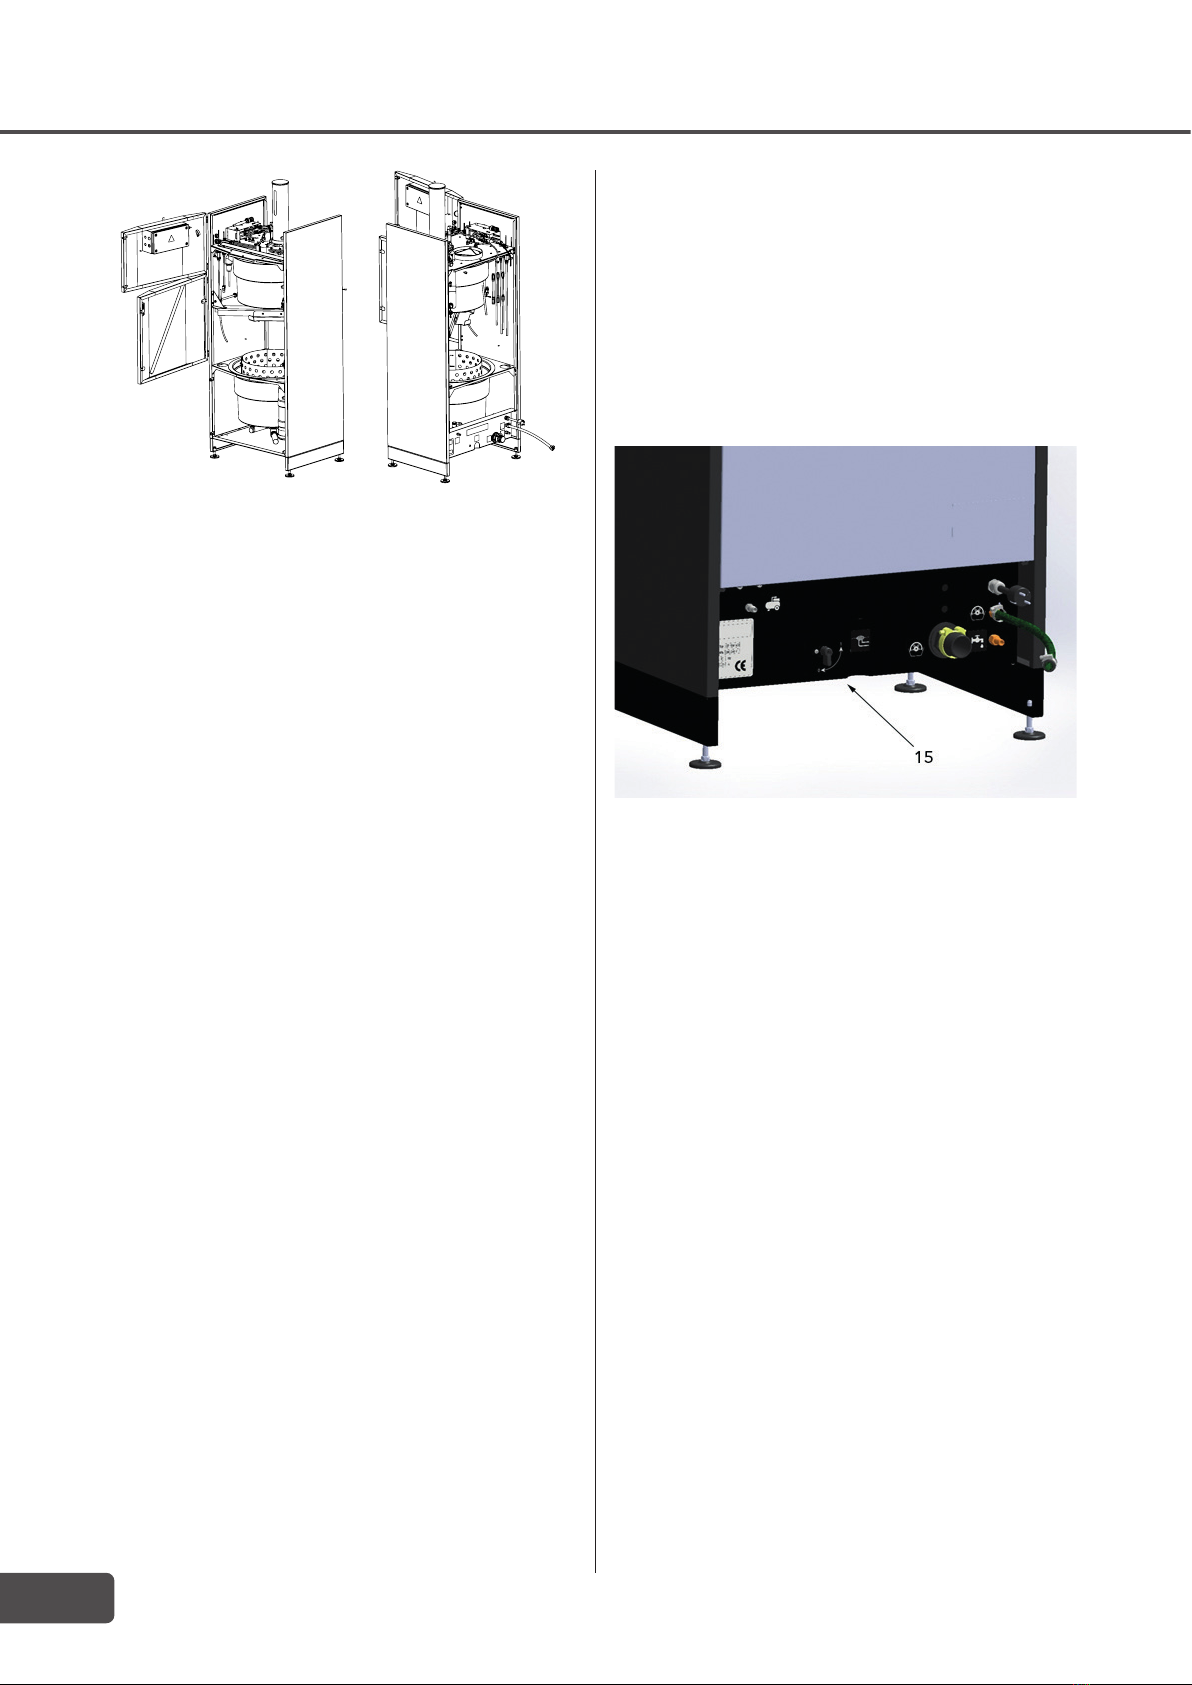
6. Close Valve to level Tube on Filter eQ
This procedure ensures that air is not suctioned
via the level tube during the final part of water
discharge. Close the ball valve (see figure below,
position 15) then confirm with “Enter” on the display.
NOTE: Control questions listed above are not displayed
during a scheduled water change.
IMPORTANT: When automatic water change is
activated, the wheel washer will be emptied of water. To
avoid damaging the wheel washer immersion heaters,
the wheel washer must be turned off at the main switch
before activating or starting a scheduled discharge.
NOTE: Before starting an automatic water change, a
new filter bag must be mounted in GP Filter eQ and the
flocculation powder container filled.
NOTE: Since the wheel washer software is independent
from GP Filter eQ, the wheel washer will signal “water
change” (granulate collection) after a certain interval.
Depending on the type of wheel washer – delete the
water change reminder and/or set the water change
interval to the maximum number of washes, alternatively
disregard the wheel washer’s recommendations for water
change to take place. However, the amount of granules
should be checked at regular intervals to ensure that
the washing results are good (the amount of granules
decreases slightly during washing and handling).
Read more about how to perform a water change in the
previous section “Menu-Water Change” under “User
Interface”.
9.3.1.2 Activating Manual Water Change
When activating manual water change, the same
process as described in the previous section “Automatic
Water Change Activation” is performed.
9.3.1 Changing Water in the Wheel Washer
When the water is to be changed in the wheel washer,
GP Filter eQ should be used for draining and filtering
the water. This should be done at least once per season,
depending on the number of washed wheels and how
dirty the wheel wash water is (and therefore the wash
result). As a rule, up to 5000 wheels can be washed
before the water in the wheel washer needs to be
changed. Shorter water change intervals can always be
scheduled because GP Filter eQ automatically empties
the wheel washer after activating the water change.
This process means that the wheel washer is emptied of
water in 15 litre increments. In total, the process takes
about 4 – 5 hours.
This process therefore replaces, to a large extent, the
“WATER CHANGE” chapter of the wheel washer manual
(which is essentially a manual process).
NOTE: The filtration process (water change) only
helps the cleaning of the wheel washer water. Any
accumulated dirt and residue inside the wheel washer
itself must therefore be removed manually.
9.3.1.1 Automatic Water Change Activation
Automatic draining of the wheel washer water can be
started directly via the menu system or programmed to
be performed at a specific time, e.g. evening when the
wheel washer is not being used or during a weekend.
See also “Menu - Water Change”.
After activating the water change, GP Filter eQ displays
the following control questions that need to be
confirmed before the process starts:
1. Start Water Change?
Confirm with “Enter” on the GP Filter eQ display.
2. Start Water Change and Follow Instructions in WW
menu
Initiate water change in the wheel washer menu.
Confirm with “Enter” on the GP Filter eQ display.
3. Granules collected?
Ensure that the granules in the wheel washer are
collected according to the procedure described
in the wheel washer manual. After completed
collection - Confirm with “Enter” on the GP Filter eQ
display.
10

231135 rev.3 2019-06-26
Drester GP Filter eQ
ENGLISH
However, the manual part is carried out in 15 litre
increments followed by the question if an additional
15 litres of water/sludge is to be suctioned out. This
process allows manual flushing of the wheel washer.
After completing the filtration process, GP Filter eQ will
continue to ask if further suction is desired in order to
flush the wheel washer clean.
9.3.1.3 Recommended Method for Water Change and
Cleaning of Wheel Washer
After completing the wheel washer water change, some
sludge and sediment will remain at the bottom of the
wheel washer. This is normal and does not affect the
washing results of the wheel washer as heavy dirt does
not circulate in the washing water.
After discharging, it is recommended to collect heavy
sludge/sediment with a small bucket or shovel, for
example, and then place it directly in e.g. a filter bag
or other hazardous waste container. This is to prevent
blockages in the drain hose or strainer. Liquid and less
heavy sludge can be suctioned up and processed by GP
Filter eQ. This is good to do in the manual water change
process where the water that is added when the wheel
washer is rinsed can be suctioned directly.
9.3.2 Cleaning the Upper Vessel
IMPORTANT: Follow directions in section “Safety
Information”.
1. Detach the compressed-air hose to the machine
(position 7).
2. Go into the “Self Test” submenu on the display and
browse to “Vessel Rinse Valve”. Activate the function
so that the upper vessel (see figure below, position
4) is rinsed with water.
3. Wipe the inside of the upper vessel thoroughly with
a cloth through the hole for the inspection hatch
(position 3).
4. Then turn off the “Vessel Rinse Valve” function.
Rinsing of the upper vessel will then cease.
5. Make sure that the upper vessel is thoroughly clean
on the inside.
NOTE: If accumulated dirt inside the upper vessel
blocks the level sensor (position 5), GP Filter eQ will be
deactivated and the error code “High Water Level in
Upper Vessel” will be displayed.
6
1
2
3
4
5
8, 9
7
9.3.3 Cleaning the Level Sensor for the Level Tube
1. Close the ball valve (see figure in section
“Automatic Water Change Activation”, position 15).
2. Remove the level tube from the tube brackets (see
figure below, position 12).
3. Empty water from the tube into a container.
4. Detach the hose between level tube and ball valve.
5. Wipe the level sensor (position 13) with a cloth.
6. Flush the hose to loosen accumulated dirt.
7. Reinstall the level tube onto the tube brackets.
8. Reinstall the hose.
9. Finally, open the ball valve.
12
13
10
11
14
9.3.4 Cleaning the Vacuum Nozzles
1. Install the silencer (see figure in “Cleaning the
Upper Vessel”, position 8).
2. Blow back into the vacuum nozzles (in the holes that
the arrows point to in position 9) with compressed
air.
3. Renew the silencer if necessary.
4. Reinstall the silencer.
11

231135 rev.3 2019-06-26
Drester GP Filter eQ
12
13
10
11
14
16
16
16
16
17
18
19
20
(9x)
9
9.3.5 Cleaning the Dosing Unit
IMPORTANT: Follow directions in section “Safety
Information”.
1. Go into “Self-test” on the display and set “Dosing
Cylinder Valve” to “On”.
2. Turn off the machine with the power switch (see
figure below, position 14).
3. Disconnect the compressed air hose to the machine
at the main feed (see figure in “Cleaning the Upper
Vessel”, position 7).
4. Loosen all compressed air hoses to the dosing unit
(see figure below, position 16).
5. Loosen the compressed air hoses at the quick
couplings to the cylinder (position 17).
6. Fit the end position sensors on the cylinder
(position 18) and note their orientation and position
relative to the sensor fittings (use in step 15).
7. Unscrew all wing nuts from the dispenser (position
19).
8. Lift the dispenser straight up. Note that there may
still be residual flocculation powder in the tube
(position 20).
9. Empty out any remaining flocculation powder and
make sure that none is left in the tube. Clean the
tube if necessary.
10. Then clean the dosing unit with the brush provided.
11. Note that the tray in the dosing unit can be set
manually in different positions in order to clean the
entire dispenser.
12. Make sure the dosing unit is dry before refitting.
13. Make sure all gaskets and O-rings are in place
before the dosing unit is refitted (see exploded
view below).
14. Tighten the wing nuts.
15. Reinstall the end position sensors.
16. Connect all compressed air hoses.
12
13
10
11
14
12

231135 rev.3 2019-06-26
Drester GP Filter eQ
ENGLISH
10. CORRECTIVE MAINTENANCE
The following is a list of the alarm texts with associated
action, problem description and problem solution,
which are shown on the display after a malfunction
occurs.
NOTE: All position numbers mentioned in the problem
description are taken from figures in “Seasonal
Preventative Maintenance”.
16
16
16
16
17
18
19
20
(9x)
13

231135 rev.3 2019-06-26
Drester GP Filter eQ
ERROR CODE TEXT IN DISPLAY ACTION IN DISPLAY PROBLEM DESCRIPTION & SOLUTION
10 Board overheated Contact Service Technician Maximum permissible PCB temperature. Check and lower the
ambient temperature (Max. 40°C).
11 Fuse MF3 Overload Check DI P8 Short circuit on digital input P8.
Fuse is self-resetting. Check cable and connected component. Re-
start the unit – if problems persist, contact a service technician.
12 Fuse MF4 Overload Check DI P11-16 Short circuit on digital input P11-16.
Fuse is self-resetting. Check cable and connected component.
Restart the unit – if problems persist, contact a service technician.
13 Fuse MF5 Overload Check DI P17-21 Short circuit on digital input P17-21.
Fuse is self-resetting. Check cable and connected component.
Restart the unit – if problems persist, contact a service technician.
14 Fuse MF6 Overload Check DO P22-26 Short circuit on digital output P22-26.
Fuse is self-resetting. Check cable and connected component.
Restart the unit – if problems persist, contact a service technician.
1 Cannot Read NVM,
Restart Machine
Contact Service Technician Internal memory failure on PCB. Reinstall software (see
"Software Update").
20 Upper Vessel Vacu-um
too High
Check Air Press./WW Drain blockage? Maximum vacuum level setting exceeded. Remove any
blockage in the wheel washer filter strainer or drain hose
(position 6) between GP Filter eQ and the wheel washer. Under
certain conditions, the maximum vacuum level setting can be
raised by service technicians.
40 Bottom Cylinder not
Retracted
Check Bottom Cylinder Valve/Pos.
sensor+
Pneumatic cylinder in upper vessel (position 1) is not returning.
Make sure the piston rod runs free. Check that the drain cone
is not stuck. Check the function and position of the position
sensor +.
Tips: Use the self-test function in the "Self-test" submenu.
41 Bottom Cylinder not
Extended
Check Bottom Cylinder Valve/Pos.
sensor -
Pneumatic cylinder in upper vessel (position 1) is not extending.
Make sure the piston rod runs free. Check that the drain cone
is not stuck. Check the function and posi-tion of the position
sensor -.
Tips: Use the self-test function in the "Self-test" submenu.
42 Dosing Cylinder not
Retracted
Check Dosing Cylinder Valve/Pos.
sensor -
Pneumatic cylinder in dispenser (position 2) is not returning.
Make sure the piston rod runs free. Remove dosing unit and
clean all moving parts. Check the function and position of the
position sensor -.
Tips 1: Use the self-test function in the "Self-test" submenu.
Tips 2: A quick clean can be done inside the upper vessel
(position 4) by removing the inspection hatch (position 3) and
using the wash brush provided.
43 Dosing Cylinder not
Extended
Check Dosing Cylinder Valve/Pos.
sensor +
Pneumatic cylinder in dispenser (position 2) is not extending.
Make sure the piston rod runs free. Remove dispenser and
clean all moving parts. Check the function and position of the
position sensor +
Tips 1: Use the self-test function in the "Self-test" submenu.
Tips 2: A quick clean can be done inside the upper vessel
(position 4) by removing the inspection hatch (position 3) and
using the wash brush provided.
50 High Water Level in
Upper Vessel
Check Upper Vessel Drain/Fouling Sensor (position 5) has an incorrect or constant signal. Make
sure the drain is not clogged or that dirt has built up inside the
upper ves-sel (position 4) at the sensor position.
51 High Water Level in
Wheel Washer
Clean WW Level Sensor/Level Tube
Blockage?
Sensor (position 13) has an incor-rect or constant signal. Make
sure that the sensor is not incorrectly aligned or has dirt on its
surface. Also clean the level tube including hose (position 12) if
there are any signs of contamination/foam.
52 Water Transfer Timeout Check WW Drain Blockage/Vacuum
Lev-el/Vacuum Leaks
Maximum time allowed with vacuum activated is exceeded.
Make sure that the drain hose (position 6) between the wheel
washer and the filter unit is not blocked. Clean if necessary.
Make sure there is no vacuum leak when vacuum is activated.
The vessel including drain must not leak. Check/clean as
necessary the bottom outlet and check the gasket on the
inspection hatch.
Tips: Use the self-test function in the “Self-test” submenu.
60 N/A Check Flocculation Powder Level Make sure the flocculation powder is not stuck or formed
obstructions in the tube (position 20). Fill up if necessary. For
longer inactive periods, it is recommended that powder be
removed in order not to absorb moisture.
61 N/A “Check Filter” A filter change is recommended. Filtering efficiency cannot be
guar-anteed on re-used filters.
70 Drain Pump Timeout Check Drain Pump and Hose Maximum permissible running time for drain pump (position
11) exceeded. Check pump function and that hoses are not
blocked Make sure that the pump level sensors (position 10) are
not short circuited.
14

231135 rev.3 2019-06-26
Drester GP Filter eQ
ENGLISH
11. FILTER MANAGEMENT
We recommend the use of drainage boxes for the
handling and storage of used filter bags (not supplied
with the standard version of GP Filter eQ and can be
ordered with part number 231143).
Dried used filter bags contain environmentally
hazardous waste and must be dispatched for disposal in
accordance with locally applicable regulations.
12. SOFTWARE UPDATE
Should only be performed by qualified personnel.
1. Switch off the power to GP Filter eQ with the black
switch.
2. Open the upper door by unscrewing the side of the
door.
3. Open the electric cabinet by unscrewing the front of
the lid.
4. Place the SD card in the card reader on the PCB as
shown below.
5. Turn on the power and wait a few seconds (the
software is now loaded).
6. Turn off the power and remove the card.
7. Screw the lid back on the cabinet.
8. Finally close the top door and screw back on.
NOTE: To be absolutely sure that the correct
software has been loaded in GP Filter eQ, go into the
“Information” submenu on the display.
13. TECHNICAL SPECIFICATION
Manufacturer HEDSON TECHNOLOGIES AB
Hammarvägen 4
SE -232 37 ARLÖV
SWEDEN
Machine Model GP Filter eQ
Voltage 230V~
Frequency 50 Hz
Current: 0.2A
Output: 46 W
Compressed air connection Thread size G¼”
Min 7 bar (100psi)
Max 12 bar (174psi)
Air consumption approx. 50L/washed wheel
Water consumption approx. 1-1.5L/washed wheel
Water connection
(accessory)
Water hose Ø ½”
Water pressure (static) Recommended >3.5 bar
(50psi)
Height 1884 mm
Width 700 mm
Depth 597 mm
Net weight 85 kg
Sound pressure level 73 dB(A)
Measured from a distance of
1 meter from machine and 1.6
meters distance from floor
15

231135 Ausgabe 3, 2019-06-26
Drester GP Filter eQ
1. ALLGEMEINE ANGABEN
Dieses Produkthandbuch enthält wichtige Informa-
tionen über den GP Filter eQ und beschreibt, wie das
Gerät richtig und sicher zu nutzen ist. Lesen Sie die
Bedienungsanleitung sorgfältig durch, bevor Sie die
Maschine benutzen. Es ist wichtig, dass der GP Filter
eQ für einen sicheren Einsatz richtig gehandhabt wird.
Ebenso wichtig ist, dass die Anweisungen sorgfältig
befolgt werden und dass alle Anwender mit der Hand-
habung des GP Filters eQ vertraut sind. Bitte sehen Sie
sich alle Abbildungen in diesem Dokument genau an,
damit Sie die Informationen vollständig verstehen.
Der GP Filter eQ darf nicht zusammen mit Reinigung-
smitteln (BIO-291) verwendet werden, da dies den
Flockungsprozess und den Wasserreiningungsprozess
beeinflusst.
2. EINSATZBEREICHE
Der GP Filter eQ ist für die Wasserreinigung und
den gemeinsamen Einsatz mit Radwaschmaschinen
GP10/12/12/24 und W750 konzipiert. Diese Rad-
waschmaschinen müssen über eine Spülfunktion
verfügen.
GP Filter eQ steigert den Service und die Effizienz in Ihr-
er Werkstatt durch eine stärker automatisierte und um-
weltfreundlichere Gesamtlösung. Schmutziges Wasser
aus der Radwaschmaschine wird vom GP Filter eQ auf-
gesaugt und durchläuft einen chemischen Prozess, bev-
or es einen Filter passiert, der Schwermetalle, Kunstst-
offpartikel und andere Fasern erfasst. Das gereinigte
Wasser wird dann zu einem Abfluss oder einem Behälter
weitergeleitet oder gepumpt. Der Wasserverbrauch pro
Reinigungszyklus ist gering, etwa 1-1,5 Liter/Rad.
3. SICHERHEITSINFORMATIONEN
Die Sicherheit wird beeinträchtigt, wenn der GP Filter
eQ auf eine unsachgemäße Art und Weise verwendet
wird. Um ein hohes Maß an Sicherheit für den Anwender
und die Maschine zu gewährleisten, ist es wichtig, dass
folgende Anweisungen befolgt werden:
• Verwenden Sie die Maschine erst, wenn Sie diese
Produkthandbuch gelesen und vollständig ver-
standen haben.
• Die Maschine muss auf die vorgeschriebene Art und
Weise installiert werden.
• Die Maschine muss auf die vorgeschriebene Art und
Weise benutzt werden.
• Die Maschine muss auf die vorgeschriebene Art und
Weise gewartet werden.
• Es dürfen nur Original-Ersatzteile verwendet werden.
• Das Produkthandbuch muss sich immer in lesbarem
Zustand an der Maschine befinden.
• Jeder Benutzer muss wissen, wo sich das Produk-
thandbuch befindet.
• Die Maschine darf nur mit speziell für diesen Zweck
vorgesehenen Originalteilen verändert oder modifi-
ziert werden.
WICHTIG: Die folgenden Sicherheitssymbole befinden
sich an Teilen der Maschine oder in diesem Produk-
thandbuch und müssen beachtet werden.
4. VERBRAUCHSMATERIALIEN
Filterbeutel und Flockungspulver liegen der Maschine
bei der Auslieferung bei. Sie sind speziell für den GP
Filter eQ entwickelt worden, um die bestmöglichen
Reinigungsergebnisse zu erzielen.
Eine Packung Filterbeutel (15 Stück) kann unter der Ar-
tikelnummer 231210 und Flockungspulver (5 kg) unter
der Artikelnummer R12076 bestellt werden.
WICHTIG: Die Verwendung von GP Filter eQ ohne
Flockungspulver und/oder Filterbeutel ist verboten, da
sonst verschmutztes Abwasser in den Abfluss gelangt
und die Maschine überflutet wird.
5. INSTALLATION
Entfernen Sie die Verpackung und überprüfen Sie, ob
der GP Filter eQ beim Transport beschädigt wurde.
Wenn die Ware beschädigt ist, melden Sie dies so sch-
nell wie möglich dem Spediteur.
1. Handhaben Sie den GP Filter eQ entsprechend den
unten gezeigten Bildern. Wenn kein Gabelstapler
Atemschutzmaske verwenden
Schutzbrille verwenden
Schutzhandschuhe tragen
Einklemmgefahr
16

DEUTSCH
231135 Ausgabe 3, 2019-06-26
Drester GP Filter eQ
zur Verfügung steht, sollten zwei Personen helfen,
den GP Filter eQ von der Palette auf einen Hubwa-
gen zu heben. Achten Sie darauf, dass die Gabeln
des Gabelstaplers ganz unter die Einheit reichen,
bevor Sie sie komplett anheben.
2. Bringen Sie den GP Filter EQ in die gewünschte Po-
sition (nicht weiter als 10 Meter von der Radwäsche
entfernt) und stellen Sie sicher, dass er stabil und
auf dem gleichen Niveau wie die Radwäsche steht.
Der GP Filter eQ ist mit Füßen ausgestattet, die
zum Ausgleich eventueller Unebenheiten vertikal
verstellt werden können.
WICHTIG: Bitte beachten Sie die Platzierung des GP
Filter eQ relativ zur Radwaschanlage. Eine unsach-
gemäße Aufstellung kann den Gebrauch und die
Wartung der Maschine behindern.
3. Je nachdem, an welche Radwaschmaschine der
GP Filter eQ angeschlossen werden soll, verbind-
en Sie das mitgelieferte Filtersieb mit der Rad-
waschmaschine, wie unten gezeigt (GP24/W750
oberes Bild GP10/12 unteres Bild).
HINWEIS: In dieser Phase muss die Rad-
waschmaschine gereinigt sein, Wasser und Granulat
müssen entleert worden sein.
WICHTIG: Die Radwaschmaschine muss gemäß
einer separat beigefügten Anleitung und abhängig
vom Typ an den GP Filter eQ mittels eines Adapt-
ersatzes angepasst werden. Dabei spielt es keine
Rolle, ob die Radwaschmaschine gebraucht oder
neu ist. Ausnahmen sind GP10/12.
Gleiches gilt für die Spülfunktion der Rad-
waschmaschine, sofern sie nicht bereits installiert
ist. Die Installation erfolgt gemäß den separaten
Anweisungen (und wird daher in diesem Handbuch
nicht erwähnt).
GP 10/GP 12
GP 10/GP 12
4. Schließen Sie den unteren Abflussschlauch der
Radwaschmaschine (wo das Sieb sitzt) über die mit-
gelieferten Kupplungen, Schläuche und Klemmen
an den GP Filter eQ an. Siehe Bild unten.
HINWEIS: Wenn der Abstand zwischen dem GP
Filter eQ und dem Abfluss zwischen 5 Meter und 10
Metern beträgt, ist ein zusätzlicher Verlängerungs-
satz (nicht in der Standardversion des GP Filters eQ
enthalten) mit der Teilenummer 231146 erforder-
lich. Dieser Verlängerungssatz enthält zusätzliche
Komponenten sowohl für den Abflussschlauch als
auch für die Spülfunktion.
17

231135 Ausgabe 3, 2019-06-26
Drester GP Filter eQ
5. Verbinden Sie Wasser (Eingang, Position 1) und
Druckluft (Eingang, Position 2) wie unten gezeigt mit
dem GP Filter eQ. Verwenden Sie das mitgelieferte
Silikon zur Abdichtung der Schlauchkupplung.
WICHTIG: Es wird davon ausgegangen, dass der
Nutzer Schlauch und Zubehör für den Anschluss von
Wasser und Druckluft vor dem Anschluss vorbereitet
hat! (Weitere Informationen finden Sie in der Rubrik
“Technische Spezifikation”).
6. Wasser (Ausgang, Position 3) wird über den mit-
gelieferten Schlauch und die Kupplungen an die
Spülfunktion der Radwaschmaschine angeschlossen
(gleicher Aufkleber wie für den Anschluss des Ab-
flussschlauchs an die Radwaschmaschine, siehe Bild
unten). Die Radwaschmaschine sollte nur über den
GP Filter eQ mit Wasser versorgt werden.
7. Dann verlegen Sie den Abflussschlauch (Position 4)
vom GP Filter eQ zur die nahegelegene Kanalisa-
tion. Achten Sie darauf, dass der Schlauch nicht so
verbogen wird, dass sich ein Rückstau bildet.
HINWEIS: Wenn der GP Filter eQ über eine Pump-
funktion verfügt, wird dieser Abflussschlauch durch
einen anderen Schlauch ersetzt, der sich oberh-
alb von Position 4 befindet. Verlegen Sie diesen
Schlauch zu einem nahegelegenen Abfluss/Be-
hälter.
HINWEIS: Wenn der Abstand zwischen dem GP
Filter eQ und dem Abfluss zwischen 5 Meter und 10
Metern beträgt, ist ein zusätzlicher Verlängerungs-
satz (nicht in der Standardversion des GP Filters eQ
enthalten) mit der Teilenummer 231141 erforderlich.
WICHTIG: Achten Sie darauf, dass nach der Installa-
tion keine Schläuche verbogen sind. Jeder zu lange
Schlauch sollte gekürzt werden, da das Wasser durch
unnötig lange Schläuche schlechter abfließen kann.
8. Schließen Sie das Stromkabel an.
9. Füllen Sie den GP Filter eQ mit dem mitgelieferten
Flockungspulver wie unten gezeigt.
10. Öffnen Sie die Tür und hängen Sie einen der mit-
gelieferten Filterbeutel an den blauen Träger.
WICHTIG: Achten Sie darauf, dass der Filterbeu-
tel an jeder Schlaufe befestigt ist und im unteren
Behälter hängt. Da sich an der Innenseite der Tür
ein Sensor befindet, ist es wichtig, dass die Tür nach
dem Aufhängen des Filterbeutels richtig geschlos-
sen wird.
11. Um die Stromversorgung einzuschalten, drücken Sie
den schwarzen Stromschalter, siehe Bild unten. Das
18

DEUTSCH
231135 Ausgabe 3, 2019-06-26
Drester GP Filter eQ
HINWEIS: Der GP Filter eQ mit der Artikel-Nr. 231000 ist
für die Installation in unmittelbarer Nähe (max. 10 Meter
entfernt) eines Abflusses und der Möglichkeit von natür-
lichem Gefälle (max. 150 Millimeter über dem Boden)
vorgesehen.
Der GP Filter eQ mit der, Artikel-Nr. 231000- T verfügt
über eine eingebaute Pumpfunktion, die den Einbau mit
einem Abwasserbehälter weiter von der Maschine (bis
zu 30 Meter) und einen größeren Höhenunterschied (bis
zu 2 Meter) ermöglicht.
Der GP Filter eQ mit der Artikel-Nr. 231000 kann, falls
nötig, nachträglich mit einem Pumpensatz (Art. Nr.
231140) ergänzt werden, um die Installation wie für
231000-T beschrieben zu ermöglichen.
6. BEDIENUNGSANLEITUNG
Aktivieren Sie den GP Filter eQ, indem Sie den grünen
Knopf drücken, siehe das Bild unten. Die Auswahl wird
auf dem Display mit dem Statustext “Wasseraufberei-
tung“ bestätigt und der Filtrationsprozess beginnt nun
automatisch.
WICHTIG: Solange sich der GP Filter eQ im aktiven
Modus befindet und keine Alarmmeldungen oder Fe-
hlercodes auftreten und die Radwaschmaschine aktiv ist,
erfolgen alle Filtrierungszyklen automatisch in Intervallen
(15 Liter Wasser/15 – 20 Räder pro Intervall)-bis der GP
Filter eQ deaktiviert wird (roter Knopf oder Auftreten
eines Fehlercodes).
Damit der GP Filter eQ richtig funktioniert, muss der Fil-
terbeutel periodisch gewechselt und das Flockungspul-
ver wieder aufgefüllt werden (siehe Abschnitt “Vorbeu-
gende Wartung”).
Display leuchtet nun auf und es wird empfohlen,
Datum und Uhrzeit einzustellen (siehe Abschnitt
”Benutzeroberfläche“).
12. Bevor der GP Filter eQ in Betrieb genommen
werden kann, muss der Niveaugeber in Rela-
tion zum Wasserstand in der Radwaschmaschine
angepasst werden, um sicherzustellen, dass die
richtige Menge an Schmutzwasser zum GP Filter eQ
übertragen wird. Befüllen Sie deshalb die Rad-
waschmaschine mit Wasser (und Granulat), sodass
sich der Wasserstand in Bezug auf die Pegelmarki-
erung der Radwaschmaschine in der Maximalposi-
tion befindet. Siehe Beispiele im Bild unten.
13. Lösen Sie die Flügelschrauben wie in der Abbil-
dung unten gezeigt und stellen Sie die Höhe des
Pegelsensors so ein, dass die Lampe gelb leuchtet.
WICHTIG: Es ist wichtig, vor dem Festziehen der
Flügelschrauben die genaue Position zu finden,
weil der Geber ein Signal bekommt. Ziehen Sie den
Sensor daher vorsichtig nach oben und unten, bis
die richtige Position gefunden ist, also genau dort,
wo die Lampe leuchtet.
19

231135 Ausgabe 3, 2019-06-26
Drester GP Filter eQ
WICHTIG: Die Verwendung von GP Filter eQ ohne Flock-
ungspulver und/oder Filterbeutel ist verboten, da sonst
verschmutztes Abwasser in den Abfluss gelangt und die
Maschine überflutet wird.
7. EINSTELLUNG DES WASSERFLUSSES
Der Wasserdruck in Werkstätten kann zwischen ver-
schiedenen Anlagen variieren und somit beeinflussen,
wie oft die Maschine einen Filterzyklus macht.
Zu hoher Druck und Wasserzufluss können dazu führen,
dass der Filterbeutel im Laufe des Tages überfüllt wird
und somit die Gefahr von Überschwemmungen besteht.
Außerdem wird sich der Verbrauch des Flockenpulvers
drastisch erhöhen.
Geringer Wasserdurchfluss und -druck in der GP Filter
eQ beeinflusst die Spülfunktion im oberen Behälter und
bewirkt, dass sich schneller Schmutz bildet und dadurch
die Wartungsfrequenz und -aufwand erhöht wird.
Nach der ersten Inbetriebnahme des GP Filter eQ ist es
daher notwendig, zu überprüfen, wie viele Räder im Ver-
hältnis zu jedem Filterzyklus gewaschen werden. Wird
die Radwaschmaschine zu oft geleert, bedeutet das,
dass der Wasserfluss in das System zu hoch ist.
Die Anzahl der gewaschenen Räder sollte zwischen
15 – 20 liegen, bevor der GP Filter eQ einen Filterzyklus
beginnt. Das entspricht einem Wasserverbrauch von
0,8 – 1 Liter pro gewaschenem Rad. Nach dem Einbau
des GP Filters eQ sollte daher notiert werden, wie viele
Räder gewaschen werden, bevor der GP Filter eQ einen
Filterzyklus startet.
Der Wasserdruckregulator, siehe Abbildung.
HINWEIS: Aufgrund der Empfindlichkeit des Pegelsen-
sors kann der Aktivierungsgrad leicht variieren. Die Ak-
tivierung des Filterzyklus wird daher im Normalbetrieb
im Verhältnis zur Anzahl der gewaschenen Räder leicht
variieren.
7.1 EINSTELLEN DES WASSERDRUCKREGLERS
HINWEIS: Bevor der Wasserdruckregler eingestellt
wird, muss zuerst ein Parameter für die Radwaschanlage
angepasst werden.
• GP10, GP12, GP24: Ändern Sie die Klarspülzeit für
alle Waschprogramme auf 10 Sekunden.
• W-750: Ändern Sie den Rückhub (Luftblasen) auf 10
Sekunden.
- Ins Menü gehen: Auf SUMME + RESET drücken
- Im Menü blättern: Auf TÜR ÖFFNEN / SCHLIESSEN
drücken
- Parameter ändern: Auf RÜHRWERK drücken
- Einstellung ändern: Auf GROSSES / KLEINES RAD
drücken
- Einstellung speichern: Auf RÜHRWERK drücken
- Aus dem Menü gehen: Auf STOPP drücken
(3 Sekunden lang)
REGULIERUNG DES WASSERDRUCKREGLERS:
1. Stellen Sie sicher, dass GP Filter eQ inaktiv ist.
2. Rufen Sie die Selbsttestfunktion von GP Filter eQ auf
und aktivieren Sie das Reinigungsrelais (P26).
3. Selbsttest an der Radwaschanlage starten und Klar-
spülung aktivieren. Stellen Sie sicher, dass aus allen
Spüldüsen Wasser austritt.
4. Der dynamische Wasserdruck wird jetzt auf dem Ma-
nometer des Wasserdruckreglers angezeigt. Voraus-
gesetzt 1,4 bar.
5. Beenden Sie den Selbsttest der Radwaschanlage.
6. Stellen Sie sicher, dass der Wasserstand in der
Radwaschanlage maximal ist und dass der Füllstand-
sensor im GP Filter eQ richtig eingestellt ist (siehe
Abschnitt Installation, Aufzählungszeichen 12 und 13).
7. GP Filter eQ aktivieren - ein Filterzyklus startet dann
automatisch.
8. Beginnen Sie nun mit dem Waschen und zählen Sie
die Anzahl der Räder, bis der nächste Filtrationszyklus
beginnt.
• Wenn der Wasserdruck verringert werden soll
(<15 gewaschene Räder pro Filtrationszyklus),
muss der Druckregler dann eingestellt werden,
wenn die Reinigungsspülung in der Rad-
waschmaschine aktiv ist, um den korrekten dyna-
mischen Wasserdruck einzustellen.
• Wenn der Wasserdruck erhöht werden soll (>20
gewaschene Räder pro Filtrationszyklus), muss
der Druckregler dann eingestellt werden, wenn
die Reinigungsspülung in der Radwaschmaschine
aktiv ist, um den korrekten dynamischen Wasser-
druck einzustellen.
20
Table of contents
Languages: