HEINRICH H6120M User manual
HEINRICH LIMITED, Marshall Avenue Worthing BN14 0ES
W: www.heinrichlimited.com E: info@heinrichlimited.com
HEINRICH
H6120M
6CH Matrix Mixer amplifier
with SD/FM/Bluetooth/USB
User Manual

HEINRICH LIMITED, Marshall Avenue Worthing BN14 0ES
W: www.heinrichlimited.com E: info@heinrichlimited.com
HEINRICH
13. Plug this apparatus to the proper wall outlet and make the plug to be disconnected readily
operable.
16. An appliance with a protecve earth terminal should be connected to a mains outlet with a
protecve earth connecon.
10. Unplug this apparatus during lightning storms or when unused for long periods of me.
11. Refer all servicing to qualified service personnel. Servicing is required when the apparatus has been
damaged in any way, such as power-supply cord or plug is damaged, liquid has been spilled or objects
have fallen into the apparatus, the apparatus has been exposed to rain or moisture, does not operate
normally, or has been dropped.
9. Use only with the cart, stand, tripod, bracket, or table specified by the manufacturer, or sold with the
apparatus. When a cart is used, use cauon when moving the cart/apparatus combinaon to avoid
injury from p-over.
15. WARNING: To reduce the risk of fire or electric shock, do not expose this apparatus to rain or
moisture.
1. Read and keep these instrucons.
3. Do not use this apparatus near water.
4. Do not block any venlaon openings. Install in accordance with the manufacturer's instrucons.
produce heat.
6. Do not defeat the safety purpose of the polarized or grounding-type plug. A polarized plug has two
blades with one wider than the other. A grounding type plug has two blades and a third grounding
prong. The wide blade or the third prong is provided for your safety. If the provided plug does not fit
into your outlet, consult an electrician for replacement of the obsolete outlet.
7. Protect the power cord from being walked on or pinched parcularly at plugs, convenience
receptacles, and the point where they exit from the apparatus.
14. Main plug is used as disconnected device and it should remain readily operable during intended
use. In order to disconnect the apparatus from the mains completely, the mains plug should be
disconnected from the mains socket outlet completely.
SAFETY WARNINGS!
8. Only use aachments/accessories specified by the manufacturer.
12. This appliance shall not be exposed to dripping or splashing water and that no object filled with
liquid such as vases shall be placed on the apparatus.
5. Do not install near any heat sources such as radiators, heat registers, stoves, or other apparatus that
2. Heed all warnings and follow all instrucons.
6 Zones Matrix Mixer Amplifier

HEINRICH LIMITED, Marshall Avenue Worthing BN14 0ES
W: www.heinrichlimited.com E: info@heinrichlimited.com
HEINRICH
INSTRUCTIONS
● 6×6 Matrix mixer amplifier with 6 x 60W, 6 x 120W outputs.
● 6 zone remote paging microphone for paging & announcement system.
● AC230V and 24V DC both operaon system.
● 100V or 4/8 Ohms operaon for PA system and hi-fi both sound system.
● Internal Bluetooth receiver with mobile use.
● 24V mute contacts to integrate with fire alarm system.
● 6 independent output zones for mulple room sound system.
● Mic 1 channel has a variable override and each microphone input has switchable phantom power.
● Different 6 zone of different music program and different volume output.
● 6 Zone speaker outputs of 100V or 4/8 Ohms speakers.
● Designed for mul-room systems requiring different audio sources.
● 3 mic/line switchable inputs of balanced XLR with 48V phantom power.
● 1 aux input and an integral USB/SD/FM player and Bluetooth can be matrix switched to any of the 6
zones independently.
● MP3/FM/Bluetooth, 3 mic/line, aux input & EMC mute input with priority.
● 6 channel mixer amplifier controller with audio sources, zone volume control .
● 6 remote control by CAT5 cable up to 200 meters to select program and control volume.
● 5 sources and EMC input matrix distributed to 6 speaker zones.
● Integral USB/SD/FM audio player and remote control.
● Matrix amplifier with remote control panel and remote paging microphone.
● 6 remote paging microphone by CAT5 cable up to 200 meters communicaon.
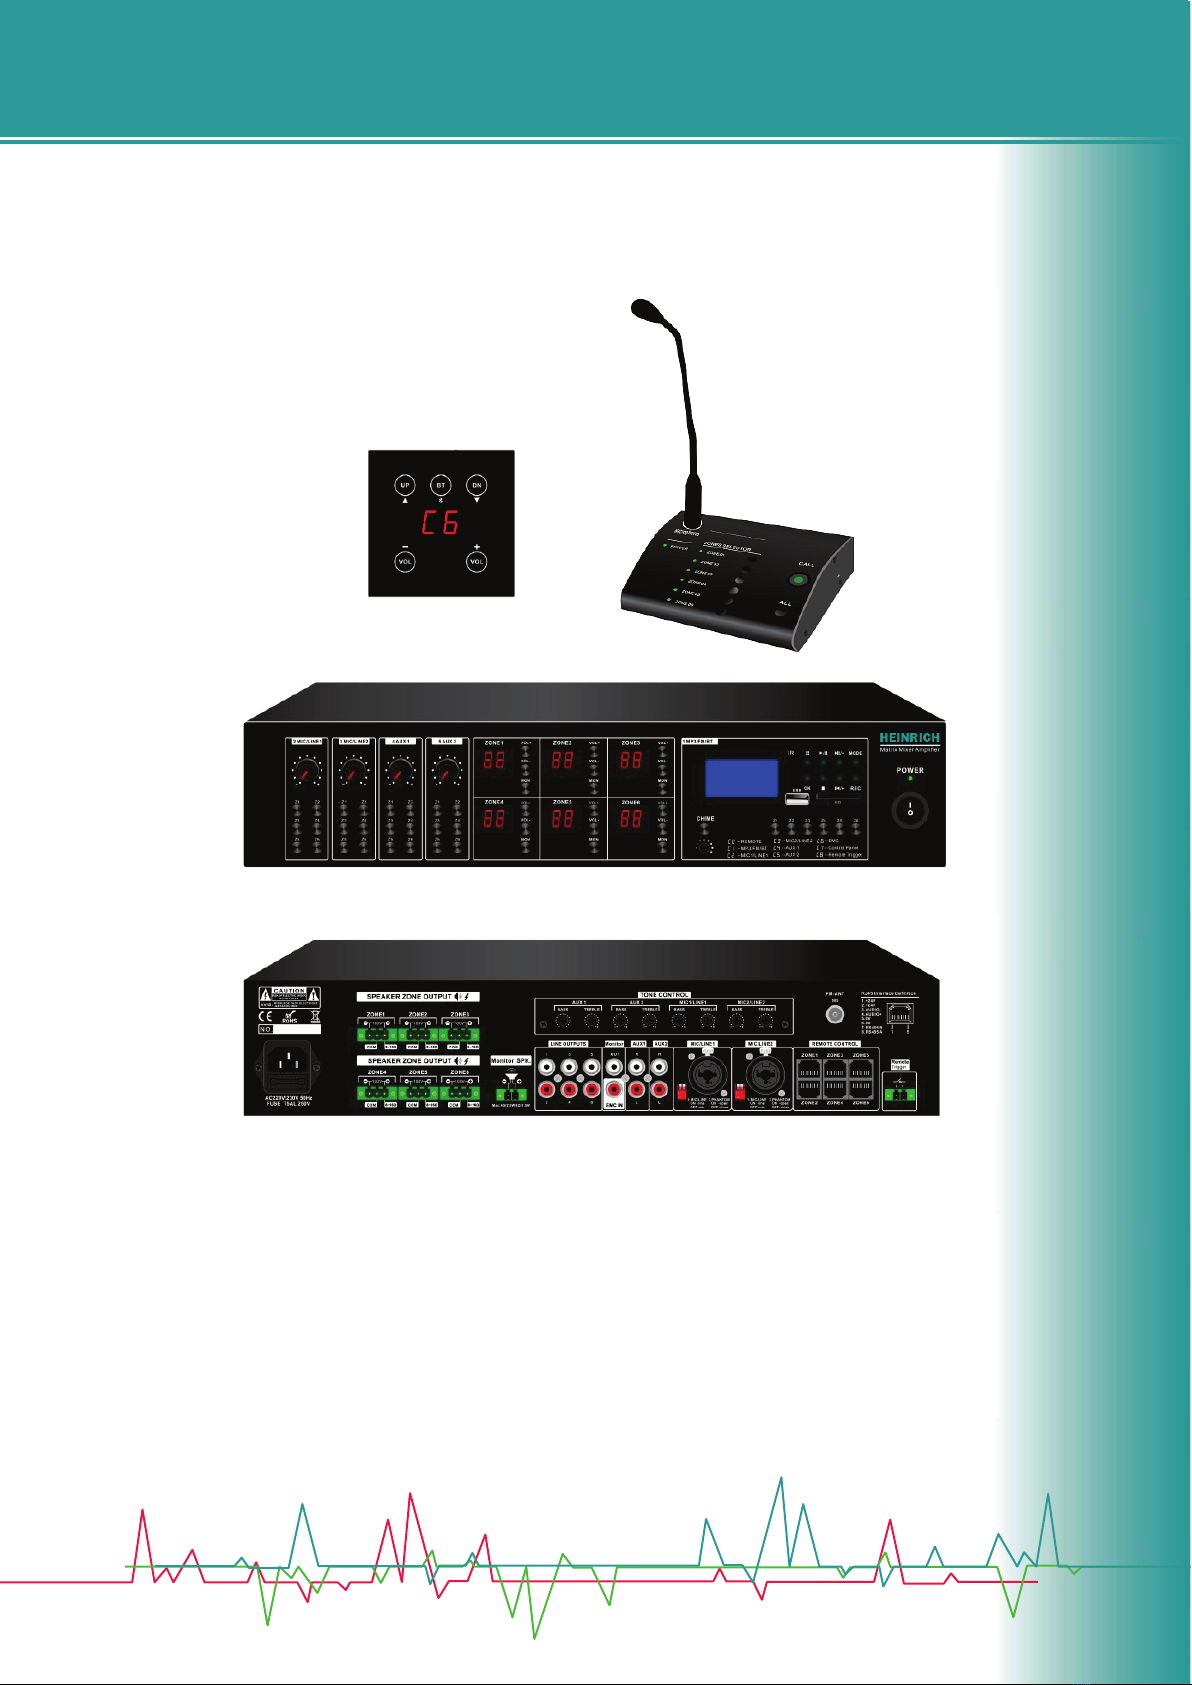
Front Panel
2. MP3/FM/Blue tooth media player module.
1. Power Switch/ Power indicate.
3. IR receiver.
5. Zone selector for MP3: You can choose MP3 play to any of zone.
6. Chime/ Volume control for Chime.
8. Zone Volume control.
10. Display of zone: This will show which audio source is playing on current zone.
4. SD card slot/ MP3 slot.
7. MP3 display.
12. Zone selector for Mic/Line: You can choose MIC/Line audio input play to any of zone.
9. MON: Monitor Open or Close.
11. Volume control for audio input.
6 Zones Matrix Mixer Amplifier
HEINRICH LIMITED, Marshall Avenue Worthing BN14 0ES
W: www.heinrichlimited.com E: info@heinrichlimited.com
HEINRICH
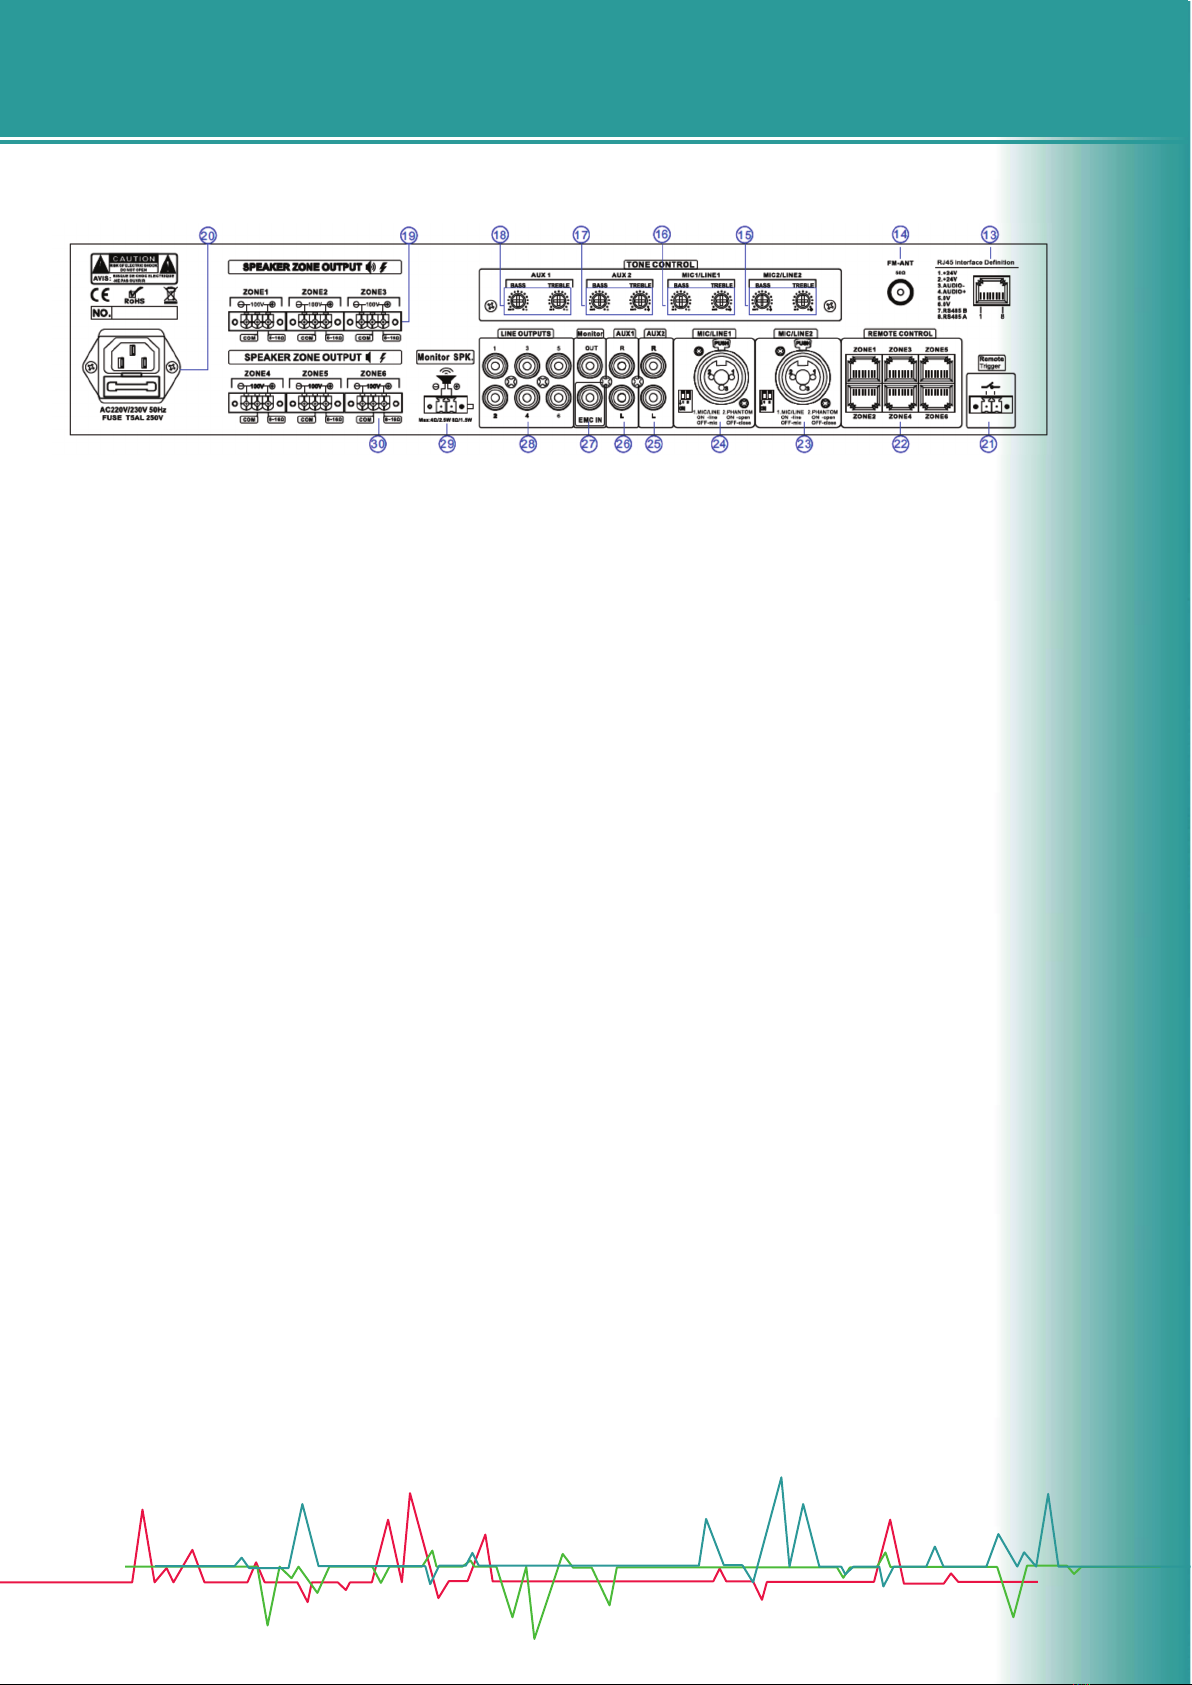
Rear Panel
13. RJ45 interface definion.
23. MIC/LINE2 XLR input.
25. AUX2 input.
27. EMC input/ Monitor Output.
29. Monitor speaker output.
19. Speaker line output.
14. FM antenna Zone output-100V&8ohms.
15. Bass & Treble volume control MIC2/Line2.
16. Bass & Treble volume control MIC1/Line1.
17. Bass & Treble volume control AUX2.
18. Bass & Treble volume control AUX1.
20. Power Socket.
21. Horn output (24V signal to trigger play the EVAC message build in).
22. Remote Microphone & Remote volume control interface.
24. Mic 1/Line 1 XLR Input.
26. AUX1 input.
28. Line output.
30. Zone 3-6 speaker output.
AMPLIFIER OPERATION GUIDANCE
Connecon and setup
► With the controller power switched off, connect the rear IEC inlet to the mains using the supplied
mains lead (or an equivalent approved type). Ensure that the voltage is correct and the speaker connect
is correct then power on.
► The controller has 5 input channels and an integral mul-source audio player.
► Microphone input 1, 2 and 3 are designed for either microphones or line level sources (such as a
CD/mp3 player or output from a mixer) via combo connectors on the rear panel, it is switch able by DIP
switch.
► These can accept either XLR or 6.3mm plugs for balanced or unbalanced signals.
DIP switches
► Mic/Line inputs 1, 2 and 3 each have 2 DIP switches on the rear panel to set the input level and/or
acvate +20V phantom power for use with condenser microphones.
6 Zones Matrix Mixer Amplifier

HEINRICH LIMITED, Marshall Avenue Worthing BN14 0ES
W: www.heinrichlimited.com E: info@heinrichlimited.com
HEINRICH
Signal Inputs and Outputs
► For checking the output of any zone, an assignable Monitor output can be connected to headphones
from the front panel 6.3mm jack or as a line output (e.g. to acve speakers) from RCA connectors at the
rear.
For 100V speakers, connect the selected zone output to the first speaker in the zone using double-
insulated speaker wire which has adequate current rang to handle the total output of the amplifier.
2. EMC input- this one is EMC audio input.
► Set the level correctly for the type of input source connected (Mic or Line)
► If the source connected is a condenser microphone which requires phantom power, make sure that
the phantom is switched on for that channel.
3. Remote microphone.
► An antenna input is provided on the rear panel for connecon to an external aerial for FM tuning
There are Bass and Treble volume control on rear panel to adjust the sound of MIC and Line input
signal.
Speaker outputs
4. Other Local input.
► The controller has a separate speaker output for each zone, connected via 3 large modular terminal
plugs. Each plug can be removed from the rear panel for convenient connecon of speaker outputs to 2
zones.
1. Horn output- with a 24V trigger voltage will acve the message build-in.
► Connect microphones or line signals to Mic/Line 1, 2 and 3 inputs, using good quality signal leads. A
stereo or mono line level source can be connected to the Auxiliary channel 4 input on 2 RCA connectors
(26).
► Be sure to make these DIP switch sengs when the amplifier is switched off. Making any changes
when the amplifier is powered up may cause loud bangs through the system which can damage the
speakers.
Priority and Emergency Acvaon
► Each zone output has a dedicated RCA signal output on the rear panel, which can be connected to
the line inputs of acve speakers or amplifiers. These are in addion to the speaker outputs detailed
below.
► Each zone output can be used to power either 100V line speakers or standard low impedance
speakers. These 2 configuraons cannot be used together, so it is important to decide which will be
used at the start.
100V line systems
Connect the “100V” output terminal for the selected zone to the posive (+) connecon of the speaker
and “COM” output to the negave (-) connecon of the speaker. Connect further speakers in parallel to
the first speaker with all posive terminals and connected together and all negave terminals
connected together as shown below.
6 Zones Matrix Mixer Amplifier

HEINRICH LIMITED, Marshall Avenue Worthing BN14 0ES
W: www.heinrichlimited.com E: info@heinrichlimited.com
HEINRICH
Make sure that the Monitor buon for Mic/Line 1 is pressed in and listen through the headphones
Gradually turn up the Monitor level control and check for the output to Zone 1
Press Z1 buon on the line of MIC/Line1, if zone1 display C2, that means MIC/Line1 output to zone 1
Operaon
To check for correct operaon of the system, select an input source and output zone for tesng. In the
following example, Mic/Line 1 input and Zone 1 output have been selected.
If Zone 1 cannot be heard from the locaon of the controller, use the monitoring feature as follows
Press the buon of Monitor (12) and connect headphones to the Monitor output (15)
If you playing MP3, press zone1 on the line of MP3, then zone 1 will have MP3 music and display on
Zone1 will show C1
When all connecons to the amplifier are made, turn all rotary controls down and switch on the power
and the power LED will illuminate.
A 100V line speaker system can comprise of many speakers connected together. The determining factor
for how many speakers can be used on a single amplifier is the power rang. For most purposes, it is
advised to connect as many speakers as needed wi th a combined waage of no more than 80% of the
amplifier's output power rang (in the case of the controller, this is 30W per zone output)
The terminals of a 100V speaker are connected via a transformer and if necessary, this transformer may
be “tapped” for different power rangs. These tappings can be used to adjust the waage (and output
volume) of each speaker in a zone to help achieve the ideal total power of the system for the relevant
zone output.
Low impedance systems
Alternavely, each zone output of the RM306 is capable of powering one or more low impedance
speakers. There is an opon on each zone for either a 4Ω or 8Ω speaker output to determine the
minimum impedance. It is essenal to select the correct output terminal when opng for low
impedance speakers.
For a single 8Ω speaker, connect the posive (+) wire to the “8Ω” terminal and the negave (-) wire to
“COM” For a single 4Ω speaker or for 2 x 8Ω speakers connected in parallel, connect the posive (+)
wire to the “4Ω” terminal and the negave (-) wire to “COM”
In either case, the connected load should have a combined impedance no lower than stated on the
terminal. Lower impedance may cause irreparable damage to the amplifier.
The connected speaker(s) must also have a power handling to accept up to 30Wrms from the zone
output. Lower power handling may risk damage to the speakers.
6 Zones Matrix Mixer Amplifier

HEINRICH LIMITED, Marshall Avenue Worthing BN14 0ES
W: www.heinrichlimited.com E: info@heinrichlimited.com
HEINRICH
Onboard Mul-Source Audio Player
The controller is fied with a built-in audio player, operated via a backlit LCD display and transport
buons. This secon provides access to a Bluetooth™ receiver, FM radio tuner and USB/SD audio
player
In order to play audio to one of the zones, it is necessary to press in one of the “Play” buon;
Mode: Select between Bluetooth, FM tuning, USB or SD playback
Play: play music
Folder: hold on the music
Prev: Back to last music
Next: go to next Music
Press the Mode buon to switch to the FM tuner funcon. For good FM recepon, it will be necessary
to connect an external aerial to the Antenna connector on the rear panel using good quality coaxial RF
cable terminated .
Select to connect as an audio device and play audio tracks on the smartphone or tablet (or other) and
the audio should be heard on the selected zone.
Press and hold “Prev” to increase volume or press and hold “Next” to decrease volume.
It may be necessary to re-select connecon as an audio device on the sending device.
FM Tuner
Long Press: Vol+&Vol-
Vol-: Reduce Volume
The buons labelled “Prev” and “Next” can adjust the audio player output volume.
If the sending device goes out of range or the Mode of the audio player is changed, the connecon will
stop. Returning to within range or to Bluetooth mode will restore the pairing.
Vol+: Increase volume
To pair a device with the controller Bluetooth receiver, it is necessary to scan for devices in the
Bluetooth menu of the sending device and select to pair with “MS-8”. Once paired, the controller
display will show it is connect
If no channels are tuned in, press the Play buon to begin auto tuning, which scans available staons
and stores them as channels within the controller FM tuner. To step through pre-set staons, press the
Previous or Next buons.
Short press: Prev& Next
Bluetooth Operaon
In order to play back audio from a smartphone, tablet or other Bluetooth device, the built-in Bluetooth
receiver will need to be paired with a device which is within range.”
6 Zones Matrix Mixer Amplifier
HEINRICH LIMITED, Marshall Avenue Worthing BN14 0ES
W: www.heinrichlimited.com E: info@heinrichlimited.com
HEINRICH
The controller audio player has inputs for a USB pen drive or SD card with standard compressed digital
audio files on them. Inserng either or both of these will switch the player to read from these sources
and the display will show “MP3 Mode”.
USB/SD Player
Aer you Insert the USB it will play automacally, you can use “Prev” or “NEXT” to choose last or next
song, “REPT” is for one song or all song repeat.
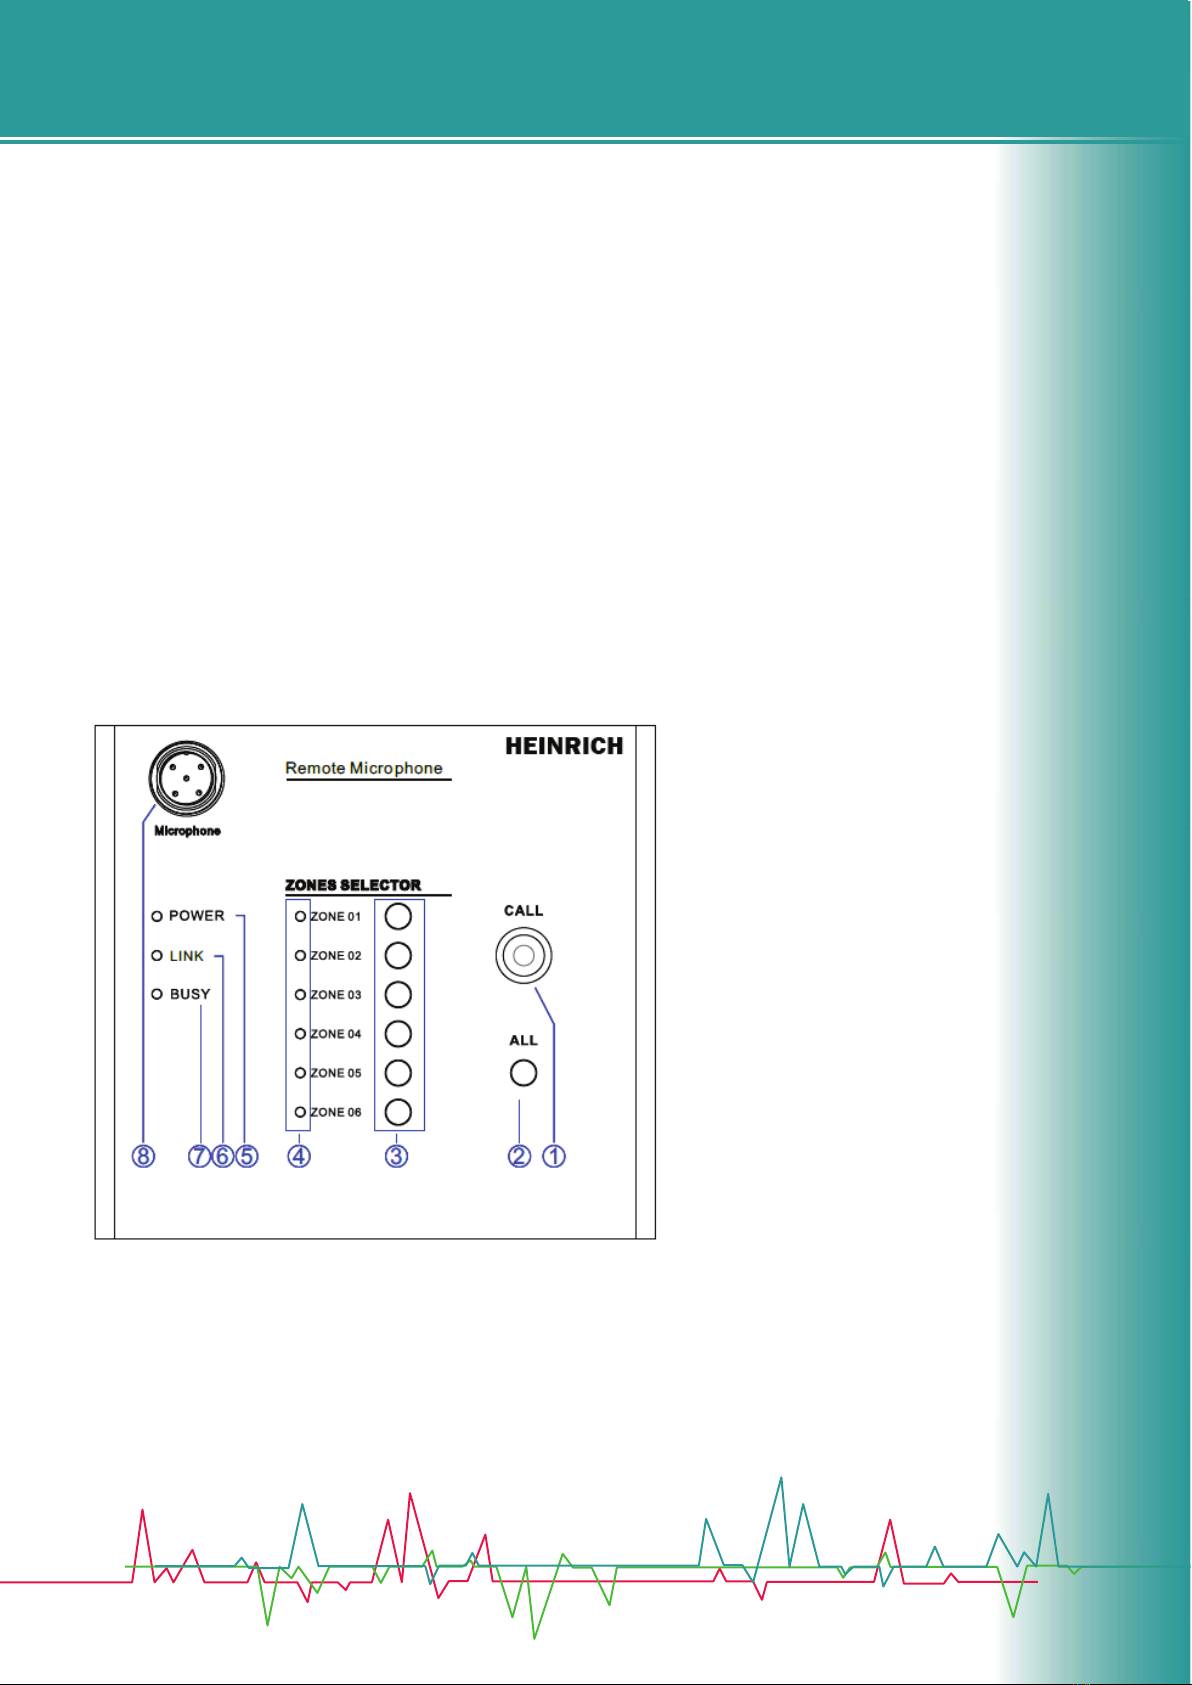
Remote Paging Microphone
1. Call buon
2. All zone selecon buon
3. Zone selecon buon
4. Zone led
5. Power LED
6. Communicate LED
7. Busy led –if on means current host zone is busy
8. Paging Microphone
C2-MIC1/Line1
Led Display Meaning
C0-FA-600XM
C1-MP3 Module
C5-AUX
C6-EMC
C7-Local input
C8-HORN 24V signal
C3-MIC2/Line2
C4-MIC3/Line3
6 Zones Matrix Mixer Amplifier

HEINRICH LIMITED, Marshall Avenue Worthing BN14 0ES
W: www.heinrichlimited.com E: info@heinrichlimited.com
HEINRICH
Remote Paging Microphone Rear Panel
9. DIP switch for each funcon(1-3 Device ID, 4 terminal resistance, 5-6 null)
10. Aux input
11. Microphone Volume control
12. RS-485port
13. Power switch
Remote Wall Mount Control Panel
1. Audio source selecon
2. Current zone audio source indicated led
3. Volume control
4. RS-485 cable connecon
6 Zones Matrix Mixer Amplifier

HEINRICH LIMITED, Marshall Avenue Worthing BN14 0ES
W: www.heinrichlimited.com E: info@heinrichlimited.com
HEINRICH
Frequency Response
Remote Mic
Speaker Output
THD
S/N Rao
Power Supply
Model
Descripon
Power Consumpon
Dimension
Input
Remote Panel
Protecon
Rated Power Output
Weight
H660M H6120M
484(W)×320(D)×88(H)mm
<0.1%
6 units by CAT5 cable up to 200 meters, direct powered by amplifier
Line1-2: 250mV; RCA type
100V and 4-8 Ohms
Mute: 250mV, phoenix connector
6 units by CAT5 cable up to 200 meters, direct powered by amplifier
400W 900W
Mic/line1-3: 2.5mV, balanced XLR input with 48V phantom power,
AC230V or AC110V, 50-60Hz
6×60W 6×120W
6×6 Matrix Mixer Amplifier with Mp3/FM/Blue Tooth
80-16KHz
>70dB
High temp, short circuit, clip & overload protecon
14.5kg 15.5kg
Specificaons
SERVICE
Warranty terms of global three years. While the term and warranty may vary by country and may not
be the same for all products. Terms and condions of warranty for a given product may be determined
first by locang the appropriate country which the product was purchased in, then by locang the
product type.
WARRANTY
Note: Specificaons may change without pre-noce.
Ensure the problem is not related to operator error, or system devices that are external to this unit.
Informaon provided in the troubleshoong poron of this manual may help with this process. Once it
is certain that the problem is related to the product contact your warranty provider as described in the
warranty secon of this manual.
Disclaimer: As per our company policy one of the constant product improvements the right is there for reserved to modify the product specificaon without prior noce
and the picture shown in the datasheet is a design base, the actual picture may vary.
6 Zones Matrix Mixer Amplifier
Table of contents


